1
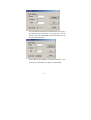
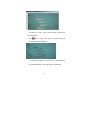
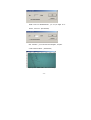
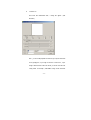
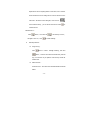
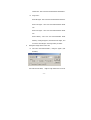
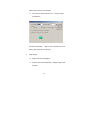
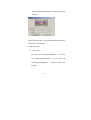
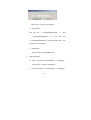
BMS Digital Camera
PE-A-21/PE-B-21
User’s Manual
Contents
Introduction of product……………………………………………………………1
Specification of product……………………………………………………………2
Product configuration……………………………………………………………3
About use occasion………………………………………………………………5
System requirements………………………………………………………………8
Installing software……………………………………………………………………9
About features of software…………………………………………………………13
How to use software………………………………………………………………..14
How to use product…………………………………………………………………36
Technology parameter………………………………………………………………38
Care and fixing………………………………………………………………………39
Technical support………………………………………………………………….40
Introduction of product
Introduction
Thanks for you take trusting in BMS digital cameras, it is designed for education,
used for video demo、video image transmission about precision image、lantern
slide、sample、document and other minute object, it can also be used for video
exporting of microscope sample. Digital camera is a new-style import equipment
of computer, it is adopted a new technology about CMOS sensor to realize
optics-electricity switchover. The still and dynamic images get by digital camera
can be imported into computer by USB port; you can see target images on screen
on real time.
-1-
Specification of product
N o.
Sort
PE-A-21
PE-B-21
Host
BMS mCam
BMS mCam
Adjuncts
of host
Outside shutter
Outside shutter
User’s Manual
User’s Manual
Drivers and applications CD
Drivers and applications CD
Packing list
Packing list
Biological Microscope Adapter
Biological Microscope Adapter
Stereo Microscope Adapter
Stereo Microscope Adapter
Wide angle ocular WF10X
Wide angle ocular WF10X
Rubber adapter
Rubber adapter
Common model
C-port model
Document
Optional
adjuncts
Comment
Comment: It is only a standard config for product,you can choose and buy
adjuncts by yourself.
-2-
Product configuration
Components Character and features
Product serial number
It is located on the bottom of product,if it be destroyed or changed,we will not
guarantee fixing.
Camera base
Main component for sustaining camera head, when connecting C-port model digital
camera head with microscope export, it is omitted.
Hand wheel for focus
Clockwise is establishing shot,anticlockwise is close shot.
Outside shutter
For long distance snatching image
Lens
-3-
Camera head has a 8mm glass lens.
Ocular and ocular adapter kit
Equipping a Biological Microscope Adapter, a Stereo
Microscope Adapter, and a Wide angle ocular (WF10×).
It makes connecting camera head with microscope easily.
Biological microscope adapter kit
When observing the microscope sample, it is used for connecting microscope ocular
with camera head, to ensure sight field is filled. The outside diameter is 28.2mm,
when the camera head face the target under the sunshine, maybe the image turns
red, and it is used as a lens hood.
Stereo Microscope adapter kit
When observing the microscope sample, it is used for connecting microscope ocular
with camera head, to ensure sight field is filled. The outside diameter is 34.2mm.
Wide angle ocular(
(10X)
)
If you can’t adjust the images from biological microscope to clear, please use the
accessory ocular.
C-port
It is designed for microscope with third export, it makes you snatching image from
-4-
microscope directly, without lens.
About use occasion
You can select use occasion about PE camera head according to your requirements.
Following are four options; it only makes a reference for you:
1、 Connecting digital camera head with telescope ocular by special biological
microscope ocular adapter. (The special biological microscope ocular should be
fit on a rubber adapter). By this way, we can capture the celestial bodies.
(Outside shutter switch makes capturing easily.)
(Digital camera head work with telescope)
2、 Connecting digital camera head with Biological or Stereo Microscope by special
microscope ocular. By this way, we can capture the image from microscope.
-5-
(Outside shutter switch makes capturing easily.)
(Digital camera head work with stereo microscope)
(Digital camera head work with biological microscope)
3、 Placing the digital camera head at center of display top, you can talk with your
colleagues face to face. (Outside shutter switch makes capturing easily.)
-6-
(Digital camera head work on the display top)
Placing the digital camera head on the desktop or high place, you can capture a bevy
of people or a wide range. (Outside shutter switch makes capturing easily.)
(Digital camera head work on desktop)
4、 Working with Microscope with third export: Take down the lens of camera head
(C-port model), screw C-port on the camera head, then fix camera head on the
third export. (See also the illustration.) Adjust position of camera head until
image is optimal.
-7-
(C-port digital camera head work with microscope with third export)
System requirements
· CPU:PII-233MHz (or Higher)
· RAM:64M (or More)
· Disk Space:100MB
· USB Port
·Microsoft Windows® 98/ Windows® ME/ Windows® 2000/ Windows® XP Operation
-8-
System
·CD-ROM Drive
Announce:It is only a suggestion for system requirements,maybe your computer
is slower, product can be used all the same,the only effect is speed.
-9-
Installing software
USB is Universal Serial Bus、plug and play,please use the following instructions to
perform the installation. (In Windows ® 2000)
Attention: Make sure your computer supports 4 pin USB Port, and running Windows
® 2000 operating system.
Installing Application and Driver
a)、First you should run Windows2000,and prepare digital camera head CD, make
sure USB Port work correctly;
b)、Place the digital camera head CD into CDROM drive;
c)、Double click CDROM drive:\Driver\Setup.exe application;
d)、BMS PhotoLib 3.04 installation process begins,(see illustration:)
- 10 -
e)、Enter “Welcome to Use Photolib3.04 ”, click next :(See illustration)
f)、 Select setup path, default path, please click next;
- 11 -
g)、Copy file to your disk: (See illustration)
- 12 -
h)、Installation complete, a dialog box appear : Would you like to install Driver now? If
you have never installed application and driver, please select “Y”, select “N”to finish
installation:(See illustration)
I)、 Select “Y”to start installation for BMS camera head driver: (See illustration)
j)、Please select language version, such as English: (See illustration)
- 13 -
k)、Click OK, driver will be installed automatically at once;
l)、 You need reboot your operating system;
m)、 Plug the USB pin of digital camera head into any USB Port on your computer,
the pilot lamp on your camera head will emit green light, now the installation process
is finished. Camera head can be used.
- 14 -
About features of software
Photolib is a rich、complete、easy、applied 32-bit image edit and manage application,
it is designed for Camera head. After perfected some times, the features are better
than before. Followings are main features:
Snatching image from digital camera head 、digital camera and scanner
or other image import equipments that support TWAIN or VFW interface.
Support BMP、JPG、TIF、TGA、PCX、JIF image format;
Support Select、Select color、Erase、Free line、Line、Curve、Rectangle、
Filled rectangle、Round Rectangle、Filled round rectangle、Ellipse、
Filled ellipse、Fill、Text、Line style、Pen width、Pen color、Fill color、
Font、Alignment、Zoom in、Zoom out、Panning tools;
Support Rotate、Scale、Canvas size、Negative、Histogram and Adjusting
that includes Photo color、Contrast、Brightness、Shadow、RGB、Gamma
etc;
Support Smooth、Sharpen、Edge Enhancement etc;
- 15 -
Support measurement that includes Line distance、Angle、Counting、
Irregular area、Perimeter and Label;
Support Images manage、Data base record。
How to use software
1、
、 VFW Port
1.1 Correctly, after startup the application, a video window appear. (See illustration)
- 16 -
捕获窗
If no view window,something must be checked, such as the connecting of cable and
so on. When Video window is closed,you want it reappear, there are two ways you
might select:
a、Select File item, then select Import Photo/VFW Capture, video window
reappear.
b、Also you can click the“
”button locate on right tool bar.
1.2 Single frame capture: If the video window is not open,please open it first,the
way is listed as 1、1. click“
”button locate on right tool bar, Also you can click
menu item Capture/Single Capture to capture image.
- 17 -
1.3 Sequence capture:Click“
”button locate on right tool bar, or click menu item
Capture/Video Capture, a message box appear,click “OK” button,sequence capture
begins. On status bar, displaying the capture message real time, such as the captured
frames,missed frames,time, and so on. If you want to finish capture, only click the
left key of mouse, a dialog box appear, click “ok” button, sequence capture is finished.
1.4 Replay the video:
If you want replay the video we have recorded just now,what’s the way?
please click menu item“Video View/Video Playback”, Playback Video window
appear, video window will auto-close. (See illustration)
There is a play key locate on left down corner, click this key, triangle turns to
square, video is replaying. If you want to come back video capture, what’s the way?
First, please close the play back video window, then open the video window, the way
- 18 -
is listed as 1、1.
1.5 Video format and Video source:
If you want to adjust video size ,click“
”button locate on right tool bar,a
dialog box about“Video Format” appear,you can set the video size by this way:
You should find“Image Size”box, click the below list key, you can select the format
you want. For example, you select “VGA”, the format
size 640*480 will display at
right editor. Click “OK”to close the dialog box, now you see, the size of the video has
changed.
If you want to set the effects of video window, please click “
”button,a dialog box
about“Video Source” appear,you can set the brightness、contrast、color of video
window by this way:
Click page label“Standard”, you might find “Settings”box, please adjust
“Brightness”、
“Contrast”、
“Color” move key,now you can see the effects are
changing, please go on until you are satisfied. When adjusting, you’d better
move the dialog box out of the video window. Click “OK”to close dialog box.
2、
、TWAIN Port:
2.1 Select File item, then select Import Photo/Select Device, a dialog box appear,
- 19 -
select camera, click select.
2.2 Select Import Photo/Capture, a capture window appear.(See illustration)
2.3 About Function of the button on capture window top. Click “Settings”button,a
dialog box about “Video Source”appear,adjust “Brightness” “Contrast”、
“Color” move key,you can see the effects of capture window are changing.
Click“Format” button,a dialog box about“Video Format”appear,you might find
“Image Size”box,click below list key to select video format you require.
“Capture”button is used for capture picture,click it, you can capture frame from
video stream, one frame is one picture. Click“close”button to close capture
window.
3、
、 Image manage,
,data base record:
:
- 20 -
3.1 Click menu item“View/DB List ToolBar”, a tool bar appear at right top:(See
illustration)
3.2 Click menu item“View/Database List”, Database list box appear at second row on
top:(See illustration)
3.3 Click menu item“View/Photo Browse”,Photo Browse box appear at bottom: (See
illustration)
3.4 See items in the Database List,if empty,well then, create a piece of record, by
this way:
Click “
”button in“DB List ToolBar”,a dialog box appear,fill in the dialog box
according to requirements,click save button to close dialog box,at the same
- 21 -
time,a new item appear at Database List,that is to say, you add a new
piece of record in your data base,(See illustration five),the value in each
column of list item corresponds with the value you have filled in the dialog
box, value of column“IMAGE_SUM”is 0,because the number of image
record is 0, this is a empty record。
3.5 Select check box“ VIEW” in “Photo Browse”,(See illustration),now if click
“
”button at right tool bar,you can see the images that have been taken
are recorded in data base,if chary enough,you will see the number of
“IMAGE_SUM” is added, at same time the images in “Photo Browse” are
added too,and you can browse on real time:(See illustration)
3.6 If you want to edit any image in data base,please double click sample image in
“Photo Browse”, a son window be created, (such like single capture frame in
un-database model),edit image at your pleasure,if you want to save edit,
- 22 -
please click“
”button, your edit is saved in data base. Let’s validate it,click
check box “VIEW” in “Photo Browse”,un-select it,you will not see the sample
images, click check box “VIEW” in “Photo Browse” again,re-select it, now
you see, the edit is shown on sample image.
3.7 If you want to see about the images you had taken,for example, you took some
images on Jan. 10th 2002,please click three combo box in“DB List ToolBar”to
select 2002、January、10, the records that built on that day will appear at data
base list box: (See illustration)
4、
、Measure line,
,Measure angle,
,Counting, Irregardless area,
,Measure perimeter
and Label:
:
4.1 Measure angle:It is very easy,set currently for image window you want to
measure,click“
”button at left tool bar,move cursor to angle vertex, press
the left key of mouse and move along with angle side until locate a right point,
loosen the left key, by this way, you drew a angle side. You can finish another
side by similar way. When the second side is finished, angle will be labeled
automatically, unit is radian.
- 23 -
4.2 Measure distance (line):
●
Measure distance in dynamic video:
1、 Make scale:Place a standard measure in front of the camera
head.(such as a ruler),make sure you can see it in video window.
Measure cell unit for ruler, move the cursor to start point, press left key
of mouse, then move the cursor to end point, loosen left key, a little
window appear on video window, it shows the size for cell unit: (see
illustration L: 28)
2、 Click menu item“Video Setup/SETSCALEVALUE”, set scale box
appear:(See illustration)
- 24 -
Fill in unit blank with the data shown at the little window (such as 28), If
you defined start point is 5,end point is 3, (on same ruler), so the real
distance is 20mm, fill in mm blank with 20. Click calculate button you can
see the result: (See illustration)
Click OK button to close dialog box, you can see a scale value show
on the left top of video window(red segment)
:(See illustration)
- 25 -
now you can measure real size for objects,press the left key mouse from
start point to end point, then loosen left key, you see a little window
appear, it shows real size for object: (See illustration)
If measure multi objects, press“shift”key, operate by similar way time
after time: (See illustration)
- 26 -
Click right key of mouse,cancel a current operation, double click to
cancel all operations.
Click“
”button,create a new image,the measure results are
recorded on image: (See illustration)
3、A scale value has been set,if you need reset it,please Click menu
item“Video Setup/SetUnit”, a dialog box appear: (See illustration)
- 27 -
Enable combo box“ResetScaleValue”, you can put integer 2-9 in
Textbox,default is 3:(See illustration)
Click “OK”button,you can see scale value disappear,the space
of ruler is wider than before:(See illustration)
Repeat process of Make scale to finish a new setting.
- 28 -
●
Measure perimeter and area:
Click“Processing/Measurement/Region”, then select the polygon area you
want to compute,perimeter and area will be labeled automatically.
5、
、 Image auto-draw
5.1
The way of create new image:Click “New”button(or Click menu item
“File/New”),a dialog box appear,input Width, Height for image you want
to create, Click “OK” button,a new image is created.
5.2
Click menu item “View/Paint Box”, a tool bar appear at right side of window:
(See illustration)
Left list box “Pen width” describes the width of pen. You can click any list
item to select the width you require. Right list box“Pen Style” describes the
style of pen,You can Click any list item to select the style you require,
such as real line, broken line, point line and so on. Left image button“Pen
- 29 -
Color” is used for selecting color for pen,click it,a dialog box appear,
select color, click ok, the color is shown at left image button. Here, if you
select“
”,“
”,“
” to make a drawing,the line color is just
you selected. Right image button“Fill Color”is used for select background
color,click it,a dialog box appear, select color, click ok, the color is shown
at right image button. Here, if you select “
”or“
” to make a
drawing,filled color or background color is just you selected.
5.3 Input text for image, click tool bar button“
,
” make a rectangle, input text. If
you want to edit size or style for text, please click first button at
“
”,a dialog box appear,you can edit size and style for
text at your pleasure. Click OK to close it. If you want to finish inputting,only
click left key of mouse outside of textbox.
5.4 Save document:
Click“
” button,a dialog box appear, click“Advanced” button,here, you
can select the format you want to save. Such as you can save image as a
shadow format.
5.5 Drawing :
- 30 -
★
Line. Click“
”button,press left key of mouse from start point to end
point, loosen left key.
★
Curve. Click menu item“Draw/Curve”,cursor show as “
”,press left
key of mouse from start point to end point, loosen left key,you can see a
weak line. Press the left key of mouse and move cursor along with
direction that cross with weak line, when loosen left key, you can see a
curve. You can adjust curve twice.
★
Rectangle. Click menu item“Draw/Rectangle”to draw hollow rectangle.
Press left key of mouse and move cursor from start point to end point,
loosen left key. Click menu item“Draw/Filled Rectangle”to draw solid
rectangle. Click menu item“Draw/Round Rectangle”to draw round hollow
rectangle. Click menu item“Draw/Filled Round Rectangle”to draw a round
solid rectangle. The way is similar as drawing hollow rectangle.
★
Rectangle select. Click“
”button to select a rectangle area. Press left
key of mouse and move cursor from start point to end point, loosen left
key, you can see a weak rectangle: (See illustration)
- 31 -
If you want to edit size and position for selected area. Move cursor to any
of eight little rectangles,cursor will show as “ ”or“
”,now, you can
adjust the size for rectangle. Move cursor inside of rectangle, cursor will
show as“
★
”, now , you can move the area at your pleasure.
Color sample. Click“
”button。Cursor will show as“
,
” click left key
of mouse at the place you want to sample color. You can see image
button“Fill Color” show the color just you sampled.
★
Erase. Click“
”button. Cursor show as“
”,press left key of
mouse and move cursor, you can erase image.
★
Pencil. This tool is used for drawing free line. Click“
show as “
”button, cursor
”,press left key of mouse and move cursor from start
point to end point, loosen left key.
5.6 Image manage:
The features of image editor are very rich.
- 32 -
●
Local zoom in:
Click menu item “ View/Partial View”, a dialog box appear : (See
illustration)
Here,you can set the properties for local view, you may not set the item
in first grouping box, if you image is real color. In other word,if your
image is shadow format or fake color format, you can set it as fake color
coding model. For example,select“GBR” coding. Combo box“Photo
- 33 -
Adjustment”is used for adjusting effects for local view, such as contrast.
Combo box“Size”is used for setting size for local view and the zoom in
scale. Click “OK” button to close dialog box, cursor show as “
”,
don’t loosen the left key,you can see the set local view .Click“
”to
cancel local view.
●Global zoom in:
”button,cursor show as“
Click“
click right to zoom out,click“
●
,
” click left key to zoom in,
”to confirm selecting.
Geometry transform:
★
Image moving:
”button to make a rectangle selecting,then click
Click“
“
”button,move the cursor inside of selected area, press left
key, move the area at your pleasure. Click left key outside the
selected area.
★
Mirror transform:
Horizontal mirror:Click menu item“Transform/Rotate/ Horizontal
Mirror”/
- 34 -
Vertical mirror:Click menu item“Transform/Rotate/ Vertical Mirror”.
★
Image rotate:
Rotate 90 degree:Click menu item“Transform/Rotate/ Rotate 90”.
Rotate 180 degree:Click menu item“Transform/Rotate/ Rotate
180”.
Rotate 270 degree:Click menu item“Transform/Rotate/ Rotate
270”.
Rotate Arbitrary : Click menu item “ Transform/Rotate/ Rotate
Arbitrary”。A dialog box appear,fill in editor box with degree,click
ok button to close dialog box. The image rotates you defined.
●
Setting about image size and canvas size:
★
Click menu item“Transform/Scale”,a dialog box appear:(See
illustration)
Fill in editor box with Width、 Height of image. Reset button is used for
- 35 -
resetting. Click ok button to close dialog box.
★
Click menu item“Transform/Canvas size”,a dialog box appear:
(See illustration)
Fill in editor box with Width、 Height of canvas. Reset button is used for
resetting. Click ok button to close dialog box.
●
Image adjusting:
★
Negative. Click“Transform/Negative”.
★
Histogram. Click“Transform/Histogram”,a dialog box appear:(See
illustration)
- 36 -
Click ok button to close dialog box.
★
Adjust
color.
Click
menu
item “ Transform/Adjust/Photo
Adjust/Color”,a dialog box appear:(See illustration)
Adjust move key R,G.,B,you can see the color are changing in
preview window. Click ok button to close dialog box.
- 37 -
★
Contrast. Click menu item“Transform/Adjust/Photo
★
Adjust/Brightness/Contrast”, the cursor show as “
,
” press
left key of mouse,move flatly to adjust contrast,move up and
down to adjust brightness. Click“
★
GAMMA.
Click
menu
”button to confirm.
item “
Transform/Adjust/Photo
Adjust/Gamma”,a dialog box appear:(See illustration)
Adjust move key Gamma,you can see changing in preview window. Click
ok button to close dialog box.
★
Adjust shadow. Click menu item “ Transform/Adjust/Photo
- 38 -
Adjust/High Light/Middle Tone/Shadow”,a dialog box appear:(See
illustration)
Adjust move key High Light,you can see the changing in preview window.
Click ok button to close dialog box.
●
Image enhancement:
★
Image smooth:
Click menu item“ Processing/Smooth/Algorithm 1” or click menu
item “ Processing/Smooth/Algorithm 2” or click menu item
“Processing/Smooth/Algorithm 3” ,a dialog box appear:(See
illustration)
- 39 -
adjust move key,click OK to close dialog box.
★
Image sharpen:
Click menu item “
“
Processing/Sharpen/Algorithm 1” or click
Processing/Sharpen/Algorithm
2”
or
click
menu
item
“ Processing/Sharpen/Algorithm 3”,a dialog box appear, adjust move
key. Click OK to close dialog box.
★
Median Filter:
Click menu item“ Processing/Median Filter”。
●
Image edge checking:
★
Sobel:Click menu item“ Processing/Sobel”, a dialog appear,
adjust move key,click OK to close dialog box.
★
Hough:Click menu item“ Processing/Hough”, a dialog appear,
- 40 -
adjust move key,click OK to close dialog box.
★
Gauss — Laplacian : Click menu item “
Processing/Edge
Enhancement”.
●
Mass counting:
Currently, you should manage image by proper way before using this
feature. Click “Processing/Measurement/Mass Counting”, the sum will
be auto-count:(See illustration)
result is shown at right side of“sum:
”,such as 5.
6、
、 Timing Capture
- 41 -
6.1
parameter setting:hit the menu item video setup->timing capture setting,then
in the dialog fill in the time space and the limited picture number。If you fill 1 in
the hours edit box and 2 in the minute edit box and 3 in the second edit box,
you will get a picture every 1 hour and 2 minute and 3 second,If you fill in 5
in the piece edit box,you will get only five piece picture every time。
6.2 timing capture:
hit the menu item capture ->start timing capture:hit the menu item capture
->stop timing capture to stop the timing capture。you can not hit this menu item,
the program will get the count of limited picture。If you want to save the captured
picture to the database。please do:
Click menu item“View/DB List Tool Bar”,a tool bar appear at right top:(See
illustration)
Click menu item“View/Database List”, Database list box appear at second row
- 42 -
on top:(See illustration)
Click menu item“View/Photo Browse”,Photo Browse box appear at bottom:
(See illustration)
See items in the Database List,if empty,well then, create a piece of record, by
this way:
Click “
”button in“DB List Tool Bar”,a dialog box appear,fill in the dialog box
according to requirements,click save button to close dialog box,at the same
time,a new item appear at Database List,that is to say, you add a new piece of
record in your data base,(See illustration five),the value in each column of list
item corresponds with the value you have filled in the dialog box, value of
column“IMAGE_SUM”is 0,because the number of image record is 0, this is a
empty record。
- 43 -
Then click the menu item capture ->start timing capture。 you can see the
images that have been taken are recorded in data base,if chary enough,you
will see the number of “IMAGE_SUM” is added, at same time the images in
“Photo Browse” are added too,and you can browse on real time:(See
illustration)
How to use product
You can use this product after installed drivers and applications.
Camera head work singly
- 44 -
Please perform following steps:
:
1、 Place digital camera head at appropriate position;
2、 Plug camera USB pin into USB port on computer;
3、 When camera head has been checked,the indicator light emit green light;
4、 Click taskbar“start”button,click“program”,click PhotoLib, start up PhotoLib or
double click shortcut key of PhotoLib on desktop, in the middle of main window,
a video window appear, maybe the image is not so clear.
5、 Aim the target,adjust focus,until image is clear.
6、 You can edit image by above ways.
7、 Outside shutter is same as Snapshot,it makes capturing easily.
Camera head work with microscope:
:
Please perform following steps:
1、 Place microscope and camera head at appropriate position;
2、 Plug camera USB pin into USB port on computer;
3、 When camera head has been checked,the indicator light emit green light;
4、 Connect power supply for stereo Microscope or Biological Microscope,switch
on light(brightness can be adjusted),place sample on work flat roof, select
magnification of
ocular according to your requirement, adjust focus, until
eyeballing image is clear
- 45 -
5、 Select adapter for microscope,for example:Select a biological microscope
adapter,fit adapter on the camera head lens, the “O” shape is fitting direction,(it
must be complete),adjust lens, until focus is longest;
6、 Fit camera head and adapter on microscope ocular;
7、 Click taskbar“start”button,click“program”,click PhotoLib, start up PhotoLib or
double click shortcut key of PhotoLib on desktop, in the middle of main window,
a video window appear, maybe the image is not so clear, adjust focus, until
image is clear;
8、 You can edit image by above ways.
C-port camera head work with Worm Microscope
Please perform by following steps:
:
1、 Place microscope and camera head at appropriate position;
2、 Plug camera USB pin into USB port on computer;
3、 When camera head has been checked,the indicator light emit green light;
4、 Connect power supply for Worm Microscope,switch on light(brightness can be
adjusted)
,place the sample on work flat roof, adjust Worm Microscope , until
image is clear in arbitrary amplificatory multiple.
5、 Take down the lens of camera head (C-port model), screw C-port on the camera
head;
6、 Then fix camera head (with C-port) on the third export on Worm Microscope.
(For detail, please see the illustration about C-port digital camera head work
with microscope with third export);
- 46 -
7、 Move Worm Microscope PHOTO switch to “IN”;
8、 Click taskbar“start”button,click“program”,click PhotoLib, start up PhotoLib or
double click shortcut key of PhotoLib on desktop, in the middle of main window,
a video window appear, maybe the image is not so clear, adjust inching switch,
until image is clear;
9、
You can edit image by above ways.
Announce specially: The digital camera head is applicable for Stereo Microscope、
Worm Microscope(third export)、Biological Microscope that are made in our company.
We can’t ensure digital camera head works with Microscopes that are made in other
company correctly!
Technology parameter
Sensor
1/3″CMOS
Glass lens
8mm glass lens
Focus
8mm
Imaging distance
3cm to infinite
Video format
24-bit
Shutter
electricity control
Highest distinguish
640×480
Total pixels
300 thousands
Lowest illumination
3 lux
SNR
≥57dB
- 47 -
Sight field angle
46˚
Brightness and contrast
electricity or hand control
Power supply
USB(5V)
operation situation
0-40℃
deposited temperature
-20-60 ℃
Care and fixing
Please take good care of your digital camera head. Followings are attentive items:
Switch off the power supply and pull out the pin of cable from electrical outlet,
before you clean your camera head;
Using soft fabric cleanout the crust of camera head;
Don’t use the organic cleanser to clean camera head;
- 48 -
Please use special cleanser to clean lens;
You’d better use camera in room;
Keep away from the dirt、 oil、 smoke、 fog、water;
Keep away from sunlight irradiating 、electric and radiation equipment;
The camera head can’t be faced the sun directly;
Don’t take down any outside components by yourself;
Environment temperature is 0-40 ℃;
Avoid oscillation when using camera head,
Technical support
Thanks for your wise choice! If you fall across problem about how to use this
equipment, and you can’t solve the matter by yourself, please contact our
- 49 -
technical group, they will give you reply immediately!
Welcome to access our web site!
http://www.breukhoven.nl
- 50 -