1
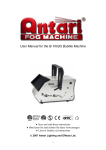
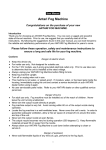
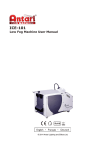
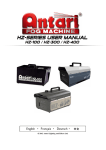
User Manual for the B-100(X) Bubble Machine ♦ Save and read these instructions ♦ Bitte lesen Sie und sichern Sie diese Anweisungen ♦ Lisez et Gardez ces instructions 2000 Antari Lighting and Effects Ltd. 1 Antari Bubble Machine Thank you for choosing the Antari Bubble Machine. You now own a rugged and powerful state-of-the-art machine. Prior to use, we suggest that you carefully read all of the instructions. By following the suggestions found in this user manual, you can look forward to exceptional performance from your Antari Bubble Machine for years to come. Please follow these operation, safety and maintenance instructions to ensure a long and safe life for your Antari Bubble Machine. Specifications Power: AC 120V/60Hz (120V Model) AC 230V/50Hz (230V Model) Fuse: F2A/250V (120V Model) T1A/250V (230V Model) Dimensions (mm): 236.6 x 189.2 x 150 Weight: Net – 3.4 kg, Gross – 4.5 kg CAUTIONS Pay attention to all warning labels and instructions printed on the exterior of your Antari Bubble Machine Do not overfill your bubble machine. Overfilling will cause the unit to leak. Danger of electric shock Keep this device dry. Keep the bubble machine upright. For the 110V models, use 3-prong grounded electrical outlet only. Prior to use take care to determine that the unit is installed at the rated voltage. Turn off or unplug when not in use. The power plug needs to be clearly seen by user when installed on the wall. This machine is not water-proof or splash-proof. If moisture, water, or any liquid gets inside the housing, immediately unplug the unit and contact a service technician or your dealer before using it again. No user serviceable parts inside. Refer to your Antari dealer or other qualified service personnel. For indoor use only. Not designed for outdoor use. This appliance must be earthed. For adult use only. The bubble machine must be installed out of the reach of children. Never leave the unit running unattended. Never aim the output at open flames. Extended use will make all surfaces slippery. Position output of bubbles away from persons. Switch off from mains when refilling the liquid or cleaning the system. Regular cleaning of the bubble wheel is required. 2 Do not transport with liquid. If the machine get wet, do not use until it is completely dry. Antari bubble liquid may leave permanent marks on clothing. Pay attention to all warning labels and instructions printed on the exterior of your Antari Bubble Machine. Unpacking & Inspection Open the shipping carton and check that all equipment necessary to operate the system has arrived intact. In addition to the Antari Bubble Machine, you should receive the following items: 1. This user manual. 2. Power cord and plug. Before beginning initial setup of your Antari Bubble Machine, make sure that there is no evident damage caused by transportation. In the event that the unit’s housing or cable is damaged, do not plug it in and do not attempt to use it until after contacting your dealer for assistance. Setup Remove all packing materials from the bubble machine. Place bubble machine on a flat surface. Loosen the side screws and lift the housing upwards. You will see a liquid tank. Pour bubble liquid into the liquid tank, being careful not to exceed the maximum fluid level. DO NOT OVERFILL. When the container is full, lower the housing and tighten the screws. 3 IMPORTANT SAFETY NOTICE: Ensure your bubble machine is unplugged from the mains electrical supply before attempting to open the housing. To help avoid accidental exposure to dangerous live AC mains voltage, two safety screws are fitted that require a screwdriver to remove. Once these are removed, the finger screws can be undone by hand (see photo above). Once the screws are removed, the lid of the housing can be carefully swung upwards, as shown above. Take care not to spill any of the bubble fluid inside the unit. The fluid tank is designed to fit only one way around. Make sure you insert it correctly, as shown above, with the lower edge facing into the machine. OPERATION Turn on the power switch located on the back of the bubble machine. You will notice that the internal bubble drum and fan are activated. Bubbles are now produced. B-100X B-100X contains a control board allowing the bubble machine to use the wireless and timer remote controls. The B-100, without this board, cannot use these remote controls. The two versions are identical in all other respects. Remotes Z-10 (on / off) BCT-1 (Timer for B-100X) BCR-1 (Wireless for B-100X) Save these instructions 4 C08B100 5