Transcript
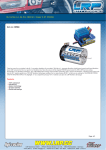
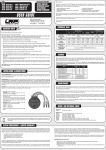
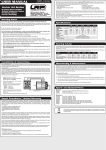
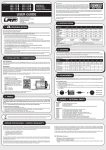
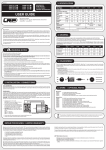
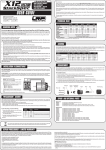
MA00029
BRUSHLESS
MAINTENANCE FREE
SENSORED TECHNOLOGY
ORDER NO.:
50670
USER GUIDE
LRP electronic GmbH
Wilhelm-Enssle-Str. 132-134, 73630 Remshalden, Germany
Tel.: int+49-7181-4098-0, Fax: int+49-7181-4098-30
[email protected] WWW.LRP-ELECTRONIC.DE
! WARNING NOTES
IMPORTANT: Pay close attention to the following points, as they will destroy the motor and void your warranty:
• Never solder a Schottky diode to the motor or the speed-control when you are using a LRP VECTOR Brushless
Modifi ed motor.
Dear Customer,
thank you for your trust in this LRP product. By purchasing a LRP VECTOR Brushless Modifi ed motor, you have
chosen a high-performance brushless motor full of new design features, such as:
• Neodymium magnets
• Handwound
• VTEC X9 teardown, dismountable
Please read and understand these instructions completely before you use this product!
With operating this product, you accept the LRP warranty terms.
SPECIFICATION
RPM
Kv
Powerrating
Power
Effi ciency
Ball Bearings
Teardown
Timing
Winding
Hall-Sensor pin assignment
• Avoid soldering longer then 5sec per soldering joint when replacing the power wires to prevent possible
damage to the motor due to overheating of the components!
• Never connect the motor incorrectly or with reversed polarity.
• All wires and connections have to be well insulated. Short-circuits can destroy the motor.
• Avoid overtightening the motor screws. Damaged threads are not covered by warranty!
INSTALLATION / CONNECTIONS
C
+
B
blue
yellow
orange
• Install the motor in the model.
CAUTION! The maximum length of the motor screws shall not exceed 8mm.
• Connect the motor and the speed-control, using the Hall-Sensor wire.
• Connect the power wires of the speed-control to the motor. You can do this by using the preassembled motor plugs or by soldering on the power wires directly to the motor.
• CAUTION! Make sure, that the polarity is right by checking the color code and the letters:
- MOT.A = blue wire
- MOT.B = yellow wire
- MOT.C = orange wire
• Finally check all the connections before using the motor.
-A
• Sensored technology
• Adjustable timing
• Standard 540 size/weight
55.440 rpm
7.700 rpm/Volt
3-Star
263W
92%
2
dismountable
adjustable
Star
compliant to IFMAR/EFRA/ROAR/BRCA/
DMC rules
Meassured at 7,2V.
Specifi cations subject to change
without notice.
GEARING
Never overgear your LRP VECTOR Brushless Modifi ed motor. A wrong gear-ratio causes much more heating and
may result in a temperature shutdown of your speed-control under extreme conditions.
Due to the unique VECTOR brushless design, this motor needs to be geared much lower then normal brushed
motors. Take your kits instruction manual to fi nd the correct pinion. The followong recommendations are a good
starting point but may vary due to different tracks, models and batteries:
Touringcars
10.0 : 1
8.0 : 1
Small, tight tracks
Big, fl uent tracks
Off-Road
13.0 : 1
12.0 : 1
DISASSEMBLY
Due to the maintenance free design of the LRP VECTOR Brushless Modifi ed motor, it is not necessary to open
the motor under normal conditions. Nevertheless, if you intend to check the ball bearings and oil them from time
to time, you can disassemble the motor.
Disassembling of the motor:
1. Remove the 3 screws at the front of the motor and take off the front cover. You can now take out the ball
bearing to clean it or, if necessary, to oil it.
2. Carefully take the magnet out of the can.
IMPORTANT! There are two spacers on the front and back of the shaft. They both have a different length. Please be sure to use the right lenght spacer on the front and rear when putting the magnet back into the can.
3. Remove the 3 screws from the back of the motor and take off the backplate. You can now take out the ball
bearing to clean it or, if necessary, to oil it.
4. To re-assemble the motor, begin with step 3. Double-check, that you use the right lenght spacers on the
magnet shaft and be sure to re-tighten alls screws securely.
C
B
A
Hall-Sensor wire
HALL-SENSOR WIRE:
This bi-directional multipole wire connects the speed-control and the motor. Do not alter or modify this cable!
The Hall-Sensor wire is imminent for the use of the LRP VECTOR Brushless Modifi ed motor. Connect the motor
to the speed-control, by using this wire and make sure, that the plugs have a proper and tight fi t. There are
replaceable hall sensor wires available:
• #81910 (20cm)
• #81920 (10cm)
POWER WIRES:
The LRP VECTOR Brushless Modifi ed comes pre-wired using common motor connectors. It‘s simply „plug &
play“ when you intend using a LRP SPHERE speed-control. You can also use normal power wires (a complete
set of power wires is included with the LRP SPHERE) and solder them directly to the motor if you prefer to use
a „hardwired“ wire setup. The unique splitted solder-tabs allow easy and convenient replacement of the power
wires. Nevertheless some soldering skills are required. Talk to your local hobbyshop if you are concerned about
replacing the wires yourself.
There is a replacement power wire set available: #82505
CAUTION: Avoid soldering longer then 5sec per soldering joint when replacing the power wires to prevent
possible damage to the speed-control due to overheating of the components!
TIMING
With the LRP VECTOR Brushless Modifi ed motor, you have the possibility to change the timing. The factory
setting is position 2. You can easily see this by checking the mark on the plastic ring and the corresponding
timing scale on the motor can. This setting is the best compromise between performance, runtime and torque.
By altering the timing, you change the characteristics of the motor. With a higher timing, the motor revs higher,
but has less torque. We recommend to use the factory setting. It is the best for most applications.
Please note: You need to use a shorter gearing, when using a higher timing.
To change the timing, do the following:
1. Loosen the 3 screws on the backplate of the motor.
2. Turn the plastic ring with the timimg mark to the desired timing position. You can use a small screwdriver
to turn the plastic ring, if necessary.
Please note: To change the timing, you only need to turn the plastic ring with the timing mark. Do not try to
turn the whole backplate of the motor.
3. Re-tighten the 3 screws on the backplate of the motor again.
long
short
REPAIR PROCEDURES/
LIMITED WARRANTY
All products from LRP electronic (hereinafter called “LRP”) are manufactured according to the highest quality
standards. LRP guarantees this product to be free from defects in materials or workmanship for 90 days from
the original date of purchase verifi ed by sales receipt. This limited warranty doesn’t cover defects, which are a
result of normal wear, misuse or improper maintenance.
To eliminate all other possibilities or improper handling, fi rst check all other components before you send in
this product for repair or warranty. Products sent in for repair, that operate perfect have to be charged with a
service fee.
By sending in this product, you assign LRP to repair the product, if it is no warranty case. The original sales
receipt including date of purchase needs to be included. Otherwise, no warranty can be granted. For quick
repair- and return service, add your address and detailed description of the malfunction.
Our limited warranty liability shall be limited to repairing the unit to our original specifi cations. In no case shall
our liability exceed the original cost of this unit. Because we don’t have control over the installation or use of
this product, we can‘t accept any liability for any damages resulting from using this product. By installing or
operating this product, the user accepts all resulting liability.
The specifi cations like weight, size and others should be seen as guide values. Due to ongoing technical improvements, which are done in the interest of the product, LRP does not take any responsibility for the accuracy
of these specs.
LRP-Distributor-Service:
• Package your product carefully and include sales receipt and detailed description of malfunction.
• Send parcel to your national LRP distributor.
• Distributor repairs or exchanges the product.
• Shipment back to you usually by COD (cash on delivery), but this is subject to your national LRP distributor‘s
general policy.
Timing setting 2
Timing setting 6