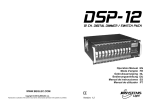
1
Operation Manual Mode d'emploi Gebruiksaanwijzing Bedienungsanleitung Manual de instrucciones WWW.BEGLEC.COM Copyright © 2005-2007 by BEGLEC cva. Reproduction or publication of the content in any manner, without express permission of the publisher, is prohibited. Version: 1.1 EN - DISPOSAL OF THE DEVICE Dispose of the unit and used batteries in an environment friendly manner according to your country regulations. FR - DÉCLASSER L’APPAREIL Débarrassez-vous de l’appareil et des piles usagées de manière écologique Conformément aux dispositions légales de votre pays. NL - VERWIJDEREN VAN HET APPARAAT Verwijder het toestel en de gebruikte batterijen op een milieuvriendelijke manier conform de in uw land geldende voorschriften. DU - ENTSORGUNG DES GERÄTS Entsorgen Sie das Gerät und die Batterien auf umweltfreundliche Art und Weise gemäß den Vorschriften Ihres Landes. ES - DESHACERSE DEL APARATO Reciclar el aparato y pilas usadas de forma ecologica conforme a las disposiciones legales de su pais. PT - COMO DESFAZER-SE DA UNIDADE Tente reciclar a unidade e as pilhas usadas respeitando o ambiente e em conformidade com as normas vigentes no seu país. ENGLISH OPERATION MANUAL ENGLISH OPERATION MANUAL SAFETY INSTRUCTIONS: OPERATION MANUAL ® Thank you for buying this JB Systems product. To take full advantage of all possibilities, please read these operating instructions very carefully. FEATURES This unit is radio-interference suppressed. This product meets the requirements of the current European and national guidelines. Conformity has been established and the relevant statements and documents have been deposited by the manufacturer. Standard 19-inch rack mount Controls up to 192 DMX channels Controls 24 scanners with up to 8 DMX channels per fixture. 12 preset movements for instant show editing Sets DMX address of iSolution effects remotely 24 chases with up to 485 scenes Auto program (scenes and chases) controlled by Speed and X-Fade sliders Scanners control with Pan/Tilt joystick or Speed and X-Fade sliders Pan/Tilt joystick with Fine adjustment function Blackout function Override function gives complete control of selected fixtures Built-in microphone for Music triggering or (Audio) line in MIDI control for Chases, Blackout, Sound, Auto, Speed and X-Fade Power failure memory 2 extra easy controllers incorporated for immediate pre-programmed shows Fog Machine trigger button with “Heating” and “Ready” LED indicators Strobe trigger button with adjustable speed BEFORE USE Check the contents: Check that the carton contains the following items: iLEAD Controller AC/DC adapter Operating instructions Some important instructions: Before you start using this unit, please check if there’s no transportation damage. Should there be any, do not use the device and consult your dealer first. Important: This device left our factory in perfect condition and well packaged. It is absolutely necessary for the user to strictly follow the safety instructions and warnings in this user manual. Any damage caused by mishandling is not subject to warranty. The dealer will not accept responsibility for any resulting defects or problems caused by disregarding this user manual. Keep this booklet in a safe place for future consultation. If you sell the fixture, be sure to add this user manual. To protect the environment, please try to recycle the packing material as much as possible. JB SYSTEMS® 1/71 CAUTION: To reduce the risk of electric shock, do not remove the top cover. No user-serviceable parts inside. Refer servicing to qualified service personnel only. The lightning flash with arrowhead symbol within the equilateral triangle is intended to alert the use or the presence of un-insulated “dangerous voltage” within the product’s enclosure that may be of sufficient magnitude to constitute a risk of electric shock. The exclamation point within the equilateral triangle is intended to alert the user to the presence of important operation and maintenance (servicing) instructions in the literature accompanying this appliance. CAUTION iLEAD Controller This symbol means: indoor use only. This symbol means: Read instructions. To prevent fire or shock hazard, do not expose this appliance to rain or moisture. To avoid condensation to be formed inside, allow the unit to adapt to the surrounding temperatures when bringing it into a warm room after transport. Condense sometimes prevents the unit from working at full performance or may even cause damages. This unit is for indoor use only. Don’t place metal objects or spill liquid inside the unit. No objects filled with liquids, such as vases, shall be placed on this appliance. Electric shock or malfunction may result. If a foreign object enters the unit, immediately disconnect the mains power. No naked flame sources, such as lighted candles, should be placed on the appliance. Don’t cover any ventilation openings as this may result in overheating. Prevent use in dusty environments and clean the unit regularly. Keep the unit away from children. Inexperienced persons should not operate this device. Maximum save ambient temperature is 40C. Don’t use this unit at higher ambient temperatures. Always unplug the unit when it is not used for a longer time or before you start servicing. The electrical installation should be carried out by qualified personal only, according to the regulations for electrical and mechanical safety in your country. Check that the available voltage is not higher than the one stated on the rear panel of the unit. The socket inlet shall remain operable for disconnection from the mains. The power cord should always be in perfect condition: switch the unit immediately off when the power cord is squashed or damaged. Never let the power-cord come into contact with other cables! In order to prevent electric shock, do not open the cover. Apart from the mains fuse there are no user serviceable parts inside. Never repair a fuse or bypass the fuse holder. Always replace a damaged fuse with a fuse of the same type and electrical specifications! In the event of serious operating problems, stop using the appliance and contact your dealer immediately. Please use the original packing when the device is to be transported. Due to safety reasons it is prohibited to make unauthorized modifications to the unit. JB SYSTEMS® 2/71 iLEAD Controller ENGLISH OPERATION MANUAL FUNCTIONS (FRONT) ENGLISH OPERATION MANUAL FUNCTIONS (rear) 1. POWER: Turns On/Off the power. 2. DC INPUT: DC 9 ~12V, 300mA min. 3. FOG MACHINE: 5 pin din socket for connecting DC Fog Machine. Fog machine diagram 1. 2. 3. 4. 5. 6. 7. 8. 9. 10. 11. 12. 13. 14. 15. 16. 17. 18. 19. 20. 21. 22. 23. 24. Scanners: To select one or more fixtures. Movement: To select/set the pan & tilt movement. Shutter: To set the strobe speed, shaking effect and open. Gobo: To select gobo. Color: To select color. Rotation: To set the rotation speed and direction. Dimmer: To set the dimmer intensity. Focus: To adjust the appropriate focus. Page/ Copy: To select memory 1~12 or 13~24 or activate memory copy. Memory: To edit exist scenes or delete a chase. Cancel: To delete a scene. Save: To save or insert or overwrite a scene. Auto/Sound/Midi: To set Auto/Sound/Midi three modes. Light show: To run the Light Show. Blackout/Stand Alone: To select Program/Blackout/Stand Alone three modes. Fog: To activate Fog Machine. Strobe: To activate Non-DMX Strobe. Hold on the Strobe button and press button 1 ~ 12 separately to change the strobe speed. X-Fade: Controls with two different functions: To set fade time when running Light shows. Fade time is the amount of time it takes for a scanner (or scanners) to move from one position to another. To set the tilt position of the Scanners when programming or to set the tilt movement range for Movement function or to set DMX value 0~255 for channels of Shutter/Gobo/ Color/Rotation/Dimmer/Focus. Speed ( Wait time ) Controls with two different functions: To set chase speed ( wait time between scenes ) within the range of 0.1 second to 5 minutes when running light shows. The fade time of scenes will be always completed, Speed slider decides the wait time ( interval time ) between scenes. To set the pan position of the Scanners or to set pan movement range for Movement function when programming. Fine: To control the pan or tilt movement of the fixture in the smallest increments. Push down the joystick to activate Fine function, push again to disable the function. Override: To override the fixture/ fixtures when the show is running. Button(1-24): Set DMX value 0~255 for channels of Shutter / Gobo / color / Rotation / Dimmer / Focus, or save 24 memories into the buttons. Stand alone: 2 extra easy controllers Incorporated for Master/Slave immediate pre-programmed light shows. Program Mode: Activate Program mode by pressing Blackout/Stand Alone button. When the LED above the button is off, it’s in Program mode. JB SYSTEMS® 3/71 iLEAD Controller (Compatible with Antari Z800 & Z1000) 4. 5. 6. 7. 8. STROBE: Trigger non-DMX strobe. Signal +12V DC. AUDIO IN: By build-in microphone or line in. MIDI IN: To receive MIDI data input. DMX IN: This connector accepts DMX signals input. DMX OUT: Two connectors sends DMX signals to DMX fixtures, use 3 pin XLR plug cable to link the fixture together. 9. STAND ALONE: The connectors are used only in master/slave mode, using 5 pin XLR cable microphone jack of the first fixture, you will find that the remote control on the first unit will control all the other units for Stand by, Function and Mode. JB SYSTEMS® 4/71 iLEAD Controller ENGLISH OPERATION MANUAL HOW TO USE ENGLISH OPERATION MANUAL REMOTELY SET DMX ADDRESS Hold on the BLACKOUT/STAND ALONE button for 3 seconds to enter StandAlone mode. You can easily control pan, tilt, shutter, gobo, color, rotation, dimmer and focus functions on the lighting fixtures by pressing the relevant buttons showing on the control panel. With the use of joystick/ sliders, you will be able to quickly set the fixtures’ Pan or Tilt position to make scenes. You can then save all these scenes step by step in a memory to create a chase (show). The controller allows you to program 24 chases with 485 programmable scenes maximum. Hold down the SCANNERS button and then press BLACKOUT/ STAND ALONE button. You will see the pan & tilt of all the fixtures in the chain stopping at the central position. The shutter & LED of the first fixture will open/ blink indicating the fixture is active, ready to be designated a new position ( the number in the chain ). If you have two chains in the venue, you can jog ( push ) joystick Left/Right to select chain 1 or chain 2, and jog joystick Up / Down to select next fixture or last fixture. PROGRAM MODE When power is turned on, the controller enters Programming mode automatically. The LED above this button lights off indicating Program mode in active. Select 1~12 button to set DMX address. BLACKOUT MODE Press the BLACKOUT/STAND ALONE button, the LED above this button lights up indicating Blackout in active. Press SCANNERS to next page to select 13~24 button for setting DMX address. STAND ALONE MODE Hold on the BLACKOUT/STAND ALONE for 3 seconds, the LED above this button will blink indicating Stand-Alone mode in active. The Stand Alone 1 and Stand Alone 2 are designed for iSolution lighting fixtures in Stand Alone ( Master/ Slave ) mode. Stand By: To blackout the lighting fixtures. Mode selection: Different run modes, e.g. fast / slow, audio / manual / auto, position, latch, etc., correspond to different functions. Function selection: Implements a wide variety of effects, like strobe, X/Y moving pattern selection, gobo/ color changing, X/Y position setting, dimmer, etc. Functions vary with different fixtures. Different lights have different modes and different functions, which can be triggered by Stand Alone mode. Please refer to each lighting fixture's user manual for more details. JB SYSTEMS® 5/71 iLEAD Controller Press the BLACKOUT/STAND ALONE button again to return to the program mode. Fixtures No. DMX channel for Moving Head Scanner Barrel Color changer Multi-Gobo projector 1 1 2 9 3 17 4 25 5 33 6 41 7 49 8 57 9 65 10 73 11 81 12 89 3 11 19 27 35 43 51 59 67 75 83 91 Fixtures No. DMX channel for Moving Head Scanner Barrel Color changer Multi-gobo projector 13 97 14 105 15 113 16 121 17 129 18 137 19 145 20 155 21 161 22 169 23 177 24 185 99 107 115 123 131 139 147 157 163 171 179 187 JB SYSTEMS® 6/71 iLEAD Controller ENGLISH OPERATION MANUAL SELECT THE FIXTURES YOU WANT TO CONTROL Press SCANNERS button You can choose one or more than one fixtures by pressing the 1~12 buttons When the buttons’ LED ( 1 ~ 12 ) are lit, you can control the fixtures. To select fixture 13~24, press SCANNERS to next page, the lower LED will be on. Upper Lower 1 13 2 14 3 15 4 16 5 17 6 18 7 19 8 20 9 21 10 22 11 23 12 24 You will see the button’s LED turned on when you select it. When the LEDs above the buttons are lit, you can control the fixtures using joystick or control sliders. To exit control of a fixture, press the number buttons again so the buttons LED light goes out. You can control multiple fixtures at same time. To select multiple fixtures, press the button of each fixture one by one. ENGLISH OPERATION MANUAL SETTING SHUTTER Select the fixtures you want to control Press SHUTTER button Select a shutter value with the 1~12 buttons, or use the X-Fade/Value slider To select strobing speed 13~24, press SHUTTER again to next page the lower LED will be on. 24 shutter values have been programmed into the controller, which you can select by pressing the relevant button (1 ~ 24) as showing below: 1 Upper Blackout 13 2 3 4 5 6 7 8 9 10 Open Slow Strobe Strobe 1 Strobe 2 Strobe 3 Strobe 4 Strobe 5 Strobe 6 Strobe 7 14 15 18 19 20 21 22 16 17 11 12 Strobe Fast 8 Strobe 23 24 Lower Shaking Shaking Shaking Shaking Shaking Shaking Shaking Shaking Shaking Shaking Shaking Open SETTING PAN/TILT POSITION Move joystick Left/Right to control the Pan movement, Up/Down to control the Tilt movement. You can also use the Speed slider and X-Fade/Value slider to control Pan or Tilt movement of the fixture. SETTING MOVEMENT Select the fixtures you want to control Press MOVEMENT button Select preset Movement patterns by pressing 1~12 buttons, and use the XFade/Value slider to adjust movement range Press MOVEMENT again to return to Program mode 12 preset Movement patterns are as below: 1 2 3 4 5 6 7 8 9 10 11 12 Movement When programming, you can select a movement pattern to create a scene. Use the Speed slider to set pan movement range, and use the X-Fade/Value slider setting tilt movement range. On the other hand, use Joystick to set the position of movement. When in Light show mode, you can use the Speed slider to set running time within the range of 0.1 second to 5 minutes, and use X-Fade /Value slider to set fade time. SETTING GOBO Select the fixtures you want to control Press GOBO button Select a gobo value with the 1~12 buttons, or use the X-Fade/Value slider To select gobos 13~24, press GOBO again to next page, the lower LED will be on. The Gobos setting are as below: 7 Gobos 1 2 3 Gob Uppe Ope Ope o r n n 1 13 14 15 Gob Gob Gob Low o o o er 6 6 7 4 5 6 7 8 9 10 11 12 Gob Gob Gob Gob Gob Gob Gob Gob Gob o o o o o o o o o 1 2 2 3 3 4 4 5 5 16 17 18 19 20 21 22 23 24 Slow Scro Scrol Scro Scro Scro Scro Scro Fast scrol ll l ll ll ll ll ll scrol l 1 2 3 4 5 6 7 l 14 Gobos 1 2 3 4 5 6 7 8 9 10 11 12 Ope Gob Gob Gob Gob Gob Gob Gob Gob Gob Gob Gob n o o o o o o o o o o o 1 2 3 4 5 6 7 8 9 10 11 13 14 15 16 17 18 19 20 21 22 23 24 Gob Gob Gob Slow Scro Scrol Scro Scro Scro Scro Scro Fast Low o o o scrol ll l ll ll ll ll ll scrol er 12 13 14 l 1 2 3 4 5 6 7 l Uppe r JB SYSTEMS® 7/71 iLEAD Controller JB SYSTEMS® 8/71 iLEAD Controller ENGLISH OPERATION MANUAL SETTING COLOR Select the fixtures you want to control Press COLOR button Select a color value with the 1~12 buttons, or move the X-Fade/Value slider. To select colors 13~24, press COLOR again to next page, the lower LED will be on. The Color settings are as below: 9 colors (full color) 1 2 3 4 5 6 Upper White White Green Green Magenta Magenta 13 14 15 UV Light Light Purple Green Green 9 colors (split color) 1 2 3 16 17 Slow scroll Pink 4 Green Upper White Green Magenta + Magenta 13 Blue 14 15 UV Purple Light Lower + + Green UV Light Purple Green 11 colors (full color) 1 2 Upper White White 3 11 colors (split color) 1 2 16 Slow scroll 4 5 3 16 Pink 4 15 Yellow Lower Orange Yellow + Pink 16 Pink 7 8 9 10 11 12 Light Yellow Yellow Orange Orange Blue Blue 19 20 21 22 23 24 Scroll Scroll Scroll Scroll Scroll Fast 2 3 4 5 6 scroll 5 6 7 8 9 10 11 12 Magenta Light Yellow Orange Light Blue + Yellow Orange Blue + + Light Blue + Orange Blue Blue Yellow 17 18 19 20 21 22 23 24 Pink Green Upper White Green + Magenta Magenta 14 18 Scroll 1 Scroll Scroll Scroll 1 2 3 Green Magenta Magenta 13 14 15 Light Lower Orange Yellow Green 13 OPERATION MANUAL SETTING GOBO ROTATION Lower ENGLISH 17 Slow scroll Scroll 4 Scroll 5 Scroll Fast 6 scroll 6 7 8 9 10 11 12 Light UV UV Amber Amber Red Blue Blue Purple Purple 18 19 20 21 22 23 24 Scroll Scroll Scroll Scroll Scroll Scroll Fast 1 2 3 4 5 6 scroll 5 Light Blue 17 6 7 Amber Red 18 19 Select the fixtures you want to control Press ROTATION button Select a rotation speed value with 1~12 buttons, or move the X-Fade/Value slider Below is the Gobo Rotation settings: ( CCW- Counterclockwise; CW- Clockwise ) 1 2 3 4 5 6 7 8 9 10 11 12 Fast CCW. CCW. CCW. Slow Slow CW. CW. CW. Fast Rotation Stop CCW Speed Speed Speed CCW. CW. Speed Speed Speed CW. Stop Speed 1 2 3 Speed Speed 3 2 1 Speed SETTING DIMMER The Dimmer settings are as below: 1 2 3 Dimmer 100% 90% 82% 4 5 6 7 8 9 10 11 12 74% 64% 55% 46% 37% 28% 19% 10% 0% SETTING FOCUS Select the fixtures you want to control Press FOCUS button Select a focus value with 1~12 buttons, or move the X-Fade/Value slider To select focus 13~24, press FOCUS again to next page, the lower LED will be on. CREATE A SCENE 1. Enter Program mode. 2. a) Press Scanners button to choose the fixtures you want to control b) Use Joystick or sliders to locate the positions of pan/tilt to create a scene. 8 9 10 11 12 Light Red UV Light Green + Blue Purple Green + Blue Orange 20 21 22 23 24 Scroll Scroll Scroll Scroll Scroll Scroll Slow scroll 1 2 3 4 5 6 Select the fixtures you want to control Press DIMMER button Select a dimmer value with 1~12 buttons, or move the X-Fade/Value slider You can adjust dimmer value of fixtures between 0%~100% 3. Press SAVE. The 1~12 buttons will light up if they have memory already saved into them. 4. Press a button to store your desired scene. 5. The scene is saved into the selected button. Fast scroll 6. By pressing Page, you can also store scenes into 13~24 button. JB SYSTEMS® 9/71 iLEAD Controller JB SYSTEMS® 10/71 iLEAD Controller ENGLISH OPERATION MANUAL ENGLISH CREATE A CHASE 1. Enter Program mode. 2. Create a scene. 3. Press SAVE button. Select a position ( 1 ~ 24 ) where you want to store the scene. OPERATION MANUAL 3. Press the button ( 1 ~ 24 ) where the memory ( chase ) is saved and select the scene that you wish to overwrite. 4. Press the same button ( e.g. 6 ) repeatedly, you can view the scene one by one. 5. Create a desired scene. 6. Hold down the SAVE button and then press former selected button ( 1 ~ 24 ) to overwrite a scene. 4. Repeat steps 2 & 3 as many times as you want until the controller’s memory is full. The SAVE LED will blink when the memory is full. 5. A chase (The controller ) can store up to 485 scenes. DELETE A SCENE RUNNING SCENES 1. Enter Program mode. 2. Press the MEMORY button, choose the desired position (1~24) in which you want to delete a scene. 3. Select the scene that you want to delete. 1. Enter Program mode. 2. Press MEMORY button. 4. Hold down CANCEL and then press the former selected button to delete a scene. 3. Press a button 1~12 or press PAGE select button 13~24 for manually running a scene. 4. Press the same button again. The second scene will be run after the first scene. Note: The SAVE button is used to store the current status into memory. The PAGE button is used to select the position of memory. The controller has 24 position in which you can save chases ( shows ) into them. When the upper LED is on, then button 1 = memory 1, button 2 = memory 2… etc, when the lower LED is on then button 1 = memory 13, button 2 = memory 14… etc. The MEMORY button is used to read exiting scenes. The LEDs will light up if there is memory saved into the buttons. COPY A CHASE 1. Enter Program mode. 2. Press the MEMORY button. 3. Select an existed chase which you want to copy. INSERT A SCENE 1. Enter Program mode. 2. Press the MEMORY button, choose the desired position (1 ~ 24) in which you want to insert a scene. 3. Select the scene where you want to insert a scene. Press the same button ( e.g. 6 ) repeatedly, you can view the scene one by one. 4. Hold down PAGE and then press a button ( 1 ~ 24 ) where you want to copy the chase into it. 4. Create a new scene. 5. Press SAVE. 6. Press the desired position ( 1~24 ) you selected again to insert the new scene. DELETE A CHASE 1. Enter Program mode. 2. Press MEMORY button. 3. Hold down MEMORY button and then press a 1~12 button or press PAGE to select a 13-24 button to delete a chase. OVERWRITE A SCENE 1. Enter Program mode. 2. Press the MEMORY button. JB SYSTEMS® 11/71 iLEAD Controller JB SYSTEMS® 12/71 iLEAD Controller ENGLISH OPERATION MANUAL ENGLISH CLEAR ALL MEMORY 1. Press the BLACKOUT/STAND ALONE for 3 seconds, into Stand-Alone mode. MIDI note 36 37 38 39 40 41 42 43 48 49 50 51 52 53 54 55 56 57 58 59 60 61 62 63 74 75 76 77 78 79 2. Hold down the MEMORY button and then press BLACKOUT / STAND ALONE button, all memory will be deleted. LIGHT SHOW 1. Press LIGHT SHOW button. The LIGHT SHOW LED will light up, indicating light show mode is active. 2. Press AUTO/SOUND/MIDI to activate Auto, Sound or MIDI mode. The LEDs indicate which mode is activated. 3. Press the button ( 1 ~ 24 ) to run a desired lighting show. When in Auto mode, you can set the light speed and fade time by using the sliders. These settings will be kept when next time you run the same light show. When in Sound mode activation, the Light show will be triggered by music, however, you can still set the fade time of the light show. OVERRIDE CONTROL When running light shows, you can press the Override button to control the fixture manually, the LED lights up indicating Override function is activated. Press “Scanners“ button to select the fixtures you want to override. MIDI OPERATION You can run a chase, set speed and fade time, light show auto or sound, and blackout using MIDI commands, This allows you to pre-program a light show to match a sequenced backing track. You cannot perform live head control or programming functions by MIDI. The controller will only respond to MIDI commands on the MIDI channel which it is set to full stop. All MIDI control is performed using Note on commands. All other MIDI instructions are ignored. To stop a chase, send the blackout on note. When programming a MIDI controlled sequence, you should always start by sending a page command, as you don’t know what the current page setting will be on the controller. When you recall a chase by MIDI, the chase will run at its programmed speed, fade and sound activation settings. If you want to change the speed, fade and sound activation by MIDI command you need to do this after you have started the chase. The speed, fade and sound setting which you set by MIDI will not be remembered as part of the chase. OPERATION MANUAL Note name C3 C#3 D3 D#3 E3 F3 F#3 G3 C4 C#4 D4 D#4 E4 F4 F#4 G4 G#4 A4 A#4 B4 C5 C#5 D5 D#5 D6 D#6 E6 F6 F#6 G6 Function Chase 1 Chase 2 Chase 3 Chase 4 Chase 5 Chase 6 Chase 7 Chase 8 Chase 9 Chase 10 Chase 11 Chase 12 Chase 13 Chase 14 Chase 15 Chase 16 Chase 17 Chase 18 Chase 19 Chase 20 Chase 21 Chase 22 Chase 23 Chase 24 SPEED X-FADE AUTO MODE SOUND MODE BLACKOUT ON BLACKOUT OFF MAINTENANCE The unit should be cleaned regularly using a wet cloth. We recommend internal cleaning to be carried out by qualified personnel. SPECIFICATIONS Power Input: DMX Input: DMX Output: Stand Alone: MIDI Signal: Audio Input: Dimensions: Weight: DC 9-12V 300 mA min 3 pin male XLR 3 pin female XLR 5 pin male XLR 5 pin standard interface By built-in microphone or line in 485 x 135 x 80 mm 2.5 kg Every information is subject to change without prior notice You can download the latest version of this user manual on our website: www.beglec.com JB SYSTEMS® 13/71 iLEAD Controller JB SYSTEMS® 14/71 iLEAD Controller FRANÇAIS MODE D’EMPLOI FRANÇAIS MODE D’EMPLOI INSTRUCTIONS DE SECURITE: MODE D’EMPLOI ® Nous vous remercions d’avoir acheté ce produit JB Systems . Veuillez lire ce mode d’emploi attentivement afin de pouvoir exploiter correctement toutes les possibilités qu’offre cet appareil. CARACTERISTIQUES Ce symbole signifie : uniquement pour usage à l'intérieur Montage en rack standard 19” Contrôle jusqu’à 192 canaux DMX Contrôle 24 scans comptant jusqu’à 8 canaux DMX par appareil. 12 mouvements préprogrammés pour la création de shows instantanés Réglez les adresses DMX des appareils ( iRock, iShow, et iMove ) à distance en utilisant le contrôleur Mémoire pour 24 programmes du type chenillard comprenant jusqu’à 485 scènes; chaque programme chenillard peut contenir un nombre indéfini de scènes, jusqu’à ce que la mémoire du contrôleur soit pleine. 2 curseurs ( SPEED, XFADE/VALUE ) pour un contrôle manuel Auto program (scènes et programmes chenillard) contrôlé par les curseurs Speed et X-Fade Contrôle des Scanners par le joystick Pan/Tilt ou par les curseurs Speed et X-Fade Joystick Pan/Tilt comprenant une fonction de réglage fin Fonction Black-out La fonction Override vous procure le contrôle manuel complet des appareils sélectionnés. Micro incorporé ou entrée « line » (audio) pour une activation au rythme de la musique Contrôle MIDI des fonctions Chase, Blackout, Sound, Auto, Speed et X-Fade Mémoire automatique en cas de panne de courant. 2 contrôleurs supplémentaires intégrés pour des shows instantanés. Touche d’activation de machine à fumée avec indicateurs Led “Heating”(pré chauffe) et “Ready”(prêt) Touche d’activation du stroboscope a vitesse réglable AVANT L’UTILISATION Contrôlez le contenu: Vérifiez si la boite contient les éléments suivants: le contrôleur iLEAD adaptateur d’alimentation AC/DC mode d’emploi Quelques instructions importantes: Afin d'éviter tout risque d'électrocution ou d'incendie, n'exposez pas cet appareil à la pluie ou à l'humidité. Afin d’éviter tout risque d’électrocution, n’ouvrez jamais l’appareil. En cas de problème, contactez votre revendeur. N’insérez jamais d’objets métalliques et ne renversez jamais de liquide dans l’appareil. L’électrocution ou le disfonctionnement peuvent en résulter. Evitez une utilisation dans des endroits poussiéreux et nettoyez l’appareil régulièrement. JB SYSTEMS® 15/71 ATTENTION: afin de réduire le risque d’électrocution, n’enlevez jamais le couvercle de l’appareil. Il n’y a aucune pièce à l’intérieur de l’appareil que vous pouvez remplacer vous-même. Confiez l’entretien uniquement à des techniciens qualifiés. La flèche dans un triangle met l'utilisateur en garde contre la présence de haute tension sans isolation dans l'appareil qui peut causer un risque d'électrocution. Un point d'exclamation dans un triangle prévient de la présence d'instructions de fonctionnement et de maintenance se trouvant dans le manuel, fourni avec l'appareil. CAUTION iLEAD Controller Ce symbole signifie : Lire le mode d’emploi. Afin d’éviter tout risque d’incendie ou de choc électrique, ne pas exposer cet appareil à la pluie ou l’humidité. Pour éviter la formation de condensation à l’intérieur de l’appareil, patientez quelques minutes pour laisser l’appareil s’adapter à la température ambiante lorsqu’il arrive dans une pièce chauffée après le transport. La condensation empêche l’unité de fonctionner en performance optimale et peut même causer des dommages. Cette unité est destinée à une utilisation à l’intérieur uniquement. Ne pas insérer d’objet métallique ou verser un liquide dans l’appareil. Aucun objet rempli de liquides, tels que des vases, ne peut être placé sur cet appareil. Risque de choc électrique ou de dysfonctionnement. Si un corps étranger est introduit dans l’unité, déconnectez immédiatement de la source d’alimentation. Aucune source de flamme nue, telle que les bougies allumées, ne peut être placée sur l'appareil. Ne pas couvrir les ouvertures de ventilation, un risque de surchauffe en résulterait. Ne pas utiliser dans un environnement poussiéreux et nettoyez l’unité régulièrement. Ne pas laisser l’unité à portée des enfants. Les personnes non expérimentées ne doivent pas utiliser cet appareil. La température ambiante maximum d’utilisation de l’appareil est de 40°C. Ne pas l’utiliser au-delà de cette température. Débranchez toujours l’appareil si vous ne l’utilisez pas de manière prolongée ou avant d’entreprendre des réparations. Les installations électriques ne peuvent être faites que par du personnel qualifié et conformément aux régulations de sécurité électrique et mécanique en vigueur dans votre pays. Assurez-vous que la tension d’alimentation de la source d’alimentation de la zone dans laquelle vous vous trouvez ne dépasse pas celui indiqué à l’arrière de l’appareil. La prise sera toujours accessible pour que le cordon secteur puisse être enlevé à chaque moment. Le cordon d’alimentation doit toujours être en condition parfaite. Mettez immédiatement l’unité hors tension si le cordon est écrasé ou endommagé. Ne laissez jamais le cordon d’alimentation entrer en contact avec d’autres câbles ! Utilisez toujours les câbles appropriés et certifiés lorsque vous installez l’unité. Pour éviter tout choc électrique, ne pas ouvrir l’appareil. En dehors du fusible principal, il n’y a pas de pièces pouvant être changées par l’utilisateur à l’intérieur. Ne jamais réparer ou court-circuiter un fusible. Remplacez systématiquement un fusible endommagé par un fusible de même type et ayant les mêmes spécifications électriques ! En cas de problèmes de fonctionnement sérieux, arrêtez toute utilisation de l’appareil et contactez votre revendeur immédiatement. Utilisez l’emballage d’origine si l’appareil doit être transporté. Pour des raisons de sécurité, il est interdit d’apporter toute modification à l’unité non spécifiquement autorisée par les parties responsables. JB SYSTEMS® 16/71 iLEAD Controller FRANÇAIS MODE D’EMPLOI FONCTIONS (FACE AVANT) FRANÇAIS MODE D’EMPLOI FONCTIONS (arrière) 1. POWER: pour allumer ou éteindre l’appareil. 2. DC INPUT: entrée pour l’adaptateur d’alimentation DC 9 ~12V, 300mA min. 3. FOG MACHINE: connecteur din à 5 broches pour connecter une machine à fumée Machine à fumée : schéma 1. 2. 3. 4. 5. 6. 7. 8. 9. 10. 11. 12. 13. 14. 15. 16. 17. 18. 19. 20. 21. 22. 23. 24. Scanners: pour sélectionner un ou plusieurs appareils. Movement: pour sélectionner/régler les mouvements pan & tilt. Shutter: pour régler la vitesse du stroboscope, l’effet de vibration et l’ouverture. Gobo: pour choisir le gobo. Color: pour choisir la couleur. Rotation: pour régler la vitesse et le sens de rotation. Dimmer: pour régler l’intensité de gradation. Focus: pour régler le focus. Page/ Copy: pour sélectionner la mémoire 1~12 ou 13~24 ou pour activer la copie de mémoire. Memory: pour modifier des scènes existantes ou pour supprimer un programme chase (chenillard). Cancel: pour supprimer une scène. Save: pour sauver, insérer ou écraser une scène. Auto/Sound/Midi: pour sélectionner les modes Auto/Sound/Midi. Light show: pour reproduire un Light Show. Blackout/Stand Alone: pour sélectionner les modes Program/Blackout/Stand Alone. Fog: pour activer une machine à fumée. Strobe: pour activer un stroboscope Non-DMX. Tenez la touche Strobe enfoncée et appuyez sur les touches 1 ~ 12 séparément pour changer la vitesse du stroboscope. X-Fade: contrôle à double fonction: Pour régler le temps de transition pendant le déroulement de Light shows. Le temps de transition (Fade time) est le temps qu’il faut pour un scanner (ou des scanners) de passer d’une position à une autre. Pour régler la position « Tilt » des Scanners pendant la programmation ou pour déterminer le champ de mouvement vertical (tilt) d’une fonction Movement ou pour régler la valeur DMX 0~255 pour les canaux du Shutter/Gobo/ Color/Rotation/Dimmer/Focus. Speed (Temps d’attente) contrôle à double fonction: Pour régler la vitesse du chenillard (temps d’attente entre deux scènes) avec une portée de 0.1 secondes à 5 minutes pendant le déroulement de light shows. La transition sera toujours effectué complètement, le curseur Speed détermine le temps d’attente (temps d’intervalle) entre les scènes. Pour régler la position « pan » des Scanners ou pour déterminer le champs de mouvement horizontal (pan) d’une fonction Movement pendant la programmation. Fine: pour contrôler les mouvements pan et tilt d’un appareil d’une façon plus fine. Appuyez sur le joystick pour activer la fonction Fine, appuyez à nouveau pour désactiver la fonction. Override: Pour contrôler manuellement le/les appareils pendant le déroulement d’un show. Touche (1-24): détermine une valeur DMX 0~255 pour les canaux du Shutter / Gobo / couleur / Rotation / Gradateur / Focus, ou pour sauvegarder 24 mémoires dans les touches. Stand alone: 2 simples contrôleurs supplémentaires incorporés pour des light shows pré programmés instantanés du type Master/Slave. Program Mode: activez le « Program mode» (programmation) en appuyant sur la touche Blackout/Stand Alone. Quand le LED au dessus de la touche est éteint, il est en « Program mode ». JB SYSTEMS® 17/71 iLEAD Controller (Compatible avec Antari Z800 & Z1000) 4. 5. 6. 7. 8. STROBE: pour commander un stroboscope non-DMX. Signal +12V DC. ENTREE AUDIO: entrée ligne. ENTREE MIDI: pour recevoir des informations MIDI. DMX IN: ce connecteur d’entrée reçoit des signaux DMX. DMX OUT: deux connecteurs envoient des signaux DMX aux appareils DMX, utilisez des câbles aux connecteurs XLR à 3 broches pour relier les appareils ensemble. 9. STAND ALONE: ces connecteurs sont uniquement utilisés pour un fonctionnement en mode maître/esclave. En utilisant le câble micro XLR à 5 broches du premier appareil, vous remarquerez que la commande à distance du premier appareil contrôlera tous les autres appareils concernant le Stand by, la fonction et le mode de fonctionnement. JB SYSTEMS® 18/71 iLEAD Controller FRANÇAIS MODE D’EMPLOI COMMENT UTILISER Vous pouvez facilement contrôler les fonctions pan, tilt, shutter, gobo, couleur, rotation, atténuation et focus des appareils d’éclairage en appuyant sur les touches appropriés du contrôleur. En utilisant le joystick/curseurs, vous pouvez rapidement régler la position Pan et Tilt des appareils afin de créer des scènes. Vous pouvez ensuite sauvegarder toutes ces scènes, pas par pas, dans une mémoire afin de créer un programme chenillard (show). Le contrôleur vous permet de programmer 24 programmes chenillard comprenant maximum 485 scènes programmables. PROGRAM MODE Quand l’appareil est allumé, le contrôleur passe automatiquement en mode de programmation (program mode). Si le LED au dessus de cette touche est éteint, cela indique que la fonction Program mode est activée. BLACKOUT MODE Appuyez sur la touche BLACKOUT/STAND ALONE. Si le LED au dessus de cette touche est allumé, cela indique que la fonction Black-out est activée. STAND ALONE MODE Tenez la touche BLACKOUT/STAND ALONE enfoncé pendant 3 secondes. Si le LED au dessus de cette touche clignote, cela indique que la fonction Stand-Alone (fonctionnement autonome) est activée. FRANÇAIS MODE D’EMPLOI REGLAGE A DISTANCE DE L’ADRESSE DMX Tenez la touche BLACKOUT/STAND ALONE enfoncée pendant 3 secondes afin d’activer le mode Stand-Alone. Tenez la touche SCANNERS enfoncée, puis appuyez sur la touche BLACKOUT/ STAND ALONE. Vous verrez que la position pan & tilt de tous les appareils de la chaîne s’arrêtent en position centrale. Le shutter & LED du premier appareil s’ouvre / clignote pour indiquer que l’appareil est actif, prêt à ce que l’on lui attribue une nouvelle position (Le numéro dans la chaîne). Si vous avez 2 chaînes dans votre set up, vous pouvez diriger le joystick à ère ème gauche ou à droite pour sélectionner la 1 chaîne ou la 2 chaîne, et diriger le joystick vers le haut ou vers le bas pour sélectionner le prochain appareil ou l’appareil précédent. Sélectionnez la touche 1~12 pour choisir l’adresse DMX. Appuyez sur la touche SCANNERS pour accéder aux touches 13~24 afin de pouvoir choisir l’adresse DMX dans cette gamme. Appuyez à nouveau sur la touche BLACKOUT/STAND ALONE pour retourner en « program mode". Les Stand Alone 1 et Stand Alone 2 sont désignés pour une utilisation autonome (fonction Maître/ Esclave) des appareils d’éclairage iSolution Stand By: Pour occulter les appareils d’éclairage. Mode: Différents modes de fonctionnement, rapide / lent, audio / manuel / auto, position, etc., correspondent à différentes fonctions. Function: Met en exécution une grande variété d’effets, tel la fonction stroboscopique, la sélection de modèles de mouvements X/Y, le changement de gobo/ couleur, le positionnement X/Y, l’atténuation, etc. Les fonctions peuvent varier selon les appareils utilisés. Différents appareils ont différents modes de travail et différentes fonctions, qui peuvent être contrôlés par le mode de fonctionnement autonome « Stand Alone ». Référez-vous au mode d’emploi de chaque appareil pour plus d’informations. JB SYSTEMS® 19/71 iLEAD Controller Fixtures (appareils) No. Canal DMX pour Moving Head Scanner Barrel Color changer Multi-Gobo projector 1 2 3 4 5 6 7 8 9 10 11 12 1 9 17 25 33 41 49 57 65 73 81 89 3 11 19 27 35 43 51 59 67 75 83 91 Fixtures (appareils) No. Canal DMX pour Moving Head Scanner Barrel Color changer Multi-gobo projector 13 14 15 16 17 18 19 20 21 22 23 24 97 105 113 121 129 137 145 155 161 169 177 185 99 107 115 123 131 139 147 157 163 171 179 187 JB SYSTEMS® 20/71 iLEAD Controller FRANÇAIS MODE D’EMPLOI SELECTIONNEZ LES APPAREILS QUE VOUS VOULEZ CONTRÔLER Appuyez sur la touche SCANNERS Vous pouvez choisir un ou plusieurs appareils en appuyant sur les touches 1~12 Quand le LED ( 1 ~ 12 ) est allumé, vous pouvez contrôler l’appareil. Pour sélectionner les appareils 13~24, appuyez sur SCANNERS pour aller à la page suivante, le LED du dessous s’allumera. FRANÇAIS MODE D’EMPLOI REGLAGE DE L’OBTURATEUR Selectionnez les appareils que vous voulez contrôler Appuyez sur la touche SHUTTER Sélectionnez une valeur d’obturation en utilisant les touches 1~12, ou utilisez le curseur X-Fade/Value Pour sélectionner une vitesse stroboscopique 13~24, appuyez à nouveau sur SHUTTER pour aller vers la page suivante ; le LED du dessous sera allumé. 24 valeurs d’obturation ont été programmées dans le contrôleur. Vous pouvez les sélectionner en appuyant sur la touche appropriée (1 ~ 24) comme affiché ci-dessous: Dessus 1 Dessous 13 2 14 3 15 4 16 5 17 6 18 7 19 8 20 9 21 10 22 11 23 12 24 Vous verrez que le LED de la touche s’allume quand vous la sélectionnez. Quand les LEDs sont allumés au dessus des touches, vous pouvez contrôler les appareils en utilisant le joystick ou les curseurs de contrôle. Pour sortir du contrôle de l’appareil, appuyez à nouveau sur les touches numérotées pour que le LED voulu s’éteigne. Vous pouvez contrôler plusieurs appareils en même temps. Pour sélectionner plusieurs appareils, appuyez un à un sur les touches des appareils. REGLAGE DE LA POSITION PAN/TILT Bougez le joystick vers la gauche ou vers la droite pour contrôler le mouvement horizontal (Pan), bougez le vers le haut ou vers le bas pour contrôler le mouvement vertical (Tilt). Vous pouvez également utiliser les curseurs Speed et X-Fade/Value pour contrôler les mouvements Pan ou Tilt de l’appareil. REGLAGE DES MOUVEMENTS Selectionnez les appareils que vous voulez contrôler Appuyez sur la touche MOVEMENT Sélectionnez un modèle de mouvement préprogrammé en appuyant sur les touches 1~12, et utilisez le curseur X-Fade/Value pour régler la portée du mouvement Appuyez à nouveau sur MOVEMENT pour retourner en « Program mode » Les 12 modèles de mouvement préprogrammés sont: 1 2 3 4 5 6 7 8 9 10 11 12 Movem ent Pendant la programmation, vous pouvez sélectionner un modèle de mouvement afin de créer une scène. Utilisez le curseur Speed pour régler la protée du mouvement pan, et utilisez le curseur XFade/Value pour régler la protée du mouvement tilt. Utilisez le Joystick pour régler la position du mouvement. Quand vous êtes en mode Light show, vous pouvez utiliser le curseur Speed pour régler la vitesse (temps d’attente) dans un gamme allant de 0.1 secondes à 5 minutes, et utiliser le curseur XFade /Value pour régler le temps de transition. JB SYSTEMS® 21/71 iLEAD Controller 1 Dessus Blackout 13 2 3 4 5 6 7 8 9 10 Open Slow Strobe Strobe 1 Strobe 2 Strobe 3 Strobe 4 Strobe 5 Strobe 6 Strobe 7 14 15 18 19 20 21 22 16 17 11 12 Strobe Fast 8 Strobe 23 24 Dessous Shaking Shaking Shaking Shaking Shaking Shaking Shaking Shaking Shaking Shaking Shaking Open REGLAGE DU GOBO Selectionnez les appareils que vous voulez contrôler Appuyez sur la touche GOBO Sélectionnez une valeur de gobo en utilisant les touches 1~12, ou utilisez le curseur X-Fade/Value Pour sélectionner les gobos 13~24, appuyez à nouveau sur GOBO pour aller vers la page suivante ; le LED du dessous sera allumé. Le réglage des Gobos est le suivant: 7 Gobos 1 2 3 Gob Ope Ope Dessus o n n 1 13 14 15 Gob Gob Gob Desso o o o us 6 6 7 4 5 6 7 8 9 10 11 12 Gob Gob Gob Gob Gob Gob Gob Gob Gob o o o o o o o o o 1 2 2 3 3 4 4 5 5 16 17 18 19 20 21 22 23 24 Slow Scro Scrol Scro Scro Scro Scro Scro Fast scrol ll l ll ll ll ll ll scrol l 1 2 3 4 5 6 7 l 14 Gobos 1 2 3 4 5 6 7 8 9 10 11 12 Ope Gob Gob Gob Gob Gob Gob Gob Gob Gob Gob Gob Dessus n o o o o o o o o o o o 1 2 3 4 5 6 7 8 9 10 11 13 14 15 16 17 18 19 20 21 22 23 24 Gob Gob Gob Slow Scro Scrol Scro Scro Scro Scro Scro Fast Desso o o o scrol ll l ll ll ll ll ll scrol us 12 13 14 l 1 2 3 4 5 6 7 l JB SYSTEMS® 22/71 iLEAD Controller FRANÇAIS MODE D’EMPLOI FRANÇAIS MODE D’EMPLOI REGLAGE DE LA COULEUR Selectionnez les appareils que vous voulez contrôler Appuyez sur la touche COLOR Sélectionnez une valeur de couleur en utilisant les touches 1~12, ou utilisez le curseur X-Fade/Value. Pour sélectionner les couleurs 13~24, appuyez à nouveau sur COLOR. Selectionnez les appareils que vous voulez contrôler. REGLAGE DE LA ROTATION DU GOBO Selectionnez les appareils que vous voulez contrôler Appuyez sur la touche ROTATION Sélectionnez une valeur de rotation en utilisant les touches 1~12, ou utilisez le curseur X-Fade/Value Le réglage des couleurs est le suivant: Ci-dessous vous trouverez les réglages de rotation de Gobo: ( CCW- sens inverse d’une montre; CWsens d’une montre ) 1 2 3 4 5 6 7 8 9 10 11 12 Fast CCW. CCW. CCW. Slow Slow CW. CW. CW. Fast Rotation Stop CCW Speed Speed Speed CCW. CW. Speed Speed Speed CW. Stop Speed 1 2 3 Speed Speed 3 2 1 Speed 9 couleurs (couleurs pleines) 1 2 3 4 5 6 Dessus White White Green Green Magenta Magenta 13 14 15 16 UV Light Light Dessous Pink Purple Green Green 9 couleurs (couleurs divisées) 1 2 3 17 Slow scroll 4 Green Dessus White Green Magenta + Magenta 13 Blue 14 15 UV Purple Light Dessous + + Green UV Light Purple Green 11 couleurs (couleurs pleines) 1 2 3 Dessus White Dessous White 11 couleurs (couleurs divisées) 1 2 3 13 14 Pink 4 16 Pink 4 Green + Magenta Magenta 15 Yellow Dessous Orange Yellow + Pink JB SYSTEMS® 5 6 7 8 9 10 11 12 Magenta Light Yellow Orange Light Blue + Yellow Orange Blue + + Light Blue + Orange Blue Blue Yellow 17 18 19 20 21 22 23 24 Slow scroll Scroll Scroll Scroll Scroll 1 2 3 4 5 Green Magenta Magenta 13 14 15 Light Orange Yellow Green Dessus White Green 16 18 Scroll 1 7 8 9 10 11 12 Light Yellow Yellow Orange Orange Blue Blue 19 20 21 22 23 24 Scroll Scroll Scroll Scroll Scroll Fast 2 3 4 5 6 scroll 17 Slow scroll Scroll 5 Scroll 6 Fast scroll 6 7 8 9 10 11 12 Light UV UV Amber Amber Red Blue Blue Purple Purple 18 19 20 21 22 23 24 Scroll Scroll Scroll Scroll Scroll Scroll Fast 1 2 3 4 5 6 scroll 5 Light Blue 16 17 Pink Slow scroll 23/71 6 7 8 9 10 REGLAGE DE L’ATTENUATION (DIMMER) Selectionnez les appareils que vous voulez contrôler Appuyez sur la touche DIMMER Sélectionnez une valeur d’atténuation en utilisant les touches 1~12, ou utilisez le curseur X-Fade/Value Vous pouvez régler la valeur d’atténuation des appareils entre 0%~100% Les réglages d’atténuation sont les suivants: 1 2 3 4 5 Dimmer 100% 90% 82% 74% 64% 6 7 8 9 10 11 12 55% 46% 37% 28% 19% 10% 0% REGLAGE FOCUS Selectionnez les appareils que vous voulez contrôler Appuyez sur la touche FOCUS Sélectionnez une valeur focale en utilisant les touches 1~12, ou utilisez le curseur X-Fade/Value Pour sélectionner une valeur focale 13~24, appuyez à nouveau sur FOCUS pour aller vers la page suivante ; le LED du dessous sera allumé. 11 12 Light Red UV Light Green Amber Red + Blue Purple Green + Blue Orange 18 19 20 21 22 23 24 Scroll Scroll Scroll Scroll Scroll Scroll Fast 1 2 3 4 5 6 scroll iLEAD Controller JB SYSTEMS® 24/71 iLEAD Controller FRANÇAIS MODE D’EMPLOI CREEZ UNE SCENE 1. Entrez dans Program mode. 2. a) appuyez sur les touches Scanners pour choisir les appareils que vous voulez contrôler b) Utilisez le Joystick ou les curseurs pour localiser les positions pan/tilt afin de créer une scène. 3. Appuyez sur SAVE. Les touches 1~12 s’allumeront si des données ont déjà été sauvés en eux. 4. Appuyez sur une touche pour enregistrer votre scène. 5. La scène est sauvegardée dans la touche que vous avez sélectionnée. FRANÇAIS MODE D’EMPLOI Remarque: La touche SAVE est utilisée pour enregistrer la condition actuelle dans la mémoire. La touche PAGE est utilisée pour sélectionner la position de la mémoire. Le contrôleur possède 24 positions dans lesquels vous pouvez enregistrer des programmes chenillard (shows). Quand le LED du dessus est allumé, la touche 1 = mémoire 1, touche 2 = mémoire 2… etc, quand le LED du dessous est allumé, la touche 1 = mémoire 13, touche 2 = mémoire 14… etc. La touche MEMORY est utilisée pour lire les scènes existantes. Les LEDs s’allumeront si il y à une mémoire enregistrée dans les touches. INSERER UNE SCENE 1. Entrez dans Program mode. 2. Appuyez sur la touche MEMORY, choisissez la position souhaitée (1 ~ 24) dans laquelle vous voulez insérer la scène. 3. Sélectionnez la scène ou vous voulez insérer une scène. Appuyez plusieurs fois sur la touche, afin de visionner les scènes une à une. 4. Créez une nouvelle scène. 5. Appuyez sur SAVE. 6. En appuyant sur Page, vous pouvez également enregistrer des scènes dans les touches 13~24. 6. Appuyez sur la position désirée (1~24) que vous avez à nouveau sélectionné pour insérer la nouvelle scène. CREEZ UN PROGRAMME CHENILLARD (CHASE) 1. Entrez dans Program mode. 2. Créez une scène. 3. Appuyez sur la touche SAVE. Sélectionnez une position (1 ~ 24) ou vous voulez enregistrer la scène. 4. Répétez les pas 2 & 3 autant de fois que vous le souhaitez jusqu’à ce que la mémoire du contrôleur soit pleine. Le LED SAVE clignotera quand la mémoire est pleine. 5. Un programme chenillard (Le contrôleur) peut enregistrer jusqu’à 485 scènes. ECRASER UNE SCENE 1. Entrez dans Program mode. 2. Appuyez sur la touche MEMORY. 3. Appuyez sur la touche (1 ~ 24) ou la mémoire ( chase ) est sauvegardée et sélectionnez la scène que vous voulez écraser. 4. Appuyez plusieurs fois sur la touche ( e.g. 6 ), afin de visionner les scènes une à une. EXECUTER LES SCENES 1. Entrez dans Program mode. 5. Créez la scène désirée. 6. Tenez la touche SAVE enfoncée, puis appuyez sur la touche sélectionnée précédemment (1 ~ 24) afin d’écraser une scène. 2. Appuyez sur la touche MEMORY. 3. Appuyez sur une touche 1~12 ou appuyez sur PAGE pour sélectionner les touches 13~24 afin d’exécuter les scènes manuellement. 4. Appuyez à nouveau sur la même touche. La deuxième scène sera exécutée après la première. JB SYSTEMS® 25/71 iLEAD Controller SUPPRIMER UNE SCENE 1. Entrez dans Program mode. 2. Appuyez sur la touche MEMORY, choisissez la position désirée (1~24) dans laquelle vous voulez supprimer une scène. 3. Sélectionnez la scène que vous voulez supprimer. JB SYSTEMS® 26/71 iLEAD Controller FRANÇAIS MODE D’EMPLOI FRANÇAIS MODE D’EMPLOI 4. Tenez la touche CANCEL enfoncée, puis appuyez sur la touche sélectionnée précédemment pour supprimer la scène. 2. Appuyez sur AUTO/SOUND/MIDI pour activer le mode Auto, Sound ou MIDI. Les LEDs indiqueront quel mode est activé. 3. Appuyez sur la touche (1 ~ 24) pour exécuter un light show. COPIER UN PROGRAMME CHASE 1. Entrez dans Program mode. 2. Appuyez sur la touche MEMORY. 3. Sélectionnez un programme chase existant que vous voulez copier. 4. Tenez la touche PAGE enfoncée, puis appuyez sur une touche (1 ~ 24) dans laquelle vous voulez copier le programme chase. SUPPRIMER UN PROGRAMME CHASE 1. Entrez dans Program mode. 2. Appuyez sur la touche MEMORY. 3. Tenez la touche MEMORY enfoncée, puis appuyez sur une touche 1~12 ou appuyez sur PAGE pour sélectionner une touche 13-24 afin de supprimer un programme chase. VIDER LA MEMOIRE 1. Appuyez pendant 3 secondes sur la touche BLACKOUT/STAND ALONE, en mode Stand-Alone. 2. Tenez la touche MEMORY enfoncée, puis appuyez sur la touche BLACKOUT / STAND ALONE, la mémoire compète sera supprimée. LIGHT SHOW 1. Appuyez sur la touche LIGHT SHOW. Le LED LIGHT SHOW s’allumera, indiquant que le mode light show est activé. JB SYSTEMS® 27/71 iLEAD Controller En « Auto mode », vous pouvez régler la vitesse et le temps de transition en utilisant les curseurs. Ces réglages seront gardés en mémoire pour quand vous exécuterez le même light show une prochaine fois. Activé en « Sound mode », le Light show sera commandé par la musique, cependant, vous pouvez toujours régler le temps de transition du light show. CONTRÔLE MANUEL (OVERRIDE) Pendant qu’un light show est exécuté, vous pouvez appuyer sur la touche Override pour contrôler manuellement un appareil, le LED s’allume pour indiquer que la fonction Override est activée. Appuyez sur les touches “ Scanners “ pour sélectionner les appareils que vous voulez contrôler manuellement. FONCTIONNEMENT MIDI Vous pouvez exécuter un programme chase, régler la vitesse et le temps de transition, light show automatique ou commandé par la musique, et black out en utilisant des commandes MIDI. Ceci vous permet de pré programmer un light show en harmonie avec une piste de séquenceur. Vous ne pouvez pas exécuter des shows manuels live ou des fonctions de programmation par MIDI. Le contrôleur ne répondra qu’aux commandes MIDI par le canal MIDI pour lequel il a été programmé. Toutes les commandes MIDI se font en utilisant des Notes. Toutes autres instructions MIDI sont ignorées. Pour arrêter un programme chenillard, envoyez la note du black out. Quand vous programmez une séquence qui vas être contrôlé par MIDI, vous devriez toujours commencer par envoyer une commande de page, puis-ce que vous ne savez pas quel réglage de page sera actif dans le contrôleur au moment opportun. Quand vous rappelez un programme chase par MIDI, le programme chase sera exécuté selon la vitesse, l’atténuation et l’activation par la musique préprogrammée. Si vous voulez changer la vitesse, l’atténuation et l’activation par la musique par commande MIDI vous devez le faire après avoir démarré le programme chase (chenillard). Les réglages de vitesse, d’atténuation et d’activation par la musique que vous avez réglés par MIDI ne seront pas retenues comme faisant partie du programme chase. Note MIDI 36 37 38 39 40 41 42 43 48 49 50 51 JB SYSTEMS® Nom de la Note C3 C#3 D3 D#3 E3 F3 F#3 G3 C4 C#4 D4 D#4 28/71 Fonction Chase 1 Chase 2 Chase 3 Chase 4 Chase 5 Chase 6 Chase 7 Chase 8 Chase 9 Chase 10 Chase 11 Chase 12 iLEAD Controller FRANÇAIS MODE D’EMPLOI 52 53 54 55 56 57 58 59 60 61 62 63 74 75 76 77 78 79 E4 F4 F#4 G4 G#4 A4 A#4 B4 C5 C#5 D5 D#5 D6 D#6 E6 F6 F#6 G6 Chase 13 Chase 14 Chase 15 Chase 16 Chase 17 Chase 18 Chase 19 Chase 20 Chase 21 Chase 22 Chase 23 Chase 24 SPEED X-FADE AUTO MODE SOUND MODE BLACKOUT ON BLACKOUT OFF ENTRETIEN L’appareil doit être nettoyé régulièrement à l’aide d’un chiffon humide. Nous vous recommandons de faire nettoyer l’intérieur de l’appareil par des personnes qualifiées. CARACTERISTIQUES Alimentation: Entrée DMX: Sortie DMX: Stand Alone: Signal MIDI: Entrée Audio: Dimensions: Poids: DC 9-12V 300 mA min 3 pin XLR male 3 pin XLR femelle 5 pin XLR male 5 pin interface standard Par micro incorporé ou entrée ligne 485 x 135 x 80 mm 2.5 kg Chacune de ces informations peut être modifiée sans avertissement préalable. Vous pouvez télécharger la dernière version de ce mode d’emploi de notre site Web: www.beglec.com NEDERLANDS GEBRUIKSAANWIJZING GEBRUIKSAANWIJZING ® Wij danken u voor de aankoop van dit JB Systems product. Om voordeel te halen uit alle mogelijkheden die dit toestel biedt, raden wij U aan deze handleiding zeer aandachtig te lezen. EIGENSCHAPPEN In dit apparaat is radio-interferentie onderdrukt. Dit product voldoet aan de gangbare Europese en nationale voorschriften. Het is vastgesteld dat het apparaat er zich aan houdt en de desbetreffende verklaringen en documenten zijn door de fabrikant afgegeven. Standaard 19-inch rack montage Stuurt tot 192 DMX kanalen Stuurt 24 scanners met maximum 8 DMX kanalen per toestel. 12 preset bewegingen voor een onmiddellijke showbewerking Stel de DMX adressen van de toestellen (iRock, iShow, en iMove) in via de controller Geheugen voor 24 chases tot 485 scènes; elke chase met een onbegrensd aantal scènes, tot het geheugen van de controller vol is 2 schuifregelaars ( SPEED, XFADE/VALUE ) voor een manuele controle Auto program (scènes en chases) wordt gecontroleerd door de Speed en X-Fade schuifregelaars Controle van de Scanners door middel van de Pan/Tilt joystick of de Speed en X-Fade schuifregelaars Pan/Tilt joystick met fijnregeling Black-out functie De Override functie biedt u de volledige controle over de geselecteerde toestellen Ingebouwde microfoon of ( Audio ) line ingang voor muzieksturing MIDI controle over Chases, Blackout, Sound, Auto, Speed en X-Fade Stroomonderbrekinggeheugen 2 extra gemakkelijke controllers zijn ingebouwd, voor het onmiddellijk uitvoeren van voorgeprogrammeerde shows Controletoets voor rookmachine met “Heating” en “Ready” LEDs Strobe controletoets met regelbare snelheid VÓÓR GEBRUIK Controleer de inhoud: Kijk na of de verpakking volgende onderdelen bevat: iLEAD Controller AC/DC voedingsadapter Gebruiksaanwijzing Enkele belangrijke instructies: Stel dit toestel nooit bloot aan regen of vocht, dit om brand en elektrocutie te voorkomen. Maak het toestel nooit open, dit om elektrocutie te vermijden. Contacteer uw dealer indien er zich een probleem moest voordoen. Plaats nooit metalen voorwerpen en mors geen vloeistoffen in het toestel. Elektrocutie of een slechte werking kan hiervan het gevolg zijn. Vermijd het toestel te gebruiken in stoffige omgevingen en reinig het toestel regelmatig. JB SYSTEMS® 29/71 iLEAD Controller JB SYSTEMS® 30/71 iLEAD Controller NEDERLANDS GEBRUIKSAANWIJZING VEILIGHEIDSVOORSCHRIFTEN: NEDERLANDS GEBRUIKSAANWIJZING FUNCTIES (VOORKANT) WAARSCHUWING: Om het risico op elektrocutie zoveel mogelijk te CAUTION vermijden mag u nooit de behuizing verwijderen. Er bevinden zich geen onderdelen in het toestel die u zelf kan herstellen. Laat de herstellingen enkel uitvoeren door een bevoegde technicus. De bliksempijl die zich in een gelijkbenige driehoek bevindt is bedoeld om u te wijzen op het gebruik of de aanwezigheid van niet-geïsoleerde onderdelen met een “gevaarlijke spanning” in het toestel die voldoende kracht heeft om een risico van elektrocutie in te houden. Het uitroepteken binnen de gelijkbenige driehoek is bedoeld om de gebruiker erop te wijzen dat er in de meegeleverde literatuur belangrijke gebruik en onderhoudsinstructies vermeld staan betreffende dit onderdeel. Dit symbool betekent: het apparaat mag enkel binnenhuis worden gebruikt. Dit symbool betekent: Lees de handleiding! Stel dit apparaat niet bloot aan regen of vocht, dit om het risico op brand en elektrische schokken te voorkomen. Om de vorming van condensatie binnenin te voorkomen, laat het apparaat aan de omgevingstemperatuur wennen wanneer het, na het transport, naar een warm vertrek is overgebracht. Condensatie kan het toestel soms verhinderen perfect te functioneren. Het kan soms zelfs schade aan het apparaat toebrengen. Gebruik dit apparaat uitsluitend binnenshuis. Plaats geen stukken metaal en mors geen vocht binnen in het toestel om elektrische schokken of storing te vermijden. Objecten gevuld met water, zoals bvb. Vazen, mogen op dit apparaat worden geplaatst. Indien er toch een vreemd voorwerp of water in het apparaat geraakt, moet U het direct van het lichtnet afkoppelen. Open vuur, zoals brandende kaarsen, mogen niet op het apparaat geplaatst worden. Bedek geen enkele ventilatieopening om oververhitting te vermijden. Zorg dat het toestel niet in een stoffige omgeving wordt gebruikt en maak het regelmatig schoon. Houd het apparaat uit de buurt van kinderen. Dit apparaat mag niet door onervaren personen bediend worden. De maximum veilige omgevingstemperatuur is 40°C. Gebruik het apparaat dus niet bij hogere temperaturen. Trek altijd de stekker uit wanneer het apparaat gedurende langere tijd niet wordt gebruikt of alvorens met de onderhoudsbeurt te beginnen. De elektrische installatie behoort uitsluitend uitgevoerd te worden door bevoegd personeel, volgens de in uw land geldende regels betreffende elektrische en mechanische veiligheid. Controleer dat de beschikbare spanning niet hoger is dan die aangegeven op de achterzijde van het toestel. Het stopcontact zal steeds vrij toegankelijk blijven zodat de stroomkabel op elk moment kan worden uitgetrokken. De elektrische kabel behoort altijd in uitstekende staat te zijn. Zet het apparaat onmiddellijk af als de elektrische kabel gekneusd of beschadigd is. Laat de elektrische draad nooit in contact komen met andere draden. Om elektrische schokken te voorkomen, moet U de behuizing niet openen. Afgezien van de zekering zitten er geen onderdelen in die door de gebruiker moeten worden onderhouden. Repareer nooit een zekering en overbrug de zekeringhouder nooit. Vervang een beschadigde zekering steeds door een zekering van hetzelfde type en met dezelfde elektrische kenmerken. Ingeval van ernstige problemen met het bedienen van het toestel, stopt U onmiddellijk het gebruik ervan. Contacteer uw dealer voor een eventuele reparatie. Gebruik best de originele verpakking als het toestel vervoerd moet worden. Om veiligheidsredenen is het verboden om ongeautoriseerde modificaties aan het toestel aan te brengen. 1. 2. 3. 4. 5. 6. 7. 8. 9. 10. 11. 12. 13. 14. 15. 16. 17. 18. 19. 20. 21. 22. 23. 24. JB SYSTEMS® 31/71 iLEAD Controller Scanners: om één of meerdere toestellen te selecteren. Movement: om de pan & tilt beweging te selecteren/in te stellen. Shutter: om de stroboscoopsnelheid, het shaking effect en “open” in te stellen. Gobo: om de gobo te kiezen. Color: om de kleur te kiezen. Rotation: om de rotatiesnelheid en rotatierichting in te stellen. Dimmer: om de intensiteit van de dimmer in te stellen. Focus: om de gepaste focus in te stellen. Page/ Copy: om geheugen 1~12 of 13~24 te kiezen of om het kopiëren van het geheugen te activeren. Memory: om bestaande scènes te bewerken of om een chase te wissen. Cancel: om een scène te wissen. Save: om een scène op te slaan, in te lassen of te overschrijven. Auto/Sound/Midi: om de Auto/Sound/Midi modus te kiezen. Light show: om een Light Show te laten lopen. Blackout/Stand Alone: om de Program/Blackout/Stand Alone modus te kiezen. Fog: om een rookmachine te activeren. Strobe: om een stroboscoop zonder DMX te activeren. Houd de Strobe toets ingedrukt en druk op één van de 1 ~ 12 toetsen om de snelheid van de stroboscoop te veranderen. X-Fade: controle met 2 verschillende functies: Om de fade tijd in te stellen tijdens het lopen van Light shows. De Fade tijd is de tijd die de scanner (of scanners) nodig heeft om van een positie naar een andere positie te bewegen. Om de tilt positie van de Scanners in te stellen tijdens het programmeren of om het tilt bewegingsbereik van de Movement functie in te stellen, of om een DMX waarde 0~255 in te stellen voor de kanalen van de Shutter/Gobo/ Kleur/Rotatie/Dimmer/Focus. Speed ( wachttijd ) controle met 2 verschillende functies: Om de chase snelheid in te stellen ( wachttijd tussen 2 scènes ) binnen een bereik van 0.1 seconde tot 5 minuten, tijdens light shows. De fade tijd van de scènes zal altijd volledig uitgevoerd worden, de Speed schuifregelaar bepaald de wachttijd (intervaltijd) tussen scènes. Om de pan positie van de Scanners in te stellen of om het pan bewegingsbereik van de Movement functie in te stellen tijdens het programmeren. Fine: om de pan of tilt beweging van een toestel te controleren op een zeer precieze manier (fijnregeling). Druk op de joystick om de Fine functie te activeren, druk weer op de joystick om deze functie uit te schakelen. Override: om één of meerdere toestellen manueel te bedienen tijdens een show. Toets(1-24): regel de DMX waarde 0~255 voor de kanalen van de Shutter / Gobo / Kleur / Rotatie / Dimmer / Focus, of sla 24 geheugens op in de toetsen. Stand alone: 2 extra gemakkelijke ingebouwde controllers voor het onmiddellijk uitvoeren van voorgeprogrammeerde light shows van het type Master/Slave. Program Mode: activeer Program mode door op de Blackout/Stand Alone toets te drukken. Wanneer de LED boven de toets uit is, is hij in Program mode. JB SYSTEMS® 32/71 iLEAD Controller NEDERLANDS GEBRUIKSAANWIJZING FUNCTIES (achterkant) NEDERLANDS GEBRUIKSAANWIJZING HOE GEBRUIKEN U kunt gemakkelijk de pan, tilt, shutter, gobo, kleur, rotatie, dimmer en focus functie van de toestellen controleren door op de gepaste toetsen van het bedieningspaneel te drukken. Door middel van de joystick/ schuifregelaars, kunt u zeer snel de Pan of Tilt positie van de toestellen instellen om scènes te maken. U kunt dan al deze scènes stapsgewijs opslaan in een geheugen om een chase (show) te maken. De controller laat u toe 24 chases te programmeren met maximum 485 programmeerbare scènes. 1. POWER: aan/uit zetten van het toestel. 2. DC INPUT: ingang voor de voedingsadapter DC 9 ~12V, 300mA min. 3. FOG MACHINE: 5 pin din aansluiting voor het aansluiten van een DC rookmachine Diagram rookmachine PROGRAM MODE Wanneer het toestel aangezet wordt start de controller automatisch in Program mode. De LED boven deze toets gaat uit, wat betekent dat de Program functie actief is. BLACK-OUT MODE Druk op de BLACKOUT/STAND ALONE toets, de LED boven deze toets gaat aan, wat betekent dat de Black-out functie actief is. 4. 5. 6. 7. 8. STROBE: controle voor een stroboscoop zonder DMX. Signaal= +12V DC. AUDIO Ingang: line ingang voor muzieksturing (kan ook via ingebouwde microfoon). MIDI IN: ingang om MIDI signalen te ontvangen. DMX IN: deze aansluiting ontvangt DMX singnalen. DMX OUT: twee aansluitingen zenden DMX signalen naar DMX toestellen, gebruik 3 pins XLR kabels om de toestellen met elkaar te verbinden. 9. STAND ALONE: de aansluitingen worden enkel gebruikt voor de master/slave modus, door middel van een 5 pins XLR/jack voor het eerste toestel. U zult merken dat de afstandbediening van het eerste toestel alle andere toestellen controleert voor wat de Stand-by, de Functie en werkmodus betreft. STAND ALONE MODE Houd de BLACKOUT/STAND ALONE gedurende 3 seconden ingedrukt, de LED boven deze toets gaat knipperen, wat betekent dat de Stand-Alone functie actief is. De Stand Alone 1 en Stand Alone 2 zijn ontworpen voor de iSolution lichteffecten in Stand Alone ( Master/ Slave ) mode. Stand By: om de lichteffecten in black-out te zetten. Mode: verschillende werkmodi, snel / traag, audio / manueel / auto, positie, enz., stemmen overeen met verschillende functies. Function: omvat een brede waaier effecten, zoals, strobe, X/Y bewegingspatronen, gobo/ kleur wisseling, X/Y positie instelling, dimmer, enz. De functies variëren van toestel tot toestel. Verschillende toestellen hebben verschillende werkmodi en verschillende functies, welke u kunt benutten via de Stand Alone werkmodus. Gelieve de gebruiksaanwijzing van elk toestel te raadplegen voor meer details. JB SYSTEMS® 33/71 iLEAD Controller JB SYSTEMS® 34/71 iLEAD Controller NEDERLANDS GEBRUIKSAANWIJZING HET DMX ADRES VAN OP AFSTAND INSTELLEN Houd de BLACKOUT/STAND ALONE toets gedurende 3 seconden ingedrukt om naar de Stand-Alone mode over te gaan. Houd de SCANNERS toets ingedrukt en druk dan op de BLACKOUT/ STAND ALONE toets. U zult merken dat de pan & tilt van alle toestellen in de keten in een centrale positie zullen stoppen. De shutter van het eerste toestel zal open zijn en de LED zal knipperen, wat aangeeft dat het toestel actief is, klaar om een nieuwe positie ( het nummer in de keten ) toegewezen te krijgen. Als u over 2 ketens in uw opstelling beschikt, dan kunt u de joystick naar links of naar rechts bewegen om keten 1 of keten 2 te kiezen, of de joystick naar boven of naar beneden bewegen om het volgende of het vorige toestel te kiezen. Kies een toets 1~12 om het DMX adres in te stellen. Druk op SCANNERS om eventueel op de volgende pagina toets 13~24 te kiezen als nieuw DMX adres. Druk weer op de BLACKOUT/STAND ALONE toets om terug naar program mode over te gaan. Fixtures No. (toestel) DMX channel for Moving Head Scanner Barrel Color changer Multi-Gobo projector 1 2 3 4 5 6 7 8 9 10 11 12 1 9 17 25 33 41 49 57 65 73 81 89 3 11 19 27 35 43 51 59 67 75 83 91 Fixtures No. (toestel) DMX channel for Moving Head Scanner Barrel Color changer Multi-gobo projector 13 14 15 16 17 18 19 20 21 22 23 24 97 105 113 121 129 137 145 155 161 169 177 185 99 107 115 123 131 139 147 157 163 171 179 187 JB SYSTEMS® 35/71 iLEAD Controller NEDERLANDS GEBRUIKSAANWIJZING KIES DE TOESTELLEN DIE U WILT BEDIENEN Druk op de SCANNERS toets U kunt één of meerdere toestellen kiezen door op de 1~12 toetsen te drukken Wanneer de LED van de toets ( 1 ~ 12 ) aan is, dan kunt u dit toestel bedienen. Druk op SCANNERS om op de volgende pagina toestel13~24, te kiezen, de onderste LED zal aan zijn. Upper Lower 1 13 2 14 3 15 4 16 5 17 6 18 7 19 8 20 9 21 10 22 11 23 12 24 U zult merken dat de LED van de toets aangaat wanneer u deze selecteert. Wanneer de leds boven de toetsen aan zijn, dan kunt u deze toestellen bedienen door middel van de joystick of controleschuifregelaars. Om uit de bediening van een toestel te stappen moet u gewoon terug op de numerieke toets drukken zodat de LED uit gaat. U kunt verschillende toestellen tegelijkertijd bedienen. Om verschillende toestellen te kiezen moet u gewoon, één voor één, op de toets van elk toestel drukken. PAN/TILT POSITIE INSTELLEN Beweeg de joystick naar links/rechts om de Pan beweging te bedienen, en beweeg hem naar boven/onder om de Tilt beweging te controleren. U kunt hiervoor ook de Speed en X-Fade/Value schuifregelaars gebruiken. BEWEGING INSTELLEN Kies de toestellen die u wilt bedienen Druk op de MOVEMENT toets Kies het gewenste bewegingspatroon door op de 1~12 toetsen te drukken en gebruik de X-Fade/Value schuifregelaar om het bewegingsbereik in te stellen Druk weer op MOVEMENT om terug naar Program mode over te gaan de 12 voorgeprogrammeerde bewegingspatronen zijn: 1 2 3 4 5 6 7 8 9 10 11 12 Movement Tijdens het programmeren kunt u een bewegingspatroon kiezen om een scène te maken. Gebruik de Speed schuifregelaar om het pan bewegingsbereik in te stellen en gebruik de X-Fade/Value schuifregelaar om het tilt bewegingsbereik in te stellen. Gebruik eveneens de Joystick om de positie van de beweging te bepalen. Tijdens een Light show kunt u de Speed schuifregelaar gebruiken om de wachttijd in te stellen binnen een bereik van 0.1 seconde tot 5 minuten, en kunt u de X-Fade /Value schuifregelaar gebruiken om de fade time in te stellen. JB SYSTEMS® 36/71 iLEAD Controller NEDERLANDS GEBRUIKSAANWIJZING NEDERLANDS SHUTTER INSTELLEN Kies de toestellen die u wilt bedienen Druk op de SHUTTER toets Kies een shutter waarde door middel van de 1~12 toetsen, of gebruik de XFade/Value schuifregelaar Om een stroboscoopsnelheid 13~24 te kiezen moet u weer op de SHUTTER toets drukken om naar de volgende pagina over te gaan. De onderste LED zal aan zijn. 24 shutter waarden zijn in de controller geprogrammeerd, welke u kunt kiezen door op de overeenstemmende toets (1 ~ 24) te drukken, zoals hieronder wordt weergegeven: 1 Upper Blackout 13 2 3 Open Slow Strobe 14 15 4 Strobe 1 16 5 Strobe 2 17 6 7 8 9 10 Strobe 3 Strobe 4 Strobe 5 Strobe 6 Strobe 7 18 19 20 21 22 11 KLEUR INSTELLEN Kies de toestellen die u wilt bedienen Druk op de COLOR toets Kies een kleurwaarde door middel van de 1~12 toetsen, of beweeg de XFade/Value schuifregelaar. Om de kleuren 13~24te kiezen moet u weer op de COLOR toets drukken om naar de volgende pagina over te gaan. De onderste LED zal aan zijn. De kleurinstellingen zijn: 12 Strobe Fast 8 Strobe 23 24 9 kleuren (volle kleur) 1 2 De gobo instellingen zijn: 7 Gobos 1 2 3 Gob o 1 13 14 15 Gob Gob Gob Low o o o er 6 6 7 Uppe Ope Ope r n n 4 5 6 7 8 9 10 11 12 Gob Gob Gob Gob Gob Gob Gob Gob Gob o o o o o o o o o 1 2 2 3 3 4 4 5 5 16 17 18 19 20 21 22 23 24 Slow Scro Scrol Scro Scro Scro Scro Scro Fast scrol ll l ll ll ll ll ll scrol l 1 2 3 4 5 6 7 l Lower 1 2 3 4 5 6 7 8 9 10 11 12 Ope Gob Gob Gob Gob Gob Gob Gob Gob Gob Gob Gob n o o o o o o o o o o o 1 2 3 4 5 6 7 8 9 10 11 13 14 15 16 17 18 19 20 21 22 23 24 Gob Gob Gob Slow Scro Scrol Scro Scro Scro Scro Scro Fast Low o o o scrol ll l ll ll ll ll ll scrol er 12 13 14 l 1 2 3 4 5 6 7 l Uppe r JB SYSTEMS® 37/71 iLEAD Controller 4 13 14 15 UV Light Light Purple Green Green 9 kleuren (split color) 1 2 5 3 16 6 17 Slow scroll Pink 4 Green Upper White Green Magenta + Magenta 13 Blue 14 15 UV Purple Light Lower + + Green UV Light Purple Green 11 kleuren (volle kleur) 1 2 Upper White Lower 14 Gobos 3 Upper White White Green Green Magenta Magenta Lower Shaking Shaking Shaking Shaking Shaking Shaking Shaking Shaking Shaking Shaking Shaking Open GOBO INSTELLEN Kies de toestellen die u wilt bedienen Druk op de GOBO toets Kies een gobo waarde door middel van de 1~12 toetsen, of gebruik de XFade/Value schuifregelaar Om de gobos 13~24 te kiezen moet u weer op de GOBO toets drukken om naar de volgende pagina over te gaan. De onderste LED zal aan zijn. GEBRUIKSAANWIJZING White 3 Pink Slow scroll 4 5 3 16 Pink 4 Green Upper White Green + Magenta Magenta 13 14 15 Yellow Lower Orange Yellow + Pink JB SYSTEMS® 5 6 7 8 9 10 11 12 Magenta Light Yellow Orange Light Blue + Yellow Orange Blue + + Light Blue + Orange Blue Blue Yellow 17 18 19 20 21 22 23 24 Scroll Scroll Scroll 1 2 3 Green Magenta Magenta 13 14 15 Light Orange Yellow Green 11 kleuren (split color) 1 2 16 18 Scroll 1 16 Pink 7 8 9 10 11 12 Light Yellow Yellow Orange Orange Blue Blue 19 20 21 22 23 24 Scroll Scroll Scroll Scroll Scroll Fast 2 3 4 5 6 scroll 17 Slow scroll Scroll 4 Scroll 5 Scroll Fast 6 scroll 6 7 8 9 10 11 12 Light UV UV Amber Amber Red Blue Blue Purple Purple 18 19 20 21 22 23 24 Scroll Scroll Scroll Scroll Scroll Scroll Fast 1 2 3 4 5 6 scroll 5 Light Blue 17 6 7 Amber Red 18 19 8 9 10 11 12 Light Red UV Light Green + Blue Purple Green + Blue Orange 20 21 22 23 24 Scroll Scroll Scroll Scroll Scroll Scroll Slow scroll 1 2 3 4 5 6 38/71 Fast scroll iLEAD Controller NEDERLANDS GEBRUIKSAANWIJZING GOBO ROTATIE INSTELLEN NEDERLANDS GEBRUIKSAANWIJZING EEN CHASE MAKEN 1. Ga over naar Program mode. 2. Maak een scène. 3. Druk op de SAVE toets. Kies een positie ( 1 ~ 24 ) waar u de scène wilt opslaan. Kies de toestellen die u wilt bedienen Druk op de ROTATION toets Kies een waarde voor de rotatiesnelheid door middel van de 1~12 toetsen of beweeg de X-Fade/Value schuifregelaar 4. Herhaal de stappen 2 & 3 zo veel als u maar wilt tot het geheugen van de controller vol is. De SAVE LED zal knipperen als het geheugen vol is. 5. Een chase (de controller ) kan tot 485 scènes opslaan. Hieronder vindt u de instellingen voor de gobo rotatie: ( CCW- tegenwijzerzin; CW- wijzerzin ) 1 2 3 4 5 6 7 8 9 10 11 12 Fast CCW. CCW. CCW. Slow Slow CW. CW. CW. Fast Rotatie Stop CCW Speed Speed Speed CCW. CW. Speed Speed Speed CW. Stop Speed 1 2 3 Speed Speed 3 2 1 Speed SCÈNES LATEN LOPEN DIMMER INSTELLEN Kies de toestellen die u wilt bedienen Druk op de DIMMER toets Kies een dimmerwaarde door middel van de 1~12 toetsen of beweeg de XFade/Value schuifregelaar U kunt de dimmerwaarde van de toestellen regelen tussen 0%~100% De dimmerinstellingen zijn: 1 2 Dimmer 100% 90% 1. Ga over naar Program mode. 2. Druk op de MEMORY toets. 3 4 5 6 7 8 9 10 11 12 82% 74% 64% 55% 46% 37% 28% 19% 10% 0% FOCUS INSTELLEN Kies de toestellen die u wilt bedienen Druk op de FOCUS toets Kies een focuswaarde door middel van de 1~12 toetsen of beweeg de XFade/Value schuifregelaar Om focus 13~24 te kiezen moet u weer op de FOCUS toets drukken om naar de volgende pagina over te gaan. De onderste LED zal aan zijn. EEN SCÈNE MAKEN 1. Ga over naar Program mode. 2. a) druk op de Scanners toetsen om de toestellen te kiezen die u wilt bedienen b) gebruik de Joystick of schuifregelaars om de pan/tilt positie te bepalen voor het maken van een scène. 3. Druk op een toets 1~12 of druk op PAGE om een toets 13~24 te kiezen en zo een scène manueel te laten lopen. 4. Druk weer op dezelfde toets. De tweede scène zal uitgevoerd worden na de eerste scène. Opmerking: De SAVE toets wordt gebruikt om de huidige status op te slaan in het geheugen. De PAGE toets wordt gebruikt om de posities van het geheugen te bepalen. De controller beschikt over 24 posities waarin u chases ( shows ) kan opslaan. Wanneer de bovenste LED aan is, dan is toets 1 = geheugen 1, toets 2 = geheugen 2… enz, wanneer de onderste LED aan is, dan is toets 1 = geheugen 13, toets 2 = geheugen 14… enz. De MEMORY toets wordt gebruikt om bestaande scènes te lezen. De LEDs zullen aangaan als er een geheugen is opgenomen in de toetsen. EEN SCÈNE INLASSEN 1. Ga over naar Program mode. 2. Druk op de MEMORY toets, kies de gewenste positie (1 ~ 24) waar u de scène wilt inlassen. 3. Kies de scène waar u een scène wilt inlassen. Druk verschillende keren op dezelfde toets om de scènes één voor één te bekijken. 4. Maak een nieuwe scène. 5. Druk op SAVE. 3. Druk op SAVE. De toetsen 1~12 zullen aan gaan als er al een geheugen in werd opgeslagen. 6. Druk op de gewenste positie ( 1~24 ) die u weer hebt geselecteerd om de nieuwe scène in te lassen. 4. Druk op een toets om de gewenste scène op te slaan. 5. De scène is opgenomen in de geselecteerde toets. 6. Door op Page te drukken kunt u ook scènes opslaan in de toetsen 13~24. EEN SCÈNE OVERSCHRIJVEN 1. Ga over naar Program mode. 2. Druk op de MEMORY toets. JB SYSTEMS® 39/71 iLEAD Controller JB SYSTEMS® 40/71 iLEAD Controller NEDERLANDS GEBRUIKSAANWIJZING 3. Druk op de toets (1 ~ 24) waar het geheugen ( chase ) is opgenomen en kies de scène die u wilt overschrijven. 4. Druk meerdere malen op dezelfde toets, zo kunt u de scènes één voor één bekijken. NEDERLANDS WIS HET VOLLEDIGE GEHEUGEN 1. Druk gedurende 3 seconden op de BLACKOUT/STAND ALONE toets, in de Stand-Alone modus. 5. Maak de gewenste scène. 6. Houd de SAVE toets ingedrukt en druk dan op de toets (1 ~ 24) die u voordien gekozen had om de scène te overschrijven. EEN SCÈNE WISSEN 1. Ga over naar Program mode. 2. Druk op de MEMORY toets, kies de gewenste positie (1~24) waarin u een scène wilt wissen. 3. Selecteer de scène die u wilt wissen. GEBRUIKSAANWIJZING 2. Houd de MEMORY toets ingedrukt en druk daarna op de BLACKOUT / STAND ALONE toets, het volledige geheugen zal gewist worden. LIGHT SHOW 1. Druk op de LIGHT SHOW toets. De LIGHT SHOW LED zal aan gaan, wat betekent dat de light show mode actief is. 2. Druk op AUTO/SOUND/MIDI om de Auto, Sound of MIDI werkmodus te kiezen. De LEDs duiden aan welke werkmodus is ingeschakeld. 4. Houd de CANCEL toets ingedrukt en druk dan op de toets die u voordien gekozen had om een scène te wissen. 3. Druk op een toets ( 1 ~ 24 ) om de gewenste light show te laten lopen. EEN CHASE KOPIËREN 1. Ga over naar Program mode. 2. Druk op de MEMORY toets. In Auto mode kunt u de snelheid en fade time instellen door middel van de schuifregelaars. Deze instellingen zullen bewaard worden voor wanneer u dezelfde light show een volgende keer gebruikt. In Sound mode zal de Light show gestuurd worden door de muziek, hoewel u steeds de fade time van de light show kunt instellen. 3. Kies een bestaande chase welke u wilt kopiëren. OVERRIDE CONTROL 4. Houd de PAGE toets ingedrukt en druk dan op een toets(1 ~ 24) waarin u de chase wilt kopiëren. EEN CHASE WISSEN 4. Ga over naar Program mode. 5. Druk op de MEMORY toets. 6. Houd de MEMORY ingedrukt en druk dan op een 1~12 toets of druk op PAGE om een13-24 toets te kiezen, om een chase te wissen. JB SYSTEMS® 41/71 iLEAD Controller Tijdens het lopen van light shows kunt u op de Override toets drukken om een toestel manueel te bedienen, de LED gaat aan, wat betekent dat de Override functie ingeschakeld is. Druk op de “Scanners“ toets om de toestellen te kiezen die u manueel wilt bedienen. MIDI WERKING U kunt een chase laten lopen, de snelheid en de fade time instellen, de light show automatisch of muziekgestuurd laten lopen en de black-out functie kiezen door middel van MIDI signalen. Dit laat u toe een light show te programmeren die zal samenlopen met een sequencerspoor. Het is niet mogelijk om manueel te werken of functies te programmeren via MIDI. De controller zal enkel reageren op MIDI bevelen via het ingestelde MIDI kanaal. De MIDI controle wordt uitgevoerd door muzieknotennummers. Alle andere MIDI instructies worden genegeerd. Om een chase te stoppen moet u de black-out noot doorsturen. Wanneer u een MIDI gestuurde sequentie programmeert, dan moet u steeds beginnen met het verzenden van een pagina commando, aangezien u niet op voorhand weet welke pagina in gebruik zal zijn. Wanneer u via MIDI een chase terug oproept, dan zal deze lopen volgens zijn geprogrammeerde snelheid, fade en geluidsactivering regelingen. Als u de snelheid, fade en geluidsactivering wilt regelen via MIDI commando, dan moet u dit doen nadat u de chase gestart heeft. De snelheid, fade en geluidsregeling welke u regelt via MIDI worden niet onthouden als deel uitmakend van de chase. JB SYSTEMS® 42/71 iLEAD Controller NEDERLANDS MIDI note 36 37 38 39 40 41 42 43 48 49 50 51 52 53 54 55 56 57 58 59 60 61 62 63 74 75 76 77 78 79 GEBRUIKSAANWIJZING Note name C3 C#3 D3 D#3 E3 F3 F#3 G3 C4 C#4 D4 D#4 E4 F4 F#4 G4 G#4 A4 A#4 B4 C5 C#5 D5 D#5 D6 D#6 E6 F6 F#6 G6 Function Chase 1 Chase 2 Chase 3 Chase 4 Chase 5 Chase 6 Chase 7 Chase 8 Chase 9 Chase 10 Chase 11 Chase 12 Chase 13 Chase 14 Chase 15 Chase 16 Chase 17 Chase 18 Chase 19 Chase 20 Chase 21 Chase 22 Chase 23 Chase 24 SPEED X-FADE AUTO MODE SOUND MODE BLACKOUT ON BLACKOUT OFF ONDERHOUD Reinig regelmatig het toestel door middel van een vochtig doek. Laat het reinigen van het binnenwerk van het toestel steeds uitvoeren door bevoegde personen. EIGENSCHAPPEN Voedingsingang: DMX Ingang: DMX Uitgang: Stand Alone: MIDI Signaal: Audio Ingang: Afmetingen: Gewicht: DC 9-12V 300 mA min mannelijke 3 pins XLR vrouwelijke 3 pins XLR mannelijke 5 pins XLR 5 pins standaard interface via ingebouwde microfoon of line ingang 485 x 135 x 80 mm 2.5 kg DEUTSCH BEDIENUNGSANLEITUNG BEDIENUNGSANLEITUNG ® Danke für den Kauf dieses JB Systems Produkts. Um die Vorteile aller Funktionen vollständig nutzen zu können, lesen Sie diese Bedienungsanleitung bitte sorgfältig. EIGENSCHAFTEN Standard 19” Einbaugerät Bis zu 192 DMX Kanäle steuerbar Für 24 Scanner mit bis zu 8 DMX Kanälen steuerbar. 12 vorprogramierte Bewegungsabläufe Set lights’ ( iRock, iShow, und iMove ) DMX Adresse durch den Controller übertragbar Speicher mit 24 Chaser mit bis zu 485 Szenen 2 Fader (SPEED, XFADE/VALUE) für manuelle Steuerung Automatik Programm (Szenen und Chaser) steuerbar über Speed- und X-Fader- Schieberegler Scanner Pan/Tilt Ansteuerung über Joystick oder Speed und X-Fade Schieberegler Pan/Tilt Joystick mit Feinjustierung Blackout Funktion Die Override-Funktion ermöglicht die gesamte Kontrolle über die ausgewählten Effekte Eingebautes Mikrofon oder Line Eingang für Musikansteuerung MIDI Funktion über Chaser, Blackout, Sound, Auto, Speed and X-Fade Stromausfallsspeicher 2 integrierte extra Controller für unmittelbare vorprogrammierte Shows Nebelmaschine Taster mit “Heizen” and “Ready” LED Anzeige Strobe-Taster mit regelbarer Geschwindigkeit VOR DEM GEBRAUCH Inhalt überprüfen: Überprüfen Sie, ob der Karton folgende Teile beinhaltet: Steuerung iSolution IL-0824 AC/DC Adapter Bedienungsanleitung Wichtige Hinweise: Um Feuer oder Elektroschlägen vorzubeugen, setzten Sie das Gerät nicht Regen oder Feuchtigkeit aus. Um Stromschläge zu vermeiden, öffnen Sie das Gehäuse nicht eigenständig. Sollte ein Problem auftauchen, wenden Sie sich an den Händler. Legen Sie keine magnetischen Metallgegenstände auf das Gerät und lassen Sie keine Flüssigkeit ins Innere kommen, um Stromschläge und Funktionsstörungen zu vermeiden. Vermeiden Sie den Gebrauch in staubigen Umgebungen und reinigen Sie das Gerät regelmäßig. Elke inlichting kan veranderen zonder waarschuwing vooraf. U kan de laatste versie van deze handleiding downloaden via onze website: www.beglec.com JB SYSTEMS® 43/71 iLEAD Controller JB SYSTEMS® 44/71 iLEAD Controller DEUTSCH BEDIENUNGSANLEITUNG SICHERHEITSHINWEISE DEUTSCH BEDIENUNGSANLEITUNG FUNCTIONS (FRONT) ACHTUNG: Um sich nicht der Gefahr eines elektrischen Schlags auszusetzen, entfernen Sie keines der Gehäuseteile. Im Geräteinneren befinden sich keine vom Benutzer reparierbaren Teile. Überlassen Sie Reparaturen dem qualifizierten Kundendienst. Das Blitzsymbol im Dreieck weist den Benutzer darauf hin, dass eine Berührungsgefahr mit nicht isolierten Teilen im Geräteinneren, welche eine gefährliche Spannung führen, besteht. Die Spannung ist so hoch, dass hier die Gefahr eines elektrischen Schlages besteht. Das Ausrufezeichen im Dreieck weist den Benutzer auf wichtige Bedienungs- und Wartungshinweise in den Dokumenten hin, die dem Gerät beiliegen. CAUTION Dieses Symbol bedeutet: Nur innerhalb von Räumen verwenden. Dieses Symbol bedeutet: Achtung! Bedienungsanleitung lesen! Zur Vermeidung von Stromschlag oder Feuer, Gerät bitte nicht Regen oder Feuchtigkeit aussetzen. Zur Vermeidung von Kondensation, lassen sie bitte nach Transport in eine warme Umgebung das Gerät einige Zeit zum Temperaturausgleich stehen. Kondensation kann zu Leistungsverlust des Gerätes oder gar Beschädigung führen. Gerät nicht im Freien und in feuchten Räumen und Umgebungen verwenden. Keine Metallgegenstände oder Flüssigkeiten ins Innere des Geräts gelangen lassen. Keine mit Flüssigkeit gefüllten Gegenstände z.B. Vasen, auf das Gerät stellen. Kurzschluß oder Fehlfunktion können die Folge sein. Falls es doch einmal vorkommen sollte, bitte sofort Netzstecker ziehen und vom Stromkreis trennen. Offene Brandquellen, wie z.B. brennende Kerzen, sollten nicht auf das Gerät gestellt werden. Ventilationsöffnungen nicht abdecken, da Überhitzungsgefahr! Nicht in staubiger Umgebung verwenden und regelmäßig reinigen. Für Kinder unerreichbar aufbewahren. Unerfahrene Personen sollen das Gerät nicht bedienen. Umgebungstemperatur darf 40ºC nicht überschreiten. Stets Netzstecker ziehen, wenn Gerät für längeren Zeitraum nicht genutzt, oder es gewartet wird. Elektrische Anschlüsse nur durch qualifiziertes Fachpersonal überprüfen lassen. Sicherstellen, daß Netzspannung mit Geräteaufkleber übereinstimmt. Die Netzsteckdose sollte immer gut erreichbar sein um das Gerät vom Netz zu trennen. Gerät nicht mit beschädigtem Netzkabel betreiben. Netzkabel nicht mit anderen Kabeln in Berührung kommen lassen! Ausschließlich vorschriftsmäßige Kabel zur Installation verwenden. Gerät nicht öffnen. Abgesehen vom Tausch der Sicherung sind keine zu wartenden Bauteile im Gerät enthalten. Sicherung niemals reparieren oder überbrücken, sondern immer mit gleichartiger Sicherung ersetzen! Bei Fehlfunktion Gerät nicht benutzen und mit Händler in Verbindung setzen. Bei Transport bitte Originalverpackung verwenden, um Schäden am Gerät zu vermeiden. Aus Sicherheitsgründen dürfen an dem Gerät keine unbefugten Veränderungen vorgenommen werden. 1. 2. 3. 4. 5. 6. 7. 8. 9. 10. 11. 12. 13. 14. 15. 16. 17. 18. 19. 20. 21. 22. 23. 24. JB SYSTEMS® 45/71 iLEAD Controller Scanners: Zum auswählen des Scanners. Movement: Zum auswählen der Pan- und Tilt-Bewegung. Shutter: zum auswählen der Blitz Geschwindigkeit, Shaking Effektes und offen Gobo: Gobo auswählen Color: Farbe auswählen Rotation: zum auswählen der Rotationsgeschwindigkeit und der Richtung. Dimmer: Dimmereinstellung. Focus: zum einstellen des Focus. Page/ Copy: zum auswählen der Speicher 1~12 oder 13~24 oder Speicher Kopieren. Memory: zum Bearbeiten vorhandener Szenen oder Löschen von Chases Cancel: Löschen einer Szene. Save: sichern, einfügen oder überschreiben einer Szene Auto/Sound/Midi: Wählen des Auto/Sound/Midi Modus. Light Show: Light Show ablaufen lassen Blackout/Stand Alone: Wählen des Program/Blackout/Stand Alone Modus Fog: Aktivieren der Nebelmaschine Strobe: Aktivieren eines analogen Stroboskops. Drücken Sie den Strobe-Knopf und dann die Taste 1 ~ 12 um die Strobegeschwindigkeit zu ändern. X-Fade: Kontrolliert zwei verschiedene Funktionen: Einstellen der Fade Time während einer Light Show. Fade time ist die Zeit, die der Scanner von einer zur anderen Position benötigt. Einstellen der Tilt-Position der Scanner während des Programmierens oder zum einstellen der Tilt-Bewegungsweite bei der Movement-Funktion oder zu Einstellen des DMX-Werts von 0~255 für Kanäle wie Shutter/Gobo/ Color/Rotation/Dimmer/Focus. Speed (Wartezeit) Steuert mit zwei verschiedenen Funktionen: Zum Einstellen der Chase-Geschwindigkeit (Wartezeit zwischen den Szenen) im Bereich von 0,1 Sekunden bis 5 Minuten während des Durchlaufens einer Lichtshow. Die Fade-Zeit der Szenen ist stets abgeschlossen, der Speed-Fader entscheidet über die Wartezeit (Zwischenzeit) zwischen den Szenen. Um die Pan-Position der Scanner oder die Pan-Bewegungsspanne der Scanner bei der Movement-Funktion während des Programmierens einzustellen. Fine: Zum Steuern der Pan- oder Tilt-Bewegung des Geräts in kleinen Schritten. Drücken Sie den Joystick nach unten um die Fine-Funktion zu aktivieren, drücken Sie erneut, zum deaktivieren der Funktion. Override: Zum überschreiben des Lichteffektes, wenn die Show läuft. Button(1-24): Stellen Sie den DMX-Wert zwischen 0~255 für Shutter- / Gobo- / Color- / Rotation- / Dimmer- / Focus-Funktionen, oder speichern Sie 24 Memories in den Knöpfen. Stand alone: 2 extra einfache Controller integriert für unmittelbar vorprogrammierte Licht-Shows im Master/ Slave-Modus. Program Mode: Aktiviert den Programm-Modus durch Drücken des Blackout/Stand Alone Knopfs. Ist die LED über dem Knopf aus, befindet man sich im Programm-Modus. JB SYSTEMS® 46/71 iLEAD Controller DEUTSCH BEDIENUNGSANLEITUNG FUNKTIONEN (RÜCKSEITE) DEUTSCH BEDIENUNGSANLEITUNG BEDIENUNGSHINWEISE Durch das Drücken der relevanten Schalter auf dem Einstellungsfeld können Sie einfach Pan-, Tilt-, Shutter-, Gobo-, Color-, Rotation-, Dimmer- und Fokus–Funktionen am Lichteffekt einstellen. Mit dem Gebrauch von Joystick/Fadern werden Sie schnell die Pan- oder Tilt-Position des Geräts einstellen können, um Szenen zu erstellen. Dann könne Sie schrittweise diese Szenen in einem Memory speichern um eine Show (Chase) zu erstellen. Sie könne maximal 24 Chases mit 485 programmierten Szenen speichern. PROGRAMM- MODUS Wenn das Gerät eingeschaltet wird, beginnt der Controller automatisch mit dem Programm-Modus. Die LED über diesem Knopf geht aus, wenn der ProgrammModus aktiviert ist. 1. POWER: Ein/Ausschalter. 2. DC INPUT: DC 9 ~12V, 300mA min. 3. FOG MACHINE: 5 Pin DIN Buchse für Nebelmaschine Nebelmaschine Diagram BLACKOUT- MODUS Drücken Sie den BLACKOUT/STAND-ALONE Knopf, die LED über diesem Knopf erleuchtet, wenn der Blackout aktiviert ist. (Compatible with Antari Z800 & Z1000) 4. 5. 6. 7. 8. 9. STROBE: Klinke Buchse für den Anschluss eines analogen Strobes +12V DC. AUDIO IN: Line Eingang MIDI IN: Midi Eingang DMX IN: DMX Eingang DMX OUT: Zwei DMX Ausgänge STAND ALONE: Die Anschlüsse werden nur im Master Slave-Modus verwendet; verwenden Sie ein 5 Pin XLR-Mikrofonkabel (Jack) zum ersten Gerät, die Funktionen (Standby, Function und Mode) des ersten Geräts steuern alle weiteren Effekte, die an den ersten angeschlossen sind. STAND ALONE- MODUS Halten Sie den BLACKOUT/STAND-ALONE- Knopf für 3 Sekunden gedrückt, die LED über diesem Knopf blinkt, wenn der Stand-Alone-Modus aktiviert ist. Stand Alone 1 und Stand Alone 2 sind für iSolution Lichteffekte im Stand-Alone (Master/ Slave)-Modus bestimmt. Stand By: Für den Blackout der Lichtgeräte. Mode Auswahl: Verschiedene Modi, z.B. schnell/ langsam, audio/ manuell, Position, Latch, usw. eigenen sich für verschiedene Funktionen. Funktionsauswahl: Führt eine große Vielfalt an Effekten aus, wie Strobe, X/Y Bewegungs-Musterauswahl, Gobo-/ Color-Veränderung, X/Y Positionssetzung, Dimmer, etc. Die Funktionen variieren mit verschiedenen Geräten. Verschiedene Lichter haben verschiedene Modi und Funktionen, die im Stand Alone Modus übertragen werden können. Bitte schauen Sie für die einzelnen Lichteffekte in der Bedienungsanleitung nach, um mehr Informationen zu erhalten. JB SYSTEMS® 47/71 iLEAD Controller JB SYSTEMS® 48/71 iLEAD Controller DEUTSCH BEDIENUNGSANLEITUNG EINSTELLUNG EINER DMX-ADRESSE Halten Sie den BLACKOUT/STAND ALONE –Knopf für 3 Sekunden gedrückt, um in den Stand-Alone- Modus zu gelangen. Halten Sie den SCANNER Knopf nach unten gedrückt und drücken Sie dann den BLACKOUT/ STAND ALONE -Knopf. Sie sehen, dass Pan und Tilt auf allen Geräten in der Reihe auf der gleichen Position anhalten. Shutter und LED des ersten Geräts öffnet sich/ blinkt, wenn das Gerät aktiv ist und fertig zur Kennzeichnung zu einer neuen Position (die Nummer in der Reihe). Wenn Sie 2 Reihen am Ort haben, könne Sie den Joystick nach links/ rechts bewegen (drücken), um Reihe 1 oder 2 auszuwählen, und ihn hoch/ runter bewegen, um das nächste oder das letzte Gerät auszuwählen. Wählen Sie den 1~12 –Knopf, um die DMX-Adresse einzustellen. Drücken Sie SCANNERS Taste zur nächsten Seite, um den 13~24 –Knopf zum Einstellen der DMX-Adresse zu wählen. Drücken Sie den BLACKOUT/STAND ALONE –Knopf erneut, um zum Programmmodus zurückzukehren. Gerät Nr. DMX –Kanal für Moving Head Scanner Barrel Color changer Multi-Gobo projector 1 1 Gerät Nr. DMX –Kanal für Moving Head Scanner Barrel Color changer Multi-gobo projector 13 97 14 105 15 113 16 121 17 129 18 137 19 145 20 155 21 161 22 169 23 177 24 185 99 107 115 123 131 139 147 157 163 171 179 187 JB SYSTEMS® 2 9 3 17 4 25 5 33 6 41 7 49 8 57 9 65 10 73 11 81 12 89 DEUTSCH BEDIENUNGSANLEITUNG WÄHLEN SIE DIE GERÄTE AUS, DIE SIE STEUERN WOLLEN Drücken Sie den SCANNERS -Knopf Durch Drücken des 1~12 –Knopfes könne Sie mehr als ein Gerät auswählen. Wenn die LEDs ( 1 ~ 12 ) der Knöpfe leuchten, könne Sie die Geräte steuern. Um die Geräte 13~24 zu wählen, drücken Sie SCANNERS zur nächsten Seite, die untere LED ist an. Obere Untere 1 13 2 14 3 15 4 16 11 19 27 35 49/71 43 51 59 67 75 83 7 19 8 20 9 21 10 22 11 23 12 24 EINSTELLEN DER SETTING PAN/TILT POSITION Bewegen Sie den Joystick links/ rechts, um die Pan-Bewegung zu steuern, hoch/ runter, um die TiltBewegung zu steuern. Sie können auch den Speed-Fader und X-Fade/Value –Fader benutzen, um die Pan- oder Tilt-Bewegung des Gerätes zu steuern. MOVEMENT EINSTELLEN Wählen Sie die Geräte aus, die Sie kontrollieren möchten Drücken Sie den MOVEMENT -Knopf Wählen Sie die vorhandenen Bewegungsmuster durch Drücken vom 1~12-Knopf und verwenden Sie den X-Fade/Value –Slider, um die Bewegungsweite einzustellen Drücken Sie MOVEMENT erneut, um zum Programmmodus zurückzukehren 12 Vorhandene Bewegungsmuster sind wie folgt: 2 3 4 5 6 7 8 9 10 11 12 Movem ent 91 iLEAD Controller 6 18 Die LEDs am Knopf leuchten, wenn Sie die Knöpfe drücken. Wenn die LEDs über den Knöpfen an sind, könne Sie die Geräte mit einem Joystick oder Control-Fader steuern. Um die Steuerung eines Gerätes zu beenden, drücken Sie die Zahlenknöpfe erneut, damit die LED am Knopf aus geht. Sie können vielfache Geräte gleichzeitig steuern. Um die vielen Geräte auszuwählen, drücken Sie den Knopf jedes Gerätes einzeln. 1 3 5 17 Beim Programmieren können Sie ein Bewegungsmuster auswählen, um eine Szene zu erstellen. Verwenden Sie den Speed–Fader, um eine Bewegungsreihe zu erstellen und verwenden Sie den XFade/Value-Fader, um die Tilt-Bewegung einzustellen. Verwenden Sie einerseits den Joystick, um die Position der Bewegung zu bestimmen. Im Lightshow-Modus könne Sie Speed-Fader verwenden, um die Abspielzeit von 0,1 Sekunden bis 5 Minuten einzustellen, und den X-Fade /Value –Fader, um die Fade-Zeit einzustellen. JB SYSTEMS® 50/71 iLEAD Controller DEUTSCH BEDIENUNGSANLEITUNG DEUTSCH EINSTELLUNG DES SHUTTERS Wählen Sie die Geräte aus, die Sie kontrollieren möchten Drücken Sie den SHUTTER -Knopf Wählen Sie einen Shutter-Wert mit dem 1~12 –Knopf oder verwenden Sie den XFade/Value -Fader Um die Strobegeschwindigkeit 13~24 auszuwählen, drücken Sie erneut SHUTTER zur nächsten Seite und die untere LED erleuchtet. EINSTELLUNG VON FARBE Wählen Sie die Geräte aus, die Sie kontrollieren möchten Drücken Sie den COLOR -Knopf Wählen Sie einen Farbwert mit 1~12 –Knopf oder bewegen Sie den XFade/Value -Fader. Um die Farben 13~24 zu wählen, drücken Sie COLOR erneut zur nächsten Seite und die untere LED erleuchtet. Die Farbplätze sind wie folgt vergeben: 24 Shutter-Werte wurden im Controller programmiert, welche Sie durch Drücken des relevanten Knopfes (1 ~ 24) wie folgt wählen können: 1 Upper Blackout 13 2 3 4 5 6 7 8 9 10 Open Slow Strobe Strobe 1 Strobe 2 Strobe 3 Strobe 4 Strobe 5 Strobe 6 Strobe 7 14 15 18 19 20 21 22 16 17 11 12 Strobe Fast 8 Strobe 23 24 Lower Shaking Shaking Shaking Shaking Shaking Shaking Shaking Shaking Shaking Shaking Shaking Open EINSTELLEN DES GOBO Wählen Sie die Geräte aus, die Sie kontrollieren möchten Drücken Sie den GOBO -Knopf Wählen Sie einen Gobo-Wert mit dem 1~12 –Knopf oder verwenden Sie den XFade/Value -Fader Um die Gobos 13~24 zu wählen, drücken Sie GOBO erneut zur nächsten Seite und die untere LED erleuchtet. Die Goboplätze sind wie folgt vergeben: 7 Gobos 1 2 3 Gob o 1 13 14 15 Gob Gob Gob Unte o o o re 6 6 7 Ober Ope Ope e n n 4 Gob o 1 16 Slow scrol l 5 6 7 8 9 10 11 12 Gob Gob Gob Gob Gob Gob Gob Gob o o o o o o o o 2 2 3 3 4 4 5 5 17 18 19 20 21 22 23 24 Scro Scrol Scro Scro Scro Scro Scro Fast ll l ll ll ll ll ll scrol 1 2 3 4 5 6 7 l 14 Gobos 1 2 3 4 5 6 7 8 9 10 11 12 Ope Gob Gob Gob Gob Gob Gob Gob Gob Gob Gob Gob Ober n o o o o o o o o o o o e 1 2 3 4 5 6 7 8 9 10 11 13 14 15 16 17 18 19 20 21 22 23 24 Gob Gob Gob Slow Scro Scrol Scro Scro Scro Scro Scro Fast Unte o o o scrol ll l ll ll ll ll ll scrol re 12 13 14 l 1 2 3 4 5 6 7 l JB SYSTEMS® 51/71 iLEAD Controller BEDIENUNGSANLEITUNG 9 Farben (full color) 1 2 3 4 5 6 Obere White White Green Green Magenta Magenta Untere 13 14 15 UV Light Light Purple Green Green 9 Farben (split color) 1 2 17 Slow scroll 18 Scroll 1 5 6 7 8 9 10 11 12 Magenta Light Green Yellow Orange Light Blue + Obere White Green Magenta Yellow Orange Blue + + + Light Blue + Magenta Orange Blue Blue Yellow 13 14 15 16 17 18 19 20 21 22 23 24 Blue UV Purple Light Slow Scroll Scroll Scroll Scroll Scroll Scroll Fast Untere + + Pink Green scroll 1 2 3 4 5 6 scroll UV Light Purple Green 11 Faben (full color) 1 2 Obere White Untere White 3 16 Pink 7 8 9 10 11 12 Light Yellow Yellow Orange Orange Blue Blue 19 20 21 22 23 24 Scroll Scroll Scroll Scroll Scroll Fast 2 3 4 5 6 scroll 4 3 13 14 15 Light Orange Yellow Green 11 Farben (split color) 1 2 4 3 16 Pink 4 Green Obere White Green Magenta + Magenta 13 14 15 Yellow Untere Orange Yellow + Pink JB SYSTEMS® 5 Green Magenta Magenta 16 Pink 17 Slow scroll 6 7 8 9 10 11 12 Light UV UV Amber Amber Red Blue Blue Purple Purple 18 19 20 21 22 23 24 Scroll Scroll Scroll Scroll Scroll Scroll Fast 1 2 3 4 5 6 scroll 5 Light Blue 17 6 7 Amber Red 18 19 8 9 10 11 12 Light Red UV Light Green Blue + Purple Green + Blue Orange 20 21 22 23 24 Scroll Scroll Scroll Scroll Scroll Scroll Slow scroll 1 2 3 4 5 6 52/71 Fast scroll iLEAD Controller DEUTSCH BEDIENUNGSANLEITUNG SETTING GOBO ROTATION Wählen Sie die Geräte aus, die Sie kontrollieren möchten Drücken Sie den ROTATION -Knopf Wählen Sie einen Wert für die Rotationsgeschwindigkeit mit den 1~12-Knöpfen aus, oder bewegen Sie den X-Fade/Value Fader Nachfolgend die Gobo Rotations- Positionen: (CCW- Counterclockwise; CW- Clockwise) 1 2 3 4 5 6 7 8 9 10 11 12 Fast CCW. CCW. CCW. Slow Slow CW. CW. CW. Fast Rotation Stop CCW Speed Speed Speed CCW. CW. Speed Speed Speed CW. Stop Speed 1 2 3 Speed Speed 3 2 1 Speed DEUTSCH BEDIENUNGSANLEITUNG ERSTELLEN EINES CHASE 1. Gehen Sie in den Programm-Modus. 2. Erstellen Sie eine Szene. 3. Drücken Sie den SAVE -Knopf. Wählen Sie eine Position (1 ~ 24), an der Sie die Szene speichern wollen. 4. Widerholen Sie die Schritte 2 & 3 so oft Sie wollen, bis der Memory-Speicher des Controllers voll ist. Die SAVE LED blinkt wenn der Speicher voll ist. 5. Ein Chase (Controller) kann bis zu 485 Szenen speichern. ABSPIELEN VON SZENEN EINSTELLUNG DES DIMMERS Wählen Sie die Geräte aus, die Sie kontrollieren möchten Drücken Sie den DIMMER -Knopf Wählen Sie einen Dimmerwert mit den 1~12 –Knöpfen, oder bewegen Sie den XFade/Value Fader Sie können den Dimmerwert der Einstellungen zwischen 0%~100% Einstellen. Die Dimmerwerte lauten wie folgt: 1 2 3 4 5 6 7 8 9 10 11 12 Dimmer 100% 90% 82% 74% 64% 55% 46% 37% 28% 19% 10% 0% EINSTELLUNG DES FOKUS Wählen Sie die Geräte aus, die Sie steuern möchten. Drücken Sie den FOCUS -Knopf Wählen Sie einen Fokuswert mit den1~12 Knöpfen, oder bewegen Sie den XFade/Value Fader Um Fokus 13~24zu wählen, drücken Sie FOCUS nochmals zur nächsten Seite, die untere LED erleuchtet. ERSTELLEN EINER SZENE 1. Gehen Sie in den Programm-Modus. 2. a) Drücken Sie den Scanners –Knopf, um die Einstellungen auszuwählen, die Sie kontrollieren möchten. b) Benutzen Sie den Joystick oder Fader um die Positionen von Pan/Tilt zu lokalisieren und eine Szene zu erstellen. 3. Drücken Sie SAVE. Die 1~12 –Knöpfe leuchten auf, wenn schon Memory in ihnen gespeichert wurde. 1. Gehen Sie in den Programm-Modus. 2. Drücken Sie den MEMORY -Knopf. 3. Drücken Sie einen Knopf 1~12 oder PAGE und wählen Sie Knopf 13~24, um eine Szene manuell laufen zu lassen. 4. Drücken Sie den gleichen Knopf erneut. Die zweite Szene wird nach der ersten Szene abgespielt. Anmerkung: Der SAVE -Knopf wird dazu verwendet, den laufenden Status im Memory zu speichern. Der PAGE –Knopf wird dazu verwendet, die Position im Memory auszuwählen. Der Controller hat 24 Positionen, in denen Sie Chases (Shows) speichern können. Wenn die obere LED an ist, dann ist Knopf 1 = Memory 1, Knopf 2 = Memory 2… etc, ist die untere LED an, dann ist Knopf 1 = Memory 13, Knopf 2 = Memory 14… etc. Der MEMORY –Knopf wird gebraucht, um eine Szenen zu lesen. Die LEDs leuchten auf, falls Memories in den Knöpfen gespeichert sind. EINFÜGEN EINER SZENE 1. Gehen Sie in den Programm-Modus. 2. Drücken Sie den MEMORY -Knopf, wählen Sie die gewünschte Position (1 ~ 24) in die Sie eine Szene einfügen wollen. 3. Wählen Sie die Szene aus, in die Sie eine Szene einfügen wollen. Drücken Sie den selben Knopf (z.B. 6) wiederholt; Sie können eine Szene nach der anderen sehen. 4. Erstellen Sie eine neue Szene. 5. Drücken Sie SAVE. 6. Drücken Sie die gewünschte Position (1~24) die Sie gewählt haben, um eine neue Szene einzufügen. 4. Drücken Sie BUTTON 1~12 in welcher die Szene gespeichert werden soll. 5. Die Szene ist nun unter dieser Taste abgelegt. 6. Drücken Sie die PAGE Taste um die BUTTONS 13~24 zu belegen. JB SYSTEMS® 53/71 iLEAD Controller ÜBERSPIELEN EINER SZENE 1. Gehen Sie in den Programm-Modus. 2. Drücken Sie den MEMORY -Knopf. JB SYSTEMS® 54/71 iLEAD Controller DEUTSCH BEDIENUNGSANLEITUNG 3. Drücken Sie den Knopf (1 ~ 24), an dem das Chase gespeichert ist und wählen Sie die Szene aus, die Sie überschreiben möchten. Drücken Sie den selben Knopf(z.B. 6) wiederholt; Sie können eine Szene nach der anderen sehen. DEUTSCH LÖSCHEN ALLER EINSTELLUNGEN 1. Drücken Sie den BLACKOUT/STAND ALONE –Knopf für 3 Sekunden, um in den Stand-Alone-Modus zu gelangen. 4. Erstellen Sie eine gewünschte Szene. 5. Halten Sie den SAVE –Knopf gedrückt und drücken Sie den vorher ausgewählten Knopf (1 ~ 24) um die Szene zu überspielen. LÖSCHEN EINER SZENEN 1. Gehen Sie in den Programm-Modus. 2. Drücken Sie den MEMORY -Knopf, wählen Sie die gewünschte Position (1~24) in der Sie eine Szene löschen wollen. 3. Wählen Sie die Szene, die Sie löschen wollen. 4. Halten Sie CANCEL gedrückt und drücken Sie dann den zuvor gewählten Knopf, um eine Szene zu löschen. BEDIENUNGSANLEITUNG 2. Halten Sie den MEMORY –Knopf gedrückt und drücken Sie den BLACKOUT / STAND ALONE –Knopf; alle Einstellungen werden gelöscht. LIGHT SHOW 1. Drücken Sie den LIGHT SHOW Knopf. Die LIGHT SHOW LED erleuchtet um anzuzeigen, dass der Light-Show-Modus aktiviert ist. 2. Drücken Sie AUTO/SOUND/MIDI um den Auto-, Sound- oder Midi-Mode zu aktivieren. Die LEDs zeigen an, welcher Modus aktiviert ist. 3. Drücken Sie den Knopf (1 ~ 24) um eine gewünschte Licht-Show laufen zu lassen. KOPIEREN EINES CHASERS 1. Gehen Sie in den Programm-Modus 2. Drücken Sie den MEMORY -Knopf. 3. Wählen Sie einen bestehende Chase aus, die Sie kopieren möchten. Im Auto-Modus können Sie die Licht- Geschwindigkeit und Fade- Zeit einstellen, indem Sie die Fader verwenden. Diese Einstellungen werden gespeichert für das nächste Mal, wenn Sie die gleiche LichtShow laufen lassen. In der Sound-Modusaktivierung wird die Licht-Show durch Musik ausgelöst, jedoch können Sie immer noch die Fade-Zeit der Licht-Show einstellen. OVERRIDE KONTROLLE 4. Halten Sie PAGE gedrückt und drücken Sie dann den Knopf (1 ~ 24), wo Sie den Chase hinein kopieren möchten. LÖSCHEN EINER CHASE 1. Gehen Sie in den Programm-Modus. 2. Drücken Sie den MEMORY -Knopf. 3. Halten Sie den MEMORY –Knopf gedrückt und drücken Sie dann einen 1~12 Knopf oder drücken Sie PAGE zum Auswählen eines 13-24 –Knopfs, um einen Chase zu löschen. JB SYSTEMS® 55/71 iLEAD Controller Wenn Licht-Shows laufen, können Sie die Override-Taste betätigen, um die Lichteffekte manuell zu steuern, die LED erleuchtet um anzuzeigen, dass die Override-Funktion aktiviert ist. Drücken Sie den "Scanner“-Taster, um die Lichteffekte auszuwählen, die sie übergehen möchten. MIDI BETRIEB Sie können eine Programm, Geschwindigkeit, Fade-Zeit einstellen, Lightshow audio oder sound und Blackout mit Midi-Befehlen steuern. Dies ermöglicht Ihnen, eine vorprogrammierte Lichtshow der Reihe nach sequenziell abzuspielen. Mit MIDI können Sie keine Live-head-Kontrolle oder Programmierfunktionen durchführen. Der Controller reagiert nur auf Midi-Befehle auf dem auf vollen Anschlag eingestellten Midi-Kanal. Die ganze Midi-Steuerung erfolgt mit Noten Befehle. Alle weiteren Midi-Anweisungen werden ignoriert. Um eine Verfolgung zu stoppen, senden Sie Blackout auf die Note. Wenn Sie eine Midi-kontrollierte Sequenz programmieren, sollten Sie immer mit dem senden eines Seitenbefehls beginnen, da Sie nicht wissen, was die Einstellung der aktuellen Seite auf dem Steuerpult ist. Wenn Sie ein Programm (Chase) durch MIDI aufrufen, läuft der Chase mit seiner programmierten Geschwindigkeits-, Fade- und Sound-Aktivierungseinstellungen. Wenn Sie Geschwindigkeit, Fade und Sound-Aktivierung mit dem Midi-Befehl ändern möchten, tun Sie dies, nachdem Sie den Chaser aktiviert haben. Die Geschwindigkeits-, Fade- und Sound-Einstellung, die Sie durch MIDI gesetzt haben werden nicht im Chaser gespeichert. JB SYSTEMS® 56/71 iLEAD Controller DEUTSCH BEDIENUNGSANLEITUNG MIDI note 36 37 38 39 40 41 42 43 48 49 50 51 52 53 54 55 56 57 58 59 60 61 62 63 74 75 76 77 78 79 Note name C3 C#3 D3 D#3 E3 F3 F#3 G3 C4 C#4 D4 D#4 E4 F4 F#4 G4 G#4 A4 A#4 B4 C5 C#5 D5 D#5 D6 D#6 E6 F6 F#6 G6 Function Chase 1 Chase 2 Chase 3 Chase 4 Chase 5 Chase 6 Chase 7 Chase 8 Chase 9 Chase 10 Chase 11 Chase 12 Chase 13 Chase 14 Chase 15 Chase 16 Chase 17 Chase 18 Chase 19 Chase 20 Chase 21 Chase 22 Chase 23 Chase 24 SPEED X-FADE AUTO MODE SOUND MODE BLACKOUT ON BLACKOUT OFF WARTUNG Das Gerät sollte regelmäßig mit einem feuchten Tuch gereinigt werden. Wir empfehlen das Innere des Gerätes von qualifiziertem Personal reinigen zu lassen. SPEZIFIKATIONEN Power Input: DMX Input: DMX Output: Stand Alone: MIDI Signal: Audio Input: Maße: Gewicht: DC 9-12V 300 mA min 3 pin male XLR 3 pin female XLR 5 pin male XLR 5 Pin Standard Schnittstelle durch ein Eingebautes Mikrofon oder Line-in 485 x 135 x 80 mm 2.5 kg ESPAÑOL MANUAL DE INSTRUCCIONES MANUAL DE FUNCIONAMIENTO Gracias por comprar este producto JB Systems®. Para sacar el máximo partido a todas las funciones, lea detenidamente estas instrucciones de funcionamiento. CARACTERÍSTICAS Este producto interfiere con señales de radio. Este aparato cumple las exigencias Europeas y nacionales de las normas actuales. Se ha establecido conformidad y las declaraciones y documentos relevantes se han depositado por el fabricante. Montaje en rack de 19 pulgadas estándar Controla hasta 192 canales DMX Controla 24 escáneres con hasta 8 canales DMX por aparato. 12 movimientos preestablecidos para edición de espectáculo instantánea Establece dirección DMX de efectos iSolution de forma remota 24 programas tipo oruga con hasta 485 escenas Programa automático (escenas y programas tipo oruga) controlado por deslizadores de velocidad y X-Fade Los escáneres se controlan mediante una palanca de mando panorámica/inclinación o deslizadores de velocidad y X-Fade Palanca de mando panorámica/inclinación con función de ajuste preciso Función de oscurecimiento (Blackout) La función de control manual proporciona un control total de los aparatos seleccionados Micrófono incorporado o entrada de audio para activación de música Control MIDI para programas tipo oruga, oscurecimiento, sonido, automático, velocidad y X-Fade Memoria a prueba de fallos de alimentación 2 controladores de fácil utilización incorporados para espectáculos preprogramados instantáneos Botón de activación de máquina de niebla con indicadores LED para “Heating” (calefacción) y “Ready” (Listo) Botón de activación Estrobo con velocidad ajustable ANTES DE UTILIZAR EL APARATO Compruebe el contenido: Compruebe que la caja contiene los siguientes elementos: 1. Controlador iLEAD 2. Adaptador CA/CC 3. Instrucciones de funcionamiento Instrucciones importantes: Para evitar incendios o riesgos de descarga, no exponga la unidad a la lluvia o a la humedad. Para evitar descargas eléctricas, no abra la cubierta. Si ocurre un problema, póngase en contacto con su distribuidor. No coloque objetos metálicos ni derrame líquidos dentro del reproductor de la unidad. Se pueden producir descargas eléctricas o fallos de funcionamiento. Evite el uso en ambientes con polvo, limpie la unidad regularmente. Technische Änderungen können auch ohne Vorankündigung vorgenommen werden! Sie können sich die neueste Version dieses Benutzerhandbuches von unserer Website herunterladen: www.beglec.com JB SYSTEMS® 57/71 iLEAD Controller JB SYSTEMS® 58/71 iLEAD Controller ESPAÑOL MANUAL DE INSTRUCCIONES PRECAUCIONES DE USO ESPAÑOL FUNCIONES MANUAL DE INSTRUCCIONES (PARTE FRONTAL) PRECAUCIÓN: Para reducir el riesgo de electrocución, no quite la cubierta superior . Ninguna pieza usable adentro para el utilizador. Dirijase unicamente a personal cualificado. El simbolo de un rayo en el interior de un triangulo alerta sobre la presencia o el uso de elementos no isolados donde un voltaje peligroso constituye un riesgo grande para causar una eventual electrocución. El punto de exclamación en el interior de un triangulo alerta al usuario sobre la presencia de importantes instrucciones de operación y de mantenimiento tenidas en cuenta en el manual de uso. CAUTION Este símbolo significa : uso para el interior solamente. Este símbolo significa : Lea las instrucciones. Para evitar riesgos de incendio o electrocución, no exponer el aparato a la lluvia o a la humedad. Para evitar que se forme condensación en el interior, permita que el aparato se adapte a las temperaturas circundantes cuando lo lleve a una habitación caliente después de transporte. Condensar algunas veces impide que el aparato funcione a rendimiento pleno o incluso puede causar daños. Este aparato es sólo para uso interior. No coloque objetos metálicos o derrame líquidos dentro del producto. No colocar objectos llenos de liquidos, como jarrónes, encima del aparato. Una descarga eléctrica o mal funcionamiento puede resultar. Si un objeto extraño entrara en el aparato, desconecte inmediatamente la alimentación. No colocar fuentes desnudas de llamas, como velas encendidas, sobre el aparato. No cubra ninguna apertura de ventilación ya que esto podría causar sobrecalentamiento. Evite su uso en ambientes polvorientos y limpie la unidad regularmente. Mantenga la unidad alejada de los niños. Personas sin experiencia no deberían manejar este aparato. La temperatura máxima del aparato es 40°C. No use este producto a temperaturas más elevadas. Siempre desenchufe el aparato cuando no lo use por un periodo largo o antes de cambiar la bombilla o de comenzar una reparación. La instalación eléctrica se debe realizar solamente por personal cualificado, según las regulaciones para la seguridad eléctrica y mecánica en su país. Compruebe que el voltaje disponible no es superior al que aparece en el panel trasero del producto. El enchufe tiene que estar siempre accessible para desconectar la alimentación. El cable de alimentación debería estar siempre en perfectas condiciones: apague el aparato inmediatamente cuando el cable de alimentación esté roto o dañado. ¡Nunca deje el cable de alimentación entrar en contacto con otros cables! Para prevenir descargas eléctricas, no abra la tapa. Aparte los fusibles no hay nada que pueda ser reparado por el usuario en el interior el aparato. Nunca repare un fusible o haga un desvio al fusible. ¡Siempre sustituya el fusible dañado por un fusible del mismo tipo y con las mismas especificaciones eléctricas! En caso de problemas serios de manejo, deje de usar el aparato y contacte su vendedor inmediatamente. Por favor, use el embalaje original cuando el aparato deba ser transportado. Debido a motivos de seguridad está prohibido de hacer modificaciones al aparato sin autorización. 1. 2. 3. 4. 5. 6. 7. 8. 9. 10. 11. 12. 13. 14. 15. 16. 17. 18. 19. 20. 21. 22. 23. 24. JB SYSTEMS® 59/71 iLEAD Controller Scanners: Para seleccionar uno o más aparatos. Movement: Para seleccionar/establecer el movimiento panorámico & de inclinación. Shutter: Para establecer la velocidad Estrobo, el efecto de sacudida y la abertura. Gobo: Para seleccionar el gobo. Color: Para seleccionar el color. Rotation: Para establecer la velocidad de giro y rotación. Dimmer: para establecer la intensidad del regulador luminoso. Focus: Para ajustar el enfoque apropiado. Page/ Copy: Para seleccionar las memoria 1~12 ó 13~24 o activar la copia de memoria. Memory: Para editar escenas existentes o borrar un programa tipo oruga. Cancel: Para borrar una escena. Save: Para guardar, insertar o sobrescribir una escena. Auto/Sound/Midi: Para establecer las modalidades Auto/Sonido/Midi. Light show: Para ejecutar el Light Show (espectáculo de luces). Blackout/Stand Alone: Para seleccionar las tres modalidades Program/Blackout/Stand Alone. Fog: Para activar la máquina de niebla. Strobe: Para activar la Estrobo no DMX. mantenga pulsado el botón Strobe y pulse el botón 1 ~ 12 por separado para cambiar la velocidad Estrobo. X-Fade: Se controla con 2 funciones diferentes: Para establecer el tiempo de atenuación al ejecutar Light shows. El tiempo de atenuación es la cantidad de tiempo que necesita un escáner (o escáneres) para moverse de una posición a otra. Para establecer la posición de inclinación de los Scanners durante la programación o para establecer el rango de movimiento de inclinación para la función Movement o establecer el valor DMX 0~255 para canales de Shutter/Gobo/ Color/Rotation/Dimmer/Focus. Speed ( Wait time ) Se controla con dos funciones diferentes: Para establecer la velocidad del programa tipo oruga (tiempo de espera entre escenas) en un rango de 0,1 segundos a 5 minutos al ejecutar espectáculos de luces. El tiempo de atenuación de las escenas siempre se completará, el deslizador Speed decide el tiempo de espera (tiempo de intervalo) entre las escenas. Para establecer la posición panorámica de los escáneres o para establecer un rango de movimiento panorámico para la función Movement durante la programación. Fine: Para controlar el movimiento panorámico o de inclinación del aparato en pequeños incrementos. Empuje hacia abajo la palanca de mando para activar la función Fine, empújelo otra vez para desactivar la función. Override: Para controlar manualmente un aparato o aparatos cuando se está ejecutando el espectáculo. Button (1-24): Establece el valor DMX 0~255 para los canales de Shutter / Gobo / Color / Rotation / Dimmer / Focus, o guardar 24 memorias en los botones. Stand alone: 2 controladores adicionales de fácil utilización para espectáculos de luces preprogramados instantáneos para Maestro/Esclavo. Program Mode: Active la modalidad Program pulsando el botón Blackout/Stand Alone. Cuando el LED encima del botón LED está apagado, está en modalidad Program. JB SYSTEMS® 60/71 iLEAD Controller ESPAÑOL MANUAL DE INSTRUCCIONES FUNCIONES (PARTE TRASERA) ESPAÑOL MANUAL DE INSTRUCCIONES MODO DE USO Puede controlar fácilmente las funciones pan (panorámica), tilt (inclinación), shutter (obturador), gobo, color, rotation (giro), dimmer (regulador de intensidad luminosa) focus (enfoque) en los aparatos de iluminación pulsando los botones correspondientes que se muestran en el panel de control. Utilizando la palanca de mando/deslizadores, podrá establecer rápidamente la posición panorámica o de inclinación de los aparatos para realizar escenas. Puede guardar todas estas escenas paso a paso en la memoria para crear un programa tipo oruga (espectáculo). El controlador le permite programar 24 programas tipo oruga con un máximo de 485 escenas programables. 1. POWER: Activa/desactiva la alimentación. 2. DC INPUT: CC 9 ~12V, 300mA min. 3. FOG MACHINE: Toma de 5 clavijas para conectar la máquina de niebla CC. Diagrama de la máquina de niebla MODALIDAD PROGRAMA Cuando el suministro eléctrico está desactivado, el controlador entra en la modalidad de programación automáticamente. El LED encima de este botón se apaga para indicar que la modalidad programa está activada. MODALIDAD BLACKOUT (OSCURECIMIENTO) Pulse el botón BLACKOUT/STAND ALONE, el LED se enciende indicando que el oscurecimiento está activado. (Compatible con Antari Z800 & Z1000) 4. 5. 6. 7. 8. STROBE: Activa la Estrobo no DMX. Señal +12V DC. AUDIO IN: Mediante micrófono incorporado o entrada. MIDI IN: Para recibir entrada de datos MIDI. DMX IN: este conector acepta entrada de señales DMX. DMX OUT: Dos conectores envían señales DMX para aparatos DMX, utilice un cable XLR de 3 clavijas para unir los aparatos. 9. STAND ALONE: Los conectores se utilizan sólo en modalidad maestra/esclava, mediante el cable XLR de 5 clavijas del micrófono del primer aparato, observará que el control remoto de la primera unidad controlará todas las demás unidades para Stand by, Function y Mode. MODALIDAD STAND ALONE (INDEPENDIENTE) Mantenga pulsado el botón BLACKOUT/STAND ALONE durante 3 segundos, el LED encima de este botón parpadeará indicando que la modalidad Stand Alone está activada. Stand Alone 1 y Stand Alone 2 están diseñados para aparatos de iluminación iSolution en modalidad Stand Alone (Maestra/Esclava). Stand By: Para oscurecer los aparatos de iluminación. Mode selection: Diferentes modalidades de ejecución, p.ej. rápida / lenta, audio / manual / auto, posición, bloqueo, etc., corresponden a diferentes funciones. Function selection: Incorpora una gran variedad de efectos, como Estrobo, selección de patrón de movimiento X/Y, cambio de gobo/color, ajuste de posición X/Y, regulador de intensidad luminosa, etc. Las funciones varían con los diferentes aparatos. Las diferentes luces constan de diferentes modalidades y diferentes funciones, que pueden activarse mediante la modalidad Stand Alone. Consulte el manual de cada aparato luminoso para obtener más detalles. JB SYSTEMS® 61/71 iLEAD Controller JB SYSTEMS® 62/71 iLEAD Controller ESPAÑOL MANUAL DE INSTRUCCIONES ESTABLECIMIENTO DE DIRECCIÓN DMX REMOTAMENTE Mantenga pulsado el botón BLACKOUT/STAND ALONE durante 3 segundos para entra en la modalidad Stand Alone. Mantenga pulsado el botón SCANNERS y a continuación, pulse el botón BLACKOUT/ STAND ALONE. Observará la panorámica & inclinación de todos los aparatos en la cadena deteniéndose en la posición central. El obturador & LED del primer aparato se abrirá/parpadeará indicando que el aparato está activo, listo para ser asignado en una nueva posición (el número en la cadena). Si tiene dos cadenas en el lugar, puede mover la palanca de mando a la izquierda/derecha para seleccionar la cadena 1 o cadena 2 y mover la palanca de mando arriba/abajo para seleccionar el siguiente o último aparato. Selecciones el botón 1~12 para establecer la dirección DMX. Pulse SCANNERS a la siguiente página para seleccionar el botón 13~24 para establecer la dirección DMX. Pulse el botón BLACKOUT/STAND ALONE otra vez para volver a la modalidad programa. Núm. de aparato 1 Canal DMX para 1 escáner de cabezal móvil Cambiador de color 3 Proyector MultiGobo 2 9 11 19 27 35 43 51 59 67 75 83 91 Núm. de aparato 13 Canal DMX para 97 escáner de cabezal móvil Cambiador de color 99 Proyector MultiGobo 14 105 15 113 16 121 17 129 18 137 19 145 20 155 21 161 22 169 23 177 24 185 107 115 123 131 139 147 157 163 171 179 187 JB SYSTEMS® 3 17 4 25 5 33 63/71 6 41 7 49 8 57 9 65 10 73 11 81 12 89 iLEAD Controller ESPAÑOL MANUAL DE INSTRUCCIONES SELECCIONE LOS APARATOS QUE DESEE CONTROLAR Pulse el botón SCANNERS Puede seleccionar uno o más aparatos pulsando los botones 1~12 Cuando el LED de los botones (1 ~ 12 ) está encendido, puede controlar los aparatos. Para seleccionar el aparato 13~24, pulse SCANNERS a la siguiente página, el LED inferior estará encendido. Superior 1 Inferior 13 2 14 3 15 4 16 5 17 6 18 7 19 8 20 9 21 10 22 11 23 12 24 Verá el LED del botón encendido cuando lo seleccione. Cuando los LEDs encima de los botones están encendidos, puede controlar los aparatos mediante la palanca de mando o los deslizadores de control. Para salir del control de un aparato, pulse otra vez los botones de número de forma que el LED se apague. Puede controlar varios aparatos al mismo tiempo. Para seleccionar varios aparatos, pulse el botón de cada aparato uno por uno. ESTABLECIMIENTO DE POSICIÓN PANORÁMICA/DE INCLINACIÓN Mueva la palanca de mando a la izquierda/derecha para controlar el movimiento panorámico, arriba/abajo para controlar el movimiento de inclinación. Puede utilizar el deslizador Speed (velocidad) y el deslizador X-Fade/Value para controlar el movimiento panorámico o de inclinación del aparato. ESTABLECIMIENTO DE MOVIMIENTO Seleccione los aparatos que desee controlar Pulse el botón MOVEMENT Seleccione los patrones de movimiento preestablecido pulsando los botones 1~12, y utilice el deslizador X-Fade/Value para ajustar el rango de movimiento Pulse MOVEMENT otra vez para volver a la modalidad programa Los 2 patrones de movimiento preestablecidos son los siguientes: 1 2 3 4 5 6 7 8 9 10 11 12 Movimiento Durante la programación, puede seleccionar un patrón de movimiento para crear una escena. Utilice el deslizador Speed para establecer el rango de movimiento panorámico y utilice el deslizador XFade/Value para establecer el rango de movimiento de inclinación. Por otro lado, utilice la palanca de mando para establecer la posición del movimiento. En la modalidad Light show (espectáculo de luces), puede utilizar el deslizador Speed para establecer el tiempo de ejecución en un rango de 0,1 segundos a 5 minutos y utilice el deslizador X-Fade /Value para establecer el tiempo de atenuación. JB SYSTEMS® 64/71 iLEAD Controller ESPAÑOL MANUAL DE INSTRUCCIONES ESPAÑOL MANUAL DE INSTRUCCIONES ESTABLECIMIENTO DE SHUTTER (OBTURADOR) Seleccione los aparatos que desee controlar Pulse el botón SHUTTER Seleccione un valor de obturador con los botones 1~12 o utilice el deslizador XFade/Value Para seleccionar una velocidad Estrobo 13~24, pulse otra vez SCANNERS a la siguiente página, el LED inferior estará encendido. ESTABLECIMIENTO DE COLOR Seleccione los aparatos que desee controlar Pulse el botón COLOR Seleccione un valor de color con los botones 1~12 o utilice el deslizador XFade/Value Para seleccionar colores 13~24, pulse otra vez COLOR a la siguiente página, el LED inferior estará encendido. Se pueden programar 24 valores de obturador en el controlador, que puede seleccionar pulsando el botón correspondiente (1 ~ 24) tal y como se muestra abajo: Los ajustes de color son los siguientes: 1 2 3 4 5 6 7 8 9 10 11 12 Superior Oscu recimiento Abierto Estrobo lenta Estrobo 1 Estrobo 2 Estrobo 3 Estrobo 4 Estrobo 5 Estrobo 6 Estrobo 7 Estrobo 8 Estrobo lenta 13 14 15 16 17 18 19 20 21 22 23 24 Inferior Sacudida Sacudida Sacudida Sacudida Sacudida Sacudida Sacudida Sacudida Sacudida Sacudida Sacudida Abierto ESTABLECIMIENTO DE GOBO Seleccione los aparatos que desee controlar Pulse el botón GOBO Seleccione un valor gobo con los botones 1~12 o utilice el deslizador XFade/Value Para seleccionar gobos 13~24, pulse otra vez GOBO a la siguiente página, el LED inferior estará encendido. El establecimiento de gobos es el siguiente: 7 Gobos 1 2 Superior Abierto Abierto 13 Inferior Gobo 6 14 Gobo 6 3 4 5 6 7 8 9 10 11 12 Gobo Gobo Gobo Gobo Gobo Gobo Gobo Gobo Gobo Gobo 1 1 2 2 3 3 4 4 5 5 15 16 17 18 19 20 21 22 23 24 Desplaza Desplaza Desplaza Desplaza Desplaza Desplaza Desplaza Desplaza Desplaza Gobo miento miento miento miento miento miento miento miento miento 7 lento 1 2 3 4 5 6 7 rápido 9 colores (color completo) 1 7 8 9 10 11 12 Verde Amarillo Amarillo Naranja Naranja Azul Azul 13 14 15 16 17 18 19 20 21 22 23 24 Desplaz Desplaza Desplaza Desplaza Desplaza Desplaza Morado Verde Verde Desplaza Desplaza Inferior Rosa amiento miento miento miento miento miento UV claro claro miento lento miento rápido 1 2 3 4 5 6 1 2 3 4 5 6 7 8 9 10 11 12 Abierto Gobo Gobo Gobo Gobo Gobo Gobo Gobo Gobo Gobo Gobo Gobo 1 2 3 4 5 6 7 8 9 10 11 13 14 15 16 17 18 19 20 21 22 23 24 Desplaza Desplaza Desplaza Desplaza Desplaza Desplaza Desplaza Desplaza Desplaza Gobo Gobo Gobo Inferior miento miento miento miento miento miento miento miento miento 12 13 14 lento 1 2 3 4 5 6 7 lento Superior 3 1 2 3 iLEAD Controller 6 Magenta 4 13 14 15 Azul Morado UV Verde Inferior + + claro Morado Verde UV Claro 5 6 16 Rosa Azul claro 17 18 7 Azul claro + Amarillo 19 8 9 10 11 12 Amarillo Amarillo + Naranja Naranja Naranja + Azul Azul 20 21 22 23 24 Desplaza Desplaza Desplaza Desplaza Desplaza Desplaza Desplaza Desplaza miento miento miento miento miento miento miento miento lento 1 2 3 4 5 6 rápido 11 colores (color completo) 1 Superior Blanco 2 3 4 Blanco Verde Magenta 13 14 15 16 Verde claro Naranja Amarillo Rosa 5 6 7 8 9 10 11 12 Azul Morado Morado Ámbar Ámbar Rojo Azul claro UV UV 17 18 19 20 21 22 23 24 Desplaza Desplaza Desplaza Desplaza Desplaza Desplaza Desplaza Desplaza miento miento miento miento miento miento miento miento lento 1 2 3 4 5 6 rápido Magenta 11 colores (color dividido) 1 Superior Blanco 13 65/71 5 Magenta Verde Magenta Superior Blanco Verde + Magenta + Magenta Azul claro 2 Verde 14 Inferior Naranja Amarillo JB SYSTEMS® 4 9 colores (color dividido) Inferior 14 Gobos 2 Superior Blanco Blanco Verde Verde JB SYSTEMS® 3 4 Verde + Magenta Magenta 15 Amarillo + Rosa 16 Rosa 5 6 12 Verde claro Ámbar Rojo Azul + Naranja 17 18 19 20 21 22 23 24 Desplaza Desplaza Desplaza Desplaza Desplaza Desplaza Desplaza Desplaza miento miento miento miento miento miento miento miento lento 1 2 3 4 5 6 rápido Azul claro 66/71 7 8 Rojo + Azul 9 10 11 Morado UV Verde claro iLEAD Controller ESPAÑOL MANUAL DE INSTRUCCIONES ESPAÑOL ESTABLECIMIENTO DE GOBO ROTATION (GIRO DE GOBO) CREACIÓN DE UN PROGRAMA TIPO ORUGA (CHASE) 1. Entre en la modalidad programa. 2. Cree una escena 3. Pulse SAVE. Seleccione una posición ( 1 ~ 24 ) donde desee almacenar la escena. Seleccione los aparatos que desee controlar Pulse el botón ROTATION Seleccione un valor de giro con los botones 1~12 o utilice el deslizador XFade/Value 4. Repita los pasos 2 & 3 tantas veces como desee hasta que la memoria del controlador esté llena. El LED SAVE parpadeará cuando la memoria esté llena. 5. Un programa tipo oruga puede almacenar hasta 485 escenas. A continuación, se muestran los ajustes de giro de gobo: (CCW- Izquierda; CW- Derecha) 1 2 3 4 5 6 7 8 9 10 MANUAL DE INSTRUCCIONES 11 12 Velocidad Velocidad Velocidad Velocidad Velocidad Velocidad Velocidad Velocidad Velocidad Velocidad Rotation Parada CCW CCW CCW CCW Velocidad CW. CW CW CW CW Parada rápida 1 2 3 lenta lenta 3 2 1 rápida EJECUCIÓN DE ESCENAS ESTABLECIMIENTO DE DIMMER (REGULADOR DE INTENSIDAD LUMINOSA) Seleccione los aparatos que desee controlar Pulse el botón DIMMER Seleccione un valor para el regulador de intensidad luminosa con los botones 1~12 o utilice el deslizador X-Fade/Value Puede ajustar el valor de intensidad luminosa de los aparatos entre 0%~100% Los ajustes del regulador de intensidad luminosa son los siguientes: 1 2 3 4 5 6 7 8 Dimmer 100% 90% 82% 74% 64% 55% 46% 37% 9 10 11 12 28% 19% 10% 0% ESTABLECIMIENTO DE FOCUS (ENFOQUE) Seleccione los aparatos que desee controlar Pulse el botón FOCUS Seleccione un valor de enfoque con los botones 1~12 o utilice el deslizador XFade/Value Para seleccionar el enfoque 13~24, pulse otra vez FOCUS a la siguiente página, el LED inferior estará encendido. CREACIÓN DE UNA ESCENA 1. Entre en la modalidad programa. 2. a) Pulse el botón Scanners para elegir los aparatos que desee controlar. b) Use la palanca de mando o los deslizadores para localizar las posiciones panorámicas o de inclinación para crear una escena. 1. Entre en la modalidad programa. 2. Pulse MEMORY. 3. Pulse un botón 1~12 o pulse el botón de selección PAGE 13~24 para ejecutar manualmente una escena. 4. Pulse el mismo botón otra vez. La segunda escena se ejecutará después de la primera. NOTA: El botón SAVE se utiliza para almacenar el estado actual en la memoria. El botón PAGE se utiliza para seleccionar la posición de la memoria. El controlador consta de 24 en las que puede almacenar programas tipo oruga (espectáculos). Cuando el LED superior está encendido entonces, botón 1 = memoria 1, botón 2 = memoria 2… etc, cuando el LED inferior está encendido entonces, botón 1 = memoria 13, botón 2 = memoria 14… etc. El botón MEMORY se utiliza para leer escenas existentes. Los LEDs se almacenarán si hay memoria almacenada en estos botones. INSERCIÓN DE UNA ESCENA 1. Entre en la modalidad programa. 2. Pulse el botón MEMORY, seleccione la posición deseada (1 ~ 24) en la que desee insertar una escena. 3. Seleccione la escena donde desee insertar una escena. Pulse el mismo botón (p.ej. 6) repetidamente, puede ver las escenas una por una. 4. Cree una nueva escena. 5. Pulse SAVE. 3. Pulse SAVE. Los botones 1~12 se encenderán si disponen de memoria almacenada en ellos. 6. Pulse la posición deseada ( 1~24 ) que ha seleccionado otra vez para insertar una nueva escena. 4. Pulse un botón para almacenar la escena deseada. 5. La escena se almacena en el botón seleccionado. 6. Pulsando Page, también puede almacenar escenas en los botones 13~24. SOBRESCRIBIR UNA ESCENA 1. Entre en la modalidad programa. 2. Pulse MEMORY. JB SYSTEMS® 67/71 iLEAD Controller JB SYSTEMS® 68/71 iLEAD Controller ESPAÑOL MANUAL DE INSTRUCCIONES 3. Pulse el botón (1 ~ 24) donde la memoria (programa tipo oruga) está almacenado y seleccione la escena que desee sobrescribir. 4. Pulse el mismo botón ( p.ej. 6 ) repetidamente, puede ver las escenas una por una. ESPAÑOL BORRADO DE TODA LA MEMORIA 1. Pulse BLACKOUT/STAND ALONE durante 3 segundos, en la modalidad Stand Alone. 5. Cree la escena deseada. 6. Mantenga pulsado el botón SAVE y a continuación, pulse el botón seleccionado anteriormente (1 ~ 24) para sobrescribir una escena. BORRADO DE UNA ESCENA 1. Entre en la modalidad programa. 2. Pulse el botón MEMORY, seleccione la posición deseada (1 ~ 24) en la que desee borrar una escena. 3. Seleccione la escena que desee borrar. MANUAL DE INSTRUCCIONES 2. Mantenga pulsado el botón MEMORY y a continuación, pulse el botón BLACKOUT / STAND ALONE, toda la memoria se borrará. ESPECTÁCULO DE LUCES (LIGHT SHOW) 1. Pulse el botón LIGHT SHOW. El LED LIGHT SHOW se encenderá, indicando que la modalidad de espectáculo de luces está activada. 2. Pulse AUTO/SOUND/MIDI para activar las modalidades auto, sonido o MIDI. Los LEDs indican que modalidad está activada. 4. Mantenga pulsado el botón CANCEL y pulse el botón seleccionado anteriormente para borrar una escena. 3. Pulse el botón (1 ~ 24) para ejecutar el espectáculo de luces deseado. COPIA DE UN PROGRAMA TIPO ORUGA 1. Entre en la modalidad programa. 2. Pulse MEMORY. 3. Seleccione el programa tipo oruga existente que desee copiar. En la modalidad Auto, puede establecer la velocidad de la luz y el tiempo de atenuación mediante los deslizadores. Estos ajustes se mantendrán la próxima vez que ejecute el espectáculo de luces. Durante la activación de la modalidad Sound, el espectáculo de luces se activará mediante la música, sin embargo, todavía podrá establecer el tiempo de atenuación del espectáculo de luces. CONTROL OVERRIDE (MANUAL) 4. Mantenga pulsado PAGE y pulse un botón (1 ~ 24) donde desee copiar el programa tipo oruga. BORRADO DE UN PROGRAMA TIPO ORUGA 1. Entre en la modalidad programa. 2. Pulse MEMORY. 3. Mantenga pulsado el botón MEMORY y pulse un botón 1~12 o pulse PAGE para seleccionar un botón 13-24 para borrar un programa tipo oruga. JB SYSTEMS® 69/71 iLEAD Controller Durante la ejecución de espectáculos de luces, puede pulsar el botón Override para controlar el aparato manualmente, el LED se enciende indicando que la función de control manual se ha activado. Pulse el botón “Scanners“ para seleccionar los aparatos que desee controlar manualmente. FUNCIONAMIENTO MIDI Puede ejecutar un programa tipo oruga, establecer la velocidad y el tiempo de atenuación, espectáculo de luces, auto o sonido y oscurecimiento mediante los comandos MIDI, esto le permite preprogramar un espectáculo de luces para que coincida con una pista auxiliar secuenciada. No puede realizar control live o funciones de programación mediante MIDI. El controlador sólo responderá a controles MIDI en el canal MIDI que esté establecido para parada total. Todo el control MIDI se realiza utilizando Nota en los comandos. Las demás instrucciones MIDI son ignoradas. Para detener un programa tipo oruga, envíe la nota de oscurecimiento. Durante la programación de una secuencia controlada por MIDI, siempre deberá comenzar enviando un comando de página, puesto que no sabe que ajuste de página actual habrá en el controlador. Cuando recupere un programa tipo oruga mediante MIDI, el programa tipo oruga se ejecutará según sus ajustes de atenuación y sonido. Si desea modificar la activación de velocidad, atenuación y sonido mediante comandos MIDI, tendrá que hacerlo después de iniciar el programa tipo oruga. Los ajustes de velocidad, atenuación y sonido establecidos mediante MIDI no serán recordados como parte del programa tipo oruga. JB SYSTEMS® 70/71 iLEAD Controller ESPAÑOL MANUAL DE INSTRUCCIONES Nota MIDI 36 37 38 39 40 41 42 43 48 49 50 51 52 53 54 55 56 57 58 59 60 61 62 63 74 75 76 77 78 79 Nombre de nota C3 C#3 D3 D#3 E3 F3 F#3 G3 C4 C#4 D4 D#4 E4 F4 F#4 G4 G#4 A4 A#4 B4 C5 C#5 D5 D#5 D6 D#6 E6 F6 F#6 G6 Función Chase 1 Chase 2 Chase 3 Chase 4 Chase 5 Chase 6 Chase 7 Chase 8 Chase 9 Chase 10 Chase 11 Chase 12 Chase 13 Chase 14 Chase 15 Chase 16 Chase 17 Chase 18 Chase 19 Chase 20 Chase 21 Chase 22 Chase 23 Chase 24 SPEED X-FADE AUTO MODE SOUND MODE BLACKOUT ON BLACKOUT OFF MANTENIMIENTO La unidad deberá limpiarse regularmente mediante un paño húmedo. ¡Le recomendamos encarecidamente que la limpieza interna sea llevada a cabo por personal cualificado! ESPECIFICACIONES Entrada de alimentación: Entrada DMX: Salida DMX: Stand Alone: Señal MIDI: Entrada de audio: Dimensiones: Peso: CC 9-12V 300 mA min XLR macho 3 clavijas XLR hembra 3 clavijas XLR macho 5 clavijas Interfaz estándar 5 clavijas Mediante micrófono incorporado o entrada. 485 x 135 x 80 mm 2.5 kg Toda la información está sujeta a cambio sin previo aviso Puede pinchar la ultima versión del manual en nuestro sitio internet www.beglec.com JB SYSTEMS® 71/71 iLEAD Controller