1
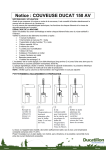
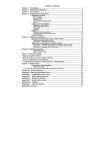
SPECTRA 8P USER MANUAL User Manual The contents of this manual with all figures, tables and graphics are intellectual property of INTERMEDICAL SRL. Unauthorized commercial or noncommercial exception or copying of contents and use of this manual (in total or in parts) are strictly forbidden unless the editor gives written permission for it. SPECTRA 8P manual was written and produced with the best care. However, errors cannot be fully excluded. INTERMEDICAL SRL does not take any responsibility and accepts no liabilities of any kind that may occur because of errors in the manual. INTERMEDICAL SRL reserves the right to change the contents and/or the informations contained in this manual without advice. Ver.: 1.00 2 User Manual 1. DESCRIPTION 1.1 TECHNICAL FEATURES SPECTRA 8P is a photometer used for biochemical tests. Light source Digitally controlled Halogen lamp (12V - 20Watt) Wavelength 6 standard interference filters: 340nm, 405nm, 505nm, 546nm, 578nm, 630nm plus 2 optional. Photometric Range 0 - 3.0 O.D. Flow cell system Delay time Flow cell with 10mm light path, interchangeable with disposable macro, semimicro, or special optical glass cuvettes. 4 sec. Reaction volume 300 L per test min. Temperature control Peltier elements, between 15°C - 45°C. Incubator 8 positions. Display Graphic, 240x128 pixel. Printer Thermal graphic, 24 characters/line. Communications USB port. Dimensions L:28 W:36 H:22 cm Power supply 100-240 VAC 50/60 Hz. 3 User Manual 1.2 PRINCIPLE OF OPERATION SPECTRA 8P is a photometer that measures the concentration of a substance in a liquid via optical principles. Through the implementation of methods designed for the particular substance it is possible to reproduce chemical reactions that turn into a solute capable of absorbing light of a specific wavelength. The physical law that determines the concentration according to absorption of light is known as the Lambert-Beer law: Dove: I0 è the intensity of light incident. I1 è the intensity of refracted light. k is a constant that depends on physical parameters such as temperature T, the optical path ℓ, the wavelength of incident light λ. C is the concentration of solute. The quantity is called as absorbance (ABS) or optical density (OD). It is proportional to the concentration by k. SPECTRA 8P directly measure the absorbance and calculate the factor k using reagents and calibrators. This makes it possible to determine the concentration C. 4 User Manual 2. INSTALLATION The installation of the instrument must be performed by a qualified technician. In any case, the following precautions should always be performed: Place the instrument into a dry and clean site. Adjust the instrument so that it is slightly tilted towards the operator Keeping clean the instrument, especially the front suction tube to avoid contamination between samples and between examinations. Use only the power cord supplied or one of equal or characteristics CE marked, CSA and UL. It should be noted that the instrument has internal self-fuse . Make sure the power supply is connected to an electrical ground . Connect the waste connector on rear side to a bottle using the tube. Check O.D. linearity by using periodically standard calibrators. If the measured absorbance is greater than 3.000 ABS, repeat the reading or dilute the sample Check periodically the regular calibration of the peristaltic pump. Keep clean and dry the surfaces of the flow cell. Wait at least 15 minutes after switching the instrument to make sure it has reached thermal equilibrium. Do not expose the instrument to heat and keep it away from direct sunlight. 5 User Manual Thermal printer Graphic display Membrane keyboard Flow cell and reading vane Incubation vane Aspiration tube SWITCH button Peristaltic pump Power supply switch Reset button Waste connector USB connector 6 User Manual 3. USER 3.1 PRINCIPAL MENU The main screen SPECTRA 8P has five items : SPECTRA 8P 1-EXECUTE METHOD 2-MODIFY METHOD 3-READ ABS 4-SETTINGS 5-FLOW CELL WASH Using the keyboard you can access all functions of the menu by pressing the button corresponding to the number specified on the left. The possible functions are: 1. EXECUTE METHOD: It allows to perform a method previously stored in the instrument. After selecting the method (see 3.2) the party suffered from the execution. 2. MODIFY METHOD: Allows you to change or insert a new method in the instrument. After selecting the method (see 3.2) the part now with the change of the same. 3. READ ABS: Allows you to read the absorbance in manual mode. This can be done in two ways: if you press the button 3 it is possible to access the reading through cuvette , if you press the button SWITCH it is possible to access the reading through flow cell. 4. SETTINGS: Provides access to menu settings. 5. FLOW CELL WASH: It allows to perform a washing of the cell flow. 3.2 STRING INPUT The input of a string is done by inserting a character at a time. There are two ways to make the character input: - and : Each time you press one of the keys you see the next or previous character. To go to the following letter must press ENTER. To confirm the input press ENTER two times or press F1. Using button 7 User Manual - Using numerical keypad: For each key has an associated set of characters. Pressing the same button repeatedly to display these characters in sequence. Pressing a button other than the one preceding it automatically switches to the next character. To confirm the input press ENTER two times or press F1. It’s possible to use the two way of input simultaneously and independently the same as always active. To delete a character press DEL to terminate without any input, press ESC. 3.3 NUMBER INPUT Enter a number via the numeric keys. To confirm press terminate press ENTER, to delete press DEL or to ESC. 3.4 ASPIRATION THROUGH FLOW CELL The aspiration of the liquid through the cell flow follows these steps: - LIQUID ASPIRATION: The instrument alerts the operator via beeper to immerse the suction tube into the liquid. The open end of the tube should always aspirate the liquid at the bottom of the cuvette. Diagram shows the example of an aspiration from cuvette Once the tube is immersed in liquid, press button SWITCH to start aspiration. - LIQUID WASHING: At the end of the aspiration of the liquid (based on the settings) the instrument alerts the operator via buzzer and wait three seconds to allow the removal of the tube from the liquid - AIR GAP ASPIRATION: Permits, if enabled, to create a gap of air in aspiration tube 3.5 WASHING OF FLOW CELL The washing of the cell flow follows these steps: 8 User Manual - REQUEST OF WASHING LIQUID: The tool alerts the operator via beeper to immerse the suction tube in the washing liquid. The same requirements used for suction. Once the tube immersed in the liquid, press the button - SWITCH to start aspiration. DISCHARGE OF LIQUID: After aspiration of the liquid (based on the settings) the instrument alerts the operator via buzzer and wait three seconds to allow the operator to remove the tube from the liquid.. PAUSE WASHING: if washing is started manually from the main menu the instrument performs a break (according to settings). During the execution of a washing method is performed without any break WASHING: The instrument washes the liquid. 3.6 SELECTING A METHOD The functions 1.EXECUTE METHOD and 2.MODIFY METHOD from principal menù request to perform or modify a method through SELECT METHOD menù: SPECTRA 8P SELECT METHOD: 1000-SLOT0 2001-SLOT1 3002-SLOT2 4003-SLOT3 5004-SLOT4 PREV NEXT The instrument has 250 memory slots each capable of containing a method and numbered from 0 to 249. The list of methods is organized to five pages each and the methods by arrows and you can move from page to page. The selection of the method may occur in two ways : 1 a 5) to - QUICK SELECTION: The shortcut through the keyboard pressing the highlighted number (da - the left of each item. NORMAL SELECTION: The normal selection is made directly from the keyboard by entering the number of slots in which the method is stored by pressing ENTER and entering the number corresponding to the method. Pressing the button PRINT it’s possible print a list of previously stored methods. It’s'advisable to print the list in order to quickly locate the slot where is stored the method to select. To enter a new method it is necessary to find a free memory slot and select it. To return to the main menu press ESC. 9 User Manual 4. ABS READING 4.1 READING THROUGH CUVETTE To measure the absorbance of a solute contained in the cuvette from the main menu by selecting the READ ABS. In this way do not use the cell flow. The screen is: SPECTRA 8P ABS: 0.000 1-FILTER: 340nm 2-CELL TEMPERATURE 37.0°C 3-TIMER: 0 sec F1-ZERO F2-ABS Le possibili opzioni sono: 1. FILTER: Repeatedly pressing the button 1, you can select the wavelength at which to read. Each time you change the filter you need to read again the zero reference of absorbance. 2. CELL TEMPERATURE: Pressing 2, you can change the temperature of the cell by entering a new reading. Along the same line you can read the current temperature of the cell. 3. TIMER: The instrument allows the setting in seconds of a timer. Pressing 3, it’s possible entering a number of seconds and soon after the release starts the countdown. At the end of the counting instrument alerts the operator via beeper. Pressing any button turns off the buzzer. Using other functions stop the countdown. F1 the instrument reads the absorbance and imposed as the zero reference and shows 0.000. F2-ABS: Pressing F2 the instrument reads absorbance and displays the result. Before reading the 4. F1-ZERO: Pressing 5. absorbance of a sample is always necessary to make zero ABS. If this was not done, the instrument indicates it both through the screen and with the buzzer. If you change the wavelength, the zero is canceled and the instrument requires re-reading. To print reading result, press PRINT. To return to the main menu press ESC. 10 User Manual 4.2 READING THROUGH FLOW CELL To measure the absorbance of a solute through aspirating peristaltic pump, from the main menu by pressing the button SWITCH. The screen is SPECTRA 8P ABS: 0.000 1-FILTER: 340nm 2-CELL TEMPERATURE 37.0°C 3-TIMER: 0 sec 4-WASH FLOW CELL F1-ZERO The options are: 1. FILTER: Repeatedly pressing the button 1, you can select the wavelength at which to read. Each time you change the filter you need to read again the zero reference of absorbance 2. CELL TEMPERATURE: Pressing 2, you can change the temperature of the cell by entering a new reading. Along the same line you can read the current temperature of the cell. 3. TIMER: The instrument allows the setting in seconds a timer. Pressing 3, it’s possible entering a number of seconds and soon after the release party the countdown. At the end of the counting instrument alerts the operator via beeper. Pressing any button turns off the buzzer. Using other functions stop the countdown. 4. WASH FLOW CELL: Pressing button 4 will start the process of washing of the cell flow. F1 the instrument reads the absorbance and imposed as the zero reference the last reading ABS and shows 0.000. 5. F1-ZERO: Pressing 6. SWITCH: Pressing the SWITCH button starts the procedure of aspiration of the sample after which the instrument automatically reads the absorbance and displays. Finally, the flow cell is empitied To print the ABS reading press PRINT. To return to main menu press ESC. 11 User Manual 5. METHOD MODIFICATION Select, from the main menu, the function MODIFY METHOD and select the method to change or enter a new one by selecting an empty slot. In both cases, the procedure for release of the parameters is the same: the insertion of a new method is, in fact, consists of a modification of default method that each memory slot already contains. For this reason we will refer only to editing of a new method. The editing of the parameters is done for pages. Each page contains a number of parameters and the sequence of pages is fixed. Within each page it’ s possible to move from one parameter to another using the arrow keys and and the selected parameter is shown on video by two side arrows e . Pressing the button ENTER it’s possible to modify selected parameter. When the operator has completed the changes, you can go to the next page of parameters by pressing ESC. The last page is the one that permits to save changes. If the operator decides to save, selects YES, otherwise, if decides not to save, chooses NO and in this case, all changes will be lost EDITING METHOD #: 0 NAME: -------------------------------- TYPE: END POINT ZERO: WATER UNITS: mg/dL TEMP: 37.0 °C CALIB: K-FACTOR Pressing the button DEL to delete method or pressing PRINT to print method. Depending on the method set some options and some parameters may be present or not. Below is the table of the parameters set for each type of programmable method: 12 User Manual PARAMETER NAME ENDPOINT YES FIXED TIME YES KINETIC YES NOTE Method name TYPE END POINT FIXED TIME KINETIC Method type ZERO WATER REAGENT SAMPLE WATER REAGENT WATER REAGENT Zero type UNITS See table See table See table Unit of measure used TEMP[°C] YES YES YES Temperature execution method CALIB K-FACTOR STANDARD K-FACTOR STANDARD K-FACTOR STANDARD Type of calculation of the factor k DECIMALS 0–3 0–3 0–3 Number of decimal digits used in displaying and printing SAMPLE[µL] YES YES YES Sample volume specified by the method REAGENT(1)[µL] YES YES YES Reagent volume specified by the method REAGENT2[µL] NO NO YES Second reagent volume specified by the method FILTER(1) YES YES YES Wavelength of the light incident FILTER2 YES NO NO Wavelength of the light incident methods for twocolored methods 13 User Manual PARAMETER WEIGHT2 ENDPOINT 0–1 FIXED TIME NO KINETIC NO NOTE Weight of the second wavelength K-FACTOR YES YES YES Factor K INTERCEPT SI NO NO Offset STD NUMBER 1–8 1 1 Number of standards or calibrators STD#n YES YES – only STD#1 YES – only STD#1 Concentration of the standard n FITTING CURVE LINEAR REG LINEAR P-W NO NO Type of approximation for multistandard methods READ TIME[sec] NO YES NO Time reading for Fixed-Time DIRECTION NO INCR DECR INCR DECR Expected direction of the reaction START dABS NO YES YES Expected direction edge of initial absorbance INCUBATION(1)[sec] NO YES YES Incubation time INCUBATION2[sec] NO NO SI Incubation time of second reagent (only if REAGENT2≠0) REAGENT BIAS NO YES NO Select YES to include in calculating the variation of the reagent READINGS # NO NO YES Number of readings to be performed 14 User Manual PARAMETER DELTA TIME[sec] ENDPOINT NO FIXED TIME NO KINETIC YES NOTE Time between reading and the subsequent NORMAL MAX YES YES YES Maximum expected concentration NORMAL MIN YES YES YES Minimum expected concentration LINEARITY MAX YES YES YES Concentration above which the method is no longer reliable REAG. MAX ABS YES YES YES Maximum expected absorbance of the reagent REAG. MIN ABS YES YES YES Minimum expected absorbance of the reagent FIT MIN NO NO 0–1 Minimum FIT for interpolation curve 15 User Manual 6. METHOD EXECUTION To execute a method choose, from the main menu, the function EXECUTE METHOD and select the method requested. The execution of a method shall be in the form of assisted procedure. Initially it runs a series of preliminary operations common to every type of method (described below). According to the print settings selected, the instrument can print the method before execution. 6.1 REQUEST OF FLOW CELL The first request relates to the flow cell. If the operator intends to work with the flow cell, he selects the YES F1 or SWITCH, otherwise the button F2. Pressing ESC aborts execution. If the operator has chosen to work with cell flow, SWITCH button is activated in order to continue execution of the method. Otherwise SWITCH is turned off. Depending on the use of flow cell, the instrument will run volume button reagent or sample aspirations and washing cycles. METHOD: NAME USE FLOW CELL? F1/SWITCH -YES F2-NO ESC-ABORT 6.2 TEMPERATURE CHECK The instrument cecks the temperature that is required by the method and expects the cell reading only if the temperature is correct. Alternatively, the operator can skip checking by ignoring the error. METHOD: NAME PLEASE WAIT FOR TEMPERATURE 37.0 37.0 F1/SWITCH-IGNORE ESC-ABORT 16 User Manual 6.3 LAMP CHECK LAMPADA AND BLANK WATER READING Initially, the instrument takes the reading of a sample of water. This reading is used to check the lamp and, as requested, as zero reference. If the lamp check fails the operator can run it again, leaving the execution or continue ignoring the error message CHECK LAMP VOLTAGE: 3.000 V GOOD LAMP CALIBRATION 6.3 REAGENT CHECK According to the settings for the method execution, the instrument may request or not the reading of absorbance of working reagent. If in the method running it was specified as white reagent then the instrument performs the reading of absorbance, otherwise the reading is done only if the parameters of maximum and minimum absorbance of the reagent are specified in the method. The absorbance reading is displayed on the screen. METHOD: NAME REAGENT LIMITS: min max REAGENT ABS: x.xxx GOOD REAGENT 6.4 STANDARD READING If the method execution is specified with the calibration standard, the instrument requires reading in sequence from the standard number abort ( 1. After reading, the operator can accept it (F1/SWITCH), repeat (F2) or ESC) execution method. METHOD: NAME ABS READ: x.xxx ABS STD#n[xxxx]: x.xxx F1/SWITCH-NEXT F2-REPEAT ESCABORT 17 User Manual During the reading of standard all read absorbances and concentrations specified by the method are printed out. If a multi-standard method is running, after the starting on LCD is shown a graph of read absorbance and interpolating curve that it’s possible to print by pressing the button PRINT. In addition to the graph is printed a list of standards and the fit calculated by the instrument. STANDARD CURVE [STD] ABS FIT: x.xxx 18 User Manual 7. END-POINT METHOD An end-point method consists of a representation of a reaction that has substance as relatively stable over time. After the operator has mixed the reagent with the analyte, the reaction begins and ends after a period of incubation time. From this moment on and for a sufficiently long period of time, the reaction products remain stable and it is possible to measure the absorbance. The value of concentration is obtained by multiplying the measured absorbance value by a factor k previously calculated on the basis of data provided by the method or obtained from a standard. 8. KINETIC METHOD A kinetic method consists of a reaction that evolves at a rate determined by the concentrations of substances dissolved in the solution. Started the reaction, the concentrations of substances change and it’s possible to determine the initial concentrations by measuring the speed of reaction over the time. The instrument measures the absorbance at fixed time, calculates the speed and after extracts the result of analysis. 19 User Manual 9. FIXED-TIME METHOD A fixed-time method is a kinetic method with only two significant readings: the beginning of reaction and the reaction order. The difference between these two measures related to time allows you to calculate the requested concentrations and therefore the result of analysis. 10. SETTINGS The settings menu allows to set the operating parameters of the instrument: SPECTRA 8P SETTINGS MENU: 1-FLOW CELL SETTINGS 2-CLOCK ADJUST 3-PRINTER SETTINGS 4-ADVANCED 01/01/2009 – 12:00 The functions available are: 1. FLOW CELL SETTINGS: This feature allows the opearator to access the configuration menu of the cell flow to adjust the aspiration volume and the calibration of the peristaltic pump. 2. CLOCK ADJUST: Allows to adjust the date and time. 3. PRINTER SETTINGS: Sets the parameters of thermal printer. 4. ADVANCED: This feature allows the operator to perform maintenance operations such as calibration lamp or thermostats. It is protected by password and should be used only by qualified technical personnel. 10.1 FLOW CELL SETTINGS The calibration of the peristaltic pump and the configuration of the aspiration air gap through the features of this menu. 20 User Manual FLOW CELL SETTINGS 1-ASPIRATION SETTINGS 2-WASHING SETTINGS 3-PUMP CALIBRATION 4-FLOW CELL WASH 10.1.1 ASPIRATION SETTINGS The aspiration function settings allows the operator to configure the amount of aspirated liquid volume and optional air gap. The aspiration procedure allows to perform two consecutive aspirations. The first concerns the aspiration fluid test and the second manifold (optional) is in the air and allows the creation of a volume of separation between two consecutive aspirations that contributes both to avoid contamination between successive samples is to use small volumes of sample. ASPIRATION SETTINGS 1-VOLUME [uL]: 300 2-CREATE AIR GAP: ON 3-AIR GAP VOLUME[uL]: 210 DEFAULT: 300/ON/210 450/ON/150 Possible options are: 1. VOLUME: Sample volume uL (micro-litres). 2. CREATE AIR GAP: ON enables the second aspiration, OFF disabled. 3. AIR GAP VOLUME: 2nd aspiration sample volume uL (micro-litres). It is advisable to avoid using suction volumes lower than the recommended default. 10.1.2 WASHING SETTINGS The washing function settings allows to set the aspiration volume of washing liquid and the waiting time, ie, the time during which the washing liquid remains in the flow cell. This pause only occurs when the washing is called from the menu, during the execution of a method is never executed 21 User Manual WASHING SETTINGS 1-VOLUME [uL]: 2-TIME [SEC]: DEFAULT: 1000 10 1000uL / 10sec Possible options are: 1. VOLUME: Washing liquid volume uL (micro-litres).). 2. TIME: Waiting time in seconds. 10.1.3 PUMP CALIBRATION PUMP CALIBRATION function allows to calibrate the peristaltic pump using the relation between the rotation of the pump and the volume aspirated. It is advisable to perform regular calibration in case of intensive use of the instrument. PUMP CALIBRATION 1-ASPIRATED VOLUME[uL]: 0 2-STEPS COUNTED: 0 3-SAVE CALIBRATION F1-TEST ASPIRATION F2-TEST WASHING SAVED uL/step: 0.000 GENERATED STEPS: 0 PRESS ‘SWITCH’ BUTTON TO GENERATE The peristaltic pump is equipped with a stepper motor. At each step made by the motor corresponds n aspiration volume of the pump. The instrument calculates the number of steps in order to obtain the desidered volume. Each time the operator press the button SWITCH the instrument activates the pump and on LCD is showed the number of steps generated so that the operator can know the number of steps necessary to obtain a given volume of liquid. The calibration procedure is done as follows 1. Prepare a volume of distilled water used for calibration. For example, UL 1000. 2. Set the requested volumein the instrument by using option 1. 3. Place the aspiration tube into the water and hold SWITCH button until the instrument has aspirated all the liquid. 4. Read on LCD screen the number of steps generated in Item GENERATED STEPS and enter it into the instrument via option 2. 5. At the end ofthe properly calibration procedure, the operator can save the calibration by option 3 otherwise repeat steps 1 to 4 22 User Manual 6. Testing the aspiration and washing through the options F1 and F2 to verify the accuracy of the calibration 11. PRINTER SETTINGS The configuration of the printer allows the operator to activate it or not both generally and for printing methods and / or results PRINTER SETTINGS 1-PRINTER ENABLE: ON 2-AUTO PRINT METHOD: OFF 3-AUTO PRINT RESULTS: ON The possible options are : 1. PRINTER ENABLE: activate or not the printer. 2. AUTO PRINT METHOD :automatically print the parameters of the method at the beginning of each execution. 3. AUTO PRINT RESULTS: automatically print the results of analysis. 23