1
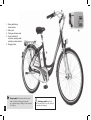
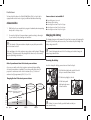
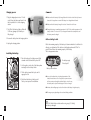
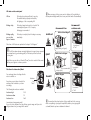
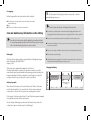
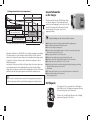
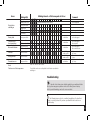
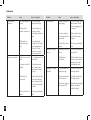
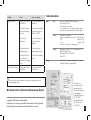
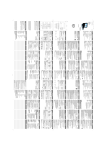
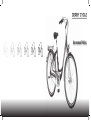
User manual Pedelec 4 1. Battery with battery status indicator 2. Battery lock 3. Pedal gear with motor unit 4. Control switch with assistance operating switch and battery status indicator 5. Charging station 5 2 1 3 2 Danger symbol: Indications with this symbol warn of possible bodily injury, in particular due to greater danger of falling or other increased risk of injury. Cautionary symbol: Indications with this symbol warn of possible material or environmental damages. Dear Customer: You have decided in favour of a Pedelec (Pedal Electric Cycle) - a bicycle that is equipped with an electric motor to give you additional assistance when riding. Characteristics 1. With this bicycle you can make better progress in headwinds, when transporting heavy loads or on steep slopes. 2. You can select the level of power assistance required according to the weight of your load and/or the prevailing road conditions. The intensity of the power assistance depends on your pedal power and the level of assistance selected. Before switching on the electric assistance system, please read the chapter “Charging the battery”. The battery must be fully charged before the motor (for electronically supported pedalling) is switched on. Power assistance is not available if: ● ● ● ● ● the pedalling power is too weak the battery light is blinking when riding at more than 24 km/h in 7th gear when riding at more than 18 km/h in 4th gear when riding at more than 14 km/h in 1st gear Charging the battery The charging time given in this manual is the time that is necessary for charging after the capacity of the battery has been used up. This is indicated by the blinking of the battery charge status LED. To avoid shortening the service life of the battery you should not charge the battery longer than 48 hours. Removing the battery Mode of operation and extent of electronic power assistance As soon as you switch on the electric assistance system and begin pedalling, electronic power assistance is available. The necessary pedal power reduces in proportion to each increase in the level of assistance (see p. 6, Selection of assistance level) by approximately 60%, 50%, or 30%. Demontage des Akkus Power assistance corresponds roughly to pedal power Power assistance Akkudiminishes festhalten und in steps Power assistance Schloss is zero (0) 1. Den das mit dem Schlüssel gegen den Uhrzeigersinn öffnen Driving force (pedal power + electronic Driving force power assistance) Start Demontage des Akkus In order to charge the battery, you must remove it from the bicycle. 1. Changing the level of electronic power assistance Demontage des Akkus 2. HoldAkku the battery firmly the lock with 1.1. Den festhalten undand das open Schloss mit the dem key in an anti-clockwise Schlüssel gegen den direction. Uhrzeigersinn öffnen 2. Tilt the battery slightly to the side. 3. Lift the battery with both hands and remove 2. Kippen Sieden den Akkumit leicht Heben it fromSie the holder. 3. Akku beiden Händen 3. aufund die nehmen Seite. Sie ihn aus der an Halterung heraus. Pedal force of the rider electronic power assistance Speed Power assistance is not available if: Lthe pedalling power is too weak 3. Heben Sie den Akku mit beiden Händen an und nehmen Sie ihn aus der Halterung heraus. 15 km/h 24 km/h 1. Den Akku festh mit dem Schlüs öffnen 3. Heben Sie den an und nehme heraus. A aus Sicherheitsgrü wissern, dass Sie d Achtung Caution: For reasons of safety you should make sure that you have removed the key. aus Sicherheitsgründen sollten Sie sich vergewissern, dass Sie den Schlüssel abgezogen haben 3 Charging process Comments 1. Plug the charging device into a 220 volt socket. Grasp the battery and insert it into the slot provided for it on the charging station. ● Make sure that the battery is fully charged before the first ride or after the bicycle has not been used for longer than one month. The battery is not charged when delivered. 2. The LEDs of the battery light up. When all 5 LEDs are glowing red, the battery is fully charged. ● Charge the battery at an ambient temperature of 0-40°C. If the outside temperature of the battery is below 0°C or above 40 °C, the charger will remain in the standby mode and the battery cannot be charged. 3. Remove the battery from the charging station. Before starting to ride ter Reihenfolge, 4. Unplug the charging station. ● Make sure that the battery is charged for at least 3 hours before its first use. Check the remaining capacity of the battery to determine whether it is sufficient for riding to your destination. If the button on the display panel marked “Push” is pressed, this will show the remaining capacity of the battery. This is an approximate value. t benötigt) Installing the battery 1. Place the battery in the battery mount, tilted 2. Kippen Sie den Akku in die outward on the left hand side by about 45°. vorhergesehene Halterung und rasten Sie ihn ein.. E 2. Use the guides on the side of the battery when inserting it into the battery holder. 3. sicher,toward dass der 3. Stellen Tilt theSie battery the bicycle until it engages the lock.gesichert ist, Akku in Position sodass er sich nicht nach vorn 4. bewegen Check that the battery is firmly seated. kann. The key is not required for installation. (der Schlüssel wird zum Anbringen des Akkus nicht benötigt). F Push E= battery empty F= battery full Battery status indicator ● In very cold weather, after a trip through mountains or if the battery has not been used for a long time, the power assistance will not operate even though the indicator light is on. In this case, the battery must be placed in the charger in order to recharge it. ● In winter, the travelling range is reduced in relation to the battery’s original capacity. ● The range may vary depending on the road and driving conditions. If all diodes flash one after another or in groups (2-3 diodes), the battery is damaged. 4 Battery Available capacity % 20 40 60 Control panel 80 100 Check battery status E F Push approx. 80 - 100 % Battery status indicator LED All five (5) LEDs on E F All three (3) LEDs on, approx. 70 – 100 % Push F Push E F Push approx. 20 - 40 % F Push approx. 10 - 20 % One (1) LED on, approx. 10 – 20 % Switching on the power assistance Press the on/off switch on the control panel. („Power“) ● After this, the battery status indicators light up and show the remaining capacity of the battery. If the lower power LED is blinking, you must charge the battery immediately before use (see section on LED light mode when riding). F Selection of assistance level “Mode” Battery status indicator LED The bicycle’s torque sensor is automatically reconfigured every time you change One (1) LED on E Push ● 10 minutes after the bicycle is brought to a halt, the current supply is automatically switched off (“Automatic cut off“). When you start riding again, repeat the procedure described above. Two (2) LEDs on E On/Off switch Two (2) LEDs on, approx. 40 - 60 % approx. 40 – 70 % Three (3) LEDs on The electronic power assistance is switch on and off by using a switch mounted on the handlebars. E F („Power“) Control panel The LEDs on the control panel light up for about two seconds and then go out again. Do not use the pedals when the LEDs are on. The torque sensor is configuring the control programme. approx. 60 - 80 % Four (4) LEDs on E Battery status indicator LED Operation Push One (1) LED blinking approx. 10 - 0 % LED blinks slowly – blinks quickly – off approx. 0 – 10 % the riding mode. This extends the useful life of the battery. If the LED does not light up during operation, check whether the battery is charged and securely mounted. LED light mode when riding During the trip, monitor the status of the light emitting diodes (LEDs). If they blink, this is a precise indication that the battery capacity is very low and that charging will soon be necessary. 5 LED status on the control panel LEDs on The battery has a charge sufficient for your trip. The available battery capacity is indicated by the lighting up of the corresponding LED. necessary when riding downhill, the accessory motor will switch off automatically. Blinking slowly The battery charge has dropped to a low level. The remaining battery power is 9% of capacity. Recharging is recommended. Blinking rapidly, goes out after approx. 3 minutes The battery is completely dead. A recharge is necessary immediately. When necessary, set the accessory motor to high mode. If no pedalling is Recommended Gear Level Road empfohlener Recommended assistance mode Hilfsmodus Shift to 3rd or 4th gear 1 2 3 Other forms of LED status are explained in the chapter “Self diagnosis” 5 6 (easy pedalling in 1st gear) The LED can show when an excessively high drain of energy is being consumed on a constant basis (e.g. when riding uphill) or if the battery has not been used for a long time. Push E Uphill Set assistance to “low” Shift to 2nd or 3rd gear F 1 Should this occur, press the on/off switch (“Power”) in order to switch off the current and then press it again to continue operation. 2 4 5 (1st is recommended for steep slopes) Selection of assistance level (Mode You can change the mode settings after the motor is switched on. Every time you press the mode switch, the assistance level is switched up or down accordingly. 6 Downhill Assistance level “Mode” Set assistance to “high” Shift to 7th gear 5 6 7 Set assistance to “low” The following three modes are available: Assistance high 1:1.3 Assistance medium 1:1 Assistance low 1:0.5 Low assistance (energy-saving mode) If you select a low assistance level you will have a greater range and if you select a high assistance level, your range will be smaller. mode corresponding to your physical capabilities, whether you are going uphill or downhill, whether you have a headwind or tailwind. You can adjust the optimal position of the gearshift and/or the accessory For stopping Neither the gearshift nor the mode switch should be activated. ● ● ● First activate the rear wheel brake or front wheel brake and rear wheel brake simultaneously. Stop Press the on/off switch to interrupt the current flow. Care and maintenance/information on the battery Have the electric drive system checked regularly by your authorized dealer. Do not perform any repair operations on the electric drive system or battery. Lack of specialist knowledge can lead to serious accidents. The battery must be fully charged at least every six months - otherwise irreparable damage may occur. Batteries cannot be disposed of with regular domestic waste. ● Do not charge your bicycle battery in any other charger. Charging other batteries in the charging station delivered with the system is also not permitted. There is a risk of explosion! ● Please do not store the battery outside and only install it just before starting to ride. ● Do not throw the battery into a fire or expose it to a heat source, because it could explode and cause serious injuries. Battery tips ● Please use only a damp cloth without chemical cleaners for cleaning the battery housing. The bicycle that you have purchased is operated with the following battery types: Model: Li-lon-battery (Ni-Li) NKY224B02 Capacity: 10 Ah ● Check the battery housing regularly for cracks, breaks or unusual deposits on the contacts. A battery with a damaged housing may no longer be used. This battery can be charged and discharged about 500 times. A battery should always be considered as a part which is subject to wear. This means that the initial capacity diminishes with increasing age and according to the frequency with which the battery is charged. If the travel range of your bicycle is no longer sufficient for you, we advise you to replace your battery. Charging the battery When delivered, the battery is in the so-called sleep mode. Therefore, the battery must be fully charged before it is operated for the first time because otherwise it can produce no current. In the sleep mode, the operating panel is inactive. Li ion battery Battery sleep mode ● Never attempt to open the battery. Battery might be damaged Long charging times Ideal temperature range for charging - 10o C 0o C 10o C 20o C 30o C 40o C 50o C If the capacity of the battery drops below 50% and if the battery remains uncharged for longer than two weeks, the sleep mode returns. Also, the battery self-discharges over time and it will enter the sleep mode after a down time of approx. 4 months, even if it is fully charged. 7 General information on the charger Discharge characteristic curve (temperature) Nominal voltage Discharge curve for lower temperature Possible discharge capacity at lower temperature (time) Possible discharge capacity at regular temperature (time) Discharge Capacity (Ah) or hours required Temperature Difference Minimum voltage for battery operation (battery cut-off voltage) Discharge curve for regular temperature Regardless of whether it is a NiCd, NiMH or Li ion battery, charging is accomplished by a chemical reaction of the substances inside the battery. Since the chemical reaction in the battery takes place slowly at low temperatures, the discharge capacity, regardless of the type of battery, tends to diminish in comparison to that at ordinary temperature. In actual use, it has been noted that, as the figure shows, the accessory motor may stop prematurely despite some remaining battery capacity, since the discharge voltage tends to remain at a lower level at a low temperature. This does not mean a malfunction and the battery will regenerate itself when the temperature rises. On several consecutive days in winter, the discharge capacity may drop due to the low temperatures with the result that the range may be suddenly reduced. The delivery includes the type NKJ38 charger. Before use, take the charger out of the cardboard box and remove the plastic wrapping. If you do not do this, the outside of the charger can be deformed by the heat. Store the charger in a dry place if you are not charging the battery. Improper handling can cause serious accidents or injuries. ● ● ● ● ● ● ● ● ● ● ● Never bring the contacts of the charger together during the charging process. Do not attempt to disassemble the charger or alter it. Do not use the charger in damp spaces. Do not continue using a damaged charger or accessories (e.g., housing, cables, plugs)! Risk of electric shock, short-circuit or fire! Keep it away from children – risk of electric shock. Please make sure that the plug is properly inserted into the socket. Plug and contacts of the charger should be kept free of dust, clean and dry. The charger can only be connected to a 220-230 V socket. Avoid prolonged direct skin contact with the charger during the charging process. During this time the device heats up to about 40-60°C. Risk of burns! The charger should only be set up in a secure stable position on a suitable surface. Do not cover the charger or place objects on it. Risk of overheating or fire! Self diagnosis The control unit of the control panel has a self-diagnosis mode. With the aid of self-diagnosis, any improper function of the electrical system can be determined. The error code is identified by different modes of blinking (number and frequency) of the diodes. 8 Errors Directly after switching on Blinking LEDs Upper power diode Middle power diode Lower power diode Blinking interval - a field corresponds to 0.5 sec Comment Indicates remaining battery capacity. Self configuration “High” mode “Medium” mode “Low” mode and further start support mode Battery dead Lower power diode and further no electric support Position error of the torque pickup Two power diodes All three mode diodes Two power diodes All three mode diodes and further no electric support Reset required and further no electric support Motor unit defective Reduce assistance level by 2 steps Reduce assistance level by 1 step Reduce assistance level by 2 steps Motor unit defective Overload One mode diode Strong overload One mode diode no blinking when cooled no blinking when cooled Transmission error Last power diode and further Reset Press “Off” and “On” twice to reset. Position error of the torque sensor To avoid this error do not use the pedals for the first two seconds after switching on. Troubleshooting Have the electric drive system checked regularly by your authorized dealer. Do not perform any repair operations on the electric drive system or battery. Lack of specialist knowledge can lead to serious accidents. The following tips are only to be considered as guidelines. You should not hesitate to contact your dealer if you have a problem with the electric drive or with the battery. 9 Fehlersuche Problem Cause Item to be checked Problem Cause Item to be checked current cannot be switched on 1) No remaining battery capacity 1) check the battery charge status indicator Weak assistance 1) Capacity drop due to battery ageing 2) Battery switch activated, fuse burnt out 2) have the voltage on the battery terminal checked by the authorized dealer 1) Have the voltage on the battery terminal checked after the charging process is completed. 2) Incorrect setting at the starting point of the torque sensor 2) Did you have your foot on the pedal when switching on? 3) Motor defect or drive problem 3) Contact your authorized dealer. 1) Battery LED does not come on 1) Have the battery tested at your dealer’s. 2) Malfunction of control switch 2) Check whether the cover foil of the control switch is damaged. If so, contact your authorized dealer. 1) Total discharge due to prolonged storage 1) Have the battery terminal voltage checked. 2) Battery switch activated, fuse burnt out 2) Have the battery terminal voltage checked. 3) Outside the temperature range (0-40°C) 3) Was the battery charged outside in the winter/ shortly after riding? 3) Malfunction of control switch/cable break Assistance not provided 1) Indicator error control switch 1) See self-diagnosis of the control switch. 2) Automatic switch-off activated 2) Check whether more than 10 minutes have elapsed since the pedals were used. 3) Malfunction of control switch 3) Check whether the label on the controls has been torn off or has peeled off. If so, contact your authorized dealer. 4) Motor defect or drive problem 10 3) check whether the covering foil of the control switch is damaged and if the cable is in bad condition. If so, contact your authorized dealer. 4) Contact your authorized dealer Battery LED does not come on Charging error standby continued Problem Cause Item to be checked Range is reduced 1) Aging, end of service life of battery 1) Check the useful life of the battery. 2) Overload (carrying heavy loads, climbing, gear use) 2) Are you driving with the bike when the gear is at “middle” or “fast”? 3) Poor bicycle maintenance 3) Do the tires have too little air, is a brake rubbing? 4) Deactivation due to prolonged storage 4) Have the battery terminal voltage checked. 5) Incomplete charge due to abnormal termination of charging process 5) Please repeat charging process. 1) Aging, end of service life of battery 1) Check the useful life of the battery. Battery status indicator Replace the electrical components on your bicycle only with parts tested for the corresponding model. We wish you a lot of pleasure with your new bicycle! Copyright © 2007 Derby Cycle Werke GmbH Reproduction, even in excerpts, only with the authorization of Derby Cycle Werke GmbH, printing errors, mistakes and technical modifications reserved! Technische Daten Drive Motor Motor type: Brushless pedal bearing motor Power output: 250 W Controlled by a force sensor i.e. at assistance level 1:1, the drive feeds the same power into the system that the rider himself applies. Battery Removable, rechargeable Lithium ion manganese battery 26 V 10 Ah (260 Wh) 8 Ah Weight 2.2 kg 10 Ah Weight 2.4 kg Service life: 3-4 years, 500 charging cycles Charger Charging time: approx. 3 h / first charge: min. 4 h Weight of charger: 530 g Power supply: 220 V (50 Hz) AC Power 62 W Range up to 80 km (* in the case of average use, optimal conditions and fully charged battery) This bicycle is in compliance with the requirements of the following EEC directives: Electro Magnetic Compatibility Directive (89/336/EEG). Low Voltage Directive (73/23/EEC and 93/68/EEC). 11