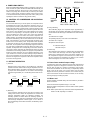
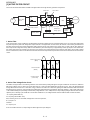
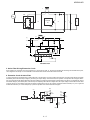
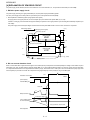
1
TopPage AEX2M14LR SERVICE MANUAL No. S2038AEX2MLRT MULITI SPLIT TYPE ROOM AIR CONDITIONERS (OUTDOOR UNIT) MODEL AE-X2M14LR In the interests of user-safety (Required by safety regulations in some countries) the set should be restored to its original condition and only parts identical to those specified should be used. CONTENTS CHAPTER 1. SPECIFICATIONS [1] SPECIFICATION ........................................... 1-1 [2] EXTERNAL DIMENSION .............................. 1-2 [3] CAPACITY TABLE......................................... 1-3 [4] ELECTRICAL PARTS.................................... 1-3 [5] WIRING DIAGRAMS ..................................... 1-4 CHAPTER 2. EXPLANATION OF CIRCUIT AND OPERATION [1] BLOCK DIAGARM ........................................ 2-1 [2] FUNCTIONS ................................................. 2-2 [3] ACTIVE FILTER CIRCUIT............................. 2-4 [4] EXPLANATION OF IPM DRIVE CIRCUIT ........ 2-6 CHAPTER 3. FUNCTION AND OPERATION OF PROTECTIVE PROCEDURES [1] PROTECTIVE FUNCTIONS AND OPERATIONS ............................................................ 3-1 [2] TROUBLESHOOTING GUIDE ...................... 3-2 CHAPTER 4. REFRIGERATION CYCLE [1] REFRIGERATION SYCLE............................. 4-1 [2] REFRIGERANT PIPE INSTALLATION WORKS ......................................................... 4-2 CHAPTER 5. DISASSEMBLING PROCEDURE [1] OUTDOOR UNIT ........................................... 5-1 Parts Guide Parts marked with " " are important for maintaining the safety of the set. Be sure to replace these parts with specified ones for maintaining the safety and performance of the set. This document has been published to be used for after sales service only. The contents are subject to change without notice. AEX2M14LR CHAPTER 1. SPECIFICATIONS AEX2M14LR Service Manual [1] SPECIFICATION ITEMS Cooling capacity 2-INDOOR OPERATION Heating capacity 2-INDOOR OPERATION Moisture removal ✩ Electrical data Phase Rated frequency Rated voltage Rated current Rated input Power factor Compressor Refrigerant system INDOOR UNIT AY-XPM7FR/9FR/12FR kW 7K & 7K kW 7K & 7K Liters/h 3.8(1.8 – 4.3)* 4.4 (1.9 – 5.4)* 1.6 Hz V Cool A Heat A Cool W Heat W Cool % Heat % Type Model Oil charge Evaporator Condenser Control Name of refrigerant Refrigerant volume Noise level (at cooling) dB(A) Single 50 230V 4.1 (1.6 – 5.3)* 4.4 (1.7 – 5.9)* 900(350– 1160)* 950 (370 – 1300)* 95 94 Hermetically sealed DC twin rotary DA130A1F-28F Ester oil VG74 Silt Fin and Grooved tube type Corrugate Fin and Grooved tube type Expansion valve R410A 1680g High/Med/Low 7FR: 37/34/28 9FR: 39/36/28 45 12FR: 40/37/29 Fan system Drive Direct drive . m3/min. Air flow quantity (at cooling) Fan Connections Refrigerant coupling Refrigerant tube size Gas, Liquid Maximum length (per unit) Maximum length (total) Maximum charge-less length Maximum height difference Additional Charge (per m) Drain joint Others Safety device Air filters Net dimensions Net weight OUTDOOR UNIT AE-X2M14LR m m m m g mm High/Med/Low 7FR: 8.0/7.4/5.4 9FR: 8.6/7.9/5.6 12FR: 10.2/8.6/6.1 Cross flow fan 33 Propeller fan Flare type 3/8”, 1/4” 25 40 25 10 15 Connected part O.D.16 Compressor: Thermistor Fan motors: Thermal fuse (indoor unit). Thermal protector (Out door unit) Fuse, Micro computer control Anti-mold polypropylene net of injection type (Washable) Width mm 790 950 (890+60) Height mm 278 645 Depth mm 198 323 (290+33) kg 10 51 NOTE: The condition of star “✩“marked item are ‘ISO5151’: *: Representative connection 1–1 AEX2M14LR 320 [2] EXTERNAL DIMENSION 950 60 320 117 527 645 890 940 323 290 170 1–2 52 24 570 24 151 52 179 284 210 621 5 645 50 890 AEX2M14LR [3] CAPACITY TABLE Outdoor Units AE-X2M14LR Recommended Combination Indoor Units AY-XPM7/9/12FR, GS-XPM9/12, GS-XPM7/9/12FR 12 7 9 9 9 7 7 7 COOLING CAPACITY TABLE Operating Status 2-Room 1-Room Combination of Indoor Units A B 12 09 12 07 09 09 09 07 07 07 12 OFF 09 OFF 07 OFF Cooling Capacity (kW) A 2.2 2.4 1.9 2.1 1.9 3.4 2.6 2.0 B 1.6 1.4 1.9 1.7 1.9 OFF OFF OFF RATING (Min. - Max.) 3.8 (1.8 - 4.3) 3.8 (1.8 - 4.3) 3.8 (1.8 - 4.3) 3.8 (1.8 - 4.3) 3.8 (1.8 - 4.3) 3.4 (1.4 - 4.0) 2.6 (1.4 - 3.3) 2.0 (1.4 - 2.7) Running Current (A) Power Consumption (W) RATING (Min. - Max.) 4.1 (1.6 - 5.3) 4.1 (1.6 - 5.3) 4.1 (1.6 - 5.3) 4.1 (1.6 - 5.3) 4.1 (1.6 - 5.3) 4.2 (1.5 - 6.0) 3.0 (1.5 - 4.2) 2.3 (1.5 - 3.2) RATING (Min. - Max.) 900 (350 - 1160) 900 (350 - 1160) 900 (350 - 1160) 900 (350 - 1160) 900 (350 - 1160) 900 (320 - 1320) 660 (320 - 920) 510 (320 - 700) Running Current (A) Power Consumption (W) RATING (Min. - Max.) 6.6 (1.7 - 5.9) 6.6 (1.7 - 5.9) 6.6 (1.7 - 5.9) 6.6 (1.7 - 5.9) 6.6 (1.7 - 5.9) 5.2 (1.5 - 7.2) 3.8 (1.5 - 6.4) 3.1 (1.5 - 4.6) RATING (Min. - Max.) 950 (370 - 1300) 950 (370 - 1300) 950 (370 - 1300) 950 (370 - 1300) 950 (370 - 1300) 1140 (320 - 1570) 830 (330 - 1400) 680 (320 - 1010) HEATING CAPACITY TABLE Operating Status 2-Room 1-Room Combination of Indoor Units A B 12 09 12 07 09 09 09 07 07 07 12 OFF 09 OFF 07 OFF Heating Capacity (kW) A 2.5 2.8 2.2 2.5 2.2 3.9 3.0 2.4 B 1.9 1.6 2.2 1.9 2.2 OFF OFF OFF RATING (Min. - Max.) 4.4 (1.9 - 5.4) 4.4 (1.9 - 5.4) 4.4 (1.9 - 5.4) 4.4 (1.9 - 5.4) 4.4 (1.9 - 5.4) 3.9 (1.2 - 4.6) 3.0 (1.2 - 4.2) 2.4 (1.2 - 3.3) [4] ELECTRICAL PARTS Compressor Outdoor fan motor Fuse 1, 101 Fuse 6 Fuse 3, 4 Fuse 5 DA130A1F-28F MLB051 — — — — Hermetically sealed DC twin rotary QFS-GA065JBZZ(20A,250V) QFS-GA064JBZZ(1A,250V) QFS-GA062JBZZ(3.15A,250V) QFS-GA063JBZZ(2A,250V) 1–3 AEX2M14LR [5] WIRING DIAGRAMS from CONTROL PWB CN14 from ELECTROLYTIC CAPACITOR C10(+) from ELECTROLYTIC CAPACITOR C10(-) from COMPRESSOR TERMINAL W "ORANGE" from COMPRESSOR TERMINAL U "RED" from COMPRESSOR TERMINAL V "WHITE" from CONTROL PWB BCN1 IPM P.W.B. 1–4 RELAY P.W.B. from CONTROL P.W.B. "CN9A" from 4 WAY VALVE from IPM "U", "V", "W" from 1–5 PO R WE SU PP P LY RELAY P.W.B and POWER SUPPLY P.W.B. .W .B. from ACTIVE FILTER MODULE from IPM P.W.B. "CN114" POWER SUPPLY P.W.B. from DIODE BRIDGE DB1 "~" from DC FAN MOTOR from TERMINAL BOARD POWER SUPPLY "L" from TERMINAL BOARD UNIT C "1" from TERMINAL BOARD UNIT C "N" from CONTROL P.W.B. "BCN16" from CONTROL BOX from CONTROL P.W.B. "BCN17" from CONTROL P.W.B. "BCN15" from TERMINAL BOARD POWER SUPPLY "N" AEX2M14LR CONTROL P.W.B and DISPLAY P.W.B 1–6 from POWER SUPPLY P.W.B. "CN17" from IPM PWB "CN101" from SUCTION THERMISTOR from THERMISTOR COMP. TENP. from EXPANSION VALVE B HEAT EXCHANGER TEMP. from HEAT SINK THERMISTOR OUT DOOR TEMP. from EXPANSION VALVE A SUCTION TEMP. CONTROL P.W.B DISPLAY P.W.B from RELAY P.W.B. "CN9" from POWER SUPPLY P.W.B. "CN16" from POWER SUPPLY P.W.B. "CN15" from TERMINAL BOARD UNIT A - "N" UNIT A, B - "2" from TERMINAL BOARD POWER SUPPLY AEX2M14LR 㧔㨀㧱㧾㧹㧵㧺㧭㧸˴㧮㧻㧭㧾㧰˴㧝㧕 㨀㨔㨑㨞㨙㨍㨘˴㧲㨡㨟㨑 㧔㨁㧺㧵㨀˴㧮㧕 㧔㨁㧺㧵㨀˴㧭㧕 㧔㨀㧱㧾㧹㧵㧺㧭㧸˴㧮㧻㧭㧾㧰˴㧮㧕 㧞 㧝 㧺 㨓 㨔 㧸 㧺 㧝 㧞 㧳㧾㧱㧱㧺㧛㨅㧱㧸㧸㧻㨃 㧮㧸㨁㧱 㧮㧸㨁㧱 㧳㧾㧱㧱㧺㧛㨅㧱㧸㧸㧻㨃 㧿㨃㧝 㧶㧼㧞 㨁㧺㧵㨀˴㧮 㨁㧺㧵㨀˴㧭 㧡 㧢 㧣 㧡 㧢 㧣 㧰㧟 㧾㧞㧝㧣 㧰㧯˴㧲㨍㨚 㧹㨛㨠㨛㨞 㧯㧺㧤㧯 㧢 㧡 㧠 㧟 㧞 㧝 㨀㧴㧠 㧯㧺㧤㧭 㧔㨠㨔㨑㨞㨙㨕㨟㨠㨛㨞㧕 㧯㧢㧤 㧔㨛㨡㨠㨐㨛㨛㨞㧕 㧜㧚㧜㧝Ǵ 㨀㧴㧟 㧝㧢㨂 㧝㧛㧠㨃 㧝㧚㧜㨗㧲 㧾㧝㧜 㧸㧡 㧯㧞㧜 㧾㧝㧞 㧢㧚㧠㧥㨗㧲 㨀㧢 㧯㧝㧥 㧝㧜㨂 㧙 㧞㧞㧜Ǵ㧲 㧗 㧾㧝㧝 㧰㧝 㧝㧚㧜㨗㧲˴ 㧯㧤㧘㧞㧜㧦 㧞㧣㧡㨂 㧞㧚㧞Ǵ㧲 㧯㧤 㧺㧾㧟 㨀㧡 㧳㧾㧭㨅 㧮㧸㧭㧯㧷 㧼㨀㧯㧝 㧲㨁㧿㧱㧠 㧞㧡㧜㨂 㧟㧚㧝㧡㧭 㧹㧾㨅㧝 㧮㧸㨁㧱 㧭㧯㧞 㧭㧯㧝 㧗 㧸㧝 㧙 㧼 㧮㧸㨁㧱 㧗 㧮㧸㨁㧱 㧗 㧮㧸㨁㧱 㧠 㧟㧞 㧝 㧾㧝㧜㧢 㧝㧛㧠㨃 㧝㧟㧜㨗 㧾㧝㧜㧡 㧝㧛㧠㨃 㧝㧟㧜㨗 㧝㧡㨂 㧢㧚㧤㨗 㧾㧥㧞 㧰㧞㧜 㧟 㧡㧜㨂 㧠㧚㧣㨗㧝㧜㧜㧜㧼 㧾㧤㧝 㧯㧣㧡 㧯㧢㧜 㧞㧡㨂 㧜㧚㧝Ǵ㧲 㧯㧢㧝 㧝㧜㨂 㧝㧜㧜Ǵ㧲 㧾㧥㧤㧭㧙㧥㧤㧳㧦㧢㧚㧤㨗㧲 㧾㧥㧣㧭 㧾㧥㧣㧮 㧾㧥㧣㧰 㧾㧥㧣㧯 㧾㧥㧣㧱 㧾㧥㧣㧲 㧾㧥㧣㧭㧙㧾㧥㧣㧴㧦㧝㧜㨗 㧾㧥㧣㧳 㧼㧯㧤㧡㧟㨄 㧞㨃 㧠 㧼㧯㧣 㧝 㧞㨃 㧞㨃 㧝㨗 㧝㨗 㧝㨗 㧾㧤㧞 㧾㧤㧡㧭 㧾㧤㧡㧮 㧾㧤㧡㧯 㧡㧢㨗 㧟 㧞 㧾㧤㧟 㧰㧞㧝 㧟㧚㧟㧷 㧾㧤㧥 㧼㧯㧤㧝㧣㨄㧟 㧝㧚㧤㨗 㧝 㧼㧯㧤 㧠 㧡㧜㨂 㧯㧤㧝 㧠㧚㧣㨗㧝㧜㧜㧜㧼 㧠㧣㧜㧜㧼㧯㧤㧞 㧾㧤㧢 㧯㧤㧟 㧞㧡㧜㨂 㧜㧚㧝Ǵ 㧟 㧞 㧞㧡㨂 㧼㧯㧤㧡㧟㨄 㧞㨃 㧠 㧼㧯㧥 㧝 㧞㨃 㧞㨃 㧝㨗 㧝㨗 㧝㨗 㧾㧥㧜㧭 㧾㧥㧜㧮 㧾㧥㧜㧯 㧾㧤㧣 㧡㧢㨗 㧞 㧟 㧾㧤㧤 㧝㧚㧤㨗 㧞 㧟㧚㧟㨗 㧾㧤㧠 㧼㧯㧤㧝㧣㨄㧟 㧝 㧼㧯㧢 㧠 㧡㨂 㧯㧡㧡㧭㧙㧡㧡㧲㧦㧝㧜Ǵ㧝㧢㨂 㧝 㧞 㧟 㧾㧥㧟 㧝㧜㨗 㧯㧢㧞 㧜㧚㧝Ǵ 㧞㧡㨂 㧝 㧞 㧟 㧠㧚㧣㨗 㧾㧣㧢 㧝㧜㨗 㧯㧺㧝㧢 㧗 㧯㧢㧠 㧽㧥 㧝㧜㨂 㧙㧠㧣Ǵ㧲 㧷㧾㧭㧝㧜㧞㧿 㧾㧥㧝 㧝㧜㨗 㧷㧾㧯㧝㧜㧡㧿 㧽㧝㧜 㧔㧯㧻㧺㨀㧾㧻㧸˴㧼㨃㧮㧕 㧾㧥㧡 㧯㧢㧥 㧯㧣㧞 㧠㧣㧜㧜㧼 㧜㧚㧝Ǵ 㧞㧡㧜㨂 㧞㧡㨂 㧝㧟㨂 㧯㧢㧡 㧯㧢㧟 㧜㧚㧜㧝Ǵ 㧡㧜㨂 㧯㧤㧢㧭㧙㧯㧤㧢㧴㧦㧜㧚㧜㧝Ǵ㧡㧜㨂 㧾㧣㧜 㧠㧚㧣㨗 㧾㧢㧥 㧠㧚㧣㨗 㧾㧢㧣 㧝㨗 㧾㧞㧞㧜 㧯㧠㧢 㧞㧣㧜 㧞㧡㨂 㧜㧚㧝Ǵ 㧢 㧡 㧠 㧟 㧞 㧝 㧡㨂 㨎 㨍 㧻㧿㧯㧝 㨒 㧾㧢㧤 㧝㨗 㧝㧜㨗 㧿 㧠㧜 㧟㧥 㧞㧢 㧞㧣 㧞㧤 㧞㧥 㧟㧜 㧟㧝 㧟㧞 㧟㧟 㧟㧠 㧟㧡 㧟㧢 㧟㧣 㧟㧤 㧞㧡 㧹㧰㧜 㧹㧰㧝 㧹㧰㧞 㧼㧠㧜 㧼㧟㧣 㧼㧟㧢 㧼㧟㧡 㧼㧟㧠 㧼㧟㧟 㧼㧟㧞 㧼㧟㧝 㧼㧟㧜 㧼㧞㧣 㧼㧞㧢 㧼㧞㧡 㧼㧞㧠 㧤 㧣 㧢 㧡 㧠 㧟 㧞 㧝 㨅 㧻 㨃 㧯㧣㧤 㧡㧜㨂 㧜㧚㧜㧝Ǵ㧲 㧰㧣 㧝 㧞 㧟 㧠 㧡 㧢 㧣 㧤 㧥 㧡㨂 㧯㧥㧟 㧞㧡㨂 㧜㧚㧝Ǵ㧲 㧾 㧿 㨀 㧽 㧯㧡㧟 㧡㧜㨂 㧜㧚㧜㧝Ǵ㧲 㧶㧼㧲 㨀 㧼 㧯㧤㧡 㧜㧚㧜㧝Ǵ 㧡㧜㨂 㧯㧤㧜 㧜㧚㧝Ǵ 㧞㧡㨂 㧾㧞㧞㧣 㧝㧜㨗 㧯㧣㧥 㧜㧚㧜㧝Ǵ 㧡㧜㨂 㧝㨗 㧝 㧟 㧾㧞㧝㧥 㧝㧜㨗 㧝 㧞 㧾㧞㧞㧡 㧝㧜㨗 㨓 㨔 㧔㨀㨔㨑㨞㨙㨍㨘 㧲㨡㨟㨑㧕 㧔㧴㧱㧭㨀㧿㧵㧺㧷㧕 㧯㧺㧡 㧾㧞㧞㧤 㧝㧜㨗 㧯㧡㧠 㧝㧜Ǵ 㧝㧢㨂 㧾㧞㧞㧥 㧾㧞㧟㧜㧯㧺㧤㧮 㨀㧴㧡 㧝㧜㨗 㧢㧚㧤㨗㧲 㧾㧞㧞㧢 㧡㨂 㧡㨂 㧝㧛㧠㨃 㧝㧜㧜 㧲㧯㧝 㧯 㧾㧠㧥 㧾㧠㧣 㧝㧛㧠㨃 㧾㧢㧝 㧾㧢㧞 㧾㧡㧥 㧾㧢㧜 㧾㧡㧣 㧾㧡㧤 㧝㧛㧞㨃˴㧝㧥㧢㨗㧲 㧾㧡㧡㧘㧡㧢㧦 㧾㧡㧢 㧾㧡㧡 㧾㧠㧤 㧾㧡㧜 㧝㧜㧜 㧝㧛㧠㨃 㧝㧜㧜 㧝㧛㧠㨃 㧝㧜㧜 㨎 㧝㧡㨂 㧟 㧠 㧗 㧤 㧙㧞 㧡㨂 㧡 㧠 㧟 㧞 㧝 㧵㧯㧥 㧝㧡㨂 㧾㧞㧜㧝 㨍 㧝㧜㧜㨗㧲 㧡㨂 㧮㧯㧺㧝 㧞㧜㧜㨗㧲 㧞㧜㧜㨗㧲 㧾㧞㧜㧡 㧾㧞㧜㧠 㧝 㨆 㧯㧺㧝㧜㧝 㧾㧝㧜㧣 㧾㧝㧝㧞 㧢㧚㧤㨗 㧢㧚㧤㨗 㧞㧡㨂㧗 㧯㧝㧜㧡㧙 㧝㧜㧜Ǵ㧲 㧯㧝㧞㧞 㧜㧚㧝Ǵ㧲 㧯㧝㧞㧟 㧜㧚㧝Ǵ㧲 㧯㧝㧝㧣 㧝㧜㧜㧜㨜㧲 㧯㧝㧝㧤 㧝㧜㧜㧜㨜㧲 㧯㧝㧝㧢 㧝㧜㧜㧜㨜㧲 㧯㧝㧝㧡 㧝㧜㧜㧜㨜㧲 㧯㧝㧝㧠 㧝㧜㧜㧜㨜㧲 㧯㧝㧝㧟 㧝㧜㧜㧜㨜㧲 㨂㨃㧲㧿㧝㧟 㧲㧻 㧝㧤 㨃㧺 㧵㧼㧹 㨂㧼㧯㧝㧝 㨂㧺㧯㧝㧡 㧞㧝 㨂㧺㧵㧝㧠 㨂㧺 㨂㧼㧵㧝㧜 㨂㨂㧲㧿㧤 㨂㨃㧲㧮㧝㧞 㧞㧜 㨁㧺 㨂㨁㧲㧿 㧠 㨂㧼㧵 㧢 㨂㨂㧲㧮 㧣 㧝㧥 㧥 㨃㧼 㧡 㨂㧼 㧝 㨂㧼㧵 㧞 㨁㧼 㨂㨁㧲㧮 㧟 㧵㧯㧟 㧷㧵㧰㧢㧡㧜㧜㧠㧭㧼 㧡㨂 㧔㧵㧼㧹˴㧼㨃㧮㧕 㧞 㨂 㧟 㨃 㧠 㨄 㧡 㨁 㨃 㨅 㧮 㧾㧞㧡㧣 㧾㧞㧡㧢 㧞㧚㧞㨗 㧝㧜㨗 㧝㨗 㧝㧛㧠㨃 㧾㧞㧢㧝 㧝㧛㧠㨃 㧻 㧞㧚㧜㨗㧲 㧾㧞㧜㧟 㧾㧞㧜㧞 㧞㧜㨗㧲 㧷㧾㧯㧝㧜㧡㧿 㧽㧤 㧾㧞㧡㧡 㧾㧞㧡㧠 㧞㧚㧞㨗 㧝㨗 㧝㧛㧠㨃 㧝㧜㨗 㧝㧛㧠㨃 㧾㧞㧢㧜 㧽㧝㧡 㧽㧝㧠㧘㧝㧡㧦㧞㧿㧭㧝㧜㧞㧜㨅 㧽㧝㧠 㧷㧾㧯㧝㧜㧡㧿 㧽㧣 㧝㧟㨂 㧮㧯㧺㧝㧣 㧝 㨃㧴㧵㨀㧱 㧾㧱㧰 㨀㨃 㧻㧾㧭㧺㧳㧱 㨀㨂 㨀㨁 㧾 㧿 㧻 㨅 㧲㧯㧥 㨑 㧰㧝㧜㧜 㧯㧝㧜㧠 㨆㧰㧝㧜㧜 㧟㧟㧜Ǵ㧲㧴㨆㧞㧠㧙㧞 㧞㧡㨂 㧙 㧗 㧜㧚㧝Ǵ㧲 㧯㧝㧝㧞 㧯㧝㧜㧤㧙 㧜㧚㧝Ǵ㧲 㧯㧝㧜㧟 㧞㧡㨂 㧝㧜㧜Ǵ㧲 㧗 㧗 㧯㧝㧜㧞 㧞㧡㨂 㧯㧝㧜㧣㧙 㧝㧜㧜Ǵ㧲 㧜㧚㧝Ǵ㧲 㧜㧚㧝Ǵ㧲 㧯㧝㧝㧝 㧰㧝㧜㧟 㧯㧺㧝㧞㧭 㧯㧺㧝㧞㧮 㧔㨢㨍㨘㨢㨑˴㧭㧕 㧔㨢㨍㨘㨢㨑˴㧮㧕 㧲㧯㧝㧜 㧰㧝㧜㧝 㧢 㧡 㧠 㧟 㧞 㧝 㧯㧝㧜㧝 㧞㧡㨂 㧯㧝㧜㧢㧙 㧝㧜㧜Ǵ㧲 㧜㧚㧝Ǵ㧲 㧜㧚㧝Ǵ㧲 㧯㧝㧝㧜 㧰㧝㧜㧞 㧗 㧜㧚㧝Ǵ㧲 㧯㧝㧜㧥 㨃 㧻 㧰㧟㧣 㧰㧟㧡 㧮㧸 㧾 㧳㧾 㧰㧟㧢 㧰㧟㧠 㨃 㨅 㧰㧟㧟 㧰㧟㧞 㧮㧸 㧾 㧳㧾 㧰㧟㧝 㧰㧟㧜 㧢 㧡 㧠 㧟 㧞 㧝 㧝 㧞 㧠 㧢 㧯㧺㧞 㧾㧡㧣㧘㧾㧡㧥㧘㧾㧢㧝㧦 㧝㧛㧞㨃˴㧝㧥㧢㨗㧲 㧾㧡㧝 㧾㧡㧤㧘㧾㧢㧜㧘㧾㧢㧞㧦 㧣㧚㧡㨗㧲 㧝㧛㧞㨃˴㧝㧤㧜㨗㧲 㧯㧟㧣 㧯㧟㧤 㧯㧟㧥 㧯㧠㧜 㧾㧡㧞㧾㧡㧟㧾㧡㧠 㧞㧡㨂 㧯㧟㧤㧘㧯㧟㧥㧘㧯㧠㧜㧦 㧾㧡㧞㧘㧾㧡㧟㧘㧾㧡㧠㧦 㧜㧚㧝Ǵ㧲 㧡㧜㨂˴㧟㧟㧜㨜㧲 㧝㧠㧚㧣㨗㧲 㧰㧟㧤 㧝㧜 㧢 㨅 㧢 㧣 㨆 㧣 㧾㧞㧟㧟㧙 㧤 㧤 㧞㧟㧤㧦㧟㧥㧜 㧝㧛㧠㨃 㧥 㧥 㧯㧡㧝 㧯㧡㧞㧞㧡㨂 㧡㧜㨂 㧜㧚㧝Ǵ㧲 㧝㧜 㧝㧜 㧜㧚㧜㧝Ǵ㧲 㧝㧡㨂 㧾㧞㧟㧣 㨅 㧾㧞㧟㧤 㨆 㧾㧞㧟㧢 㨄 㧾㧞㧟㧡 㨃 㧾㧞㧟㧠 㨂 㧾㧞㧟㧟 㨁 㧾㧞㧟㧥 㧝㧜㨗 㧾㧞㧟㧞 㧝㧜㨗 㧶㧼㧠 㧶㧼㧡 㧝㧜㨗 㧾㧞㧟㧝 㧤 㧗㧝㧝 㧙 㧗㧥 㧯㧥㧣 㧯㧥㧢 㧞㧡㨂 㧡㧜㨂 㧜㧚㧝Ǵ㧲 㧝㧜㧜㧜㨜㧲 㧝㨗 㧾㧞㧜㧜 㧰㧤 㧡㨂 㧷㧵㧭㧟㧟㧥㧼 㧣 㧵㧯㧡 㧢 㧗 㧙 㧞㧡 㧞㧟 㧞㧠 㨂 㨃 㨁 㧔㧵㧼㧹˴㧼㨃㧮㧕 㧰㧢 㧹㧾㨅㧝 㧝㧡㨂 㧽㧝㧝 㧝㧟㨂 㧢㧡 㧠 㧟 㧞 㧝 㧯㧺㧰 㧟 㧝㧞 㧙 㧝㧟 㧝㧠 㧝 㧷㧾㧯㧞㧠㧡㧹 㧝㧚㧤㨗 㧾㧠㧢 㧝㧤㨂 㨒㨘㨍㨟㨔㧮㧯㧺㧝㧡 㧤 㧣 㧢 㧡 㧠 㧟 㧞 㧝 㨣㨞㨕㨠㨑㨞 㧯㧺㧝㧡 㧤 㧾㧠㧠 㧝㧚㧤㨗 㧡㨂 㧢㧡 㧠 㧟 㧞 㧝 㧼㧣㧜㧤㧜 㧼㧣㧝㧣㧥 㧼㧣㧞㧣㧤 㧼㧣㧟㧣㧣 㧼㧣㧠㧣㧢 㧼㧣㧡㧣㧡 㧼㧣㧢㧣㧠 㧔㨁㧕㧼㧣㧣㧣㧟 㧵㧯㧝 㧔㨂㧕㧼㧤㧜㧣㧞 㧔㨃㧕㧼㧤㧝㧣㧝 㧔㨁㧕㧼㧤㧞㧣㧜 㧔㨄㧕㧼㧤㧟㧢㧥 㧔㨂㧕㧼㧤㧠㧢㧤 㧔㨅㧕㧼㧤㧡㧢㧣 㧔㨃㧕㧼㧤㧢㧢㧢 㧔㨆㧕㧼㧤㧣㧢㧡 㧯㧠㧡 㧞㧡㨂 㧠㧝㧠㧞㧠㧟㧠㧠㧠㧡㧠㧢㧠㧣㧠㧤㧠㧥㧡㧜㧡㧝㧡㧞㧡㧟㧡㧠㧡㧡㧡㧢㧡㧣㧡㧤㧡㧥㧢㧜㧢㧝㧢㧞㧢㧟㧢㧠 㧜㧚㧝Ǵ㧲 㧮 㧞㧢 㧺 㧣㧢 㧡 㧠 㧟 㧞㧝 㧯㧠㧠 㧯㧠㧟 㧡㨂 㧜㧚㧝Ǵ㧝㧜㧜Ǵ 㧞㧡㨂 㧝㧜㨂 㧼 㨙㨛㨚㨕㨠㨛㨞 㧾㧢㧢 㧝㧜㨗 㧔㧯㧺㧕 㧝 㧞 㧟 㧠 㧾㧢㧡 㧡㨂 㧾㧞㧞㧞㧙㧞㧞㧠 㧞㧠㧞㧟㧞㧞㧞 㧞㧝㧞㧜㧝㧥㧝㧤㧝㧣㧝㧢㧝㧡㧝㧠㧝㧟㧝㧞㧝㧝㧝㧜㧥 㧦㧝㧜㨗 㧾㧣㧟 㧝㧜㨗 㧽 㧠 㧟 㧞 㧝 㧡㨂 㧯㧺㧱 㧾㧞㧞㧝㧞㧣㧜 㧡㧜㨂 㧡㨂 㧾 㧝Ǵ 㧵㧯㧞 㧯㧠㧣 㧯㧺㧲 㧯㧥㧤 㧜㧚㧝Ǵ 㧞㧡㨂 㧵㧯㧢 㧡㨂 㧡㨂 㧡 㧠 㧟 㧢 㧣 㧾㧥㧢 㧾㧥㧠 㧞 㧤 㧟㧚㧟㨗 㧟㧚㧟㨗 㧝 㧱㧱㧼㧾㧻㧹 㧾㧝㧜㧝 㧾㧝㧜㧞 㧝㧚㧤㨗㧲 㨆㧰㧝㧜㧝 㧽㧹㧝㧜㧝㧔㧵㧼㧹㧕 㧾㧝㧜㧜 㧾㧝㧜㧜㧦㧡㨃˴㧜㧚㧜㧞㧜 㧾㧝㧝㧟 㧯㧺㧝㧝㧠 㧝㧤㨗㧲㨆 㨑 㧡㧜㨂㧝㧜㧜㧜㨜㧲 㧯㧝㧝㧥 㧝㧢 㧾㧝㧜㧠 㧝㧛㧠㨃 㧝㧟㧜㨗 㧝㧣 㧞㧞 㧼 㧲㨁㧿㧱㧝㧜㧝㧜㧚㧟㧟Ǵ㧲㧜㧚㧜㧞㧞Ǵ㧲 㧢㧟㧜㨂˴ 㧡㧜㨂 㧯㧝㧞㧝 㧯㧝㧞㧜 㧞㧜㧭 㧞㧡㧜㨂 㧾㧝㧜㧟 㧝㧛㧠㨃 㧝㧟㧜㨗 㧷㧾㧯㧝㧜㧡㧿 㨀㧺 㨅㧱㧸㧸㧻㨃 㧯㧝㧜 㧯㧥 㧲㧯㧢 㧝㧜㧜㧜Ǵ㧲 㧝㧡㧜㧜Ǵ㧲 㨀㧼 㧠㧞㧜㨂 㧠㧞㧜㨂 㧲㧯㧡 㧲㧯㧞 㨅㧱㧸㧸㧻㨃 㨅㧱㧸㧸㧻㨃 㧯㧺㧝㧟 㧝 㧞 㧟 㧠 㧡 㧢 㧵㨛 㧲㧯㧤 㧸㧞 㧭㧲㧝 㧭㧯㨀㧔㧼㧲㧯㧕 㧿㧭㧯㨀㧟㧞㧠㧞㧜 㧲㧯㧟 㧗 㧸㧝 㨃㧴㧵㨀㧱 㧞㧡㧜㨂 㧾㧝㧟㧭㧘㧝㧟㧮㧘㧝㧟㧯㧘㧝㧟㧰㧘㧝㧟㧱㧘㧝㧟㧲㧦 㧝㧡㨂 㧝㧭 㧠 㧟 㧞 㧝 㧯㧺㧝㧠 㧝 㧞 㧟 㧠 㧡 㧢 㧮㧯㧺㧝㧟 㧝㧛㧠㨃 㧝㧹 㧲㨁㧿㧱㧢㧝㧛㧞㨃 㧝㧚㧡㨗 㨀㧾㧝 㧰㧝㧟 㧡㧢㧜㧲 㧾㧞㧡 㧝 㧝㧞 㧞㧡㧜㨂 㧯㧞㧞 㧝㧛㧠㨃 㧾㧞㧞 㧾㧞㧝 㧜㧚㧜㧝Ǵ㧲㧝㧜㨗 㧾㧝㧟㧰 㧞㧞㧜㨜㧲 㧝㧟 㧾㧝㧟㧭 㧝㧚㧢㧡㨗㧲 㧾㧟㧜 㧾㧞㧠 㧯㧞㧢 㧟 㧝㧛㧠㨃 㧰㧝㧠 㧝㧟㨂 㧾㧝㧟㧱 㧞㨗㨂 㧾㧝㧟㧮 㧞㧞㨗 㧯㧞㧟 㧰㧥 㧾㧝㧣 㧜㧚㧜㧟㧟Ǵ㧲 㧥 㧾㧝㧟㧲 㧾㧝㧟㧯 㧲㧮㧟 㧢㧤㨗 㧞㧡㨂 㧗 㧡㧜㨂 㧞㨃 㧝㧜 㧯㧞㧣 㧗 㧗 㧗 㧾㧞㧟 㧯㧟㧞 㧟㧠㧚㧤㨗㧲 㧝㧝 㧟㧡㨂 㧙 㧝㧜Ǵ㧲 㧝㧜 㧝㧤㨂 㧙 㧙 㧙 㧡㨂 㧾㧟㧡 㧝㧛㧠㨃 㧝㧡㧜Ǵ㧲 㧾㧝㧤 㧾㧟㧢 㧤 㧝 㧞 㧟 㧠 㧵㧯㧤 㧰㧝㧝 㧤 㧝㧹 㧰㧝㧢 㧵㧯㧠 㧾㧟㧟 㧾㧟㧣 㧝㧚㧡㨗 㧾㧠㧜 㧯㧞㧤 㧯㧞㧥㧾㧞㧣 㧿㨀㧾㧙㧸㧠㧣㧞 㧷㧵㧭㧣㧤㧜㧡㧭㧼㧵 㧡㨂 㧝㧛㧠㨃 㧞㧡㨂 㧞㧡㨂㧝㧜㨗 㧟 㧝㨗 㧡㧗 㧰㧝㧣 㧝㧚㧤㨗 㧢 㧣 㧝㧜 㧥 㧵㧯㧣 㧞 㧽㧞 㧝㧤㨂 㧷㧵㧭㧟㧟㧥㧲 㧰㧝㧡 㧣㧤㧜㧡 㧾㧟㧞 㧞㧿㧭 㧗 㧯㧟㧠 㧠㧙 㨆㧰㧝 㧝㧡㧤㧢㧳 㧝㧞 㧝㧜㨂 㧡 㧯㧞㧠 㧙 㧝㧜㧜Ǵ㧲 㧯㧟㧟 㧵㧯㧡 㧯㧡㧤 㧞㧡㨂 㧾㧟㧤 㧗 㧜㧚㧝Ǵ㧲 㧝㧜㨗 㧜㧚㧝Ǵ㧲 㧾㧞㧜 㧟㧟㧜㧜㨜㧲 㧙 㧢 㧯㧡㧢 㧯㧡㧣 㧞㧡㨂 㧝㧛㧠㨃 㧟㧚㧟㨗 㧯㧡㧥 㧽㧠 㧯㧟㧜 㧾㧞㧤 㧯㧟㧝 㧝㧛㧠㨃 㧰㧝㧜 㧾㧟㧝 㧢㧤㧜 㧾㧟㧠 㧞㧡㨂 㧞㧡㨂 㧡㧜㨂 㧟㧡㨂㧝㧜㨗 㧜㧚㧝Ǵ㧲 㧷㧾㧭㧝㧜㧞㧿 㧲㧮㧝 㧝㧛㧠㨃 㧝㧛㧠㨃 㧜㧚㧝Ǵ㧲 㧜㧚㧝Ǵ㧲 㧾㧝㧠 㧝㧡㧜Ǵ㧲 㧞㧡㨂 㧜㧚㧜㧝Ǵ㧲 㧠㧚㧢㧠㨗㧲㧥㧚㧡㧟㨗㧲 㧾㧞㧥 㧝㧛㧠㨃 㧾㧝㧢 㧠㧚㧣㨗 㧾㧝㧡 㧽㧟 㧯㧞㧝 㧟㧚㧟 㧯㧞㧡 㧟㧚㧟 㧢㧤㧜㨜㧲 㧠㧣㧜㨜㧲 㧝㧛㧞㨃 㧝㧛㧞㨃 㧯㧝㧣 㧯㧝㧤 㧲㨁㧿㧱㧡 㧞㧭 㧞㧡㧜㨂 㧡㨂 㧲㧮㧞 㧝 㧟 㧤 㧣 㧢 㧡 㨀㧴㧞 㧠 㧔㨔㨍㨑㨠 㨑㨤㨏㨔㨍㨚㨓㨑㧕 㧟 㧞 㨀㧴㧝 㧔㨏㨛㨙㨜㨞㨑㨟㨟㨛㨞㧕㧝 㧔㨟㨡㨏㨠㨕㨛㨚˴㧕 㨀㧴㧢 㧔㧿㨁㧯㨀㧵㧻㧺˴㧭㧕 㨀㧴㧣 㧔㧿㨁㧯㨀㧵㧻㧺˴㧮㧕 㧺 㧭 㧮 㧡 㧯㧺㧢 㧔㧾㧱㧸㧭㨅˴㧼㨃㧮㧕 㧲㧯㧣 㧡 㧯㧺㧥 㧯㧺㧥㧭 㧡 㧞 㧠 㧠 㧝 㧟 㧞 㧝 㧡 㧠 㧟 㧞 㧝 㧤 㧯㧺㧟 㧟 㧵㧯㧝㧞 㧷㧵㧰㧢㧡㧜㧜㧠㧭㧼 㧾㨅㧝 㧯㧠㧭 㧞㧣㧡㨂 㧜㧚㧜㧟㧟Ǵ㧲 㧾㧤㧭 㧝㨃 㧝㧜㧜 㧯㧣 㧽㧝 㧷㧾㧯㧝㧜㧞㧿 㧡㧜㨂㧝㧜㧜㧜㨜㧲 㧾㧥 㧡㧚㧢㨗 㧞 㧼㧯㧝 㧟 㧼㧯㧤㧝㧣㧝㧢 㧠 㧡㨂 㧞㧡㧜㨂 㧟㧚㧝㧡㧭 㧲㨁㧿㧱㧟 㧯㧝㧡 㧯㧝㧟 㧠 㧯㧝㧢 㧞 㧯㧝㧠 㧯㧢 㧜㧚㧜㧝Ǵ㧲 㧡㧜㨂 㧝 㧾㧢 㧾㧠㧝㧛㧞㨃 㧝㧛㧞㨃 㧝㧡㧜㨗 㧝㧡㧜㨗 㧰㧞 㧾㧞㧜㧥 㧝㧜㨗 㧾㧞㧝㧝 㧝㧜㨗 㧾㧞㧝㧜 㧝㧜㨗 㧰㧡 㧾㧣 㧝㧛㧞㨃 㧾㧡 㧝㧡㧜㨗 㧝㧛㧞㨃 㧝㧡㧜㨗 㧰㧠 㧟 㧝 㧯㧺㧠 㧠㧙㨃㧭㨅 㨂㨍㨘㨢㨑 㧯㧝㧞 㧯㧝㧝㧘㧯㧝㧟㧦 㧯㧝㧝 ˴㧠㧣㧜㧜㨜㧲 㧞㧡㧜㨂 㧟 㧝 㧯㧺㧝 㧾㨅㧝 㧠 㧾㧞㧝㧞 㧝㧜㨗 㧯㧢㧣 㧾㧞㧝㧟 㧾㧞㧝㧠 㧡㧜㨂 㧝㧜㨗 㧝㧜㨗 㧯㧢㧢 㧜㧚㧜㧝Ǵ㧲 㧡㧜㨂 㧞㧚㧞㨗 㧾㧞㧝㧡 㧜㧚㧜㧝Ǵ㧲 㧞㧚㧞㨗 㧾㧞㧝㧢 㧡㨂 㧮㧯㧺㧝㧝 㧞 㧟 㧠 㧝 㧮㧸㨁㧱 㧻㧾㧭㧺㧳㧱 㧞 㧯㧝㧞㧘㧯㧝㧠㧦 㧝㧜㧜㧜㧜㨜㧲 㧞㧡㧜㨂 㧮 㧭 㧮㧾㧻㨃㧺 㧮㨀㧝 㧮㧸㨁㧱 㧺㧾㧝 㧞㧡㧜㨂 㧞㧜㧭 㧿㧭㧝 㧸㧢 㧮㨀㧞 㨀㧠 㨀㧝 㧾㧱㧰 㧳㧾㧱㧱㧺 㧞 㧟 㧠 㧝 㧯㧺㧝㧝 㧸㧱㧰㧞 㧸㧱㧰㧝 㧼㨁㧹㧼˴㧰㧻㨃㧺 㧿㨃 㨃㧵㧾㧱˴㧯㧴㧱㧯㧷 㧿㨃 㧿㨃㧞 㨃㧵㧺㨀㧱㧾˴㧯㧻㧻㧸 㧔㧰㧵㧿㧼㧸㧭㨅˴㧼㨃㧮㧕 㧔㨀㧱㧾㧹㧵㧺㧭㧸˴㧮㧻㧭㧾㧰˴㧭㧕 㧮㧾㧻㨃㧺 㧮㧾㧻㨃㧺 㧾㧞 㧝㧛㧠㨃 㧡㧝㧜㨗 㧾㧥㧤㧲 㧯㧝 㧞㧣㧡㨂 㧝Ǵ㧲 㧾㧥㧤㧱 㧯㧞 㧞㧣㧡㨂 㧝Ǵ㧲 㧾㧥㧤㧳 㧯㧟 㧞㧣㧡㨂 㧝Ǵ㧲 㧲㨁㧿㧱㧝 㧾㧥㧤㧰 㧾㧟 㧝㧛㧠㨃 㧟㧚㧥㨗 㧾㧝 㧝㧛㧠㨃 㧡㧝㧜㨗 㧾㧥㧤㧯 㧟 㧾㧥㧤㧮 㧸㧠 㧾㧥㧤㧭 㧝 㧯㧤㧢㧲 㧟 㧯㧡㧡㧲 㧮㧯㧺㧝㧢 㧯㧤㧢㧱 㧸㧟 㧯㧡㧡㧳 㧮㧸㨁㧱 㧢㧤㧜Ǵ㧲 㧯㧤㧢㧰 㧺㧾㧞 㧰㧮㧝 㧯㧤㧢㧭 㧝 㧯㧤㧢㧮 㧔㧼㧻㨃㧱㧾˴㧿㨁㧼㧼㧸㨅˴㧼㨃㧮㧕 㧯㧡㧡㧱 㧮㧾㧻㨃㧺 㧢㧤㧜Ǵ㧲 㧯㧤㧢㧯 㨀㧞 㧯㧡㧡㧰 㧾㧞㧞㧠 㧲㧯㧠 㧯㧡㧡㧮 㧮㧸㨁㧱 㧰㧝㧞 㧾㧝㧥 㧯㧡㧡㧯 㧮㧾㧻㨃㧺 㧾㧟㧞㧘㧾㧟㧟㧦㧝㧛㧞㨃㧞㧣㧜㨗㧲 㧻㧾㧭㧺㧳㧱 㧮㧾㧻㨃㧺 㧾㧞㧢 㧠㧚㧢㧠㨗㧲 㧝㧛㧠㨃 㧾㧞㧞㧟 㧾㧞㧠㧜˴㧝㧜㨗 㧳㧾㧱㧱㧺㧛㨅㧱㧸㧸㧻㨃 㧾㧥㧣㧴 㧳㧾㧱㧱㧺㧛㨅㧱㧸㧸㧻㨃 㧞㨗 㧝㧛㧠㨃 㧯㧡㧡㧭 㧾㧞㧢㧞 㧝㧜㨗 㧔㧼㧻㨃㧱㧾˴㧿㨁㧼㧼㧸㨅㧕 㧯㧤㧢㧳 㧾㧞㧞㧞 㧝㧚㧤㨗 㧾㧠㧡 㧾㧠㧟 㧝㨗 㨃㧴㧵㨀㧱 㨄㧝 㨄㧜 㨂㧿㧿 㧼㧠㧝 㧼㧠㧞 㧾㧿㨀 㧼㧠㧟 㧼㧠㧠 㧼㧠㧡 㧼㧠㧢 㧼㧠㧣 㧼㧡㧜 㧼㧡㧝 㧼㧢㧜 㧼㧢㧝 㧼㧢㧞 㧼㧢㧟 㧼㧢㧠 㧼㧢㧡 㧼㧢㧢 㧼㧢㧣 㧭㨂㧿㧿 㧭㨂㧯㧯 㧭㨂㧾 㧼㧞㧟㧔㧮㧕 㨂㧯㧯 㧼㧞㧞㧔㧻㧕 㧼㧞㧝㧔㨅㧕 㧼㧞㧜㧔㨃㧕 㧼㧝㧣 㧼㧝㧢 㧼㧝㧡 㧼㧝㧠 㧼㧝㧟 㧼㧝㧞 㧼㧝㧝 㧼㧝㧜 㧼㧜㧣 㧼㧜㧢 㧼㧜㧡 㧼㧜㧠 㧼㧜㧟 㧼㧜㧞 㧼㧜㧝 㧼㧜㧜 㨂㧯㧯 㨂㧿㧿 㧯 㧾㧠㧝 㧝㨗 㧾㧠㧞 㧝㨗 㧞㧡㨂 㧜㧚㧝Ǵ㧲㧯㧠㧝 㧡㧜㨂 㧝㧜㧜㧜㨜㧲 㧯㧡㧜 㧡㧜㨂 㧝㧜㧜㧜㨜㧲 㧯㧠㧥 㧡㧜㨂 㧝㧜㧜㧜㨜㧲㧯㧠㧤 㧯㧺㧝㧣 㧯㨀㧝 㧯㧤㧢㧴 㧾㧝㧜㧥㧾㧝㧜㧤 㧺 1–7 㧾㧝㧝㧝㧾㧝㧝㧜 㧾㧝㧜㧤㧙㧾㧝㧝㧝㧦 㧝㧛㧠㨃 㧟㧟 㧭㧱㧙㨄㧞㧹㧝㧠㧸㧾˴㧯㧵㧾㧯㨁㧵㨀˴㧰㧵㧭㧳㧾㧭㧹 AEX2M14LR AEX2M14LR Manual CHAPTER 2. EXPLANATION OF CIRCUITService AND OPERATION AEX2M14LR [1] BLOCK DIAGARM Power supply circuit 1A Fuse Smoothing circuit Filter circuit Active filter circuit 20 A Fuse AC power CPU oscillator circuit DC power supply circuit DC over voltage detection circuit Expansion valve A drive circuit Expansion valve A Expansion valve B drive circuit Expansion valve B Expansion valve C drive circuit Expansion valve C 4-way valve relay drive circuit 4-way valve Outdoor fan motor drive circuit Outdoor fan motor Power transistor module drive circuit Power transistor module 3.15 A Fuse 2A Fuse 20 A Fuse Unit - unit wiring (AC power and serial signals) Serial I/O circuit CPU reset circuit CPU Compressor DC overcurrent detection circuit AC overcurrent detection Current transformer Compressor thermo. circuit Compressor thermistor (RE) CN8A Heat exchanger pipe thermo. circuit Heat exchanger pipe thermistor (OR) CN8A Outdoor temp. thermo. circuit Outdoor temperature thermistor (G) CN8A Suction pipe thermo. circuit Suction pipe thermistor (BK) CN8A Heat sink thermo. circuit Heat sink thermistor (BK) CN8B Unit A thermo. circuit Thermistor unit A (BL) Unit B thermo. circuit Thermistor unit B (WH) LED drive circuit LED Pump down switch circuit Wire check switch circuit Position detection circuit Compressor Thermal fuse circuit Thermal fuse in terminal board 2–1 CN5 Suction thermistor CN8C AEX2M14LR [2] FUNCTIONS 1. FREQUENCY CONTROL 2. OVER CURRENT PROTECTION 1) AC current peak control DC over current detection, AC over current detection. To protect against over current due to sudden change in load, the compressor is stopped if 24A DC is exceeded in the DC section. If the set value of AC current is exceeded in the AC section, the compressor is stopped. 90 seconds after the compressor has been stopped, another starting try will be made. Three retries are allowed. On the fourth retry, a complete stop request signal is sent to the indoor unit, and the outdoor unit will remain stopped until the indoor operation is stopped. DC over current is detected by the power module. AC over current is detected by CT1, on the outdoor PWB. Cooling mode 13.6A Heating mode 13.6A 2) Prevention control of outdoor heat exchanger overheating If the temperature of the outdoor heat exchanger exceeds the overheating prevention line 1 or 2 during cooling, the operating frequency is lowered by approximately 5 to 15Hz. After that, the frequency is lowered approximately 5Hz once every 60 seconds or approximately 15Hz once every 120 seconds. When the temperature of the outdoor heat exchanger goes below the overheating prevention clear line, the frequency is raised by approximately 5Hz once every 60 seconds, and normal operation is restored. If the frequency is lowered to minimum frequency without the temperature of the outdoor heat exchanger decreasing and this condition lasts for 1 minute, the compressor will be stopped. Overheating Prevention line 1 55C Overheating Prevention line 2 57C Overheating Prevention clear line 54C Cooling mode 16.0A 3. COMPRESSOR PROTECTION CONTROL If the temperature of the compressor exceeds 113C, the compressor is stopped. In this case, the outdoor fan is not stopped until the temperature of compressor drops below 99C. In 90 seconds after the compressor is stopped, if the temperature is below 90C, another starting try will be made. Three retries are allowed. On the fourth retry, a complete stop request signal is sent to the indoor unit, and the outdoor unit will remain stopped until the indoor operation is stopped. Lower 5Hz once every 60 seconds Lower 15Hz once every 120 seconds 4. POWER TRANSISTOR MODULE PROTECTION 3) Prevention control of compressor overheating If the temperature of the compressor exceeds approximately 108 C, the operating frequency is lowered approximately 5Hz. After that, the frequency is lowered approximately 5Hz once every 60 seconds. When the compressor temperature drops below approximately 108C, the frequency is raised approximately 5Hz once every 60 seconds, and normal operation is restored. If the frequency is lowered to minimum frequency without the temperature of the compressor decreasing, and this condition lasts for 1 minute, the compressor will be stopped. If the temperature of the heat-sink exceeds 90C, the compressor is stopped. In this case, the outdoor fan does not stop, and when the temperature of the heat-sink decreases to 80C 180 seconds after operation is stopped, another try will be made. Three retries are allowed. On the fourth retry, a complete stop request signal is sent to the indoor unit, and the outdoor unit will remain stopped until reset is performed. At this time, the 3-minutes delay for control of the outdoor unit will not function; therefore, do not cancel by removing the plug and cutting the power. Also if the temperature of the heat-sink exceeds 100C, a complete stop request signal is sent to the indoor unit, and the outdoor unit will remain stopped until reset is performed. At this time, the 3-minutes delay for control of the outdoor unit will not function; therefore, do not cancel by removing the plug and cutting the power. 4) Prevention control of indoor heat exchanger overheating Two minutes after room several decrease If the temperature of any of indoor heat exchangers exceeds the overheating prevention line 1 or 2 during heating, the operating frequency is lowered to minimum frequency. When the temperature of all of indoor heat exchangers go below the overheating prevention line 1, the frequency is raised by approximately 5Hz once every 60 seconds, and normal operation is restored. If the condition that the frequency is minimum lasts for 2 minutes, the compressor will be stopped. 5. SERIAL SIGNALS Serial signals consist of all 96-bit signals. If the condition as outdoor unit unable to receive a serial signal from the indoor unit continues for 30 seconds, it closes the expansion valve which corresponds to the room which can not be communicated. If all indoor units can not communicate with the outdoor unit, the compressor is stopped. <when normal > If the temperature of any of indoor heat exchangers exceeds the overheating prevention line 1 or 2 during heating, the operating frequency is lowered by approximately 5 to 15Hz. After that, the frequency is lowered approximately 5Hz once every 60 seconds or approximately 15Hz once every 90 seconds. When the temperature of all of indoor heat exchangers go below the overheating prevention line 1, the frequency is raised by approximately 5Hz once every 60 seconds, and normal operation is restored. If the condition that the frequency is minimum lasts for 2 minutes, the compressor will be stopped. 54ºC (59ºC) 47ºC (60ºC) 44ºC (57ºC) Overheating prevention line 1 900 2100 6. THERMISTOR OPEN OR SHORT When compressor, heat exchanger, outdoor thermistor, suction thermistor (CN8A) are in OPEN or SHORT condition, even if they are in the condition which an operation signal is transmitted from indoors, the compressor will not start. If any suction thermistors (CN8C) become OPEN or SHORT resistance, the protective procedure will work only for the cycle corresponding to the malfunctioning suction thermistor. Overheating prevention line 2 57ºC (62ºC) 7. MISWIRING CHECK “Mis-wiring check” is conducted by detecting the indoor heat exchanger temp. For example, when the expansion valve for only room A is open, and the wiring is correct, the indoor heat exchanger temp for room A will reduce. If the wiring is incorrect, the indoor heat exchanger temp for a different room will reduce. 51ºC (57ºC) 48ºC (54ºC) When ON (When OFF) Heating mode 16.0A 8. SAFETY TIME 5200 When the unit is operated by the remote control after the breaker is turned on, the safety device of the compressor will work and the compressor will not operate for 90 seconds. 7200 2–2 AEX2M14LR 9. PUMP DOWN SWITCH More than 20 min. When the PUMP DOWN SWITCH (SW1) is pressed for 5 seconds or more, the total A/C system will start its TEST RUN automatically and the compressor frequency will be 48.3 Hz. When operating only the outdoor unit (cooling 48.3 Hz fixed mode) To make only the outdoor unit run in cooling mode, and apply a voltage of 230 V AC to N and L on the terminal board and push the pump down switch. (SW1) (Avoid operating the outdoor unit alone for long periods of time.) Heating operation start 10. CONTROL OF COMPRESSOR OR AND EXPANSION VALVE For 90 seconds after turning on the AC power, the compressor will not be activated even if indoor units request the compressor to do so. If the compressor receives a request from one or more indoor units after 90 seconds have passed, it will be turned on and the expansion valve corresponding to the requesting indoor unit will be opened. When the indoor unit of a room requests for the cooling operation to the outdoor unit and it runs responding to the request, requests for the heating can't be accepted if the indoor units in other rooms send individual requests. If the indoor unit in another room sends a request for the heating operation, the operation lamp and timer lamp of the indoor unit in that room start flashing in turn to inform that the unit is in the standby mode. If the operation in one room is stopped while the indoor unit in another room is in the stand-by mode, the operation mode requested by the indoor unit which is now in the stand-by mode will be accepted. At this time, the compressor will be temporarily stopped to switch the four- way valve and restart after 90 seconds. During the cooling or dry operation, the expansion valve corresponding to the indoor unit that is not running is closed. Therefore, the refrigerant will not flow into those units However, if the heating operation is in progress, it is possible that it flows into indoor units which are out of operation depending on the cycle conditions. As a result, the indoor exchanger may be heated up even if it is not activated. This is not abnormal. When the operations in all rooms are stopped, the compressor is off and the expansion valves in all rooms are fully opened. More than 20 min. More than 20 min. Defrosting Defrosting Max. 10 min. Max. 10 min. 3) During defrosting When defrosting begins, the compressor stops. Approximately 1 minutes later, the compressor reactivates in the refrigeration cycle, and the outdoor heat exchanger is defrosted. Each mode is as follows: The outdoor fan is s topped The operating frequency is as shown in the table below. The indoor fan is s topped. All expansion valve are open. for 5 minutes 3900 rpm after that 3700 rpm 4) Defrost stop When defrosting time exceeds 10 minutes When the temperature of the outdoor heat exchanger rises above approximately 15C Defrost stop is determined by either of the above conditions, and the compressor is stopped. At the same time, the outdoor fan go ON. The compressor is reactivated in the heating cycle 1 minutes after it was stopped, and normal control resumes. 11. DEFROST OPERATION 12. Power factor module Output voltage 1) Overview If a voltage error over 450V is detected at power factor module output voltage, the compressor is stopped for 3 minutes. In this case, the outdoor fan does not stop for 3 minutes, and another try will be made. Three retries are allowed. On the fourth retry, a complete stop request signal is sent to the indoor unit, and the outdoor unit will remain stopped until reset is performed. At this time, the 3 minutes delay for control of the outdoor unit will not function; therefore, do not cancel by removing the plug and cutting the power. Defrosting begins during heating if the conditions for compressor operation time and outdoor heat exchanger temperature are met. When defrosting begins, the indoor and outdoor fans stop. Defrosting stops when the temperature of the outdoor heat exchanger goes above approximately 15C or defrosting time exceeds 10 minutes. Defrost mask time Heating begins Defrost mask time Defrost mask time 13. Winter cool Cooling operation is available during the winter season by the built in winter cool function. Lower limit of outdoor temperature range is -10C DB. Defrosting Max. 10 min. Defrosting Max. 10 min. When the outside air temperature is low, the outdoor unit fan operates at slower speed. NOTE: Built-in protect drive may work when outdoor temperature falls below 21C DB, depending on conditions. 2) Defrosting If the compressor operation time is more than 20 minutes in the heating mode and the outdoor air temperature and outdoor heat exchange temperature satisfy the defrosting conditions, the defrosting operation is started. When the defrosting operation is started, the indoor fan starts to run intermittently. When the outdoor heat exchanger temperature reaches approx. 15C or above or when the defrosting time exceeds 10minutes, the defrosting operation is quit. 2–3 AEX2M14LR [3] ACTIVE FILTER CIRCUIT This circuit uses Active Filter Module and IPM as the figure below for the high efficiency operation of compressor. Active Filter Choke coil Rectification circuit AC + Noise filter circuit Sine wave current ON/OFF Voltage raise signal Compressor Driving signal Compressor IPM Positional detection IPM Control source Control source IC1 1. Active Filter In the case the direct current is obtained by the diode bridge and smooth capacitor from the commercial power source, the current wave shape will be the pulse shape at the peak of the voltage wave shape as shown in the figure below. For this reason, the harmonic current will be generated and at the same time the power factor will be deteriorated. While monitoring the AC input voltage in the control circuit, in order to be the same phase and wave shape as this voltage wave shape, IGBT is made ON/OFF by the carrier frequency of approximately 20 kHz. By adoption of this Active Filter, the current wave shape can be made to the sine wave synchronized to the commercial power source and the power factor can be made to almost 99%. As a result of this, reactor can be disused. Active Filter works for the improvement of power factor and as the countermeasures for the harmonic current. Power-supply voltage (50Hz) Current waveform (Before) Current waveform (Active Filter) 2. Active Filter Voltage Raise Circuit The IGBT in the figure below is the switching transistor of the Active Filter. By adding ON signal to the gate of IGBT from the control IC, IGBT turns ON and the collector current Ic flows. This current flows from the + side of the diode bridge DB to the Choke coil, the - side of the diode bridge DB through IGBT from the Choke coil L. At this time, energy is stored in the choke coil L. Next, when gate signal of IGBT turned OFF, IGBT will be turned OFF and the energy stored in L during the ON time of IGBT will be discharged through the diode D, electrolytic capacitor C, load, primary side and the + side of DB. Assuming the input voltage of Active Filter (voltage between + and - of DB) as Ei, the output voltage (voltage at the both ends of smooth capacitor) as Vo, switching cycle of IGBT as T and ON time of IGBT as ton, the voltage between collector emitter of IGBT Vs will be as follows; Vs= 0 (during ON of IGBT: ton) Vs= Vo (during OFF of IGBT: T-ton) Here, assuming no loss in L and IGBT, average value of Vs turns equal to Ei, Ei = (T-ton)/T x Vo Therefore Vo = T/(T-ton) x Ei As ton is a smaller value than T, output voltage Vo will be higher than input voltage Ei. 2–4 AEX2M14LR L + DB D Control Ei Vs IC Vo + RL C IGBT - L1 (+) L2 P (-) Io PFC control 1 2 3 4 5 6 BCN13 Active Filter Circuit 3. Active Filter Driving Electronics Circuit At the operation of compressor, the microcomputer (IC1), as the 50th pin gets “H”, will turn the transistor Q4 ON through the transistor Q3. By this, 18V is supplied to the 3rd pin of connector BCN13 of the Active Filter and the Active Filter will be turned ON. 4. Protection Circuit of Active Filter In order to prevent from the destruction of Active Filter due to the excessive over output voltage of Active Filter, the Active Filter will be turned OFF immediately at the abnormal output voltage by monitoring the output voltage. At the same time, the operation of compressor will be stopped. Detection circuit of the abnormal voltage detects the abnormal voltage by inputting the output voltage of Active Filter to the 4th pin of comparator IC (IC5) at the divided voltage by the resistors (R31, R32 and R33) and comparing with reference voltage. When the output voltage of Active Filter reaches 450V or higher, the 4th pin of IC5 will be higher than the reference voltage at the 5th pin, the output of comparator will be reversed (HL), the L signal will be entered at the 52nd. pin of microcomputer (IC1) and the operation of the Active Filter will be stopped. 18V 5V R36 1M IC1 52 3 2 12 4 + 5 0V R33 270KF R35 34.8KF R32 270KF IC5 C57 0.1u 50V R34 9.53KF C56 0.1u 50V 0V 0V 2–5 R31 4.64KF 0V DC Voltage AEX2M14LR [4] EXPLANATION OF IPM DRIVE CIRCUIT The power supply for the IPM drive, and the shunt resistor for over current detection, etc., are provided out of the IPM (in control PWB). 1. IPM drive power supply circuit The power supply for driving the upper-phase IGBT (HU, HV, HW) drive employs a Bootstrap system. The 15-V power supply for the lower-phase IC is provided by the control printed circuit board (PWB). 1. Brief explanation of Bootstrap system (single power drive system) To supply power to the upper-phase IC, the microcomputer (IC1) turns ON the lower-phase IGBT (LU, LV, LW). It results in a charging current that flows through the electrolytic capacitor in each upper-phase IC input and charges the Bootstrap capacitor up to 15V voltage. The power supply for the subsequent stages is stored when the lower-phase IGBT is ON in common drive control of the compressor. Initial charge period P(Vcc) Charging current group Bootstrap capacitor (HU,HV,HW) HVIC VDB U,V,W, High-voltage-withstanding, high-speed recovery diode N-side IGBT (LU,LV,LW) VD LVIC VCIN(n) N(GND) Bootstrap circuit 2. DC over current detection circuit When a current about 24A or higher flows through the shunt resistor (R100) on IPM printed circuit board (PWB), the voltage on this resistor is input to IPM CIN pin (16). Then, the gate voltage of the lower-phase IGBT (LU, LV, LW) inside the IPM turns OFF to cut the over current off. At the same time, an L output which lasts about 1.8 ms is generated from IPM Fo pin (18), and it results in an L level input to over current detection input pin (53) of the microcomputer (IC1) and then turns OFF the compressor driving signal output (IC1 from pins (65) to (70)) to the IGBT gate. SET Protection circuit status RESET (Lower phase) Internal IGBT gate About 24A SC a1 Output current Ic (A) SC reference voltage Sense voltage relative to shunt resistance Delay by CR time constant circuit About 1.8 ms Error output Fo 2–6 AEX2M14LR 3. 120 energizing control (digital position detection control) This control system detects the digital position detection signal and adjusts the rate of acceleration/deceleration accordingly. The motor's induced voltage waveform is input to the comparator in the form of PWM-switched pulse, and a position detection signal is generated as a reference voltage which is equal to 1/2 of 370 VDC. However, since there is no induced voltage waveform when the PWM waveform is OFF, the microcomputer works in an internal processing so that detection is enabled only when it is ON. Based on the position signal detected, actual PWM waveform output timing is determined. Since it does not use a filter circuit, the accuracy of detection. The microcomputer works in an internal processing to eliminate spiky voltage during the regenerative process. Furthermore, even if the induced voltage is low, position detection is still possible, and it allows sensor-less operation at low rotation speed in the initial stage of operation. These reduce the starting current and improve reliability of IPM. Terminal voltage waveform Reference voltage (1/2 of DC voltage) Spiky voltage (cancelled) Comparator output waveform (Position signal waveform) 4. 180 energizing control This is the control system to moderate the speed by the current phase difference for higher efficiency and lower noise of the compressor. The current phase difference control is the control system paid attention to the interrelation between efficiency and phase gap generated by the applied voltage of motor and current in the coil of motor as shown in the figure below. Motor voltage Motor current Efficiency This control is the forced magnetization system independent of the location of rotor, detecting the phase difference between driving voltage phase and line current phase flowing in motor coil, and controls the modulation rate data to get the phase difference at the best efficiency. Difference of current and voltage peak Ტ Best timing Ჷ( Უ Voltage /Current phase difference Concept chart of the current phase difference control 5. DC Current Detection Sensor Circuit Control of current phase difference is made by reading in the phase difference generated at the both edges of shunt registor (R100) by the compressor electrifying current on the PWB through the Op-amp (IC9) to the microcomputer. This is a control to modulate up to the phase with the best efficiency by comparing the phase of this input current, so called compressor electrifying current, with the compressor driving voltage. In the case that phase difference between motor voltage and current is large (current delay is large), the control will be made by lowering the compressor modulation rate data (compressor effective value). IPM FUSE 101 250V 20A P S FC1 C121 630v 0.33Ǵ TU TV TW R201 100KF N CIN C119 1000p 5V ZD101 R113 18KF R100 0.02 D8 Z 8 1 IC1 C96 1000P Y 15V R200 1K C97 0.1μ 4 2 + 3 IC9 0V Inverter current detection circuit 2–7 R R202 20KF R203 2.0KF 5V R204 200KF R205 200KF 0V Y Z C CHAPTER 3. FUNCTION AND OPERATION OF PROTECTIVE PROCEDURES [1] PROTECTIVE FUNCTIONS AND OPERATIONS NO. Function Operation Detection time Description 1 DC over current 2 AC over current 3 Compressor overheat prevention control 4 Compressor high temperature error 5 Outdoor heat exchanger overheat prevention control Compressor is stopped if a current approximately 24A or more flows in the power transistor module. Lowers the operating frequency if the compressor AC current exceeds set value (16.0A). Stops the compressor if the current exceeds at minimum frequency. Lowers the operating frequency if the temperature of the compressor thermistor (TH1) rises above 108C. Compressor is stopped if the thermistor stay above 108C for 2 minutes at minimum frequency. Compressor is stopped if the compressor thermistor is above 113C (Or when TH1 shorts) Lowers the operating frequency if the temperature of the outdoor heat exchanger rises above 57C during cooling. Stops the compressor if the temperature stays above 57C for 2 minutes at minimum frequency Compressor ia stopped, if heat exchanger or outdoor thermistor shorts. Close the expansion valve of the corresponding room, if some suction thermistor shorts. Compressor is stopped, if compressor or heat exchanger or outdoor thermistor opens. Close the expansion valve of the corresponding room, if some suction thermistor shorts. opens. Compressor is stopped, if the operating frequency is above 70Hz and the compressor current is below 0.8A. INDOOR If open, while timer LED blinks, operation is continued. If short, operation is continued. OUTDOOR Closes the expansion valve of the corresponding room if the outdoor unit does not receive a serial signal from one or more indoor unit for 30 seconds. Compressor is stopped, if the outdoor unit does not receive a serial signal from all indoor units. Restart condition Restart time In door Out door During compressor operation Automatically restarts after safety time (180 seconds) 4 times Yes Yes During compressor operation Automatically restarts after safety time (180 seconds) 4 times Yes Yes During compressor operation Automatically restarts after safety time (180 seconds) No limit No No During compressor operation Automatically restarts when thermistor (TH1) temperature falls below 99C (approximately 30 minutes) 4 times Yes Yes During compressor operation Automatically restarts after safety time (180 seconds) No limit No No When the room is activated turns ON and the compressor starts. Operation OFF 1 time Yes Yes When the room turns ON and the compressor starts. Operation OFF 1 time Yes Yes During compressor operation Automatically restarts after safety time.(180 sec.) 4 times Yes Yes During operation Automatically restarts as soon as the serial communication becomes possible. No limit Yes Yes 6 Thermistor short 7 Thermistor open 8 AC abnormal current 9 Serial signal error 10 Miswiring check error Compressor is stopped, and miswiring check operation ends. During miswiring operation Miswiring check operation will not restart automatically. 4 times Yes Yes 11 Indoor heat exchanger overheat prevention control Lowers the operating frequency if the temperature of any of indoor heat exchanger rises high temperature during heating. Stops the compressor if the temperature stay high for 2 minutes at minimum frequency. During compressor operation Automatically restarts after safety time.(180 sec.) No limit No No Compressor stops if DC voltage is 450V or higher. During compressor operation 4 times Yes Yes Compressor stops if DC voltage is 270V or lower. During compressor operation 4 times Yes Yes 12 13 Power factor module (Active Filter) over voltage error Power factor module (Active Filter) low voltage error 3–1 Automatically restarts after safety time.(180 sec.) Automatically re-starts after safety time.(180 sec.) NO. Function Description Operation Detection time Restart condition Restart time In door Out door When power source frequency cannot be determined (at startup) or when power source clock can not be detected for 1 continuous second (at startup). Operation stops if there is no input of rotation pulse signal from outdoor unit fan motor for 30 seconds. At compressor start up, when in operation. Compressor continues operation without stopping. None Yes Yes When outdoor unit fan is in operation. Operation OFF or ON. Yes ✩1 Yes Yes 14 Power factor module (Active Filter) clock error 15 Outdoor unit DC fan error 16 DC compressor rotation error Operation stops if rotation of compressor is abnormal. During compressor operation Automatically restarts after safety time.(180 sec.) 8 times Yes Yes 17 IPM overheat prevention control. IPM high temperature error The compressor stops if the temperature of Heat sink exceeds 90C. During compressor operation Automatically restarts after safety time.(180 sec.) No limit No No 18 Thermal fuse error When thermal fuse in the outdoor terminal board below. Operation OFF 1 times Yes Yes ✩1 The outdoor unit restarts four times before the indoor unit error is displayed (complete shutdown). [2] TROUBLESHOOTING GUIDE 1. SELF-DIAGNOS IS FUNCTION AND DISPLAY MODE 1) To call out the content of the self-diagnosis memory, hold down the emergency operation button for more than five seconds when the indoor unit is not operating. a) According to the content of the self-diagnosis memory, the Operation LED (main category) and the Plasmacluster Ion LEDs (sub-category) flash in sync with the Timer LED on the indoor unit. b) In the event a complete shutdown occurs due to a malfunction, the Operation LED (red), Timer LED (yellow), Plasmacluster Ion LED (blue) flash to indicate the general information of the generated malfunction. c) If the power cord is unplugged from the AC outlet or the circuit breaker is turned off, the self-diagnose is memory loses the stored data. 2) Display of detailed self-diagnosis result with main category and sub-category indications When malfunction information is called out, the main category and sub-category of the self-diagnose is result are indicated by the Operation, Timer, and Plasmacluster Ion LEDs on the indoor unit. Main category *1: Example of self-diagnosis result displayed on indoor unit: Suction thermistor open-circuit error Timer LED [yellow] ON OFF Operation LED [red] ON OFF Plasmacluster Ion LED [blue] Basic flashing cycle due to error 1 sec 1 sec 1 sec Malfunction No. 5 sec Figures in ( ) indicate numbers (binary notation) assigned based on the flashing sequence. Flashing for main category indication Flashing for sub-category indication *2: The self-diagnosis display function of the outdoor unit indicates the error information by flashing LED1 on the outdoor unit according to the content of self-diagnosis. The self-diagnosis display function of the outdoor unit is active only for about 3 to 10 minutes after self-diagnosis is performed during operation, and the display returns to normal condition after this display period. The content of self-diagnosis cannot be called out by the self-diagnosis display function of the outdoor unit. Example of self-diagnosis display on outdoor unit : Compressor high-temperature abnormality ON OFF 0.5 sec 0.5 sec 0.5 sec 0.5 sec 0.5 sec 0.5 sec 0.5 sec 0.5 sec 0.5 sec 3–2 0.5 sec 0.5 sec 0.5 sec 0.5 sec Sub-category 3–3 2 time Indoor/outdoor units in complete shutdown 8 time Indoor/outdoor units in complete shutdown Indoor/outdoor units in complete shutdown Indoor/outdoor units in complete shutdown 7 time Indoor/outdoor units in complete shutdown 12 time 11 time 9 time 6 time Indoor/outdoor units in complete shutdown Indoor/outdoor units in complete shutdown 5 time 1 time Indoor/outdoor units in complete shutdown Indoor unit in operation Outdoor unit in temporary stop Normal flashing Indication by LED1 on outdoor unit *2 Indoor/outdoor units in operation Status of indoor/outdoor units Floor / ceiling for 5 seconds -1 -2 -3 -4 Operation lamp(RED) Cluster lamp(BLUE) Operation lamp(RED) Cluster lamp(BLUE) Thermistor Unit A - C thermistor open circuit error -4 -5 Operation lamp(RED) Cluster lamp(BLUE) Operation lamp(RED) Cluster lamp(BLUE) Cycle temperature Outdoor unit DC Fan 9 -4 11 -0 12 -0 Operation lamp(RED) Cluster lamp(BLUE) Operation lamp(RED) Cluster lamp(BLUE) Operation lamp(RED) Cluster lamp(BLUE) (1)Replace the outdoor control board assembly. (2)Reattach (3)Check the wiring between units. (1)Check to make sure outdoor unit thermistor TH2 (exchange) and TH3 (pipe (1)Correct the installation. temperature) are installed in correct portions. (2)Check if the refigerant volume is abnomally low. (2)Change the speccified amount of refrigerant. (3)Check the 4-way valve for proper operation. (3)Replace the 4-way valve. 4 way valve error or Gas leak error (1)Check the thermal fuse in terminal board (for Power supply) (2)Check connector CN5 of the outdoor unit. (1)Replace terminal board for Power supply (2)Replace the outdoor unit control PCB assembly. (1)Correct the installation. (2)Replace the outdoor unit fan motor. (3)Replace the outdoor unit control PCB assembly. (4)Replace the outdoor unit control PCB assembly. (3)Correct refrigerant clogs. (Stop valve,pipe,expansion valve) (1)Check the expansion valve. (unit A - C) (2)Are four expansion valves connected by mistake (3)Check the wiring between units. Abnormal wire check error (1)Check connector CN3 of the outdoor unit DC fan motor for secure installation. (2)Check the outdoor unit fan motor for proper rotation. (3)Check fuse FUSE5. (4)Outdoor unit control PCB (1)Replace the outdoor unit control PCB assembly. (2)Charge the specified amount of refrigerant. Outdoor unit DC fan rotation error (1)Ensure unobstructed air flow from the outdoor unit air outlet. (2)Check the outdoor unit fan motor. (1)Replace the outdoor unit control PCB assembly. (2)Charge the specified amount of refrigerant. (3)Correct refrigerant clogs. (Stop valve,pipe,expansion valve) (1)Replace the outdoor IPM PWB (1)Ensure unobstructed air flow from the outdoor unit air outlet. (2)Check the outdoor unit fan motor. (1)Replace the outdoor unit IPM PWB assembly. (1)Replace the outdoor unit IPM PCB assembly. (2)Correct the installation (tighten the screws). Apply silicon grease. (3)Replace the outdoor unit fan motor. (4)Replace the outdoor unit IPM PCB assembly. (5)Replace the compressor. (4)Replace the outdoor unit control PCB assembly. (2)Replace the outdoor unit thermistor assembly. (3)Replace the outdoor unit thermistor assembly. (1)Correct the installation. (1)Change the heat-sink thermistor. _ _ _ (1)Ensure unobstructed air flow from the outdoor unit air outlet. (2)Connect power supply of proper voltage. (3)Charge the specified amount of refrigerant. (4)Replace the outdoor unit compressor thermistor assembly. (5)Replace the expansion valve coil,expansion valve or outdoor unit control PCB assembly. AC current deficiency error (1)IPM continuity check (1)Ensure unobstructed air flow from the outdoor unit air outlet. (2)Check the outdoor unit fan motor. (1)Check the IPM is attached correcity to the outdoor unit IPM PWB. (1)IPM continuity check. (2)Check the IPM and heat sink for secure installation. (3)Check the outdoor unit fan motor for proper rotation. (4)No abnormality found in above inspections (1)through (3). (5)No abnormality found in above inspections (1)through (4). (1)Check connector CN8A and CN8C of the outdoor unit thermistor for secure installation. (2)Measure resistance of outdoor thermistors TH1 ~ 4, 6 ~ 8. (3)Check the lead wires of thermistors TH1 ~ 4, 6 ~ 8 on the outdoor unit control PCB for open-circuit. (4)No abnormality found in above inspections (1)through (3). (1)Measure resistance of the heat-sink thermistor (CN8B). (Temporary stop for cycle protection) (Temporary stop for cycle protection) (1)Check the outdoor unit air outlet for blockage. (2)Check if the power supply voltage is AC 230V at full power. (3)Check the pipe connections for refrigerant leaks. (4)Measure resistance of the outdoor unit compressor thermistor. (TH1:Approx.53k at 25ºC) (5)Check the expansion valve for proper operation. (Temporary stop for cycle protection) (3)Replace the outdoor unit control PCB assembly. (2)Replace the outdoor unit thermistor assembly. (1)Replace the outdoor unit thermistor assembly. _ Remedy (1)Ensure unobstructed air flow from the outdoor unit air outlet. (2)Check the outdoor unit fan motor. AC maximum current error AC current error when OFF AC overcurrent error IPM pin level error DC overcurrent error Thermal fuse error in terminal board Thermal fuse in terminal board (for power supply) Abnormal wire check Outdoor unit AC Current 8 -0 -2 -3 -1 7 -0 -1 Outdoor unit DC Current Operation lamp(RED) Cluster lamp(BLUE) Operation lamp(RED) Cluster lamp(BLUE) Operation lamp(RED) Cluster lamp(BLUE) Operation lamp(RED) Cluster lamp(BLUE) Operation lamp(RED) Cluster lamp(BLUE) Operation lamp(RED) Cluster lamp(BLUE) 6 -0 Discharge thermistor open circuit error -2 Operation lamp(RED) Cluster lamp(BLUE) Heat exchanger thermistor open Outdoor unit circuit error thermistor opencircuit Outdoor temperature thermistor open circuit error Suction thermistor open circuit error -1 IPM high temperature error Temperature stop due to IPM over heat. Temporary stop due to out door unit heat exchanger overheat. Temporary stop due to indoor unit heat exchanger overheat. Temporary stop due to compressor discharge overheat. Suction thermistor open circuit error Compressor high temperature error Thermistor Unit A - C thermistor short circuit error Operation lamp(RED) Cluster lamp(BLUE) Operation lamp(RED) Cluster lamp(BLUE) _ Inspection location/method Heat exchanger thermistor short circuit (1)Measure resistance of the outdoor unit thermistors. (TH2 ~ 4, 6 ~ 8: Approx.4.4k at 25ºC error (2)Check the lead wire of the outdoor unit thermistor for torn sheath and Outdoor temperature thermistor shortcircuit. short circuit error (3)No abnormality found in above inspections (1)and (2). Suction thermistor short circuit error Normal Sub category Operation lamp(RED) Cluster lamp(BLUE) Cycle temperature Outdoor unit thermistor short-circuit Main category Content of diagnosis -5 5 -0 Operation lamp(RED) Cluster lamp(BLUE) Operation lamp(RED) Cluster lamp(BLUE) Operation lamp(RED) Cluster lamp(BLUE) 2 -0 -1 -2 -3 0 -0 1 -0 Main Sub Operation lamp(RED) Cluster lamp(BLUE) Operation lamp(RED) Cluster lamp(BLUE) Operation lamp(RED) Cluster lamp(BLUE) Operation lamp(RED) Cluster lamp(BLUE) Operation lamp(RED) Cluster lamp(BLUE) X Lighting pattern at the time of timer lamp lighting Wall (Panel) : Flashes 3 times in 0.2-sec intervals Indication on indoor unit Flashes in 1-sec intervals (normal) : 1sec ON / 1sec OFF X : : OFF 3–4 X X X Indoor/outdoor units in complete shutdown Indoor/outdoor units in operation Indoor/outdoor units in operation Indoor unit in operation Outdoor unit in complete shutdown X 14 time Indoor/outdoor units in complete shutdown Indoor unit in operation Outdoor unit in complete shutdown 13 time Indication by LED1 on outdoor unit *2 Indoor/outdoor units in complete shutdown Status of indoor/outdoor units Floor / ceiling Sub category Operation lamp(RED) Operation lamp(RED) Cluster lamp(BLUE) Operation lamp(RED) Cluster lamp(BLUE) 30 -0 20 -0 19 -0 -1 Operation lamp(RED) Cluster lamp(BLUE) Operation lamp(RED) Cluster lamp(BLUE) 18 -0 Operation lamp(RED) Cluster lamp(BLUE) Cluster lamp(BLUE) 17 -0 EEPROM data error Indoor unit control PCB Drain pump unit Drain pump unit error Indoor unit fan error Serial erroneous wiring Serial short-circuit Erroneous wiring Serial open-circuit Indoor unit fan Wires between units Wires between units low valtage error -2 Operation lamp(RED) Cluster lamp(BLUE) Operation lamp(RED) Cluster lamp(BLUE) Clock error Active Filter overvoltage error -1 Active Filter Outdoor unit Detection error of inverter current. Compressor rotation error (at 180º energizing) Compressor rotation error. (at 120º energizing) DC compressor Compressor startup error Main category Content of diagnosis Operation lamp(RED) Cluster lamp(BLUE) Operation lamp(RED) Cluster lamp(BLUE) 14 -0 -1 -2 -3 Operation lamp(RED) Cluster lamp(BLUE) Operation lamp(RED) Cluster lamp(BLUE) Operation lamp(RED) Cluster lamp(BLUE) 13 -0 for 5 seconds Main Sub Operation lamp(RED) Cluster lamp(BLUE) X Lighting pattern at the time of timer lamp lighting Wall (Panel) : Flashes 3 times in 0.2-sec intervals Indication on indoor unit Flashes in 1-sec intervals (normal) : 1sec ON / 1sec OFF X : : OFF (1)Check connector CN2 and CN10. (EEPROM read data error) (1)Check the indoor fan motor for proper rotating operation. (Check fan lock.) (2)Check the lead wire of the indoor fan motor for open-circuit. (3)Check connector of the indoor unit fan motor for secure installation. (4)No abnormality found in above inspections (1)through (3). (1)Check the wires between units. (1)Check the wires between units. (1)Correct the wiring. (2)Replace the fuse/outdoor unit control PCB assembly. (3)Replace the outdoor unit control PCB assembly. (1)Check the wires between units. (2)Check the outdoor unit fuse. (3)Check 15-V,13-V and 5-V voltages on the PCB. Check resistance between IPM terminals. (4)Check pins No.5 and 8 of connector CN3 of the outdoor unit fan motor for short-circuit. (5)Outdoor unit control PCB. (1)Replace the Drain pump unit unit. (2)Re-insertion of CN2 and CN10. (1)Replace the indoor unit control PCB. (1)Replace the indoor fan motor. (2)Replace the indoor fan motor. (3)Correct the installation of CN3 of the indoor fan motor. (4)Replace the indoor unit control PCB. (1)Correct the wiring. (1)Correct the wiring. (5)Replace the outdoor unit control PCB board. (4)Replace the outdoor unit fan motor. (1)Connect stable power supply. (2)Replace the outdoor unit control PCB assembly. (2)Replace tfe outdoor unit control PCB assembly. (1)Conect stable power supply. (1)Check the wires between units. (2)Check voltage between N and 1 the indoor/outdoor unit terminal boards. (1)Check the AC power supply valtage for fluntuation. (1)Replace the outdoor unit control PCB assembly. (1)Connect stable power supply. (2)Replace the outdoor unit control PCB assembly. (1)Check the clock for proper inputt. (1)Replace the outdoor unit control PCB assembly. (1)Check the AC power supply voltage for fluctuation. (2)No abnormality found in above inspection (1). (3)Replace the Active Filter. (4)Replace the outdoor unit control PWB assembly. (5)Replace the compressor. (2)Replace the outdoor unit control PWB assembly. (3)Replace the outdoor unit control PWB assembly. (1)Correct the installation. (U:Red,V:White,W:Orange) Remedy (1)Check the circuit of detection of inverter current. (1)Check the colors (red,white,orange)of the compressor cords for proper connection. (PWB side, compressor side) (2)Check if the IPM terminal resistance values are uniform. (3)Check if outdoor main relay (MRY1) turns on and voltage of both end of the condenser (C10) has become DC380V. (4)No abnormality found in above inspections(1)and(3). (5)No abnormality found in above inspections(1)and(4). Inspection location/method CHECK METHOD CAUTION: CHECKING PRINTED CIRCUIT BOARDS (PWB) Non-insulated control circuit Do not touch the cabinet or bring metal parts into contact with the cabinet. The GND terminals of the low-voltage circuits (control circuits for microcomputer and thermistors and drive circuits for expansion valve and relays) on the control printed circuit board (PWB) are connected to the compressor drive power supply (370-VDC negative terminal). Therefore, exercise most caution to prevent electric shock. Danger!! Do not connect the grounding wire. If a measuring instrument used for the test is grounded, its chassis (ground) has the same electric potential as the 0-V probe. Since noninsulated circuits have the following voltage potential difference from the ground, connection of the grounding wire results in a short-circuit between the 0-V line and the ground, thus allowing an excessive current to flow to the tester to cause damage. If the sheaths of the thermistor lead wires or expansion valve lead wires inside the outdoor unit become damaged due to pinching by the front panel or other metal parts or contacting a pipe, a high voltage can flow and destroy the circuits. To prevent these problems, carefully conduct assembly work. Reason The oscilloscope (chassis ground) has the same electric potential as the 0-V probe. The entire electronic control section of the outdoor unit has a voltage potential difference from the ground. When the oscilloscope is setup, the 0-V line and the ground voltage (ground) will be short circuited, resulting in an excessive current flow to cause damage to the oscilloscope or indoor electric circuits. CAUTION: when attaching or removing the board When operating only the outdoor unit (cooling 48.3 Hz fixed mode) to make the outdoor unit run in cooling mode, apply a voltage of 220 ~ 240V AC to L and N on the terminal board and push the pump down switch (SW1). (Avoid operating the outdoor unit alone for long periods of time.) (D) 0 (D) Figure 2 Temperature properties of outdoor thermistors TH2 : Heat exchanger pipe thermistor (CN8A 3 - 4 ) TH3 : Outdoor temp. thermistor (CN8A 5 - 6 ) TH4 : Suction thermistor (CN8A 7 - 8 ) TH6 : Thermistor unit A (CN8C 1 - 2 ) TH7 : Thermistor unit B (CN8C 3 - 4 ) 1 1 8 Connector CN8A 6 Connector CN8C 500k ) 400k Resistance ( Resistance ( ) TH1 compressor thermistor (CN8A 1 - 2 ) 25ºC resistance 45 k 300k 200k 5.78k 3.06k 4.17k 2.28k 1.72k 100k 0 -20 0 20 60 40k 0ºC resistance 14.5 k 25ºC resistance 4.431 k TH2 - TH4 TH6 - TH8 30k 20k 10k 0 80 100 120 Temperature (ºC) -20 0 20 40 Temperature (ºC) 3–5 60 To measure the resistance, first remove the connector from the board. Thermistor Compressor thermistor Heat exchanger pipe thermistor Outdoor temp. thermistor Suction thermistor Thermistor unit A (suction) Thermistor unit B (suction) No. TH1 TH2 TH3 TH4 TH6 TH7 Connector CN8A CN8A CN8A CN8A CN8C CN8C Color Red Orange Green Black Blue White Connector pin No. 1 to 2 No. 3 to 4 No. 5 to 6 No. 7 to 8 No. 1 to 2 No. 3 to 4 Figure 3 Temperature properties of heatsink thermistor 500 Thermistor Heatsink Resistance (k ) 400 Signal Color CN8B Black To measure the resistance, first remove the connector as shown at right. 300 1 3 Heatsink thermistor TH5 (black) 25ºC resistance 50k 200 6.14k 100 3.25k 12.3k 0 -20 0 20 40 60 Temperature (ºC) 80 Tester 100 2. How to distinguish the defective parts 1. When all rooms are not cooled Are the timer lamps of the indoor units in all rooms flashing ? Yes No Press the OPERATION button to start operating the air-conditioner. (One-room operation ON) (Set the cooling mode to 18ºC) Yes Is the compressor of the outdoor unit operating ? No The cooling cycle is abnormal. Are the timer lamps of the indoor units in all rooms flashing ? Yes Check the failure symptom with the failure diagnosis mode. No Check the pressure. Check that the power between the terminal board " N " and " 1 " of the indoor unit is AC 230V, 50Hz. Repair the wiring between the units. 3–6 TO A (Check the failure with the outdoor unit.) 3–7 Replace the thermistor. No Is the resistance value of the thermistor for the compressor (TH1), heat Yes ex-changer (TH2) or outdoor temperature (TH3) or suction (TH4, TH6-7) correct? Open circuit of the outdoor thermistor A No Check the voltage (15V). No AC overcurrent No Yes Replace the fan motor. Yes Connect CN3 Inspect the compressor, heat exchanger and piping. The cycle is abnormal. Yes Is the resistance value between 5 and 8 of fan motor 0? Check the FUSE 5 Yes Is CN3 connected ? No Is the outdoor fan motor operating ? Overheat of the compressor Replace the Compressor. The compressor is abnormal. Replace the IPM PWB Yes Power module PWB (IPM) abnormality Replace the IPM PWB. Yes No Connect CN6. Check the voltage (5V). Replace the current transformer Yes Is CN6 connected ? Yes Are 2 LEDs switched off ? Open circuit of serial signal line Short circuit of serial signal line Is the resistance value of the No winding in the current transformer (CT1) ? (720) Fix the IPM PWB with screws securely. Yes Replace the outdoor control PWB. No Abnormal AC current Is the winding of the current transformer (CT1) broken ? Is each of the resistance values among the terminals of the Yes IPM PWB 0 ? P - U, N - U P - V, N - V P - W, N - W No Is the IPM PWB in a state of floating from the heat sink ? Connect CN16 No Is each of the resistance values among the terminals of the IPM PWB 0 ? P - U, N - U No P - V, N - V P - W, N - W Check the voltage (15V). Yes No Is CN16 connected ? Rotation error of the compressor Fix the Power factor module with screws secuerly Yes No Replace the Power factor module (AF1) Is the resistance value among Yes the terminal of the Power factor module (AF1) 0 ? No Is the Power factor module in a state of flaoting from the heatsink? Power factor module (AF1) error 2. When one room is not cooled (other rooms are cooled) Is the timer lamp of the indoor unit in the room not cooled flashing ? Yes No Press the OPERATION button to start operating the air-conditioner. (Set the cooling mode to 18ºC.) Yes Is the timer lamp of the indoor unit in the room not cooled flashing ? Check the failure symptom with the failure diagnosis mode. No No Check that the power between the terminal board "N" and "1" of the indoor unit is AC 230V. Short circuit of the thermistor error Open circuit of the thermistor error Is the resistance value of the thermistor for UNIT A (TH6) or UNIT B Yes (TH7) Yes Abnormal fan motor of indoor unit Open circuit of serial signal line Short circuit of serial signal line Is the resistance value of the No winding in the fan motor ? Yes Is the wiring between the units connected by mistake or broken ? Yes Replace the indoor control PWB. No Repair the wiring between the units. No Repair the wiring between the units. Replace the indoor fan motor. Replace the thermistor. Replace the outdoor control PWB or the expansion valve (UNIT A) or the expansion valve (UNIT B) Replace the indoor control PWB. 3. When all rooms are not heated Does the air get cooler in the cooling operation mode? Yes No Press the ON switch on the remote control to run the air conditioner. Set the temperature to 32ºC in the heating mode and start operation. Refer to 1 All rooms are not cooled. No Is the outdoor compressor running? Yes No Yes Check the four-way valve. Has the cycle been switched? To A No The heating cycle is normal. Is AC230V applied between the connector (CN4) 1 and 3 of the 4-way valve ? Pressure check No Yes Replace the 4-way valve. Replace the outdoor control P.W.B.. 3–8 AEX2M14LR CHAPTER 4. REFRIGERATION CYCLE AEX2M14LR Service Manual [1] REFRIGERATION SYCLE STOP valve (Liquid) UNIT A (3) Expansion valve B Heat exchanger (4) Expansion valve A Heat exchanger Heat exchanger (3) (2) 4-way valve UNIT B Accumulator Compressor (1) STOP valve (Gas) OUTDOOR UNIT INDOOR UNIT Refrigeration Cycle UNIT B UNIT A INDOOR UNIT OUTDOOR UNIT Cooling heating Flow of Refrigerant 1. Cycle temperature and pressure in stop valve Running unit AY-XPM7FR & AY-XPM7FR & (2 units) AY-XPM12FR (1 unit) No (1) (2) (3) (4) Stop valve pressure (gas side) (MPa gauge) Frequency (Hz) (1) (2) (3) (4) Stop valve pressure (gas side) (MPa gauge) Frequency (Hz) Cool (MAX) 72 40 13 17 1.00 60 80 38 10 12 0.78 65 4–1 Operation Mode Cool (Test run) Heat (MAX) 63 69 38 1 15 28 21 4 1.13 2.35 35 70 67 77 37 2 13 39 18 3 1.01 3.20 35 70 Heat (Test run) 43 3 24 4 1.72 30 54 3 28 5 2.25 35 AEX2M14LR Running unit No (1) (2) (3) (4) Stop valve pressure (gas side) (MPa gauge) Frequency (Hz) (1) (2) (3) (4) Stop valve pressure (gas side) (MPa gauge) Frequency (Hz) AY-XPM9FR (1 unit) AY-XPM7FR (1 unit) Operation Mode Cool (Test run) Heat (MAX) 63 77 37 2 14 38 20 4 1.07 3.12 30 60 62 69 36 3 14 34 20 5 1.07 2.83 20 50 Cool (MAX) 73 37 10 14 0.87 50 68 37 11 16 0.93 40 Heat (Test run) 48 4 28 5 1.98 25 41 4 28 6 1.79 20 Standard conditions Indoor side Dry-bulb temp. (C) Relative humidity (%) 27 47 20 – Cooling Heating Outdoor side Dry-bulb temp. (C) Relative humidly (%) 35 40 7 87 2. PERFORMANCE CURVES NOTE: Total cooling capacity and total input with 2 units running. (Running frequency: 60HZ) 1100 Input(W) (Running frequency: 50HZ) ˴ 900 ˴00 19 17 16 36 34 32 30 Heatingcapacity(kW) 20 4.5 4.0 3.5 3.0 24 Outlet air temp. (ºC) 700 ˴00 18 Coolingcapacity(kW) 1000 800 ˴00 Outlet air temp. (ºC) Input(W) 1000 6.0 28 5.0 26 4.0 3.0 -6 -4 -2 0 2 4 6 8 10 12 Outside air temp. (ºC) 26 28 30 32 34 36 38 40 42 44 At Heating for AY-XPM9FR (for AE-X2M14LR) Outside air temp. (ºC) At Cooling for AY-XPM9FR (for AE-X2M14LR) [2] REFRIGERANT PIPE INSTALLATION WORKS 1. Piping Max. piping length A ------------------ 25m 2. Air-removing Use an adapter for preventing vacuum pump oil from flowing back to the gauge manifold hose. ON/OFF operation of the vacuum pump should be made by the adapter switch. INDOOR UNIT Min. piping length A ------------------ 3m Max. level difference B -------------- 10m • If total piping length exceeds 25m, add 15g of refrigerant per 1m. • When the outdoor unit is placed at a higher level than the indoor units, provide a trap near the hose’s lead-in port. 1) Remove both valve shaft caps of the stop valves. A Max. total piping length of all unit --- 40m B 2) Remove the service port cap of the stop valve (gas side). OUTDOOR UNIT 3) Connect the gauge manifold hose to the service port and the vacuum pump. Be sure that the hose end to be connected to the service port has a valve core pusher. 4) Open the gauge manifold valve and operate the vacuum pump for 10-15 minutes. Make sure the compound gauge reads -0.1MPa (76cmHg). B 5) Close the gauge manifold valve. 6) Turn off the vacuum pump. TRAP 7) Fully open the stop valve (liquid side) with hexagon socket screw key. Turn all the way up to contact. 4–2 AEX2M14LR CAUTION: Execute the pump down operation using with PUMP DOWN SWITCH. The compressor might stop on the way if pump down is operated while cooling operation mode without PUMP DOWN SWITCH. 8) Fully open the stop valve (gas side) with hexagon socket screw key. Turn all the way up to contact. 9) Disconnect the gauge manifold hose from the service port. 10)Replace the service port cap and both valve shaft caps tightly. Turn until the torque suddenly increases. Now tighten a 1/6-turn more. NOTE: * * 4. MISWIRING CHECK Use a gauge manifold and hoses exclusive for R410A. Miswiring check must be performed after installation, reinstallation and service. This multi-type air conditioner is designed with a WIRE CHECK SWITCH on the outdoor unit, and miswiring of unit-to-unit wiring will be self-corrected by microcomputer. Miswiring check may not be performed when the outdoor temperature is below 5C. After air removal, check the tube connections for gas leak using a leakage detector or soapy water. Regarding leakage detector, use high-sensitivity type designed specially for R410A. 1) Complete the unit-to-unit wiring/piping and perform the air removing of the pipes. Turn the electrical circuit breaker ON. Before turning the circuit breaker ON, make sure no one is working on the indoor units installation. Electrical shock or injury may occur. Gauge manifold Compound gauge Lo Hi 2) Check that all LED (LED1, 2) on the display board unit are flashing synchronously in a slow (one flash per second) cycle. If either one or more of all LED is/are kept lighted on, check and correct the Hose Stop valve (gas side) Service port Stop valve (liquid side) wrong wirings among, N, 1, 2, terminals so that all LED will flash slowly, showing normal condition. Vacuume pump adapter Service port 3) Press the WIRE CHECK SWITCH (SW2) on the display board unit for 5 seconds or more. The flashing of all LED will change. Mis-wiring (mis-piping) check will start and the indoor and outdoor units will start operating. (The red operation lamp on the indoor unit will flash, and three BEEP will be emitted.) Miswiring of unit-to-unit wiring will be self-corrected. Hexagon socket screw key 4mm Valve shaft cap OPEN 4) Wrong piping works cannot be corrected, and will be detected as an error. When an error is detected during checking, all LED will show triple flash for eight times. The indoor and outdoor operation will stop. Turn the circuit breaker OFF and check and correct the miswiring (mispiping)*. After correction, return to step 1 and repeat the miswiring (mispiping) check again. If error is still detected, or other types of LED signal should be indicated, please contact a service technician. (Refer to wiring diagram attached inside the outdoor unit cabinet for self diagnosis signal.) 3. Pump down (Pump down is adopted in the case of unit removal for reinstallation, abandonment, repair etc.) Pump down is to collect the refrigerant into the outdoor unit by control of the stop valves and the compressor. 1) Turn the circuit breaker on. 2) Check that all LED (LED1, 2) on the display board unit are flashing synchronously in a slow (one flash per second) cycle. 5) All LED (LED1, 2) will flash synchronously in a slow (one flash per second) cycle when miswiring (mispiping) check is completed with no error detection (3–6 minutes), and the operation of indoor and outdoor units will stop. (The red operation lamp flashing on the indoor unit will go off.) 3) Stop the air conditioner operation. 4) Remove both valve shaft caps of the stop valves. 5) Press the PUMP DOWN SWITCH (SW1) on the display board unit for 5 seconds or more. The indoor/outdoor unit will start operation in the pump down mode. (the OPERATION lamp on the indoor unit will flash and three BEEP will be emitted.) 6) Place the control box cover back in the reverse order. *Correction points on error detection 6) After 5 – 10 minutes, fully close the stop valve (liquid side) by turning the hexagon socket screw key clockwise. a) Are all piping the total multi air conditioner system connected? b) Are the stop valves open? SW 1 PUMP DOWN SW 2 WIRE CHECK UNIT B LED 2 UNIT A LED 1 LED 2 UNIT B NOTE: Wait more than 90 seconds after finishing pump down, and turn off the circuit breaker off. Stop valve (gas side) Stop valve (liquid side) 4–3 SW 1 SW 2 9) Replace the service port cap and both valve shaft caps tightly. WIRE CHECK LED 1 UNIT A 8) Press the PUMP DOWN SWITCH (SW1) on the display board unit for 5 seconds or more. The operation of indoor/outdoor unit will stop. PUMP DOWN 7) After 2 – 3 minutes, immediately close the stop valve (gas side) fully. AEX2M14LR Service CHAPTER 5. DISASSEMBLING PROCEDURE AEX2M14LR Manual If, in carrying out repairs and modifications, the work requires the use of arc- and flame-producing apparatus, such as welding, brazing and soldering equipment, this work shall only be started after the rooms have been thoroughly ventilated. While the work is being carried out, the mechanical ventilation, if any, shall be kept in constant operation and all windows and doors kept open. In the case of repairs to parts of the refrigerant circuit, it may be necessary that not only the workman but also a second person shall be present for observation and assistance. Necessary protective equipment shall be available and, in the case of open flames or arcs, fire extinguishing apparatus shall be ready to hand. Welding and brazing shall be carried out by qualified workmen. [1] OUTDOOR UNIT CAUTION: DISCONNECT THE UNIT FROM POWER SUPPLY BEFORE ANY SERVICING. 1. PROCEDURE 4. Remove the 4 screws fixing the fan guard then remove it and remove the 7 screws fixing the cabinet then remove it. 1. Remove the 2 screws fixing the pipe cover then remove it. 3 screws are at the left. 2 screws are at the right. 1 screw is at the front. 1 screw is at the rear. 2. Remove the 3 screws fixing the control box cover then remove it. 5. Remove the 3 screws fixing the control box angle then remove it. CAUTION: DISCHARGE ELECTROLYTIC CAPACITOR BEFORE TOUCHING THIS CAPACITOR OR OTHER COMPONENTS OR WIRINGS. 3. Remove the 6 screws fixing the side cover R then remove it. 6. Cut the 2 wire fixing bands. 5–1 AEX2M14LR 7. Disconnect the 9 connectors. 10.Unfasten the nut fixing the propeller fan then remove it. Expansion valve (CN12A, CN12B): 2pcs. Remove the 5 screws fixing the control box then remove it. Thermistor (CN8A, CN8B): 2pcs. 1 screw is at the right. Fan motor (CN3): 1pc. 4 screws are at the front. Reverse valve coil (CN4): 1pc NOTE: How to disassemble of control box assembly is shown in step 15 - 25. Display board unit (CN11): 1pc NOTE: Caution to connectors position especially the expansion valves, when reinstalling 11. Remove the 2 screws fixing the fan motor angle assembly then remove it with lifting up as unhook the hook on the base pan. 8. Remove the compressor cover B. Disconnect 5 terminals. Remove the 3 screws fixing the fan bulkhead assembly then remove. Coil for PFC1 (L1): 2pcs (White) Compressor: 3pcs (Red, White and Orange) NOTE: Caution to connectors position especially the compressor, when reinstalling. 12.Remove the 4 screws fixing the fan motor then remove it. 9. Remove the 13 screws fixing the rear cabinet then remove it. 1 screw is at the left. 5 screws are at the right. 7 screws are at the rear. 5–2 AEX2M14LR 13.Remove the 3 screws fixing the coil for PFC then remove it How to disassemble the control box assembly NOTE: When the coil re-install, silicone grease must be paste to the back face of the coil. 16.Cut the 3 wire fixing bands. Disconnect the 7 connectors. [CN6, CN15, CN9A, CN16, CN17, CN5, CN101 (IPM)] 14.Remove the 3 strings on the compressor cover A then remove it Lift up the Control Board Unit (PWB) and remove it. Control board unit 15.Remove the 6 thermistors on copper tube. Install this SHAORT-CIRCUIT CONNECTOR in a new CONTROL PWB at CONTROL PWB exchange. NOTE: Caution to position when re-installing. 17.Disconnect the 2 terminals (Blue and Brown). And Remove the 3 screws fixing the terminal board angle assembly then turn it inside out. TH8 (BROWN) (Just on the tilted pipe) TH7 (WHITE) (Just on the horizontal pipe) TH6 (BLUE) Blue (Just on the horizontal pipe) TH3 (GREEN) TH4 (BLACK) TH2 (ORANGE) Refer to page 5-5 (Mounting position of thermistors and expansion valves) 5–3 Brown AEX2M14LR 21.Remove the 2 screws fixing the heat sink cover then remove it. 18.Disconnect the 5 terminals (T1, 2, 4, 6, MRY1) and 3 connectors (CN14, CN2, CN13 (Active Filter)). 22.Cut a wire fixing board. 19.Remove the 3 screws fixing the power supply board unit (PWB). 23.Remove the each of 4 screws fixing the heat sink. NOTE: Confirm two kinds of spacer put in 4 holes have clung. Seal the 4 burring holes with silicone sealer before reinstalling. 20.Disconnect 2 connectors (CN1,CN9). Then lift up the relay board unit (PWB) and remove it. 5–4 AEX2M14LR 24.Disconnect the 5 terminals (TP, TU, TV. TW, TN) and 1 connector (CN114) on the IPM PWB. And Remove the 2 screws fixing the IPM PWB and remove it. 25.Disconnect the 6 terminals (P, Io, +, -, L1, L2) and 1 connector (CN13) on the active filter. And Remove the 2 screws fixing the power module and remove it. NOTE: When the IPM PWB re-install, silicone grease must be paste to the back face of the IPM. NOTE: When the active filter re-install, silicone grease must be paste to the back face of the Active Filter. Active filter or Power transistor module(IPM) OK NG CAUTION: Fix the connector of the power module securely. 2. Mounting position of thermistors and expansion valves Mounting position of thermistors and expansion valves are shown below. Thermistor • Check the cord color of thermistor before mounting. • Thermistor Suction, Suction A, Suction B, Suction C are mounted on GAS side pipes. • Thermistor Heat exchanger is mounted on LIQUID side pipe. Expansion valve • Check the labels before connecting to the Control Board Unit. Thermistor Suction (Black) Label Expansion valve B Thermistor Suction B (White) Label Expansion valve A Thermistor Suction A (Blue) Suction A Suction B Suction C Suction Outdoor temp. Heat exchanger Compressor Thermistor Heat exchanger (Orange) Thermistor B Connector label CAUTION: Mismounting and misconnecting will cause error or failure. 5–5 A Expansion valve AEX2M14LR MEMO 5–6 AEX2M14LR PartsGuide PARTS GUIDE MULITI SPLIT TYPE ROOM AIR CONDITIONERS (OUTDOOR UNIT) MODEL AE-X2M14LR In the interests of user-safety (Required by safety regulations in some countries) the set should be restored to its original condition and only parts identical to those specified should be used. CONTENTS [1] OUTDOOR UNIT [4] PACKING PARTS [2] CONTROL BOARD UNIT PARTS INDEX [3] IPM30A BOARD PARTS Parts marked with " " are important for maintaining the safety of the set. Be sure to replace these parts with specified ones for maintaining the safety and performance of the set. This document has been published to be used for after sales service only. The contents are subject to change without notice. AEX2M14LR [1] OUTDOOR UNIT 2-21 2-20 6-6 4-5 4-2 1-36 4-4 4-6 4-3 2-14 2-2 1-30 6-11 2-23 2-99 6-6 4-1 2-2 2-13 2-46 6-5 2-12 2-93 6-5 6-5 1-10 1-49 2-67 1-12 3-15 1-2 6-14 6-5 1-47 1-48 6-5 2-28 1-41 3-8 6-1 2-80 1-15 1-50 1-34 6-7 1-5 1-25 1-4 3-7 1-77 6-4 1-46 6-13 6-5 3-16 6-13 6-13 1-71 1-6 6-5 1-52-2 1-65 1-52-1 1-54 3-11 1-16 1-21 2-66 1-22 3-20 1-27 3-18 1-16 3-5 6-3 1-24 1-23 1-19 1-20 1-13 3-4 1-68 3-3 3-9 1-57 1-58 3-6 6-13 1-52 1-83 1-26 6-3 1-1 1-53 6-5 2-67 3-193-1 1-63 1-61 2-27 1-14 1-55 6-13 1-64 2-26 6-10 1-78 1-66 6-13 1-35 2-19 2-6 1-69 1-40 3-14 3-17 6-8 1-32 6-5 1-37 6-5 1-8 1-42 6-4 1-73 1-31 6-13 2-63 2-4 2-5 1-39 6-4 1-11 6-9 1-62 1-76 1-3 1-45 1-9 1-9-1 6-4 1-38 1-67 2-10 2-84 2-83 2-18 2-62 1-34 2-98 2-8 6-13 1-17 6-2 6-13 1-44 1-43 2-1 6-11 2-2 2-22 6-5 2-2 2-85 2-65 2-9 2-7 2-3 2-16 2-15 2-9 6-12 1-18 1-51 2-17 2-11 6-13 3-12 3-13 3-10 3-9 3-10 3-2 1-60 6-5 1-56 1-59 1-28 6-13 6-13 1-7 2 3-21 AEX2M14LR NO. PARTS CODE PRICE NEW PART RANK MARK RANK DESCRIPTION [1] OUTDOOR UNIT 1-1 1-2 1-3 1-4 1-5 1-6 1-7 1-8 1-9 1-9-1 1-10 1-11 1-12 1-13 1-14 1-15 1-16 1-17 1-18 1-19 1-20 1-21 1-22 1-23 1-24 1-25 1-26 1-27 1-28 1-30 1-31 1-32 1-34 1-35 1-36 1-37 1-38 1-39 1-40 1-41 1-42 1-43 1-44 1-45 1-46 1-47 1-48 1-49 1-50 1-51 1-52 1-52-1 1-52-2 1-53 1-54 1-55 1-56 1-57 1-58 1-59 1-60 1-61 1-62 1-63 1-64 1-65 1-66 1-67 1-68 1-69 1-71 1-73 1-76 1-77 1-78 1-83 CCHS-A789JBTB CMOTLB426JBEZ DCAB-A161JBTA FCOV-A330JBWZ GCAB-A366JBTA GFTA-A455JBTB GGADFA042JBFA GPLTMA059JBTB LANGKA236JBPZ LANGKA253JBPZ LHLD-A574JBFA LSUB-A024JBPZ MSPR-A026JBE0 MSPR-A027JBE0 MSPR-A036JBE0 MSPR-A046JBE0 MSPR-A129JBE0 NFANPA142JBFA PCOV-A578JBEZ PCOV-A589JBEZ PDAI-A241JBTA PGUM-A115JBEZ PGUM-A119JBEZ PGUM-A120JBEZ PGUM-A121JBEZ PRDAFA163JBEZ PGUMS0170JBE0 PGUMSA319JBEZ PSEL-D235JBEZ PSEL-B954JBEZ PSEL-B956JBEZ PSEL-B966JBEZ PSEL-C011JBEZ PSEL-C017JBEZ PSEL-C019JBEZ PSEL-C260JBEZ PSEL-C261JBEZ PSEL-C262JBEZ PSEL-C277JBEZ PSEL-C282JBEZ PSEL-C343JBEZ PSEL-C353JBEZ PSEL-C354JBEZ PSEL-C369JBEZ PSEL-C370JBEZ PSEL-C371JBEZ PSEL-C372JBEZ PSEL-C373JBEZ PSKR-A353JBWZ PSPA-A146JBE0 PSPF-B112JBEZ PSPF-B113JBEZ PSPF-B114JBEZ PSPF-B072JBEZ PTUB-A196JBEZ RTRN-A294JBZZ PCOV-B484JBFA TLAB-B709JBRA PFPFPD477JBEZ PSEL-D236JBEZ TLAB-C250JBRA TLAB-E544JBRZ TLAB-C773JBRZ TLABMA819JBRA TLABCC545JBRZ TSPC-G699JBRZ PSEL-C378JBEZ PSEL-C379JBEZ LSUB-A038JBWZ PSEL-C382JBEZ CFTA-A339JBKZ PSEL-C938JBEZ TLAB-C511JBRA TLAB-E787JBEZ PSPF-B073JBEZ PSEL-D274JBEZ BD CA BN AZ BR AP BH AF AY AM AE AP AB AB AB AC AD BE AE AF BC AM AG AG AE AP AE AF AG AF AF AC AC AC AD AC AC AC AG AD AE AP AE AC AC AC AC AC AZ AC AY AY AQ AK AK BG AG AH AG AG AG AM AN 2-1 2-2 2-3 2-4 2-5 2-6 2-7 DBOX-A079JBYZ DSGY-E095JBKZ LANG-A451JBWZ LANG-A458JBWZ LBNDKA154JBWZ LHLD-0261JBM0 LPLTPA016JBFZ AS CB AE AR AN AB AG CABINET AND UNIT PARTS Base pan assembly Fan motor Rear cabinet assembly Coil cover assembly Cabinet Control box cover Fan guard Side cover R Motor angle Fan Motor angle sub Thermistor holder Motor angle sub Spring Thermistor spring Thermistor spring Protector spring Cycle spring Propeller fan Sw board cover Cover Flare coupling base Damper rubber Valve rubber Valve rubber Damper rubber Heat sink Damper rubber Damper rubber INSULATOR Bulkhead insulator Bulkhead seal Bulkhead seal Insulator Cabinet seal Insulator Seal A Seal B Seal C Cover insulator Cushion Bulkhead insulator A Insulator Insulator Accum.cushion Insulator Seal Seal Seal Bulkhead Spacer Compressor cover A2 N AH AK AB AB AN AC AY AK AC AK AK AG N N Compressor cover B2 Pipe insulator Active coil (L1) TUBE COVER Label INSULATOR INSULATOR Unit label Service label Label INVERTER LABEL Wiring diagram Name label Insulator Insulator Flare cup.sub-S Seal D Control cover assembly Insulator Label EU energy label Compressoor cover C2 Accum cushion CONTROL BOX PARTS Cont.box spot assembly Control board unit Cont.box angle Terminal board ang. Capacitor band Cord holder Pwb support A 3 AEX2M14LR NO. PARTS CODE PRICE NEW PART RANK MARK RANK DESCRIPTION [1] OUTDOOR UNIT 2-8 2-9 2-10 2-11 2-12 2-13 2-14 2-15 2-16 2-17 2-18 2-19 2-20 2-21 2-22 2-23 2-26 2-27 2-28 2-46 2-62 2-63 2-65 2-66 2-67 2-80 2-83 2-84 2-85 2-93 2-98 2-99 LPLTPA017JBFZ LPLTPA018JBFZ LPLTPA027JBFZ PCOV-A601JBWZ PSEL-C376JBEZ PRDAFA215JBEZ PRDAFA216JBEZ PSEL-C037JBEZ PSEL-C074JBEZ PSEL-C374JBEZ PSHE-A195JBEZ PSHE-A196JBEZ PSPA-A064JBE0 PSPA-A065JBE0 PSPA-A150JBZZ DSGY-C347JBKZ QTANZA021JBZZ QTANZA044JBZZ QW-IZA120JBZZ PSHE-A273JBEZ RC-AZA046JBE0 RC-EZA250JBZZ VHDD25VB60+-1 RH-HXA096JBZZ RH-HXA095JBZZ RTHM-A022JBE0 TLAB-B777JBRZ TLAB-D246JBRZ TLAB-D243JBRZ RH-TXA008JBZZ PSEL-C377JBEZ RHOG-A169JBE0 AG AG AN AQ AC BE BC AE AC AC AH AE AA AA AF BV AN AU AU AF BE BG AN AZ BC AN AC AF AM BR AC AK 3-1 3-2 3-3 3-4 3-5 3-6 3-7 3-8 3-9 3-10 3-11 3-12 3-13 3-14 3-15 3-16 3-17 3-18 3-19 3-20 3-21 CCIL-A158JBKZ DVLV-A952JBKZ DVLV-A953JBKZ DVLV-A954JBKZ DVLV-A668JBKZ DVLV-A669JBKZ GLEG-A029JBE0 LBSHCA005JBE0 LX-NZA250JBEZ LX-NZA251JBEZ PACU-A052JBEZ PCAP-A083JBEZ PCAP-A084JBEZ PCMPRA524JBEZ PCON-A611JBPZ PCOV-0562JBE0 PMUF-A091JBEZ PVLVRA040JBEZ PVLVXA081JBEZ RMOTSA038JBZZ FCMPRA244JBKZ AX AU AU AU AZ AW AE AA AE AG BH AC AC CM CH AD AZ BM BB BD CM N 4-1 4-2 4-3 4-4 4-5 4-6 LHLD-A459JBEZ LPFT-A029JBF0 TINS-B240JBRZ TINS-B241JBRZ LBND-A046JBE0 TINS-B242JBRZ AD AD AK AK AE AK N N 6-1 6-2 6-3 6-4 6-5 6-6 6-7 6-8 6-9 6-10 6-11 6-12 6-13 6-14 LX-BZA434JBEZ LX-BZA075JBE0 LX-BZA078JBEZ LX-BZA140JBE0 LX-BZA364JBEZ LX-HZA007JBEZ LX-NZA319JBEZ LX-NZA313JBEZ XBPS740P14JS0 XCTS740P10000 XBPS740P20J00 XBPS730P10000 LX-BZA140JBE0 XTTWW40P16000 AR AA AB AB AC AE AE AE AB AC AF AF AB AC N N Pwb support B Heatsink support Pwb support C Heatsink cover Insulator Haet sink Heat sink Insulator Insulator Seal Angle sheet Cord holder sheet Spacer Spacer Spacer IPM30A board assembly Terminal board 4P Terminal board 3P Compressor cord (for compressor) Protection sheet (for display PWB) Electrolytic capacitor (C9) Electrolytic capacitor (C10) Diode bridge (DB1) Thermistor (TH6-TH8) Thermistor (TH1-TH4) Thermistor (TH1) Caution label Label Label Active filter Insulator Thermistor (HEATSINK) CYCLE PARTS Coil Flare union unit 3S Flare union unit 3S Flare union unit 2S 3way valve unit 3way valve unit Comp. cushion rubber Terminal bushing Flare nut Flare nut Accumulator Nut bonnet Nut bonnet Compressor Condenser Terminal cover Muffler Expansion valve Reverse valve Coil Compressor assembly (3-7, 3-8, 3-14, 3-16) ACCESSORY PARTS Holder Drain joint Installation manual (English, Italian) Installation manual (French, Spanish) Wire fixing band Installation manual (Portuguese) SCREWS AND NUTS Special screw Special screw (for earth) Special screw Special screw Special screw Special screw Special nut Special nut Machine screw Tapping screw Machine screw Machine screw Special screw Special screw 4 AEX2M14LR NO. PARTS CODE PRICE NEW PART RANK MARK RANK DESCRIPTION [2] CONTROL BOARD UNIT PARTS 2-2 2-2-1 2-2-2 2-2-3 2-2-4 D2-4 L5 L6 Q2 CT1 D14 D19-21 D26-37 IC1 IC2 IC4 IC5 IC6 IC7 IC8 IC9 NR1-NR3 PC1 Q11 Q13-15 RY1 SA1 SW1-3 TR1 MRY1 PTC1 L3 L4 D1 D38 PC4.6.8 PC5.7.9 IC3 IC12 DSGY-E095JBKZ QFS-GA065JBZZ QFS-GA062JBZZ QFS-GA063JBZZ QFS-GA064JBZZ VHD1SR139-6-1 RFILNA013JBZZ RFILNA007CBZZ VS2SA1586G+-1L RTRN-A305JBZZ VHDRK36LF011B VHD1SR139-6-1 VHD1SR35-4A-1 RH-IXB001JBNA RH-IZA140JBE0 VHISTRL472+-1 VHIKIA339F+-1L FH-IXA494JBKZ RIC--A022BDE0 VHIMM1431A+-1+ VHINJM2904M-1R RH-VXA002JBZZ VHGPC81716P-1L VSKRC245M//-3 VS2SA1020Y+-1+ RRLYDA008JBZZ QSPGCA006JBZZ QSW-PA016DRE0 RTRNWA034JBZZ RRLYDA010JBZZ RH-QXA005JBZZ RFIL-A116JBZZ VHD1SS133//-1 VHGPC817XP3-1L VHGPC853HXP-1R RIC--A025BDE0 CB BA AF AE AF AB BE AR AB N N AD AB AC AE AL AD N AE AD AD AF AD AC AH AH AH AB AG AN AW AY AA AD AG AE Control board unit Fuse (FUSE1,101) Fuse (FUSE3, 4) Fuse (FUSE5) Fuse (FUSE6) Diode Normal coil (L5) Common coil (L6) Transistor (Q2) Transformer (CT1) Diode (D14) Diode Diode (D26~37) Micro computer (IC1) Integrated circuit (IC2) Integrated circuit (IC4) Integrated circuit (IC5) EEPROM-AEX2M4LR (IC6) Integrated circuit (IC7) Integrated circuit (IC8) Integrated circuit (IC9) Varistor (NR1-NR3) Photo coupler (PC1) Transistor (Q11) Transistor (Q13~15) Relay (RY1) Surge absorb (SA1) Tact switch (SW1,2,3) Transformer (TR1) Relay (MRY1) PTC thermistor (PTC1) Coil (L3,4) Diode (D1,38) Photo coupler (PC4,6,8) Photo coupler (PC5,7,9) Integrated circuit (IC3, IC12) [3] IPM30A BOARD PARTS 2-23 2-23-1 R1 DSGY-C347JBKZ RH-IXA859JBZZ RR-WZA028JBE0 RH-TXA008JBZZ VHDD25VB+-1 IPM30A board assembly Power module (PS21267-P) Cement Resistor (R100) ACTIVE FILTER(SACT32420G) DIODE BRIDGE(D25VB60) BV BQ AE BR [4] PACKING PARTS 5-3 5-1 NO. PARTS CODE 5-2 PRICE NEW PART RANK MARK RANK DESCRIPTION [4] PACKING PARTS 5-1 5-2 5-3 SPAKCC801JBEZ CPADBA131JBKZ CPADBA132JBKZ BD AZ AS N Packing case Bottom pad assembly Packing pad assembly 5 AEX2M14LR INDEX PARTS CODE [ C ] CCHS-A789JBTB CCIL-A158JBKZ CFTA-A339JBKZ CMOTLB426JBEZ CPADBA131JBKZ CPADBA132JBKZ [ D ] DBOX-A079JBYZ DCAB-A161JBTA DSGY-C347JBKZ " DSGY-E095JBKZ " DVLV-A668JBKZ DVLV-A669JBKZ DVLV-A952JBKZ DVLV-A953JBKZ DVLV-A954JBKZ [ F ] FCMPRA244JBKZ FCOV-A330JBWZ FH-IXA494JBKZ [ G ] GCAB-A366JBTA GFTA-A455JBTB GGADFA042JBFA GLEG-A029JBE0 GPLTMA059JBTB [ L ] LANG-A451JBWZ LANG-A458JBWZ LANGKA236JBPZ LANGKA253JBPZ LBND-A046JBE0 LBNDKA154JBWZ LBSHCA005JBE0 LHLD-0261JBM0 LHLD-A459JBEZ LHLD-A574JBFA LPFT-A029JBF0 LPLTPA016JBFZ LPLTPA017JBFZ LPLTPA018JBFZ LPLTPA027JBFZ LSUB-A024JBPZ LSUB-A038JBWZ LX-BZA075JBE0 LX-BZA078JBEZ LX-BZA140JBE0 " LX-BZA364JBEZ LX-BZA434JBEZ LX-HZA007JBEZ LX-NZA250JBEZ LX-NZA251JBEZ LX-NZA313JBEZ LX-NZA319JBEZ [ M ] MSPR-A026JBE0 MSPR-A027JBE0 MSPR-A036JBE0 MSPR-A046JBE0 MSPR-A129JBE0 [ N ] NFANPA142JBFA [ P ] PACU-A052JBEZ PCAP-A083JBEZ PCAP-A084JBEZ PCMPRA524JBEZ PCON-A611JBPZ PCOV-0562JBE0 PCOV-A578JBEZ PCOV-A589JBEZ PCOV-A601JBWZ PCOV-B484JBFA PDAI-A241JBTA PFPFPD477JBEZ No. PRICE NEW PART RANK MARK RANK 1-1-1 1-3-1 1-1-71 1-1-2 4-5-2 4-5-3 BD AX AY CA AZ AS 1-2-1 1-1-3 1-2-23 3-2-23 1-2-2 2-2-2 1-3-5 1-3-6 1-3-2 1-3-3 1-3-4 AS BN BV BV CB CB AZ AW AU AU AU 1-3-21 1-1-4 2-IC6 CM AZ 1-1-5 1-1-6 1-1-7 1-3-7 1-1-8 BR AP BH AE AF 1-2-3 1-2-4 1-1-9 1-1-9-1 1-4-5 1-2-5 1-3-8 1-2-6 1-4-1 1-1-10 1-4-2 1-2-7 1-2-8 1-2-9 1-2-10 1-1-11 1-1-68 1-6-2 1-6-3 1-6-4 1-6-13 1-6-5 1-6-1 1-6-6 1-3-9 1-3-10 1-6-8 1-6-7 AE AR AY AM AE AN AA AB AD AE AD AG AG AG AN AP AN AA AB AB AB AC AR AE AE AG AE AE 1-1-12 1-1-13 1-1-14 1-1-15 1-1-16 AB AB AB AC AD 1-1-17 BE 1-3-11 1-3-12 1-3-13 1-3-14 1-3-15 1-3-16 1-1-18 1-1-19 1-2-11 1-1-56 1-1-20 1-1-58 BH AC AC CM CH AD AE AF AQ AG BC AG PARTS CODE PGUM-A115JBEZ PGUM-A119JBEZ PGUM-A120JBEZ PGUM-A121JBEZ PGUMS0170JBE0 PGUMSA319JBEZ PMUF-A091JBEZ PRDAFA163JBEZ PRDAFA215JBEZ PRDAFA216JBEZ PSEL-B954JBEZ PSEL-B956JBEZ PSEL-B966JBEZ PSEL-C011JBEZ PSEL-C017JBEZ PSEL-C019JBEZ PSEL-C037JBEZ PSEL-C074JBEZ PSEL-C260JBEZ PSEL-C261JBEZ PSEL-C262JBEZ PSEL-C277JBEZ PSEL-C282JBEZ PSEL-C343JBEZ PSEL-C353JBEZ PSEL-C354JBEZ PSEL-C369JBEZ PSEL-C370JBEZ PSEL-C371JBEZ PSEL-C372JBEZ PSEL-C373JBEZ PSEL-C374JBEZ PSEL-C376JBEZ PSEL-C377JBEZ PSEL-C378JBEZ PSEL-C379JBEZ PSEL-C382JBEZ PSEL-C938JBEZ PSEL-D235JBEZ PSEL-D236JBEZ PSEL-D274JBEZ PSHE-A195JBEZ PSHE-A196JBEZ PSHE-A273JBEZ PSKR-A353JBWZ PSPA-A064JBE0 PSPA-A065JBE0 PSPA-A146JBE0 PSPA-A150JBZZ PSPF-B072JBEZ PSPF-B073JBEZ PSPF-B112JBEZ PSPF-B113JBEZ PSPF-B114JBEZ PTUB-A196JBEZ PVLVRA040JBEZ PVLVXA081JBEZ [ Q ] QFS-GA062JBZZ QFS-GA063JBZZ QFS-GA064JBZZ QFS-GA065JBZZ QSPGCA006JBZZ QSW-PA016DRE0 QTANZA021JBZZ QTANZA044JBZZ QW-IZA120JBZZ [ R ] RC-AZA046JBE0 RC-EZA250JBZZ RFIL-A116JBZZ RFILNA007CBZZ RFILNA013JBZZ RH-HXA095JBZZ RH-HXA096JBZZ RH-IXA859JBZZ RH-IXB001JBNA RH-IZA140JBE0 RHOG-A169JBE0 RH-QXA005JBZZ N N N N 6 No. PRICE NEW PART RANK MARK RANK 1-1-21 1-1-22 1-1-23 1-1-24 1-1-26 1-1-27 1-3-17 1-1-25 1-2-13 1-2-14 1-1-30 1-1-31 1-1-32 1-1-34 1-1-35 1-1-36 1-2-15 1-2-16 1-1-37 1-1-38 1-1-39 1-1-40 1-1-41 1-1-42 1-1-43 1-1-44 1-1-45 1-1-46 1-1-47 1-1-48 1-1-49 1-2-17 1-2-12 1-2-98 1-1-66 1-1-67 1-1-69 1-1-73 1-1-28 1-1-59 1-1-83 1-2-18 1-2-19 1-2-46 1-1-50 1-2-20 1-2-21 1-1-51 1-2-22 1-1-53 1-1-78 1-1-52 1-1-52-1 1-1-52-2 1-1-54 1-3-18 1-3-19 AM AG AG AE AE AF AZ AP BE BC AF AF AC AC AC AD AE AC AC AC AC AG AD AE AP AE AC AC AC AC AC AC AC AC AB AB AC AK AG AG AG AH AE AF AZ AA AA AC AF AK AK AY AY AQ AK BM BB 2-2-2-2 2-2-2-3 2-2-2-4 2-2-2-1 2-SA1 2-SW1-3 1-2-26 1-2-27 1-2-28 AF AE AF BA AH AB AN AU AU 1-2-62 1-2-63 2-L3 L4 2-L6 2-L5 1-2-67 1-2-66 3-2-23-1 2-IC1 2-IC2 1-2-99 2-PTC1 BE BG AY AR BE BC AZ BQ AE AK AW AEX2M14LR PARTS CODE RH-TXA008JBZZ " RH-VXA002JBZZ RIC--A022BDE0 RIC--A025BDE0 RMOTSA038JBZZ RRLYDA008JBZZ RRLYDA010JBZZ RR-WZA028JBE0 RTHM-A022JBE0 RTRN-A294JBZZ RTRN-A305JBZZ RTRNWA034JBZZ [ S ] SPAKCC801JBEZ [ T ] TINS-B240JBRZ TINS-B241JBRZ TINS-B242JBRZ TLAB-B709JBRA TLAB-B777JBRZ TLAB-C250JBRA TLAB-C511JBRA TLAB-C773JBRZ TLABCC545JBRZ TLAB-D243JBRZ TLAB-D246JBRZ TLAB-E544JBRZ TLAB-E787JBEZ TLABMA819JBRA TSPC-G699JBRZ [ V ] VHD1SR139-6-1 " VHD1SR35-4A-1 VHD1SS133//-1 VHDD25VB+-1 VHDD25VB60+-1 VHDRK36LF011B VHGPC81716P-1L VHGPC817XP3-1L VHGPC853HXP-1R VHIKIA339F+-1L VHIMM1431A+-1+ VHINJM2904M-1R VHISTRL472+-1 VS2SA1020Y+-1+ VS2SA1586G+-1L VSKRC245M//-3 [ X ] XBPS730P10000 XBPS740P14JS0 XBPS740P20J00 XCTS740P10000 XTTWW40P16000 No. PRICE NEW PART RANK MARK RANK 1-2-93 32-NR1-NR3 2-IC7 2-IC3 IC12 1-3-20 2-RY1 2-MRY1 3-R1 1-2-80 1-1-55 2-CT1 2-TR1 BR BR AF AE AE BD AH AN AE AN BG 4-5-1 BD N 1-4-3 1-4-4 1-4-6 1-1-57 1-2-83 1-1-60 1-1-76 1-1-62 1-1-64 1-2-85 1-2-84 1-1-61 1-1-77 1-1-63 1-1-65 AK AK AK AH AC AG AC AN AH AM AF AM AK N N N 2-D2-4 2-D19-21 2-D26-37 2-D1 D38 31-2-65 2-D14 2-PC1 2-PC4.6.8 2-PC5.7.9 2-IC5 2-IC8 2-IC9 2-IC4 2-Q13-15 2-Q2 2-Q11 AB AB AC AA 1-6-12 1-6-9 1-6-11 1-6-10 1-6-14 AF AB AF AC AC N N AG AK N N AN AD AD AD AG AD AD AD AL AH AB AC 7 COPYRIGHT © 2009 BY SHARP CORPORATION ALL RIGHTS RESERVED. COPYRIGHT © XXXX BYSHARP CORPORATION No part of this may be reproduced, stored ALLpublication RIGHTS RESERVED. in retrieval systems, or transmitted in any form or by any means, electronic, mechanical, photocopying, recording, or other wise, without prior written permission No publisher. part of this publication may be reproduced, of the stored in a retrieval system, or transmitted in any form or by any means, electronic, mechanical, photocopying, recording, or otherwise, without prior written permission of the publisher.