1
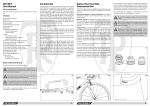
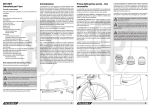
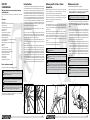
RITCHEY
USER MANUAL
Introduction
Wheels, quick-releases, tires, tubes, rim tape
and brake pads
Important information about use, care, maintenance and mounting
Contents
Introduction
Before your first ride – Determined use
Before every ride
Special characteristics of carbon
Cleaning and care
Maintenance
General notes on installation
Using a torque wrench
How to use the quick-releases
Mounting the wheels
The tire equipment – tires, tubes and rim tape
Mounting the tires
Wire bead (clincher) and folding bead tires
Tubular tires
Wheels
Truing up the wheels
Mounting the sprocket assembly
Dismounting the sprocket assembly
Mounting the brake rotors
Brake pads for rim brakes
Warranty terms
A note on wear
Manufacturer´s guarantee
1
2
2
3
3
4
4
5
5
6
7
8
8
10
12
12
12
13
13
14
15
15
16
Notes on this user manual
Congratulations, when buying a RITCHEY part, you made a superb
choice. RITCHEY develops, testsi and manufactures our products
with dedication to uphold the highest standards of quality. Like all
high-quality sports equipment, RITCHEY components require careful installation in order to function properly and provide long-term
dependability. We recommend that you ask a qualified mechanic
at your local authorized RITCHEY retail shop for help with installation and use RITCHEY parts together whenever possible in order
to achieve the optimum performance and durability. Our precise
tolerances are intended to ensure component compatibility, and
are carefully monitored during production and quality control so
that installation will be easy and trouble-free.
This manual contains important notes about use, care, maintenance and mounting.
Please read this manual carefully, beginning with the general
information, followed by the chapter referring to the component
you purchased, or you intend to use. Doing so will ensure smooth
installation and trouble-free use of the product.
Keep this user manual for your records and future reference. If you
sell or lend your component or bike to someone, share this manual
with the new user.
With RITCHEY components, as with all lightweight bicycle products, special care and attention need to be paid to proper installation and intended use. Materials used by RITCHEY are extremely
strong and durable, with very low weight. However, sometimes
they can break, rather than bend, in the event of an accident. Internal damage to the component may not show up obviously or with
visible signs of damage. In the event of undue stress of any kind,
e.g. as a result of a crash, the components need to be inspected
by a qualified mechanic to ensure the product is safe to continue
using. Therefore consult your RITCHEY dealer after any such occurrence.
Pay particular attention to the following symbols:
This symbol means that your life or health may be in
danger unless you comply with provided instructions or
carry out prescribed measures.
!
Before your first ride – Determined use
Before every ride
RITCHEY wheels, quick-releases, tires, tubes, rim tape and brake
pads are designed for use on road and triathlon (i.e. time trial),
cyclocross and mountain bikes and their typical use.
1. Are the quick-release levers or nuts of the front and rear wheel
properly closed (a)? For more information, see sections “How to
use the quick-releases“ and “Mounting the wheels”.
Check the following points before setting off:
They are, however, not built for freeriding, dual slalom, downhill,
jumps and comparable uses. For more information, see the specifications in our catalogue and/or visit our website at
www.ritcheylogic.com.
Never modify the wheels, the rim tape or the brake pads. Do not
file or drill any holes in the components, especially in parts made
of carbon, as this would damage their structural integrity and void
your warranty.
We recommend to always use RITCHEY parts together in order to
achieve optimal performance and component durability. If you
intend to combine RITCHEY parts with parts from other manufacturers, make sure they are compatible, i.e., that all dimensions
are exactly the same according to the specifications given in this
manual.
Wheels, tires, etc. are designed for an overall load of 110 kilos (242
lbs) including rider and baggage, e.g. rucksack.
If you have any questions, please contact your local
RITCHEY dealer.
After a crash, accident or other major impact, have your
RITCHEY wheels, tires, etc. checked by your RITCHEY
dealer for your own safety.
If one of your wheels or quick-releases gives any creak
ing or cracking noises or shows any outward damage,
such as notches, cracks, dents, discolorations, etc. do not use
your bike anymore until you have consulted your local RITCHEY
dealer who will check the part thoroughly and replace it if necessary.
Improperly closed quick-releases can cause the wheels to
come loose. This can lead to a serious accident!
2. Are the tires in good condition and do they have sufficient pressure? Do at least a thumb test by pushing your thumb down on
the tire (b). The tire should only yield a little. For more information, see section “The tire equipment – tires, tubes and rim
tape“.
3. Spin the wheels to check whether the rims are true. Watch the
clearance between brake pad and rim, or, in the case of disc
brakes, between rim and frame or fork. Out of round rims can be
an indication of cracked tires, broken axles or a damaged rim. As
you look over the bike at the brake / wheel area if the clearance
on the right side differs from that on the left side, the wheel or
the brake has come out of its centred position.
4. Test the brakes while standing by firmly pulling the brake levers
towards the handlebars (c). The brake pads of rim brakes must
hit the rim sides with their entire surface. They must not touch
the tires. You should not be able to pull the lever all the way to
the handlebars! With disc brakes you should have a stable pressure point at the lever. Oil or brake fluid must not leak out onto
the rotor or stopping power will be reduced and cause unsafe
breaking performance. For more information, see your general
bike manual.
Please note that the braking effect and the road grip of
your bike are both greatly reduced in wet conditions. Be
particularly cautious and do not ride as fast as under dry conditions.
Braking on fast and steep descents can cause your
wheels to heat up, possibly damaging the tires, tubes
and rims. In the worst case this can result in a sudden loss of air
and thus in a serious accident. Let your brakes cool off from time
to time.
This symbol warns you about actions that could lead to
damage of property or the environment.
(a)
This symbol indicates there is special information on how
i to handle the product and may refer you to a specific
passage in this manual requiring your special attention.
(b)
(c)
The possible consequences described above are not repeated
every time one of the symbols appears!
open
close
1
2
Special characteristics of carbon
In the case of RITCHEY products made of carbon fibre-reinforced
resin, also referred to as carbon or abbreviated CFRP (a), special
care and attention is required.
Carbon is an extremely strong material which combines high
compression resistance with low weight. Please note that carbon,
unlike metals, shows no visible deformation after overstress even
though some of its fibres may be damaged. This makes it very dangerous to continue using a carbon part after an impact or undue
stress, as it may fail without previous warning thereby causing an
accident with unforeseeable consequences.
If your RITCHEY carbon part sustained this kind of impact or undue
stress, we strongly recommend that you take your complete bike
to a local RITCHEY dealer for inspection. He will check the damaged bike and, if necessary, replace the deficient part. In case there
are any unanswered questions or doubts, the dealer can contact
RITCHEY or one of our distributors directly.
For safety reasons RITCHEY components made of carbon must
never be repaired; they must be replaced at once. Prevent further
use by taking appropriate measures, i.e. destroying it.
Parts made of carbon must under no circumstances be exposed to
excessive heat. Therefore, never have a carbon component enamelled or powder-coated. The temperatures required for doing so
could destroy it. Do not leave carbon fibre parts near a source of
heat or in a closed car or trunk during hot weather.
If any notches, tears, deformations, dents or discolorations etc. are
visible on your carbon part or if it makes any creaking or cracking noises, do not use the bike until the part has been replaced!
After undue stress, a crash or other major impact, replace the part
or have it inspected by your local RITCHEY dealer before using it
again.
Cleaning and care
Maintenance
General notes on installation
Clean your tires and wheels with water and a soft cloth at regular
intervals. If necessary, use a non abrasive soap to remove grime.
You may add a little detergent liquid for cleaning and removing
tough stains, such as oil or grease, from hard surfaces. Do not use
degreasing agents, which contain organic solvents (e.g. acetone,
trichloroethylene, methylene, etc.). Chemicals of this sort may
damage the finish or substructure of the material.
Check the true running of the rims (c), the bolts of the sprocket
assemblies and the play of the bearings after the first 100-300
kilometres (62-186 miles) and true the wheels and/or adjust the
bearings for play, if necessary. Check at least every 2,000 kilometres (1,242 miles) thereafter. Please note that truing wheels and
adjusting bearings are jobs best left to skilled mechanics. Ask your
RITCHEY dealer to do these routines.
In general, wheel and tire mounting as well as brake pad replacement are jobs for skilled mechanics. We therefore recommend that
you have these jobs performed by an authorized RITCHEY dealer.
Be sure to strictly observe each of the following instructions. Nonobservance of these instructions can lead to a component failure,
resulting in a crash or injuries.
After your bike has dried, apply a wax based polish to painted,
carbon and metal surfaces (exception: braking surfaces) (b). Polish
the parts after the wax has dried. With this treatment your wheels
will keep their nice appearance for years.
After about three years the tires and tubes have aged to an extent
that they need to be checked thoroughly and have to be replaced,
if necessary, as, at this stage, they usually have reached the end of
their life span. Contact your local RITCHEY dealer.
hile cleaning, look for cracks, scratches, dents, as well as bent or
W
discoloured material. If you think there may be a problem, see your
local RITCHEY dealer. Have damaged or defective components
replaced immediately.
If your bike is equipped with rim brakes, have the thickness of the
rim sides measured after you are through the second set of brake
pads at the latest. If the thickness is found to be less than 1 mm,
have the rims replaced!
Make absolutely sure to keep the braking surfaces free
of any cleaning agent, grease or oil. Otherwise the braking performance might be drastically reduced or even rendered
ineffective.
hubs rotate on hermetically sealed, replaceable
! The
industrial bearings. Replacing the bearings requires
some experience. We therefore advise you to leave this job to
your RITCHEY dealer.
Be sure to never store the wheels and tires in the blazing sun or
near sources of heat. When storing your bike for the winter period,
make sure the tires have enough pressure.
!
We recommend using RITCHEY wheels with RITCHEY tires as well
as RITCHEY wheels with RITCHEY brake pads, because they are
designed to fit and function as an integrated whole. If you choose
to use a part from another manufacturer, consult the product documentation of this part regarding size accuracy to ensure proper fit
and usability with RITCHEY components.
RITCHEY assumes no responsibility for problems resulting from a
RITCHEY component being used with a part from another manufacturer.
Be sure to check the dimensional accuracy of tires and rims before
installation. If you are in doubt, ask your RITCHEY dealer to check
the components. He can decide, whether this is a problem which
can be solved or whether the part has to be replaced.
Damaged parts must not be re-used under any circum
stances whatsoever. If there is any doubt, we recommend replacing the part. Do not use your bike until this has been
done.
Check the tire pressure at regular intervals and follow the recommendations of RITCHEY.
Installation of non-matching parts may cause the clamping to fail
and lead to a serious crash.
Do not use any aggressive agents, such as benzine,
thinners, etc. when cleaning your wheels and tires.
Please note that rims with carbon braking surfaces, e.g. WCS carbon
tubular wheel sets, need special brake pads. RITCHEY recommends
Swisstop Yellow King.
Bear in mind that you need to get used to the braking
response of carbon rims, as with WCS carbon tubular
wheel sets. A carelessly actuated front wheel brake can lead to a
crash. Before you set off for the first time be sure to practise using
the brakes away from public roads.
(a)
3
(b)
(c)
4
Using a torque wrench
How to securely mount the wheel
To achieve a reliable clamping of two parts, RITCHEY considers the
use of a torque wrench absolutely necessary.
• Open the quick-release. The marking “Open“ printed on the
lever should become visible now (b).
If the maximum torque given by RITCHEY does not generate sufficient clamping force, apply RITCHEY Liquid Torque (assembly
paste) to interconnecting surfaces to increase friction.
• Move the lever back as if to close it. Now you should be able to
read “Close” on the outside of the lever. From the start of the
closing movement up to about the first half of its travel the lever
should move very easily, i.e. without clamping the wheel.
Exceeding the recommended torque (generally indicated somewhere on the part to be clamped) creates too much clamping
force, which can lead to a component failure. This not only bears
the high risk of an accident, but also voids the warranty.
Overly loose or overly tight bolts can result in compo
nent failure and in an accident! Be sure to strictly observe
the torque specifications. If you do not have a high-quality
torque wrench, see your local RITCHEY dealer.
• Over the second half of its travel, the force you need to move it
should increase considerably. Towards the end of its travel the
lever should be very hard to move. Use the ball of your thumb
to push it in all the way while your fingers pull on an immovable
part such as the fork or a rear stay, but not on a brake rotor or
line (c). In its end position the lever should be parallel to the
bike, i.e. it must not stick out to the side.
Be sure to never ride a bike without having checked the
secure fastening of the wheels before you set off. A
wheel that comes loose during riding is very likely to cause an
accident!
Make sure the levers of both quick-releases are always on
the side opposite the chain. This will help you to avoid
mounting the front wheel the wrong way round. With disc
brakes we recommend mounting the quick-release lever on the
side opposite the rotor to ensure a secure clamping.
The wheels are attached to the frame at the hub axles. Each axle is
clamped tight in its drop-outs by means of a quick-release.
To remove the wheel open the quick-release lever and loosen the
tightening nut by a few turns, if necessary. The front wheel is usually additionally secured by means of drop-out catches at the fork
tips which prevent the wheel from coming off, in the event of an
unintentional loosening of the quick-release.
The lever should lie close to the frame or fork leg so it cannot be
opened accidentally.
i
Be sure to also read the manual of your bike manufacturer before mounting or removing the wheels.
After mounting a wheel in a road bike, please check whether the
wheel is accurately seated in the drop-outs and centred between
the fork legs or rear stays.
Make sure the quick-release lever is properly closed and
- immediately close the release lever of the calliper rim brake
(Shimano, SRAM) or shift the bolt in the gear/brake lever (Campagnolo) back to its original position,
- immediately mount the brake body of hydraulic rim brakes and
close the quick-release! Make sure the brake pads touch the rim
and not the tire or the spokes,
- if you have disc brakes, check whether the brake pads rest
snugly in their seats in the brake calliper before mounting the
wheel. This is the case if the brake-pad clearance runs parallel to
the wheel and if the wear indicators are in the correct position.
Make sure you push the brake disc between the brake pads,
• If you can turn the lever around, the wheel is not securely fastened. Open the lever again and turn the tightening nut clockwise by half a turn to increase the initial tension (d).
• Close the lever again and check the wheel for tightness. If the
lever can no longer be turned, it is properly fastened.
• Finally lift the bike a few centimetres so that the wheel no
longer touches the ground and hit the tire from above (e). If it
is properly fastened, the wheel will remain firmly fixed in the
drop-outs of the frame.
- immediately reconnect the brake cable of V-brakes (rim brakes)!
Make sure the brake pads touch the rim and not the tire or the
spokes,
• To check whether the lever is securely locked try to turn it while
it is closed. Apply pressure to the end of the hand lever.
How to use the quick-releases
Mounting the wheels
(c)
As the proper use of quick-releases is not common
knowledge, which can be a cause of accidents, we recommend that you read the following instructions thoroughly
and practice the procedures as outlined.
- actuate the brake lever (with disc brakes repeatedly) after
mounting the wheel and tightening the quick-release. Spin
the wheel subsequently. The brake disc should not drag on the
brake calliper or on the brake pads.
After mounting the wheel test the brakes while stan
ding. The brake lever should have a defined pressure
point. You should not be able to pull it all the way to the handlebars. If the result of the brake test is not satisfactory, check both,
bike and brake system, according to your general bike manual.
Quick-release retention mechanisms essentially consist of two
operative elements (a):
After the mounting make sure the brake pads or rotors
are still free of grease or other lubricants before you set
off on your bike again.
1. The hand lever on one side of the wheel: Release this lever to
loosen the wheel and close it to create a strong clamping force
on a 180 degree axis.
2. The tightening nut on the opposite side of the clamp: Set the
initial tension by turning the nut on the threaded rod.
(a)
(b)
5
(d)
(e)
6
The tire equipment – tires, tubes
and rim tapes
Tires have to be inflated to the correct air pressure in order to work
properly. The air pressure range (minimum and maximum permissible pressure) is given on the tire side-wall or on the type label
(a). The minimum pressure specification means maximum cushioning and is therefore best for off-road cycling. Rolling resistance
decreases with increasing pressure, but so does comfort.
Inflation pressure is often given in the old measurement units, i.e.
in psi (pounds per square inch). The following table gives the most
common pressure values in terms of both systems.
psi
bar
psi
bar
psi
bar
30
2.1
70
4.8
110
7.6
40
2.8
80
5.5
120
8.3
50
3.5
90
6.2
130
9.0
60
4.2
100
6.9
140
9.7
RITCHEY tubes are available for road bikes and mountain bikes in
two weight classes. The lighter ones are intended to be used in
competition, as they provide less rolling resistance. They are, however, more prone to snake bite flats.
Generally, there are two valve types used for road bikes, mountain
bikes and hybrid bikes:
1. Sclaverand or Presta valves: This type is commonly used on
almost all types of bicycles. It is designed to withstand extremely
high pressures and accept air with less force from the pump.
2. Schrader valve: This valve has been adopted from car tires and is
mainly used on mountain bikes.
Both valve types are usually equipped with a plastic cap to protect
them from dirt. After removing the protective cap the Schrader
valve can be inflated directly with a suitable pump.
Please note that the rider’s weight is also relevant for the pressure.
Lightweight riders need less pressure, whereas heavy riders need
more. The maximum pressure specification, however, should not
be exceeded, even by heavy riders.
!
Tubes
Riding with too low pressure can lead to pinch flats, also
referred to as snake bites.
Treat your tires with care and do not ever ride over sharp
edges. Make sure not to exceed the maximum permissible pressure when inflating your tire! It might come off the rim
or burst during the ride.
Hand pumps are often unsuitable to inflate tires to high
i pressures unless fixing a flat while on the road. A better
choice is a hand and foot-operated stand pump equipped with
a pressure gauge which enables you to check the pressure at
home.
Tires
Make it a rule to only use the tire according to its intended use, as
it may otherwise wear down or fail fairly quickly. Be sure to observe
the notes on the different fields of usage in the RITCHEY catalogue
and ask your RITCHEY dealer for advice, if you are not sure.
(a)
With Presta valves you first have to undo the small knurled nut a
little and depress it carefully until air starts to escape (b). With this
valve type it often happens that the knurled nut is not screwed
down properly and air slowly leaks out. Check that the nut is seated
on its stem.
Rim tape
RITCHEY rim tape is available for road bikes in the ETRTO size 622
mm (28”) in widths of 17 mm and for mountain bikes in the ETRTO
size 559 mm (26”) in widths of 20 mm.
The tape is designed to fit in the rim valley of all RITCHEY wheels.
Mounting the tires
If you want to replace a tire, you need to know the dimensions
of the old tire which are marked on the side of the tire. There are
two designations, the more precise of which uses millimetres. The
number sequence 50-559 means that the tire is 50 mm wide when
fully inflated and has an inner diameter of 559 millimetres. The
other designation for this tire reads 26x2.1 which refers to inches
(c).
Wire bead/clincher and folding
bead tires
Check the condition of the rim and the rim tape as a first step. Make
sure the rim base is entirely covered and watch out for sharp edges
and holes. Check whether the rim sides are bent in or worn out in
case of rim brakes. If you are in doubt, please contact your local
RITCHEY dealer.
Be sure to replace a defective rim tape immediately.
Mounting a wider tire than prescribed may result in a
dragging of the tire tread along frame or fork. In the
worst case, the wheel might stop rotating properly.
Please note that under extreme conditions a wide tire mounted
on a rim that is too narrow can make the tire slip off the rim while
riding. This creates high risk of an accident! Ask your local RITCHEY
dealer for advice.
Mounting a tire that is wider than the frame specs accept
can cause serious injury if body parts inadvertently touch
the spinning tires and mud guards will not work properly.
Tires wider than the ones mounted by the bike manufac
turer can make the shoe tip collide with the tire while
taking a turn and pedalling at low speed. This can cause an accident.
(c)
Always make sure the rim tape accurately covers the entire rim
base, remains centered and does not slip to either side. If the tape
is too narrow, it will not cover the sharp edges sufficiently and tend
to slip out of the correct position. Tape that is too wide prevents
reliable fitting of the tire bead seat and can lead to unexpected tire
blow off when inflated.
When mounting a tire make sure no foreign matter, such as dirt or
sand, gets inside the tire and take care to not damage the tube.
Slip one side of the tire onto the rim. Make sure to observe the
prescribed rotation direction indicated on the tire sidewall (d). Use
your thumbs to press the tire bead over the rim flange along the
entire circumference. Regardless of the type of rim, you should be
able to do this without any tools. If you don’t succeed, you can use
a plastic tire lever ((c) p. 9).
!
tire.
Tubes wear out from age. RITCHEY therefore
advises to replace the tube, whenever you mount a new
Stick the tube valve through the valve hole in the rim.
Inflate the tube slightly so that it becomes round and push it into
the tire cavity all the way round (e). Make sure not to leave any
folds in the tube.
To finish mounting the tire, start at the point opposite of the valve.
Use your thumbs to press the other tire bead over the rim flange
as far as you can. Make sure the tube does not get pinched and
squashed between tire and rim. This can be prevented by pushing
the tube with a finger into the tire hollow as you work it along.
Work the tire onto the rim by approaching the valve symmetrically
from both sides. Towards the end you must pull the tire forcefully
downwards to make the already mounted portion of the tire slip
into the deepest part of the rim trough. This will ease the mounting
noticeably on the last centimetres.
Before mounting the tape, put the valve holes of tape and rim on
top of each other. Press the tape in this area towards the rim base
and work it in evenly along both sides until it slips completely over
the rim flange. Make sure the tape does not get twisted in the process.
Finish by checking the correct seat of the tape over the entire rim
valley circumference.
(b)
7
(d)
(e)
8
Check the seat of the tube inside the tire once again and press the
last stretch of tire over the rim flange by using the balls of your
thumbs (a).
Once a portion of the tire bead is levered over the rim edge, the
tire side can be pulled over the rim by working one tire lever slowly
around the entire circumference. Now you can pull out the tube.
If you have problems, use plastic tire levers. Make sure the blunt
ends point towards the tube and that the tube does not get damaged.
If necessary, you can remove the whole tire by pulling the other
tire bead off the rim.
Press the valve deep into the tire so that the tube does not get
caught between rim and tire beads. Make sure the valve stands in
upright position and does not appear crooked!
If it does not, you need to remove one tire bead and reposition the
tube. To make sure the tube does not get pinched between rim
and bead, inflate the tire a little and then flex it along the entire
tire circumference. While doing so you can check whether the rim
tape has shifted.
Do not use any tire mounting paste, soapy water or the
like. Otherwise the tire might get twisted while riding
and result in a valve breakage.
See to it that the valve does not get caught in the rim, as this can
damage the tube.
Replace the tube. RITCHEY recommends repairing tubes, according to the instructions of the repair kit manufacturer, only in case of
on the road need and replacing the tube at the next opportunity.
After having removed the tire, you should check the rim tape. The
tape should be sound, without cracks and fit evenly on the rim
base, covering all spoke ends and holes. With hollow section rims,
i.e. double chamber rims, make sure the tape covers the entire rim
base. It should not be too wide, so as to stand up along the rim
sides. Furthermore, you should only use rim tape made of fabric
or rigid synthetic material with hollow section rims. Contact your
RITCHEY dealer, if you are in doubt about what kind of rim tape
to use.
Inflate the tube to the desired pressure. The maximum pressure is
marked on the tire sidewall.
Remove the valve cap and the fastening nut from the valve and
deflate the tire completely.
(b)
Press the tire from the sides towards the centre of the rim opposite
of the valve. You will find it easier to remove the tire, if you do this
around its entire circumference.
i
For your own safety, RITCHEY recommends to have a
tubular tire mounted by a dealer.
There are two possibilities of gluing a tubular tire to the rim, i.e.
with adhesive tape or with liquid tire glue. Using adhesive tape will
speed up the mounting, the tire, however, will not hold as reliably
as with liquid glue. In the event of a puncture the tape will often
cling to the dismounted tire and your spare tire may not bond to
the rim sufficiently.
A poorly glued tire can come off the rim – causing risk of an
accident!
Special tire glue does, by the way, not only stick to rims and tires,
but also to fingers and clothes. For this reason be sure to wear old
work clothes when mounting tires.
When mounting a tire on a rim that has already been
i used, it may be necessary to remove glue residues and
dirt with a steel brush or with emery cloth. When you are done,
wipe the rim with a soft rag and benzine.
Position the plastic tire lever under one of the tire beads approx. 5
cm besides the valve and lever the tire out of the rim (c).
Hold the tire lever tight in this position.
Remove the protective valve cap and mount a valve extension, if
necessary, to the valve head unscrewed before, if you intend to
mount the tire in a deep section rim. Use an appropriate valve
extension which is included in the delivery of the RITCHEY WCS
carbon tubular wheel set.
Inflate the tire to a point where it starts to become round and then
stick the valve through the hole in the rim (d). Starting from the
valve and working in both directions, press the tire into the tire bed
all the way round, as described further below. If you are unable to
mount the tubular tire completely on the rim or only with excessive forces, it might not be properly mounted. Stretch the tire, by
putting your foot in the tubular and pulling it forcefully upwards
with both hands. Stretch the tire in this way all around several
times. Then try again and see whether the mounting has become
easier.
After mounting the tubular tire (that has not yet been glued!),
spin the wheel and see whether the tire runs true. The area where
the valve comes out of the tire is often thickened which leads to
a vertical runout of the rim and makes the wheel jolt during the
ride. Remove the burrs from the valve hole of an aluminium rim or
countersink it with a big drill, a triangular scraper or a round file.
If you have carbon rims be careful when removing the burrs from
the hole edge with a round file. Insert the file only from the outside
to the inside and not vice versa, otherwise the fibres of the resin
matrix might fray out. Seal the area with instant glue subsequently.
This pretreatment will lead to an improved valve fitting to the rim.
If time permits, you can leave the unglued tire inflated on the rim
for a few days to make the final mounting easier.
Clean the rim base from any grease or oil using a benzine or spiritsoaked rag (e). Wait until the solvent has evaporated completely
before you start applying the tire glue. The easiest way to apply the
glue is by clamping the wheel in a truing stand or by mounting it
on an old fork clamped in a vice.
Benzine and tire glue should only be used in a well-aired
place, since both materials are highly flammable. Keep
them in a safe place out of children’s reach.
Slip the second tire lever between rim and tire at a distance of
about ten centimetres beyond the first lever and pull the tire bead
over the edge of the rim in this area, as well.
(a)
To ensure a durable fit, a tubular tire needs to be mounted carefully. The mounting needs to be carried out in several steps and
may require a little time at the beginning. A little practice and
experience with the glue you are using and the respective tubular
model can speed up the job.
For a better fit of the tire, RITCHEY therefore recommends applying
a thick base consisting of multiple thin layers of liquid tire cement
(tire glue). The coat of glue will stick to the rim even after tire
removal and allow the spare tire to bond sufficiently for the ride
home. Once home, the spare tire needs to be removed and fixed
permanently with another layer of tire glue.
Check the proper seat of the tire by means of the witness line on
the tire side (b). The witness line must be even with the rim flange
all around the tire. Spin the wheel to check the proper seat.
Dismounting
Tubular tires
(c)
9
(d)
(e)
10
With liquid tire glue you need several layers to create a well-adhesive base. Spread the tire glue evenly and in very thin layers over
nearly the entire circumference of the rim (a). Leave a section of
five to ten centimetres without glue right opposite the valve to
facilitate tire removal at a later date. With a little practice you will be
able to apply the glue straight from the tube. If this does not work
at first, you might find it easier to use a stiff brush. When using tire
glue in tins, you need a brush in any case. Allow the tire glue to dry
until a finger test will proof that it is tacky-dry. This can take several
hours. Apply another two thin layers of glue in the same way and
let them dry again. Leave the wheel unridden until the next day.
Before mounting the tire also apply a coat of glue to the base tape.
To complete the adhesive bed add a last coat of glue.
Let the topmost coat flash off for a short moment, but not dry, and
place the wheel on the ground with the valve hole facing upwards.
Inflate the tire until it starts to round and then stick the valve
through the valve hole and press it firmly against the rim. Make
sure the sides of the tire do not touch the adhesive bed, since your
tire will otherwise look smudgy right away. If you have taken care
to leave the section opposite the valve hole free of glue, you need
not be concerned about glue smearing on the ground or dirt getting into the glue when you place the wheel on the ground.
When the tire runs smoothly in the centre, take the wheel off the
mounting stand and inflate the tire to approximately half its normal
pressure. Lean your hands on the ends of the axle and quick-release
skewers and roll the wheel a few metres on the ground (c). As you
roll the wheel, vary between pressing it vertically downward and
at a slant to either side.
When the tire runs true during the final check, inflate the tire to the
maximum pressure. Now release the pressure to about 4 bar. Wait
at least eight hours, or better yet, a whole day, before taking it for
a first ride. Inflate the tire to the desired pressure, according to the
recommendations of RITCHEY.
Removal
To dismount the tire, start opposite the valve by pushing the tire to
the centre of the rim until there is a gap and the tire starts to come
off. If the tire remains tight, stick a plastic tire lever into the gap and
lift the tire off the rim.
Mounting the sprocket assembly
Although wheels are delivered accurately trued, it is a matter of
fact that the spokes will “bed in” to the hub and rim on the first kilometres. As a result thereof the spokes lose a little tension. Furthermore, a loosening of the spokes on their own can lead to a lateral
or vertical runout of the wheel. For this reason make sure the wheel
set is checked and trued up, if necessary, after you have run it in, at
the latest, however, after about 400 kilometres (248 miles) (d).
If you have a Shimano 10-speed assembly, make sure to insert the
thin spacer ring on the freehub, prior to installing the sprockets.
Otherwise you will not be able to fasten it securely.
Truing up the wheels
the wheels is a job best left to a bicycle
! Truing
dealer. Inappropriately tightened spokes can cause irreparable damage.
If you feel you are skilled, be sure to observe the following instructions:
• Do not release the nipples to true up a lateral or vertical wobble.
Always re-tension the spokes to regain the tension they have
lost during riding.
• The nipples of wheels may “cling” to the spokes if the wheel is
older. It is advisable to start with slightly releasing the nipples,
i.e. by a quarter turn, before you tighten them, to prevent the
spokes from winding up with undue tension.
Take hold of the tire right and left of the valve with both hands, pull
it vigorously downward and work it bit by bit into the rim base (b)
until you have about 20 cm left to go.
Starting from the top again on either side of the valve pull the tire
down with your hands, letting them gradually slip down to the
not yet mounted section. Keeping the tire taut by holding your
fingers against the rim and your thumbs on the tire, brace the
wheel against your hips. Press the tire with both thumbs into the
rim base.
Wheels
(b)
Once the tire is seated in the base, it needs to be centred, since
it will rarely run true right away. To do so clamp the wheel in the
mounting stand again and spin it. If the tread does not run accurately in the centre or if there is any lateral swerving of the tubular,
lift it in that area, twist it a little and place it down again.
avoid any damage RITCHEY recommends storing
! To
RITCHEY wheels in a wheel bag when transporting your
bike with the wheels removed or when you do not use them for
a longer period of time.
(d)
RITCHEY wheels are only available with a freehub for Shimano,
Campagnolo and SRAM sprocket assemblies (e).
RITCHEY freewheel bodies are made of steel or aluminium.
If you fit the aluminium freehub bodies of WCS wheel sets with
single sprockets or with sprocket assemblies that are assembled
from single sprockets plus spacers, the single sprockets will eat
their way into the softer material of the freehub body which makes
a later removal difficult. The freewhub body will be damaged or
“notched” from this type of use!
It is more advisable to use Shimano Spiderarm “carrier-style”
sprocket assemblies. These sprocket assemblies have the larger
sprockets mounted on an aluminium or plastic support, which
provides a larger mating surface, thus distributing the load of the
sprockets more effectively.
Performance Tip: Spray the sprockets and the whole sprocket
assembly with a thin coat of wax before mounting it and let it dry
well. This prevents corrosion and makes for an easier removal at a
later date.
Push the sprockets onto the profiled freehub body. The profile is
asymmetric to ensure the ramps of adjacent sprockets are optimally positioned in relation to one another. Make sure that the
tooth number engraved on each sprocket faces inward. If there
are no engraved tooth numbers, mount the sprockets so that the
ramps face outward.
Grease the thread and the contact area of the lock nut and tighten
it by hand by one to two turns before applying a fixing tool.
Tighten the nut with a torque wrench fitted onto the fixing tool (f).
Be sure to observe the recommended torque of 30 – 40 Nm and do
not exceed the maximum torque. Over tightening the torque can
damage the thread.
Finish by turning the freehub assembly with the sprockets installed.
Check it for ease of movement and make sure the sprockets run
true. If they do not, you need to remove the sprocket assembly and
find out the cause.
(a)
(c)
(e)
After replacing a sprocket assembly or mounting the
rear wheel for the first time onto your bike you need to
check the functioning of the gears. Please make sure the derailleur limit stops are properly adjusted. An inappropriate adjustment can lead to a failure of the drive or make the rear derailleur
collide with the spokes – causing risk of an accident and damage
to your bike!
(f)
11
12
Dismounting the sprocket assembly
Mounting the brake rotors
Start with mounting a plug tool that matches exactly the profile
of the sprocket assembly lock nut. Secure the tool, if necessary,
with the quick-release (a). Instead of closing it as usual, however,
be sure to only tighten it a little to help tension the plug tool into
the splines.
RITCHEY MTB Disc Wheels are made for 6-hole mountings in
accordance with the IS 2000 standard.
This is to prevent the tool from tilting or slipping off abruptly. Hold
the sprocket assembly tight with a chain whip (b). Loosen the
assembly locknut by using a ring or fork spanner that matches the
extractor tool.
Open the quick-release bit by bit as the lock ring comes loose so
that you can remove it.
Remove the sprocket assembly from the freehub body. The first
sprockets and the spagers are mounted individually. If they cannot
be removed, they may have worked themselves into the surface of
the freehub body. Free the sprockets by inserting two wide-blade
screwdrivers opposite each other into the gaps at the outermost
sprocket and gently work the sprocket loose.
checking and adjusting the rear derailleur, be sure
! When
to follow the instructions of the general user manual of
your bike or the user manual of the gear manufacturer.
(a)
Place the rotor on the hub flange. Observe the arrow on the rotor.
It must be visible from outside and point in the wheel’s rotational
direction (c).
Check whether the rotor engages fully with the hub flange. If not,
both the rotor and the hub flange need to be measured. In this
case, contact your dealer. Be sure to always use original parts supplied by the brake manufacturer (rotors and bolts).
If the bolts are to be re-used after dismounting, they
i need to be treated with another coat of retaining com
pound!
Be sure to strictly observe the mounting instructions of
i the bike and brake manufacturers in the respective user
manuals.
Brake pads for rim brakes
RITCHEY recommends combining RITCHEY brake pads with
RITCHEY rims for best results. Contact your local RITCHEY dealer if
you have questions.
If the brake pads are worn down, have them replaced immediately.
The degree of wear can be determined by the wear indicators, such
as grooves in the pads that wear down gradually with braking (f).
For safest braking performance in the straight be sure to always
actuate both brakes when braking is required. The front brake
controls up to 100% of the stopping force. Over braking the front
wheel can make the bike topple over. Be sure to test your brakes
after a brake pad replacement in an area free of traffic until you
have full control of your bike.
Insert all six bolts without grease and tighten them with a Torx or
Allen key until their heads engage with the rotor.
If necessary, apply a liquid bolt retaining compound (Loctite) to
the bolt threads, if they have not yet been treated with retaining
compound by the manufacturer (d).
Be careful when applying the brakes in a corner. Ritchey recommends that you avoid braking in corners as this makes the tires slip
and leads to a crash. In the unlikely case you have to slow down
when taking a turn please actuate the rear brake.
Now rotate the rotor contrary to the direction of the arrow and
tighten the bolts crosswise with a torque wrench to a torque of 3
to 4 Nm. Then tighten them further to the torque recommended
by the manufacturer (e).
Please note that the braking power and the road grip of your bike
are both greatly reduced in wet conditions. Be particularly cautious
when riding on wet roads and do not ride as fast as you would in
dry conditions allowing for additional time to stop.
(e)
(c)
Braking on fast and steep descents can heat up the wheel and possibly damage the tire and/or tube. The glued tire can come loose
or the tube may suddenly lose air. This can make you lose control
of your bike and lead to a crash. Do not let the brakes drag when
riding downhill. Stop, if necessary, and let the brakes cool down
from time to time.
Before using your RITCHEY wheels in a race while it is raining, we
strongly recommend you test ride your bike in the rain to get used
to the different braking performance.
Please note that the sides of the rims wear down, as well. Ask your
dealer to check the rim thickness after you are through the second
set of brake pads at the latest (g).
(b)
(d)
(f)
(g)
worn
ok
13
14
Warranty terms
A note on wear
Brake pads
This guarantee does not cover damage resulting from:
Under European consumer law, the purchaser has full statutory
warranty rights within the first two years from date of purchase.
In North America, these rights apply to the first year from the date
of purchase. According to these laws, your dealer is responsible for
ensuring the product is free of defects that could cause premature
wear from normal use. The two year warranty law is only valid in
countries where European (EU) regulations apply! Please ask your
dealer about the regulations in your country.
Bicycles components are subject to wear due to normal and proper
use. The rate of wear will depend on care and maintenance, the
bicycle usage and the environmental conditions, such as rain, mud,
dust and sand. Some components require regular care and maintenance. Nevertheless, just like all components, they will sooner or
later reach the end of their service life depending on intensity and
conditions of use.
Brake pads wear down during braking as a result of the friction on
the rim. Depending on riding habits, topography, surface of ground
and weather conditions, the brake pads wear down at a more or
less rapid pace.
• wear
The following RITCHEY components are especially subject to wear
due to the nature of their intended use and not covered for wear
under this warranty:
Manufacturer´s guarantee
Warranty claims will only be accepted, if the bicycle has been used
solely for its intended purpose (see section “Before your first
ride”).
It does not cover damage resulting from wear (wear of tires, brake
pads and brake track of the rim in the case of rim brakes), neglect
(insufficient care and maintenance), accidents, overstress caused by
overloading, incorrect installation, improper treatment or as a result
of modifications made to the component.
Be sure to strictly follow all assembly instructions in this manual as
well as all additional instructions provided by the manufacturers of
products used in conjunction with RITCHEY products, especially bolt
torque specifications and the prescribed maintenance instructions.
Observe all instructions with regard to procedures and verification
processes listed in this manual as well as any other instructions
that may be included in the delivery of RITCHEY pro¬ducts. Also
adhere strictly to any and all instructions referring to the replacement of safety relevant components, such as worn brake pads and
rim sides.
Your direct contact with regard to all issues outlined in this manual
and corresponding instructions is your local RITCHEY dealer, who
should be qualified to answer your questions. In order to obtain
assistance from a RITCHEY dealer, you may be required to show
your receipt.
If you have a warranty issue or concern, you must contact the
RITCHEY dealer who sold you the bicycle component in question.
RITCHEY has exclusive agreements with all of our partners to service potential warranties. If you purchase a RITCHEY product from an
unauthorized dealer, e.g. an auction site at the internet, you have no
recourse through RITCHEY on any of its authorized dealers, the warranty becomes void and you must seek resolution with the reseller
who sold you the product.
Tire equipment
Tires wear down depending on the riding style, the surface of the
ground and the stress they are exposed to. This wear cannot be prevented, but it can be reduced by adopting good riding habits and
careful handling. A worn tire without tread can no longer provide
the usual road grip and may result in an accident. Be sure to replace
tires that are worn, cracked or damaged in any way for your own
safety.
To lengthen the service life of your tires, avoid any braking that
stops the wheel suddenly and drags it over the ground and do not
ride over sharp edges.
Tubes
Tubes wear down and get old, as well. RITCHEY therefore advises to
replace the tube, whenever you mount a new tire.
Rims with rim brakes
Rim brakes not only cause wear to the brake pads, but also to the
rim. Therefore, check your rims regularly, e.g. whenever inflating the
tires.
Be sure to observe the specifications given on the rim. Ask your
bicycle dealer to examine the remaining thickness of the rims at
the latest when you are through your second set of brake pads. If
the rim sides deform or show hairline cracks when you increase the
pressure, this may be a sign that the rims have reached the end of
their service life and that they have to be replaced. Worn rims can
fail without warning and cause serious injury, so do not neglect this
inspection.
RITCHEY International, Ltd.
Via Cantonale 2
CH- 6916 Grancia-Lugano
RITCHEY Corporate Office
620 Spice Island Drive
Sparks, NV 89431
RITCHEY Design Inc. - Taiwan Branch
22-1, #123 Chungang Rd. Sec 3
Taichung 407
Taiwan R.O.C.
RITCHEY Sales & Warranty
575 Old County Road
San Carlos, CA 94070
Brake pads on carbon brake tracks wear down particularly quickly.
Therefore, be sure to check the condition of the brake pads after
every ride and replace them in time.
RITCHEY products have been developed and manufactured with
great care and have gone through numerous testing controls.
Our products are examined as part of our internal quality control
pro¬cess to meet strict standards as well as by external, independent test laboratories.
For the EU market we grant, independent of legal regulation, a
voluntary guarantee that your RITCHEY product is free of manufacturing and processing defects for two years from the date of
purchase.
For the North American market we grant, independent of legal
regulation, a voluntary guarantee, that your RITCHEY product is free
of manufacturing and processing defects for one year from date
of purchase (excluding abrasion, tire equipment, rim sides etc. as
described further above).
If you did not acquire the product through an autho
rized dealer, you runIf you did not acquire the product
through an authorized dealer, you run the riskrchasing a product
RITCHEY cannot guarantee the performance you expect.
i
• neglect (insufficient care and maintenance)
• accidents
• overstress caused by overloading
• incorrect installation or improper treatment
• changes or modifications to the component (e.g. drilling holes
into the rims)
The instructions in this and all RITCHEY manuals are carefully
designed to maximize the life span of RITCHEY products. Any guarantees are void, if installation instructions are ignored and/or if regular inspection and maintenance intervals are neglected.
In the event of a warranty claim, RITCHEY reserves the right to provide the current successor model of the respective part in an available color – or if such part is not available, a higher grade model – to
remedy the claim. The guarantee does not cover assembly, refitting
costs or any new accessories that may be required (e.g. because
parts differ in dimension).
The guarantee does not cover labour and transport costs, nor does
it cover follow-up costs resulting from defects.
Your direct contact for any issue should be your RITCHEY dealer/
reseller, who is authorized to respond to your inquiries.
In case of any inquiries, please contact your national distributor.
Find contact information for your national distributor at
www.ritcheylogic.com.
This manufacturer’s guarantee only applies to claims made by the
initial buyer, who must present the purchase receipt with date of
purchase, dealer address and model number. Guarantee claims will
only be accepted, if the bicycle has been used in accordance with
the intended use of RITCHEY products.
Technical details in the text and illustrations of this manual are
subject to change.
© No part of this publication may be reprinted, copied or transmitted by hand or with mechanical or electronic systems or used
for an another business purpose without prior written permission.
Concept and text: Zedler Engineering www.zedler.de
If you have any further questions, please contact your local distributor. You will find a list at www.ritcheylogic.com.
15
1. Edition 1, Octobre 2008
16