1
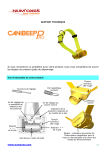
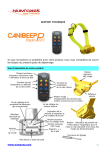
User’s guide DECLARATION « CE » DE CONFORMITE / « EC » DECLARATION OF CONFORMITY Directive R&TTE 1999/5/CE NUM’AXES déclare que / declares that le collier de dressage / the training collar CANICOM 1500 PRO satisfait à toutes les dispositions de la Directive N° 1999/5/CE du 07/04/99 du Conseil Européen complies to all dispositions of the European Council Directives below N° 1999/5/CE et est conforme aux normes suivantes / and complies with standards below: ETSI EN 300 220 Les rapports de tests sont disponibles à l’adresse ci-dessous : Test reports are available at the following address: NUM’AXES Z.A.C. des Aulnaies – 745 rue de la Bergeresse – BP 30157 45161 OLIVET CEDEX – FRANCE Tél. + 33 (0)2 38 63 64 40 / Fax + 33 (0)2 38 63 31 00 11/04/2005 - M. Pascal GOUACHE – Président du Directoire WARNING Any person with individual device for cardiac assistance (pacemaker, defibrillator) must take precautions when they use CANICOM 1500 PRO. This device emits some static magnetic fields (a magnet is located in the remote control). Frequency= 869 Mhz, at = 500 mW The device complies with the European Standard ETSI EN 300 220. Thank you for choosing a NUM’AXES product. Before using your CANICOM 1500 PRO, please read the instructions in this guide carefully and keep it for future reference. Before using CANICOM 1500 PRO, we strongly advise you to have your dog checked by your vet to ensure he is fit to wear a collar. Regularly check your dog’s neck as repeated rubbing of the contact points against the animal’s skin may cause irritation. If this happens, remove the collar until all signs of skin irritation have disappeared. Do not leave the collar more than 8 hours per day on your dog. Start with the lowest level of stimulation and define the level from which your dog reacts by increasing gradually. Do not hesitate to contact a professional trainer for any further advice. User’s guide - CANICOM 1500 PRO 1/24 Index Page Contents of the product CANICOM 1500 PRO ...................................................................................... 2 Description of the product .................................................................................................................. 2 CANICOM 1500 PRO remote control activate/deactivate the remote control ......................................................................................... 3 assignment of the buttons .......................................................................................................... 3 checking/replacing batteries of remote control ............................................................................... 6 CANICOM training collar first use from new ..................................................................................................................... 6 how to use the remote control with a CANICOM receiver collar ......................................................... 8 checking/replacing battery of CANICOM collar ............................................................................... 9 changing the contact points ........................................................................................................ 9 how to check that your CANICOM 1500 PRO is functioning properly .................................................. 9 getting the best results .............................................................................................................. 9 fitting the CANICOM collar .......................................................................................................... 9 starting out with the training collar ............................................................................................ 10 the difference between “continuous” and “flash” stimulation .......................................................... 10 cautions for use - maintenance ................................................................................................. 10 troubleshooting ...................................................................................................................... 10 CANIBEEP RADIO PRO beeper collar description of the product ........................................................................................................ 11 first use from new ................................................................................................................... 11 how to use the remote control with a CANIBEEP RADIO PRO beeper collar ....................................... 15 checking/replacing battery of CANIBEEP RADIO PRO collar ............................................................ 15 advice ................................................................................................................................... 16 examples ............................................................................................................................... 16 cautions for use - maintenance ................................................................................................. 18 troubleshooting ...................................................................................................................... 18 CANIFLY bird launcher description of the product ........................................................................................................ 19 first use from new ................................................................................................................... 19 checking/replacing batteries of CANIFLY ..................................................................................... 20 cautions for use - maintenance ................................................................................................. 20 troubleshooting ...................................................................................................................... 21 Technical specifications .................................................................................................................... 22 Guarantee ........................................................................................................................................ 22 Guarantee conditions ........................................................................................................................ 22 Register your product ....................................................................................................................... 23 Spare parts ....................................................................................................................................... 23 Collection and recycling of your device at the end of its life ............................................................... 23 ● Contents of the product CANICOM 1500 PRO ● CANICOM receiver collar equipped with short contact points 3-V Lithium CR2 battery for the collar CANICOM 1500 PRO remote control equipped with 2 alkaline LR06 batteries neon test lamp pair of long contact points carry strap DVD this user’s guide Description of the product 2 contact points (short or long) Diagram 1 CANICOM COLLAR Red mark: area where the On/Off switch magnet is located User’s guide - CANICOM 1500 PRO On/Off indicator + Radio reception indicator + Battery level indicator 2/24 Diagram 2 REMOTE CONTOL On/Off button + LCD screen retro-lightning Continuous stimulations limited to 8 seconds Stimulation level indicator (from 1 to 18) Booster button Beeper button Magnet position indicator: this magnet allows you to switch On/Off the training or beeper collar and to (re)code the training collar with the remote control ● Indicator of selected program LCD screen Stimulations level adjustment Flash stimulations shorter than 1 second Battery level indicator Radio transmission indicator Indicator of selected CANICOM training collar A or B Selection key dog B CANICOM collar with yellow strap Diagram 3 LCD SCREEN Selection key dog A CANICOM collar with black strap 1, 2, 3 and 4 buttons programmable buttons for CANIBEEP RADIO PRO collar and CANIFLY CANICOM 1500 PRO remote control - ACTIVATE/DEACTIVATE THE REMOTE CONTROL Remote control is supplied with batteries fitted. ▪ Activate: press for one second the On/Off button Indications appear on the LCD screen. ▪ Deactivate: press for one second the On/Off button The LCD screen goes out. located on the side of the remote control (Diagram 2). located on the side of the remote control (Diagram 2). To increase the battery life, we recommend you to deactivate the remote control if you are not using it for a long period. - ASSIGNMENT OF THE BUTTONS The CANICOM 1500 PRO remote control is designed to operate with 1 or 2 CANICOM training collars, 1 or 2 CANIBEEP RADIO PRO beeper collars, 1, 2, 3 or 4 CANIFLY bird launchers. The range approximately reaches 1500 meters depending on geography and environment. A and B buttons: CANICOM training collars selection buttons Before sending any training instruction (beep sound or stimulations), you have to select the dog you want to send a message to: dog A (CANICOM collar with black strap) dog B (CANICOM collar with yellow strap) In order to select the dog you want to train on the remote control, briefly press the A or B button (the letter A or B will appear on the LCD screen). Diagram 4 User’s guide - CANICOM 1500 PRO 3/24 1, 2, 3 and 4 buttons: control of 1 or 2 CANIBEEP RADIO PRO collars and 1 to 4 CANIFLY bird launchers buttons designed to control 1 or 2 CANIBEEP RADIO PRO beeper collars Diagram 5 buttons designed to deactivate temporarily or completely 1 or 2 CANIBEEP RADIO PRO beeper collars Buttons designed to operate 1 to 4 CANIFLY bird launchers Programs In order to control 1 or 2 CANIBEEP RADIO PRO beeper collars or operate the opening of 1, 2, 3 or 4 CANIFLY bird launchers, it is necessary to assign the 4 buttons (numbered from 1 to 4) of the remote control according to the desired use. For that purpose, a program of use has to be selected (4 programs are available). ▪ Program 1 Program designed to operate the opening of 1, 2, 3 or 4 CANIFLY bird launchers (buttons 1 to 4) (Diagram 6). 4 CANIFLY ▪ Diagram 6 Program 2 Program designed to operate the opening of 1 or 2 CANIFLY bird launchers (buttons 1 and 2) and activate 1 yellow CANIBEEP RADIO PRO beeper collar (buttons 3 and 4) (Diagram 7). 2 CANIFLY 1 yellow CANIBEEP RADIO PRO beeper collar Diagram 7 ▪ Program 3 Program designed to activate 1 yellow CANIBEEP RADIO PRO beeper collar (buttons 1 and 2) and operate the opening of 1 or 2 CANIFLY bird launchers (buttons 3 and 4) (Diagram 8). 1 yellow CANIBEEP RADIO PRO beeper collar 2 CANIFLY Diagram 8 User’s guide - CANICOM 1500 PRO 4/24 ▪ Program 4 Program designed to activate 1 or 2 CANIBEEP RADIO PRO beeper collars (Diagram 9): yellow CANIBEEP RADIO PRO (buttons 1 and 2) orange CANIBEEP RADIO PRO (buttons 3 and 4) 1 yellow CANIBEEP RADIO PRO beeper collar 1 orange CANIBEEP RADIO PRO beeper collar Diagram 9 A label located on the back of the remote control reminds you the assignment of the buttons according to the selected program (in addition to the serial number). 1 Assignment of 1, 2, 3 and 4 buttons according to the selected program 2 3 4 P1 P2 P3 P4 1 2 3 4 : represents the 4 buttons located on the front of the remote control (numbered from 1 to 4) P1 – P2 – P3 – P4: represents the 4 programs : represents a CANIFLY bird launcher : represents a CANIBEEP RADIO PRO beeper collar Program selection procedure: 1. Press the “-” button until reaching the level “01” (Diagram 10). Diagram 10 “-” button 2. When the level “01” is reached, press the “-” button for 5 seconds until “00” flashes on the LCD screen. 3. Press the 1, 2, 3 or 4 button to select the appropriate program (Diagram 11): the program number appears on the LCD screen. Diagram 11 1, 2, 3 or 4 button 4. Press the “+” button to confirm the program selected (Diagram 12). Diagram 12 User’s guide - CANICOM 1500 PRO “+” button 5/24 - CHECKING/REPLACING BATTERIES OF REMOTE CONTROL Performances (radio range) of the remote control may deteriorate as batteries become weak. Be prepared to replace the batteries. To check the condition of the batteries, turn On the remote control and look at the battery level indicator on the LCD screen. The symbols which appear indicate the following: Fully charged batteries. Weak batteries: prepare to replace them. Dead batteries: your CANICOM 1500 PRO switches to safety mode and the system lock up. The batteries must be replaced. NUM’AXES advises to use the same type and same brand of batteries as those supplied in your new purchased product. Other brands of batteries may not operate, or may not be completely compatible with your product. You can purchase the suitable batteries from NUM’AXES or from your distributor. Replace the old batteries with new ones as follows: ▪ ▪ ▪ ▪ ▪ ▪ On the back of the remote control, unscrew the screw and remove the battery cover. Remove the old batteries. Insert the new batteries (alkaline LR06 AA) paying attention to follow polarity indicated on the battery housing (Diagram 13). Put the battery cover back in place. Retighten the screw. Check the remote control operates correctly. Diagram 13 Replacing batteries of CANICOM 1500 PRO remote control WARNING Make sure the polarity is correct ● CANICOM training collar - FIRST USE FROM NEW Fitting the battery in the CANICOM receiver collar ▪ ▪ ▪ ▪ ▪ Unscrew the 4 screws of the top of CANICOM. Insert the battery (3 Volt Lithium CR2) paying attention to follow polarity indicated on the battery housing (Diagram 14). A beep sound (low pitch) is emitted, indicating the correct installation of the battery. If you do not hear any beep sound after inserting the battery, immediately remove it from its housing. Check the polarity before trying again. Before putting the lid back in place, check that the rubber seal is in its groove. Retighten moderately the 4 screws. Polarity “-” of the battery Polarity “+” of the battery Seal Diagram 14 User’s guide - CANICOM 1500 PRO 6/24 Activate/deactivate the CANICOM training collar A magnet located in the remote control is used to switch the CANICOM receiver collar On or Off. ▪ ▪ Activate: move the remote control towards the collar so that the magnet position indicator on the remote control comes into contact with the red mark on the collar, hold for 1 second (Diagram 15). The indicator light on the collar will flash in green indicating the CANICOM receiver is On. Deactivate: move the remote control towards the collar so that the magnet position indicator on the remote control comes into contact with the red mark on the collar, hold for 1 second (Diagram 15). The indicator light on the collar will flash from green to red and then off: the CANICOM receiver is Off. If you have several collars, renew the same procedure for each one. To increase the battery life of the remote control and receiver collar, you should deactivate the units if you are not using them for a long period. Place these two areas together for 1 second Diagram 15 Activate/deactivate a CANICOM receiver collar with a CANICOM 1500 PRO remote control Coding of the remote control and CANICOM receiver collar Each remote control has its own individual radio operator code. The coding of the remote control with the receiver collar enables the two units to work together (you can add a second CANICOM collar at any time). IMPORTANT: before beginning the coding (first use of the receiver collar or re-coding), make sure no other person is using his CANICOM 1500 PRO or other products from the NUM’AXES range close by: your receiver collar could accidentally record the code of his remote control. If that occurs, re-code the remote control with your receiver collar. CODING PROCEDURE FOR THE 1ST USE Coding of collar A with black strap: 1. Activate the remote control: press for 1 second the On/Off red button located on the side of the remote control. 2. Press the A key on the remote control in order to select the collar A (the letter A will appear on the LCD screen). 3. Activate the collar A: move the remote control towards the collar so that the On/Off switch magnet comes into contact with the red mark on the collar, hold for 1 second. 4. Move the remote control away from the receiver collar. 5. Press the beeper button located on the side of the remote control. A beep sound is emitted; the receiver collar is then synchronized with your remote control. If you have a 2nd CANICOM collar (collar B with yellow strap), renew the same procedure (press the B key at point 2). RE-CODING PROCEDURE (for all coding procedures other than the 1st) Re-coding of collar A with black strap: 1. Activate the remote control: press for 1 second the On/Off red button located on the side of the remote control. 2. Press the A key on the remote control in order to select the collar A (the letter A will appear on the LCD screen). 3. Collar A in position “deactivated” (indicator light off): move the remote control towards the collar so that the magnet position indicator comes into contact with the red mark on the collar, hold for 6 seconds. The indicator light on the collar lights in fixed green, then flashes in red. 4. Move the remote control away from the receiver collar. 5. Press the beeper button located on the side of the remote control. A beep sound is emitted; the receiver collar is then synchronized with your remote control. If you have a 2nd CANICOM collar (collar B with yellow strap), renew the same procedure (press the B key at point 2). User’s guide - CANICOM 1500 PRO 7/24 Reprogram a CANICOM receiver collar The CANICOM receiver collar can be re-coded indefinitely, either with the same remote control, or with a new remote control from the CANICOM range (Ref. Re-coding procedure). - HOW TO USE THE REMOTE CONTROL WITH A CANICOM RECEIVER COLLAR button: beeper If you press the beeper button located on the side of the remote control, the receiver collar will emit sound signals. There is no time limit for this function: the beeper will continue to sound for as long as the button is pressed. A transmission symbol will appear on the LCD screen of the remote control. The indicator light on the collar goes from flashing green to permanent green for as long as the button is pressed. It is up to you to use the beeper button depending on the way you want to train your dog. With the beeper button you can: ▪ send a sound to your dog when it is disobedient, ▪ draw its attention, … It’s very important to always use the beeper in the same way in order not to disturb your dog. “F” button: flash stimulations Press the F button to send a warning to your dog using flash stimulations transmitted by the two contact points located on the receiver collar for a defined length of time of less than one second. A transmission symbol will appear on the LCD screen of the remote control. The indicator light on the collar goes from flashing green to permanent red while the stimulations are being sent. “C” button: continuous stimulations Press the C button to send a warning to your dog using continuous stimulations transmitted by the two contact points located on the receiver collar, this will last for as long as the button is pressed but limited to 8 seconds maximum. A transmission symbol will appear on the LCD screen of the remote control. The indicator light on the collar goes from flashing green to permanent red while the stimulations are being sent. “B” button: Booster Press the Booster button to stop your dog instantaneously. You can choose the stimulation level you think to be the best for an immediate effect. As a result, you do not need to press the “+” button. Those stimulations are transmitted by the two contact points located on the collar for as long as the button is pressed but no more than 8 seconds maximum. The stimulation level selected thanks to the Booster button can be different for each CANICOM collar. Configuration of the Booster button: programming the Booster button for the collar A (with black strap): press the A button for 5 seconds until the stimulation level flashes on the LCD screen press the “+” or “-” button to modify the stimulation level press the A button to confirm the level selected If you have a 2nd CANICOM collar (collar B with yellow strap), renew the same procedure (press the B key at point 1 and 3). “+” and “-” buttons: stimulations level control buttons Use the “+”and “-” buttons for rapid adjustment of the stimulation level of the receiver collar. 18 levels are available. Level 1: very weak stimulations – Level 18: strong stimulations Always start with the lowest level of stimulation. Retro-lightning of the LCD screen You can light the LCD screen for approximately 6 seconds by pressing briefly the On/Off red button second). User’s guide - CANICOM 1500 PRO (approx. ½ 8/24 - CHECKING/REPLACING BATTERY OF CANICOM RECEIVER COLLAR To check the condition of the receiver collar battery, observe the indicator light located on the front of the receiver collar: ▪ battery fully charged: flashes slowly green. ▪ weak battery: flashes quickly red. Replace it with a new 3-V Lithium CR2 battery (See § First use from new: Fitting the battery in the CANICOM receiver collar). Check the receiver collar operates correctly. NUM’AXES advises to use the same type and same brand of batteries as those supplied in your new purchased product. Other brands of batteries may not operate, or may not be completely compatible with your product. You can purchase the suitable batteries from NUM’AXES or from your distributor. - CHANGING THE CONTACT POINTS Two different series of contact points are supplied. The length of the contact points must be sufficient to have proper contact with the dog’s skin, enabling the device to operate correctly. If you have a long-haired dog and the short contact points fitted to the collar in the factory are inadequate, remove and replace them with the long ones supplied with the kit. Carefully tighten them manually (do not use a key). - HOW TO CHECK THAT YOUR CANICOM 1500 PRO IS FUNCTIONING PROPERLY You can check that your CANICOM 1500 PRO is operating correctly at any time. Before doing so, make sure that the CANICOM receiver collar is turned “Off” (indicator light off). Place the neon test lamp in contact with each of the contact points (by unscrewing them, then by screwing them up in order to grip wires of the lamp under the contact points). ▪ Turn “On” the remote control and CANICOM receiver collar. ▪ Select the collar you want to test on the remote control (press the A or B key in order to select the collar – the letter A or B will appear on the LCD screen). ▪ Press the F or C button and modify the level of intensity of the stimulations: the test lamp will come on with more or less intensity. Renew the same procedure for each CANICOM collar. ▪ ▪ - GETTING THE BEST RESULTS The training instructions you send to your dog are sent from the remote control to the receiver collar by radio waves. These radio waves are sensitive and the range reaches approximately 1500 meters (depending on geography and environment). The performances of your CANICOM 1500 PRO will be optimal if you follow these recommendations: ▪ To obtain a good radio range, do not cover the antenna when you hold the remote control in your hand. ▪ The position of the CANICOM receiver collar around the neck of your dog should be in the following way: the “On/Off” indicator is visible and is not in contact with the breast of the dog. ▪ Check the batteries (remote control and receiver collar) before using the unit and replace them as soon as the level of load is weak. ▪ The performances of the batteries decrease slightly in temperatures lower than 0°C. If possible, keep the remote control warm (e.g. inside a pocket) before using it. - FITTING THE CANICOM COLLAR The strap must be adjusted so that the contact points are in contact with the skin of the dog. ▪ ▪ If the strap is too loose, the collar is likely to move and repeated friction can irritate the skin of your dog. Furthermore, it will not function correctly. If the collar is too tight, the dog will have breathing difficulties. Do not leave the collar positioned at the same place for long periods (i.e. over 3 hours) because this can cause irritations. If your dog must wear the collar for long periods, regularly change the position on the neck of your dog. Never leave the collar more than 8 hours per day on your dog. Check your dog’s neck regularly. If irritations appear, remove the collar until all signs of skin irritations have disappeared. User’s guide - CANICOM 1500 PRO 9/24 - STARTING OUT WITH THE TRAINING COLLAR ▪ ▪ ▪ ▪ ▪ You can start using the collar with 6-month-old puppies that have already received some basic training: “stay”, “sit” or at least “no”. Do not use the collar with dogs that are not in good physical shape (i.e. cardiac problems, epilepsy) or have behavioural problems. Your dog will need to get used to the collar, for a few days let the dog wear the collar but do not use it. Positive and effective training takes time. Do not rush: Choose a familiar area, a place your dog is used to. Define the level of stimulation from which your dog reacts by starting with the level of the lowest intensity and increasing gradually. Choose the right moment to press the button: at the exact time your dog does something wrong. Give your dog plenty of encouragement: it will learn faster and its desire to respond will only increase. Do not hesitate to contact a professional trainer for any further advice. - THE DIFFERENCE BETWEEN “CONTINUOUS” AND “FLASH” STIMULATION Both functions are extremely interesting and useful, since they can be adapted to any dog and any situation. ▪ “continuous” stimulation Should be typically used for training at a location that is familiar to the dog (at the beginning). Because the stimulation is continuous, use the lowest intensity and take advantage of the length of the stimulation rather than of the intensity, so your dog has time to understand. ▪ “flash” stimulation Use this function to correct your dog. A low stimulation will attract its attention; it will feel something unpleasant at the precise moment it is behaving badly. - CAUTIONS FOR USE - MAINTENANCE ▪ ▪ ▪ ▪ ▪ ▪ ▪ ▪ ▪ ▪ ▪ ▪ This appliance is not intended for use by persons (including children) with reduced physical, sensory or mental capabilities, or lack of experience and knowledge, unless they have been given supervision or instruction concerning use of the appliance by a person responsible for their safety. Children should be supervised to ensure that they do not play with the appliance. Before using the collar, we advise you to have your dog checked by a vet to ensure he is fit to wear a collar. The CANICOM receiver collar is totally waterproof. Your dog can swim in water. In order to maintain water tightness, we recommend the replacement of the seal located in the receiver collar every year. The remote control is shower proof only: it is only designed to remain a short time in the rain. Put it in a dry place as soon as possible. If the remote control falls into the water, it could be damaged in an irreversible way. Your dog should not wear a tag, metallic collar, or any other kind of collar together with the CANICOM training collar. Avoid placing the remote control close to objects sensitive to magnetic fields which could be irreversibly damaged. Do not place or keep the unit in places exposed to high temperatures. Remove the battery from the receiver collar and the remote control if you are not using the appliance for 3 months or more. The collar will memorize the configuration chosen (coding). It is necessary to replace the batteries every two years, even if the unit has not been used for long periods. Never leave a discharged battery in the unit (remote control and collar): leakage could damage your product. Avoid cleaning the unit with volatile liquids such as solvents or cleaning fluids. Use a soft cloth and neutral detergent. The strap can be washed with soapy water. - TROUBLESHOOTING Should your CANICOM 1500 PRO stop working or develop a fault, first read this guide over, then check the batteries and that you are using the product correctly. If you encounter any problem, re-code the CANICOM receiver collar with the remote control (ref. re-coding procedure). User’s guide - CANICOM 1500 PRO 10/24 Re-initialize the system as follows: Remove the collar battery from its housing With a metallic tool (e.g. screwdriver, scissors) touch each of the 2 battery contacts for 2 seconds approximately (ref. Diagram 16) Insert the battery again: one beep is emitted indicating the battery is in correct position. Restart your CANICOM collar using the remote control. Diagram 16 Reset: connect the 2 supports of the battery If the problem persists, contact your distributor or check out on www.numaxes.com. You can also contact NUM’AXES at +33.2.38.69.96.27 or by Email [email protected]. Depending on the extent of the malfunction, you may have to return your product for service and repair. For all repairs please supply the following: the complete product the proof or purchase (invoice or sales receipt) If you omit one of these items, the After Sales Service will have to invoice you for any repair costs incurred. ● CANIBEEP RADIO PRO beeper collar - DESCRIPTION OF THE PRODUCT Battery polarity indicator Red indicator LED Diagram 19 Sound diffuser Diagram 17 Diagram 18 Strap Polarity “-” of the battery Polarity “+” of the battery Magnetic switch position indicator Allows you to switch On/Off the collar and to select the operating modes - FIRST USE FROM NEW Fitting the battery in the CANIBEEP RADIO PRO beeper collar ▪ ▪ ▪ ▪ ▪ Unscrew the 4 screws of the top of CANIBEEP RADIO PRO collar using a Philips screwdriver. Insert the battery (3 Volt Lithium CR123 A) paying attention to follow polarity indicated on the battery housing. A beep sound (low pitch) is emitted and the red indicator LED flashes, indicating the correct installation of the battery. Put the top back in place paying attention to the rubber seal. It must be clean, well positioned in its groove, and the groove must be clean too in order to avoid any problem with the waterproof function. Firmly screw up the 4 screws in order to maintain your product’s water tightness. User’s guide - CANICOM 1500 PRO 11/24 Activate/deactivate the CANIBEEP RADIO PRO beeper collar A magnet located in the remote control is used to either switch On/Off the CANIBEEP RADIO PRO collar. ▪ ▪ Activate: move the remote control towards the collar so that the magnet position indicator comes into contact with the area indicated on the back of the collar, hold for at least 1 second (ref. Diagram 20). The collar will emit two low pitch beep sounds and the red indicator light will flash briefly indicating the CANIBEEP RADIO PRO is On. Diagram 20 Activate/deactivate a CANIBEEP RADIO PRO collar with a CANICOM 1500 PRO remote control Deactivate: move the remote control towards the collar so that the magnet position indicator comes into contact with the area indicated on the back of the collar, hold for at least 1 second (ref. Diagram 20). The collar will emit one low pitch beep sound and the red indicator light will flash briefly indicating the CANIBEEP RADIO PRO is Off. To increase the battery life of the remote control and receiver collar, you should deactivate the units if you are not using them for a long period. Place these two areas together for 1 second Coding of the remote control and CANIBEEP RADIO PRO beeper collar The synchronization of the remote control with your CANIBEEP RADIO PRO collar(s) is necessary only at the first use of the collar(s). Coding enables the remote control and the collar(s) to work together. You can add the 2nd CANIBEEP RADIO PRO collar at any time. IMPORTANT: before beginning the coding, make sure no other person is using his CANICOM 1500 PRO or other products from the NUM’AXES range close by: your collar could accidentally record the code of his remote control. CODING PROCEDURE FOR THE 1ST USE 1. To begin the coding procedure, your remote control and CANIBEEP RADIO PRO collar must be switched On. 2. Select the program 2, 3 or 4 on the remote control (Ref. § CANICOM 1500 PRO remote control/Assignment of the buttons/Programs). 3. Unscrew the 4 screws of the top of CANIBEEP RADIO PRO collar with a Philips screwdriver. 4. Briefly press on the push button located in the case of the collar (Diagram 21): a red indicator LED will show. Once the red LED light shows, you have only 5 seconds to synchronize the remote control and the collar. 5. Move your remote control away from the collar, pressing continuously on the “2” or “4” button of the remote control (depending on the program selected) until you see the red indicator LED going Off. 6. The collar emits a beep sound: the collar has correctly recorded the code of the remote control. 7. Check the coding of your collar by testing the operation of the CANIBEEP RADIO PRO. 8. Once you have finished the coding, put the top back in place paying attention to the rubber seal. It must be clean, well positioned in its groove, and the groove must be clean too in order to avoid any problem with the waterproof function. 9. Firmly screw up the 4 screws in order to maintain your product’s water tightness. NOTE: if the 5 seconds have passed before having time to code the collar, or if the code is badly recorded in the collar, you can start again by pressing the push button. NOTE: if you have a 2nd collar, renew the same procedure. Diagram 21 Push button for coding Red indicator LED User’s guide - CANICOM 1500 PRO 12/24 Reprogram a CANIBEEP RADIO PRO collar The coding system located in the collar memorizes up to 9 different codes. This memory can become saturated if you have encoded your collar with several remote controls. In this case, the red indicator LED flashes after you press the push button to code. In order to erase this memory, press continuously on the push button until the LED is Off: the memory is empty and you can recode your collar with a remote control. Changing operating modes and selecting tones CANICOM 1500 PRO allows you to locate one or two dogs at the same time with different tones. Either when they are pointing, or when they are moving or pointing. You have the possibility of carrying out various adjustments on the collar: you thus personalize your CANIBEEP RADIO PRO according to your requirements and the behaviour of your dog. To change the tone emitted by your CANIBEEP RADIO PRO collar or to change operating modes, when you turn it On, you need to leave the magnet position indicator on the remote control in contact with the area indicated on the back of the collar (Diagram 20). The collar emits a number of beep sounds (from 1 to 12). Modes 1 to 12 run through as long as you leave the two areas in contact. Move the remote control away from the collar as soon as you have reached the desired mode: the collar will memorize the configuration chosen. The next time you will turn it On, the CANIBEEP RADIO PRO collar will be in the last selected mode. The table below shows how your CANIBEEP RADIO PRO collar works according to the selected mode: Number of beeps Pointing dog 1 One beep every 2 seconds, tone Nr 1 2 3 4 Moving dog No sound r No sound r No sound r No sound One beep every 2 seconds, tone N 2 One beep every 2 seconds, tone N 3 One beep every 2 seconds, tone N 4 “Moving” modes (from 5 to 8): the interval between 2 beeps can be adjusted when the dog is moving 5 One beep every 2 seconds, tone Nr 1 One beep every * seconds, tone Nr 1 6 One beep every 2 seconds, tone Nr 2 One beep every * seconds, tone Nr 2 7 One beep every 2 seconds, tone Nr 3 One beep every * seconds, tone Nr 3 8 One beep every 2 seconds, tone Nr 4 One beep every * seconds, tone Nr 4 *: 5, 10, 15 or 20 seconds depending on the selected settings For the following modes (from 9 to 12), you trigger a beep sound of the selected tone only when you briefly press on the button (“1” or “3” button depending on the beeper collar you are using and the program selected) 9 One beep, tone Nr 1 when you press the you are using and the program selected) 10 One beep, tone Nr 2 when you press the you are using and the program selected) 11 One beep, tone Nr 3 when you press the you are using and the program selected) 12 One beep, tone Nr 4 when you press the you are using and the program selected) button (“1” or “3” button depending on the beeper collar button (“1” or “3” button depending on the beeper collar button (“1” or “3” button depending on the beeper collar button (“1” or “3” key depending on the beeper collar Operation When On and according to the selected mode (1, 2, 3, 4, 5, 6, 7 or 8), the collar may emit beep sounds when your dog is not moving, if it has been still for at least 5 seconds. As soon as the dog moves, it’s considered as moving. User’s guide - CANICOM 1500 PRO 13/24 “Moving” mode: interval of location When your collar is positioned on “moving” mode (from 5 to 8), the interval between two beep sounds can be adjusted so that you can locate your dog moving. Use the supplied screwdriver in order to activate the pre-set inside the CANIBEEP RADIO PRO collar (Diagram 22). Pre-set positions Results Beep sound every 5 seconds Diagram 22 Beep sound every 10 seconds Interval location pre-set Beep sound every 15 seconds Beep sound every 20 seconds Setting the movement detection sensitivity When leaving the factory, the collar is set to an intermediate position (medium sensitivity). It is up to you to adjust the sensitivity of your CANIBEEP RADIO PRO collar to your dog’s behaviour and to the results you want to obtain. To change the movement detection sensitivity, you need to remove the lid of the collar in order to get access to the sensitivity adjustment screw situated inside the collar (Diagram 23). 2 examples: 1) After pointing, you still want to hear CANIBEEP RADIO PRO while your dog is sliding towards the prey: with the supplied screwdriver, turn de sensitivity screw counter-clockwise to the minimum (minimum sensitivity). Collar is still beeping while the dog is moving. 2) Your want to hear CANIBEEP RADIO PRO only when your dog is perfectly still; the collar stops beeping at the slightest movement of the dog: with the supplied screwdriver turn the sensitivity screw clockwise to the maximum (maximum sensitivity). CAUTION: the adjustment system has a stop for the minimum sensitivity and a stop for the maximum sensitivity (maximum ¾ turn). Turn delicately and without forcing using the supplied screwdriver. Less sensitive to movements Diagram 23 Minimum sensitivity STOP Movement detection sensitivity adjustment screw Medium sensitivity STOP Maximum sensitivity More sensitive to movements Adjusting sound volume When leaving the factory, the collar is set at the maximum sound volume, the system is set at the maximum stop, you can not turn beyond to increase the sound volume. It is up to you to adjust your CANIBEEP RADIO PRO collar sound volume to the level you wish. User’s guide - CANICOM 1500 PRO 14/24 To adjust the sound volume, you need to lift the lid in order to get access to the adjusting screw situated inside the collar (Diagram 24). To decrease the sound volume of your CANIBEEP RADIO PRO collar, turn the adjustment screw clockwise to the minimum (minimum sound volume). To increase the sound volume of your CANIBEEP RADIO PRO collar, turn the adjustment screw counter-clockwise to the maximum (maximum sound volume). CAUTION: the adjustment system has a stop for the minimum sound volume and a stop for the maximum sound volume (maximum ½ turn). Turn delicately and without forcing using the supplied screwdriver. Sound volume adjustment screw Diagram 24 Medium sound volume Maximum sound volume STOP High sound volume Minimum sound volume STOP Low sound volume - HOW TO USE THE REMOTE CONTROL WITH A CANIBEEP RADIO PRO BEEPER COLLAR The CANICOM 1500 PRO remote control is designed to operate with one or two CANIBEEP RADIO PRO collars (a yellow one and/or an orange one). From the remote control you can: ▪ Locate the dog: briefly or continuously press the button on the remote control (“1” or “3” button depending on the collar you want to use and the program selected) to activate a beep sound on the collar whenever your dog is pointing or moving. ▪ Deactivate temporarily the collar: briefly press (1 to 2 seconds) the button (“2” or “4” button depending on the collar you want to use and the program selected):the collar is in stand-by (it is temporarily switched Off: no beep sounds whether the dog is pointing or moving). The red indicator LED is still flashing to indicate that the collar is not definitely turned Off. ▪ Reactivate the collar after it was temporarily deactivated: if your collar has been temporarily deactivated, press the button (“1” or “3” button depending on the collar you want to use and the program selected), you reactivate your collar on the last selected mode. ▪ Completely switch off the collar: if you continuously press (approx. 5 seconds) the button (“2” or “4” button depending on the collar you want to use and the program selected), you will completely switch Off your collar (Warning: you will not be able to remotely reactivate it). - CHECKING/REPLACING BATTERY OF CANIBEEP RADIO PRO COLLAR The battery - when - when - when condition is checked in 3 distinct occasions: you insert the battery you turn the collar On you turn the collar Off During these 3 operations, if your hear 6 close low pitch beep sounds (instead of 1 or 2 low pitch beep sound) and the indicator LED flashes rapidly, the battery is weak. Replace the old battery with a new one (3 Volt Lithium CR123A) (Ref. § Fitting the battery in the CANIBEEP RADIO PRO beeper collar). User’s guide - CANICOM 1500 PRO 15/24 When changing the battery, there can remain some power in your CANIBEEP RADIO PRO collar. In that case, the collar does not emit any low pitch beep sound and the LED does not light when inserting the new battery. To make sure the collar operates properly and the battery is well inserted, turn your collar On with the remote control (Ref. § Activate/deactivate the CANIBEEP RADIO PRO collar). After changing the battery, your collar will work according to the last selected mode. NUM’AXES advises to use the same type and same brand of batteries as those supplied in your new purchased product. Other brands of batteries may not operate, or may not be completely compatible with your product. You can purchase the suitable batteries from NUM’AXES or from your distributor. - ADVICE If your dog has never been used to wearing a beeper collar, we recommend you to use CANIBEEP RADIO PRO in “moving” mode (from 5 to 8) for the 2 or 3 first times: with time your dog will familiarize itself with the collar. When you put CANIBEEP RADIO PRO around your dog’s neck, direct the sound diffuser upward so that the sound beeps do not come too close to your dog’s ears. We advise you to program your CANIBEEP RADIO PRO collar before putting it on your dog’s neck: - modes 1 to 4: operates only when the dog is pointing - modes 5 to 8: operates when the dog is moving and then pointing - modes 9 to 12: emits a beep sound only when you press the you want to use and the program selected) button (“1” or “3” button depending on the collar If you wish to train several dogs at the same time, we recommend you to program each CANIBEEP RADIO PRO collar with a distinct tone in order to recognize each dog (4 tones available). Following these instructions, you will see that it will not take a long time before your dog understands. - EXAMPLES 1 – You want to track your dog when it is pointing Put CANIBEEP RADIO PRO on your dog (sound diffuser upwards) previously programmed in mode: 1 – 2 – 3 or 4 Moving dog: No sound Pointing dog: One beep sound every 2 seconds Goal: to track the pointing dog and check that is stays still. 2 – You want to track your dog when it is moving and then pointing Put CANIBEEP RADIO PRO on your dog (sound diffuser upwards) previously programmed in mode: 5 – 6 – 7 or 8 Moving dog: One beep sound every 5, 10, 15 or 20 seconds (depending on the selected settings) Pointing dog: One beep sound every 2 seconds Goal: to track the dog while it follows a prey track when hunting. User’s guide - CANICOM 1500 PRO 16/24 3 – Locate your dog from time to time Put CANIBEEP RADIO PRO on your dog (sound diffuser upwards) previously programmed in mode: 9 – 10 – 11 or 12 or Moving dog or pointing dog: No sound One beep sound only when you press the button (“1” or “3” button depending on the collar you want to use and the program selected) Goal: locate the dog you can not see (in concealed area). 4 – Train a young pointer using an expert dog To train a young dog, it is useful to start out with the help of an expert dog, which carries out the function of the instructor. In this case CANIBEEP RADIO PRO is very effective, as it allows the “beginner” dog to rely on its ears, as well as on its senses, to understand how the expert dog is working. Start out by putting the collar in mode 5 (for example and pre-set selected on 10 seconds) on dog A (instructor) Dog A Dog Dog A moving: One beep sound every 10 seconds, tone Nr 1 A Dog A pointing: One beep sound every 2 seconds, tone Nr 1 Bring dog B (beginner) with collar in mode 6 (for example) next to dog A already pointing. Dog B pointing: One beep sound every 2 seconds, tone Nr 2 Goal: when the beginner will understand the connection between the beep sound, which indicates that the instructor dog is pointing, and the presence of the prey, it will naturally begin to master the skill. It will thus find a great number of prey, tracking the pointing dog by itself and it will learn the technique in little time. With this system the period necessary before it can successfully hunt by itself is greatly reduced. CANIBEEP RADIO PRO is very useful for hunting but it is also a great training tool. Used with a CANICOM training collar, it will make training faster, thanks to constant contact and control of dog’s behaviour. If you use both CANIBEEP RADIO PRO and CANICOM at the same time, we advise you to attach the CANICOM collar on the same strap but at the opposite side of the CANIBEEP RADIO PRO collar in order to prevent the two collars from banging together. User’s guide - CANICOM 1500 PRO 17/24 - CAUTIONS FOR USE - MAINTENANCE ▪ ▪ ▪ ▪ ▪ ▪ ▪ ▪ ▪ ▪ ▪ ▪ ▪ ▪ ▪ ▪ Before using the collar, have your dog checked by a veterinarian to ensure he is fit to wear a beeper collar. We advise you to use the CANIBEEP RADIO PRO collar on dogs over 6 months old. To prevent damaging your CANIBEEP RADIO PRO, we advise against your dog wearing any metal identity tag, any metal collar, collar bell or any other collar around its neck when it is wearing its beeper collar. Yet, if you wish to use along with your CANIBEEP RADIO PRO collar another tool (training collar, collar bell …) we advise you to attach them on the same strap but at the opposite side of the CANIBEEP RADIO PRO collar in order to prevent them from banging together. Give your dog time to get used to the sounds of the CANIBEEP RADIO PRO collar. The sound volume might scare the dog at the beginning: to help him get used to CANIBEEP RADIO PRO, lower the sound volume thanks to the volume adjustment screw (see § Adjusting sound volume). In this way you will reduce the volume and with time your dog will familiarize itself with the collar. If your dog shows any behavioural problems, we suggest you ask your veterinarian for advice. Avoid using CANIBEEP RADIO PRO indoors; the volume (approx. 94 dB A at the maximum sound volume) could irreversibly damage your ear-drums. It is easier to start the collar and adjust sound or mode before you put it on your dog. The CANIBEEP RADIO PRO collar is waterproof. Your dog can cross any watercourse without damaging it. However, if CANIBEEP RADIO PRO remains under water for a long time, the cavity of the sound diffuser may become filled with water and the emission power will be reduced. To restore unit performance, shake your collar holding the diffuser downward to let all the water out. Before using the collar, check that the seal is clean and well positioned in its groove, and also check that the 4 screws of the top of the collar are properly tightened in order to ensure the water tightness of your product. In order to maintain water tightness, we recommend the replacement of the seal in the collar every year. Do not place or keep the unit in places exposed to high temperatures. It is necessary to change the battery every 2 years, even if the unit has not been used for long periods. Never leave a discharged battery in the unit: leakage could damage your CANIBEEP RADIO PRO. Remove the battery from your CANIBEEP RADIO PRO collar if you are not using it for a long period of time (3 months or more). The collar will memorize the configuration chosen. Avoid placing the remote control close to objects sensitive to magnetic fields which could be irreversibly damaged. Keep your product out of reach of children. It is not a toy for you or your children. Avoid cleaning the unit with volatile liquids such as solvents or cleaning fluids. Use a soft cloth and neutral detergent. The strap can be hand-washed with soapy water. - TROUBLESHOOTING Should your product stop working or develop a fault, first read this guide over, then check the batteries and that you are using it correctly (operating modes, movement detection sensitivity, sound volume adjustment). If the problem persists, contact your distributor or check out on www.numaxes.com. You can also contact NUM’AXES at +33.2.38.69.96.27 or by Email [email protected]. Depending on the extent of the malfunction, you may have to return your product for service and repair. For all repairs please supply the following: the complete product the proof of purchase (invoice or sales receipt) If you omit one of these items, the After Sales Service will have to invoice you for any repair costs incurred. User’s guide - CANICOM 1500 PRO 18/24 ● CANIFLY bird launcher - DESCRIPTION OF THE PRODUCT Arm Latch bar (closed) Diagram 25 On/Off button Latch bar (opened) Magnet Remote release receiver Trapdoor Diagram 26 - FIRST USE FROM NEW Coding procedure The synchronisation of the remote control with the bird launcher(s) is only necessary at the first use of any CANIFLY. Coding enables you to program the buttons numbered from 1 to 4 of your remote with each CANIFLY numbered from 1 to 4. IMPORTANT: before beginning the coding, make sure no other person is using his CANICOM 1500 PRO or other products from the NUM’AXES range close by: your CANIFLY could accidentally record the code of his remote control. Before starting the coding procedure, you have to select a program enabling you to control bird launchers (program 1, 2 or 3 – Ref. § CANICOM 1500 PRO remote control/Assignment of the buttons/Programs). CODING PROCEDURE 1. To begin the coding procedure, press continuously (approx. 5 seconds) on the green On/Off button located on the remote release receiver when switching On the bird launcher (Diagram 25): a red LED located on top of the On/Off button lights then flashes. 2. Press the button numbered “1”, “2”, “3” or “4” on the remote control (depending on the CANIFLY you want to code and the programme selected). 3. Your CANIFLY is then synchronised with your remote control. Renew the same procedure for each CANIFLY. The CANIFLY can be re-coded indefinitely, either with the same remote control or with a new CANICOM 1500 PRO remote control. User’s guide - CANICOM 1500 PRO 19/24 Activate/deactivate the CANIFLY bird launcher In order to activate or deactivate the bird launcher, press the On/Off button located on the remote release receiver. When the bird launcher is turned On, a LED located on the On/Off button flashes approximately every 3 seconds. - CHECKING/REPLACING BATTERIES OF CANIFLY To check the condition of the CANIFLY batteries, observe the LED located on the On/Off button: ▪ batteries fully charged: flashes slowly red ▪ weak batteries: flashes quickly red – the batteries must be replaced Warning: Weak batteries could deteriorate the radio range as well as the opening of the bird launcher. NUM’AXES advises to use the same type and same brand of batteries as those supplied in your new purchased product. Other brands of batteries may not operate, or may not be completely compatible with your product. You can purchase the suitable batteries from NUM’AXES or from your distributor. Replace the old batteries with new ones as follows: ▪ Unscrew the 4 screws of the remote release receiver and remove the battery cover. ▪ Remove the old batteries. ▪ Insert the new batteries (alkaline LR06 AA) paying attention to follow polarity indicated on the battery housing. ▪ Put the battery cover back in place (make sure the seal is in its groove). ▪ Retighten the 4 screws. NOTE: any other disassembling will result in loss of guarantee. - CAUTIONS FOR USE - MAINTENANCE ▪ It is necessary to turn Off both the remote control and the bird launcher when you are not using them (storage, transport …). ▪ Radio range of the remote control may vary depending on geography and environment. ▪ Lubricate regularly the latch bar. ▪ In order to avoid damages during transport, the following rules are highly recommended: The two arms that maintain the “fabric nest” should be in an unlocked position and the fabric tended. The trapdoor should remain closed using the latch. The latch bar should be placed against the magnet. The remote release receiver should be deactivated by pressing the On/Off button located on top of the case (no LED flashing on the On/Off button). For transport, use one of the plastic system spacers as handle. ▪ Do not carry CANIFLY by any of the following areas: hinged jibs latch bar “fabric nest” trapdoor ▪ For transport, the launcher has to be opened and put horizontally. ▪ The electromagnetic system designed to close the launcher is robust, reliable and does not require any maintenance. Nevertheless, the magnets have to remain clean. If it is not the case, the bird launcher could open itself at an untimely moment. ▪ We recommend you to wipe dry your CANIFLY launcher after using it in wet conditions. ▪ We recommend you to store the CANIFLY launcher in a dry place to avoid any problem of corrosion. ▪ The launcher opens with great force; move away from the launcher with your dog. ▪ Keep your CANICOM 1500 PRO remote control and CANIFLY bird launcher out of reach of children. User’s guide - CANICOM 1500 PRO 20/24 ▪ In all cases, put the two arms that maintain the fabric in position unbolted, “fabric nest” tended. The latch bar will be placed against the magnet. Never store the CANIFLY and the remote control together. ▪ IMPORTANT: YOUR CANIFLY IS NOT A TOY FOR YOUR CHILDREN, BUT A MEANS OF TRAINING FOR YOUR DOG. NUM’AXES COULD NOT BE HELD RESPONSIBLE IN CASE OF IMPROPER USE. - TROUBLESHOOTING If the bird launcher does not open/receive the signal from the transmitter Solution: Check the condition of the batteries of both bird launcher and remote control (Ref. § Checking/replacing batteries of remote control and § Checking/replacing batteries of CANIFLY). If the range is insufficient Solution: Check the condition of the batteries of both bird launcher and remote control (Ref. § Checking/replacing batteries of remote control and § Checking/replacing batteries of CANIFLY). Weak batteries reduce the radio range. If the launcher does not remain closed Solution: Clean the active face of the magnet; close the launcher. If the arms still do not remain in the closed position contact your distributor. If the problem persists, contact your distributor or check out on www.numaxes.com. You can also contact NUM’AXES at +33.2.38.69.96.27 or by Email [email protected]. Depending on the extent of the malfunction, you may have to return your product for service and repair (In the event of a return for service, please return the complete bird launcher with the remote control). For all repairs please supply the following: the complete product the proof or purchase (invoice or sales receipt) If you omit one of these items, the After Sales Service will have to invoice you for any repair costs incurred. User’s guide - CANICOM 1500 PRO 21/24 ● Technical specifications CANICOM 1500 PRO CANICOM remote control training collar CANIBEEP RADIO PRO beeper collar CANIFLY bird launcher Power 2 alkaline 1.5-V LR06 AA 1 Lithium 3-V CR2 batteries battery Battery life Continuous use: approx. 50 000 triggers Frequency (power) 869,525 MHz (500 mW) 869,525 MHz Antenna Flexible Integrated Integrated Integrated Radio range Approx. 1500 meters Tightness Shower proof Waterproof Waterproof IP 67 Radio operator safety and coding By microcontroller By microcontroller By microcontroller By microcontroller Battery power indicator Indicator on the LCD screen Indicator light Indicator light and beep sounds Indicator light Levels of stimulations 18 Temperature limitations Between – 20°C and +40°C Between – 20°C and +40°C Between -10°C and +40°C Between – 20°C and +50°C Dimensions Weight (with the battery) 132 mm x 62 mm x 31 mm 130 g In stand-by: approx. 7 months* Continuous use: approx. 2 months** 1 Lithium 3-V CR123A battery 3 alkaline 1.5-V LR06 AA batteries Approx. 70 000 beeps Approx. 250 openings 869,525 MHz 38 mm x 68 mm x 43 mm 66 mm x 72 mm x 38 mm 75 g (without strap) 77 g (without strap) Collar adjustable to neck sizes from 20 to 50 cm Collar adjustable to neck sizes from 20 to 50 cm Open launcher: 300 mm x 240 mm x 300 mm Closed launcher: 300 mm x 130 mm x 300 mm 2,380 kg * for a use of 4 hours a day ** about 5 000 stimulations of 2 seconds at level 9 ● Guarantee NUM’AXES guarantee the product against production defects for 2 years after purchase. All postage and packing charges will be the purchaser’s sole responsibility. ● Guarantee conditions 1. The guarantee will be valid only if the proof of purchase (invoice or sales receipt), without cancellation, is submitted to the distributor or to NUM’AXES. The guarantee is limited to the original purchaser. 2. This guarantee does not cover the following: ▪ changing the batteries ▪ changing the strap ▪ direct or indirect risks incurred when sending the article back to the distributor or NUM’AXES ▪ damage to the article caused by: i. negligence or incorrect use (ex. bites, breakage, cracking) ii. use contrary to the instructions or not envisioned therein iii. repairs performed by unauthorized persons ▪ loss or theft 3. If the product is found to be defective, NUM’AXES will either decide to repair or to replace it. 4. No claim may be advanced against NUM’AXES, particularly in relation to incorrect use or breakdown. 5. NUM’AXES reserves the right to modify the characteristics of its products with a view to making technical improvements or to comply with new regulations. User’s guide - CANICOM 1500 PRO 22/24 6. The information contained in this guide may be subject to amendment without prior notice. 7. Photos and drawings are not contractual. ● Register your product Your product can be registered on our website at www.numaxes.com. ● Spare parts You can purchase spare parts from your supplier at any time (batteries, strap, beeper collar, bird launcher …). ● Collection and recycling of your device at the end of its life The pictogram which appears on your product means that this one can not be thrown with household refuse. You have to bring the device to a collection location suitable for treatment, development, recycling of electronic wastes or bring it back to your distributor. Adopting this process, you do something for the environment; you contribute to the preservation of natural resources and to the protection of human health. User’s guide - CANICOM 1500 PRO 23/24 NUM’AXES Z.A.C. des AULNAIES 745 rue de la Bergeresse BP 30157 45161 OLIVET CEDEX FRANCE Tél. + 33 (0)2 38 63 64 40 / Fax + 33 (0)2 38 63 31 00 www.numaxes.com [email protected] User’s guide - CANICOM 1500 PRO 24/24