1
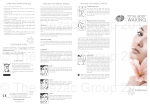
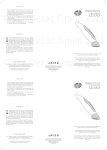
• Use only with supplied heater cup. • During use the heating cup will get very hot. Hold with handle only. • Unplug the heater after use and allow to completely cool before cleaning. • Do NOT store away heater until it has completely cooled down. • Remove any wax spillages or deposits using the supplied wax equipment cleaner. • Clean with a damp cloth using soap. Do not use harsh detergents, solvents or abrasives. Do NOT immerse heater in water or any other liquid to clean it. • If spilled liquids have entered the interior of the heater then do not use. Dry thoroughly before use. • Do not use if mains lead or plug are damaged or if unit is malfunctioning. • The compact heater power supply cable is not a user replaceable item. If it is damaged then the heater must be destroyed or returned to the manufacturer. WA X I N G D I F F E R E N T A R EAS The skin on your face is particularly sensitive and special care needs to be taken when removing facial hairs. Both Hard Wax and Soft Wax (with paper strips) can be used for facial waxing. Experiment and see which works best for you. The wooden spatulas can be carefully split in two lengthways by simply bending them until they snap. This provides a more manageable means of applying the wax to small areas. For best results we recommend using soft wax on large areas such as the legs. Legs are the best area to start waxing because they are the least sensitive. UPPER LIP The upper lip ideally needs to be treated as three separate areas. Hairs generally grow downwards directly under the nose and outwards at either side towards the corners of the mouth. Wax each area separately, applying the wax in the same direction of the hair growth and then removing the strip against the hair growth for the best results. CHIN AND CHEEKS This is a fairly straightforward area of the face to treat but it is still advisable to use a thinner split spatula and smaller wax strips to give you greater control during the hair removal process. EYEBROWS Eyebrow waxing is designed to give definition and shape to these highly visible features. Great care must be taken to only remove those hairs that you wish to remove. You can protect the hairs to be retained by lightly coating them with petroleum jelly to prevent the wax sticking to them. Disposal The product is classed as Electrical or Electronic equipment so please ensure that at the end of the life of this product it is disposed of in the correct manner in accordance with local authority requirements. You can then use the small split spatula to shape your eyebrow, defining their lines and highlighting your eyes as shown in the diagrams below. 1 It must NOT be disposed of with household waste. 2 STEP 1 Place a spatula vertically against the side of your nostril. The hairs that remain on side of the spatula between the two brows should be removed. STEP 2 Looking straight ahead place a spatula vertically in line with your pupil. This is where the highest point of the brow should be. WA X I N G D I F F E R E N T A R EAS FOREARM AND LEGS Start at the wrist or ankle and work up. It is important to note which way the hairs are growing as the direction can change as you progress. The skin needs to be kept taut by moving and bending your elbow, wrist, knees or ankle. STEP 3 Place a spatula diagonally at the edge of the nostril and out towards the tip of the eye. The eyebrow should finish at the point where the spatula meets the eyebrow. TOTAL BODY WAXING ™ BRAZILIAN/ BIKINI/ HOLLYWOOD You may wish to wear a particular swimsuit or style of underwear when you wax your bikini line to show you just how far you need to wax, particularly if the garment is high cut. It is best to trim hairs that are longer than 10mm to roughly 5mm, or the process of removal can be both haphazard and painful! Also, because the hairs in this sensitive region grow in many directions it is best to treat just a small area at a time. The hairs at the bikini line are often deep-seated and you may wish to use a cold compress made from dampened cotton wool to help relieve any stinging after waxing. To find the right position try sitting in a comfortable chair with your feet above your waist and your legs spread. Or, stand with one leg at waist height, with sole of foot on wall. For general bikini waxing hard or soft wax can be used. For more dramatic waxing such as the Hollywood or Brazilian then hard wax must be used. Soft wax is NOT suitable for use on genital or personal areas. UNDERARM This is another sensitive part of the body and the hairs are again liable to grow in many directions and be deep-seated. Do not attempt to remove all the hairs growing under the arm in one movement, instead treat the area in stages using narrower paper strips which can be cut to size. Again these hairs need to be trimmed if they are too long (more than 5cm). Keep the skin taut by stretching and moving your arm as necessary. Your cold compress may come in handy to prevent discomfort. Both soft wax and hard wax can be used for underarm waxing. Experiment and see which works best for you. After waxing the underarm area avoid using antiperspirants or deodourants for at least 24 hours. A F T E R WA X I N G • It is important to take extra care of the waxed areas of your body especially for the first 24 hours. Although you can use an antiseptic moisturising lotion to soothe your skin, do NOT use perfumed body lotions or creams since these can cause an allergic reaction or discomfort. • Exfoliating 2 days after your treatment and everyday thereafter will prevent ingrown hairs. 3 ® 1-IN-CWAX-UK/2.0 CARE AND MAINTENANCE • We recommend wearing loose fitting, natural fibre clothing after treatment, and avoiding tight fitting or nylon clothes which may rub on the treated areas. • The removal of deep-seated and/or thick hairs such as those found under the arm or at the bikini line can sometimes cause small drops of blood to appear on the surface of the skin. A cold compress made of dampened cotton wool will remove these traces of blood and help to cool the area. user guide P R E C AU T I O N S patch T ES T s oft WA X - l a rg e A R EAS h a rd WA X h a ir r e m ova l • Please read all instructions thoroughly and retain for future reference. Always do a patch test on the inside of your forearm or on a small area of your skin for possible skin reaction. Wait 24 hours. If irritation occurs do not use this product. The area to be treated must be clean, dry and free of make-up and grease, e.g. moisturisers, lotions, etc. It is a good idea to wash and dry the area prior to treating as this will temporarily remove the body’s natural oils and help the wax adhere to the hairs. The area to be treated must be clean, dry and free of make-up and grease, e.g. moisturisers, lotions, etc. It is a good idea to wash the area prior to treating as this will temporarily remove the body’s natural oils and help the wax adhere to the hairs. ! • Do not use this product on loose skinned parts of your body or any areas showing signs of: Varicose veins, skin diseases (for example eczema, psoriasis, dermatitis), cuts and abrasions, irritation, warts, moles, hypersensitivity or sunburn, diabetes, phlebitis, recent scar tissue, other skin conditions. We recommend you consult your physician before treatment if you suffer from any of the above conditions. • Be aware that during pregnancy clients can experience increased water retention. • Do not use on cuts or broken skin. • Protect clothing and surroundings. S O F T WA X - SMA L L A R EAS The area to be treated must be clean, dry and free of make-up and grease, e.g. moisturisers, lotions, etc. It is a good idea to wash and dry the area prior to treating as this will remove the body’s natural oils and help the wax adhere to the hairs. 1 STEP 1 Heating Times Full Tub = 60 minutes ½ Tub = 30 minutes ¼ Tub = 20 minutes STEP 1 1 1 0 Place 1 tablet inside wax heater cup and heat on highest setting (II) for 20 minutes. Stir every 10 minutes until the wax takes on a thick honey-like consistency. 0 • Keep out of reach of children. 2 Using a wooden spatula or a metal spoon transfer a small quantity of wax into the heating cup and place inside the heater. As a guide 1 tbsp should be enough for 2 underarms. 0 • Always pull off the strip in one quick motion backwards parallel to the skin. If the strip is pulled away from the skin instead of parallel to the skin the hairs tend to be tugged up. This is both painful and does not remove the hairs successfully. It can also cause bruising to the skin. STEP 2 STEP 2 Switch to highest setting (II). Stir every 10 minutes until the wax is the same consistency as syrup. 2 STEP 2 Switch to lowest setting (I) to maintain an ideal temperature for treatment. 0 2 0 TIPS • Always apply wax in the same direction of hair growth and the pull off in the opposite direction of the hair growth. STEP 1 Remove tub lid. Place tub inside heater (without the heating cup). Remove the wax tub lid and seal. Retain the plastic lid for re-sealing the wax after use. • During the 24-hour period following your treatment, you should avoid hot baths, tanning beds, saunas or other heat treatments. As a general guide 1 tablet will be enough for 2 underarm treatments. Stir occasionally. 60 minutes • Peeling off slowly will be painful and unsuccessful. 3 0 • Never re-apply wax to treated area. Use tweezers to remove any remaining hairs. STEP 3 4 4 Allow wax to cool on skin until it is hard, but still pliable. STEP 4 Using a spatula, apply a very thin coat of wax in the same direction as hair growth. Initially you should cover an area slightly smaller than the paper strip to make removal easier. As you become more proficient you can work on larger areas at one time. • Hard Wax - If it breaks or is brittle, then the application was too thin, it was allowed to set too long or the room temperature is too cool. 5 • Soft Wax - You can re-use the paper strip until it has become fully loaded with wax when it should be discarded. • Soft Wax - If you fold a small piece of the end of the paper strip over before use, this gives you a section to grip as you pull the strip away from your skin. STEP 4 Using a spatula, apply a thick and even coat of wax in the same direction of hair growth. Apply in small, even strips no wider than 1 inch. Switch to the lowest setting (I). Stir thoroughly. Test on a small area of skin to check temperature. Using a spatula, apply a very thin coat of wax in the same direction as hair growth. • Hard Wax - The application should be thicker than with a soft wax and should be even all the way around the edges, extending beyond the hair growth area. • Hard Wax - Beginners should apply only one strip at a time. After you have mastered the technique, apply as many strips of wax as you are comfortable with at one time, allowing the wax to set. Switch to level (I) setting. Leave for 20 minutes. Stir thoroughly until the wax is the same consistency as syrup. Test on a small area of skin to check temperature. STEP 3 3 20 minutes • Trim hair before waxing with an electric trimmer or scissors to about 5mm long. The hairs should be no less than 5mm in length to allow the wax to grip firmly. • Hard Wax - The surface dulls as it sets. Use this as a guide to determine when the wax is ready to remove. STEP 3 3 0 • As a general guide hard wax is more suitable for more sensitive areas such as the bikini line and facial hair. Soft wax is more appropriate for waxing larger areas such as arms and legs and the back. 3 STEP 5 6 Firmly smooth down paper strip over area of wax. Holding skin taut, pull off with one quick motion in the opposite direction of hair growth. Do NOT pull away from the skin. 5 3 6 Initially you should cover an area slightly smaller than the paper strip to make removal easier. As you become more proficient you can work on larger areas at one time. 3 STEP 5 5 Firmly smooth down paper strip over area of wax. Holding skin taut, pull off with one quick motion in the opposite direction of hair growth. Do NOT pull away from the skin. Apply firm pressure to treated area with the palm of your hand or a cold compress to soothe the area. Apply firm pressure to treated area with the palm of your hand or a cold compress to soothe the area. DO NOT re-apply wax to treated area within 24 hours. DO NOT re-apply wax to treated area within 24 hours. STEP 4 4 6 Holding skin taut, pull wax off with one quick motion in the opposite direction of hair growth. Do NOT pull away from the skin. STEP 5 Immediately apply firm pressure to the area with the palm of your hand or a cold compress to soothe the area. Move onto next patch and repeat steps 3 - 5 until area is completely hair free. DO NOT re-apply wax to treated area within 24 hours.