1
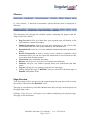
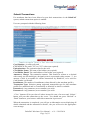
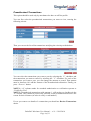
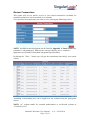
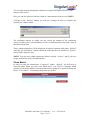
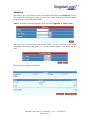
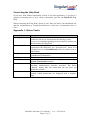
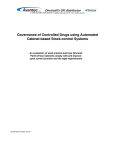
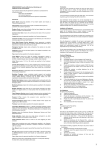
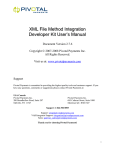
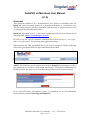
DeltaPAY v2 Merchant User Manual (v1.9) Overview This document intends to be a comprehensive user guide for merchants who use DeltaPAY card processing system as a payment mechanism in e-commerce sites. This document assumes you have familiarity with the usage of a web browser as well as with payment processing procedures. DeltaPAY Merchant tools is a web based application and can be accessed on the following URL: https://www.deltapay.gr/user/ In order to use the system, DeltaPAY administrators will assign you a “user login” and a “user password” for accessing your pages and settings. When entering the URL mentioned above you will be prompted with the following form where you should fill in the login and password provided. NOTE: The first time you ever login to the system, DeltaPAY will prompt you for a new password of your choice. This might also happen, if DeltaPAY administrator or DeltaPAY bank user forces your account to change its password on the next login. If ever you need more information or there is something you do not understand, please read the section Contacting the Help Desk. DeltaPAY Merchant User Manual – v1.9 – 23/03/2010 Page 1 of 11 Choices If “Allow Submit” is checked on merchant’s options then the menu is displayed as followed: Available choices are listed on the top of the window displayed. This document goes through all available options explaining the purpose and the usage of each one of them. Page Preview will let you check how your payment page will display to the end customers (normal merchants). Submit Transactions will let you post new transactions to the system (only for merchants that have this option enabled by the administrator) Preauthorized is used to review the authorized transactions and send them for billing. Review Transactions is used to search, review, refund or eventually cancel transactions. Here you can also export the transactions in excel format in order to use them with external systems. Close Batch is the settlement procedure. Batches will let you see an overview of already closed batches. Statistics will give you further reporting about your transactions and their status. Log out will log you out, getting you back to the login page. Finally clicking the logo of DeltaPAY will get you back to the home page of DeltaPAY Merchant Tools. Page Preview Your first option will let you preview the payment page that your users will see when they will be redirected to the DeltaPAY server. This page is customized by the bank administrators and your logo can be displayed to the upper right corner. Clicking “Page Preview” will open a new window displaying your payment page. This page is non-functional. DeltaPAY Merchant User Manual – v1.9 – 23/03/2010 Page 2 of 11 Submit Transactions For merchants that have been allowed to post their transactions via the DeltaPAY system, submit transactions option is enabled. Users are prompted with the following form: Card Number: A valid credit card CVV2/CVC2: The card CVV2 or CVC2 value (not required). Expiration date: The expiration date for the card. Card Holder Name: The name of the holder (not required). Card Holder Email: The email address of the holder (not required). Amount to Charge: The transaction amount. This should be written as a decimal with exactly two decimal digits. (decimals point is represented with a comma “,”). An amount of 0,00 is acceptable for offline transactions by DeltaPAY, to be used for Card Number verification. Installments: The number of installments (when allowed by the merchant profile) Transaction Type: Selection among supported transactions type for this merchant profile (Pre-authorized and /or Transaction) or default if no choices available. Parameter 1: Any parameter (text or number) you wish. Parameter 2: Any parameter (text or number) you wish. “Clear” button will let you clear all values inserted in case of an error and “Submit” button will post this transaction to the server. You should not press “Refresh” or “Back” button on your browser while this transaction is processed. When the transaction is completed, you will get an information screen displaying all details submitted and the transaction reference, else you will receive the appropriate error message. DeltaPAY Merchant User Manual – v1.9 – 23/03/2010 Page 3 of 11 Preauthorized Transactions This option should be used only by merchants who have an off line profile. You can first select the preauthorized transactions you want to view, entering the following criteria: Then you can see the list of the transactions satisfying the criteria provided above. You can select the transactions you want to post by selecting the ”P” checkbox and the transactions you want to cancel by selecting the ”C” checkbox. For each of the transactions you want to post, you can change the amount to posted. That amount must be between 0,01 and the amount of the Preauthorized transaction. Finally you press “Process” button. NOTE 1: “A” column stands for extended authorization or verification systems as “Verified by Visa” NOTE 2: Preauthorised transactions with amount 0 , will not have a checkbox in the “P” column. They cannot be posted, only canceled, as the preauthorization itself is the reason for their existence (in order to verify a card number) If ever you want to see details of a transaction you should use Review Transactions choice. DeltaPAY Merchant User Manual – v1.9 – 23/03/2010 Page 4 of 11 Review Transactions This option will let you search, review or even cancel transactions (available for transactions that have not been settled yet in a batch). You can select the transactions you want to view, entering the following criteria: NOTE: Available status descriptions can be found in Appendix 1: Status Codes The parameter 1 and parameter 2 fields are the ones provided by your e-commerce application (see DeltaPAY Merchant Integration Specifications) By hitting the ”Show” button you will get the transactions that satisfy your search criteria. Ascending or descending sort can be applied on any column using the appropriate arrows. NOTE: “A” column stands for extended authorization or verification systems as “Verified by Visa” DeltaPAY Merchant User Manual – v1.9 – 23/03/2010 Page 5 of 11 You can select the transactions you want to cancel by selecting the”Cancel” checkbox. This option is available only to transactions with status “Completed”. Then you should click on the following button: “Export to excel” button will prompt you in order to download the results of your query to an excel file (hit the “Open” button when prompted). The export includes columns which are not visible in the Transactions list of the Review Transactions Page. The extra columns include: “Email”: the card holder email “Refund”: the refund amount for this transaction, if a refund exists “Difference”: the difference “Transaction Amount” – “Refund Amount” “Transaction Closing Date”: the date of the clearing of the transaction “Transaction Batch Id”: the id of the batch the transaction is included in “Refund Closing Date”: the date of the clearing of the refund of the transaction “Refund Batch Id”: the id of the batch the refund of the transaction is included in “Refund Trans Number”: the DeltaPay Id of the refund of the transaction “Terminal Id”: the Id of the Terminal the transaction has been completed through NOTE 1: This export will give you the total of records found for your query even if they are displayed in multiple pages. A “zoom” function is also provided when you click on a transaction. DeltaPAY Merchant User Manual – v1.9 – 23/03/2010 Page 6 of 11 You can also navigate through the transactions using the navigation arrows on the bottom of the screen. Here you can also proceed with the refund of a transaction as follows (see NOTE): Clicking on the “Refund” button you will get a prompt in order to complete the amount you wish to refund. The maximum amount to refund can not exceed the amount of the transaction selected. Further more, the installments will be set automatically to the same value as the initial transaction. These refund transactions will be displayed as negative amounts with status “Refund” until they get included in a batch settlement. After this they are marked as “Settled” always with a negative sign. NOTE: You can only refund transactions that are already “Settled” and if you have proper permissions set by the administrator. Close Batch In order to settle the transactions “Completed” and/or “Refund” you will have to close the batch. When you enter close batch choice, you will see a message which informs you about the number of transactions that are going to be settled. Pressing the button “Close Batch” all pending transactions are settled. DeltaPAY Merchant User Manual – v1.9 – 23/03/2010 Page 7 of 11 Batches This choice gives you a review of batches in DeltaPAY system. You can select a specific Batch ID, select from the Terminal IDs available and finally any range of dates desired. Leaving the fields blank will give you all the batches available. Ascending or descending sort can be applied on any column using the appropriate arrows. “Export to excel” button will prompt you in order to download the results of your query to an excel file (hit the “Open” button when prompted). NOTE: This export will give you the total of records found for your query even if they are displayed in multiple pages. Clicking on the Batch ID will zoom to the list of the transactions included in this batch settlement. DeltaPAY Merchant User Manual – v1.9 – 23/03/2010 Page 8 of 11 Ascending or descending sort can be applied on any column using the appropriate arrows. “Export to excel” button will prompt you in order to download the results of your query to an excel file (hit the “Open” button when prompted). NOTE: This export will give you the total of records found for your query even if they are displayed in multiple pages. Clicking on the “…” in the “Summary” column of the Batch List will show a summary of this batch settlement in a pop-up window. “Print” button will prompt you to print the summary through a printer you can access “Export to excel” button will prompt you in order to download the results of your query to an excel file (hit the “Open” button when prompted). DeltaPAY Merchant User Manual – v1.9 – 23/03/2010 Page 9 of 11 Statistics This choice gives you statistics about the transactions inserted in DeltaPAY system. You can select any range of dates as well as the status desired. Leaving the status blank will give you all the transactions. NOTE: Available status descriptions can be found in Appendix 1: Status Codes. Once you have selected the period and the status, you can select the order of the grouping between Date and Status (i.e. per date and per status or per status and per date). The results are displayed as follows: DeltaPAY Merchant User Manual – v1.9 – 23/03/2010 Page 10 of 11 Contacting the Help Desk If you have need further information on how to use this application, or you have a question concerning one of your clients’ transaction, you can call DeltaPAY Help Desk. When contacting the Help Desk, please be sure that you know your MerchantCode and the Authorisation or Transaction Reference if you have a transaction issue to solve. Appendix 1: Status Codes Status Code Pending Preauthorized Completed Declined Cancelled Refund Settled Description This is a temporary status for transactions that were inserted to DeltaPAY but not yet forwarded to the clearing system. If you see a transaction pending for more than one minute you should contact the Help Desk. If your merchant profile is set to off line mode, then your transactions (the valid ones), get ”Preauthorized” status. You will then have to use Preauthorized choice in order to post or cancel them. Transaction is posted either on line, or after processing with Preauthorized Transactions. This transaction was declined from the system. This transaction was cancelled using Preauthorized or Review Transactions interface. This is a refund transaction entered manually using the merchant administration interface provided. The status “Refund” means that this transaction has not been yet included in a batch. This transaction was included in a batch that is already closed. (Settled refund transactions are displayed with a negative sign). DeltaPAY Merchant User Manual – v1.9 – 23/03/2010 Page 11 of 11