Transcript
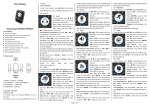
NAMES OF PARTS
WARNINGS
NOTICES BEFORE USE
Never use different charger than the one provided as it may damage the product
Do not raise the volume in high levels for long time periods, especially when
you are using earphones, as it could damage your hearing.
Keep the unit away from any strong magnetic field or electr omagnetic wave s .
User manual
Avoid the following conditions:
Too high and too low temperature.
Direct sunshine
Humid, water drop, oil, chemical liquid, insecticide
Suddently moved from cold to warm area, should wait for the player to become
as warm as the room temperature in order to avoid humidity inside the unit.
Never to put any liquid container like flower vase on top of the player.
MP 1290
SPECIFICATIONS
POWER: DC 5V
OUTPUT IMPEDANCE: SPEAKER 4 OHMS
OUT PUT POWER: 2W+2W(IMPEDANCE 4 OHMS)
USB PLAY FORMAT: MP1 MP2 MP3
USB READING BIT RATE:32kbps-320kbps.
BATTERY: d.c-3.7V(3.7V 800Ma li-lion battery one piece)
CHARGING TIME: 3-5 HOURS(Can support about 2 hours playback when full )
DIMENSION: 66(L)x74(W)x106(H)mm
WEIGHT: ABOUT 0.24KGS
ACCESSORIES
External USB/MP3 SD/MMC card slot
Audio input
Remote control
USB charge battery
USER MANUAL
WARRANTY CARD
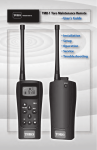
REMOTE CONTROL
USB LINE-IN LINE
AUDIO LINE-IN LINE
AC/DC ADAPTER
1PCS
1PCS
1PCS
1PCS
1 PCS
1 PCS
USB LINE-IN LINE
AUDIO LINE-IN LINE
THE SPECIFICITY IS SUBJECT TO CHANGE WITHOUT FURTHER NOTICE.
OPERATIONS
POWER
When to change battery or when to charge battery:
When the sound volume is becoming less or distortion; power light becomes faint.
Battery charging:
There are two USB cords used to charge the unit.
The method is to put the USB port into computer and the other head to the unit's
DC jack (USB cord A) or the USB jack (USB cord B). During this period,
please put the unit power switch to OFF.
***Charge the unit as soon as it is out of power in order to save the life of the
battery inside.
Thank you for choosing our company's products. In order to use this player c orrectly
and conveniently, you are advised to read this user manual carefully first.
Keep this manual in a safe place for future reference.
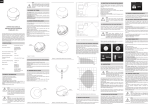
1.SPEAKER
2.LCD DISPLAY WINDOW
3.REMOTE CONTROL RECEIPTION WINDOW
4.PLAY INDICATOR LIGHT
5.SD MMC CARD SLOT
6.USB PORT
7.MODE BUTTON
8.PREVIOUS/VOL-
9.PLAY/PAUSE BUTTON
10.NEXT/ VOL+
11.POWER INDICA TOR LIGHT
12.POWER SWITCH
13.AUDIO INPUT JACK
14.AUDIO OUTPUT JACK
15.USB CHARGING JACK A (DC :5V)
16.USB CHARGING JACK A (DC :5V)
17.EXTERNAL DC INDICA TOR LIGHT
REMOTE CONTROL FUNCTION.
1.MODE button: change between USB and card
MODE
2.REP. Button:
NEXT
PLAY/PAUSE BUTTON
When playing USB or Card, press this button once, PREVIOUS
VOLUME+
VOLUMEEQ BUTTON
then the repeat function is off, indicator(4) off,
100+BUTTON
REPEAT BUTTON
press second time, then repeat the correct song, NUMBER BUTTON
indicator light flash slowly, Press the third time,
then repeat the play of the MP3 file folder(if there
is any folder), then indicator light flash fast, press the
fourth time, all the songs will repeat, the indicator light ON.
3.Number button
A.During the playback, press number button can select the song directly.
B.Press 100+ button can select songs number 100 after
For example, select number 115 song, press 1
5 and 100+
Select number 215
song, press 1
5
100+ and 100+
4.EQ Button (sound effect)
Press this button during playback, you can choose different sound effect.
5.+ - button: increase the volume or reduce the volume
6.Other buttons function are the same as the buttons on the player.
ON/OFF
Put the power switch (12) to position ON, indicator light(11) on, connect to power,
then can operate as follow:
PLAY MP3 music by USB stick or Memory Card
1.Insert USB stick or memory card in USB jack(6) or card slot(5),
then the player will play the mp3 files directly. Playing indicator light will be ON,
press PLAY/PAUSE button(9) then pause, press again then resume.
2.During the play, press PREVIOUS(8) then play the previous song,
press NEXT(10) then play the next song.
3.During the play, press
or
to increase or reduce
the sound volume.
4.When both USB stick and Memory Card are connected to the unit,
keep pressing PLAY(9) for 2 seconds to exchange between the USB or Card play.
5.Before to get the USB stick or Memory card out,
put the power switch to position OFF to stop the play first.
***Please don't put the USB or Card out when playing,
it will destroy the memory device.
Audio Line-in
This unit can be an amplifier for any audio output device (cell phone, mp3 player,
cassette player, CD player, radio receiver, etc.). The method is to use the line-in
cord to connect the audio out put device to this player, then switch on this player,
then it is ok.
Audio output function
Which connecting to the external av equipment insert one end of the audio cord into
the audio output jack (14),and insert another end into the jack of external amplifier
equipment, then can make the loudspeaker function
Operation of Clock &Alarm Clock
1. After switching on the power ,the unit is on Standby, press the MODE button
without loosing, you can turn on/off the unit.
2.Under the Standby mode, clock is working, and the Clock uses 12-hour
measurement.
3.Under the Standby mode, press the "MODE" button, you can enter into the
clock setting status, here the "HOUR" position will be flashing on the LCD
screen, you can adjust by the UP/DOWN button, then press the "MODE"
button to confirm and enter into minute setting up; here the "MINUTE"
position will be flashing, you can press UP/DOWN ("PREV/NEXT") button to
adjust the minute, then press the "MODE" button to save and exist.
4.Under the Standby mode, press the "PLAY" without loosing to enter into the
Alarm clock setting mode, here the "HOUR" position will be flashing, you can
press the "PREV/NEXT" button to adjust, then press the "PLAY"button to
confirm and enter into minute setting, here the "MINUTE" position will be
flashing, you can press "PREV/NEXT" button to set the the minute, then press
the "PLAY" button to save and exist. After setting up, the system defaults the
alarm clock to be on, and the LCD screen will show alarm clock mark. During
the setting, no operation within 10 seconds, it will cause the setting to be
cacelled automatically.
5.At time of the alarm clock, you can hear the "beep,beep" sound and alarm mark
will be flashing.
6.When the alarming is heard, you can turn off the alarm by pressing any but to
of "MODE, PREV/V-/NEXT/V+, PLAY/PAUSE". the alarming will be
continuously working in the coming next day.
7)When the alarming is working, if without any operation, it will be turn off
automatically within one hour.
8)Under the standby mode, no adjustment to the alarm clock, press "PLAY"
button, you can turn on/off the alarm clock.
Notes: Normally, the clock standby time is around 30 hours. If you need to
use the clock, please connect external power supply.
RADIO
1. press the "MODE" button to enter into the radio mode, press PLAY button
and keep for 2 seconds or above, or press the PLAY button on the remote controller,
you can start the auto -searching station, after searching the station the system will
automatically save it (it allows to save at most 30 stations). While auto searching
station, only stereo station can be saved.
Press the Previous / next button for 2 seconds or above, (or previous/next button on
remote controller) to start the manual searching station, after searching the station,
just press the EQ button on remote controller to save it. You can enjoy the programs
after searching the station, LCD screen will show the current FM frequency.
2. Press the previous/next button (or "CH-/CH+" on remote controller), you can
search the station forward or backward, you can also press the number button on
remote controller to select your desired station. If the receiving signal is not good,
you can press the play button on unit to enter into the slightly adjustment status,
then press previous/next button to slightly adjust (or press previous / next button
on remote controller to slightly adjust), and press the play button to enter into normal
station searching mode.
3. During the FM station searching,pull out the FM antenna, you can get better
reception result.
NOTICE ABOUT RECYCLING
Your product is designed and manufactured with high quality materials and components
which can be recycled and reused.
This symbol means that electrical and electronic equipment, at their end-of-life,
should be disposed of separately from your household waste. Please dispose of this equipment
at your local community waste collection/ recycling centre.
In the European Union there are separate collection systems for used electrical and electronic
products. Please help us to conserve the environment we live in!
Declaration of Conformity
This product complies with the requirements of the following directives:
Electromagnetic Compatibility (EMC) Directive: 2004/108/EC
Low Voltage Directive (LVD): 2006/96/EC
Eco Design requirements for standby and off mode power consumption directive:
2005/32/EC
CE Marking Directive: 93/68/EEC
the above directives declare that the Portable Alarm clock Radio/Media Player MP1290 is
in compliance with following standards:
EN55013:2001+A1:2003+A2:2006
EN61000-3-2:2006
EN61000-3-3:1995+A1:2001+A2:2005
EN55020:2007
EN60065:2002+A1:2006+A11:2008
EXCLUSIVE IMPORTER IN GREECE:
Amiridis – Savvidis S.A.
• 33, Vas. Olgas avenue
P.C. 54641, Thessaloniki, Greece
Tel: +30 2310 850107, +30 2310 850108, Fax: +30 2310 867835
• 45, Posidonos street
P.C. 18344, Moschato, Athens, Greece
Tel: +30 210 9402064, Fax: +30 210 9402137
• www.amiridis-savvidis.gr