1
User's Manual
Copyright © 2002
All rights reserved.
Trademarks
Macintosh® and Apple® are registered trademarks of Apple Computer Inc.
Windows® is a trademark of Microsoft corporation. Adobe ®, Acrobat®, and
Photoshop are registered trademark of Adobe Systems Incorporated. Ulead®
PhotoExpress® are registered trademarks of Ulead Systems Inc. All other
products or name brands are trademarks of their respective holders.
Important
Pictures you may acquire from any of the bundled software and/or Pictures, or
documents you scan may be protected under copyright law. The
unauthorized use of such materials could be a violation of the rights of the
copyright holder.
Table of Contents
Package Contents .......................................................................................... 1
Features ........................................................................................................ 2
Camera Components ..................................................................................... 3
Getting Ready ................................................................................................ 4
A. Loading the Battery .............................................................................. 4
B. Basic Picture Taking Operation ............................................................... 5
Other Modes of Operation .......................................................................... 6-9
A. 80 Shots Mode ..................................................................................... 6
B. 20 Shots Mode ..................................................................................... 7
C. Continuous Shooting Mode ................................................................... 8
D. Self-Timer Mode .................................................................................. 9
Erasing All Images from Camera .................................................................. 10
Connecting the Camera to your PC ............................................................ 11
Utility Software Installation .................................................................... 12-13
A. Installing Camera Driver ..................................................................... 12
B. Installing Other Bundled Software ........................................................ 13
Using the l'espion as a Digital Camera .......................................................... 14
l'espion Digital Camera interface ................................................................ 14
Zoom ................................................................................................ 14
Acquire ............................................................................................. 14
Acquire All ......................................................................................... 14
Download .......................................................................................... 14
AVI Creator ....................................................................................... 14
Exit .................................................................................................. 14
Downloading Images to your PC .................................................................. 15
Using Ulead PhotoExpress ..................................................................... 15
Using the l'espion as a PC/Web Cam .......................................................... 17
A. Select Camera Source ......................................................................... 16
B. Send a Video Mail ............................................................................ 17
Frequently asked questions and technical support.............................................. 18
Package
Contents
AAA Battery
(Alkaline recommended)
l'espion
digital camera
Key chain
Special USB cable
CD-ROM
(Contains digital camera software and user's manuals)
l'espion Quick Reference
and other inserts
1
Features
• Compact and lightweight
Size: 55 x 38 x 15mm Weight: approx. 40g (without battery)
• Easy to operate
Fixed focus with only two-button (function mode and shutter) operation
• Three choices of picture taking modes
Continuous shooting mode (20 or 80 shots maximum)
Self-timer mode (10 seconds delay)
CIF (20 shots) QCIF (80 shots) image recording mode (352 x 288 &
176 x 144 pixels respectively)
• AVI Image Conversion
Easily transfer “Still images” into “Motion pictures” using the AVI
(Audio Video Interlead) format application.
• Instant image frames erasure
All images can be cleared instantly to start a new picture taking session.
• Low power consumption with auto energy-save mode
Camera automatically enters into “Sleep” (energy-saving) mode when it
remains inactive for 30 seconds.
• Supports USB interface
With USB, download of images to your PC is accomplished at higher
speed.
• Software package bundle
Ulead Photo Express (Digital Still camera software)
EyeStar Mail (PC/Web camera software)
Adobe Acrobat Reader (Software for reading the user's manual)
2
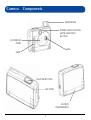
Camera
Components
VIEWFINDER
POWER AND FUNCTION
MODE SELECTION
BUTTON
LCD DISPLAY
PANEL
LENS
GRIP
SHUTTER BUTTON
USB PORT
BATTERY
COMPARTMENT
3
Getting Ready
A. Loading the Battery
(1 AAA size battery)
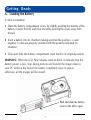
1 Open the battery compartment cover, by slightly pushing the bottom of the
battery coverto the left, and then smoothly pushing the cover away from
the rail.
2 Insert a battery into its chamber making sure that the positive (+) and
negative (-) ends are properly oriented with the polarity indicated on
chamber.
3 Close and slide the battery compartment cover back to its original position.
WARNING: When the LCD Panel display starts to blink, it indicates that the
battery power is low. Stop taking pictures and transfer the images data to
your PC within a day before the battery completely loses its power,
otherwise, all the images will be erased.
Push and slide the battery
cover to the left to open
4
B . Basic Picture Taking Operation
NOTE: The camera is designed without a power switch. It uses energy-saving or
“Sleep” mode to control its power. If the camera is off, press the Function Mode button to
turn the camera back on.
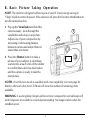
1 Pop up the Viewfinder and hold the
camera steady. Look through the
viewfinder and set up your picture.
Adjust size of your composition by
increasing or decreasing distance
between camera and subject but not
nearer than one meter.
1
2
2 Press the Shutter button to take a
picture of your subject. A short beep
sound emits at each click of the shutter
to confirm that a shot has been taken
and the camera is ready to take the
next picture.
NOTES: 20 or 80 shots mode is available with erase capability (see next page for
details). After each shot, the LCD Panel will show the number of remaining shots
available.
WARNING: A warning beep (longer and lower tone compared to normal beep) will
emit if exposure is too dark for a normal picture taking. No image is taken when this
condition occurs.
5
Other Modes of Operation
A . 80 Shots Mode
This mode of operation allows you to take 80 shots of lower-resolution images
in QCIF (176 x 144) format. To set your camera into 80 Shots mode
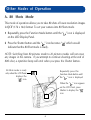
1 Repeatedly press the Function Mode button until the “
on the LCD Display Panel.
2 Press the Shutter button and the “ ” icon becomes “
indicate that the 80 Shot mode is ready.
” icon is displayed
” which would
NOTE: Switching from 80 pictures mode to 20 pictures modes will not erase
any images in the camera. If you attempt to continue shooting at the end of
80th shot, a repetitive beep will emit when you press the Shutter button.
80 Shots mode is ready
only when the LCD Panel
displays the
“ ” icon
Repeatedly press this
Function Mode button until
the “ ” icon is displayed
When the “ ” icon appears
on the LCD Panel, press
Shutter to display the “ ”
icon
6
B . 20 Shots Mode
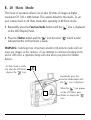
This mode of operation allows you to take 20 shots of images at higher
resolution CIF (352 x 288) format. The camera default to this mode. To set
your camera back to 20 Shots mode after operating in 80 Shots mode1 Repeatedly press the Function Mode button until the “
on the LCD Display Panel.
2 Press the Shutter button and the “ ” icon becomes “
indicate that the 20 Shot mode is ready.
” icon is displayed
” which would
WARNING: Switching from 20 pictures mode to 80 pictures mode will not
erase any images in the camera. If you attempt to continue shooting at the
end of 20th shot, a repetitive beep will emit when you press the Shutter
button.
20 Shots mode is ready
only when the LCD Panel
displays the “ ” icon
Repeatedly press this
Function Mode button until
the “ ” icon is displayed
When the “ ” icon appears
on the LCD Panel, press
Shutter to display the “ ”
icon
7
C . Continuous
Shooting
Mode
This mode of operation allows you to
take multiple frames of images when
holding down the Shutter button while
aiming at your subject. A maximum of
20 or 80 shots can be taken depending on
which shooting mode you are in.
Continuous shooting under 20 Shots
mode takes about 2 seconds to fully
consume the 20 frames, while it takes
about 8 seconds under 80 Shots
mode. If you release the Shutter
midway, only part of the available
frames will be loaded with images.
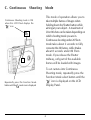
Continuous Shooting mode is ON
when this LCD Panel displays the
“ ” icon
To set camera into Continuous
Shooting mode, repeatedly press the
Function Mode select button until the
“ ” icon is displayed on the LCD
Display Panel.
Repeatedly press this Function Mode
button until the
mode icon is displayed
8
D . Self-Timer
Mode
The Self-Timer mode of operation allows a 10 seconds shutter release delay after
pressing the Shutter button.
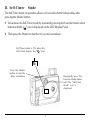
1 Set camera into Self-Timer mode by repeatedly pressing the Function Mode select
button until the “ ” icon is displayed on the LCD Display Panel.
2 Then press the Shutter to start the 10 second countdown.
Self-Timer mode is ON when this
LCD Panel displays the “ ” icon
Press the Shutter
button to start the
delay countdown
Repeatedly press this
Function Mode button
until the “Self-Timer
mode” icon is
displayed
9
Erasing All Images from Camera
Whenever you wish to discard the images you have already taken, you can erase
them from the camera. Take note that this erase feature functions only as “AllFrame Erase.” No partial erasure is allowed.
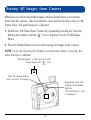
1 Enable the “All-Frame-Erase” feature by repeatedly pressing the Function
Mode select button until the “ ” icon is displayed on the LCD Display
Panel.
2 Press the Shutter button twice to start erasing all images in the camera.
NOTE: If you do not press the Shutter a second time within 5 seconds, the
erase function is aborted.
“All-Frame-Erase” is ON when this LCD
Panel displays the “ ” icon
Press the Shutter button
twice to erase all images
Repeatedly press this
Function Mode button
until the
“All-Frame-Erase” icon
is displayed
10
Connecting the Camera to PC
NOTE: It is assumed that you have already installed the bundled software into your
computer. If not, install software as instructed in the section on “Utility Software
Installation” of this manual.
To transfer (download) the images data
from the camera to your PC, connect the
camera to your PC with the supplied
USB cable.
1 Insert the smaller terminal of the USB
cable into the camera's USB port.
2 Plug the other end of the USB
cable into the USB port of your
computer.
3 Perform downloads to your
computer by referring to the
section on “Downloading images”
later in this manual.
4 Operate the camera as web
camera by referring to the EyeStar
Mail section on pages 16-17 of this
manual.
11
Utility Software Installation
The Utility CD that accompanies your camera contains the l'espion Digital Camera
Driver bundled with valuable image-editing software.
A . Installing Digital Camera Driver
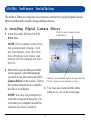
Click to start camera driver
installation
1 Insert the utility CD into the CDROM drive.
NOTE: If the installer screen does
not automatically display, click
the Start button, then click Run
from Windows Start menu, and
execute the file cdsetup.exe from
the CD.
2 When the l'espion Software Installer
screen appears, select the language
you wish to use, then select and click
Click the User Manual button to open the
Camera Driver on the screen. Follow for the l'espion User Manual to view
the on-line instructions to complete
3 You may also install all the other
the driver installation.
software as set on the next page.
NOTE: You may be prompted to
restart the computer at this point. Do
not restart your computer until all the
software has been installed.
12
file
B . Installing Other Bundled Software
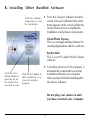
Click the software
components to start
the installation
1 From the l'espion Software Installer
screen, click each software in the order
that it appears on the screen, follow the
on-line instructions to complete the
installation of all software components:
Ulead Photo Express
This is your Image-editing software for
creating digital photo albums, cards etc.
EyeStar Mail
This is your PC and/or Web Camera
software.
Click the User
Manual button to
open the file for
the manual that
you wish to view
Click the Exit button to
abort installation or to
close the Installer
program
2 A desktop shortcut of the program is
automatically created after successful
installation. Restart your computer
when you have finished installing all of
the above software.
Do not plug your camera in until
you have restarted your computer.
13
Using the l'espion as a Digital Camera
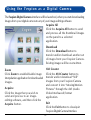
The l'espion Digital Camera interface will be launched, when you start downloading
images from your digital camera to any of your image-editing software.
Acquire All
Click the Acquire All button to send
and process all the thumbnail images
on the panel to a selected
application.
Download
Click the Download button to
transfer and/or download another set
of images from your l'espion Camera.
Existing images will be overwritten.
Zoom
Click Zoom to enable/disable image
interpolation application for downloaded
images.
Acquire
Click the image that you wish to
send and process to an imageediting software, and then click the
Acquire button.
AVI Creator
Click the AVI Creator button to
transfer and/or download “Still”
images from your l'espion Camera
and convert it into “Moving/Motion
Pictures” through the AVI (Audio
Video Interleaved) format
application.
Exit
Click the Exit button to close/quit
l'espion Digital Camera Interface.
14
Installation
Windows
DownloadingUnder
Images
to your98PC
Using Ulead Photo Express
1 Launch Photo Express by doing the
following in succession: Start,
Programs - Photo Express.
2 Click the Photo mode tab from the
left side bar of the screen. The Photo
mode window will appear.
3 From the Toolbar, click the get
button and then the Camera icon -the Select Data Source dialog box
will appear, choose l’espion digital
camera from the list, and then click
the Acquire button.
4 The l'espion Digital Camera interface
appears. Please refer to the previous
page for a description of this.
For more details on how to enhance/ 5 Click Exit when you are ready to
return to Photo Express to further
add special effects to your images, or
enhance the selected image(s).
create digital albums; greeting cards
etc., please refer to the Help menu of
Photo Express.
15
Using the l'espion as a PC/Web Cam
NOTE: The EyeStar Mail is required only when the camera is used as a PC camera.
The EyeStar Mail is a complete consumer video package for recording audio
and video clips that you can send to your family and friends. This package
includes all the software you will need for capturing, creating personalized
cards, and sending messages on-line.
A . Select
Camera
Source
1 Launch EyeStar Mail by:
a) Double-clicking the EyeStar Mail icon
on your desktop; or
b) From Windows Taskbar,
double-click the following in succession:
Start, Programs, EyeStar Mail, EyeStar
Mail.
2 When the EyeStar Mail panel appears,
click the video options button, and then
select l'espion Digital Camera from the
camera source list.
3 To send a video mail, follow the steps as
described on the next page.
CAUTION: Be sure to download images to any image-editing software (Ulead
Photo Express, Ulead PhotoExplorer, Trellix Web etc.) from the camera before using
it as a PC/Web cam under EyeStar Mail. Otherwise, you will lose all the images you
have taken.
16
B . Send a Video Mail
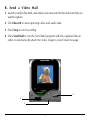
1 Launch your EyeStar Mail, and adjust your camera to the desired view that you
want to capture.
2 Click Record to start capturing video and audio data.
3 Click Stop to end recording.
4 Click Send Mail to run the Send Mail program with the captured data in
order to automatically attach the video image to your E-mail message.
4
2
3
17
Frequently asked questions
Q Why does the LCD display flash on my camera.
A The battery on your camera needs replacing.
Q I am trying to install the Eyestar Mail software but the
serial number is incorrect.
A Please recheck the number you have entered, there
should not be any spaces between the characters as
follows EM001-123456
Q I am using the camera as a webcam and the display has A The display will change while using the camera as a
gone strange and I have lost my images.
Webcam this is quite normal. The camera’s memory
is used as a buffer, therefore any images will be
cleared for space.
Q Why are my images lost when I change the battery.
A The images are stored on the internal memory of the
camera, this memory is powered by the battery.
For on-line technical support please visit our website: www.digitaldreamco.com
or email: [email protected]
18