1
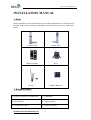
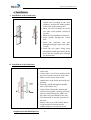
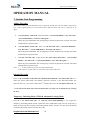
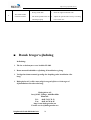
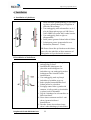
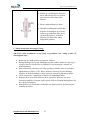
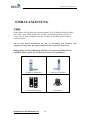
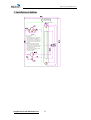
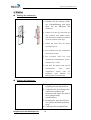
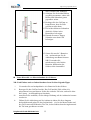
http://www.polymath.com.cn Table of Contents……………………………………………………..1-3 ■ English Manual ............................................................................. 4 INSTALLATION MANUAL ............................................................ 5 1. Parts.....................................................................................................................5 2. Required Tools....................................................................................................5 3. Installation Template ..........................................................................................6 4. Pre-installations...................................................................................................6 5. Sizing Spindle (to the correct length) .................................................................7 6. Installations .........................................................................................................8 OPERATION MANUAL ................................................................ 10 7. Outside Unit Programming ...............................................................................10 Adding PIN codes ..........................................................................................10 Deleting PIN codes ........................................................................................10 Temporary Unlocking Mode (TUM) & Automatic Locking Mode ..............10 Anti Malicious Operation Setup ....................................................................11 8. Unlocking from the Outside Unit .....................................................................11 9. Inside Unit Programming..................................................................................11 Adding the PIN code......................................................................................12 Resetting the lock...........................................................................................12 Arming the alarm system from the inside unit...............................................12 Disarming the alarm system from the Inside unit..........................................12 Going outside without arming the alarm system when the inside handle is in UNLOCK position .........................................................................................12 Going outside and arming the alarm system when the inside handle is in Unlock position..............................................................................................12 Going outside when the inside handle is in lock position and the alarm system is disarmed .........................................................................................13 Going outside when the inside handle is in lock position and the alarm system is armed..............................................................................................13 10. Trouble shooting .............................................................................................15 ■ Dansk brugervejledning ............................................................ 16 INSTALLATIONS VEJLEDNING ................................................. 17 1. Dele ...................................................................................................................17 2. Nødvendigt værktøj ..........................................................................................18 3. Installationsskabelon......................................................................................18 4. Forberedelser.....................................................................................................20 PolySecu® LP-908 PIN Code lock 1 http://www.polymath.com.cn 5. Tilpasning af låsen til dørtykkelse. ...................................................................21 6. Installation.........................................................................................................22 BRUGEN AF KODELÅSEN.......................................................... 24 7. Opsætning af ydersiden på kodelåsen...............................................................24 Indlægning af koder .......................................................................................24 Midlertidig konstantåben & Automatisk låsning af låsen..............................24 Anti hærværks/indbruds funktion ..................................................................25 8. Åbning af låsen fra ydersiden. ..........................................................................25 9. Åbning af låsen med nøgle ...............................................................................25 10. Opsætning af låsen på indersiden. ..................................................................26 ÆNDRING af PInkoden. ...............................................................................26 Nulstilling af låsen .........................................................................................26 LP-908 sammen med Birkegården A/S alarmsystem (Xtra tilbehør)............26 Tilkoble alarmsystemet fra indersiden...........................................................26 Frakoble alarmsystemet fra indersiden ..........................................................27 Udgang uden at tilkoble alarmsystemet med inderhåndtaget i åben position27 Udgang og tilobling af alarmsystemet ...........................................................27 Udgang med inderhåndtaget i låst position og alarmsystemet frakoblet .......27 Frakobling af inderhåndtaget uden udgang og uden tilkobling af alarmsystemet ................................................................................................27 11. Problemløsning ...............................................................................................28 ■ Gebrauchsanweisung ................................................................ 29 EINBAUANLEITUNG................................................................... 30 1. Teile ..................................................................................................................30 2. Notwendiges Werkzeug ....................................................................................31 3. Installationsschablone .......................................................................................32 4. Vorbereitungen .................................................................................................33 5. Anpassung von LP-903 nach der Türstärke......................................................33 6. Einbau ...............................................................................................................34 GEBRAUCHSANWEISUNG DES LP 908.................................... 36 7. Programmieren der äußeren Schlossfunktionen ...............................................36 Eingeben von Codes ......................................................................................36 Löschen Eines PIN codes...............................................................................36 Zeitweiliges Offenstehen bzw. automatisches abschliessen des schlosses....37 ANTI - MIssbrauch - funktion.......................................................................37 8. Öffnen des Schlosses von außen.......................................................................37 9. Programmieren der inneren Schlossfunktionen. ...............................................38 Änderung des Pin-codes ................................................................................38 Null-stellen aller funktionen und codes auf werkeinstellung ........................38 PolySecu® LP-908 PIN Code lock 2 http://www.polymath.com.cn LP-908 zusammen mit Birkegården A/S alarmsystem (extra zubehör) ........38 Einschalten des alarmsystems von der innenseite .........................................38 Abschalten des alarmsystems von der innenseite ..........................................39 Ausgang ohne einschalten der alarmanlage mit tür-offen von innen ............39 Ausgang mit einschalten der alarmanlage .....................................................39 Ausgang mit verschlossenem innengriff und ohne alarmanlage ...................39 Von innen abschliessen ohne ausgang und ohne alarmanlage.......................40 10. Problemlösung/Service ...................................................................................40 PolySecu® LP-908 PIN Code lock 3 http://www.polymath.com.cn ■ English Manual PREFACE ¾ Thank you for using PolySecu® LP-908 PIN code lock. ¾ Please read this Manual carefully before installation & use. This manual covers installation procedures and operation steps. ¾ Manufacture, or their representative, will not be responsible for any damages caused by incorrect installation or mishandling of the lock. Any such damages will void manufacture’s warranty. PolySecu® LP-908 PIN Code lock 4 http://www.polymath.com.cn INSTALLATION MANUAL 1. Parts Please familiarize yourself with all the parts in the packaging box of the Polysecu® LP-908. If any part is missing or damaged, contact our service center or your local dealer. Outdoor Unit Indoor Unit Rubber Gaskets Keys Screws Alkaline Batteries 2. Required Tools ① Electric or battery operated Drill ② A Hammer ③ One Drill bit ④ A pair of pliers ⑤ A Carpenter Chisel ⑥ A pair of scissors PolySecu® LP-908 PIN Code lock 5 http://www.polymath.com.cn ⑦ Philips & flat head screw drivers 3. Installation Template Fold along dotted line and fit on door edge B C A POLYMat h Installation Template Pre-installations A. Fold and apply the template to the edge of the door bevel. Mark the holes (four holes for the three point mortise, six holes for the other one) on the door face as indicated on the template. B.Mark the central line of the door edge, and then align the Line B with this central line, and make sure the entire Line C should stay at the same horizontal level. C. Bore the holes required and install the lock according to the Installation Guide. 4. Pre-installations Apply the installation template on the door, mark the holes on the door surface and bore the holes needed according to the instructions on the template. PolySecu® LP-908 PIN Code lock 6 http://www.polymath.com.cn 5. Sizing Spindle (to the correct length) Polysecu® LP903 is designed to fit door thickness of 40cm to 90cm. TRIM THE SPINDLE PER DOOR THICKNESS. Trim the spindle accordingly, with a pair of pliers, hacksaw or metal cutters. Notes: 1) If the door thickness falls between two notches, then mark the appropriate spot on the tailpiece and cut the tailpiece to that length. 2) Please be sure to use the referenced diagram while cutting your spindle. The motor could be dislodged if the spindle is not cut properly and is too long, due to excessive pressure. Warranty will be voided if this occurs. 3) If the door thickness is even bigger than the full length of the spindle, please contact us or the local dealer for extra long screws and spindles. PolySecu® LP-908 PIN Code lock 7 http://www.polymath.com.cn 6. Installations A. Installation of the outside unit. 1. Select the right rubber gasket for the outside unit according to the door thickness, and put the rubber gasket to the back of the outdoor unit. 2. Make sure the UP marks are on the two sides of the spindle, instead of top side. 3. Make sure the deadbolt is retracted. 4. Insert spindle through the 21mm hole. 5. Insert the connector and wire through the bigger upper hole (Dia: 17mm). 6. Insert the two upper fixing posts through the small upper holes on the door and the bottom post through the bottom hole. B. Installation of the inside unit. 1. Put the rubber gasket to the back of the inside unit 2. Connect the 2 sets of wires and insert all the wires into the wire hole on the door. 3. Make sure the arrow mark on the spindle tube of the inside unit on the top position. 4. Insert the spindle through the spindle tube of the indoor unit. 5. Gently finish joining the outdoor and indoor units together, ensuring all fixing posts are aligned properly. Make sure the cables are not jammed by the door. 6. Turn the handle to test the operation of the latch. 7. Remove the cover of the battery house of the inside unit. Fasten the two middle-length screws into the screw PolySecu® LP-908 PIN Code lock 8 http://www.polymath.com.cn holes inside the battery house and through the two upper fixing posts. 8. Fasten the longest screw into the screw hole below the inside handle and through the bottom fixing post. 9. Insert 3 high-quality AA batteries this will enable you to program and test the lock 10. Put the battery cover on and fasten the screw. C. Final inspection/adjustment prior to setup and use. Note: After installation and prior to using the unit, make sure you read and follow the steps below: ① Insert 3 new high-quality AA batteries in the battery housing. ② Turn the handles down and up. They should turn freely. If and when the inside and outside locks are attached securely but the handles don’t turn freely, see the trouble shooting table below for possible solution. If the handles turn freely, continue with the next step. ③ Make sure you selected the appropriate rubber gasket for the outside unit according to the right door thickness. ④ Close the door and fully lift up the sliding cover of the outside unit and enter the factory-set PIN code to check if the motor moves smoothly or not. If yes, turn down the outside handle to see if it can unlock the door or not. If not, view the trouble shooting part of the manual below to find the possible solution. PolySecu® LP-908 PIN Code lock 9 http://www.polymath.com.cn OPERATION MANUAL 7. Outside Unit Programming Adding PIN codes There can be TEN sets individual PIN codes set from the outside unit. The Set number ranges from 0 to 9. The original factory-set system PIN Code is 123. The PIN code can be 1 digit up to 10 digits. A. ADD the Master 1 PIN code:Enter *0 + 123 + *(Green LED blinks) + New PIN code + *(Green LED blinks) + New PIN code again + * When the green LED blinks and one long beep is heard, the operation succeeds; if the Red LED blinks, the operation fails. B. ADD the Master 2 PIN code:Enter *1 + the 0 set PIN code + *(Green LED blinks) + New PIN code + * (Green LED blinks) + New PIN code again + * When the green LED blinks and one long beep is heard, the operation succeeds; if the Red LED blinks, the operation fails. C. ADD the User PIN code:Enter *2~9 + one of the master PIN codes + *(Green LED blinks) + New PIN code + * (Green LED blinks) + New PIN code again + * When the green LED blinks and one long beep is heard, the operation succeeds; if the Red LED blinks, the operation fails. Notes: 1.“+”is only a follow-up mark, not a functional button. 2. The 0 and 1st set PIN codes are the master PIN codes of the lock. Deleting PIN codes Enter *+ the set number of the PIN code which should be deleted + one master PIN code + #. When the Green LED blinks, the deletion operation succeeds; if the Red LED blinks, the operation fails. I.E. If we want to delete the 2nd set PIN code, enter *2 + the master PIN code + #. ▲ Note: The master PIN codes cannot be deleted this way. They can be deleted only by resetting the lock. Temporary Unlocking Mode (TUM) & Automatic Locking Mode Enter #1 + one master PIN code + # (with the Green LED blinking) + 1 to trigger the Temporary Unlocking Mode (TUM). When the Green LED blinks again and one long beep is heard, the lock gets into Temporary Unlocking Mode (TUM), and user can turn down the handle to unlock without the need to enter any PIN code. PolySecu® LP-908 PIN Code lock 10 http://www.polymath.com.cn Enter #1 + one master PIN code + # (with the Green LED blinking) + 0 to get the lock back to Automatic Locking Mode. When the Green LED blinks again and one long beep is heard, the lock gets back into Automatic Locking Mode, and user cannot unlock from outside before one correct PIN code is entered. Important Note: Temporary Unlocking Mode might possibly get your house or room into insecure situation. Unless you’re sure it’s 100% necessary and safe, otherwise it’s strongly recommended not to apply this functionality. ▲ The original factory-set mode is Automatic Locking Mode. Anti Malicious Operation Setup Enter #2 + the master PIN code + # (with the Green LED blinking) + 1 to trigger Anti Malicious Operation functionality. When the Green LED blinks again and a long beep is heard, this functionality is triggered. Enter #2 + the master PIN code + # (with the Green LED blinking) + 0 to cancel this functionality. When the Green LED blinks, this functionality ceases to work. ▲ Important Note: When this functionality is applied, any wrong PIN code access attempts on five consecutive occasions will immobilize the lock for 5 minutes. During this period, any button on the outside unit will cease to function. 8. Unlocking from the Outside Unit The power button on the outside unit is used to trigger the night-view light beneath the PIN code keypad. This night-view light will last 3 seconds with no operation following, but will not turn off until any operation on the keypad is accomplished. Fully lift up the outside sliding cover and directly enter one existing outside PIN code + # (or + *, or + the PWR button). When you hear the motor moving, turn down the handle to unlock. Meanwhile the lock will send out a wireless disarming signal to disarm the alarm system. 9. Inside Unit Programming Only one set PIN code can be added on the inside unit. The Set number of this PIN code is 1. ▲ Normally the inside handle stays in unlock position. PolySecu® LP-908 PIN Code lock 11 http://www.polymath.com.cn Adding the PIN code A. Enter ﹡+123+﹡(with the Green LED blinking)+New PIN code+﹡(with the Green LED blinking)+New PIN code again+﹡. When the Green LED blinks again and one long beep is heard, the operation succeeds. ▲ Important Notes: The PIN code on the Inside Unit is an individual code and will remain unchanged no matter how the PIN codes on the outside unit are changed. Resetting the lock Resetting the lock would possibly decrease security to your house. Please contact Birkegaarden A/S in Denmark at 0045-46789384 to get the instructions on how to perform this functionality. Arming the alarm system from the inside unit A. When there’re infra-red sensors inside the room, enter the inside PIN code + * to send out wireless arming demand to the alarm set. When the signal is sent out successfully, you’ll hear one short beep and see the Red LED blink once from the lock; when the alarm set receives the signal successfully, you’ll hear a short beep and see the red light turn on from the alarm set. B. When there’s no infra-red sensor inside the room, enter the inside PIN code +* + * to send out the wireless arming demand to the alarm system. When the signal is sent out successfully, you’ll hear two short beeps and see the red LED blink twice from the lock; when the alarm system receives the signal successfully, you’ll hear two short beeps and see the red light turn on from the alarm set. Disarming the alarm system from the Inside unit If you want to disarm the alarm, enter the inside PIN code +* (or #)from the inside unit to send out disarming demand. When you hear three short beeps and see the Green LED blink once from the lock, the alarm is disarmed successfully. Going outside without arming the alarm system when the inside handle is in UNLOCK position Enter the PWR button from the inside keypad. In 3 seconds after the PWR button is pushed, the outside handle will get into unlock position and will stay that for another 5 seconds. You have to lift up the outside handle to lock the three point mortise before the timer expires. After the timer expires, the inside handle and outside handle will get back to lock position simultaneously Going outside and arming the alarm system when the inside handle is in Unlock PolySecu® LP-908 PIN Code lock 12 http://www.polymath.com.cn position A. When there’re infra-red sensors inside the room, enter the PIN code + * to put the inside handle in Unlock position for you to go outside. In 3 seconds after the PWR button is pushed, the outside handle will get into unlock position and will stay that for another 5 seconds. You have to lift up the outside handle to lock the three point mortise before the timer expires. After the timer expires, the inside handle and outside handle will get back to lock position simultaneously. When the Red LED on the lock blinks once and one beep is heard, the wireless alarm arming demand has been sent out. When the red light turns on and one beep is heard on the alarm set, the alarm system has been armed successfully. B. When there’s no infra-red sensor inside the room, enter the PIN code + * + * to put the inside handle in Unlock position for you to go outside. In 3 seconds after the PWR button is pushed, the outside handle will get into unlock position and will stay that for another 5 seconds. You have to lift up the outside handle to lock the three point mortise before the timer expires. After the timer expires, the inside handle and outside handle will get back to lock position simultaneously. When the Red LED on the lock blinks twice and two beeps are heard, the wireless alarm arming demand has been sent out. When the red light turns on and three beeps are heard from the alarm set, the alarm system has been armed successfully. Going outside when the inside handle is in lock position and the alarm system is disarmed A. If you want to lock the three point mortise after going outside, enter the existing inside PIN code + # + the PWR button to put the inside handle in Unlock position for you to go outside. In 3 seconds after the PWR button is pushed, the outside handle will get into unlock position and will stay in that position for another 5 seconds. You have to lift up the outside handle to lock the three point mortise before the timer expires. After the timer expires, the inside handle and outside handle will get back to lock position simultaneously, and then the Red LED on the lock will blink once and one beep will be heard. B. If you don’t want to lock the three point mortise after going outside, enter the existing inside PIN code + #, and don’t need to touch any other button, just turn down the inside handle to unlock in 10 seconds. After the timer expires, the inside handle will get back to lock position, then you’ll see the red LED blink once and hear one beep from the lock. Going outside when the inside handle is in lock position and the alarm system is armed A. When there’re Infra-red sensors inside the room, and you want to lock the three point mortise after going outside, enter the existing inside PIN code + * + the PWR button to put the inside handle in Unlock position for you to go outside. In 3 seconds after the PWR button is pushed, the outside handle will get into unlock position and will stay that for PolySecu® LP-908 PIN Code lock 13 http://www.polymath.com.cn another 5 seconds. You have to lift up the outside handle to lock the three point mortise before the timer expires. After the timer expires, the inside handle and outside handle will get back to lock position simultaneously. When the Red LED on the lock blinks once and one beep is heard, the wireless alarm arming demand has been sent out. When one beep is heard and the red light turns on on the alarm set, the alarm system has been armed successfully. B. When there’re infra-red sensors inside the room, but you don’t want to lock the three point mortise after going outside, enter the existing inside PIN code + *. Don’t need to touch any other button, just turn down the inside handle to unlock in 10 seconds. After the timer expires, the inside handle will get back to lock position, and when the Red LED on the lock blinks once and one beep is heard, the wireless alarm arming demand has been sent out. When one beep is heard and the red light turns on on the alarm set, the alarm system has been armed successfully. C. When there’s no infra-red sensor inside the room, and you want to lock the three point mortise after going outside, enter the existing inside PIN code + * + * + the PWR button to put the inside handle in Unlock position for you to go outside. In 3 seconds after the PWR button is pushed, the outside handle will get into unlock position and will stay that for another 5 seconds. You have to lift up the outside handle to lock the three point mortise before the timer expires. After the timer expires, the inside handle and outside handle will get back to lock position simultaneously. When the Red LED on the lock blinks twice and two beeps are heard, the wireless alarm arming demand has been sent out. When two beeps are heard from the alarm set and its red light turns on, the alarm system has been armed successfully. D. When there’s no infra-red sensor inside the room, and you don’t want to lock the three point mortise after going outside, enter the existing inside PIN code + * + *. Don’t need to touch any other button, just turn down the inside handle to unlock in 10 seconds. After the timer expires, the inside handle will get back to lock position, and when the Red LED on the lock blinks twice and two beeps are heard, the wireless alarm arming demand has been sent out. When two beeps are heard from the alarm set and its red light turns on, the alarm system has been armed successfully. ▲ When you enter the inside PIN code + # (or *) again immediately after entering the same sequence, the inside handle will get back to lock position and the wireless alarm disarming demand will be sent out. When the power is lower than 3.3V, the lock will send out low-power alert. You’ll hear 8 beeps and see the red LED blink. PolySecu® LP-908 PIN Code lock 14 http://www.polymath.com.cn 10. Trouble shooting Trouble Possible Reasons Solutions 1. Low power 1 The lock cannot be opened properly after a preset PIN code is entered. 2. The clutch 1. Change batteries does not working 3. Electronics damaged. 3. Replace the electronics part. 4. The spindle not installed 4. Re-install the spindle exactly to the properly. 1. The 2 Handles are too tight to be turned. 2. Check and repair the clutch spindle proper mark on it. does not match the door thickness. 1. Use a new lock whose spindle matches the door thickness. 2. There’s a declination for 2. Adjust the location of the fixing holes. the fixing holes. 1. The wireless alarm module 1. Replace the wireless module in the lock not working 3 The outside or inside lock unit cannot be armed or disarmed properly. 2. The antenna not pulled out 2. Fully pull out the antenna. 3. The alarm unit is located 3. Install the alarm unit a little far away too closely to an electric interference, i.e. PC, TV set, big power motor, AC power source, etc. PolySecu® LP-908 PIN Code lock 15 from the interference. http://www.polymath.com.cn 4 The inside handle cannot be locked. 1. Wrong inside PIN 1. Enter the right inside PIN code. 2. The inside spindle tube not 2. Adjust the spindle tube exactly according installed properly to the mark on it. ■ Dansk brugervejledning Indledning: ¾ Tak for at du benytter vores kodelås LP-908. ¾ Denne manual indeholder vejledning til installation og brug. ¾ Venligst læs denne manual grundigt før du påbegynder installation eller brug. ¾ Birkegården A/S er ikke ansvarlig for nogen fejl der er forårsaget af fejlinstallation eller ukorrekt brug. Birkegården A/S Osvej 83-85, Jyllinge, 4000 Roskilde Denmark. Tel: 0045-70 23 70 32 Fax: 0045-46 78 96 85 http://www.birkegaarden.net E-mail: [email protected] PolySecu® LP-908 PIN Code lock 16 http://www.polymath.com.cn INSTALLATIONS VEJLEDNING 1. Dele Kontroller venligst at alle nedenstående dele er i kassen hvor du har købt produktet. Hvis der mangler noget kontakt da venligst Birkegården A/S service center eller den forretning hvor produktet er købt. Birkegården A/S har professionelle installatører der gerne udfører installationen for dig. Kontakt Birkegården A/S på 70 23 70 32 for nærmere aftale herom. 1 x Yder lås PolySecu® LP-908 PIN Code lock 1 x Inder lås 17 http://www.polymath.com.cn 2 x gummipakninger 5 x nøgler 3 x Alkaline batterier Skruer 2. Nødvendigt værktøj Boremaskine Hammer Stemmejern Skruetrækker Borsæt Fein Cut Tusch til opmærkning 3. Installationsskabelon PolySecu® LP-908 PIN Code lock 18 http://www.polymath.com.cn Fold along dotted line and fit on door edge B A POLYMat h Installation Template Pre-installations A. Fold and apply the template to the edge of the door bevel. Mark the holes (four holes for the three point mortise, six holes for the other one) on the door face as indicated on the template. B.Mark the central line of the door edge, and then align the Line B with this central line, and make sure the entire Line C should stay at the same horizontal level. C. Bore the holes required and install the lock according to the Installation Guide. PolySecu® LP-908 PIN Code lock 19 C http://www.polymath.com.cn 4. Forberedelser Vigtigt! Kontroller at låsen passer på døren og låsekassen inden der bores. Placer skabelonen eller pakning på døren og marker alle huller på døren. Bor de nødvendige installationshuller ifølge skabelonen/pakningen i døren. Husk at fjerne låsekassen før der bores. De flytbare gevindstykker til låsen, påsættes bagstykket af låsen før montage. Ente med 1 stk. under firkantpalen eller med 1 på hver side af palen. Benyttes der en på hver side af palen. Skal trekantstykket monteres, inden bagsiden påsættes. PolySecu® LP-908 PIN Code lock 20 http://www.polymath.com.cn 5. Tilpasning af låsen til dørtykkelse. TILPAS FIRKANTPALLEN TIL DØRTYKKELSEN. Tilpas firkantpalen til den korrekte dørtykkelse, efter målene på palen. Benyt en nedstryger eller andet værktøj der kan klippe i metal. Bemærk: 1) Vær omhyggelig med afkortningen af palen, da forkert længde kan beskadige låsen. Garantien bortfalder hvis palen er forkert afkortet. 2) Hvis dørtykkelsen er stører end 90 mm, så kontakt venligst Birkegården A/S, eller din lokale forhandler og bestil en ekstra lang pal. PolySecu® LP-908 PIN Code lock 21 http://www.polymath.com.cn 6. Installation A. Installation af yderlåsen. 1. Husk at benytte gummipakning på ydersiden og placer gummipakningen på bagsiden af ydersiden før montage. 2. Vær omhyggelig med at kontrollere at de 2 pile på firkant palen peger op! NB! Låsen virker IKKE hvis palen ikke vendes korrekt. 3. Vær omhyggelig med at riglen er tilbagetrukket. 4. Palen puttes igennem firkant hullet til fallen. 5. Ledningerne puttes igennem hullet over låsekassen (Diameter: 17mm). NB! Passer låsen ikke på låsekassen skal denne byttes eller det anbefales at låsen monteres af Birkegården A/S professionelle montører. B. Installation af inderlåsen. 4. Placer gummipakningen til bagsiden omhyggeligt på låsen. 5. Sammenkoble ledningerne fra ydersiden med ledningerne fra indersiden og vær omhyggelig med at ledningerne ikke klemmes under installationen. 6. Vær omhyggelig med at pilen på indersiden af spindlen peger op. 7. Inder spindlen sammenkobles med firkant pallen fra ydersiden. 8. Forsigtigt sættes inder og underside sammen, så alle gevind og skruehuller er placeret ud for hinanden. 9. Tag fat i håndtaget for at kontrollere at fallen kan åbnes. 10. Låsen skrues sammen med de 2 små skruer igennem hullerne i batteriboksen. 11. Derefter skrues den nederste lange skrue i under håndtaget på indersiden. PolySecu® LP-908 PIN Code lock 22 http://www.polymath.com.cn 12. Indsæt de 3 medfølgende batterier i låsen. NB! Benyttes der en forkert type batterier virker låsen ikke korrekt. 13. Monter batteridækslet på låsen. 14. NB! Den medfølgende trekant skal benyttes til montagen, hvor låsens nederste gevindstykke ikke passer igennem låsekassen. Trekanten monteres på indersiden, inden bagstykket påsættes. C. Sidste kontrol før låsen tages i brug.. NB: Efter endt installation og før brug af produktet vær venlig at læse de efterfølgende tips: • • • • • • Benyt kun nye high-quality AA batterier til låsen. Bevæg håndtaget op og ned. Håndtaget og fallen SKAL kunne bevæge sig let og ubesværet. Hvis dette ikke er tilfældet se efter løsningen i afsnittet for problemløsning. Åbne dækslet på ydersiden, ved stille og roligt at skubbe dette op og indtast fabrikskoden på låsen (123#). Kører motoren i låsen og det ydre håndtag tilkobles så døren kan åbnes er låsen monteret korrekt og døren kan lukkes. Låsen kan betjene 3-punkt låsen i døren ved at håndtaget løftes. Benyttes låsen til en alm. låsekasse hvor riglen ikke betjenes, kan selve låsekassen udskiftes så denne også betjenes af låsen. Kontakt Birkegården A/S for yderlig information. Birkegården A/S eller dennes forhandler har alarmsystemer der kan benyttes sammen med låsen. PolySecu® LP-908 PIN Code lock 23 http://www.polymath.com.cn BRUGEN AF KODELÅSEN 7. Opsætning af ydersiden på kodelåsen Indlægning af koder Låsen kan have 10 individuelle koder, fra yder siden. Alle cifre fra 0 til 9 kan benyttes og koden kan indeholde fra 1 til 10 cifre. Fabrikskoden er 123#. Opret den 1 Masterkode, tryk::*0 + 123 + *(Grøn LED blinker) + Ny PINKODE + *( Grøn LED blinker) + Ny PINKODE igen + *. Herefter skal den grønne LED blinke og der skal høres et langt beep. Så er indtastningen lykkes; Hvis den røde LED blinker er indtastningen slået fejl. Opret den 2 Masterkode, tryk::*1 + Master 1 koden + *(Grøn LED blinker) + Ny PINKODE + *( Grøn LED blinker) + Ny PINKODE igen + *. Herefter skal den grønne LED blinke og der skal høres et langt beep. Så er indtastningen lykkes; Hvis den røde LED blinker er indtastningen slået fejl. Opret Brugerkoder fra nr. 2 til 9, tryk::*2~9 + 1 af Masterkoderne + *( Grøn LED blinker) + Ny PINKODE + *( Grøn LED blinker) + Ny PINKODE igen + *. Herefter skal den grønne LED blinke og der skal høres et langt beep. Så er indtastningen lykkes; Hvis den røde LED blinker er indtastningen slået fejl. Bemærk: 1.“+” er kun en makering af den næste indtastning, IKKE en knap der skal trykkes.. Sletning af en PINKODE Tryk *+ nummeret på den kode der skal slettes + en af Masterkoderne + #. Herefter skal den grønne LED blinke og der skal høres et langt beep. Så er indtastningen lykkes; Hvis den røde LED blinker er indtastningen slået fejl. ▲ Bemærk: Masterkoderne kan IKKE slettes på denne made. Disse kan kun slettes ved at låsen nulstilles. Midlertidig konstantåben & Automatisk låsning af låsen Tryk #1 + en af Masterkoderne + # (Grøn LED blinker) + 1. Dette aktiverer den midlertidige konstant åben funktion (TUM). Når den grønne LED blinker og der høres et langt beep, er (TUM) funktionen aktiveret og brugeren kan efter indtastning af en kode, gå ind og ud af døren uden brug af koder. Når der tastes en kode igen, låses døren. PolySecu® LP-908 PIN Code lock 24 http://www.polymath.com.cn Tryk #1 + en af Masterkoderne + # (Grøn LED blinker) + 0. Dette sætter låsen tilbage til Automatisk låsning. Når den grønne LED blinker og der høres et langt beep, er låsen tilbage I automatisk låsnings tilstand og bruger kan herefter ikke åbne døren uden brug af koder. Bemærk: Brugen af (TUM) kan muligvis udsætte dit hjem/forretning/rum for fare. Medmindre du er 100 % sikker på at det er sikkert at benytte denne funktion, anbefales det IKKE at benytte denne. ▲ Låsen er ved købet sat til i automatisk låsnings tilstand. Anti hærværks/indbruds funktion Tryk #2 + en af Masterkoderne + # (Grøn LED blinker) + 1 for at aktiverer funktionen. Når den grønne LED blinker igen og der høres et langt beep, er funktionen aktiveret. Tryk #2 + en af Masterkoderne + # (Grøn LED blinker) + 0 for at deaktiverer funktionen. Når den grønne LED blinker igen, er funktionen deaktiveret. ▲ Bemærk: Denne funktion træder I kraft hvis der indtastes en forkert kode 5 gange efter hinanden. Herefter vil låsen blive blokeret I 5 minutter og vil ikke kunne benytte I denne periode. 8. Åbning af låsen fra ydersiden. Den runde PWR knap på ydersiden aktiverer det blå natlys på kodetastaturet og giver brugeren et godt overblik over knapperne om natten. Nat lyset vil være aktiveret i maksimalt 3 sekunder efter hver tastning. Kør glidedækslet op: Tast en gyldig kode. Når du kan høre at motoren har kørt, kan døren åbnes. Bemærk: Hvis låsen benyttes sammen med et af vores alarmsystemer vil der samtidig blive send et trådløst signal der frakobler alarmsystemet og døren vil kunne åbnes uden at alarmsystemet skal frakobles yderligere. 9. Åbning af låsen med nøgle Åbning af låsen med nøgle er kun beregnet som en nødåbning og ikke en funktion der må anvendes i dagligdagen. PolySecu® LP-908 PIN Code lock 25 http://www.polymath.com.cn Indsæt nøglen, drej 3 til 4 omgange mod uret, eller til du mærker modstand. Herefter er låsen åben. Låsen lukkes ved at dreje nøglen 3 til 4 omgange med uret, eller til der mærkes modstand. Der må aldrig bruges vold! Vigtigt. Åbnes låsen med nøgle, SKAL låsen lukkes med nøgle igen. Før den fungerer elektronisk! 10. Opsætning af låsen på indersiden. Indersiden kan kun have 1 PINKODE. ▲ Låsen er ved modtagelsen sat I åben tilstand fra indersiden. ÆNDRING af PInkoden. Tryk: * + 123 + *(Grøn LED blinker) + Ny PINKODE + *( Grøn LED blinker) + Ny PINKODE igen + *. Herefter skal den grønne LED blinke og der skal høres et langt beep. Så er indtastningen lykkedes. Hvis den røde LED blinker er indtastningen slået fejl. ▲ Bemærk: PINKODEN på indersiden er den samme uanset pinkoderne på ydersiden og denne ændres ikke selv om pinkoderne på ydersiden ændres. Nulstilling af låsen Nulstilling af låsen kan kun gøres af autoriseret montører. Kontakt venligst Birkegaarden A/S på +45-70237032 eller på e-mail service@birkegården.net for yderlig information. LP-908 sammen med Birkegården A/S alarmsystem (Xtra tilbehør) Tilkoble alarmsystemet fra indersiden. 1) Med en IR sensor: Tast den indvendige pinkode + * for at udsende et tilkoblingssignal til alarmen. Efter 10 sekunder sendes tilkoblings signalet og du vil høre 1 kort beep og se den røde LED blinke en gang fra låsen; Når signalet er modtaget med succes, vil du høre et kort beep og se den rode lampe på alarmsystemet blive tændt. 2) Uden en IR sensor: Tast den indvendige pinkode + * + * for at udsende et tilkoblingssignal til alarmen. Efter 10 sekunder sendes tilkoblings signalet og du vil høre 2 korte beep og se den røde LED blinke en gang fra låsen; Når signalet er modtaget med succes, vil du høre et kort beep og se den rode lampe på alarmsystemet blive tændt. PolySecu® LP-908 PIN Code lock 26 http://www.polymath.com.cn Bemærk; Indtastes den samme kode igen frakobles alarmsystemet straks. Frakoble alarmsystemet fra indersiden Hvis alarmsystemet ønskes frakoblet fra indersiden, tast den indvendige pinkode + *, eller # for at udsende et frakoblingssignal til alarmen. Når signalet er udsendt med succes, vil du høre 1 kort beep og se den grønne LED blinke engang fra låsen og alarmsystemet er frakoblet. Udgang uden at tilkoble alarmsystemet med inderhåndtaget i åben position Tryk på PWR knappen på indersiden. 3 sekunder efter der er trykket på PWR knappen vil yderhåndtaget blive tilkoblet i 5 sekunder. Herefter kan 3-punkt-låsen aktiveres. Når tiden er udløbet vil yderhåndtaget blive låst automatisk. Udgang og tilobling af alarmsystemet Når der er en IR-sensor I rummet, tast den indvendige pinkode + * Efter 10 sekunder frakobles inderhåndtaget og der udsendes et tilkoblings signal til alarmsystemet. Hvis 3-punkt-låsen skal aktiveres samtidig, tast de indvendige pinkoden + * eller # + PWR knappen og 3 sekunder efter der er trykket på PWR knappen vil yderhåndtaget blive tilkoblet i 5 sekunder. Herefter kan 3-punkt-låsen aktiveres. Når tiden er udløbet vil yder- og inderhåndtag blive låst automatisk og der udsendes et tilkoblings signal til alarmsystemet. Når der ikke er en IR-sensor I rummet, tast de indvendige pinkoden + * + * efter 10 sekunder frakobles inderhåndtaget og der udsendes et tilkoblings signal til alarmsystemet. Hvis 3-punkt-låsen skal aktiveres samtidig, tast de indvendige pinkoden + * + * + PWR knappen og 3 sekunder efter der er trykket på PWR knappen vil yderhåndtaget blive tilkoblet i 5 sekunder. Herefter kan 3-punkt-låsen aktiveres. Når tiden er udløbet vil yder- og inderhåndtag blive låst automatisk og der udsendes et tilkoblings signal til alarmsystemet. Udgang med inderhåndtaget i låst position og alarmsystemet frakoblet 1) Hvis du ønsker at tilkoble 3-punkt-låsen efter udgang, tast den indvendige pinkode + # + PWR knappen for at aktivere det indvendige håndtag så du kan gå ud. 3 sekunder efter at PWR knappen er aktiveret, er yderhåndtaget tilkoblet i 5 sekunder. Herefter låser både inder- og yderhåndtaget igen. 2) Hvis du ikke ønsker at tilkoble 3-punkt-låsen efter udgang, tast den indvendige pinkode + # , efter 10 sekunder frakobles det indvendige håndtag. Frakobling af inderhåndtaget uden udgang og uden tilkobling af alarmsystemet Tast den indvendige pinkode + # + #, herefter frakobles håndtaget så udgang ikke er PolySecu® LP-908 PIN Code lock 27 http://www.polymath.com.cn muligt. Bemærk; Denne funktion anbefales man kun at benytte med største forsigtighed, da svigt i elektronikken kan betyde at man ikke kan komme ud. Det anbefales kun at benytte denne funktion hvis man har flere udgange. BATTERISKIFT Når spændingen er lavere end 3.3V, vil låsen begynde at udsende en alarm der betyder at batterierne SKAL skiftes. Du vil høre8 beep og se den røde lampe blinke. 11. Problemløsning Problem Mulig årsag Løsning 1. Mangler strøm 2. Koblingen virker ikke 3. Elektronik fejl 4. Firkantpalen er ikke monteret korrekt 1. Skift batterier. 2. Kontakt Birkegården A/S. 3. Kontakt Birkegården A/S. 4. Kontroller firkantpalen, fortsætter problemet kontakt Birkegården A/S. 1.Firkantpalen har ikke den korrekte længde. 2. Låsen er ikke placeret korrekt på døren. 1. Benyt en korrekt firkantpal. 1. Kontakt Birkegården A/S. 3 Alarm til og frakobling virker ikke. 1.Det elektroniske trådløse modul i låsen virker ikke. 2. Antennen er ikke trukket ud. 3. Alarmen er placeret for tæt på en elektrisk forstyrrelse f.eks. PC eller TV. 4 Indv. håndtag kan ikke låse. 1. Forkert inder pinkode. 2.Den indvendige kobling er forkert monteret. 1. Indtast den korrekte pinkode. 2. Juster den indvendige kobling. 1 2 Låsen åbner ikke ordentligt efter at korrekt pinkode er indtastet. Håndtaget køre for stramt. PolySecu® LP-908 PIN Code lock 28 2.Juster låsen på døren, fortsætter problemet kontakt Birkegården A/S. 2. Træk antennen ud. 3. Flyt alarmsystemets modtager. http://www.polymath.com.cn ■ Gebrauchsanweisung Einleitung: ¾ Vielen Dank, dass Sie sich für unser Codeschloss LP-908 entschlossen haben. ¾ Diese Anleitung enthält die Einbauanweisung und Gebrauchsanweisung. ¾ Bitte lesen Sie die Anleitung gründlich durch bevor Sie den Einbau oder mit dem Gebrauch beginnen. ¾ Birkegården A/S haftet nicht für Fehler, die beim Einbau oder durch Fehlanwendung verursacht werden. Birkegaarden A/S Osvej 83-85, Jyllinge 4000 Roskilde Dänemark. Tel: 0045-46 78 93 84 Fax: 0045-46 78 96 85 http://www.birkegaarden.net E-Mail: [email protected] PolySecu® LP-908 PIN Code lock 29 http://www.polymath.com.cn EINBAUANLEITUNG 1. Teile Kontrollieren Sie bitte dass alle unten benannten Teile im Kasten beim Kauf dabei sind. Sollte etwas fehlen wenden Sie sich bitte an Ihr Birkegaarden A/S Service Center oder an Ihren Verkäufer oder das Geschäft, in welchem Sie das Schloss erworben haben. NB! Vor dem Einbau kontrollieren Sie bitte ob Türrichtung und Türmassiv dem Angegebenen entsprechen. Die Angaben finden Sie an der Außenseite des Kartons. Birkegaarden A/S hat fachkundige Monteure, die gerne den Einbau für Sie ausführen. Bitte wenden Sie sich hierzu an unsere Servicenummer. 1 x äußeres Schlossteil 1 x inneres Schlossteil 2 x Gummidichtungen 5 x Schlüssel PolySecu® LP-908 PIN Code lock 30 http://www.polymath.com.cn Schrauben 3 x Alkalien-Batterien 2. Notwendiges Werkzeug Bohrmaschine Hammer Stemmeisen Schraubenzieher Bohrer Stichsäge oder entsprechendes Markierungsstift/Tuschstift PolySecu® LP-908 PIN Code lock 31 http://www.polymath.com.cn 3. Installationsschablone Fold along dotted line and fit on door edge B A POLYMat h Installation Template Pre-installations A. Fold and apply the template to the edge of the door bevel. Mark the holes (four holes for the three point mortise, six holes for the other one) on the door face as indicated on the template. B.Mark the central line of the door edge, and then align the Line B with this central line, and make sure the entire Line C should stay at the same horizontal level. C. Bore the holes required and install the lock according to the Installation Guide. PolySecu® LP-908 PIN Code lock 32 C http://www.polymath.com.cn 4. Vorbereitungen Befestigen Sie die Schablone an der Tür und markieren Sie alle Bohrlöcher. Bohren/Schneiden Sie alle nötigen Löcher in/durch die Tür. Vor dem Durchbohren den Einsteckschlosskasten entfernen. 5. Anpassung von LP-903 nach der Türstärke. LP-903 ist dafür designt an Türstärken von 40 bis 90 millimeter zu passen. Anpassung der quadratischer Türstock nach Türstärke: Bitte der Türstock zu der richtigen Türstärke anpassen nach die abmessungen auf der Türstock. Bitte ein dazu verwendbar Säge benutzen oder Werkzeug dass in Metal schneiden kann. N.B.: 1) Sei bitte sorgfältig mit der abkürzung der Türstock, denne in verkehrter Länge kann das Schloss beschädigen. Die Garantie fällt weg wenn der Türstock falsch verkurzt ist. 2) Sollte die Türstärke grösser als 90 mm sein, dann bitten wir Ihnen an Birkegaarden A/S oder Ihren Lokale Verkäufer Kontakt zu nehmen, um ein ekstra langes quadratischer Türstock zu bestellen PolySecu® LP-908 PIN Code lock 33 http://www.polymath.com.cn 6. Einbau Montage der Außenseite. 1.Nehmen Sie die richtige Größe der Gummidichtung und legen diese auf die Rückseite des Schlosses 2. Stellen Sie sicher, dass die Pfeile auf dem Vierkant nach OBEN zeigen. NB: Das Schloss funktioniert NICHT, wenn der Vierkant falsch liegt. 3. Stellen Sie sicher, dass der Riegel zurückgezogen ist. 4. Den Vierkant durch das Vierkantloch für die Falle stecken. 5. Die Leitungen durch das Loch oberhalb des Schlosskastens stecken. (Durchmesser: 17mm) 6. NB! Passt das Schloss nicht auf den Schlosskasten, sollte dieser umgetauscht werden, oder wir empfehlen einen Monteur von Birkegaarden A/S zu bestellen. Montage der Innenseite. 7. Legen Sie die Gummidichtung sorgfältig auf das Innenschloss. 8. Verbinden Sie die Leitungen der Außenseite mit denen der Innenseite und achten Sie darauf, die Leitungen nicht einzuklemmen. 9. Beachten Sie, dass der Pfeil auf der Spindel ebenfalls nach Oben zeigt. 10. Verbinden Sie die Spindel mit PolySecu® LP-908 PIN Code lock 34 http://www.polymath.com.cn dem Vierkant vom Außenteil. 11. Schieben Sie die beiden Hälften sorgfältig zusammen, sodass alle Bolzen und Schrauben genau gegenüber stehen. 12. Betätigen Sie den Griff um zu kontrollieren, dass die Falle geöffnet werden kann. 13. Die beiden kleineren Schrauben durch die Löcher in der Batteriebox befestigen. 14. Danach die untere, längere Schraube unter dem Griff befestigen. 15. Setzen Sie nun die 3 Batterien ein und montieren Sie die Abdeckung zum Batteriekasten. NB! Verwenden Sie minderwertige oder falsche Batterien funktioniert das Schloss nicht einwandfrei. Letzte Kontrolle vor Inbetriebnahme des Schlosses. NB: Nach Einbau und vor Inbetriebnahme lesen Sie bitte folgende Tipps: i. ii. iii. iv. Verwenden Sie nur hochqualitative AA-Batterien für das Schloss. Bewegen Sie den Griff auf und ab. Der Griff und die Falle sollen sich unbeschwert bewegen können. Sollte dies nicht der Fall sein, suchen Sie bitte die Lösung im dazugehörigen Abschnitt. ontrollieren Sie nochmals, ob die richtige Dichtung auf der Außenseite benutzt worden ist. Öffnen Sie die Abdeckung auf der Außenseite indem Sie diese langsam hochschieben und geben Sie den Originalcode ein. Ist der Motor hörbar und der Griff rastet zum Öffnen der Türe ein, ist das Schloss korrekt eingebaut und die Tür kann geschlossen werden. PolySecu® LP-908 PIN Code lock 35 http://www.polymath.com.cn v. vi. vii. Wenn vorhanden: Der Griff betätigt das 3-Punkte Schloss indem Sie den Griff anheben. Benutzen Sie das Schloss für ein normales Einsteckschloss und der Riegel lässt sich nicht schließen, kann man das Einsteckteil auswechseln und somit den Riegel betätigen. Bitte Birkegaarden A/S [email protected] für weitere Infos kontaktieren. Birkegården A/S oder deren Händler bieten Ihnen ein Alarmsystem an, das mit dem LP-908 integriert benutzt werden kann. Sehen Sie dazu auch die Homepage. GEBRAUCHSANWEISUNG DES LP 908 7. Programmieren der äußeren Schlossfunktionen Eingeben von Codes Das Schloss kann von außen 10 individuelle Codes haben. Alle Ziffern von 0 bis 9 können verwendet werden und der Code kann von 1 bis 10 Ziffern enthalten. Originalcode ab Werk ist 123. 1). Mastercode eingeben::*+ 0 + 123 + *(Grün LED blinkt) + Neuer PIN-CODE + *(Grün LED blinkt) + Neuen PIN-CODE wiederholen + *. Hiernach soll der grüne LED blinken und ein langer Piepton ertönen. Damit ist das Eingeben gelungen. Blinkt der rote LED ist die Eingabe misslungen. 2). Mastercode eingeben::*1 + Master 1 Code + *(Grün LED blinkt) + Neuer PINCODE + *( Grün LED blinkt) + Neuen PIN-CODE wiederholen + *. Hiernach soll der grüne LED blinken und ein langer Piepton ertönen. Damit ist die Eingabe gelungen. Blinkt der rote LED ist die Eingabe misslungen. 3). Benutzercode von Nr. 2 bis 9 eingeben:*2~9 + 1 der beiden Mastercodes + *( Grün LED blinkt) + Neuer PIN-CODE + *( Grün LED blinkt) + Neuen PIN-CODE wiederholen + *. Hiernach soll der grüne LED blinken und ein langer Piepton ertönen. Damit ist die Eingabe gelungen. Blinkt der rote LED ist die Eingabe misslungen. ▲ WICHTIG: “+” ist hier lediglich ein Hinweis auf die nächste Taste, es ist KEIN Pluszeichen dass eingegeben wird Löschen Eines PIN codes PolySecu® LP-908 PIN Code lock 36 http://www.polymath.com.cn Drücken Sie * + die Nummer des zu löschen Codes + eine der beiden Mastercodes + #. Hiernach soll der grüne LED blinken und ein langer Piepton ertönen. Damit ist die Eingabe gelungen. Blinkt der rote LED ist die Eingabe misslungen. ▲ WICHTIG: Mastercodes können auf diese Weise NICHT gelöscht werden, nur durch erneute Werkseinstellung des Schlosses. Zeitweiliges Offenstehen bzw. automatisches abschliessen des schlosses Drücken Sie #1 + eine der Mastercodes + # (Grün LED blinkt) + 1. Dies betätigt das zeitweilige Offenstehen des Schlosses (TUM). Wenn der grüne LED blinkt und ein langer Piepton ertönt ist diese Funktion eingegeben und die Tür lässt sich ohne Anwendung eines Codes öffnen. Drücken Sie #1 + eine der Mastercodes + # (Grün LED blinkt) + 0. Dies stellt das Schloss wieder auf automatisches Abschließen zurück. Wenn der grüne LED blinkt und ein langer Piepton ertönt, ist das Schloss erneut auf automatisches Abschließen eingestellt und kann wiederum nur mit Anwendung eines Codes geöffnet werden. WICHTIG: Das Benutzen der Offenstehen-Funktion (TUM) kann möglicherweise die Sicherheit Ihres Hauses/Geschäfts/Raumes beeinträchtigen. Anwendung dieser Funktion wird nur dann empfohlen, wenn Sie zu 100 % sicher sind, dass sie nicht missbraucht werden kann. ▲ Das Schloss ist bei Lieferung grundsätzlich auf automatisches Abschließen eingestellt. ANTI - MIssbrauch - funktion Drücken Sie # +2 + eine der Mastercodes + # (Grün LED blinkt) + 1 um diese Funktion zu betätigen. Sobald der grüne LED nochmals blinkt ist die Funktion eingeschaltet.. Drücken Sie # +2 + eine der Mastercodes + # (Grün LED blinkt) + 0 um die Funktion abzuschalten. Sobald der grüne LED nochmals blinkt ist die Funktion ausgeschaltet. ▲ WICHTIG: Diese Funktion tritt ein, wenn jemand einen falschen Code 5 Mal nacheinander eingibt. Das Schloss wird für 5 Minuten blockiert und kann in diesem Zeitraum nicht betätigt werden. 8. Öffnen des Schlosses von außen. Der runde PWR-Knopf auf der Außenseite betätigt das Nachtlicht und gibt dem Benutzer eine gute Übersicht über das Ziffernfeld bei Dunkelheit. Das Nachtlicht leuchtet 3 Sekunden bei jedem Knopfdruck. PolySecu® LP-908 PIN Code lock 37 http://www.polymath.com.cn Die Abdeckung hochschieben: Einen gültigen Code eingeben. Wenn Sie den Motor gehört haben, kann die Tür geöffnet werden. WICHTIG: Wenn eines unserer Alarmsysteme angeschlossen ist wird gleichzeitig ein drahtloses Signal gesendet, welches die Alarmanlage abschaltet, und die Tür kann geöffnet werden ohne ein zusätzliches abschalten der Anlage 9. Programmieren der inneren Schlossfunktionen. Von innen ist nur 1 Pin-Code möglich. ▲ Das Schloss ist beim Kauf von innen aufgeschlossen. Änderung des Pin-codes Drücken Sie: * + 123 + *(Grün LED blinkt) + Neuer PIN-CODE + *( Grün LED blinkt) + neuen PIN-CODE wiederholen + *. Hiernach soll der grüne LED blinken und ein langer Piepton ertönen. Damit ist die Eingabe gelungen. Blinkt der rote LED ist die Eingabe misslungen. ▲ WICHTIG: Der Pin-Code auf der Innenseite bleibt immer gleich, ungeachtet der Codes auf der Außenseite und verändert sich auch nicht bei Änderungen auf der Außenseite. Null-stellen aller funktionen und codes auf werkeinstellung Null-stellen des Schlosses kann ausschließlich vom Fachmann erfolgen. Bitte wenden Sie sich an Ihren Händler oder service@birkegården.net LP-908 zusammen mit Birkegården A/S alarmsystem (extra zubehör) Einschalten des alarmsystems von der innenseite 1) Mit dem IR Fühler: Den Innencode eingeben + * um dem Alarmsystem ein Signal zu übermitteln. Nach 10 Sekunden wird dieses gegeben und Sie hören 1 kurzen Piepton und sehen den roten LED am Schloss ein Mal blinken. Wenn das Signal erfasst ist hören Sie nochmals einen kurzen Piepton und die rote Lampe an der Alarmanlage leuchtet. 2) Ohne den IR Fühler: Den Innencode eingeben + * + * um dem Alarmsystem ein Signal zu übermitteln. Nach 10 Sekunden wird dies gegeben und Sie hören 2 kurze Pieptöne und sehen den roten LED am Schloss ein Mal blinken. Wenn das Signal erfasst ist hören Sie nochmals einen PolySecu® LP-908 PIN Code lock 38 http://www.polymath.com.cn kurzen Piepton und die rote Lampe an der Alarmanlage leuchtet. WICHTIG: Wird der gleiche Code wiederholt wird die Anlage sofort abgeschaltet. Abschalten des alarmsystems von der innenseite Wenn Sie das Alarmsystem von innen abschalten möchten, drücken Sie den Innencode + * oder # um ein Entschärfungssignal an das Alarmsystem zu übermitteln. Wenn das Signal erfasst ist hören Sie 1 kurzen Piepton und sehen den grünen LED am Schloss ein Mal aufleuchten. Die Alarmanlage ist somit entschärft. Ausgang ohne einschalten der alarmanlage mit tür-offen von innen Drücken Sie den PWR-Knopf auf der Innenseite. 3 Sekunden danach wird der Aussengriff für 5 Sekunden zugeschaltet, wobei Sie die 3-Punktverriegelung anheben können. Danach wird der Aussengriff automatisch verriegelt. Ausgang mit einschalten der alarmanlage Mit dem IR Fühler im Raum: Den Innencode eingeben + *. Nach 10 Sekunden wird der Innengriff verriegelt und die Alarmanlage eingeschaltet. Wenn die 3-Punktverriegelung gleichzeitig betätigt werden soll, drücken Sie den Innencode + * + * + den PWR-Knopf und 3 Sekunden danach wird der Aussengriff für 5 Sekunden zugeschaltet, wobei Sie die 3-Punktverriegelung anheben können. Danach wird der Aussengriff automatisch verriegelt und die Alarmanlage eingeschaltet. Ohne den IR Fühler im Raum: Den Innencode eingeben + * + * . Nach 10 Sekunden wird der Innengriff verriegelt und die Alarmanlage eingeschaltet. Wenn die 3-Punktverriegelung gleichzeitig betätigt werden soll, drücken Sie den Innencode + * oder # + den PWR-Knopf und 3 Sekunden danach wird der Aussengriff für 5 Sekunden zugeschaltet, wobei Sie die 3-Punktverriegelung anheben können. Danach wird der Aussengriff automatisch verriegelt und die Alarmanlage eingeschaltet. Ausgang mit verschlossenem innengriff und ohne alarmanlage 1) Wenn Sie nach Ausgang die 3-Punktverriegelung betätigen möchten, drücken Sie den Innencode + # + PWR-Knopf um den Innengriff betätigen zu können. 3 Sekunden nach dem Drücken des PWR-Knopfes ist der Aussengriff ebenfalls für 5 Sekunden gekoppelt und danach verriegeln Innen- und Aussengriff wieder. 2) Wenn Sie die 3-Punktverriegelung NICHT betätigen möchten Innencode + # nach 10 Sekunden ist der Innengriff verriegelt. PolySecu® LP-908 PIN Code lock 39 drücken Sie den http://www.polymath.com.cn Von innen abschliessen ohne ausgang und ohne alarmanlage Drücken Sie den Innencode + # + #, damit wird der Innengriff verriegelt und die Tür von innen verschlossen. Kein Ausgang möglich ohne den Innencode, wie beschrieben, wieder einzugeben. WICHTIG: Diese Funktion sollte man nur mit größter Vorsicht anwenden, denn sollte die Elektronik gerade dann ausfallen, kann es bedeuten, dass man nicht zur Tür hinaus kann. Es empfiehlt sich diese Funktion nur dann zu benutzen, wenn mehr als eine Ausgangstür vorhanden ist. BATTERIENWECHSEL. Wenn die Stromspannung niedriger als 3,3 Volt beträgt, wird das Schloss einen Alarm abgeben der bedeutet, dass die Batterien erneuert werden müssen. Sie werden 8 Pieptöne hören und die rote Lampe blinken sehen. 10. Problemlösung/Service Bei entstehenden Problemen mit der Funktion des Schlosses suchen Sie bitte eine Lösung an Hand der folgenden Anweisungen. Ansonsten wenden Sie sich bitte an Ihren Händler oder über Mail an [email protected]. Problem Lösung 1. Wenig Strom 2. Kupplung funktioniert nicht 3. Elektronikfehler 4. Vierkant falsch montiert 1.Batterien wechseln. 2.Kontakt zum Service. 3.Kontakt zum Service. 4.Vierkantrichtung kontrollieren. 1.Vierkant hat nicht die richtige Länge. 1.Richtigen Vierkant verwenden. 2. Das Schloss ist nicht einwandfrei montiert. 2.Montage nachvollziehen, sonst Kontakt zum Service. 1. 3 Alarm Ein- und Ausschalten funktioniert nicht 1.Die drahtlose Elektronik funktioniert nicht. 2.Antenne ist nicht ausgezogen. 3.Alarm ist zu dicht an anderen elektronischen Geräten. 4 Innengriff kann nicht schliessen. 1. Falscher Innencode 2. nnenkupplung falsch montiert 1.Richtigen Code eingeben 2.Innenkupplung kontrollieren 1 2 Das Schloss öffnet nicht ordentlich nach Eingabe des Codes. Ursache Der Handgriff ist zu stramm. PolySecu® LP-908 PIN Code lock 40 Kontakt zum Service 2. Antenne ausziehen 3. Empfänger woanders anbringen. http://www.polymath.com.cn PolySecu® LP-908 PIN Code lock 41