1
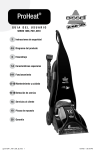
Carpet cleaning
8920, 8930, 8960,
1. While pressing the trigger, make one slow forward wet pass and another one back
9200, 9300, 9400 SERIES
2. Release the trigger and make one slow forward and backward pass over
the same area. Repeated passes will help aid in dry time
BISSELL is happy to be of service.
Contact us directly at 1-800-237-7691 or
visit the website for helpful instructions at
www.bissell.com
3. Continue passes until cleaning area is complete
4. When the dirty water reaches the “FULL” line on the tank, it is time to empty
PLEASE DO NOT RETURN THIS PRODUCT TO THE STORE
PLEASE KEEP FOR FUTURE REFERENCE
5. Empty dirty water by removing tank from base of machine. Carry to sink
or outside to dispose of water. Unlatch top of tank and pour dirty water
through triangle shaped opening in corner
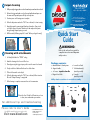
Quick Start
6. Refill as needed, following steps 4 & 5 under "Before you begin cleaning"
5.
Guide
6.
WARNING:
Refer to the enclosed user guide for
complete instructions and important
safety notices.
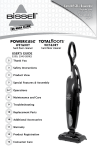
Cleaning with attachments
1. Set ReadyTools dial to the “TOOLS” setting
2. Attach the cleaning tool to the end of the hose
Package contents:
3. Clean by pressing the trigger to spray solution onto the area to be cleaned
a. Machine Base & 2 tank system
e. Lower Hose Rack
4. Slowly scrub the tool back and forth over the soiled surface
b. Upper Handle
5. Tilt the tool forward to suction liquid
c. 4 Screws - taped to handle
f. Tool Attachment(s)
(varies by model)
Phillips head screw driver is needed for assembly
7. When cleaning is complete, remove and rinse tool in warm water
1.
a.
Refer to the User’s Guide for full instructions on how
to clean, store and maintain your machine
g.Formula
(varies by model)
d. Upper Hose Rack
6. When the dirty water reaches the “FULL” line on the tank, follow instruction
#5 under “Carpet Cleaning” to empty tank
b.
c.
f.
d.
g.
For additional tips and troubleshooting
Please refer to User's Guide
Earn BISSELL rewards! Register your product today!
Visit: www.bissell.com
1204357
© 2011 BISSELL Homecare, Inc.
BISSELL Homecare, Inc.
P.O. Box 1888
Grand Rapids, MI 49501
e.
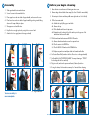
Assembly
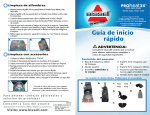
Before you begin cleaning
1. Slide upper handle onto machine base
1. Move furniture to another area if cleaning an entire room
2. Screw 3 screws into the marked holes
2. Remove large dirt and debris from carpet (See User's Guide for more details)
3. Place upper hose rack onto back of upper handle, and secure with screw
3. Pre-treat spots & stains and heavy traffic areas (optional- see User's Guide)
4. Place lower hose rack onto back of upper handle by pushing in and sliding
down until it snaps firmly into place
4. Fill the clean water tank
4a.Unlatch the top by lifting up on tank latch
5. Wrap power cord and flex hose
4b.Remove the top
6. Keep flex hose snugly in place by using the hose secure latch
4c. Fill the bladder with clean hot tap water
4d. Re-attach top by hooking the lip of the tank top into the groove of the
tank bottom and secure the latch
7. Attach tool to hose grip (extra tool storage on back)
5. Fill the formula tank with water and BISSELL 2X formula
5a.Remove formula tank and unscrew the cap and insert
1.
2.
5b.Fill with water to the WATER line
3.
5c.Fill with BISSELL 2X formula to the FORMULA line
5d.Replace cap and insert and place back into formula tank holder
6. Set Custom Clean Dial (located on the foot of the unit or on the upper handle)
7. Set ReadyTools Dial ("Floor Cleaning” for carpet cleaning or “TOOLS”
for cleaning with the hose and tool)
8. Plug into outlet, and turn the power and heater (if desired) switch on
4.
Your assembly is
now complete.
6.
7.
9. If using the heater, let the machine warm up for 1 minute before cleaning
a
4a.
4b.
4c.
4d.
5a.
5b.
6.
7.
a. Tough Stain Brush
8.
Power
For complete user's guide, visit www.bissell.com
Heater