Transcript
IMPORTANT!! PLEASE READ ENTIRE INSTRUCTION SHEET BEFORE ASSEMBLY!!
IMPORTANT NOTE: Your sling seat may appear to be slightly warped. This is not unusual.
Proper assembly procedure will straighten out the sling seat in the frame. There are four bolts
used to attach the seat frame to the seat base. After inserting all the bolts, each of these bolts
must be tightened a few revolutions at time in rotation.
Step 1: Identify all parts packed in the carton against the parts list. Remove all protective
materials. Set parts on a flat, non-abrasive surface to avoid scratching. If you are
missing any parts or are unsure how to proceed with assembly, call our Customer
Service Center immediately at 1-800-416-3511. Do not attempt to assemble chair
if any parts are missing or damaged.
IMPORTANT NOTE: Assembling this chair requires attaching the chair frame to the chair
base. We recommend two people work together to assemble the chair since it is critical that
all the holes in the chair frame are aligned exactly with the holes in the chair base. All bolts
need to be inserted and tightened into the fixed nuts in a straight and direct path. Inserting
the bolts at even the slightest angle could strip the nuts and bolts, damaging the entire chair.
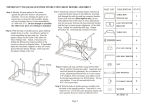
Step 2: Working from behind the chair, have another person stand in front of the chair and
position the chair frame in between the arms of the chair base (as shown) so that the
holes on both sides of the upper portion of the chair frame back align with the fixed
nut holes in the chair base.
CHAIR BASE
(CROSS SECTION)
CHAIR FRAME
(CROSS SECTION)
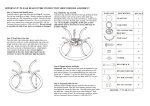
Step 3: From behind the chair, insert a bolt through the hole on one side of back portion of
the chair frame and into the fixed nut hole in the back arm portion of the chair base.
(Bolt head will be towards the center of the chair back). Make sure the bolt is inserted
exactly straight! Hand tighten 3-4 revolutions only. DO NOT TIGHTEN
COMPLETELY. Repeat for opposite side of chair.
Step 4: Working from the underside of the front of the chair, insert a bolt through the chair
frame and into the fixed nut holes in the chair base. Hand tighten 3-4 revolutions
only. DO NOT TIGHTEN COMPLETELY. Repeat for opposite side.
PARTS LIST
Step 5: Tighten all bolts. Each bolt must be tightened a 3-4 revolutions only at a time. Begin
with top left bolt. Move to bottom right bolt then to top right bolt, followed by bottom
left bolt. Repeat this X pattern until all bolts are tight. DO NOT OVER TIGHTEN
BOLTS. Over tightening may strip bolts or nuts, damaging the entire chair.
Step 6: Examine the chair from the front. If the sling seat does not appear tight or straight in
the seat base, repeat steps 3, 4 and 5. If you do not feel your chair is assembled
properly, or you have any questions, call our Customer Service Center at 1-800-416-3511.
Page 2
DESCRIPTION
QTY./PCS
PARTS LIST
DESCRIPTION
QTY./PCS
CHAIR FRAME
1
BOLT
4
CHAIR BASE
1
HEX WRENCH
1
MODEL # 50-4460-702