1
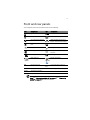
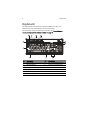
Aspire L Series
User's Guide
Copyright © 2006. Acer Incorporated.
All Rights Reserved.
Aspire L Series User's Guide
Original Issue: 09/2006
Changes may be made periodically to the information in this publication without obligation
to notify any person of such revisions or changes. Such changes will be incorporated in new
editions of this manual or supplementary documents and publications. Acer Incorporated
makes no representations or warranties, either express or implied, with respect to the
contents hereof and specifically disclaims any implied warranties of merchantability or fitness
for a particular purpose.
For your convenience, we suggest that you enter the model number, serial number, purchase
date, and place of purchase information in the space provided below. The serial number and
model number are recorded on the label affixed to your computer. All correspondence
concerning your unit should include the serial number, model number, and purchase
information.
No part of this publication may be reproduced, stored in a retrieval system, or transmitted, in
any form or by any means, electronically, mechanically, by photocopy, recording, or otherwise,
without the prior written permission of Acer Incorporated.
Aspire L Series Desktop Computer
Model number: __________________________________
Serial number: ___________________________________
Purchase date: ___________________________________
Place of purchase: ________________________________
Acer and the Acer logo are registered trademarks of Acer Incorporated. Other companies'
product names or trademarks are used herein for identification purposes only and belong to
their respective owners.
iii
Information for your safety and
comfort
Safety instructions
Read these instructions carefully. Keep this document for future reference.
Follow all warnings and instructions marked on the product.
Turning the product off before cleaning
Unplug this product from the wall outlet before cleaning. Do not use liquid
cleaners or aerosol cleaners. Use a damp cloth for cleaning.
Warnings
•
•
•
•
•
Do not use this product near water.
Do not place this product on an unstable cart, stand or table. If the product
falls, it could be seriously damaged.
Slots and openings are provided for ventilation to ensure reliable
operation of the product and to protect it from overheating. These
openings must not be blocked or covered. The openings should never be
blocked by placing the product on a bed, sofa, rug or other similar surface.
This product should never be placed near or over a radiator or heat
register, or in a built-in installation unless proper ventilation is provided.
Never push objects of any kind into this product through cabinet slots as
they may touch dangerous voltage points or short-out parts that could
result in a fire or electric shock. Never spill liquid of any kind onto or into
the product.
To avoid damage of internal components and to prevent battery leakage,
do not place the product on a vibrating surface.
Using electrical power
•
•
•
•
This product should be operated from the type of power indicated on the
marking label. If you are not sure of the type of power available, consult
your dealer or local power company.
Do not allow anything to rest on the power cord. Do not locate this
product where people will walk on the cord.
If an extension cord is used with this product, make sure that the total
ampere rating of the equipment plugged into the extension cord does not
exceed the extension cord ampere rating. Also, make sure that the total
rating of all products plugged into the wall outlet does not exceed the fuse
rating.
Do not overload a power outlet, strip or receptacle by plugging in too
many devices. The overall system load must not exceed 80% of the branch
•
circuit rating. If power strips are used, the load should not exceed 80% of
the power strip's input rating.
This product's AC adapter is equipped with a three-wire grounded plug.
The plug only fits in a grounded power outlet. Make sure the power outlet
is properly grounded before inserting the AC adapter plug. Do not insert
the plug into a non-grounded power outlet. Contact your electrician for
details.
Warning! The grounding pin is a safety feature. Using a power
outlet that is not properly grounded may result in electric shock
and/or injury.
Note: The grounding pin also provides good protection from
unexpected noise produced by other nearby electrical devices that
may interfere with the performance of this product.
•
Use the product only with the supplied power supply cord set. If you need
to replace the power cord set, make sure that the new power cord meets
the following requirements: detachable type, UL listed/CSA certified, type
SPT-2, rated 7 A 125 V minimum, VDE approved or its equivalent, 4.6
meters (15 feet) maximum length.
Product servicing
Do not attempt to service this product yourself, as opening or removing covers
may expose you to dangerous voltage points or other risks. Refer all servicing to
qualified service personnel.
Unplug this product from the wall outlet and refer servicing to qualified service
personnel when:
•
the power cord or plug is damaged, cut or frayed
•
•
•
•
•
liquid was spilled into the product
the product was exposed to rain or water
the product has been dropped or the case has been damaged
the product exhibits a distinct change in performance, indicating a need
for service
the product does not operate normally after following the operating
instructions
Note: Adjust only those controls that are covered by the operating
instructions, since improper adjustment of other controls may
result in damage and will often require extensive work by a
qualified technician to restore the product to normal condition.
v
Replacing the battery pack
The notebook uses lithium batteries. Replace the battery with the same type as
that which came bundled with your product. Use of another battery may
present a risk of fire or explosion.
Warning! Batteries may explode if not handled properly. Do not
disassemble or dispose of them in fire. Keep them away from
children. Follow local regulations when disposing of used
batteries.
Telephone line safety
•
•
Disconnect all telephone lines from the equipment when not in use and/or
before servicing.
To avoid the remote risk of electric shock from lightning, do not connect
the telephone line to this equipment during lightning or thunderstorms.
Disposal instructions
Do not throw this electronic device into the trash when discarding.
To minimize pollution and ensure utmost protection of the global environment,
please recycle. For more information on the Waste from Electrical and
Electronics Equipment (WEEE) regulations, visit
http://global.acer.com/about/sustainability.htm.
Mercury advisory
For projectors or electronic products containing an LCD/CRT monitor or display:
Lamp(s) inside this product contain mercury and must be recycled or disposed of
according to local, state or federal laws. For more information, contact the
Electronic Industries Alliance at www.eiae.org. For lamp-specific disposal
information, check www.lamprecycle.org.
Tips and information for comfortable use
Computer users may complain of eyestrain and headaches after prolonged use.
Users are also at risk of physical injury after long hours of working in front of a
computer. Long work periods, bad posture, poor work habits, stress,
inadequate working conditions, personal health and other factors greatly
increase the risk of physical injury.
Incorrect computer usage may lead to carpal tunnel syndrome, tendonitis,
tenosynovitis or other musculoskeletal disorders. The following symptoms may
appear in the hands, wrists, arms, shoulders, neck or back:
•
•
•
•
•
numbness, or a burning or tingling sensation
aching, soreness or tenderness
pain, swelling or throbbing
stiffness or tightness
coldness or weakness
If you have these symptoms, or any other recurring or persistent discomfort
and/or pain related to computer use, consult a physician immediately and
inform your company's health and safety department.
The following section provides tips for more comfortable computer use.
Finding your comfort zone
Find your comfort zone by adjusting the viewing angle of the monitor, using a
footrest, or raising your sitting height to achieve maximum comfort. Observe
the following tips:
•
•
•
•
•
•
•
refrain from staying too long in one fixed posture
avoid slouching forward and/or leaning backward
stand up and walk around regularly to remove the strain on your leg
muscles
take short rests to relax your neck and shoulders
avoid tensing your muscles or shrugging your shoulders
install the external display, keyboard and mouse properly and within
comfortable reach
if you view your monitor more than your documents, place the display at
the center of your desk to minimize neck strain
Taking care of your vision
Long viewing hours, wearing incorrect glasses or contact lenses, glare, excessive
room lighting, poorly focused screens, very small typefaces and low-contrast
displays could stress your eyes. The following sections provide suggestions on
how to reduce eyestrain.
vii
Eyes
•
•
•
Rest your eyes frequently.
Give your eyes regular breaks by looking away from the monitor and
focusing on a distant point.
Blink frequently to keep your eyes from drying out.
Display
Keep your display clean.
•
•
•
•
•
•
Keep your head at a higher level than the top edge of the display so your
eyes point downward when looking at the middle of the display.
Adjust the display brightness and/or contrast to a comfortable level for
enhanced text readability and graphics clarity.
Eliminate glare and reflections by:
•
placing your display in such a way that the side faces the window or
any light source
•
•
•
•
•
minimizing room light by using drapes, shades or blinds
using a task light
changing the display's viewing angle
using a glare-reduction filter
using a display visor, such as a piece of cardboard extended from the
display's top front edge
Avoid adjusting your display to an awkward viewing angle.
Avoid looking at bright light sources, such as open windows, for extended
periods of time.
Developing good work habits
Develop the following work habits to make your computer use more relaxing
and productive:
•
Take short breaks regularly and often.
•
•
•
Perform some stretching exercises.
Breathe fresh air as often as possible.
Exercise regularly and maintain a healthy body.
Warning! We do not recommend using the computer on a couch
or bed. If this is unavoidable, work for only short periods, take
breaks regularly, and do some stretching exercises.
Note: For more information, please refer to “Regulations and
safety notices” on page 32 in the AcerSystem User's Guide.
1 System tour
Package contents
Accessing the User's Guide
Front and rear panels
Keyboard
Optical drive
Taking care of your CDs and DVDs
2 Setting up your computer
Arranging a comfortable work area
Adjusting your chair
Positioning your PC
Positioning your monitor
Positioning your keyboard
Positioning your mouse
Connecting peripherals
Connecting your mouse and keyboard
(for selected models)
Connecting a monitor
Connecting the power cable
Taking care of your AC adapter
Turning on your computer
Turning off your computer
Connecting options
Connecting to the network
Connecting multimedia devices
3 System utilities
Dual-display
Recovering your system
4 Frequently asked questions
Frequently asked questions
iii
iii
v
vi
1
3
4
5
6
7
7
9
11
11
11
13
13
13
14
14
15
16
16
17
18
19
19
20
23
25
26
27
29
Appendix A: Regulations and safety notices 31
Regulations and safety notices
32
Contents
Information for your safety and comfort
Safety instructions
Disposal instructions
Tips and information for comfortable use
FCC notice
Modem notices
Laser compliance statement
Macrovision copyright protection notice
Radio device regulatory notice
General
European Union (EU)
The FCC RF safety requirement
Canada — Low-power license-exempt radio
communication devices (RSS-210)
Federal Communications Comission
Declaration of Conformity
Declaration of Conformity for CE marking
Index
32
33
36
36
36
36
37
37
38
39
40
41
1
1 System tour
This chapter discusses the features and
components of your computer.
3
Package contents
Before you unpack your computer, make sure that you have enough space to
set up your computer.
Carefully unpack the carton and remove the contents. If any of the following
items are missing or damaged, contact your dealer immediately:
Aspire computer
User's guide (for selected models),
warranty card and installation poster
Items contained in the accessory box
•
Keyboard (USB/Wireless)
•
Mouse (USB/Wireless)
AC adapter and power cable
Other user documentation and third-party software
4
1 System tour
Accessing the User's Guide
This User's Guide is also available on your computer as an Adobe Acrobat
PDF file.
To access the User's Guide (for Windows XP)
1.
On the Windows XP taskbar, click on the start button then select All
Programs, AcerSystem.
2.
Click on Aspire L Series User’s Guide.
5
Front and rear panels
Your computer's front and rear panels consist of the following:
Icon
Component
Icon
Component
Eject button
DVI port
Power button
CRT/LCD monitor port
Hard disk drive indicator
OBR (One Button Recovery)
button (for selected models)
LAN indicator / Network
port
Line-out jack
USB ports
Microphone-in jack
Kensington lock
Headphone/Speaker-out/lineout port
DC-in jack
Line-in jack
IEEE 1394 port
Media card reader
FM
FM radio input jack
TVOUT
TV antenna/cable output jack
TV
TV antenna/cable input jack
SPDIF
Coaxial digital audio output jack
AV-IN
A/V input connector
Note: See "Connecting peripherals" on page 14 and "Connecting
options" on page 19 for more information.
6
1 System tour
Keyboard
The keyboard has full-sized keys that include separate cursor keys, two
Windows keys, four multimedia keys, and 12 function keys.
For information on how to connect your keyboard, see "Connecting your
mouse and keyboard (for selected models)" on page 14.
No.
Description
No.
Description
1
Sleep button
2
Internet/Email/Search keys
3
Multimedia keys
4
Volume control/mute keys
5
e key (Scroll Lock)
6
Num Lock key
7
Cursor keys
8
Application key
9
Windows logo key
10
Caps Lock key
11
Function keys
7
Optical drive
Your computer may come with a DVD/CD-RW combo, DVD-Dual or DVD-Super
multi drive. This drive is located on the front panel of your computer. The DVD
drive allows you to play not only old CD-ROMs, CD-I disks, and video CDs, but
digital video disks (DVDs) as well. The DVD-Dual and DVD-Super multi drive
allow you to record or burn recordable and rewritable disks.
CDs and DVDs, like diskettes, are also compact, lightweight and easy to carry
around. However, they are more delicate than diskettes and must be handled
with extra care.
To eject the optical disk when the computer is turned on, press the drive eject
button.
Taking care of your CDs and DVDs
•
Keep your disk in its case when not in use to avoid scratches or other
damage. Any kind of dirt or damage can affect the data on the disk, impair
the disk lens reader on the CD or DVD drive, or stop the computer from
successfully reading the disk.
•
When handling disks, always hold them by the edges to avoid smudges
or fingerprints.
•
When cleaning disks, use a clean, dust-free cloth and wipe in a straight line
from the center to the edge. Do not wipe in a circular motion.
•
Clean your CD or DVD drive periodically. You may refer to the Cleaning Kit
for instructions. Cleaning kits can be purchased in any computer or
electronics shop.
8
1 System tour
2 Setting up your
computer
This chapter contains step-by-step instructions
on how to set up your computer and connect
additional peripherals.
11
Arranging a comfortable work area
Working safely and comfortably begins with the arrangement of your work
space and the proper use of equipment. For this reason, it is very important to
take time and think about how you are going to arrange your work area. Refer
to the diagram on the following page as you set up your system.
Here are some points to consider:
Adjusting your chair
Having the right kind of chair does not necessarily mean you'll be properly
supported. It is necessary to adjust your chair to fit your body. Proper body
posture will make you more comfortable and productive.
•
Avoid tilting your chair. If you have a chair that tilts, lock the tilt knobs so
that your chair will not tilt forward or backward while you are using your
computer.
•
Adjust your chair height in such a way that you can sit on it with your
thighs parallel to the floor and your feet resting flat on the floor.
•
Rest your body on the chair back. Your torso works harder to maintain
balance if you do not rest your body on the chair back.
Positioning your PC
12
2 Setting up your computer
Take note of the following when selecting a location for your computer:
•
Do not put your computer near any equipment that might cause
electromagnetic or radio frequency interference, such as radio
transmitters, televisions, copy machines or heating and air-conditioning
equipment.
•
Avoid dusty areas and extremes of temperature and humidity.
•
You may place your computer beside your desk or under your table, as
long as it does not block the space you need for working and moving.
Warning: Do not cover the top mesh to prevent overheating.
•
Your computer comes with a stand that can be easily installed or removed
with a coin. Use the stand if you want to place your computer vertically.
13
Positioning your monitor
Place your monitor at a comfortable viewing distance, usually 50 to 60 cm away.
Adjust the display in such a way that the top of the screen is at or slightly below
eye level.
Positioning your keyboard
The location of the keyboard is a very important factor for your posture.
Placing it too far away will make your body lean forward, forcing you to sit
in an unnatural position. Placing it too high will add tension to your
shoulder muscles.
•
The keyboard should be placed just above your lap. Adjust the keyboard
height by flipping the folding stands located under the keyboard.
•
Keep your lower arms parallel to the floor as you type. Your upper arms
and shoulders should be relaxed. Then try typing with a light touch. If you
feel any shoulder or neck strain, stop for a while and check your posture.
•
Position your keyboard in front of your monitor. Putting your keyboard
beside your monitor will make you turn your head while you type which
could add tension to your neck muscles.
Positioning your mouse
•
The mouse should be placed on the same surface as your keyboard so that
you can reach it with ease.
•
Adjust its position to allow enough space for movement without making
you stretch or lean over.
•
Use your arm to move the mouse. Do not rest your wrist on the table when
moving the mouse.
14
2 Setting up your computer
Connecting peripherals
Setting up your computer is easy. For the most part, you only have four things
to connect: the mouse, the keyboard, the monitor, and the power cable.
Note: The peripherals shown in the connections below are
for your reference only. Actual device models may vary in
select countries.
Connecting your mouse and keyboard (for
selected models)
Plug your USB mouse or keyboard cable into any of the USB ports
on the front and rear panels of your computer.
located
15
Connecting a monitor
To connect a monitor, simply plug the monitor cable into the monitor port
(blue port) or DVI port located on the rear panel of your computer .
Note: Refer to the monitor manual for additional instructions
and information.
16
2 Setting up your computer
Connecting the power cable
Make sure that the AC adapter is properly plugged into the computer and to
the power outlet.
Caution: Before you proceed, check the voltage range in your
area. Make sure that it matches your computer's voltage setting.
Note: Plug the power cable in tightly to avoid accidental
shutdown.
Taking care of your AC adapter
Here are some ways to take care of your AC adapter:
•
Do not connect the adapter to any other device.
•
Do not step on the power cable or place heavy objects on top of it.
Carefully route the power cable and any cables away from foot traffic.
•
When unplugging the power cable, do not pull on the cord itself but pull
on the plug.
•
The total ampere ratings of the equipment plugged in should not exceed
the ampere rating of the cord if you are using an extension cord. Also, the
total current rating of all equipment plugged into a single wall outlet
should not exceed the fuse rating.
17
Turning on your computer
After connecting the necessary peripherals and plugging in the power cable,
you are now ready to turn the computer on and get to work.
To turn on your computer:
1
Turn on all peripherals connected to your computer, such as the monitor,
printer, speakers, etc.
2
On the front panel of your computer, press the Power button.
Important: Make sure that the power cable is properly plugged
into an electrical outlet. If you are using a power strip or an AVR
(Auto-Voltage Regulator), make sure that it is plugged in and
turned on.
18
2 Setting up your computer
Turning off your computer
To turn off your computer, follow the steps below.
For Windows XP:
1
On the Windows XP taskbar, click on the Start button, and click Turn Off
Computer, then click Turn Off.
2
Turn off all peripherals connected to your computer.
If you cannot shut down your computer normally, press and hold the power
button for at least four seconds. Quickly pressing the button may put the
computer in suspend mode only.
19
Connecting options
Connecting to the network
You can connect your computer to a Local Area Network (LAN) using a network
cable. To do so, simply plug the network cable into the network port
the rear panel of your computer.
Note: Consult your network system administrator or operating
system manual for information on how to configure your
network setup.
on
20
2 Setting up your computer
Connecting multimedia devices
You can connect multimedia devices such as microphones, earphones or
headphones, external speakers and audio line-in devices. These devices will let
you take advantage of your computer's multimedia features.
Note: The multimedia devices shown below are for reference only.
Actual device models may vary in selected countries.
Plug the devices in as follows:
•
Microphone: Connects to the Microphone-in jacks
on the front and rear panels of your computer.
(pink jacks) located
Note: For information on how to configure multimedia devices,
consult the documentation that came with each device.
21
•
Earphones, headphones: Connect to the headphone jack
the front panel of your computer.
located on
Note: To adjust the headphone volume, use the volume control
buttons on the keyboard. You can also adjust the volume by using
the volume icon on the taskbar at the bottom of your screen.
•
External speakers: Connect to the audio-out/line-out jack
jack) located on the rear panel of your computer.
(lime-green
22
•
2 Setting up your computer
Audio line-in device: Connects to the audio-in/line-in jack
jack) located on the rear panel of your computer
(light blue
3 System
utilities
This chapter describes applications that are
preinstalled on your computer.
25
Dual-display
To enable the dual monitor feature of your computer, first ensure that
the second monitor is connected, then, select Start, Control Panel,
Display and click on Settings. Select the secondary monitor (2) icon in
the display box and then click the check box Extend my Windows
desktop onto this monitor. Finally, click Apply to confirm the new
settings and click OK to complete the process.
26
3 System utilities
Recovering your system
If your operating system files are lost or damaged, the recovery process
will restore your system's original factory default settings or last system
backup.
1
Your Aspire L Series computer includes an OBR (see page5"Front and rear
panels") button, a feature that makes restoring your system quick and
easy.
2
After the POST runs, Press Alt + F10 combine key during BIOS to enter
hidden partition.
3
This utility has same password protection with Acer eRecovery. Follow all
onscreen instructions.
Caution! Running the Recovery operation will erase all files
previously saved on the C drive so make sure to back up your
important files before starting the recovery process.
Note : This feature occupies 5GB in a hidden partition on your
hard drive to store the default settings.
If you attempt to restore your system using the One Button Recovery
feature, and the system DOES NOT respond, contact your local vendor
or authorised Acer representative immediately.
4 Frequently
asked
questions
This chapter tells you what to do in case your
computer is not working properly. However,
if a more serious problem arises, contact your
dealer or the technical support center
(www.acersupport.com) for assistance.
29
Frequently asked questions
The following questions indicate possible situations that may arise during the
use of your computer and each is followed by easy answers and solutions.
I pressed the power switch but the system did not boot up.
Check the LED located above the power switch.
If the LED is not lit, no power is being applied to the system. Try the following:
•
Check if you properly plugged the power cable into an electrical outlet.
•
If you are using a power strip or AVR, make sure it is plugged in and
turned on.
Nothing appears on the screen.
Your computer's power management function automatically blanks the screen
to save power. Just press any key to turn the display back on.
If pressing a key does not work, you can restart your computer. If restarting
your computer does not work, contact your dealer or technical support center
for assistance.
The printer does not work.
Do the following:
•
Make sure the printer is connected to a power outlet and that it is
turned on.
•
Make sure the printer cable is connected securely to the USB port and the
corresponding port on the printer.
•
For additional information concerning the printer, refer to the printer's
documentation.
No sound comes out from the computer.
Check the following:
•
The volume may be muted. Look for the Volume icon on the taskbar. If it is
crossed-out, click on the icon and deselect the Mute option. You can also
press the volume control/mute knob on your USB keyboard to toggle from
mute to sound on.
•
If headphones, earphones or external speakers are connected to the lineout jack of your computer, the internal or built-in speakers are
automatically turned off.
30
4 Frequently asked questions
System cannot read hard disk, CD or DVD information.
Check the following:
•
Make sure you are using the correct type of disk.
•
Make sure the CD or DVD is inserted into the drive correctly.
•
Check if the CD or DVD is clean and unscratched.
•
Check your drive by using a good (undamaged) disk. If your drive can not
read the information on the good disk there may be a problem with the
drive. Contact your dealer or technical support center for assistance.
System cannot write data on the hard disk, DVD-Dual or
DVD-Super multi.
Check the following:
•
Make sure the hard disk is not write-protected.
•
Make sure you are using the correct type of disk.
Appendix A:
Regulations and
safety notices
32
Appendix A: Regulations and safety notices
Regulations and safety notices
ENERGY STAR guidelines compliance
As an ENERGY STAR partner, Acer Inc. has determined that this product meets
the ENERGY STAR guidelines for energy efficiency.
FCC notice
This device has been tested and found to comply with the limits for a Class B
digital device pursuant to Part 15 of the FCC rules. These limits are designed to
provide reasonable protection against harmful interference in a residential
installation. This device generates, uses, and can radiate radio frequency energy
and, if not installed and used in accordance with the instructions, may cause
harmful interference to radio communications.
However, there is no guarantee that interference will not occur in a particular
installation. If this device does cause harmful interference to radio or television
reception, which can be determined by turning the device off and on, the
user is encouraged to try to correct the interference by one or more of the
following measures:
•
Reorient or relocate the receiving antenna.
•
Increase the separation between the device and receiver.
•
Connect the device into an outlet on a circuit different from that to which
the receiver is connected.
•
Consult the dealer or an experienced radio/television technician for help.
Notice: Shielded cables
All connections to other computing devices must be made using shielded cables
to maintain compliance with FCC regulations.
Notice: Peripheral devices
Only peripherals (input/output devices, terminals, printers, etc.) certified to
comply with the Class B limits may be attached to this equipment. Operation
with non-certified peripherals is likely to result in interference to radio and TV
reception.
Caution
Changes or modifications not expressly approved by the manufacturer could
void the user's authority, which is granted by the Federal Communications
Commission, to operate this computer.
33
Operation conditions
This device complies with Part 15 of the FCC Rules. Operation is subject to the
following two conditions: (1) this device may not cause harmful interference,
and (2) this device must accept any interference received, including interference
that may cause undesired operation.
Notice: Canadian users
This Class B digital apparatus complies with Canadian ICES-003.
Remarque à l'intention des utilisateurs canadiens
Cet appareil numérique de la classe B est conforme a la norme NMB-003 du
Canada.
Declaration of Conformity for EU countries
Hereby, Acer, declares that this PC series is in compliance with the essential
requirements and other relevant provisions of Directive 1999/5/EC.
Compliant with Russian regulatory certification
Modem notices
Notice for USA
This equipment complies with Part 68 of the FCC rules. Located on the modem is
a label that contains, among other information, the FCC Registration Number
and Ringer Equivalence Number (REN) for this equipment. Upon request, you
must provide this information to your telephone company.
If your telephone equipment causes harm to the telephone network, the
telephone company may discontinue your service temporarily. If possible, they
will notify you in advance. But, if advance notice is not practical, you will be
notified as soon as possible. You will also be informed of your right to file a
complaint with the FCC.
34
Appendix A: Regulations and safety notices
Your telephone company may make changes in its facilities, equipment,
operations, or procedures that could affect the proper functioning of your
equipment. If they do, you will be notified in advance to give you an
opportunity to maintain uninterrupted telephone service.
If this equipment should fail to operate properly, disconnect the equipment
from the phone line to determine if it is causing the problem. If the problem is
with the equipment, discontinue use and contact your dealer or vendor.
Caution: To reduce the risk of fire, use only No. 26 AWG or larger
UL Listed or CSA Certified Telecommunication Line Cord.
TBR 21
This equipment has been approved [Council Decision 98/482/EC - "TBR 21"] for
single terminal connection to the Public Switched Telephone Network (PSTN).
However, due to differences between the individual PSTNs provided in different
countries, the approval does not, of itself, give an unconditional assurance of
successful operation on every PSTN termination point. In the event of problems,
you should contact your equipment supplier in the first instance.
List of applicable countries
EU member states as of May 2004 are: Belgium, Denmark, Germany, Greece,
Spain, France, Ireland, Italy, Luxembourg, the Netherlands, Austria, Portugal,
Finland, Sweden, United Kingdom Estonia, Latvia, Lithuania, Poland, Hungary,
Czech Republic, Slovak Republic, Slovenia, Cyprus and Malta. Usage allowed in
the countries of European Union, as well as Norway, Switzerland, Iceland and
Liechtenstein. This device must be used in strict accordance with the regulations
and constraints in the country of use. For further information, please contact
local office in the country of use.
Notice for Australia
For safety reasons, only connect headsets with a telecommunications
compliance label. This includes customer equipment previously labelled
permitted or certified.
35
Notice for New Zealand
1
The grant of a Telepermit for any item of terminal equipment indicates
only that Telecom has accepted that the item complies with minimum
conditions for connection to its network. It indicates no endorsement of
the product by Telecom, nor does it provide any sort of warranty. Above
all, it provides no assurance that any item will work correctly in all respects
with another item of Telepermitted equipment of a different make or
model, nor does it imply that any product is compatible with all of
Telecom's network services.
2
This equipment is not capable, under all operating conditions, of correct
operation at the higher speeds for which it is designed. Telecom will accept
no responsibility should difficulties arise in such circumstances.
3
Some parameters required for compliance with Telecom's Telepermit
requirements are dependent on the equipment (PC) associated with this
device. The associated equipment shall be set to operate within the
following limits for compliance with Telecom's Specifications:
a
There shall be no more than 10 call attempts to the same number
within any 30 minute period for any single manual call initiation, and
b
The equipment shall go on-hook for a period of not less than 30
seconds between the end of one attempt and the beginning of the
next call attempt.
4
Some parameters required for compliance with Telecom's Telepermit
requirements are dependent on the equipment (PC) associated with this
device. In order to operate within the limits for compliance with Telecom's
specifications, the associated equipment shall be set to ensure that
automatic calls to different numbers are spaced such that there is not less
than 5 seconds between the end of one call attempt and the beginning
of another.
5
This equipment shall not be set up to make automatic calls to Telecom's
111 Emergency Service.
6
This device is equipped with pulse dialing while the Telecom standard is
DTMF tone dialing. There is no guarantee that Telecom lines will always
continue to support pulse dialing.
7
Use of pulse dialing, when this equipment is connected to the same line as
other equipment, may give rise to bell tinkle or noise and may also cause a
false answer condition. Should such problems occur, the user should NOT
contact the telecom Fault Service.
8
This equipment may not provide for the effective hand-over of a call to
another device connected to the same line.
9
Under power failure conditions this appliance may not operate. Please
ensure that a separate telephone, not dependent on local power, is
available for emergency use.
36
Appendix A: Regulations and safety notices
Laser compliance statement
The CD or DVD drive used with this computer is a laser product.
The CD or DVD drive's classification label (shown below) is located on the drive.
CLASS 1 LASER PRODUCT
CAUTION: INVISIBLE LASER RADIATION WHEN OPEN. AVOID EXPOSURE
TO BEAM.
APPAREIL A LASER DE CLASSE 1 PRODUIT
LASERATTENTION: RADIATION DU FAISCEAU LASER INVISIBLE EN CAS
D’OUVERTURE. EVITTER TOUTE EXPOSITION AUX RAYONS.
LUOKAN 1 LASERLAITE LASER KLASSE 1
VORSICHT: UNSICHTBARE LASERSTRAHLUNG, WENN ABDECKUNG GEÖFFNET
NICHT DEM STRAHLL AUSSETZEN
PRODUCTO LÁSER DE LA CLASE I
ADVERTENCIA: RADIACIÓN LÁSER INVISIBLE AL SER ABIERTO. EVITE EXPONERSE
A LOS RAYOS.
ADVARSEL: LASERSTRÅLING VEDÅBNING SE IKKE IND I STRÅLEN.
VARO! LAVATTAESSA OLET ALTTINA LASERSÅTEILYLLE.
VARNING: LASERSTRÅLNING NÅR DENNA DEL ÅR ÖPPNAD ÅLÅ TUIJOTA
SÅTEESEENSTIRRA EJ IN I STRÅLEN
VARNING: LASERSTRÅLNING NAR DENNA DEL ÅR ÖPPNADSTIRRA EJ IN I
STRÅLEN
ADVARSEL: LASERSTRÅLING NAR DEKSEL ÅPNESSTIRR IKKE INN I STRÅLEN
Macrovision copyright protection notice
This product incorporates copyright protection technology that is protected by
U.S. patents and other intellectual property rights. Use of this copyright
protection technology must be authorized by Macrovision, and is intended for
home and other limited viewing uses only unless otherwise authorized by
Macrovision. Reverse engineering or disassembly is prohibited.
Radio device regulatory notice
Note: Below regulatory information is for models with wireless
LAN and/or Bluetooth only.
General
This product complies with the radio frequency and safety standards of any
country or region in which it has been approved for wireless use. Depending on
37
configurations, this product may or may not contain wireless radio devices (such
as wireless LAN and/or Bluetooth modules). Below information is for products
with such devices.
European Union (EU)
This device complies with the essential requirements of the European Council
Directives listed below:
73/23/EEC Low Voltage Directive
•
EN 60950-1
89/336/EEC Electromagnetic Compatibility (EMC) Directive
•
EN 55022
•
EN 55024
•
EN 61000-3-2/-3
99/5/EC Radio & Telecommunications Terminal Equipment (R&TTE) Directive
•
Art.3.1a) EN 60950-1
•
Art.3.1b) EN 301 489 -1/-17
•
Art.3.2) EN 300 328-2
•
Art.3.2) EN 301 893 *applies to 5 GHz only
List of applicable countries
EU member states as of May 2004 are: Belgium, Denmark, Germany, Greece,
Spain, France, Ireland, Italy, Luxembourg, the Netherlands, Austria, Portugal,
Finland, Sweden, United Kingdom Estonia, Latvia, Lithuania, Poland, Hungary,
Czech Republic, Slovak Republic, Slovenia, Cyprus and Malta. Usage allowed in
the countries of European Union, as well as Norway, Switzerland, Iceland and
Liechtenstein. This device must be used in strict accordance with the regulations
and constraints in the country of use. For further information, please contact
local office in the country of use.
The FCC RF safety requirement
The radiated output power of the wireless LAN Card is far below the FCC radio
frequency exposure limits. Nevertheless, the PC series shall be used in such a
manner that the potential for human contact during normal operation is
minimized as follows:
38
Appendix A: Regulations and safety notices
1
This device is restricted to indoor use due to its operation in the 5.15 to
5.25 GHz frequency range. FCC requires this product to be used indoors for
the frequency range 5.15 to 5.25 GHz to reduce the potential for harmful
interference to co-channel Mobile Satellite systems.
2
High power radar are allocated as primary users of the 5.25 to 5.35 GHz
and 5.65 to 5.85 GHz bands. These radar stations can cause interference
with and/or damage this device.
3
An improper installation or unauthorized use may cause harmful
interference to radio communications. Also any tampering of the internal
antenna will void the FCC certification and your warranty.
Canada — Low-power license-exempt radio
communication devices (RSS-210)
a
Common information
Operation is subject to the following two conditions:
1. This device may not cause interference, and
2. This device must accept any interference, including interference
that may cause undesired operation of the device.
b
Operation in 2.4 GHz band
To prevent radio interference to the licensed service, this device is
intended to be operated indoors and installation outdoors is subject
to licensing.
c
Operation in 5 GHz band
•
The device for the band 5150-5250 MHz is only for indoor usage to reduce
potential for harmful interference to co-channel Mobile Satellite systems.
•
High power radars are allocated as primary users (meaning they have
priority) of 5250-5350 MHz and 5650-5850 MHz and these radars could
cause interference and/or damage to LELAN (Licence-Exempt Local Area
Network) devices.
39
Federal Communications Comission
Declaration of Conformity
This device complies with Part 15 of the FCC Rules. Operation is subject to the
following two conditions: (1) This device may not cause harmful interference,
and (2) This device must accept any interference received, including
interference that may cause undesired operation.
The following local manufacturer/importer is responsible for this declaration:
Product name:
Personal computer
Model:
Aspire L Series
Name of responsible party:
Acer America Corporation
Address of responsible party:
2641 Orchard Parkway
San Jose, CA 95134
USA
Contact person:
Mr. Young Kim
Tel:
408-922-2909
Fax:
408-922-2606
40
Appendix A: Regulations and safety notices
Declaration of Conformity for CE marking
Name of manufacturer:
Acer Inc.
Address of manufacturer:
8F, 88, Sec. 1, Hsin Tai Wu Rd.
Hsichih, Taipei Hsien 221
Taiwan
Declares that product:
Personal computer
Model:
Aspire L Series
Conforms to the EMC Directive 89/336/EEC as attested by conformity with the
following harmonised standards:
EN55022:1994 /A2: 1997: Limits and Methods of Measurement of Radio
Interference characteristics of Information Technology Equipment
EN55024: 1998/A1: 2001: Information technology equipment — Immunity
characteristics — Limits and methods of measurement including:
EN61000-4-2: 1995/A1: 1998/A2: 2001
EN61000-4-6: 1996/A1: 2001
EN61000-4-3: 1996/A1: 1998
EN61000-4-8: 1993/A1: 2001
EN61000-4-4: 1995/A2: 2001
EN61000-4-11: 1994/A1: 2001
EN61000-4-5: 1995/A1: 2001
EN61000-3-2: 2000: Limits for harmonics current emissions
EN61000-3-3: 1995/A1: 2001: Limits for voltage fluctuations and flicker in
low-voltage supply systems
Conforms to the Low Voltage Directive 73/23/EEC as attested by conformity
with the following harmonised standard:
EN60950: 2000: Safety of Information Technology Equipment Including
electrical business equipment. This equipment has been approved to Council
Decision 98/482/EC (CTR21) for pan-European single terminal connection to the
Public Switched Telephone Network (PSTN).
We, Acer Inc., hereby declare that the equipment bearing the trade name and
model number specified above was tested conforming to the applicable Rules
under the most accurate measurement standards possible, and that all the
necessary steps have been taken and are in force to assure that production units
of the same equipment will continue to comply with the requirements.
04/01/2006
Easy Lai, Director
Qualification Center
Product Assurance
Date
41
Index
system cannot write to disk 30
system did not boot up 29
front panel 5
K
keyboard
A
accessing the online User’s Guide
4
6
R
C
recovering your system
connecting options
multimedia devices 20
audio line-in device 22
earphones/headphones 21
external speakers 20
microphone 20
network 19
serial mouse 19
S
D
disk drives
CD-ROM/DVD-ROM/CD-RW drive
inserting CDs/DVDs 7
taking care CDs/DVDs 7
F
Frequently-asked questions 29
blank screen 29
no audio 29
no sound 29
printer not working 29
system cannot read disk 30
26
safety
CD or DVD 36
FCC notice 32
modem notices 33
setting up computer 11, 14
area 11
chair 11
connecting peripherals
external monitor 15
power cable 16
keyboard 13
monitor 13
mouse 13
T
turning off computer 18
software shutdown 18
suspend mode 18
turning on computer 17
power button 17