1
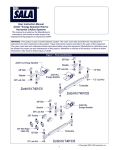
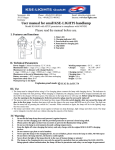
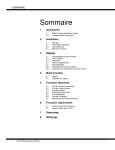
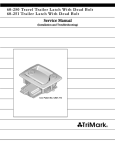
EC MACHINERY DIRECTIVE 98/37/EEC, 91/368/EE, 93/68/EEC
EC LOW VOLTAGE DIRECTIVE 73/23/EEC, 93/68/EEC
EC EMC DIRECTIVES 89/336/EEC, 92/31/EEC, 93/68/EEC
EU NOISE DIRECTIVE 2000/14/EEC
DECLARATION OF CONFORMITY
We hereby certify that OSAKI ABV2000 Blower - Vacuum - Shredder
complies with all the relevant provisions of the
EC Directives 98/37/EEC, 91/368/EE, 93/68/EEC, 73/23/EC, 93/68/EEC,
89/336/EEC, 92/31/EEC, 93/68/EEC & 2000/14/EEC
Harmonised Standards Applied: EN 292-1:1991, EN 292-2:1991 EN,
55014-1: 1993 + A1: 97+ A2:99, EN 55014-2: 1997, EN 61000-3-2: 1995 +A1: 1998+A2: 1998,
EN 61000-3-3: 1995, EN 60335-1: 2002, Parts of IEC 60335-2-100: 2002
Official Agent
KENNEDY TOOLS
Wigston Works, Leicester, England, LE18 2ET
Supplied by an ISO9001 approved company.
Signed:
Date: 11th Jan 2013
Name: Keith Read
Position: HSQE Team
QUALITY GUARANTEE & WARRANTY
BLOWER - VACUUM - SHREDDER
• A powerful compact tool, which, at the click of a switch
changes from a blower to a vacuum
• The high impact shredding blade allows the vacuumed
material to be converted into garden mulch
• Easy to empty 45 litre bag
• 250km/h blow speed
• 2,000 watt motor
• 10m cable
• Lightweight
• Wheels for easy manoeuvrability
• Shoulder strap for user comfort
OSAKI LAWN & GARDEN TOOLS carry one years manufacturers warranty.
OSAKI LAWN & GARDEN TOOLS are designed & produced
to the highest standards & specifi cations
OSAKI LAWN & GARDEN TOOLS are fully guaranteed against
faulty materials & workmanship
Should they be found to be defective, they will either be repaired or replaced
free of charge (fair wear and tear and/or misuse excepted).
This does not affect your legal rights.
Please retain supplier invoice as proof of purchase.
ABV2000
ORDER CODE
OSA-279-0200K
Osaki continually strives to improve it products, specifications may change without prior notice.
© The Kennedy Group Ltd. 04/2013
OPERATORS MANUAL
SERVICE AND REPAIR
INTRODUCTION
Osaki Power Tools are committed to the the Production of Quality Power Tools that
are designed for high performance and long service life. If safety and maintenance
procedures are observed they will last for many years.
INTRODUCTION
IMPORTANT NOTE!
Make sure you read these instructions
carefully, and follow them. Use the
instructions to familiarise yourself with
the device, the proper way to operate it
and the device safety information.
Keep these operating instructions in a
safe place.
INTENDED USE
• The blower/vacuum is designed to
blow/vacuum leaves as well as lawn
debris such as grass clipping leaves
and small twigs. It is not to be used
for any other purpose.
• The device is only to be used on dry
surfaces.
• The device is intended for
non-commercial use in private homes
and gardens. Under no circumstances
is it to be used in public outdoor
areas, sports stadiums or in
agricultural or forestry settings.
2
A comprehensive in house
repair and service facility is
available through your
local agent.
DESCRIPTION OF DEVICE
(See fig. 1)
1. On/off switch
2. Motor housing, hand-grip
3. Cable holder
4. Power plug
5. Handle adjustment nut and bolt
6. Handle
7. Collection bag
8. Blower tube
9. Suction nozzle
10. Operating mode selector
11. Safety switch
12. Strap
SPECIFICATIONS
Model:
ABV2000
Nominal voltage:
230 V
Nominal frequency:
50Hz
Power Consumption:
2.000W
Blower air speed:
270km/h
Suction force:
780 m/h
Collection bag capacity: Approximately 45 L
Acoustic pressure (LpA):
90 dB(A)
Noise emission level (LpA):
104dB(A)
Vibration level:
<2.5m/s²
9
TROUBLESHOOTING
FAULT
LIKELY CAUSE
SOLUTION
No power.
Check the power cord, extension
cord and fuse.
Defetive power cord.
Send the device to the Osaki repair
and service facility.
Motor conection loose.
Send the device to the Osaki repair
and service facility.
Blower tube mounted incorrectly.
Make sure the tube is mounted as
described in the instructions.
Motor doesn’t come on.
TECHNICAL DRAWINGS
RECYCLING
The product packaging, as well as the
blower and its accessories, should be
recycled. The plastic components are
marked as such for purposes of sorting
recycled materials.
Waste electrical products should not be disposed of
with household waste. Please recycle where facilities
exist. Check with your local Authority or retailer for
recycling advice.
8
THE NUMBERS MENTIONED IN THE TEXT CORRESPOND WITH THE PICTURES
3
MAINTENANCE
TECHNICAL DRAWINGS
PLUGGING IN AND SWITCHING ON THE DEVICE
• Insert the power plug into the extension cord
connector.
• Loop the power cord around the cable holder
(See fig.6). This will prevent the cord from coming
unplugged.
• Move the on/off switch (1) to position 1.
To turn off the device, move the power switch to
position 0 (off).
OPERATION MODES
The blower has two operating modes:
• Vacuum mode (See fig.7b)
• Blow mode (See fig.7a)
VACUUM MODE (See fig.8)
• To vacuum, move the operating mode selector
(10) all the way to the left to the "Vacuum" symbol.
This can be done either when the device is turned
off or while it is in operation.
BLOW MODE (See fig. 9)
• To blow, move the operating mode selector (10)
all the way to the right "blow" symbol. This can be
done either when the device is turned off or while
it is in operation.
• Point the end of the blower tube forward and
move slowly, blowing the garden debris or leaves
together (or away from difficult to reach places).
MAINTENANCE
IMPORTANT!
Maintenance, repairs and cleaning should always be
performed with the device unplugged.
• Under no circumstances should running water or
a high pressure cleaner be used on the blower.
• Do not use strong cleaning agents.
• After each use, remove the collection bag from
the device, turn it inside out and clean it thoroughly.
This will prevent mould and unpleasant odours from
developing.
• If the bag is very soiled, wash it with soap and
water.
• If the zipper becomes stiff, rub dry soap on the
zipper teeth.
• Keep the device and its air vents clean at all times.
• Wipe any dirt off the device with a damp cloth. If
the blower tube becomes soiled, clean it with a
brush.
• In the event of soiling from vacuumed debris makes
the “operating mode selector” (10) stiff, simply
move it back and forth several times and it will move
easily again.
IMPORTANT: Make sure you empty the collection
bag before using the device for blowing. Otherwise,
debris might begin spilling out of the bag.
EMPTYING THE COLLECTION BAG
• Switch off and unplug the device.
• Open the collection bag zipper and shake out
the contents of the bag.
The bag should be emptied before it becomes full
otherwise the device's vacuuming power will be
greatly reduced. Organic debris should be composted.
4
THE NUMBERS MENTIONED IN THE TEXT CORRESPOND WITH THE PICTURES
7
ASSEMBLY
• Never operate the blower on damp or wet grass.
Using the blower on sloping areas:
Do not work in areas with unduly steep slopes.
Always position yourself horizontally to the slope and
make sure your feet are firmly on the gound. Exercise
particular caution whenever you change directions
while working on a slope.
• Keep the air outlet unobstructed and clean at
all times.
• Never direct the suction/blown air opening toward
persons or animals.
MAINTENANCE AND STORAGE
• Make sure that all screws, nuts and bolts are
tight, doing this will ensure that the blower is safe
to operate.
• Check the collection bag regularly for signs of
wear and/or distortion.
• For reasons of safety, any worn or damaged
component should be replaced or repaired
immediately by a qualified technician.
• When not in use, the blower should be stored in
a dry location that is inaccessible to children.
The blower can be plugged into any 230 volt AC outlet
with 10 amps of fuse protection. The electrical outlet
is to be protected by an Earth Leakage Circuit Breaker
(ELCB) with a max triggering current of 30m amps.
BEFORE USE
- STEPS PRIOR TO OPERATION
Only operate the device after completely assembling
it. Prior to each use, check the power cord for signs
of damage. Under no circumstances should the power
cord be used if it shows any signs of damage.
ASSEMBLING THE DEVICE
MOUNTING THE HANDLE (See fig.2)
• Lie the handle (6) on the upper section of the motor
housing (2). Press it in and align it with the handle
section.
• Insert the bolt (5) through the handle adjustment
nut (5) and the motor housing.
Tighten down the nut (5).
6
MOUNTING THE BLOWER TUBE (See fig.3 & 4)
Assemble the suction nozzle (9) and blower tube (8)
sections of the blower tube. The two components
should lock in place with an audible click.
NOTE: Before attaching the blower tube to the device,
make absolutely certain that the two components of
the tube are tightly assembled. Under no
circumstances should they be disassembled at any
future time.
NOTE: The blower is fitted with a safety switch (11)
which is only activated when the blower tube is
attached to the device.
WARNING: The two sections of the blower tube must
be connected together and then fixed with the screws
to the housing before use.
MOUNTING THE COLLECTION BAG (See fig.5)
• Attach the collection bag (7) to the connector on
the housing in such a way that the tube locks onto
the connector and makes an audible click.
• Attach each of the hooks to the blower tube and
motor housing.
ADJUSTING THE STRAP
Adjust the length of the strap (12) in such a way that
when the device is operated, the blower tube is nearly
touching the ground (but not actually touching it).
The guide rollers underneath the blower tube make
it easier to point the tube in the desired direction.
SAFETY
SAFETY
Safety-related icons on the device
Warning
Do not run with the device
Read the instructions before
operating the device
Never use the device in the rain
or snow. Keep the device away
from dampness and water
Make sure no other persons
are nearby while the device is
being operated
Wear eye and hearing
protection
Switch off and unplug the
device before cleaning or
performing maintenance on it
SAFETY INFORMATION
FAMILIARISING YOURSELF WITH THE DEVICE
• Read these instructions carefully so as to
familiarise yourself with proper use of the device
and its operating and control functions.
• Under no circumstances should children less then
14 years of age be permitted to operate the blower
• Under no circumstances should persons who are
unfamiliar with the contents of these instructions
be permitted to operate the device. Ordinances and
regulations in some municipalities may set
aminimum age for operations of the blower.
• Under no circumstances should the blower ever be
operated when other persons, particularly children,
or pets are nearby.
• The user is liable for any accidents or damage
incurred by third parties or their property.
HEALTH AND SAFETY PRECAUTIONS
• When you operate the blower, always wear
full length trousers, as well as sturdy closed shoes
that provide good support.
• Under no circumstances should jewellery, any other
body ornamentation, or loose clothing be worn
while operating the device as these items could be
drawn into the suction orifice. When working
outdoors, rubber gloves and non-slip footwear
should always be worn. If you have long hair, put
it in a hair net.
• Wear protective garments and goggles. Wearing
protective garments such as a dust mask, non
slip footwear, protective gloves, a helmet and/or
hearing protection (depending on the type and
application of the electrical device concerned)
reduces the risk of injury.
• When performing work that generates dust, wear
a breathing mask.
• Each time you use the blower, check the
integrity of the device's power cord and your own
extension cord. The device should only be
operated when its accessories are in perfect
working order.
Any damaged or defective components
should be repaired immediately by a qualified
technician.
• Under no circumstances should the blower be
operated while you are wearing damaged
protective garments, shielding or without safety
equipment such as the deflection device or
collection bag.
Only extension cords that are rated for outdoor
use should be used outdoors. Any extension
cord used should measure a minimum of
1.5mm2. All plug-in connections should have
an earthing contact and water-spray shielding.
OPERATING THE DEVICE
• Make sure the power cord is kept behind and
away from the device while you work.
• If the power cord or extension cord are damaged
while you work, unplug the blower immediately.
• Never use the power cord as a handle to lift or
carry the device.
• Always unplug the device under the following
circumstances:
- When the blower is not in use, is being
carried/transported, or is left unattended.
- While examining, cleaning or unclogging the
device.
- When performing maintenance on it, or
attaching accessories to it.
- If the device strikes a foreign object or begins
vibrating abnormally.
• Use the blower in daylight or with adequate
illumination.
• Bear in mind that the force generated by an
electrical device can make you lose your
balance. Therefore, make sure that your feet are
firmly on the ground and that your body is well
balanced when you are operating the device.
5