1
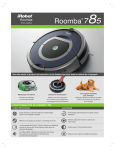
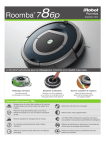
VMS2 user guide
PLEASE READ THESE INSTRUCTIONS FULLY PRIOR TO USE.
VMS2 can be used in individual strips, or assembled into networks.
To use VMS2:
1. Cut strips to desired length and network configuration and apply onto the laminate,
securing with suitable flash tape where required.
2. Seal the open ends of the VMS2 strip with VMS2TAPE.
3. Cut a small hole (approx 25mm diameter) in the
centre of the VMS2 strip for the VMS2PORT, taking care
not to damage the non-porous membrane or mesh.
A minimum of 1 port per 50m of VMS2 is required.
4. Locate the VMS2PORT over the hole, and seal around the port flange with sealant tape.
5. To assemble VMS2 into networks, follow steps 1, 2 and 3.
Aerovac Systems Ltd
www.aerovac.com
6. Apply a square of sealant tape around
the hole.
Aerovac Systems Italy S.r.l
www.aerovac.it
Aerovac Systèmes France
www.aerovac.fr
Richmond Aircraft Products
www.richmondaircraft.com
Aerovac Systems Ltd.
All statements, technical information and recommendations contained in this publication are based on tests believed to be reliable, but their
accuracy and/or completeness are not guaranteed. The user shall determine the suitability for this particular purpose and shall assume all risk
and liability in connection herewith. All values stated are nominal. For further details about tolerances please contact Aerovac Systems quality
department.
Revised: September 2010
VMS2 user guide
7. Apply a second strip of VMS2 over the
hole and seal to the sealant tape.
8. Apply the vacuum bag.
9. Cut holes in the vacuum bag for the vacuum hoses.
10. Apply a small strip of sealant tape around
the bottom of the 12mm vacuum hose.
11. Push the vacuum hose into the VMS2PORT, ensuring the hose sits flush with the
shoulder (located half way up the hole of the port) and DOES NOT sit on the base of
the VMS2PORT.
The sealant tape will self seal to the top of the VMS2PORT.
12. Seal the vacuum bag around the
hose where it has been inserted into the
VMS2PORT, ensuring that no leaks are present.
13. Apply vacuum and carry out a leak test.
Aerovac Systems Ltd
www.aerovac.com
Aerovac Systems Italy S.r.l
www.aerovac.it
Aerovac Systèmes France
www.aerovac.fr
Richmond Aircraft Products
www.richmondaircraft.com
Aerovac Systems Ltd.
All statements, technical information and recommendations contained in this publication are based on tests believed to be reliable, but their
accuracy and/or completeness are not guaranteed. The user shall determine the suitability for this particular purpose and shall assume all risk
and liability in connection herewith. All values stated are nominal. For further details about tolerances please contact Aerovac Systems quality
department.
Revised: September 2010