1
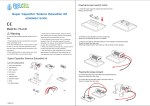
User Guide
ScoopFree Overview
Automatic Operation
Product Setup
Cartridge Installation
Maximizing Cartridge Life
Cycle Button
Indicator Light
Acclimating Your Cat
Safety Precautions
Changing the Cartridge
Care and Cleaning
Troubleshooting
Replacement Cartridges
Customer Service
Limited Warranty
Guarantee
Important Safeguards
TM
SAVE THIS INSTRUCTION MANUAL
1
1
2
3
4
5
5
6
6
7
8
8
10
10
11
11
12
Congratulations! You have purchased ScoopFree™,
the first litter box you can leave alone for up to 30 days!
Read this instruction manual completely before first use!
ScoopFree™ Overview
•
Your cat will use ScoopFree just like any other litter box.
•
This ScoopFree Automatic Litter Box includes your first litter
cartridge, which is filled with Fresh Step® Crystals cat litter.
•
The crystal kitty litter absorbs urine and dries out solid waste,
resulting in unsurpassed odor control.
•
ScoopFree automatically rakes solid waste into a covered trap
after each use and absorbs urine, leaving the litter clean & fresh.
•
For up to one month with one cat there is nothing to fill, empty
or clean. Just replace the cartridge at least once every 30 days.
Automatic Operation
•
Optical sensors detect when your cat is inside the box.
•
The crystal litter immediately starts to absorb moisture, dry out
waste and lock in odors. Note: Crystal litter does not clump!
•
A 20-minute countdown cycle begins when your cat leaves
the box and a light on top of the unit will blink slowly.
•
If your cat returns to the box, the countdown cycle stops.
•
The countdown cycle resets when your cat leaves again.
•
After the countdown, the rake sweeps through the litter and
moves the dried-out solids into the waste trap. The crystals
absorb the urine.
•
The rake reverses direction to smooth out and level the litter bed.
•
There is nothing to fill, empty or clean for up to 30 days per cat!
1
Product Setup
• ScoopFree™ is packaged for protection during shipping. Please
remove the packaging material carefully.
• The power cord is packaged inside a small box separate
from the litter box assembly.
• Packaging material is not a toy. Please dispose of properly and keep
away from children and pets.
• Find a clean, dry, and level location to put your ScoopFree litter box.
IMPORTANT! READ THIS BEFORE PLUGGING IN LITTER BOX! .
The rake will automatically move to the home position
when you plug in the unit. Make sure there is nothing
inside the litter box!
• Connect the power cord to the litter box and an electrical outlet.
• The rake will automatically move towards the home position.
• After the rake stops, the indicator light will glow steady green.
2
Cartridge Installation
Step 1: Place cartridge cover underneath
litter tray. The cover is extra protection
from leaks and will be used later for
cartridge disposal.
Step 2: Write cartridge installation
and change dates on waste trap. You
may want to note these dates on a
calendar too.
Then remove litter container and
inner packaging.
Step 3: Lift up litter box up by grasping
waste lid. For added convenience, stand
litter box on its end.
Step 4: Grasp cartridge by waste trap
and slide opposite end of cartridge
against back of litter box.
Step 5: Lower litter box onto cartridge.
You should hear a click, which confirms
the magnets on the waste lid have
grabbed the magnet contacts on the
litter cartridge.
Make sure the litter box is level and
is sitting on the cartridge.
Step 6: Open litter container and tear
corner notch to open bag. Empty into tray
and spread litter evenly. Do not lift waste
door! Do not put litter in waste trap!
Step 7: Activate rake by pressing and
holding the cycle button on the top
of the litter box to start the rake.
Your litter box is now ready for use!
Warning: Do not use the
cartridge for more than 30 days.
If overused, it may leak urine.
3
Maximizing Cartridge Life
1.
This product works best if placed away from areas of high
humidity such as bathrooms and showers.
2.
Cat diets high in crude fiber and ash content will greatly
increase the bulk of you cat’s solid waste output. This may
prematurely fill the waste compartment. To maximize
cartridge life consider changing your cat’s diet to a brand with
less roughage.
3.
Stirring litter crystals once a week may better accommodate
cats that are ill and/or have a high urine output. This will
distribute saturated crystals and extend the life of the
cartridge.
4.
Be sure to mix in the crystal from behind the rake and along
the sides of the litter box. Crystal from behind the rake can be
reached using the cycle button to move the rake away from
the parked position. Allow the rake to move to the waste end
then press the cycle button again to stop the rake for stirring.
After stirring, press the cycle button again to return the rake to
the park position.
5.
The above procedure will also benefit cats that do not dig and
those that urinate consistently in the same spot. Do not mix in
litter from under the waste compartment area.
4
Cycle Button
Although ScoopFree™ is designed to operate automatically; you may
manually control the rake by pushing the cycle button on the top of the
litter box. It may be necessary to press and hold for several moments.
•
•
•
Push once to start rake cycle.
Push again to stop cycle.
Push one more time, and rake returns to home position.
If the rake is stopped somewhere other than the home position,
pressing the cycle button resets the box and returns the rake home.
Indicator Light
The indicator light is located on top of the litter box next to the cycle
button. It tells you the status of the litter box and can help you diagnose
potential problems.
Indicator Light
Status
Steady Green
Litter box has power and rake is in the home
position.
Slow Flashing
Cat has left litter box and countdown timer
or automatic raking is in process.
Moderate Flashing
Cat or object in box is triggering sensor.
Rapid Flashing
Rake is stopped somewhere other than the
home position. This occurs when:
• User presses cycle button to stop rake
• Rake has encountered an obstruction
• Waste trap is too full or there is some
accumulation behind rake in home position
Refer to ‘Troubleshooting’ section for
more information.
5
Acclimating Your Cat
•
Most cats adapt easily and quickly to ScoopFree™.
•
To help your cat adjust to crystal kitty litter, we recommend adding
a cupful of your old litter to your first ScoopFree cartridge.
•
To expedite the transition, we suggest leaving your old litter box
next to your ScoopFree and not cleaning your old litter box.
•
You can also gradually remove clean litter from the old litter box.
•
As the old litter box gets too shallow and its odor increases, your
cat will start exploring and using ScoopFree.
•
Most cats will start using ScoopFree within 7 to 10 days.
Important Safety Precautions
• Do not use with cats that have problems using litter boxes.
• Do not let small children play with or near the litter box.
• If you are pregnant or have an immune deficiency, do not
touch cat waste, soiled litter or used cartridges at any time.
• Do not immerse ScoopFree in water.
• Periodically make sure the light is green and litter is clean.
• DO NOT ADD LITTER to cartridge. It will not work properly.
Safety Stop
•
The rake is designed to stop if something obstructs its path. The
rake will stop, and the indicator light will flash rapidly.
•
The countdown timer will not cycle if the indicator light is
flashing rapidly.
•
After you remove the obstruction, press the cycle button
to reset the box and to return the rake to the home position.
Full Waste Trap
•
The rake may also stop if the front of the waste trap is full, so be
sure to check the waste trap if the light is flashing rapidly.
•
If the waste trap is full, replace the litter tray cartridge.
6
Changing the Cartridge
You should not add litter or remove waste during normal operation.
The litter can remain clean and fresh for up to 30 days with one cat;
however, some kittens, overweight cats or cats older than 10 years may
use up cartridges more quickly. In addition, if you see waste collecting
outside the waste trap, it may be time to change the cartridge. Under
normal conditions, you should change cartridges as follows:
Step 1: Jiggle the litter box to reduce
litter that may have accumulated behind
the rake. This will prevent the small
amount of litter spillage that may occur
when lifting the litter box.
Step 2: Stand ScoopFree™ up on its
end by lifting the front of the waste lid.
Slide out old cartridge.
Step 3: Remove cover from under
tray and place over cartridge.
Secure with tape if desired or place
within
a drawstring garbage bag.
Step 4: Discard entire cartridge in
waste can.
Step 5: Install a new cartridge as
described on Page 3.
7
Care and Cleaning
ScoopFree™ seldom needs cleaning because of its revolutionary
design; surfaces most likely to get soiled are discarded with each
cartridge. Nevertheless, you may occasionally choose to clean
ScoopFree™ as follows:
•
Remove power cord from litter box.
•
Remove Waste Lid by tilting it out. It should fall out of its slots.
•
Wipe all surfaces with mild soap and water.
•
Wipe rake with sponge or brush.
•
Make sure optical sensors are not blocked.
•
Do not immerse your ScoopFree in water or spray it down.
•
Do not expose your ScoopFree to excessive sunlight or
moisture.
To re-attach waste lid,
position as shown, then
slide pins into the slots
and rotate down.
Troubleshooting
Common Issue
Remedy
Indicator light is
flashing rapidly
and rake is stalled.
Check if waste trap is full. If so, replace cartridge.
Check for any obstructions. If so, remove obstruction
and then press cycle button.
Ensure litter is evenly distributed and waste lid is
properly installed. Never add extra litter.
If light is still flashing rapidly, unplug box, remove and
reinstall cartridge and plug box back in. Then press
cycle button to reset box and activate rake.
Waste has
collected behind
the rake
Press cycle button to move rake forward and then press
button again to stop the rake. Remove debris and press
cycle button to reset the box.
8
Troubleshooting (continued)
Common Issue
Remedy
Rake stalls NEAR
the waste lid
Make sure magnets on waste lid are properly attached
to cartridge. If not, lift waste lid up and then press it
back down; you should hear a “click” when correctly
attached. Ensure litter box is seated properly on
cartridge and box is level. Then, press cycle button to
reset litter box.
Rake stops UNDER
the waste lid
Check to see if the waste trap is full. If so, replace
cartridge. Otherwise confirm magnets are properly
connected and then press cycle button.
Rake does not
tilt-up at home
position.
Waste may have collected behind rake. Review Waste
has collected behind the rake above.
Magnets on waste
lid do not attach
to cartridge.
Waste lid may not be properly installed. See Care and
Cleaning section to remove and reinstall waste lid.
Then press down on lid or lift waste door on cartridge
until a click is heard, indicating magnets have attached.
Litter box is not
level on cartridge
ScoopFree™ should rest on the cartridge when
installed, not on floor. Make sure litter box is
completely seated and level on cartridge.
Having another
issue?
Still having a problem? Try these steps:
• Unplug box, wait a minute and reconnect plug
• Lift up box, gently shake cartridge to redistribute
litter, lower box
• Remove system lid and then replace lid
• Press cycle button to activate rake
If you still have a problem, visit our website
www.ScoopFree.com or call us toll-free
(888) 726-MEOW (6369) or (312) 466-6000
DO NOT RETURN THE PRODUCT TO THE STORE!!!
PLEASE CALL SCOOPFREE FIRST!!!
Indicator flashes
rapidly and system
will not rake
Check to see if the sensors are obstructed. Clear any
litter that may have collected in the sensor holes.
9
Replacement Cartridges and Parts
To order replacement cartridges or litter box parts:
Visit www.ScoopFree.com or call (888) 726-MEOW (6369) or (312) 466-6000.
Customer Service
For Assistance Setting Up or Operating ScoopFree™:
Be sure to read the “Troubleshooting” section of this manual.
You may also visit www.ScoopFree.com for additional instructions,
video demonstrations and tips from ScoopFree customers and staff.
Alternatively, call our toll-free number (888) 726-MEOW (6369) or
(312) 466-6000.
Have Questions Regarding Repairs, Warranty or 90-Day
Money Back Guarantee?
Please visit www.ScoopFree.com or call (888) 726-MEOW (6369) or
(312) 466-6000.
PLEASE DO NOT RETURN PRODUCTS TO THE STORE!
PLEASE CALL SCOOPFREE FIRST.
If you have any problem, contact us for fastest service. Returning
ScoopFree to a retail store only delays the repair process. Call us.
Please have your name, address, phone number, sales receipt
and product serial number available. Our staff will give you
detailed instructions and help you resolve any issues.
10
Limited Warranty
The ScoopFree™ Automatic Litter Box carries a limited warranty for
one year from the date of purchase on all major parts (motor, rake,
sensors, etc.) if used under normal conditions.
Manufacturer will either replace or repair (at its option) such part(s)
free of charge excluding postage and handling. This excludes damage
to the product resulting from misuse.
For complete directions on how to best return the product for repair
while still covered under this warranty, email [email protected] or
call us toll-free: (888) 726-MEOW (6369) or (312) 466-6000.
PLEASE DO NOT RETURN THE PRODUCT TO THE STORE
PLEASE CALL SCOOPFREE FIRST!!!
90 Day Money Back Guarantee
We believe the ScoopFree Automatic Litter Box offers the BEST
GUARANTEE in the industry. If you or your cats are not completely
satisfied, email [email protected] or call us toll free: (888) 726MEOW (6369) or (312) 466-6000 for more information.
Copyright© 2005-2006 by Lucky Litter LLC. All Rights Reserved.
ScoopFree™ is a trademark of Lucky Litter LLC.
Patents Pending. Designed in the U.S.A. Printed in China.
11
Important Safeguards
•
Read this instruction booklet carefully before setting up
and using ScoopFree™.
•
Remove all packaging material before connecting power cord.
•
Do not allow anything to rest on the power cord. Do not plug in
cord where people or animals may walk or trip on it.
•
Do not operate this or any appliance with damaged power cord
or if appliance malfunctions or has been damaged in any manner.
•
To protect against electric shock, do not place cord, plug or
appliance in water or other liquids.
•
Before cleaning, unplug the appliance from wall outlet. To unplug,
grip plug and pull from wall outlet or remove power cord from unit.
•
Do not use accessories or attachments that are not recommended
by the manufacturer; they may cause fire, electric shock or injury.
•
Close supervision is always necessary when this or any appliance is
used by or near children. Avoid contact with moving parts.
•
Do not place the appliance on an unsteady surface.
•
Do not use appliance for other than intended use.
•
Do not use outdoors.
12