1
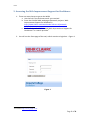
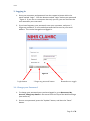
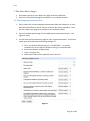
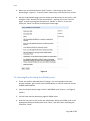
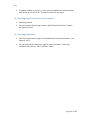
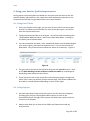
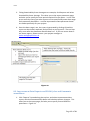
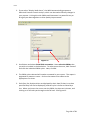
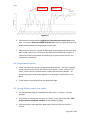
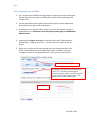
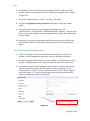
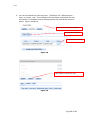
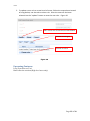
NIHR CLAHRC Northwest London Web Improvement Support for Healthcare User Guide v2.08 NIHR CLAHRC Northwest London Contents 1. Purpose of This Tool .................................................................................................. 1 2. Accessing the Web Improvement Support for Healthcare ........................................ 2 3. Logging In .................................................................................................................. 3 3.1. Change your Password ........................................................................................ 3 4. The Welcome Page .................................................................................................... 4 4.1. Send Messages .................................................................................................... 4 5. The Project Home Page ............................................................................................. 6 5.1. Send Messages .................................................................................................... 6 6. Entering Data ............................................................................................................. 8 7. The Data Entry Pages................................................................................................. 9 7.1. Entering Improvement Data ................................................................................ 9 7.2. Entering Plan-Do-Study-Act (PDSA) cycles .................................................... 10 7.3. Entering Long Term Success Tool entries ........................................................ 11 7.4. Entering Comments .......................................................................................... 11 8. Using your data for Quality Improvement ............................................................... 12 8.1. Using Data Tables ............................................................................................. 12 8.2. Using Reports.................................................................................................... 12 8.3. Improvement Data Reports and PDSA Cycles and Comments annotations..... 13 8.4. Programme Reports .......................................................................................... 15 8.5. Seeing all the project data easily....................................................................... 15 8.5. Exporting Improvement Data and Reports ....................................................... 16 9. Requesting to join a project ..................................................................................... 17 10. Reporting a problem .............................................................................................. 18 11. Logging Out ........................................................................................................... 19 12. Managing Users and Roles (Admins Only). .......................................................... 20 12.1. Adding a brand new user ................................................................................ 20 12.2. Roles available in WISH ................................................................................. 21 12.3. A current user of WISH .................................................................................. 22 12.4. Deleting and Updating roles. .......................................................................... 23 Upcoming Features: ..................................................................................................... 25 Contact Us .................................................................................................................... 26 i NIHR CLAHRC Northwest London 1. Purpose of This Tool The Web Improvement Support for Healthcare (WISH, formerly the Web Reporting Tool) has been developed in collaboration by Imperial College London, and Chelsea and Westminster Hospital. It is designed so that your project(s) can share data with everyone in the team, wherever there is internet access, allowing everyone to know what is going on, and to be able to add their own experiences and comments as the “story” of your improvement initiative develops. By capturing Quantitative Data you have evidence about the effects you are having on your process, whilst the Qualitative Data (such as comments and PDSAs) gives potential reasons for those quantitative changes; including how those effects were achieved by everybody’s efforts, or influenced by external events. This will allow you to tell others about how you achieved successful changes. Also within the software we are developing method to help teams assess the Long Term Success of their project. Notes: Requires Internet connectivity. Some organisations’ firewalls might prevent access – ask your local IT department if at first you cannot connect to the application. Browsers with confirmed compatibility: Internet Explorer 9 Browsers that will work but may have some quirks: Internet Explorer 7 and upwards Firefox 4 and upwards Google Chrome 10 and upwards Safari Recommended minimum screen resolution: 1024 x 768 Please use the WISH menus to navigate the tool instead of the browser buttons. Page 1 v2.06 2. Accessing the Web Improvement Support for Healthcare 1. There are several ways to get to the WISH a. Use the link in the welcome email you received b. From the CLAHRC NWL web pages (Research projects- Web Improvement Support for Healthcare) http://www.clahrc-northwestlondon.nihr.ac.uk/researchprojects/web-reporting-tool c. Alternatively search for “CLAHRC Web Improvement Support for Healthcare” in a search provider1. 2. You will see the front page of the tool, which contains a login box – Figure 1. Figure 1 1 For instance http://www.google.co.uk Page 2 of 28 v2.06 3. Logging In 1. Enter your username and password into the respective boxes within the panel marked “Login”. Click the button marked “Login” below your password - Figure 2. If you are on a computer that only you use, you can also have the tool remember your username. 2. If you have forgotten your password, enter your username, and press “I forgot my password”, a new random password will be sent to your email address. This can be changed once logged in. Figure 2 Login button I forgot my password button Remember me toggle 3.1. Change your Password 1. To change your password once you have logged in, go to Resources, My Account, Change my details in the menu bar at the top of the Welcome Page (see section 4). 2. Enter a new password, press the “Update” button, and then the “Done” button. Page 3 of 28 v2.06 4. The Welcome Page 1. You will now see the Welcome Page – Figure 3 on the next page a. You can select the project with which you want to work (if you are a member of several projects), b. Run reports c. Use administration tools d. Access your account details, the user guide, and report a problem feature e. Log out Please note the appearance of the Welcome Page and menu items will differ between users, this is because some users have administration rights and programme level access. If you do not have all the features seen in the screen shots do not panic – this is probably right, but do feel free to check! 4.1. Send Messages f. Send messages to all of the members of your project(s). These messages appear only within the tool itself, they are shown on the Welcome Page, and Project Home Page. To select a project click on the list, to select many projects hold down “control” (on your keyboard) and click on the ones you want to select. g. These messages can be “promoted” to comments by admin users. This means if someone says in the messages “The clinic had 20 new staff today”, rather than writing this into the comments as well, simply select the message and hit promote. It keeps copies of both, and both can be independently deleted as well. Page 4 of 28 v2.06 Quick link back to this page 1b Programme wide reports are found here (not all users) Session will expire unless buttons are clicked 1e Log out 1d Your account details, this user guide, and Report a problem feature 1c See and manage users, projects, and roles 1f You can send a message to a project or to multiple projects from this panel 1a Select the project from here – this takes you to the Project Home Page (figure 4) 1f Any messages from all of your projects will be displayed on this Welcome Page and the Project Home Page Figure 3 Page 5 of 28 v2.06 5. The Project Home Page 1. Once you have selected a project to work in you will see your “Project Home Page”– Figure 4 on the next page a. b. c. d. e. f. g. h. Add new data – of various types. View your own data entries (and those of others if you are an admin) Run reports (so you can see all the project data) Use various administration tools Access the user guide, and report a problem feature Log out Send message to the project Admin features buttons (some users only) Please note the appearance of the Project Home Page screen and menu items will differ between users, this is because some users have administration rights and programme level access. If you do not have all the features seen in the screen shots do not panic – this is probably right, but do feel free to check! 5.1. Send Messages i. j. Send messages to all of the members of this specific project. These messages appear only within the tool itself, and are found on the Welcome Page and the Project Home Page. On this page, only the current project will be sent messages. These messages can be “promoted” to comments by admin users. This means if someone says in the messages “The clinic had 20 new staff today”, rather than writing this into the comments as well, simply select the message and hit promote. It keeps copies of both, and both can be independently deleted as well. Page 6 of 28 v2.06 Go back to the Welcome Page 1b View Project Data (as well as being able to add data) 1f Log out 1c Run project specific reports (including some admin only reports 1e) 1e Your account details, this user guide, and Report a problem feature Project and role details. Your role determines what you can do in this project on WISH 1g Sends a message that ALL members of this specific project will see on their Project Home Page and their Welcome Page. 1a Add Data Quick Buttons 1h Admin features (some users only) Figure 4 Page 7 of 28 v2.06 6. Entering Data 1. First you need to select what project for which you wish to add data – this is done from the Welcome Page – see Section 4 2. Once you have selected the desired project you will be taken to the Project Home Page – see section 5 3. There are several types of data that can be added: a. b. c. d. Improvement Data (bespoke to each project) Plan-Do-Study-Act (PDSA) cycles (for planned rapid tests of change) (Long Term Success – upcoming feature) Comments (for contextual factors impacting on your project; e.g. staff illness; new trainee starts; bank holiday; or we have now got the data collection right) 4. The easiest way to enter data is to use the quick link buttons at the bottom of that home page – see Figures 4 & 5. a. Clicking on the appropriate button will take you directly to the data entry page for the respective data type - the click to select drop down is for the improvement data Figure 5 b. In the data entry pages, you will notice a new option in the top bar to return to the project home page – figure 6 Go back to the Project Home Page Go back to the Welcome Page Figure 6 Page 8 of 28 v2.06 7. The Data Entry Pages 1. Each data type has its own data entry page and all are different. 2. Each has a record details page from where you can delete records. 7.1. Entering Improvement Data 1. Every project has its own bespoke improvement data and measures; as such, each will look different, but all share a common data entry procedure. Here we use a data entry page for a bundle of care example project. 2. From the Project Home Page click the Add Improvement Data button – see figures 4 and 5. 3. You will now see the data entry page for your improvement data. It will have a data entry box that looks something like figure 7. a. Fill in any Dates as dd/mm/yyyy (i.e. 31/09/2012) – or use the calendar icon to the right of the box to bring up a selection box. b. Select drop downs as appropriate c. Type in any free text d. Note some fields will be required, others will not. Figure 7 Page 9 of 28 v2.06 4. When you are finished hit the “Save” button – this brings up the record details page – Figure 8. “Cancel” button stops entry and removes this record. 5. On this record details page you can review your data entry for any errors, and using the “Edit” button you can amend them – putting you on the “amend page”, as well as giving you the option to “Delete” a record. Or you can simply hit “Done” to return to the project home page. Figure 8 7.2. Entering Plan-Do-Study-Act (PDSA) cycles 1. These are used for planned tests of change – for more guidance ask your project manager, get in touch with CLAHRC NWL, or use the resources on the CLARHC NWL website 2. From the Project Home Page click the “Add PDSA cycle” button – see figures 4 and 5. 3. You will now see the data entry page for PDSA cycles. 4. Give the new cycle a title, enter the information about your PDSA cycle in the appropriate boxes provided, then click “Save”, and then after reviewing the record hit “Done”. Page 10 of 28 v2.06 5. To update a PDSA as you carry it out, select the PDSA from the data tables (see section 8) use the “Edit” function to enter the new parts. 7.3. Entering Long Term Success Tool entries 1. Upcoming feature 2. From the Project Home Page click the “Add LTSuccessTool Entry” button – see figures 4 and 5. 7.4. Entering Comments 1. From the Project Home Page click the Add Improvement Data button – see figures 4 and 5. 2. You will now see the data entry page for your Comments. Enter your comment then click on “Save” and then “Done”. Page 11 of 28 v2.06 8. Using your data for Quality Improvement Having spent time putting data into WISH you and your team will want to use the data for Quality Improvement, this is best done with the Reporting functions, but sometimes you will want to get behind the scenes with the data. 8.1. Using Data Tables 1. From your Project Home page, you can view all your entries (all the project entries if an admin account holder) for each of the data types. You do this from the Project Data menu. 2. Taking Improvement Data as an example – this will be called something like “ProjectName Measures Data”, within the Project Data Menu. Clicking on this takes you to the data table. 3. You can manipulate the table, view, amend and delete records (depending on your access rights), and add new records as well. You can also search the data tables. Only a few columns of data are shown as a summary - Figure 9. Figure 9 4. The grey bar at the top can be clicked to bring out the search function. Each of the table headings can be clicked to reorder the table by ascending and descending order based on that column. 5. If you click View next to the record the record summary page is brought up; whilst “Edit” takes you directly into the amend page, from where updates can be made or records deleted, depending on your access rights. 8.2. Using Reports 1. On the Project Home Page, along the top bar you will see links to Reports including your project’s Improvement Data reports, as well as the Sustainability Score Average, PDSA reports and Comments reports that are common to all projects. 2. Reports also allow you to view all the PDSAs and Comments made by everyone else. Page 12 of 28 v2.06 3. Taking Sustainability Score Average as an example, click Reports and select Sustainability Score Average. This takes you to the report parameter page, and asks you to specify the time period required for the report – in this case on an event-by-event, but other reports can be specified by exact date range. Each parameter box differs – and the Improvement Data parameter boxes are made specifically for your project. 4. Once the date range is set, the report is generated by clicking OK and the report can be viewed, exported, and printed, as per Figure 10. The tool tips only occur after the parameter box has been run. If you are unsure how to use these reports, please contact your project manager or [email protected] Figure 10 8.3. Improvement Data Reports and PDSA Cycles and Comments annotations 1. Click “Reports” located along the top bar; and select Improvement data report, which will automatically detect and calculate process changes. This takes you to the report page, and asks you to specify several different parameters - Figure 11. Page 13 of 28 v2.06 2. If you select “Display XmR charts”, the WISH automatically generates a Statistical Process Control Analysis, which can be used to identify changes in your process. Linking this with PDSAs and Comments is a powerful way to bring all your data together to drive Quality Improvement. Figure 11 3. Scroll down and select Show PDSA annotation. Next select the PDSAs that you wish to include in the box below. To select more than one, hold ‘Control’ and click the individual PDSA cycles. Next, click OK. 4. The PDSA cycles selected will now be annotated in your report. The report is paginated by measure name – click on that name to be taken to the appropriate run chart. 5. Each Plan, Do, Study and Act are displayed by their date (if there is no date specified they will not be displayed), and the cycle is shown as linked by a line. When you hover the cursor over the PDSA, the plan text is shown, and clicking on it will take you through to the full text. See Figure 12. Page 14 of 28 v2.06 Comment PDSA Figure 12 6. Comments are annotated by toggling the Comments parameter item with a click. This item is below the PDSA selection box, and you might have to scroll down the parameter list using the bar on the right. 7. Comments are shown in reports as diamonds corresponding to the week they were made. Hover your cursor over the diamond to display the number of comments made in that week, and clicking on it opens the full text for the comments in that week. 8.4. Programme Reports 1. Some users will have access to Programme level reports. These are typically a one-stop access points for the Project level reports. There is also an “All Users” report that lists all usernames; and an Overall Activity Report – an overarching report that draws together a lot of project information in one place. 2. These reports are available from the Welcome Page. 8.5. Seeing all the project data easily 1. On the Welcome Page go into Administrative menu – Projects – List own projects. 2. Scroll down to the project you want hit “view” on the right hand side. Click Project Entries to expand/ collapse (at the bottom of page) 3. Click each tab to move between data types, and use select to view the record. Page 15 of 28 v2.06 8.6. Exporting Improvement Data and Reports Export raw data Needs Internet Explorer 9 or above 1. Go to the project, then in use the menu Project Data – [Improvement Data] 2. In the Improvement Data table page, underneath the clickable grey search bar, on the right there is a download as CSV link. 3. Click this to open or save the data table Export Data from the reports & Exporting the Report This provides processed data as per measures definition for your project. The exports can take a few minutes to render in the background 1. Export the report to get processed data – the data are at the end of the report. 2. Go to the Improvement data report Reports – Data Reports – improvement data report 3. Run the report with parameters desired 4. Use Export report – 4th icon in on the top left – and export as excel 5. Select open file 6. Ignore the warning about formatting to open the file 7. Save from Excel 8. Instead of selecting Excel – you can also export to use with PowerPoint but instead export as OpenPresentation format – this is readable in PowerPoint but usually renders better 9. Alternative export as pdf Export the data behind the report This provides raw and processed data 1. Use the third icon in “Export Data”, and then select export table 2. Select the columns you want to put into the report from the left side box and use icons in the centre to move them to the right side box 3. Export as csv, comma separated Page 16 of 28 v2.06 9. Requesting to join a project 1. As a current account holder on the WISH application, you might join in the work on another project and need access. An admin user from that project might simply add you to that project by “assigning a new role” – an email should be sent to notify you of this. But want you can also request to join a project if you are interested in participating. 2. On the welcome page (once logged in) go through the menu: Administrative Project Roles - Role Requests - Request Project Role 3. Then select the project, and press request (Figure 13). By design, the role you request has the lowest access rights, but an admin user can change this if they approve your request. Figure 13 Page 17 of 28 v2.06 10. Reporting a problem 1. If you encounter a problem with WISH then please do let us know, it is the only way we know that something is wrong. Try to note down as much as possible about what you were trying to do, when, where, and any technical information (such as type of computer and internet browser). If there is an error code, it is useful for us to have that as well. 2. In order to get in touch you can talk with your project manager; talk to us; emails us; or use the Report a Problem feature. This is found in the Resources menu from either the Welcome Page or the Project Home Page. 3. Select the area of the tool you were having problem with – either Data Entry or Reporting or Other. Give a short summary title. Then please provide as much detail as you can in the detailed description box. A screen shot can be attached as well to show us the problem. Finally, press “Submit bug”. Page 18 of 28 v2.06 11. Logging Out 1. If you have been entering data, ensure that you have clicked on the save and done buttons, and are returned to the Welcome Page or the Project Home Page before logging out – this is to ensure that you do not lose any data by accident. 2. It is important to log out of the tool when you have finished. To log out, simply click on the word “Logout” just below the NIHR logo in the top righthand corner of the page. Page 19 of 28 v2.06 12. Managing Users and Roles (Admins Only). 1. This section of WISH and thus the user guide is still being upgraded – there will be changes! As an advanced feature allowing creation and customisation of users and access roles. 2. At the time of writing: To create a new user you will need to be an administrative account holder. If you think you should be an “admin user” then contact your project manager, or us. 3. There are two cases in user management: A brand new user of WISH or a current user of WISH, who may or may not be part of your project (give a new role or deny access) 12.1. Adding a brand new user 1. For admins only; on the welcome page use the menu “Administrative - Users - Create user account”. This brings up the add user account menu (Figure 14). Several new roles and projects can be assigned at once (depending on your own access rights). Roles are shown in Figure 15. 2. Please make sure to “look up name” to check whether the user really is “brand new”. If they already have an account, a different approach is needed see deleting and updating section later. Type in the name Activate the login (click) Name look up Date of joining or current date Set password or generate random Auto generated Type in the email Add project and role one at a time, one role per project only. Select the drop down on right and “remove” to undo an error Figure 14 Page 20 of 28 v2.06 12.2. Roles available in WISH 1. Several roles are available – not all will be displayed to you, as it will depend on your own role as to what roles can be assigned, see Figure 15. 2. Most users will need “project member” access. 3. Someone responsible for managing data would suit an “information lead” role. 4. Those of you managing team composition, or with a project, manager or senior role would need “project administrator” – giving control over all project data (including user management). 5. People working across a programme of work might want to consolidate their access as “programme lead” – this gives access to additional programme wide summary reports and data control. 6. Programme evaluator is for people who are looking across many projects but do not need to add data at all. 7. Project Viewer is to allow others to look at the reports and some data but with no ability to edit or add data. 8. Programme administrator is an advanced role with audit features, and other high controls, only a few users would need this. There is also a WISH developer’s role. Figure 15 Page 21 of 28 v2.06 12.3. A current user of WISH 1. For a current user of WISH you might want to assign them a new role to give them access to your project or modify their current role (by deleting their current role). 2. Project level admins have rights for particular projects, whilst programme level admins have rights across all projects. 3. As an admin user, you can either assign a new role and approve or deny a requested role, or add directly from the project home page to ASSIGN NEW ROLE as below 4. Alternatively, assign a new role by using the menu path “Administrative – Project Roles – Assign a new role” – a screen similar to Figure 16 will be shown. 5. Select user, project and role by working your way through the tabs, and select. Each of these can be changed if you make a mistake, using the “change X” button in the appropriate tab. Once you are done hit save. Use the tabs to navigate If nothing is selected this will instead be “select” X” and take you through to selection screens, where you need to click “select” next to appropriate entry. This button allows you to change that. Review panel Figure 16 Page 22 of 28 v2.06 6. Alternatively, when on the Project Home page: Click the “Add user to this project” button in the bottom left of the screen, this preselects the “project” in Figure 16. 7. Or use the “Administrative – Users - list users”, and “edit” 8. You can also Approve or Deny a requests that other current users have made. 9. As an admin user make sure you navigate to through the menu “Administrative – Project Roles – Role Request page” regularly. This will bring up the roles request page (either at a programme or project level, depending on your rights). 10. Anything in here can be approved or denied; you can also increase the user role (which by default is set to the lowest level), up to your own maximum rights. 12.4. Deleting and Updating roles. 1. If you try to assign a new role to someone who already has a role in the project, or some programme wide roles, an error message will display. 2. For the programme wide roles this is not a problem – they have access to all projects. But perhaps you are trying to change the rights of a project role. 3. Or maybe someone has left altogether and you want to prevent they access (you can also more simply make the account inactive, by going into the “Administrative – Users - list users, and editing the entry to “active” toggle is not ticked Figure 17. That way should they return you can reinstate them easily by making the account active again) User information panel Figure 17 Page 23 of 28 v2.06 4. You can also delete the roles they have. To delete a role “Administrative – Users - list users”; edit. Then looking at the User Roles underneath the user information, click update next to the appropriate role, and delete will be an option. Figures 18 and 19. End of User information panel Project Roles panel This button to select Figure 18 This button to delete the role Figure 19 Page 24 of 28 v2.06 5. To update a user role to a new level of access, follow the steps above instead of using delete, use the tabs to select role. Once the new role has been selected use the “update” button to save the new role – Figure 20 Once a new role is selected, use this button This tab to navigate This tab to select Figure 20 Upcoming Features: Long Term Success Tool Data collection creation (High level users only) Page 25 of 28 v2.06 Contact Us WISH is designed to be easy to use and to provide you with useful feedback to drive your improvement initiative. If you have any comments or suggestions, we would be very pleased to hear them, and of course if you have any problems at all then get in touch. You can contact us via email or by telephone: E: [email protected] T: 020 331 8144 WISH was built in collaboration with: Imperial College London -Dept. Medicine -Dept. Computing Chelsea and Westminster Hospital Funded by NIHR CLAHRC NWL