1
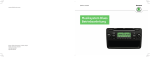
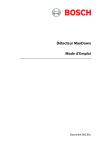
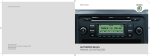
Astron TM SOLAR SECURITY LIGHT W User Guide E S Ensure your solar panel is South facing or as near as possible Clean your solar panel from time to time Do NOT place your solar panel in shaded areas. Do NOT charge behind glass Please read these instructions carefully before installing your light. Please remember that the Astron64 is quite heavy. Before you begin installation please take great care to ensure the surfaces you intend to mount it on are sturdy enough to take its weight. Failure to install your Astron64 correctly could result in human or animal injury, damage to your property and damage to your Astron64. If you are at all unsure please contact your retailer or The Solar Centre for advice. Always take great care when installing your Astron64, particularly when installing it in high places. Before installing your Astron64 Solar Security Light please consider the location of your light, motion sensor and solar panel before you start making alterations to your property. There are 5 metres of cable between the light and solar panel and either 20cm or 120cm of cable between the light and the motion sensor. Installing the Astron64 Solar Panel The Astron64 has a powerful solar panel that charges the internal high capacity battery during the day. At night this charge powers the Astron64 enabling it to light when it detects motion. Before installing your Astron64 solar panel you'll need to consider the best place for it to receive the most amount of sunlight. Position the Astron64 solar panel in a South facing location that is not obstructed by buildings, fences, trees, sheds, bushes or the shadows that these create. Please note that Roof Mounting Wall Mounting a poor solar panel location will drastically reduce the performance of your Astron64 Solar Security Light. The solar panel that comes with your Astron64 has 45 degree mounts which will enable you to mount the solar panel at 45 degrees on either a horizontal surface such as a shed or garage roof, or a vertical surface such as a wall. Once you have decided on your solar panel location, connect the solar panel brackets to the solar panel by using the screws and washers provided. With mounts attached, position your solar panel in your desired location and mark the holes in the solar panel mounts. Depending on the surface, either drill or prepare the holes for mounting before screwing your solar panel into place using screw plugs. TM SOLAR FLOODLIGHT Installing the Astron64 PIR Motion Sensor Your motion sensor can be installed either 20cm or 120cm away from your light, please check this measurement before making any alterations to your property. On the font of the motion sensor there is a single screw in the centre of the housing above the actual detector. Unscrew this screw and put it safely to one side. Grip the motion sensor (not the housing above it), pull the housing cover off and place it safely to one side. Place the motion sensor in your desired location and mark the two holes. Depending on the surface, either drill or prepare the 2 holes for mounting before screwing your motion sensor into place using screw plugs. Finally, screw the motion sensor housing cover back into place. Installing the Astron64 Light Place the Astron64 face down on a steady surface. Using a spanner, Mole grips or pliers, remove the two nuts that secure the wall bracket to the light. Carefully put the 2 nuts, 4 washers and 2 locking washers to one side and remove bracket. Now position the bracket in your desired location and mark the 2 holes. Drill your 2 screw marks and secure bracket using the supplied screws, washers and screw plugs. Now Motion Sensor Solar Panel reattach your Astron to the bracket. Connecting your Astron64 Light, Solar Panel and Motion Sensor There are 2 cables attached to the bottom of the light unit. The cable on the left (as you face the light) is for the motion sensor, the cable on the right is for the solar panel. You will notice that the solar panel connector has 2 pins whereas Left Right sensor is within 20cm of your light, simply plug the motion sensor cable into the left hand connector on the light. If your motion sensor is over 20cm away from your light, you will need to connect the motion sensor extension cable to the motion sensor cable before connecting it to the light. Operating Instructions Now your Astron64 is fully installed press the power button on the underside of the light unit. The Astron64 is now on. It will charge during the day and activate automatically at night when it detects motion. At dawn the Astron64 will enter standby mode and recharge throughout the day. If the Astron64 is turned off it will still charge during the day, but it will not activate after dark. SENS TIME LUX SENS TIME LUX Recommended Settings The Astron64 has 3 motion sensor settings that can be adjusted by turning the dials under the motion sensor. Unlike mains powered security lights, solar security lights can only work for as long as there is charge in their batteries, so it is important to conserve this charge by setting your Astron64 motion sensor correctly. Poorly adjusted settings will result in the Astron64 continually running out of charge. SENS Use the ‘SENS’ dial to adjust the range sensitivity of the PIR detector on the Astron64. The range sensitivity decides how close motion has to be to the motion sensor before the light will activate. If the ‘SENS’ is set too low the light may not activate at all, if the sensitivity is set too high the light may activate unnecessarily which can run the battery flat. Try to set the SENS dial as low as possible while ensuring the Astron64 performs as you require. TIME Use the ‘TIME’ dial to adjust the amount of time the Astron64 will light for each time it detects motion. The Astron64 will light for between 5 seconds and 60 seconds depending on how you set this dial. Try to set the TIME dial as low as possible while ensuring the Astron64 performs as you require. LUX Use the ‘LUX’ dial to set how dark it is before the Astron64 will start to activate. If the ‘LUX’ is set too low (dial moved towards the moon icon) the light may not activate as desired after dark, if the ‘LUX’ is set too high (dial moved towards the sun icon) the light may activate even though it is still light. Try to set the LUX dial as low as possible while ensuring the Astron64 performs as you require. Troubleshooting If you are encountering problems with your Astron64, its more than likely something you can resolve yourself. An Astron64 that has its solar panel in a poor location with its settings set too high will struggle to work at all, but that doesn’t mean there is a fault with the unit. Please try the troubleshooting tips below before contacting your retailer. Recharge Procedure 1. Double check the location of your solar panel. Ensure it is as south facing as possible and in an unobstructed location. 2. Turn the Astron64 off at the switch on the underside of the light and leave it to recharge for 3-5 days. Set the dials as shown in the diagram above. 4. After 3-5 days return to the Astron64 and turn it back on at the switch on the underside of the light 5. If your light still does not illuminate after dark please contact your retailer. Maintenance Clean the surface of the solar panel and light lens with a soft, slightly moistened cloth or a dry brush only. Do not use corrosive cleansing agents or chemical solutions since this may damage the housing surface or impair operation. Keep the solar panel free of dirt, debris and snow, or your Astron64 Solar Security Light will not charge properly. This may also shorten battery life or cause malfunction. Safety Instructions The Solar Centre assume no liability for any damage resulting from the use of this product, nor do we assume liability for any damage to property or personal injury caused by improper use or failure to observe the instructions. Unauthorised conversion and/or modification of the unit will invalidate any guarantee. To avoid damage to eyesight, do not look directly at the light source. This device is not a toy and should be kept out of reach of children. Do not expose the device to extreme temperatures (less than -25ºC or higher than 50ºC), strong vibration or mechanical stress. For customer support please contact: The Solar Centre Ltd Unit 5, Dencora Centre Campfield Road St Albans AL1 5HN T: 0845 094 1250 W: solarcentre.co.uk E: [email protected] RoHS Made in China to Solar Centre Specification solarcentre R making solar that works