1
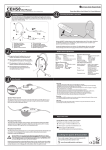
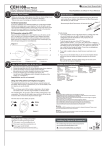
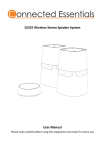
CET-5 Belt Drive Turntable
User Guide
Please read carefully before assembling and using this equipment and retain for future use.
Always take care to protect the stylus and tonearm, these are delicate items and damage is not covered under warranty. Latest advice and set up information can be found at www.connectedessentials.co.uk
Page | 1
Important!
1. Please check carefully that you have unpacked all parts supplied. Your CET5 is carefully checked and shipped in packaging designed to protect in transit. All units and contents are
checked before leaving our factory to be sure they are complete. Do not dispose of any packaging until you have established your unit is assembled and is operating correctly.
2. Always take care to protect the stylus and tonearm, they are delicate parts. The stylus cover and the tonearm lock should always be secured in place when not in use.
3. Ensure that the mains voltage of your supply corresponds to the operating voltage of the unit. Your unit is ready to be connected to an AC mains voltage of 220V/50Hz. ONLY
operate the unit on the correct supply for your power outlet. If in any doubt always consult a qualified electrician .
4. Please read and follow all recommendations and warnings in this manual for your safety.
5. Position your turntable on a solid level surface that does not conduct vibration from its surroundings.
What’s in the box?
a)
b)
c)
d)
e)
f)
1x CET-5 Turntable,
1x Dust Cover,
2x Hinge,
1x USB Cable,
1x Audio (RCA) Cable,
1x Centre adapter for hole ‘punched’ singles.
Always take care to protect the stylus and tonearm, these are delicate items and damage is not covered under warranty. Latest advice and set up information can be found at www.connectedessentials.co.uk
Page | 2
Getting To Know Your CET-5
Fig.1 Platter & Tonearm View
1.
2.
3.
4.
5.
6.
7.
8.
Dust Cover – protects the platter and turntable components from dust when not in
use.
Tonearm – holds the cartridge and is placed on the record to play.
Adaptor - use this adaptor when playing 45 RPM records that have a ‘punched out’
centre.
Tonearm Lever - use this to lower and raise the tonearm
Auto Stop On/Off Switch – allows to stop the record turning without moving the
tonearm back to its rest position.
33/45/78 RPM Switch – switch between 33, 45 or 78 rpm for playing at the correct
speed.
Headshell - this holds the cartridge and stylus (‘needle’) in place and provides
protection by means of its removable stylus protection cover (not shown).
Platter – place your record here to play.
Platter and Tonearm View
NB! Always take care to protect the stylus and tonearm, they are delicate parts. The stylus cover and tonearm lock should always be secured in place when not in use.
Fig.2 Rear Panel View
9. USB Port - connect to a PC for converting records to digital format with your chosen software
10. Line Out (RCA) - use to connect the turntable to your amplifier or audio system (unit).
11. Power Cord - connect this cord to a grounded AC outlet of the correct voltage. If a plug adapter is to be
used only use an approved and suitable product. ONLY operate the unit on the correct supply for your
power outlet. If in any doubt consult a qualified electrician.
Rear Panel View
Always take care to protect the stylus and tonearm, these are delicate items and damage is not covered under warranty. Latest advice and set up information can be found at www.connectedessentials.co.uk
Page | 3
Setting Up Your CET5
Amplifier/Audio System Connection
Connect audio output plugs to the magnetic record player or ‘phono’ input on your amplifier or audio system. The CET-5 has an inbuilt pre-amplifier so will also work with most ‘Aux in’
inputs. If you have multiple inputs on your unit you can try connecting to each input and testing which works and gives the best audio performance, of course be sure to select (switch) the
input you wish to use.
NB! Only connect to an input socket, damage to your equipment may occur if connected incorrectly.
1.
2.
Red plug into R/H channel input.
White plug into L/H channel input.
Playing a Record
1.
2.
3.
Choose the required playing speed by toggling the speed selector switch.
Remove the protective stylus cover and release the pick-up arm clip.
Place the cartridge vertically over the first track of the record the turntable will start turning. Use the tonearm lever to lower the tonearm.
Converting your records to digital format
The CET5 is equipped with a USB output, so you can connect your turntable with the USB cable provided to a computer (PC) to convert records to your chosen digital format; MP3, AAC,
WAV etc to play on a portable music player.
To carry out a conversion you will need a computer and software. Various software programs (paid for and freeware) are available to carry out this task. Audacity for example is a freeware
program, http://audacity.sourceforge.net/. Many PC’s will come with suitable software pre-loaded.
NB! Conversion is a computer and software function so its use is not covered by this manual or our product support service.
IMPORTANT RECOMMENDATIONS
-
We advise you to clean your records using a specialist record cleaning cloth or brush impregnated with antistatic properties.
For the best performance your stylus should be replaced periodically (approximately every 250 hours).
Dust the stylus from time to time using a very soft brush dipped in alcohol (brushing carefully from back to front of the cartridge).
Always take care to protect the stylus and tonearm, these are delicate items and damage is not covered under warranty. Latest advice and set up information can be found at www.connectedessentials.co.uk
Page | 4
Troubleshooting
How do I connect the turntable to my amplifier?
The CET5 can be connected to various inputs on your amplifier or dock (your unit). Look for inputs marked ‘Aux in’ or ‘Line in’. Some amplifiers have Phono input sockets. You can try
connecting to the inputs on your unit and testing which works and gives the best audio performance, of course be sure to select the input you wish to use. The phono input (if you have one)
is usually the best place to start. Please note that the CET15 features a built in pre amplifier and connecting it via a phono socket may cause the sound to be distorted if your unit is designed
to work with a record deck without pre-amp, if that is the case please use an alternative socket. IMPORTANT: be sure to only connect the audio output from your CET 100 to an input
socket, if connected to another type of socket you may cause damage to your equipment.
I seem to be getting a distorted sound when connecting to my amplifier.
This is most likely the case if you are connecting the CET5 to a phono socket on your amplifier, that has been designed to work with a record deck without a pre-amp. Please try an
alternative socket. If this does not solve your problem, try connecting the CET5 to a different device to verify it is working correctly. Contact amplifier manufacturer for further information.
Is recording software included?
Conversion to mp3 is a PC and software function so its use is not covered by our product support service. If you do not already own software that could assist with that function (your Mac or
PC may already have suitable software installed), various programs (paid for and freeware) are available to carry out this task. Audacity for example is a freeware program,
http://audacity.sourceforge.net/
I am missing parts.
Please check carefully that you have unpacked all parts supplied. Your CET5 is carefully checked and shipped in extensive packaging to protect in transit, all units and contents are checked
before leaving the factory to be sure they are complete. The belt is located on the underside of the platter – it is placed over the centre rim. Do not dispose of any packaging until you have
established your unit is assembled and is operating correctly.
Always take care to protect the stylus and tonearm, these are delicate items and damage is not covered under warranty. Latest advice and set up information can be found at www.connectedessentials.co.uk
Page | 5
I require spares – where can I get replacement items?
Spares are available from our nominated distributor Wire Free AV – www.wirefreeav.co.uk
When playing some records they jump, but this is not the case with others that don’t jump and play ok.
Is the record that jumps damaged? Scratches are not always obvious to the naked eye. Also consider the actual quality of the record itself. The smaller the groove and closer together the
tracks, the lower the audio output and sound quality. This is typical of compilation albums, where smaller grooves allow more tracks to be included on a record, but this is at the expense of
sound quality. It also means jumping of the stylus is more likely as the groove is not as deep as a standard album. The sound quality of 12” single is normally deemed to be the highest as
more room is available to create deeper grooves in the record pressing process and most 12” singles play at 45 R.P.M. Bigger grooves and faster playback speed equals better sound quality
and more tolerance to stylus jump.
I can hear rumble from my speakers when I play a record.
It is likely this is due to either record wear or audio feedback reaching the stylus/deck or vibrations from whatever the record deck is mounted on. Your record deck should be placed on a
solid surface/stand that is level and does not transmit vibrations from its surroundings. A stylus and cartridge will amplify whatever is picked up including vibrations and feedback from its
surroundings. Dedicated Hi Fi enthusiasts with high end systems go to great lengths to isolate the turntable from its environment. Most of us don’t need to go to such lengths, a solid surface
or better still a specialist Hi Fi rack will provide enough isolation.
My records seem to be playing at inconsistent speed.
There are several factors that could potentially cause this problem. In order to eliminate these please first check that the correct speed is selected on top of the turntable. Following on from
that, please verify that the belt is fitted correctly and securely. If both of these are confirmed as correct, please check your record for damages or warping.
I cannot hear any audio from the turntable.
Please ensure the turntable is connected correctly to your amplifier or equipment. Look for inputs marked ‘Aux in’, or ‘Line in’ on your audio device. Some amplifiers have Phono input
sockets. You can try connecting to the inputs on your unit and testing which works and gives the best audio performance, of course be sure to select the input you wish to use.
Always take care to protect the stylus and tonearm, these are delicate items and damage is not covered under warranty. Latest advice and set up information can be found at www.connectedessentials.co.uk
Page | 6
Warning:
Changes or modifications to this unit not expressly approved by the party responsible for compliance could void the users authority to operate the equipment. Operation is subject to the following two conditions: (1) this device may not
cause interference, and (2) this device must accept any interference, including interference that may cause undesired operation of the device. Further information can be found at www.connectedessentials.co.uk.
WEEE Directive
Directive 2002/96/EC OF THE EUROPEAN PARLIAMENT AND COUNCIL OF 27 th January 2003 on waste electrical equipment. Products that include the WEEE symbol shown below should not be placed in the normal household waste, but
should be disposed of using the appropriate WEEE disposal facility. Those facilities may be advised to you by your local council or organisation from which the product(s) was purchased. For the latest information on the WEEE directive
please access the following website www.environment-agency.gov.uk/weee.
Important Information:
1. Please note - All the safety and operating instructions should be read before the appliance is operated.
2. Retain Instructions - The safety and operating instructions should be retained for future reference.
3. Heed Warnings - All warning on the appliance and in the operating instructions should be adhered to.
4. Follow Instructions - All operating and usage instructions should be followed.
5. Water and Moisture - The appliance should not be used near water, for example, near a bathtub, washbowl, kitchen sink, washing machine, in a wet basement or near a swimming pool.
6. Power Sources - The appliance should be powered only as described in these operating instructions or as marked on the appliance.
7. Do not leave the unit unattended while in use.
8. This electric product is not a toy! To avoid risk of fire, burns, personal injury and electric shock keep out of reach of children.
9. Do not use this product for other than its intended use.
10. Do not close doors or windows on the product or extension cords as this may damage the wire insulation.
11. Electrical ratings of the extension cord must be as high as, or higher than the electrical ratings of the product.
12. Do not cover the product with cloth, paper or any material that is not part of the product when it is in use.
13. CAUTION: to reduce the risk of fire do not deliberately reposition pins on the plug assembly.
14. WARNING: Keep unit and power cord out of reach of children.
15. ALWAYS: switch off the turntable at the mains socket when not in use.
16. No repair should be carried out by the user
17. WARNING: A cut off plug inserted into a 13 amp socket is a serious safety shock hazard.
Ensure the cut off plug is disposed of safely
Always take care to protect the stylus and tonearm, these are delicate items and damage is not covered under warranty. Latest advice and set up information can be found at www.connectedessentials.co.uk
Page | 7
UK Wiring Instructions
1. Your Electric plug includes a moulded BS 13 amp (fused) on the supply cord.
2. Should it be necessary at any stage to replace the moulded plug or cord, it must be replaced with the correct part which includes a suitable moulded fused plug. (NB The original moulded plug and lead should be disposed of safely)
Class I (1) Earthed Appliance
The wires in the mains lead are coloured in accordance with the following code:
GREEN & YELLOW = EARTH
BLUE = NEUTRAL
BROWN = LIVE
1. The wire which is coloured GREEN and YELLOW must be connected to the terminal in the plug which is marked with the letter E.
2. The wire which is coloured BLUE must be connected to the terminal which is marked with the letter N.
3. The wire which is coloured BROWN must be connected to the terminal which is marked with the letter L. With this appliance, a suitable fuse of 3 amps must always be fitted, in the plug.
Version 1. Effective 01/04/2014
Always take care to protect the stylus and tonearm, these are delicate items and damage is not covered under warranty. Latest advice and set up information can be found at www.connectedessentials.co.uk
Page | 8