1
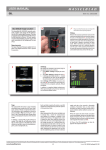
THERMAL RADIATORS RX4P RX6P RX8P RX10P RX12P RX4E RX6E RX8E RX10E RX12E INSTALLATION INSTRUCTIONS AND USER GUIDE Lea estas instrucciones atentamente antes de instalar o utilizar el aparato por primera vez. Please read these instructions before installing or using this appliance for the first time. Leia estas instruções antes de ligar o aparelho a primeira vez. INSTALLATION INSTRUCTIONS 1.- WARNING Please read these instructions before installing or using this appliance for the first time. The warranty of the heater will not cover any damage caused by non observance of any of these instructions. The instructions should be retained for future reference. This guide must be kept and given to any new owner. Please check that the voltage in the rating label fits the power supply. Any reinstallation should be carried out by trained personnel. The use of these heaters is forbidden in any area where there is a presence of gases, explosives or inflammable objects. DO NOT USE THIS HEATER TO DRY CLOTHES. The surfaces of this heater can be hot, so young children should not be left unsupervised in the vicinity of the heater. Children should be supervised to ensure they do not play with the appliance. Neither the connecting cable nor any other object must come into contact with the hot unit. Do not cover this heater at any time. The air outlet at the top of the thermal radiator and the air inlet at the bottom are provided to ensure the most efficient operation of the appliance. They also protect the heater from overheating; therefore, it is essential that at no time are they covered. This heater should be switched off at the isolating switch before any repair work is carried out. The thermal radiator should not be installed just below an electrical socket. The appliance must be installed in such a way that it is impossible for anyone using a bath or shower, to touch the controls. The installation must be carried out in accordance with the current electrical regulations. The heater is fitted with a flexible cable size 3 x 1.00 mm² for electrical connection. It may be used to connect the heater to the fixed wiring of the premised through a suitable connection box positioned adjacent to the heater. The supply circuit to the heater must incorporate a double pole isolating switch having a contact separation of at least 3 mm. If the flexible power cable for this unit is damaged, it may only be replaced by a repair workshop recognised by the manufacturer, as special tools are necessary. This appliance is not intended for use by persons with reduced physical, sensory or mental capabilities, or lack of experience and knowledge, unless they have been given supervision or instruction concerning the use of the appliance by a person responsible for their safety. This appliance must be earthed. The infrared heater is designed to only work in a horizontal position. All models are supplied with an electrical interrupt cut-out. This will switch off the heater if, for any reason, it overheats. Should the cut-out operate, turn the heater off and remove the cause for the overheating. The cut-out will be reset automatically. The presence of air particles of smoke, dust and other pollutants could, in time, discolour the walls and surfaces around the heater. MODELS MODULES W (cm) RX4P RX4F RX4E 4 41.5 D (cm) H (cm) WEIGHT (kg) 9,5 VOLTAGE INPUT (W) 500 RX6P RX8P RX10P RX6F RX8F RX10F RX6E RX8E RX10E 6 8 10 57.5 73.5 89.5 10 + 2 cm separated from the wall 58 13,5 17,5 21,5 220-240V~ 750 1000 1250 RX12P RX12F RX12E 12 105.5 25,5 1500 2.- INSTRUCTIONS ON INSTALLATION - Open the carton at the indicated side. The screws are in the accessories bag. Turn the carton upside down to allow the heater to stand. Check that it is the correct model and that it is in good condition. - To obtain optimum performances it is necessary to maintain a minimum clearance of 15 cm between the radiator and any inflammable material as furniture, curtains etc. See figure. shelf mínimum 15cm Closest object to the left end Closest object to the right end minimum15cm mínimum 10cm mínimum 25cm 9 Position and fix the brackets at the correct distance from the floor and hang the unit on the hooks of the brackets. And mark the wall. Use the polystyrene packaging to level the heater and protect the floor. Use the heater as a template and mark the fixing points on the wall using a pencil through the two fixing holes in the square brackets. - The studs and screws are in the accessories bag. - Hung the unit on the hooks of the brackets. - By turning the screw the metallic square will go downwards, retaining the heater. Repeat this on the other bracket. 3.- USING THE THERMAL RADIATOR ELECTRONICS MODELS RX-P SUN mode indicator modo SOL Operation in electronic models is controlled by means of two rotary knobs. MOON mode indicator It is possible to regulate the temperature level with accuracy by means of the temperature selector. The heating indicator will be lit when the heater is consuming energy. When this dial is set in * position the heater is in frost protection mode, at this stage if the room temperature drops below 3ºC the heater will connect itself automatically. Heating indicator De consumo There are three selectable positions with the mode selector dial: Temperature selector 0: The heater is switched off permanently. No frost protection mode here. : SUN mode on, the heater maintains the set temperature with the temperature selector dial. : Moon mode on, the heater maintains a temperature 3ºC lower than the one set with the temperature selector dial. Mode selector 10 MODELOS RX-F DIGITAL CONTROL Digital display: It shows the temperature and other messages. + Key : It increases the temperature set point. Heating indicator: This small dot will be lit when the heater is consuming energy. - Key : It decreases the temperature set point. Start / Stop key: Press this key to start / stop the heater. By pressing this key for a few seconds the keyboard will be locked. To unlock it press again this key for a few seconds. ECO key: Press this key to activate the ECO mode. START / STOP Press the key to start / stop the heater. Once the heater is started the display will show the room temperature. When the heater is stopped a small dot in the display will advise that the heater is in stand-by. To switch it off completely unplug the cable from the supply circuit or operate the double pole switch at the consumer unit. SELECTING THE ROOM TEMPERATURE The digital models RX-F have a built-in ambient thermostat with a sensibility of 0.1ºC. It is possible to set the room temperature with an accuracy of 0.5ºC. Set the room temperature by means of the + and – keys. The set point will be shown blinking, then it will be automatically validated and the display will show the existing room temperature. An small dot will be lit when the heater is consuming energy. ECO MODE: Select the ECO mode by pressing the key. The display will show E c o and the room temperature will be reduced 3ºC. Note: It is possible to modify the set back value from 3ºC to a different one. Press the the factory default value. Increase or decrease the value using the + and automatically in a few seconds. key four seconds and the display will show – keys. The new set back value for ECO mode will be stored 3. 0 as FROST PROTECTION MODE: With this mode on, if the room temperature drops below 5ºC the heater will connect itself automatically. Press the – key to decrease the room temperature set point until the display shows H H H . KEYBOARD LOCK Press the key more than six seconds and the keyboard will be locked. The display will show working internally. To unlock the keyboard press again the key more than four seconds. 11 and the controller will keep on DIGITALS MODELS RX-E Digital DISPLAY: It shows the temperature and messages. Heating indicator: This small dot will be lit when the heater is consuming energy. Key + : It increases the values. SUN indicator Frost protection key: If the display shows the time the heater is in frost protection mode. Press this key to shift from frost protection mode to standard mode and vice versa. SUN key : Press once to see the SUN temperature value. Press + or – keys to modify the value. Press this key for more than two seconds to set the time or day of the week. MOON key : Press once to see the MOON temperature value. Press + or – keys to modify the value. PRG key: Allows you to create check or modify programs. Move forward with + or – keys and allocate the SUN, MOON, or temperature to any of the 48 intervals of 30 minutes of the day by means of the relevant key. MOON indicator Key It decreases the values. time, other : Selector: 0 The heater is switched off permanently. P The heater is following a program. I The heater is maintaining the SUN temperature constantly. Both indicators will be lit at the same time. Digital models have built in an electronic thermostat with a sensibility of 0.1 ºC. It is possible to set temperatures with an accuracy of 0.5ºC. The daily or weekly programmer (selectable) allows you to allocate three different temperature levels to any of the 48 intervals of 30 minutes of the day. SWITCHING ON THE HEATER AND SETTING THE TIME Turn the mode selector dial to P position and press the minutes by pressing + and - keys and press the is necessary to set the time press the FROST PROTECTION MODE key more than two seconds. The display will show the time intermittently. Set the . Set the hours the same way. Press once more the key to store the time. If at any time it key and repeat the above steps. : With this mode on, if the room temperature drops below 3ºC the heater will connect itself automatically. If the display shows the time the heater is in frost protection mode. Press the display) to standard mode (temperature is shown in the display) and vice versa. key to shift from frost protection mode (time is shown in the SELECTOR “O”, “P”, “I”. Position “0”: The heater is switched off permanently. The display is switched off. Position “P”: The heater is following a program. It will maintain the SUN, MOON or position if the display shows the time the heater is frost protection mode. Position “I”: temperatures as per the introduced program. At this The heater is maintaining the SUN temperature constantly both luminous indicators SUN and MOON will be lit. This could be useful when SUN temperature is required and we do not want to modify the program. At this position if the display shows the time the heater is in frost protection mode. Press the key to shift from frost protection mode (time is shown in the display) to standard mode (temperature is shown in the display) and vice versa. 12 SUN, MOON AND TEMPERATURES The electronic programmer is able to handle three temperature levels during the 24h of the day. Press the key to set the SUN temperature. The display will show the SUN temperature value blinking. Set the SUN temperature value by means of the +o– keys and press the key to store the value. If the display shows the time the heater is in frost protection mode. Press the key to shift from frost protection mode (time is shown in the display) to standard mode (temperature is shown in the display) and vice versa. Repeat the above steps with the key to set the MOON temperature. The temperature level is 3ºC and it is a fix value. This temperature level can be used as off selection when setting the temperatures during curtain times of the day. SUN, MOON, or temperatures can be allocated to any of the 48 intervals of 30 minutes of the day. DAILY PROGRAMMES It is basic to visualize the day split into 48 intervals of 30 minutes each; SUN, MOON, or temperatures can be allocated to any of them. The default settings include daily mode so that the heater will repeat the program every day. If different programmes are required along a week, please see the next step WEEKLY PROGRAMMES. To check a programme or to make a new one follow these steps: to allocate SUN, MOON or Press the PRG key and the display will show 00:00 intermittently. Press one of the three keys OFF (frost protection) from 00:00h to 00:30h. If SUN or MOON temperatures are selected the relevant luminous indicator will be lit. If OFF temperature is selected both luminous indicators will be off. + key to go to the next interval. The display will show 00:30 intermittently and, again, press one of the three keys to allocate SUN, MOON or OFF (frost protection) from 00:30h to 01:00h or press + key directly if the existing temperature level is ok. Repeat these steps allocating the desired temperatures levels over the 24 hours of the day. Press the – key at any time to modify a previous period. By reaching the 23:30 in the display and pressing + key the controller will store the program and will return to the previous mode. At any time PRG key can be use also to store the program and return the previous mode. Press the SUN MOON OFF 00:00 01:00 02:00 03:00 04:00 05:00 06:00 EXAMPLE Let’s see an example of how to introduce a program with the above distribution of temperatures. 07:00 08:00 09:00 10:00 11:00 12:00 2 - Press 5 - Press SUN temperature from 19:30h to 24:00h. 16:00 17:00 18:00 19:00 20:00 21:00 22:00 00:00 Off SUN temperature from 7:30h to 9:00h. MOON temperature from 15:00h to 19:30h. 15:00 3 - Press + key SUN temperature from 13:00h to 15:00h. 14:00 1 - Press PRG OFF from 24:00h to 7:30h in the morning. The heater will be on only if the temperature drops to 3ºC. MOON temperature from 9:00h to 13:00h. 13:00 4 - Repeat steps 2 and 3 until display shows: 00:30 07:30 On 6 - Press + key 08:00 7 - Press 8 - Press + key 08:30 9 - Press 10 - Press + key 09:00 11 - Press 12 - Press + key 13 - Repeat steps 11 and 12 until display shows: 09:30 13:00 14 - Press 15 - Press + key 16 - Repeat steps 14 and 15 until display shows: 13:30 15:00 17 - Press 18 - Press + key 19 - Repeat steps 17 and 18 until display shows: 15:30 19:30 20 - Press 21 - Press + key 22 - Repeat steps 20 and 21 until display shows: 20:00 23:30 23 - Press 24 - Press + key 13 GRAB 23:00 24:00 WEEKLY PROGRAMMES It is possible to allocate different programs to different days of the week. To do this, the controller has to be upgrade from 24hr mode (factory default) to 24hr/7days mode as follows: Move the selector to 0 position, the display will be Off. Press the key at least five seconds. The display will show SETTING THE DAY: Press the required, by pressing stored. key more than two seconds and the display will show the number of the day. Set the correct number, if + or – keys. Press the key and the display will show now the time. Press again the To check a programme or to make a new one press show 00:00 key and at the same time turn the selector to P position maintaining the P-SE which means that weekly mode has been set. PRG key: The display will show dia1 . Press again key and new values will be PRG key and the display will intermittently. Follow now the steps from DAILY PROGRAMMES section until the display shows again process with the 7 days of the week. When the display shows If the display shows dia7 dia1 . Repeat this the weekly program will be stored by pressing + key. dia1 then, pressing + key more than three seconds will copy the day 1 program to day 2 and so on. It is possible to allocate any of the three temperature levels to all the intervals of any day maintaining the relevant until an audible signal is heard. To turn back a controller from 24hr/7days to a single 24hr press key PRG key more than six seconds. This will restore the factory default settings. KEYBOARD LOCK key more than six seconds and the keyboard will be locked. The display will show working internally. To unlock the keyboard press again the key more than six seconds. Press the and the controller will keep on 4. - CLEANING AND MAINTENANCE Clean and dust with a dry, soft cloth only when the unit is disconnected and cold. Do not use solvents or abrasive products for cleaning. This thermal radiator has been manufactured under an assured quality system using environment friendly processes. Please take the heaters to a clean point once their useful life is finished, in order to recycle their materials in the right way. 5. - TROUBLESHOOTING - The thermal radiator does not heat. Check the heater or the air inlets are not covered. Digital models: the display shows the time press the or NIGHT temperatures are right. - The room does not reach the right temperature. key to switch on the heater. Check that the DAY Check the selected temperature is in accordance with the desired temperature. Maybe the room needs more heating power. - DAY and NIGHT luminous indicators are lit at the same time. Digital models: Continuous mode has been selected. Turn the knob to the “P” position to return to the Program mode if required. - The display shows “Err1” or “Err2” Digital models: Contact the after sale service. - Only daily programmes. The controller is in a single 24hr mode (factory default). See WEEKLY PROGRAMMES section to swift to 24hr/7days mode. - The keyboard is locked. If the display shows than six seconds. the keyboard is locked. To unlock the keyboard press the 14 key more WIRING MODELS RX-P R heating element Ts safety cut out C three way selector MODELS RX-F R heating element Ts safety cut out MODELS RX-E R heating element Ts safety cut out C three way selector 15 NOTAS / NOTE / NOTAS 23 E: GB: P: ADVERTENCIA: Para evitar sobrecalentamientos, no cubrir el aparato de calefacción. WARNING: In order to avoid overheating do not cover the heater. ADVERTENCIA: Para evitar sobreaquecimentos, não cobrir o aparelho de aquecimento. E El símbolo en el producto o en su embalaje indica que este producto no se puede tratar como desperdicio normales del hogar. Este producto se debe entregar al punto de recolección de equipos eléctricos y electrónicos para reciclaje. Al asegurarse de que este producto se deseche correctamente usted ayudará a evitar posibles consecuencias negativas para el ambiente y la salud pública, lo cual podría ocurrir si este producto no se manipula de forma adecuada. Para obtener información más detallada sobre el reciclaje de este producto, póngase en contacto con la administración de su ciudad, con su servicio de desechos del hogar o con la tienda donde compró el producto. Estas disposiciones solamente son válidas en los países miembros de la UE. GB The symbol on the product or in its packaging indicates that this product may not be treated as household waste. Instead it shall be handed over to the applicable collection point for the recycling of electrical and electronic equipment. By ensuring this product is disposed of correctly, you will help prevent potential negative consequences for the environment and human health, which could otherwise be caused by inappropriate waste handling of this product. For more detailed information about recycling of this product, please contact your local city office, your household waste disposal service or the shop where you purchased the product. These instructions are only valid in the EU member states. P O simbolo no producto ou na embalagem indica que este produto nâo pode ser tratado como lixo doméstico. Em vez disso, debe ser entregue ao centro de recolha selectiva para a reciclagem de equipamento eléctrico e electrónico. Ao garantir uma eliminaçâo adequada deste produto, irá ajudar a evitar eventuais consequências negativas para o meio ambiente e para a saúde pública, que, de outra forma, poderiam ser provocadas por um tratamento incorrecto do produto. Para obter informaçôes mais pormenorizadas sobre a reciclagem deste produto, contacte os serviços municipalizados locais, o centro de recolha selectiva da sua área de residência ou estabelecimenteo onde adquiriu o produto. Este regulamento só é valido no paises da Uniâo Europeia. www.elnur.es Fabricado por ELNUR s.a. Pol. Ind. “El Nogal” Villa Esther, 11 28110, ALGETE - Madrid Tf. de atención al cliente: +34 902 19 57 14 Como parte de la política de mejora continua Elnur s.a. se reserva el derecho a realizar modificaciones técnicas sin previo aviso. As a part of the policy of continuous product improvement Elnur s.a. reserves the right to alter specifications without notice. Como parte da política de melhoria contínua do produto, Elnur s.a reserva a direita alterar especificações sem observação prévia. @2011 Cod. 30201230 rev.0