1
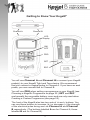
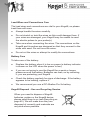
USER GUIDE
www.kegel8.co.uk
2
Welcome to Kegel8® Tight and Tone
Dear Customer,
Thank you for choosing Kegel8® Tight & Tone. You are now one
step closer to having a stronger, healthier pelvic floor.
Created especially for women, the Kegel8 Tight & Tone is an
effective neuromuscular stimulator (STIM). This means Kegel8
works by producing electrical pulses that stimulate the muscles and
nerve fibres in your pelvic area.
Using Kegel8 Tight & Tone to exercise your pelvic area can:
●●
Help with continence problems
●●
Prevent or reduce pelvic floor problems
●●
Increase sexual satisfaction
●●
Treat vaginal, uterine, and bowel prolapses (depending on
severity of symptoms)
●●
Help strengthen muscles that have become weakened following
childbirth, hernia operations or hysterectomies.
●●
Improve pelvic muscle strength and blood supply.
If you have never used a neuromuscular stimulator before, you
may be a little apprehensive. That’s quite normal - lots of people
are cautious at first, but soon realise that there is nothing to worry
about. The probes are designed for comfort and while you will be
able to feel the effects of the electric pulses, they should not cause
any discomfort.
If you follow the instructions in this User Guide, Kegel8 Tight & Tone
is a safe and effective way of exercising your pelvic floor.
Customer Care
We aim to provide our customers with outstanding products and
customer service. So if you have comments or ideas regarding
Kegel8 features, please get in touch (for contact details, Customer
Care on page 46).
3
Warnings
Please pay careful attention to the following safety warnings:
●●
Do not insert lead wires into a mains power supply.
●●
Do not immerse unit into water or any other substance.
●●
Type BF equipment, Continuous Operation.
●●
Do not use the Kegel8® Tight & Tone unit in the presence of a
flammable anaesthetic gas mixture and air or with Oxygen or
Nitrous Oxide.
●●
If using rechargeable 9 Volt PP3 Nickel Metal Hydride batteries,
be sure to use a CE approved battery charger. Never connect
the Kegel8 Tight & Tone directly to a battery charger or to any
other mains powered equipment. We advise not to use Ni-Cad
rechargeable batteries.
●●
Patient Probes and Electrodes are for single patient use only.
●●
Keep out of reach of children.
●●
Do not use this stimulator on your facial area unless you are
under strict guidance from a qualified Clinician.
●●
Operation in close proximity (e.g. 1m) to a shortwave or
microwave therapy equipment may produce instability in the
stimulator output.
●●
Simultaneous connection of a patient to a high frequency
surgical equipment may result in burns at the site of the
stimulator electrodes and possible damage to the stimulator.
●●
This unit must be used with the guidance of a Physiotherapist
or Doctor.
●●
No modification of this equipment is not permitted.
Symbols on rear of Kegel8 explained:
Type BF Equipment
Caution
(output)
Follow
instructions
for use
Do not dispose in normal
dustbin (see Recycling on
page 45)
4
Contra Indications & Precautions
Please read this Kegel8® Tight & Tone User Guide
before using this stimulation device.
STIM (Kegel8) should not be used:
●●
By patients fitted with a demand style cardiac pacemakers
unless so advised by their Doctor.
●●
During pregnancy [unless medically advised].
●●
By patients with undiagnosed pain conditions.
●●
By patients with undiagnosed skin, vaginal or rectal conditions.
●●
With patients who have diminished mental capacity or physical
competence who cannot handle the device properly.
●●
On anaesthetised or desensitised skin.
●●
When driving a vehicle or operating potentially dangerous
equipment.
●●
Use the Kegel8® Tight & Tone only as directed.
●●
Do not immerse the unit in water or any other liquid
●●
Keep unit out of reach of children.
●●
If in doubt about the use of the Kegel8 Tight & Tone unit call
your distributor for advice, Doctor, or Healthcare professional.
●●
Only use CE approved skin electrodes.
●●
Only use CE approved vaginal or rectal probes.
Do not place electrodes:
●●
Over carotid sinus nerves, larynx or trachea.
●●
Inside mouth.
●●
Over the area of the heart unless so advised by your doctor.
●●
On your facial area unless under strict guidance from a
qualified clinician.
5
6
Contents
Kegel8® Tight & Tone User Instructions
Important Safety Information
10
Kegel8 Tight & Tone Check List
12
Getting to Know Your Kegel8
13
®
®
How Your Kegel8® Works16
Using Kegel8® for the First Time
17
Starting Your Kegel8® Exercises18
Kegel8® Exercise Tips21
Choosing a Kegel8® Programme
22
Creating a Custom Programme
25
Programme Specifications
28
Taking Care of your Kegel8
29
® Frequently Asked Questions31
Technical Specifications
STIM Specifications
36
Electromagnetic Compatibility and
Interference (EMC)37
References and Contact Details
Warranty42
Clinical References43
Clinical References44
Recycling45
Customer Care46
7
8
Kegel8® Tight & Tone
User Instructions
9
Important Safety Information
Who Can Use Kegel8® ?
Your Kegel8 Tight & Tone is designed to be used by women and
when used correctly, is a safe and effective way of strengthening
pelvic floor muscles. However, as it works by using electrical pulses,
there are some people that should seek medical advice before using
Kegel8.
DO NOT USE KEGEL8:
●●
If you have been fitted with a demand style cardiac pacemaker.
●●
During pregnancy.
●●
If you have undiagnosed pain, skin, vaginal or rectal conditions.
●●
On anaesthetised or desensitised skin.
●●
If you do not have the mental capacity or physical competence
to use the device as instructed.
●●
When driving a vehicle or operating potentially dangerous
equipment.
●●
In water or other fluid. Never submerge your Kegel8.
●●
While you are connected to high frequency equipment. Applying
the Kegel8 probes or electrodes while you are connected to
high frequency equipment could cause burns and damage your
Kegel8. If in doubt, please call your distributor for advice or
seek assistance from a doctor or healthcare professional.
Please note that Kegel8 can be used safely by women fitted with
IUD or Mirena coils. Kegel8 does not affect these devices.
IMPORTANT
Only Use Your Kegel8 as Described
in this User Guide.
Keep Out of Reach of Children.
10
Important Safety Information
Where Can You Use your Kegel8® ?
Kegel8 Tight & Tone is designed for home use, but can be used
in medical centres and hospitals too. Before you use your Kegel8,
please make sure:
●●
The room does not contain flammable gases. This is especially
important in hospitals and medical centres as Kegel8’s
electrical pulses can ignite flammable gases, such as those
used in anaesthetics. If in doubt, ask for assistance.
●●
You are not positioned close (1-2m) to a shortwave or
microwave therapy device, microwave oven, mobile telephone,
wireless device, or radio. These devices can cause instability in
your Kegel8 unit.
Using your Kegel8 Safely
●●
Only use the Kegel8 in your vaginal and rectal regions as
described in this user guide. Never use Kegel8 on other parts of
your body as the electrical pulses could damage your health.
●●
To ensure your personal hygiene, do not allow other people to
use your probes. Always clean your probes thoroughly after use
(Kegel8 Probe Care on page 29).
●●
Only use CE approved vaginal or rectal probes with your
Kegel8. All official Kegel8 probes are CE approved.
●●
To power your Kegel8 device, use a 9v battery. Never connect
your Kegel8 device or its probes to a mains power supply as
this could result in electrocution and death.
●●
Do not immerse your Kegel8 device or its probes in water, fluids
or any other substance.
●●
Please be aware that Kegel8 is Type BF equipment (provides
some protection against electric shock).
11
Kegel8® Tight & Tone Check List
When you open the Kegel8® Tight & Tone packaging, you should
find:
●●
1 × Kegel8® Tight & Tone unit
●●
1 × 9 Volt Battery
●●
1 × Kegel8® Probe
If you have purchased the Kegel8® Tight & Tone, you will have
the Kegel8® Comfort probe.
If you have purchased the Kegel8® Tight & Tone Plus, you will
have the Kegel8® Periform probe.
●●
1 × Kegel8® Lead Wire
●●
1 × Kegel8® Tight &Tone User Guide
●●
1 × Kegel8® Product Guarantee Registration Form.
In the unlikely event that any of the items above are missing, please
contact Customer Care (see page 46).
12
Getting to Know Your Kegel8®
Channel A
Channel B
LCD
Display
ON/
OFF
PRG
SET
ESC
Back
Front
You will use Channel A and Channel B to connect your Kegel8
probe(s) to your Kegel8 Tight and Tone device. We recommend
that you connect a vaginal probe to Channel A. If you have an anal
probe, you can connect that to Channel B.
You will use PRG when setting a programme on your Kegel8 (see
Choosing a Kegel8® Programme on page 22.) SET and ESC
are beneath the removable battery cover and are only used when
Creating a Custom Programme (see page 25).
The front of the Kegel8 also has two sets of + and - buttons. You
can use these buttons to increase (+) or decrease (-) the strength
of the electrical pulse being sent via Channel A and Channel
B respectively. (The buttons labelled A are for Channel A, those
labelled B are for Channel B).
13
When you first power up your Kegel8® Tight & Tone, the LCD will
display the following information:
3 Hz
150 µs
P 01
0mA
0mA
Hz
Hz amount is the number of electrical pulses per second (Hertz).
This value will vary, depending on the programme you have
selected.
µS
The µs amount is the duration of a single electrical pulse. The higher
the value, the more it penetrates your muscles. Again, this amount
will vary depending on the programme you have selected.
Programme Number or Programme Timer
The top right area of the LCD shows either the number of the
programme that is currently selected or the amount of time
remaining on the programme (currently running).
Channel Outputs (in MilliAmps)
The two large numbers at the bottom of the display show the
amount of electric current being output through Channel A and
Channel B. The large number on the left-hand side of the LCD
represents Channel A and the large number on the right-hand side
represents Channel B.
14
For example, if you connect your Kegel8 probe to Channel A, set
the unit to run programme 6, and press the + button for A, the LCD
could show:
0: 14
10 Hz
200 µs
3mA
0mA
Your Kegel8 Probe(s)
Your Kegel8 Tight & Tone comes complete with a vaginal probe,
which you should connect to Channel A. As an optional accessory,
you can purchase an anal probe for use with Channel B. If you have
two probes, you can use them separately or at the same time.
Each probe has a wire connected to its ‘tail’ end and metal strips
that run up each side towards the ‘head’. The electric pulse
produced by your Kegel8 is transferred to your pelvic muscles
through the metal strips.
Icons Shown on the Back of your Kegel8:
Caution
(output)
Type BF Equipment
Follow
instructions
for use
Do not dispose in normal
dustbin (see Recycling on
page 45)
15
How Your Kegel8® Works
The Kegel8® Tight & Tone Pelvic Health Device is one of a new
breed of modern Neuromuscular Stimulators (STIM) developed with
the aim of achieving optimum pelvic health for women. Kegel8 works
by producing electrical pulses that stimulate the muscles and nerve
fibres in your pelvic area.
If you haven’t used a neuromuscular stimulator before, the idea of
applying electric pulses to your body can seem a little strange. But
there’s no need to be concerned - your body already uses electrical
signals all the time. For example, let’s say you want to tense the
bicep muscle in your arm. To do this, your brain sends an electrical
signal to your muscle via your nervous system. When the signal
reaches your bicep, it causes the muscle to contract, and when the
signal is not present, your muscle relaxes again. Kegel8 works in
a very similar way - it sends electric pulses to precise areas of the
weakened muscles in your pelvic area, causing them to contract
and relax. Over time, this strengthens the muscles and nerve fibres,
giving you greater muscle control and improving tone and tightness.
Kegel8 Tight & Tone features several pre-set programmes for pelvic
floor exercise. These programmes have been carefully planned so
that they:
●●
Work your muscles appropriately, helping them to strengthen
gradually
●●
Allow your muscles to rest for the correct amount of time
●●
Are easy to use in 20-60 minute sessions.
There have been many research papers and clinical trials relating
to neuromuscular stimulation. If you are interested in finding out
more, a list of relevant papers is included in our Clinical References
section on page 43.
16
Using Kegel8® for the First Time
What to expect from your Kegel8
When you first use Kegel8, you most likely begin by choosing one
of the pre-set programmes. These programmes are designed to
treat a variety of female health problems, so you should choose
the programme that is best suited to your needs (we explain the
programmes in Choosing a Kegel8® Programme on page 22).
At the start of every programme, Kegel8 begins at 0mA, which
means there is no electrical pulse. When you are ready to begin,
you press the + button for the appropriate channel repeatedly to
increase the electrical current.
When the electrical current reaches a certain level, you will begin
to feel a knocking sensation in your pelvic muscles. This happens
when the electrical current begins to stimulate your muscles at low
levels. You may also feel a tingling sensation. When you get to this
stage, slowly increase the electrical current to a level that is working
your muscles but is comfortable too.
Many women find that they start to feel their muscles being
stimulated when Kegel8 is set to around 25mA, with settings over
30mA giving the muscles a full workout. But everybody is different,
so you need to choose settings that you are comfortable with. The
stronger the sensation you can feel, the more work your pelvic
muscles are doing. But don’t push yourself too hard. If you feel
discomfort, press the - button for the channel to reduce the current.
As you exercise, you will feel your muscles pull up, tighten, and
then relax again. During the relaxation part of the exercise, your
Kegel8 will produce a lower amount of electrical current. If you use
Kegel8 as described, 1 or 2 times per day, your pelvic muscles will
get stronger. This will give you greater control and you will be able to
gradually increase the amount of current.
Now, let’s get you started - go to Starting Your Kegel8® Exercises on
page 18.
17
Starting Your Kegel8® Exercises
Ready to start your pelvic floor exercises? Then let’s get to it!
1. Before you start using your Kegel8 Tight & Tone, please read
the Important Safety Information on page 11.
When used correctly, the Kegel8 is a safe and effective way of
tightening and toning your pelvic floor. But remember, Kegel8 is
an electrical device and if misused can cause harm. So please
read the Safety Information carefully.
2. On the back of your Kegel8, slide off the battery cover and
insert the battery. Make sure the red material strip is under
the battery - it makes it easier to remove the battery when a
replacement is needed. Slide the battery cover back on.
3. Make sure the probe is clean by rinsing it in cold or warm water
(see Kegel8 Probe Care on page 29). Unclean probes could
cause infection.
4. Connect the lead wire to the vaginal probe and Kegel8 unit. All
of the wires are fitted with the appropriate connections, so all
you have to do is:
●●
Insert the red pin on the lead wire into one of the
connections on the probe’s wire.
●●
Insert the black pin on the lead wire into the remaining free
connection on the probe’s wire.
●●
Insert the white connection on the lead wire into the
Channel A slot on your Kegel8 unit. If you are looking at
the front of the Kegel8 unit, the Channel A socket is on the
top-left of the unit. Push the lead in firmly so that it is fully
connected.
If you are going to use an anal probe, connect it to the Channel
B socket. Kegel8 is designed so that you can use a vaginal
probe only, an anal probe only, or both a vaginal and anal
probe at the same time. Just make sure that your probes are
connected to the appropriate channels (Channel A for vaginal,
Channel B for anal).
18
5. Insert the Kegel8 probe(s).
i.
Get into a comfortable position. Many women choose to
use Kegel8 in a sitting position or standing up. Inserting a
probe is similar to inserting a tampon, so you may already
know what position suits you best.
ii.
Hold the base of the probe. The base is the plastic part at
the ‘tail’ end (the end with the wires).
iii. Position the probe so that the metal strips are on the left
and right sides. For a vaginal probe, this means that the
metal strips should be facing the inside of your thighs.
iv. Gently insert the ‘head’ end of the probe into your vagina/
anus. Push the probe 2 inches (5.5cm) inside your vagina/
anus. This is less than you would insert a tampon. The
base part of the probe should always be outside of your
body.
To ease insertion, we recommend that you use a good quality
water-based lubricant such as KE Gel. The lubricant will also
help to improve the transfer of the electrical pulse from the
probe to your muscles.
If the lubricant doesn’t help, you may be suffering from vaginal
atrophy, a condition that causes dryness and thinning of your
vaginal walls. Your doctor can prescribe an oestrogen cream
that can help. Don’t use Kegel8 while you are being treated with
the cream. When you have completed the treatment, resume
using the Kegel8 - you should find that you can insert the probe
much more easily.
Please do not let vaginal atrophy stop you from experiencing
the benefits of Kegel8. There are effective solutions available to
overcome this painful condition.
6. Press the ON button on the Kegel8 control unit.
7. Press the PRG button to choose a programme (see Starting
Your Kegel8® Exercises on page 18).
19
8. Press the + button(s) to start the programme.
If you are using the vaginal probe only, you should press the +
button for Channel A. If you are only using the anal probe, press
the + button for Channel B. Press both + buttons if you are
using two probes.
When you press a + button, the mA (milliamps) reading for
that channel changes to 1 and your programme begins. The
programme icon is replaced with a timer that counts down
through your exercise routine.
9. Once your programme has started, press the relevant + button
to increase the amount of power (milliamps) in the electrical
pulses. The higher the amount of mAs, the more effective
your programme will be, but always choose a level that feels
comfortable. If you are feeling discomfort or pain, reduce the
amount of mAs by pressing the - button for the channel you are
using.
At the end of the programme, your Kegel8 will automatically
switch off.
10. When the programme is complete, remove the probe by pulling
gently at its base. Do not pull the wires as this could damage
your probe.
11. Clean your probe under running warm water. Do not place your
probe in boiling water as this will damage your probe.
For extra peace of mind, you can wash your probes with
sterilising fluid if you wish. We also recommend that you wipe
your Kegel8 unit clean with a damp cloth or antiseptic wipe. Do
not use alcohol-based products as this could damage the LCD.
12. Dry your probe and store it in a clean, dry place. We
recommend that you keep your Kegel8 in its original packaging.
20
Kegel8® Exercise Tips
●●
Try to Start with a Power Output of 30 mAs or
Above
The amount of power needed to stimulate pelvic floor muscles
varies from person to person. By default, the Kegel8 unit has
a 0 mAs output and you need to increase the power manually,
by pressing the + button. You should increase the power to a
level where you can feel the effects of the electric pulse, but it
is not causing any discomfort. Many women find that a setting
of around 30 mAs is a good starting point, but only you can tell
what is comfortable for you.
As your pelvic floor muscles begin to strengthen, you should
find that you can increase the power output.
●●
Exercise 1-2 Times per Day for 12 Weeks
We recommend that you use Kegel8 1 or 2 times per day for 12
weeks. Alternate between your choice of programme and P 08
- General Pelvic Floor Workout24t each day. For example:
Monday P 03, Tuesday P 09, Wednesday P 03, Thursday P 09,
Friday P 03 and so on. When you have better muscle control,
you can use P 09 2-3 times per week on an ongoing basis to
maintain your muscle strength.
If you decide to exercise twice a day, it is important that you do
not do back-to-back sessions. This is because your pelvic floor
muscles need time to relax and recover between sessions. We
suggest that you use Kegel8 once in the morning and once at
night.
●●
Be Patient. Kegel8 WILL Improve Your Pelvic
Floor
Everybody’s different. Some people respond to Kegel8
exercises very quickly, whereas with others it takes a number
of weeks to feel real improvements. But rest assured, if you
use Kegel8 regularly and follow our instructions carefully, your
pelvic floor muscles and nerve fibres will get stronger.
21
Choosing a Kegel8® Programme
Your Kegel8 Tight and Tone has 9 pre-set exercise programmes,
each of which is designed to treat a specific type of pelvic floor
problem. It also has 3 ‘spare’ programme slots that your therapist
can use to create custom programmes tailored to your needs (see
Creating a Custom Programme on page 25).
To choose a programme, turn your Kegel8 on and press the PRG
button to cycle through the available programmes. Keep pressing
the PRG button until the programme you want to use is displayed.
If you are going to use a pre-set exercise, choose the programme
that is applicable to your health issue:
P 01 - Pain Relief
The Kegel8 Pain Relief programme helps treat pain in the pelvic
area. It is particularly useful for treating vulvodynia, a condition that
can cause burning, stinging, irritation and rawness in the female
genital area.
For more details, see Programme Specifications on page 28.
P 02 - Prolapse/Frequent Urination
This programme is great for women who have vaginal prolapse
or have a frequent urge to urinate (but don’t suffer from bladder
leakage).
Kegel8 actually has two programmes for helping you overcome
frequent urges to urinate. We recommend that Programme 02
is used by menopausal and post-menopausal women, whereas
women of child-bearing age should start with P 05 - New Mothers
and Frequent Urination23n.
For more details, see Programme Specifications on page 28.
NOTE: If you have anal prolapse, please contact our care line.
We can programme your Kegel8 to help with this condition.
22
P 03 - Stress Incontinence
Lots of women suffer from incontinence, especially during exercise
and lovemaking. Programme 03 is designed to give you improved
muscle control so that you can prevent bladder leakage. This
programme is set at a rate of 40Hz which is the level favoured by
UK physiotherapists.
For more details, see Programme Specifications on page 28.
P 04 - Stress Incontinence (Scandinavian)
Programme 04 is the same as Programme 03, except that it uses a
lower rate of 30Hz. This is the level favoured by physiotherapists in
some Scandinavian countries.
For more details, see Programme Specifications on page 28.
P 05 - New Mothers and Frequent Urination
If you are a new mother or feel the need to pass urine frequently,
this is the programme for you. It is a great way to start exercising
your pelvic muscles after childbirth. You can usually start
Programme 05 after your 6 week check-up, if your healthcare
professional says it is okay.
For more details, see Programme Specifications on page 28.
P 06 - Frequent Urination (Scandinavian)
Designed to help women who feel a frequent urge to urinate,
Programme 06 uses constant stimulation. This is the recommended
approach in some Scandinavian countries. In the UK, a work/rest
programme is preferred as this allows the muscle to relax and
recuperate.
For more details, see Programme Specifications on page 28.
23
P 07 - Lack of Sensation
After surgery or childbirth, you may find that you have good
muscle control, but experience a lack of sensitivity. This can be
due to nerve damage and is a problem that can be helped with
Programme 07.
For more details, see Programme Specifications on page 28.
P 08 - General Pelvic Floor Workout
Programme 08 is an excellent workout that targets all of the pelvic
floor muscles and nerve fibres.
When you first start using Kegel8, you should use one of the other
programmes and P 08 on alternate days. For example, Monday P
04, Tuesday P08, Wednesday P 04, Thursday P 08 and so on. This
will help to strengthen your pelvic floor muscles and give them a
suitable amount of recovery time.
When your pelvic muscles are stronger (generally, after 12 weeks),
you may be able to change to using P 08 only, 2-3 times a week.
You can do this on an ongoing basis to keep your pelvic floor
muscles tight and toned.
For more details, see Programme Specifications on page 28.
P 09 - Low Endurance
Choose P 09 if you find that you can tense your pelvic floor muscles
quite easily, but can’t keep them tense for very long. Programme
09 will help to build up muscle strength and improve muscle
endurance.
For more details, see Programme Specifications on page 28.
24
Creating a Custom Programme
Many women find that the pre-set programmes that are built into
Kegel8® are ideal for treating their pelvic floor problems. But in
certain situations, a medical professional may advise a different
type of programme. This is not a problem, as Kegel8 has a custom
programme feature that allows doctors to create a simple single
phase programme.
NOTE: You only need to create a custom programme if your
healthcare professional has advised you that the pre-set
programmes are unsuitable for your needs.
To create a custom programme:
1. Remove the battery cover to reveal the SET and ESC buttons.
2. Turn the Kegel8 on and press the ESC button to display the
home screen.
3. Press the PRG button on the front repeatedly until the LCD
shows PC 1, PC 2, or PC 3. These are your 3 custom
programme memory slots.
4. Press the SET button on the back. The Hz symbol shown on
the LCD will flash on and off to show that it is selected and
ready for a value to be entered. Use the + or - button to adjust
the pulse rate (Hertz).
NOTE: Hz, µS, WRK, RST, RMP, ALT, and SYN are
explained at the end of this section.
5. Press the SET button and the µS symbol will flash
on/off. Use the + and – button to adjust the pulse
duration (the possible range is 50 to 450 µS).
6. Press the SET button and the Clock [Time] symbol
will flash on and off. Use the Channel A + and - buttons to
alter the hours and the Channel B + and - buttons to adjust the
minutes. (Maximum time is 1 hour 30 minutes).
25
7. Press the SET button and the WRK [Work] symbol
will flash on and off. Use the + and – buttons to adjust
the work period (2 –99 seconds).
8. Press the SET button and the RST [Rest] symbol
will flash on and off. Use the + and – buttons to adjust
the rest period (2 – 99 seconds).
9. Press the SET button and the RMP [Ramp up] symbol will
flash on/off. Use the + and - buttons to adjust the ramp up
period (0.1 - 9.9 seconds).
10. Press the SET button and the ALT [Alternating] or
SYN[Synchronous] symbol will flash on and off. Use the +
and – buttons to select ALT or SYN.
11. Press ESC to store the custom programme.
26
Kegel8 Programme Settings - Explained
Each Kegel8 programme has several settings that you will need
to understand if you are creating a custom programme. Getting to
know how these settings work will also help you to understand the
specifications for the pre-set programmes.
●●
Hz - The number of electrical pulses per second (in Hertz).
Generally, 1-15HZ is for treating slow responding muscle fibres,
and 35Hz-45Hz for fast responding muscle fibres. Values
of 45Hz and above are used for treating muscle fatigue and
promoting muscle strength and flexibility.
●●
µS - The duration of a single pulse (the ‘pulse width’). The
wider a pulse is, the more muscle penetration it has.
●●
RMP (Ramp Up) - How long it takes to achieve full muscle
contraction (in seconds).
●●
WRK (Work) - How long the electrical current will keep the
muscle tight (working). Again, this is in seconds.
●●
RST (Rest) - The amount of time between each pulse (in
seconds). The muscles will rest for this amount of time.
●●
ALT (Alternating) - The Kegel8 will output an electric current
through one channel at a time.
●●
SYN (Synchronous) - The Kegel8 will output an electric current
through both channels at the same time.
27
Programme Specifications
Programme
PO1 to PO9
PAIN RELIEF
P01
URGE
P02
Hz
Rate
PW
uS
Ramp
Rest
Overall
Work Time
Up
Time
Time
in
Time in
in
in
Seconds
Seconds
Seconds Minutes
3
150
1
Cont
20
10
250
1
5
5
20
STRESS 1
P03
40
200
1
6
15
20
STRESS 2
P04
30
200
0.8
5
8
20
FREQ/URGE 1/
NEW MOTHERS P05
10
200
1
5
5
20
FREQ/URGE 2
P06
10
200
1
Cont
0
15
LACK OF SENSATION
P07
Sequential:
3Hz for 3 mins,
10Hz for 10 mins,
20Hz for 5 mins, 250uS,
Ramp up time 0.8 secs,
30Hz for 4 mins, 40Hz for 3 mins 200uS
Ramp up time 0.6 secs,
Work Time 4 sec, Rest Time 4 sec
25
Sequential:
20Hz for 3 mins,
3Hz for 5 mins, 10Hz for 15 mins,
20Hz for 15 mins, 250uS,
GENERAL
Ramp up time 0.8 secs,
PELVIC FLOOR
30Hz for 5 mins, 40Hz for 5 mins, 200uS,
WORKOUT P08
Ramp up time 0.6 secs
10Hz for 12 mins,250uS,
Ramp up time 0.8 secs
Work Time 4 sec, Rest Time 4 sec
BUILDING UP
ENDURANCE
20
250
0.8
5
5
P09
28
60
20
Taking Care of your Kegel8®
Accessories and Modifications
Only use CE approved accessories, such as probes, with your
Kegel8 device. All official Kegel8 probes are CE approved and so
have been tested for safety.
Do not modify your Kegel8 device. Making unauthorised
adjustments to your Kegel8 will invalidate your warranty and could
result in injury.
Kegel8 Screen (LCD) Care
Your Kegel8’s LCD is covered with a thin protective layer. This layer
helps to protect your LCD from scratches.
If your LCD appears to be scratched, gently peel off the protective
layer. If the scratch only damaged the protective layer, it can be
replaced with another screen protector. If, however, the LCD itself
is damaged, you will need to get it repaired. For more information,
please contact Customer Care (see page 46).
When cleaning your Kegel8, please do not use cleaning sprays or
alcohol based cleaning solutions as this could damage the LCD.
Kegel8 Probe Care
Each Kegel8 probe is designed for ease of use and should last 1218 months with proper care.
●●
Never immerse your probe in boiling water or boiling liquids.
This could damage your probe.
●●
When inserting a probe, hold its base. Do not hold it by the
wires as this could damage the probe.
●●
Before use, always clean the probe in warm, but not boiling,
soapy water. Alternatively, you could clean your probe with an
antibacterial cleanser such as our own Kegel Klean.
29
Lead Wires and Connections Care
The lead wires and connections are vital to your Kegel8, so please
treat them with care:
●●
Always handle the wires carefully
●●
Do not stretch or twist the wires as this could damage them. If
your wires are damaged, your Kegel8 may be unable to send
the electric pulses to your probe(s).
●●
Take care when connecting the wires. The connections on the
Kegel8 and its probes are designed so that they connect to the
wires with ease. Do not force the wires.
●●
Do not cut the wires or attempt to modify the connections.
Battery Care
To take care of the battery:
●●
Replace the battery when it is low on power (a battery indicator
is shown on the LCD when the power is low).
●●
If you are not going to use the Kegel8 for a week or longer,
please remove the battery. Batteries can leak, so by removing
it, you are protecting your Kegel8.
●●
Check the battery regularly for signs of discharge. If the battery
appears to be leaking, replace it.
●●
We recommend you use a GP Alkaline Pro 9v battery.
Kegel8 Disposal - Use our Recycling Service
When you need to dispose of Kegel8
batteries, probes or the Kegel8 device,
please send them to us (see Recycling on
page 45). We will make sure they are
disposed of correctly and materials are
recycled where possible.
30
Frequently Asked Questions
Q: How soon after the birth of my baby can I start with my
Kegel8® Tight & Tone?
Please consult with your midwife or doctor. Generally, women
start using Kegel8 after a successful six week check-up.
Q: I have an IUD or Mirena coil. Can I use the Kegel8?
Yes. Kegel8 is unaffected by Mirena coils or IUDs.
Q: Can I use Kegel8 while I am pregnant?
No. Clinical guidelines advise against using any vaginal STIM
devices during pregnancy.
Q: I have had pelvic surgery. How soon can I start using my
Kegel8?
Please consult with your doctor or consultant as every case is
different. Using Kegel8 after pelvic surgery could help to speed
recovery as it is an effective way of strengthening your pelvic
floor.
Q: Can I use my Kegel8 when I have my period?
Yes. However, if you are at the peak of your period and the flow
is heavy, you may prefer to wait. Here in the office, we tend to
use Kegel8 on lighter flow days.
You may also like to know that many of our customers have
reported that Kegel8 helps with menstrual cramps too.
Q: I have suffered an anal prolapse. Can I use Kegel8?
Yes, of course. When used with an anal probe, Kegel8 can help
you recover from this condition.
If you have suffered an anal prolapse, please contact Customer
Care (see page 46). We will provide you with a special
customised programme for this condition.
31
Q: How far should I insert the probe?
The probe needs to be inserted by just 2 inches (5.5cm). This
is the optimum level to stimulate the pelvic floor muscles.
Q: I find it painful inserting the probe. What should I do?
Try using a water-based lubricant. If this does not help, see
your doctor as you may be suffering from vaginal atrophy,
which causes dryness and thinning of the vaginal walls. It can
be treated quite easily, so don’t worry, you will soon be able to
use your Kegel8.
Q: I aim to have my mAs at 40, but on some programmes it
drops to 30 - why is that?
While the programme goes through its preset routine the
rate and length of the electrical pulses vary. When the pulse
rate and length increase, the mAs drop so that the intensity
does not take you by surprise. So if you feel a decrease in
intensity, just use the + button to increase the mAs back up to a
comfortable level.
Q: Why can’t I get the mAs to increase past 6, 7 or 8?
This is an issue that is usually caused by the probe not making
effective contact with your muscles. We recommend that you
try using your Kegel8 while lying down or sitting with your legs
elevated. This will help to prevent the probe from becoming
misplaced.
If the probe’s metal strips are not in direct contact with your
muscles, the mAs cannot go higher and the current cuts off for
your safety. You can also get better results by using a waterbased lubricant, such as KE Gel.
32
Q: Why can I only feel stimulation on one side?
This could be due to:
1. The position of the probe. To work correctly, the metal
strips on your probe need to be in direct contact with your
muscles. We recommend that you sit with your legs held
tightly together and squeeze your pelvic floor as much as
possible against the probe. You can also get better results
by using a water-based lubricant such as KE Gel.
2. You may have nerve damage to one side. This type of
nerve injury can occur during childbirth (caused by the
pressure from the baby’s head during delivery). It means
you have less sensation on one side. If this is the case,
we recommend you purchase a Perisize probe, which
allows you to vary the intensity of each side of the probe.
Increasing the intensity on the side that is in contact with
your desensitised area can help to promote resprouting of
the damaged nerves.
Call our helpline for more information.
Q: Why are there two channels?
There are two channels because Kegel8 allows you to use two
probes alternately or at the same time (one vaginal probe, one
anal probe). Channel A (left-hand side) is for a vaginal probe
and Channel B (right-hand side) is for an anal probe.
A selection of anal probes is available online at www.Kegel8.
co.uk.
Q: How do I clean my probe?
Simply rinse the insertable part under the tap, keeping the
wires dry at all times. Do not boil the probe. It can be sterilized
using a mild sterilizing solution or you can spray it with Kegel
Klean.
For more information, Taking Care of your Kegel8® on page
29.
33
Q: How long will the battery last?
If you use the Kegel8 daily, the battery should last about 3
months. You can get replacements from us or at your local
supermarket - please choose a quality 9v battery that will not
leak. You will know when your battery is low because a battery
icon will flash on your Kegel8 screen.
For more information, Taking Care of your Kegel8® on page
29.
Q: How long will my probe last?
With normal use, your probe should last between 12 - 18
months. We recommend you replace it after this time to keep
getting the maximum results from your Kegel8.
For more information, Taking Care of your Kegel8® on page
29.
Q: I can’t find the answer to my question?
Get in touch with Customer Care (see page 46), we are here
to help.
34
Technical
Specifications
35
STIM Specifications
1. Dual channel: individually isolated circuits.
2. Amplitude: 0 - 90 mA into 500 Ohm load; indication only.
Actual mA will tend to be less than indicated due to electrode
impedance:
●●
At 1000 Ohms load (Electrodes in poor condition), the
maximum will be limited to 70 mA
●●
At 1500 Ohms load the maximum will be limited to 65 mA.
3. Type: Constant Current, maximum output voltage 180 Volts +10
/ -30 Volts
4. Waveform: Asymmetrical, rectangular bi-phasic with zero DC
current.
5. Selectable pulse width: 50 µS - 450 µS [2% accuracy].
6. Pulse Rate selection: in the continuous mode 2 Hz - 100 Hz
[2% accuracy].
7. Time duration of the treatment selectable: 1 to 90 minutes.
8. Low Battery Indicator: If the battery goes below 6.9 volts +/- 0.2
volts the battery symbol will flash on/off once every second.
9. Open Electrode Detect: If an open circuit is detected at the
output of Channel A or B, the output current will be reset at 0.
10. Ramp up time: 0.3 - 9.9 seconds.
11. If the battery voltage is below 6.6 (+/- 0.2) volts the unit will not
turn on.
Physical dimensions: 108 x 62 x 23 mm.
Weight: 0.07KG without battery, 0.1KG with battery.
Environmental Conditions for use: +10 to +30 degrees
Centigrade. 0-90% Humidity.
Environmental conditions for storage & transport: -10 to +50
degrees Centigrade. 0-90% Humidity.
36
Electromagnetic Compatibility and
Interference (EMC)
Kegel8 products are designed to produce very low levels of radio
frequency (RF) emissions (interference), and to be immune from
effects of interference produced by other equipment operating
in their vicinity. They are also resistant to damage relating to
electrostatic discharge when operating in a typical domestic and or
clinical environment.
®
They are certified to meet the international EMC standard
EN60601-1-2.
Table 201: Guidance and manufacturer’s declaration electromagnetic emissions
®
The Kegel8 product is intended for use in the electromagnetic environment
®
specified below. The customer or the user of the Kegel8 product should ensure that it is
used in such an environment.
Emissions
Test
Electromagnetic environment guidance
Compliance
®
RF emissions
CISPR 11
Group 1
RF emissions
CISPR 11
Class B
Harmonic emissions
Not applicable
IEC 61000-3-2
IEC 61000-3-2
The Kegel8 product uses RF energy only for its
internal function. Therefore, its RF emissions are
very low and are not likely to cause any
interference in nearby electronic equipment.
The Kegel8® product is suitable for use in all
establishments, including domestic
establishments and those directly connected to
the public low-voltage power supply network that
supplies buildings used for domestic purposes.
Voltage fluctuations/ Not applicable
flicker emissions
IEC 61000-3-3
37
Table 202: Guidance and manufacturer declaration
- electromagnetic immunity
The Kegel8® product is intended for use in the electromagnetic environment
specified below. The customer or the user of the Kegel8® product should ensure that it is
used in such an environment, and that precautions regarding that environment are heeded.
Immunity
test
IEC 60601
test level
Compliance
level
Electrostatic
discharge
(ESD)
IEC 61000-4-2
±6 kV
contact
±8 kV air
±6 kV
contact
±8 kV air
Floors should be wood, concrete or
ceramic tile. If floors are covered with
synthetic material, the relative humidity should be at least 30%.
Power
frequency
(50/60 Hz)
magnetic
field
IEC 61000-4-2
3 A/m
3 A/m
Power frequency magnetic fields
should be at levels characteristic of a
typical location in a typical commercial
or hospital environment.
38
Electromagnetic
environment
- guidance
Table 204: Guidance and manufacturer’s declaration electromagnetic immunity
The Kegel8® product is intended for use in the electromagnetic environment
specified below. The customer or the user of the Kegel8® product should ensure that it is
used in such an environment.
Immunity
test
IEC
Compliance
60601
level
test
level
Electromagnetic environment guidance
Portable and mobile RF communications
equipment should be used no closer to any part
of the Kegel8® product, including cables, than
the recommended separation distance. This
can be calculated from the equation applicable
to the frequency of the transmitter.
Recommended separation distance
Conducted
RF IEC
61000-4-6
Radiated RF
IEC 610004-3
3 Vrms
150 KHz
to 80
MHz
3V/m
80 MHz
to 2, 5
GHz
3 Vrms
150 KHz to
80 MHz
3V/m
80 MHz to
2, 5 GHz
d=1.2√P (150 KHz to 80 MHz);
d=1.2√P (80 MHz to 800 MHz);
d=2.3√P (800 MHz to 2.5 GHz);
d is the recommended separation distance in
meters (m).
P is the maximum output power rating of the
transmitter in watts (W) (according to the
transmitter manufacturer).
Field strengths from fixed RF transmitters, as
determined by an electromagnetic site survey,
should be less than the compliance level in
each frequency range.
Interference may occur in the vicinity of
equipment marked with the following symbol:
NOTE 1: At 80 MHz and 800 MHz, the higher frequency range applies.
NOTE 2: These guidelines may not apply in all situations. Electromagnetic propagation is
affected by absorption and reflection from structures, objects and people.
(a) Field strengths from fixed transmitters, such as base stations for radio
(cellular/cordless) telephones and land mobile radios, amateur radio, AM and FM radio
broadcast and TV broadcast cannot be predicted theoretically with accuracy. To assess the
electromagnetic environment due to fixed RF transmitters, an electromagnetic site survey
should be considered. If the measured field strength in the location in which Kegel8®
product is used exceeds the applicable RF compliance level above, the Kegel8® product
should be observed to verify normal operation. If abnormal performance is observed,
additional measures may be necessary, such as reorienting or relocating the Kegel8
product.
(b) Over the frequency range 150 KHz to 80 MHz, field strengths should be less than 3V/m.
39
Table 206: Recommended separation distances between
portable and
®
mobile RF communications equipment and Kegel8 product.
®
The Kegel8 product is intended for use in an electromagnetic environment in which
®
radiated RF disturbances are controlled. The customer or the user of the Kegel8 product
can help prevent electromagnetic interference by maintaining a minimum distance® between
portable and mobile RF communications equipment(transmitters) and the Kegel8 product
as recommended below, according to the maximum output power of the communications
equipment.
Separation distance according to frequency of
transmitter
Rated maximum
output power of
transmitter W
150k Hz to 80
MHz
d=1.2√P
80 MHz to 800
MHz
800 MHz
to 2,5 GHz
d=1.2√P
d=2.3√P
0,01
0.12
0.12
0.23
0,1
0.38
0.38
0.73
1
1.2
1.2
2.3
10
3.8
3.8
7.3
100
12
12
23
For transmitters rated at a maximum output power not listed above, the recommended
separation distance (d) in meters [m] can be estimated using the equation applicable to the
frequency of the transmitter. For the equation, P is the maximum output power rating of the
transmitter in watts (W) according to the transmitter manufacturer.
NOTE 1: At 80 MHz and 800 MHz, the separation distance for the higher frequency range
applies.
NOTE 2: These guidelines may not apply in all situations. Electromagnetic propagation is
affected by absorption and reflection from structures, objects and people.
40
References
and Contact Details
41
Warranty
Savantini Ltd (Medical Dept.) provides a warranty to the original
purchaser that this product will be free from defects in the material,
components and workmanship for a period of 1 year from the date
of purchase [invoice date].
If Savantini Ltd is satisfied that the product(s) is defective, the
purchaser may return this unit(s) to Savantini Ltd (Medical Dept.) or
the appointed distributor for repair or replacement with a new unit.
All returns must first be authorised by Savantini Ltd (Medical Dept.)
in advance. The liability of Savantini Ltd (Medical Dept.) under this
limited product warranty does not extend to any misuse or abuse
such as dropping or immersing the unit in water or other liquid
substance or tampering with the unit or normal wear and tear.
Any evidence of tampering will nullify this warranty.
Manufactured by:
Savantini Ltd.
14D iPark, Innovation Drive, Kingston upon Hull, HU5 1SG, England
This product is manufactured in compliance with the European
Union Medical Device Directive MDD93/42/EEC under the
supervision of SGS, Notified Body number 0120.
Savantini Ltd. is certified by SGS to the following
Quality Standards: ISO 9001:2008, ISO13485:2003.
42
Clinical References
Neuromuscular Stimulation:
Knight S, Laycock J, Naylor D. [1998]
Evaluation of neuromuscular electrical stimulation in the treatment
of genuine stress incontinence;
Physiotherapy 84, No. 2, 61 - 71.
Gibson J.N, Smith K, Rennie MJ. [1988]
Prevention of disuse muscle atrophy by means of electrical
stimulation. Maintenance of protein synthesis;
The Lancet; 2(8614: 767-70).
Lindstrom S, Fall M, Carlson C A, Erlandson BE. [1983]
The neurophysiological basis of bladder inhibition in response to
intravaginal electrical stimulation.
Fall M, Ahlstrom K., Carlsson C, Ek A, Erlandson BE,
Frankenberg AS, Mattiasson A. [1986]
Contelle: Pelvic floor stimulator for female stress-urge incontinence.
A multicentre study; Urology 27, 282-287.
Berghmans L C, Hendriks H J, Bo K, Hay Smith E J, deBie R A,
van Waalwijk Van Doorn E S. [1998]
Conservative treatment of stress urinary incontinence in women:
a systematic review of randomised clinical trials. Br. J. Urol. 82(2),
181 - 191.
Eriksen B C, Bergmanm S, Eik-Nes S H. [1989]
Maximal Electrostimulation of the pelvic floor in female idiopathic
detrusor instability and urge incontinence. Neurourol. Urodynam, 8,
219 - 230.
43
Clinical References
Miller K, Richardson D A, Siegel S W, Karram M M, Blackwood
N B, Sand P K. [1998]
Pelvic Floor electrical stimulation for genuine stress incontinence,
who will benefit and when? Int. Urogynecol, J. Pelvic Floor
Dysfunction, 9(5), 265 - 270.
Osterberg, Graf W, Eeg-Olofsson K, Hallden M, Pahlman L.
[1999]
Is electrostimulation of the pelvic floor an effective treatment for
neurogenic faecal incontinence. Scan J Gastroenterology 34(3):31924
44
Recycling
In compliance with Waste Electrical and Electronic Equipment
(WEEE) Regulations 2006, we aim to reduce the amount of
electrical waste being sent to landfill sites.
Dispose of Your Kegel8® Responsibly
with our Recycling Scheme
Simply send your Kegel8 probes, batteries and devices to the
following address and we will take care of disposal for you.
WEEE Recycling
Savantini LTD
14D iPark
Innovation Drive
Kingston upon Hull
HU5 1SG
United Kingdom
45
Customer Care
If you want to find out more about our products, have a problem with your
Kegel8® or just need some assistance, please call our friendly Customer
Care team.
Customer Care
+44(0)1482 496 932
Call us, we’re here to help you
Monday-Friday, 8am - 5pm (GMT)
Savantini Limited
14D iPark
Innovation Drive
Kingston upon Hull
HU5 1SG
United Kingdom
Fax: +44 (0)1482 873570
Email: [email protected]
Web: www.Kegel8.co.uk
This product is manufactured by Savanti Ltd. in compliance with
the European Union Medical Device Directive MDD93/42/EEC
under the supervision of SGS, Notified Body number 0120.
Savantini Ltd. is certified by SGS to the following Quality Standards:
ISO 90001:2008, ISO 13485:2003