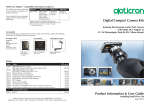
1
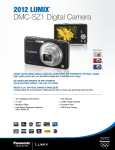
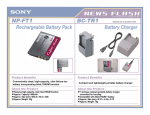
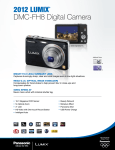
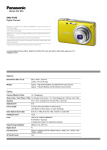
50065 DCC Adapter - compatibility with Opticron eyepieces
The following list shows which
insert (or set of inserts) are required
to fit a particular eyepiece.
Current price for the recommended
eyepiece HDF T 40810 is listed in
table below.
500681 ø41.5
50066 ø51
50067 ø45.5
HDF T 40862
HDF T 40810
HR2 409303
HR2 40933
HR2 409313
HDF T 40872 dis IS 409183
HDF T 40809
HDF 40862 dis
HR MM2 409093
500692 ø33
UKT1
HR 408123
HR 408133 dis
50068 insert only fits in combination with 50067 insert
50069 insert only fits in combination with 50068 and 50067 inserts
3
Remove rubber eyecup before connecting DCC adapter
dis - discontinued eyepieces
1
Digital Compact Camera Kits
2
Accessories
Chosen specifically to complement the camera, camera mount and DCC adapter, the following
accessories are available to purchase separately.
SD Memory 4GB
Li-ion Battery
Cable Release Frame
BCK-7E 3.6V 680mAh
Code: 50173
Includes cable release
Code: 50144
featuring the Panasonic Lumix FS40 Camera
with 50065 DCC Adapter or
41114 Photoadapter Push-fit SDL (28mm thread).
Storage 4GB:
Images
14M (4320x3240 pixels)
685 exp
Movies
HD 1280x720 8mins 24sec
VGA 640x480 15mins (max)
Code: 50073
(Other brand may
be supplied)
Product Information & User Guide
OPTICRON PO Box 370, Unit 21, Titan Court, Laporte Way, Luton, Bedfordshire, LU4 8YR, UK
Telephone: 01582 726522 Facsimile: 01582 723559 Email: [email protected]
June 2012
Opticron FS40 digital compact camera kits are a high quality, easy to use solution to the problem of
choosing a suitable compact camera for high magnification telephotography (digi-scoping). FS40 kits
contain a Panasonic Lumix FS40 camera with 4GB SD memory card and bespoke camera mount
plus the option of one of the following:
a. DCC Adapter and 2 inserts for connection to selected HDF T, HDF, HR2 and HR eyepieces
b. Photoadapter Push-fit SDL (28mm thread) for connection to the 40935 and 40936 SDL eyepieces.
Optional accessories include a universal cable release system and spare Panasonic Li-ion
rechargeable battery.
User Instructions
1. Choosing an eyepiece (50065 DCC Adapter only)
For the highest overall image quality use HDF T 40810 eyepiece with
50067 insert. Depending on the focal length and objective dia. of your
telescope, other suitable eyepieces include; HDF T 40862, HDF T
40809, HR2 40933 and HR2 40930.
2. Initial setup
Before connecting everything together, set up your telescope and
eyepiece on a tripod as you would for viewing, making sure your chosen
eyepiece is screwed firmly into position. Focus on an object in the
normal way until the image being viewed comes into sharp focus. Twisttype eyecups should be in the ‘down’ position and fold down rubber
eyecups should be removed from the eyepiece.
Fig. 1
3. Attaching the camera mount to the camera body
The camera slots into the cradle [Fig. 1] and is fixed in position by
screwing the thumbscrew into the 1/4" socket on the underside of the
camera body [Fig. 2]
Product Information
4. Preparing and fitting your chosen adapter
Fig. 6
Camera fitted with
mount
Panasonic Lumix FS40 Camera
• 14.1 megapixel CCD
• HD movie recording
• Optical image stabiliser
• Zoom lens f.4.3-21.5mm aspheric
5x optical zoom
35mm equivalent; 24mm to 120mm
•
•
•
•
•
•
•
•
•
F2.5~F6.4
TTL auto focus
Shutter: 8~1/1600
Shooting: single or burst
Exposure
- Metering: Multiple
- Compensation: ±2EV 1/3 EV steps
- ISO: auto, 100, 200, 400, 800,
1600, High sense mode 16006400
Modes
- Program (Intelligent Auto,
Normal, 15 Scene, Movie)
2.7” TFT LCD monitor
WxHxD: 96.4x55.5x19.9mm
Weight: 103g (w/o battery & card)
Supplied complete with 3.6V Li-ion rechargeable
battery, charger and software
Fig. 2
41114 Photoadapter
Push-fit SDL (28mm)
A lightweight aluminium
tube assembly
manufactured to the
diameter of the 40935/36
SDL eyepieces. Camera
side, the adapter is fitted
with a 28mm1 thread for
connection to the mount
supporting the camera.
Eyepiece side, the push-fit
connection over the SDL
eyepiece has a locking
thumb screw.
Note: To get the best
image when using the
40935 SDL, adjust
magnification setting on
the eyepiece to; HR 66
38x, HR 80 48x, GS 665
32x, GS 815, ES 80 40x
50065 DCC Adapter
The DCC Adapter comprises an
aluminium tube & locking ring
that can be fitted with a
number of compression ring
inserts of different diameters.
Camera side, the DCC Adapter
features a 28mm thread
connection to the lens mount
supporting the camera.
Eyepiece side, the push-fit
connection over specific HDF
or HR eyepieces has
anti-clockwise lock down.
Inserts are available in a choice
of internal diameters to suit
different eyepieces;
• 50066 Ø51mm
• 50067 Ø45.5mm
• 50068 Ø41.5mm1
• 50069 Ø33mm2
50068
50067
50069
50068
1
2
1
Also supplied with 42mm
T-mount step ring
insert only fits in combination with
insert.
insert only fits in combination with
and 50067 inserts.
• Assemble the component parts of your chosen adapter as illustrated
on previous page. [Fig. 6]
• If using the 41114, make sure the 28mm threaded step ring is fitted
to the main housing.
• Screw the adapter onto the camera mount. [Fig. 3]
• The camera is now ready to attach to the viewing eyepiece. [Fig. 4]
Fig. 3
5. Fitting the combined assembly to the telescope eyepiece [Fig. 5]
• Place assembly over the eyepiece and push down until the internal wall
of the adapter comes into contact with the end of the eyepiece. [a]
• Hold the main section of the adapter secure and turn the locking
ring anti-clockwise until tight making sure the camera remains
horizontal. [b]
• Turn the camera ON, making sure the flash is switched off before
taking photographs. For additional guidance on how to operate the
camera please read the instructions supplied.
Fig. 4
Tips for taking pictures
• The FS40 doesn’t have a viewfinder so images are composed using
the LCD monitor. When the camera is turned on the LCD monitor
will show a single rounded picture of the image you originally set
your scope and eyepiece to. Once this single rounded picture is
obtained you can adjust the camera zoom to eliminate any vignetting
and make any fine focus adjustments using the telescope.
• For general digi-scoping use sport mode and adjust the exposure
using the menu control as required. To minimise shake when pressing
the shutter, use a pinch grip with your thumb on the base of the
camera, try the 2 sec timer or optional cable release frame.
a
b
Fig. 5