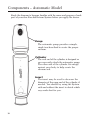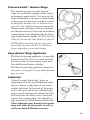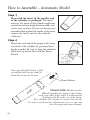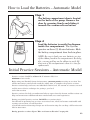
1
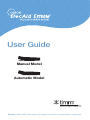
User Guide
Manual Model
Automatic Model
Caution: Federal (USA) law restricts this device to sale by or on the order of a physician.
Indications for Use
The ErecAid® Esteem® Vacuum Therapy System is intended to artificially
produce an erection in males suffering from erectile dysfunction
(impotence) in order to facilitate sexual intercourse, or to create and
maintain erections by providing arterial (oxygen-rich) blood flow to
the penis during recovery from prostatectomy. A vacuum is applied to
the penis, causing it to become erect and rigid as blood is drawn into
the corpora cavernosa. A constriction ring is then placed on the base
of the penis to restrict venous blood flow out of the penis. The device
is intended to be used at home or in a doctor’s office or clinic.
Osbon ErecAid® Esteem® – Vacuum Therapy System
Timm Medical Technologies, Inc.
9600 West 76th Street, Suite T
Eden Prairie, MN 55344 USA
Toll Free: 800-438-8592
Phone: 952-947-9410
Fax: 952-947-9411
email: www.timmmedical.com
Device and Component Patent: #4,378,008; #4,856,498; #5,244,455;
#5,306,277; #5,234,402; 5,643,290
Packing List
ErecAid Esteem Vacuum Therapy System
®
®
Please immediately check to make sure the following components
are included in your box:
1 Ea
Easy Carrying Case
1 Ea
DVD – ErecAid® Esteem® Multi-lingual Instructions
1 Ea
User Guide for Osbon ErecAid® Esteem® with
Warranty Registration Card
1 Ea
Component Order Form
1 Ea
Quick Reference Guide
1 Ea
Inverse Tapered Clear Cylinder with Insert
1 Ea
Osbon Personal Lubricant™
1 Ea
ErecAid® Esteem Manual (or Automatic) Pump Handle
1 Ea
Easy-Action® Ring Loader
1 Ea
.750 Pink Medium “D” High Tension Ring
1 Ea
.750 Beige Medium “C” Standard Tension Ring
1 Ea
.875 Pink Large “B” High Tension Ring
1 Ea
.875 Beige Large “A” Standard Tension Ring
In the event that any of these items are missing, immediately
call us at 800-438-8592.
Please remember to immediately complete and mail in Warranty
Registration Card (located in back of User Guide) within 90 days
of purchase. The completed Warranty Registration Card will provide
you with a limited lifetime warranty, refund options, assistance with
orders for accessories and toll-free technical assistance.
i
Please Read This User Guide
in its Entirety Before Using
Your Device
ii
Patient Bill of Rights
This Patient Bill of Rights informs you of your
rights prior to receiving services from Timm
Medical Technologies, Inc.
Timm Medical Technologies, Inc. treats the patient in a dignified
and respectful manner.
Timm Medical Technologies, Inc. respects the patient’s right to
and need for effective communication.
Timm Medical Technologies, Inc. respects the patient’s cultural
and personal values, beliefs, and preferences.
Timm Medical Technologies, Inc. respects the patient’s right to
privacy.
Timm Medical Technologies, Inc. allows the patient to access, request
amendment to, and obtain information on disclosures of his or her
health information, in accordance with law and regulation.
Timm Medical Technologies, Inc. honors the patient’s right to give
or withhold informed consent.
Timm Medical Technologies, Inc. protects the patient and respects
his or her rights during research, investigation, and clinical trials.
The patient and his or her family have the right to have complaints
reviewed by Timm Medical Technologies, Inc.
Timm Medical Technologies, Inc. informs the patient about his or
her responsibilities related to his or her care, treatment, or services
(Included in order forms and systems manuals.)
Timm Medical Technologies, Inc. informs the patient that they
may contact the Joint Commission Office of Quality Monitoring to
report any unresolved concerns or complaints related to patient
safety and quality of care by either calling (800) 994-6610 or email
[email protected].
iii
Notice of Privacy Practices
THIS NOTICE DESCRIBES HOW MEDICAL INFORMATION ABOUT YOU MAY BE USED AND DISCLOSED AND
HOW YOU CAN OBTAIN ACCESS TO THIS INFORMATION. PLEASE REVIEW IT CAREFULLY. If you have any
questions about this notice, please contact Privacy Officer of our office at Timm Medical Technologies, Inc.,
9600 West 76th Street, Suite T, Eden Prairie, MN 55344, toll free (800) 438-8592.
WHO WILL FOLLOW THIS NOTICE
This notice describes the information privacy practices followed by our employees, staff and other office personnel.
The practices described in this notice will also be followed by health care providers you consult with by telephone
(when your regular health care provider from our office is not available) who provide “call coverage” for your health
care provider.
YOUR HEALTH INFORMATION
This notice applies to the information and records we have about your health, health status, and the health care and
services you receive at this office. We are required by law to give you this notice. It will tell you about the ways in
which we may use and disclose health information about you and describes your rights and our obligations regarding
the use and disclosure of that information.
HOW WE MAY USE AND DISCLOSE HEALTH INFORMATION ABOUT YOU
For Treatment We may use health information about you to provide you with medical treatment or services. We may
disclose health information about you to doctors, nurses, technicians, office staff or other personnel who are involved
in taking care of you and your health. For example, your doctor may be treating you for a heart condition and may
need to know if you have other health problems that could complicate your treatment. The doctor may use your medical history to decide what treatment
is best for you. The doctor may also tell another doctor about your condition so that doctor can help determine the
most appropriate care for you.
Different personnel in our office may share information about you and disclose information to people who do not work
in our office in order to coordinate your care, such as phoning in prescriptions to your pharmacy, scheduling lab work
and ordering x-rays. Family members and other health care providers may be part of your medical care outside this
office and may require information about you that we have.
For Payment We may use and disclose health information about you so that the treatment and services you receive at
this office may be billed to and payment may be collected from you, an insurance company or a third party. For example, we may need to give your health plan information about a service you received here so your health plan will pay
us or reimburse you for the service. We may also tell your health plan about a treatment you are going to receive to
obtain prior approval, or to determine whether your plan will cover the treatment.
For Health Care Operations We may use and disclose health information about you in order to run the office and
make sure that you and our other patients receive quality care. For example, we may use your health information to
evaluate the performance of our staff in caring for you. We may also use health information about all or many of our
patients to help us decide what additional services we should offer, how we can become more efficient, or whether
certain new treatments are effective.
Appointment Reminders We may contact you as a reminder that you have an appointment for treatment or medical
care at the office.
Treatment Alternatives We may tell you about or recommend possible treatment options or alternatives that may be
of interest to you.
Health-Related Products and Services We may tell you about health-related products or services that may be of
interest to you.
Please notify us if you do not wish to be contacted for appointment reminders, or if you do not wish
to receive communications about treatment alternatives or health-related products and services. If you advise us in
writing (at the address listed at the top of this Notice) that you do not wish to receive such communications, we will
not use or disclose your information for these purposes.
SPECIAL SITUATIONS
We may use or disclose health information about you without your permission for the following
purposes, subject to all applicable legal requirements and limitations:
To Avert a Serious Threat to Health or Safety We may use and disclose health information about you when necessary to prevent a serious threat to your health and safety or the health and safety of the public or another person.
Required By Law We will disclose health information about you when required to do so by federal, state or local
law.
iv
Notice of Privacy Practices
(continued)
Research We may use and disclose health information about you for research projects that are
subject to a special approval process. We will ask you for your permission if the researcher will have access to your
name, address or other information that reveals who you are, or will be involved in your care at the office.
Organ and Tissue Donation If you are an organ donor, we may release health information to
organizations that handle organ procurement or organ, eye or tissue transplantation or to an organ donation bank,
as necessary to facilitate such donation and transplantation.
Military, Veterans, National Security and Intelligence If you are or were a member of the armed forces, or part of
the national security or intelligence communities, we may be required by military command or other government
authorities to release health information about you. We may also release information about foreign military personnel to
the appropriate foreign military authority.
Workers’ Compensation We may release health information about you for workers’ compensation or similar programs. These programs provide benefits for work-related injuries or illness.
Public Health Risks We may disclose health information about you for public health reasons in order to prevent or
control disease, injury or disability; or report births, deaths, suspected abuse or neglect, non-accidental physical
injuries, reactions to medications or problems with products.
Health Oversight Activities We may disclose health information to a health oversight agency for audits, investigations, inspections, or licensing purposes. These disclosures may be necessary for
certain state and federal agencies to monitor the health care system, government programs, and
compliance with civil rights laws.
Lawsuits and Disputes If you are involved in a lawsuit or a dispute, we may disclose health information about you in
response to a court or administrative order. Subject to all applicable legal requirements, we may also disclose health
information about you in response to a subpoena.
Law Enforcement We may release health information if asked to do so by a law enforcement official
in response to a court order, subpoena, warrant, summons or similar process, subject to all applicable legal requirements.
Coroners, Medical Examiners and Funeral Directors We may release health information to a coroner or medical
examiner. This may be necessary, for example, to identify a deceased person or determine the cause of death.
Information Not Personally Identifiable We may use or disclose health information about you in a way that does not
personally identify you or reveal who you are.
Family and Friends We may disclose health information about you to your family members or
friends if we obtain your verbal agreement to do so or if we give you an opportunity to object to such a disclosure and
you do not raise an objection. We may also disclose health information to your family or friends if we can infer from
the circumstances, based on our professional judgment that you would not object. For example, we may assume you
agree to our disclosure of your personal health information to your spouse when you bring your spouse with you
into the exam room during treatment or while treatment is discussed.
OTHER USES AND DISCLOSURES OF HEALTH INFORMATION
We will not use or disclose your health information for any purpose other than those identified in the previous sections without your specific, written Authorization. If you give us Authorization to use or disclose health information
about you, you may revoke that Authorization, in writing, at any time. If you revoke your Authorization, we will no
longer use or disclose information about you for the reasons covered by your written Authorization, but we cannot
take back any uses or disclosures already made with your permission.
If we have HIV or substance abuse information about you, we cannot release that information without a special
signed, written authorization from you that complies with the law governing HIV or substance abuse records.
YOUR RIGHTS REGARDING HEALTH INFORMATION ABOUT YOU
You have the following rights regarding health information we maintain about you:
Right to Inspect and Copy You have the right to inspect and copy your health information, such as medical and
billing records, that we use to make decisions about your care. You must submit a written request to Privacy Office at
Timm Medical Technologies, Inc. in order to inspect and/or copy your health information. If you request a copy of the
information, we may charge a fee for the costs of copying, mailing or other associated supplies. We may deny your
request to inspect and/or copy in certain limited circumstances. If you are denied access to your health information,
you may ask that the denial be reviewed. If such a review is required by law, we will select a licensed health care professional to review your request and our denial. The person conducting the review will not be the person who denied
your request, and we will comply with the outcome of the review.
v
Notice of Privacy Practices
(continued)
Right to Amend If you believe health information we have about you is incorrect or incomplete, you may ask us to
amend the information. You have the right to request an amendment as long as the information is kept by this office.
We may deny your request for an amendment if it is not in writing or does not include a reason to support the
request. In addition, we may deny your request if you ask us to amend information that:
a) We did not create, unless the person or entity that created the information is no longer available to
make the amendment.
b) Is not part of the health information that we keep.
c) You would not be permitted to inspect and copy.
d) Is accurate and complete.
Right to an Accounting of Disclosures You have the right to request an “accounting of disclosures.” This is a list
of the disclosures we made of medical information about you for purposes other than treatment, payment and
health care operations. To obtain this list, you must submit your request in writing to Privacy Officer. It must state
a time period, which may not be longer than six years and may not include dates before April 14, 2003. Your
request should indicate in what form you want the list (for example, on paper, electronically). We may charge you
for the costs of providing the list. We will notify you of the cost involved and you may choose to withdraw or
modify your request at that time before any costs are incurred.
Right to Request Restrictions You have the right to request a restriction or limitation on the health information
we use or disclose about you for treatment, payment or health care operations. You also have the right to request
a limit on the health information we disclose about you to someone who is involved in your care or the payment
for it, like a family member or friend. For example, you could
ask that we not use or disclose information about a surgery you had.
We are Not Required to Agree to Your Request If we do agree, we will comply with your request unless the
information is needed to provide you emergency treatment.
To request restrictions, you may complete and submit a Request For Restricting Uses and Disclosures and
Confidential Communications Form Information to: Privacy Officer, Timm Medical Technologies, Inc., 9600 West
76th Street, Suite T, Eden Prairie MN 55344.
Right to Request Confidential Communications You have the right to request that we communicate with you
about medical matters in a certain way or at a certain location. For example, you can ask that we only contact you
at work or by mail.
To request confidential communications, you may complete and submit the Requests For Restricting Uses and
Disclosures and Confidential Communications to Privacy Officer. We will not ask you the
reason for your request. We will accommodate all reasonable requests. Your request must specify how or where
you wish to be contacted.
Right to a Paper Copy of This Notice You have the right to a paper copy of this notice. You may
ask us to give you a copy of this notice at any time. Even if you have agreed to receive it electronically, you are
still entitled to a paper copy. To obtain such a copy, contact Privacy Officer, Timm Medical Technologies, Inc.,
9600 West 76th Street, Suite T, Eden Prairie MN 55344.
CHANGES TO THIS NOTICE
We reserve the right to change this notice, and to make the revised or changed notice effective for medical
information we already have about you as well as any information we receive in the future.
We will post a summary of the current notice in the office with its effective date in the top right hand corner. You
are entitled to a copy of the notice currently in effect.
COMPLAINTS
If you believe your privacy rights have been violated, you may file a complaint with our office or with the
Secretary of the Department of Health and Human Services. To file a complaint with our office, contact Privacy
Officer, Timm Medical Technologies, Inc., 9600 West 76th Street, Suite T, Eden Prairie, MN 55344 or call toll free:
(800) 438-8592. You will not be penalized for filing a complaint.
vi
User Guide
ErecAid Esteem Manual and Automatic
Vacuum Therapy System
®
Contents
®
Page
Packing List . . . . . . . . . . . . . . . . . . . . . . . . . . . . . . . . . . . . . i
Patient Bill of Rights . . . . . . . . . . . . . . . . . . . . . . . . . . . . . . iii
Notice of Privacy Practices . . . . . . . . . . . . . . . . . . . . . . . .iv
Principles of Operation . . . . . . . . . . . . . . . . . . . . . . . . . . . .1
Using a Vacuum Therapy Device . . . . . . . . . . . . . . . . . . . .1
Esteem Manual System
Components . . . . . . . . . . . . . . . . . . . . . . . . . . . . . . . .5
How to Assemble . . . . . . . . . . . . . . . . . . . . . . . . . . .7
Initial Practice Sessions . . . . . . . . . . . . . . . . . . . . .8
How to Load the Tension Ring . . . . . . . . . . . . . . .10
Easy-Action Ring Applicator . . . . . . . . . . . . . . . . .12
How to Create an Erection . . . . . . . . . . . . . . . . . .14
How to Keep the Erection . . . . . . . . . . . . . . . . . . .16
Removing the Tension Rings . . . . . . . . . . . . . . . . .17
Esteem Automatic System
Components . . . . . . . . . . . . . . . . . . . . . . . . . . . . . . .19
How to Assemble . . . . . . . . . . . . . . . . . . . . . . . . . .21
How to Load the Batteries . . . . . . . . . . . . . . . . . .22
Initial Practice Sessions . . . . . . . . . . . . . . . . . . . .22
How to Load the Tension Ring . . . . . . . . . . . . . . .24
Easy-Action Ring Applicator . . . . . . . . . . . . . . . . .26
How to Create an Erection . . . . . . . . . . . . . . . . . .28
How to Keep the Erection . . . . . . . . . . . . . . . . . . .30
Removing the Tension Rings . . . . . . . . . . . . . . . . .31
Tips for Best Results . . . . . . . . . . . . . . . . . . . . . . . . . . . . . .32
Situations and Recommendations . . . . . . . . . . . . . . . . . . .33
Don’t Worry If . . . . . . . . . . . . . . . . . . . . . . . . . . . . . . . . . . . .36
System Care . . . . . . . . . . . . . . . . . . . . . . . . . . . . . . . . . . . . .37
Glossary of Terms . . . . . . . . . . . . . . . . . . . . . . . . . . . . . . . . . . .37
90-Day Return Policy . . . . . . . . . . . . . . . . . . . . . . . . . . . . . .38
Notes and Cautions . . . . . . . . . . . . . . . . . . . . . . . . . . . . . . . . . . . .39
Warranty Registration Card . . . . . . . . . . . . . . . . . . . . . . . . .44
For Further Assistance . . . . . . . . . . . . . . . . . . . . . . . . . . . .46
5 Year Limited Lifetime Warranty . . . . . . . . . . . . . . . . . . .46
vii
Principles of Operation
A human erection is a complex event that involves the brain, hormones,
blood vessels, nerves and muscles inside the penis. When these work
together properly, the penis fills with blood to produce an elongated
and hard erection. In simple terms, an erection is a blood-filling and
blood-storing event, which takes place inside a man’s penis.
A vacuum pump pulls blood into the penis to produce an erection. A
tension ring or band holds the blood in the penis, keeping the erection
long enough to have sexual intercourse. When the ring or band is
removed, the erection quickly goes away.
Using A Vacuum Therapy Device
Please read the following information carefully before using your
ErecAid.® While no serious injury has been reported from proper use
of this device, it is still important to observe some simple precautions.
If you have any questions, call Timm Medical Technologies, Inc.’s toll
free help line at 800-438-8592.
Contraindications
External vacuum therapy is a proven way to treat Erectile
Dysfunction, or impotence. However, some patients should not
use the device. These include:
1. Men with a previous history of spontaneous priapism (an erection
that lasts more than four hours). This may be extremely painful
and may cause permanent damage to the penis.
2. Men who have sickle cell trait or disease, or hypercoagulability
(excessive blood clotting) are more likely susceptible to suffer
from priapism.
3. Men who have a bleeding disorder or who bruise easily. Use of a
vacuum device may cause painful bruising of the penis in these men.
For the general population, there is no inherent or significant risk in
properly using a vacuum device. Misuse of the device or tension rings,
however, may result in painful or permanent injury to the penis. Users
should therefore read and follow instructions very carefully.
1
General Warnings and Precautions
Caution Talk to your doctor if any complications occur in using this
device. Stop using the device if complications continue.
Caution Do not leave the ring on your penis for more than 30
minutes. Do not fall asleep wearing the ring. Leaving the ring on too
long may damage your penis by keeping blood from flowing into it.
Caution Allow at least 60 minutes between uses of ErecAid.
Using the rings too often may cause bruising at the base of the penis
(where the penis is joined to the body).
1. If you have symptoms of Erectile Dysfunction (not being able to
get or keep an erection that allows you to have sex), talk to your
doctor before using the ErecAid® to prevent a delay in discovering
and treating the cause. Common causes of Erectile Dysfunction
are heart disease, diabetes, multiple sclerosis, cirrhosis of the liver,
chronic renal failure and alcoholism.
2. Ask your doctor about using the ErecAid if you are taking anticoagulant (blood-thinning) medicine; if you have a penile implant;
or if you have Peyronie’s disease, leukemia or other blood disorders
where bleeding or clotting may be a problem. The effects of the
ErecAid system on the components of implanted penile prostheses
have not been adequately investigated. Therefore, if you have a
penile prosthesis, consult your physician prior to use.
3. Do not use the vacuum pump under the influence of drugs or
alcohol. These substances may reduce your sensitivity to pain or
impair your ability to follow directions properly.
4. The vacuum pump may bruise the blood vessels just below the
surface of the skin, which may cause petechiae (very tiny spots
beneath the skin) when you first begin using your System. This is a
response to placing the penis under vacuum pressure too long, too
quickly or after a long period of inactivity. If this happens,
discontinue use of the System until discoloration completely
disappears – about five to seven days.
5. Always use the least amount of vacuum pressure necessary to
produce an erection. Using too much pressure or increasing the
vacuum pressure too quickly may cause discomfort, pain or bruising.
Release vacuum pressure immediately if pain occurs.
2
6. Improper use of the vacuum pump could result in the swelling of
the penis and/or serious, permanent injury to the penis. Improper
use may also worsen pre-existing medical conditions such as
Peyronie’s disease, priapism and urethral strictures.
7. If you notice a bend or curve in your penis when you first use your
ErecAid, talk to your physician.
8. If your hands are impaired, you should not use this product. You
must have full use of your hands to safely use the rings and pump. If
you do not have enough strength in your hands, you may not be able
to remove the ring. Delayed ring removal could damage your penis.
9. The vacuum pump may not be safe for men who cannot feel pain
in the area around their penis. If you have diabetes, you may have
a reduced ability to feel pain. Pain may be a sign that your penis
is being bruised.
10. Tension rings are not a means of birth control. Do not rely on tension
rings to avoid pregnancy.
11. Always use the lowest amount of tension necessary to maintain the
erection. Start by using the largest size ring with the lowest tension.
Add tension, if necessary, by using the next lowest tension level. Do
not skip a level when adding tension.
12. After a period of inactivity when the pump has not been utilized,
practice sessions will again be necessary to recondition penile
tissue prior to resuming sexual activity.
13. If you will not be having sexual activity on a regular basis, you
need to continue therapy practice sessions on a regular basis.
3
®
®
ErecAid Esteem
Vacuum Therapy System
Manual Model
4
Components – Manual Model
Study the diagram to become familiar with the name and purpose of each
part of your new ErecAid Esteem System before you apply the device.
Pump
The manual pump is ergonomically designed
to facilitate easy operation to create the
proper vacuum.
Cylinder
The oval end of the cylinder is designed so
you can easily attach the manual pump. The
other end of the cylinder fits snugly against
your body to help create the vacuum seal.
Insert
The insert may be used to decrease the
diameter of the open end of the cylinder, if
needed. You should try using the System
with and without the insert to decide which
way works best for you.
5
Pressure-Point ™ Tension Rings
The patented pressure-point tension
rings are medically engineered for safety,
performance and comfort. You may use the
rings individually or in various combinations
to keep your erection once you have created
it using the System (refer to Situation on
page 34). You will have four pressure-point
tension rings packaged with your System:
one Medium and one Large ring in standard
tension (beige); one Medium and one Large
ring in high tension (pink). See Ring Tension
Chart for tension and color details on page 9.
A
A
A
A
NOTE: Please note that tension rings are a
disposable item and will last 1-6 months or
longer, depending on use and storage.
Easy-Action® Ring Applicator
The Easy-Action ring applicator is a specially
designed tool that lets you easily load the
Pressure-Point tension ring(s) onto your
ErecAid Esteem System cylinder.
The Easy-Action ring applicator consists of
two parts – a top part, or cap, and a bottom
part, or cone.
Lubricant
Osbon Personal Lubricant™ plays an
important part in the overall function of the
System. Proper application of our watersoluble lubricant to the head of the penis
and to the open end of the cylinder helps
create a good vacuum seal against the body.
The lubricant also helps you to load and
remove the tension rings. You should use
only water-based Osbon Personal Lubricant.
Other lubricants may damage the tension
rings and other System parts, as well as
void your limited lifetime warranty.
6
How to Assemble – Manual Model
Step 1
Start with the insert in the smaller end
of the cylinder, as packaged. The insert
narrows the inside of the cylinder and keeps
scrotal tissue from being drawn in while
you create your erection. If your erection
presses uncomfortably against the inside of
the insert, remove the insert and use the
cylinder without it.
Step 2
Attach the oval end of the pump to the
large oval end of the cylinder by pressing
them firmly together. Be sure to keep the
cylinder’s label face up and opposite to the
Pump Handle.
Now your ErecAid® Esteem System is
fully assembled, and you are ready
to learn how to use the System.
Pump
Handle
PLEASE NOTE: If you have difficulty attaching the
pump to the cylinder, using your index finger, apply a small amount
of lubricant to the outer rim of the pump. This will allow the cylinder
to connect more easily. Use only a small amount of lubricant as excess can seep
into the pump and cause damage.
7
Initial Practice Sessions – Manual Model
Practice sessions should be at least 10 –15 minutes daily for a
minimum of two weeks.
Before using your ErecAid® System for intercourse, you must practice
creating an erection. You will be much more satisfied with results by
taking the time to complete the practice sessions. Practice sessions help
you learn your individual comfort level, the amount of vacuum you
need, the best pumping rate for you and the most effective technique
for getting a good seal and a firm erection.
Practice sessions also help you understand what to expect from the
System, and the sessions can help you become more confident and
more satisfied with your sexual experiences.
Most importantly, after a period of sexual inactivity, the vessels
in the penis need to become accustomed to being filled with
blood again. After a period of inactivity when the pump has
not been utilized, practice sessions will again be necessary to
recondition penile tissue prior to resuming sexual activity. If
you will not be having sexual activity on a regular basis, you
need to continue therapy practice sessions on a regular basis.
Follow the practice session outlined below, you will provide a
slow but steady increase of blood through the vessels of the
penis, giving you a better erection.
During your initial practice sessions, DO NOT use a tension ring(s).
You will only be practicing how to create an erection. Later, when you
become comfortable with creating your erection, you will learn how
to load and transfer tension rings. Proper use of the tension rings lets
you keep a full erection suitable for intercourse.
During practice sessions refer to “How to Create an Erection” on
page 14 and also skip over “How to Keep the Erection” on page 16.
8
How to Select the Tension Ring
You will need to experiment to find the tension ring that’s right for you.
Begin with the largest Ring (A) and determine if it is comfortable and
provides a satisfactory erection. If not, try the (B) Ring then and then the
(C) Ring and then the (D) Ring. Always try to keep the erection with
the least amount of tension. Correct positioning of the tension ring is
also necessary to keep the erection. Tension rings should be positioned
so that the “U” shaped notch is on the bottom of the penis and the
pressure points are at the top of the penis.
NOTE: When using a combination of rings, the ring with the greatest
amount of tension should be closest to your body. See page 34 for
instructions on loading and transferring no more than two tension rings.
COLOR CODED TENSION RINGS
BEIGE
PINK
Standard Tension
High Tension
(Ring tension letter
indicator as listed
in “Ring Tension
Chart”)
Pressure Points
A
A
“U” Notch
Loops
Ring Tension Chart
Minimum
Tension
Level One
One large standard-tension ring (beige-A)
Level Two
One large high-tension ring (pink-B)
Level Three
One medium standard-tension ring (beige-C)
Level Four
One medium high-tension ring (pink-D)
Level Five
One medium standard-tension (beige-C) and
One large standard-tension ring (beige-A)
Level Six
One medium high-tension (pink-D) and
One large high-tension ring (pink-B)
Level Seven One medium high-tension (pink-D) and
Maximum Tension
One medium standard-tension ring (beige-C)
9
How to Load the Tension Ring Manually
Loading With Your Index Fingers:
Step 1
Place the cylinder between your legs so the
ErecAid labeling on the cylinder is facing
you. Now, hold the tension ring so the
U-notch is facing away from you, and your
index fingers are on the inside of the ring.
Step 2
Place the U-notch on the lip of the cylinder
farthest away from you. With your index
fingers inside the tension ring, pull the
tension ring over the cylinder. Do not use
the outer loops.
Step 3
Pull the tension ring over the lip of the
cylinder by pushing on the cylinder with
your thumbs and pulling the tension ring
across with your index fingers.
Step 4
The tension ring should now be around the
lip of the cylinder. If you need to add
additional rings to the cylinder, slide the
first ring 1/4” towards the pump handle to
allow space for the additional ring.
Then, choose an additional ring and repeat
steps 1 through 3.
10
How to Load the Tension Ring Manually
continued
Loading With Your Thumbs:
Step 1
Place the cylinder between your legs so the
ErecAid labeling on the cylinder is closest
to you. Now, hold the tension ring so the
U-notch is pointing away from you, and
your thumbs are on the inside of the ring.
Step 2
With your thumbs on the inside of the
tension ring and the U-notch pointing away
from you, begin stretching the tension ring
over the lip of the cylinder. Use your index
fingers as leverage to stretch the tension
ring over the lip of the cylinder with your
thumbs. Start from the part of the cylinder
closest to you and move out.
Step 3
The tension ring should now be around the
lip of the cylinder. If you need to add additional rings to the cylinder, slide the first
ring 1/4” towards the pump handle to allow
space for the additional ring. Then, choose
an additional ring and repeat steps 1
through 2.
11
How to Load the
Tension Ring Using
the Easy-Action
Ring Applicator
Cap
Cross Bars
White Dot
®
Slots
Cone
Step 1
Remove the pump and the insert from the
cylinder. Put a towel on a table or counter
top and stand the cylinder on top of the
towel with the large end of the cylinder
face down. The towel will keep the cylinder
from slipping.
Step 2
Separate the Easy-Action ring applicator
by holding the base of the cone in your
hand and then pushing the button on the
top of the cap. Place the base of the ring
applicator cone in the small open end of the
cylinder. Twist the cone so that the white
dot on top of the cone lines up with the
cylinder groove opposite the cylinder label.
Step 3
Lubricate the entire cone surface with
Osbon Personal Lubricant.™
Step 4
Place the tension ring on the cone, making
sure to align the U-notch on the tension
ring with the white dot on the cone.
12
Step 5
Place the cap back on the cone and tension
ring, lining up the cross bars of the underside of the cap with the slots on the top of
the cone.
Step 6
Then quickly and firmly press straight
down on the cap of the ring applicator
with one hand while holding the cylinder
in an upright position on the towel with
your other hand to help stabilize it.
Step 7
The tension ring should now be transferred to the cylinder in the correct
position. If you need to add additional
rings to the cylinder, slide the first ring
1/4" towards the pump end of the cylinder
to allow space for the additional ring(s).
Then, choose another ring and repeat
steps 2 through 6.
Step 8
After you have loaded your tension ring(s),
remove your ring applicator from the
cylinder and replace the insert. Place the
pump handle back on to the cylinder.
You are now ready to create an erection
with your ErecAid® Esteem® System.
13
How to Create an Erection – Manual Model
Assemble your System according to the
two-step procedure on page 7.
Step 1
Apply Osbon Personal Lubricant™
to the following:
1. two inches inside the open end of the
cylinder;
2. the rim of the cylinder which meets
the body to form the vacuum seal; and
3. the entire head of the penis.
Applying lubricant properly will help you
achieve the best erection possible.
Tip: Trimming the pubic hair around the
base of the penis with a pair of scissors may
also prove helpful in creating an airtight seal.
Step 2
It is recommended that you stand for this
step (the System can also be used when you
are sitting or lying down).
Place the lubricated penis inside the
cylinder with the label on the cylinder
facing up. With one hand, hold the cylinder
at a downward 45° angle with the open end
snugly against the body.
Tip: Rotate cylinder slightly back and forth
to make an airtight seal against the body,
make sure the testicles are not drawn into
the cylinder.
14
Step 3
Pump slowly to remove the air from the
cylinder. Begin by pressing the pump handle
two times to create the vacuum seal. Then
wait 5 to 10 seconds between pumps to
increase blood flow. You should not force
the pump handle past its stopping point. If
the vacuum pressure increases too quickly,
you may feel discomfort.
If you have any discomfort, stop pumping
and press the vacuum release button.
Then begin pumping again. Continue slowly
for best results, waiting 5 to 10 seconds
between pumps. You may need to press the
vacuum-release button several times while
creating the erection. The number of pumps
needed for a firm erection will vary according to the individual. Experiment to find
out how many times you’ll need to pump.
Step 4
Usually the penis will lift slightly from the
floor of the cylinder when the erection
is complete. This process may take a few
minutes. If your erection begins to press
uncomfortably against the inside of the
insert, remove the insert and start over
without it.
NOTE: It may take a bit longer than
expected for some men to get an erection.
By repeating the practice sessions, you’ll
be able to get a firmer erection more
quickly and be able to use less vacuum.
15
How to Keep the Erection – Manual Model
With the tension ring loaded on your cylinder, follow the steps you’ve
learned already to create an erection using the System. Remember to
use Osbon Personal Lubricant™ and to place the cylinder over your
penis ensuring the “U” notch is to the bottom of the penis and the
loops are to the top.
NOTE: If you are not sure if the ring is positioned correctly, remove the
ring from the cylinder and repeat the ring loading steps.
Step 1
Slide the tension ring(s) from the cylinder
to the base of your erect penis, one at a
time. Keep the cylinder snug to the body
while sliding off the ring(s). Many men find
it easiest to slide the ring off by holding one
side of the ring against the body while tipping the pump away from the body in the
opposite direction.
Step 2
Note: You may also push the green
vacuum release button to remove the
cylinder. The penis will remain erect until
you remove the tension ring(s). Do not leave
the tension ring(s) on your penis longer than
30 minutes.
16
Removing the Tension Rings
Remove the tension ring(s) after sexual activity. Remember:
Do not keep the ring(s) on your penis for longer than 30 minutes.
Step 1
Apply a small amount of lubricant in front
of the ring, and on the penis.
Step 2
Grasp the loops and pull SLIGHTLY
outward, away from the penis. Hold the
loops outward for at least 10 seconds or
until the penis loses some firmness.
Step 3
Slowly pull the ring(s) forward and off
your penis.
NOTE: Lying down will help the blood flow
into the body faster.
17
®
®
ErecAid Esteem
Vacuum Therapy System
Automatic Model
18
Components – Automatic Model
Study the diagram to become familiar with the name and purpose of each
part of your new ErecAid Esteem System before you apply the device.
Pump
The automatic pump provides a simple,
single touch method to create the proper
vacuum.
Cylinder
The oval end of the cylinder is designed so
you can easily attach the automatic pump.
The other end of the cylinder fits snugly
against your body to help create the
vacuum seal.
Insert
The insert may be used to decrease the
diameter of the open end of the cylinder, if
needed. You should try using the System
with and without the insert to decide which
way works best for you.
19
Pressure-Point ™ Tension Rings
The patented pressure-point tension
rings are medically engineered for safety,
performance and comfort. You may use the
rings individually or in various combinations
to keep your erection once you have created
it using the System (refer to Situation on
page 34). You will have four pressure-point
tension rings packaged with your System:
one Medium and one Large ring in standard
tension (beige); one Medium and one Large
ring in high tension (pink). See Ring Tension
Chart for tension and color details on page 23.
A
A
A
A
NOTE: Please note that tension rings are a
disposable item and will last 1-6 months or
longer, depending on use and storage.
Easy-Action® Ring Applicator
The Easy-Action ring applicator is a specially
designed tool that lets you easily load the
Pressure-Point tension ring(s) onto your
ErecAid Esteem System cylinder.
The Easy-Action ring applicator consists of
two parts – a top part, or cap, and a bottom
part, or cone.
Lubricant
Osbon Personal Lubricant™ plays an
important part in the overall function of the
System. Proper application of our watersoluble lubricant to the head of the penis
and to the open end of the cylinder helps
create a good vacuum seal against the body.
The lubricant also helps you to load and
remove the tension rings. You should use
only water-based Osbon Personal Lubricant.
Other lubricants may damage the tension
rings and other System parts, as well as
void your limited lifetime warranty.
20
How to Assemble – Automatic Model
Step 1
Start with the insert in the smaller end
of the cylinder, as packaged. The insert
narrows the inside of the cylinder and keeps
scrotal tissue from being drawn in while you
create your erection. If your erection presses
uncomfortably against the inside of the insert,
remove the insert and use the cylinder
without it.
Step 2
Attach the oval end of the pump to the large
oval end of the cylinder by pressing them
firmly together. Be sure to keep the cylinder’s
label face up and in line with the Power
Button.
Now your ErecAid System is fully
assembled, and you are ready to
learn how to use the System.
Power Button
PLEASE NOTE: Should you have
difficulty attaching the pump to the cylinder,
using your index finger, apply a small amount
of lubricant to the outer rim of the pump.
This will allow the cylinder to connect more easily.
Use only a small amount of lubricant as excess can seep
into the pump and cause damage.
21
How to Load the Batteries – Automatic Model
Step 1
The battery compartment door is located
on the back of the pump. Remove the
door by pressing firmly and sliding it
towards the vacuum release button.
Step 2
Load the batteries to match the diagram
inside the compartment. The System
operates on three (3) AA-size batteries. Slide
the battery compartment door back in place.
NOTE: Be sure to load your new batteries on top
of the ribbon found in the compartment. By doing
this, you can pull up on the ribbon to easily lift
them out of the compartment when it is time for
replacement.
Initial Practice Sessions – Automatic Model
Practice sessions should be at least 10 –15 minutes daily for a
minimum of two weeks.
Before using your ErecAid® System for intercourse, you must practice creating an erection. You
will be much more satisfied with results by taking time to complete the practice sessions.
Practice sessions help you learn your individual comfort level, the amount of vacuum you need
and the most effective technique for getting a good seal
and a firm erection.
Practice sessions also help you understand what to expect from the System, and the sessions can
help you become more confident and more satisfied with your sexual experiences.
During your initial practice sessions, DO NOT use a tension ring(s).
You will only be practicing how to create an erection. Later, when you become comfortable with
creating your erection, you will learn how
to load and transfer tension rings. Proper use of the tension rings lets you keep a full erection suitable for intercourse.
During practice sessions skip to “How to Create an Erection” on page 28.
22
How to Select the Tension Ring
You will need to experiment to find the tension ring that’s right for you.
Begin with the largest Ring (A) and determine if it is comfortable and
provides a satisfactory erection. If not, try the (B) Ring then and then the
(C) Ring and then the (D) Ring. Always try to keep the erection with
the least amount of tension. Correct positioning of the tension ring is
also necessary to keep the erection. Tension rings should be positioned
so that the “U” shaped notch is on the bottom of the penis and the
pressure points are at the top of the penis.
NOTE: When using a combination of rings, the ring with the greatest
amount of tension should be closest to your body. See page 34 for
instructions on loading and transferring no more than two tension rings.
COLOR CODED TENSION RINGS
BEIGE
PINK
Standard Tension
High Tension
(Ring tension letter
indicator as listed
in “Ring Tension
Chart”)
Pressure Points
A
A
“U” Notch
Loops
Ring Tension Chart
Minimum
Tension
Level One
One large standard-tension ring (beige-A)
Level Two
One large high-tension ring (pink-B)
Level Three
One medium standard-tension ring (beige-C)
Level Four
One medium high-tension ring (pink-D)
Level Five
One medium standard-tension (beige-C) and
One large standard-tension ring (beige-A)
Level Six
One medium high-tension (pink-D) and
One large high-tension ring (pink-B)
Level Seven One medium high-tension (pink-D) and
Maximum Tension
One medium standard-tension ring (beige-C)
23
How to Load the Tension Ring Manually
Loading With Your Index Fingers:
Step 1
Place the cylinder between your legs so the
ErecAid labeling on the cylinder is facing
you. Now, hold the tension ring so the
U-notch is facing away from you, and your
index fingers are on the inside of the ring.
Step 2
Place the U-notch on the lip of the cylinder
farthest away from you. With your index
fingers inside the tension ring, pull the
tension ring over the cylinder. Do not use
the outer loops.
Step 3
Pull the tension ring over the lip of the
cylinder by pushing on the cylinder with
your thumbs and pulling the tension ring
across with your index fingers.
Step 4
The tension ring should now be around the
lip of the cylinder. If you need to add
additional rings to the cylinder, slide the
first ring 1/4” towards the pump handle to
allow space for the additional ring.
Then, choose an additional ring and repeat
steps 1 through 3.
24
How to Load the Tension Ring Manually
continued
Loading With Your Thumbs:
Step 1
Place the cylinder between your legs so the
ErecAid labeling on the cylinder is closest
to you. Now, hold the tension ring so the
U-notch is pointing away from you, and
your thumbs are on the inside of the ring.
Step 2
With your thumbs on the inside of the
tension ring and the U-notch pointing away
from you, begin stretching the tension ring
over the lip of the cylinder. Use your index
fingers as leverage to stretch the tension
ring over the lip of the cylinder with your
thumbs. Start from the part of the cylinder
closest to you and move out.
Step 3
The tension ring should now be around the
lip of the cylinder. If you need to add additional rings to the cylinder, slide the first
ring 1/4” towards the pump handle to allow
space for the additional ring. Then, choose
an additional ring and repeat steps 1
through 2.
25
How to Load the
Tension Ring Using
the Easy-Action
Ring Applicator
Cap
Cross Bars
White Dot
®
Slots
Cone
Step 1
Remove the pump and the insert from the
cylinder. Put a towel on a table or counter
top and stand the cylinder on top of the
towel with the large end of the cylinder
face down. The towel will keep the cylinder
from slipping.
Step 2
Separate the Easy-Action ring applicator
by holding the base of the cone in your
hand and then pushing the button on the
top of the cap. Place the base of the ring
applicator cone in the small open end of the
cylinder. Twist the cone so that the white
dot on top of the cone lines up with the
cylinder groove opposite the cylinder label.
Step 3
Lubricate the entire cone surface with
Osbon Personal Lubricant.™
Step 4
Place the tension ring on the cone, making
sure to align the U-notch on the tension
ring with the white dot on the cone.
26
Step 5
Place the cap back on the cone and tension
ring, lining up the cross bars of the underside of the cap with the slots on the top of
the cone.
Step 6
Then quickly and firmly press straight
down on the cap of the ring applicator
with one hand while holding the cylinder
in an upright position on the towel with
your other hand to help stabilize it.
Step 7
The tension ring should now be transferred to the cylinder in the correct
position. If you need to add additional
rings to the cylinder, slide the first ring
1/4" towards the pump end of the cylinder
to allow space for the additional ring(s).
Then, choose another ring and repeat
steps 2 through 6.
Step 8
After you have loaded your tension ring(s),
remove your ring applicator from the
cylinder and replace the insert. Place the
pump handle back on to the cylinder.
You are now ready to create an erection
with your ErecAid® Esteem® System.
27
How to Create an Erection – Automatic Model
Assemble your System according to the
two-step procedure on page 21.
Step 1
Apply Osbon Personal Lubricant™
to the following:
1. two inches inside the open end of the
cylinder;
2. the rim of the cylinder which meets
the body to form the vacuum seal; and
3. the entire head of the penis.
Applying lubricant properly will help you
achieve the best erection possible.
Tip: Trimming the pubic hair around the
base of the penis with a pair of scissors may
also prove helpful in creating an airtight seal.
Step 2
It is recommended that you stand for this
step (the System can also be used when you
are sitting or lying down).
Place the lubricated penis inside the
cylinder with the label on the cylinder
facing up. With one hand, hold the cylinder
at a downward 45° angle with the open end
snugly against the body.
Tip: Rotate cylinder slightly back and forth
to make an airtight seal against the body,
make sure the testicles are not drawn into
the cylinder.
28
Step 3
Press the power button on the pump
to remove the air from the cylinder. Now
begin creating the vacuum by pressing the
power button on the pump for several
seconds. Then stop the pump and wait 5
to 10 seconds to increase blood flow. If the
vacuum pressure increases too quickly,
you may feel discomfort.
If you have any discomfort, stop the
pump and press the vacuum-release
button. Then turn the pump on again for
several seconds. Rather than running the
pump continually, it is recommended that
the pump be turned on for several seconds
then turned off for 5 to 10 seconds.
Continue this until you have achieved an
erection. You may need to press the vacuumrelease button several times. The amount
of vacuum needed for a firm erection will
vary according to the individual. Experiment
to find out how long you’ll need to keep
the pump running.
Step 4
Usually the penis will lift slightly from the
floor of the cylinder when the erection
is complete. This process may take a few
minutes. If your erection begins to press
uncomfortably against the inside of the
insert, remove the insert and start over
without it.
NOTE: It may take a bit longer than
expected for some men to get an erection.
By repeating the practice sessions, you’ll
be able to get a firmer erection more
quickly and be able to use less vacuum.
29
How to Keep the Erection – Automatic Model
With the tension ring loaded on your cylinder, follow the steps you’ve
learned already to create an erection using the System. Remember to
use Osbon Personal Lubricant™ and to place the cylinder over your
penis ensuring the “U” notch is to the bottom of the penis and the
pressure point bumps are to the top.
NOTE: If you are not sure if the ring is positioned correctly, remove the
ring from the cylinder and repeat the ring loading steps.
Step 1
Slide the tension ring(s) from the cylinder
to the base of your erect penis, one at a
time. Keep the cylinder snug to the body
while sliding off the ring(s). Many men find
it easiest to slide the ring off by holding one
side of the ring against the body while tipping the pump away from the body in the
opposite direction.
Step 2
Press the green vacuum-release button
and remove the cylinder. Set the cylinder
aside during sexual activity. The penis will
remain erect until you remove the tension
ring(s). Do not leave the tension ring(s) on
your penis longer than 30 minutes.
30
Removing the Tension Rings
Remove the tension ring(s) after sexual activity. Remember:
Do not keep the ring(s) on your penis for longer than 30 minutes.
Step 1
Apply a small amount of lubricant in front
of the ring, and on the penis.
Step 2
Grasp the loops and pull SLIGHTLY
outward, away from the penis. Hold for at
least 10 seconds or until the penis loses
some firmness.
Step 3
Slowly pull the ring(s) forward and off
your penis.
NOTE: Lying down will help blood flow
into the body faster.
31
Tips for Best Results
After a period of sexual inactivity, the vessels in the penis need
to become accustomed to being filled with blood again.
After a period of inactivity when the pump has not been
utilized, practice sessions will again be necessary to recondition
penile tissue prior to resuming sexual activity. If you will not be
having sexual activity on a regular basis, you need to continue
therapy practice sessions on a regular basis. Follow the practice
session outlined below, you will provide a slow but steady
increase of blood through the vessels of the penis, giving you a
better erection.
1. Be sure the cylinder is firm against your body. If you allow air to enter
the cylinder, the vacuum will not be sufficient to create an erection. If
getting a good seal is difficult for you, trim the pubic hair around the
base of the penis so the cylinder can make better contact with your skin.
Remember to apply lubricant to the rim of the cylinder. The lubricant is
designed to help create a proper seal.
2. Allow your erection to develop slowly. Increasing the vacuum too quickly
may cause discomfort or temporary bruising.
3. If you lose your erection with the tension ring in place, you may need
to increase the amount of tension. Refer to the chart on page 23 to
select the best tension for you.
4. You may also lose the erection if air enters the cylinders before the
tension ring(s) is/are in place. Be sure you position the tension ring(s)
on the penis before releasing the vacuum. Keep the cylinder pressed
firmly to your body during transfer of the tension ring(s).
5. Be sure to remove the tension ring(s) within 30 minutes.
Do not fall asleep with the tension ring(s) in place. Remove the tension
ring(s) before urinating.
6. An erection achieved with the System usually has greater girth (thickness), since the blood vessels are filled to their maximum potential.
However, ErecAid Esteem System is not an enlargement device; it
simply allows the penis to obtain its largest natural state.
7. Keep in mind that an erection achieved with the System will remain
rigid until you remove the tension ring(s). Most men are able to continue
intercourse after ejaculation/orgasm, if desired.
NOTE: For automatic model, be sure the batteries are in good working order
before applying the System. Insufficient power may not provide enough
vacuum to create an erection. Be sure to remove batteries if anticipating an
extended period between applications of the System. Whenever you turn off
the automatic pump, be sure to press the vacuum-release button briefly
before restarting the pump motor.
32
Situations and Recommendations
Just as there are many causes of Erectile Dysfunction, many different
situations may occur with its management. Some situations may
require special attention as you use ErecAid® Esteem® System. If you
encounter any of the situations described on the following pages,
follow the recommendations outlined to achieve a comfortable
erection with your ErecAid System.
This information is not intended to take the place of medical advice
from your prescribing physician.
Situation – Erection Not Suitable for Intercourse
You have used the pump and cylinder to obtain an erection, but
have not achieved an erection suitable for intercourse.
Recommendation
1. Liberally lubricate the head of your penis, two inches (5 cm)
inside the open end of the cylinder and the rim of the cylinder,
as previously described.
2. Place the lubricated penis into the cylinder. Pump slowly, pausing
for 5 to 10 seconds between pumps.
3. If the penis starts to tingle or feels uncomfortable while pumping,
push the vacuum-release button until that particular feeling goes
away. Resume pumping until the uncomfortable feeling starts
again or until you achieve an erection.
4. Release the vacuum, allowing the penis to become soft. Without
removing the cylinder, repeat steps two and three.
Practice this process 10 to 15 minutes daily without the tension ring(s)
(see page 8 or page 22 Practice Sessions) until you can achieve and
maintain an erection within the cylinder. Repeat for a minimum of
two weeks.
33
Situation – Initial Loss of Firmness
You lose firmness when you transfer the tension ring(s).
Recommendation
Reapply vacuum with ring(s) still in place. Be sure you have adequately
lubricated the cylinder. Place cylinder over your partially erect penis and
tension ring(s). Hold the cylinder firmly against the body. Then slowly
pump a few additional times until you achieve sufficient firmness.
Situation – Loss of Firmness During Sexual Activity
You have used each of the tension rings individually but still lose firmness
during sexual activity. In other words, Tension Levels 1– 4 (described in the
tension chart below) have not provided sufficient firmness.
Ring Tension Chart
Minimum
Tension
Level
Level
Level
Level
Level
One
Two
Three
Four
Five
Level Six
Level Seven
Maximum Tension
One large standard-tension ring (beige-A)
One large high-tension ring (pink-B)
One medium standard-tension ring (beige-C)
One medium high-tension ring (pink-D)
One medium standard-tension (beige-C) and
One large standard-tension ring (beige-A)
One medium high-tension (pink-D) and
One large high-tension ring (pink-B)
One medium high-tension (pink-D) and
One medium standard-tension ring (beige-C)
Recommendation
Remove the single tension ring from the penis. Follow the steps below to
position and transfer no more than two tension rings.
1. Begin with one medium and one large standard-tension ring
(Tension Level 5, described on pages 9 & 23). Continue adjusting ring
tension up to Tension Level 7 until sufficient firmness is achieved.
Once the optimal combination of rings is in place at the base of the
erect penis, DO NOT adjust them or firmness will be lost.
2. Position the ring with the greater amount of tension on the cylinder
first. Once loaded on the cylinder, slide the first ring 3/4 " away from
the end of the cylinder to allow room for the second ring.
3. Position the second ring (lower tension) on the cylinder and recreate
the erection.
4. Transfer the lowest tension ring onto the base of your penis – this will
break the vacuum seal.
5. NOTE: If you are using the insert, remove it now to reposition the cylinder over the tension ring on the penis.Twist the cylinder slightly to
move it over the applied ring and re-create the vacuum. The lower
tension ring will now be inside the cylinder.
6. Re-create the vacuum until the penis again lifts from the floor of
the cylinder. Transfer the second ring (higher tension) onto the base of the
penis, so that it leap frogs over the first ring and is closest to the body.
7. If you continue to lose firmness during sexual activity after trying all
seven tension levels outlined in the chart above, call Timm Medical
34
Technologies, Inc.’s Technical Support for assistance.
Situation – Scrotal Tissue Pulled into Cylinder
The force of the vacuum pulls body or scrotal tissue into the cylinder.
Recommendation
1. Remember to pump slowly.
2. Try using the optional adapter insert.
3. In the beginning, do not apply lubricant to the rim area of the
cylinder that comes into contact with scrotal tissue. However, if
you find that you need to apply lubricant to the entire rim to get
an airtight seal, be sure to wipe off any excess lubrication from
around the scrotal sac.
4. Make sure the underside of the penis is in contact with the floor
of the cylinder. Reach underneath the cylinder with a dry cloth
and gently remove the scrotal tissue from the cylinder. If you
lose pressure, pump a few more times.
5. If these steps do not solve the issue, an EZ™ Tension Ring will
be helpful.
NOTE: Call Timm Medical Technologies, Inc.’s Technical Support
for assistance and information about optional EZ Tension Rings at
800-438-8592.
Situation – Erect Penis has Distortion or Curvature
While using your ErecAid Esteem system, you discover that the
erect penis has a distortion or curvature.
Recommendation
If you notice a distortion, bend or curve in your penis when you first
use your ErecAid system, discontinue use and seek your physician’s
advice. Some men who have not been sexually active for some time
may have Peyronie’s Disease. See Glossary for definition.
Situation – Unable to Release Vacuum
You have achieved an erection and the release button does not
release pressure.
Recommendation
1. Press and hold release button.
2. Place one finger between the cylinder and body to manually
release vacuum.
35
Don’t Worry If . . .
…You feel pressure while applying the vacuum. This is not harmful.
If you feel discomfort, however, it may be a signal that you are pumping
too fast. Simply press the vacuum-release button, wait a moment and
begin again.
…Your penis turns slightly dusky or bluish in color after you apply
the tension ring(s). This is a normal response to the increase of blood
in the penis. The discoloration should disappear when you remove
the tension ring(s).
…You experience some petechiae (very tiny reddish spots beneath the
skin) or bruising of the penis when you first begin using your System.
This is a response to placing the penis under vacuum pressure too long,
too quickly or after a long period of inactivity. If this happens, discontinue
use of the System until discoloration completely disappears – about five
to seven days.
…You notice a slight drop in the temperature of the penis. This coolness
is not harmful. It is a normal response to the reduced blood flow caused
by the tension ring. It is possible to warm your penis by wrapping a
warm washcloth around it for several moments.
…Your erection has a “hinge” effect. The penis may pivot at its base when
the ring is in place. If this occurs, you may find it necessary to guide
the penis into the vagina or try different positions with your partner for
successful intercourse.
…Your semen does not flow through at point of climax. The pressure
of the tension ring(s) sometimes interferes with ejaculation. This is not
harmful, and does not affect climax. Instead, your semen may flow out
when you remove the tension ring(s). (Note: Tension rings are NOT a
means of contraception.)
…Your cylinder develops condensation on the inside. This is simply the
result of the heat from your body reacting with the lubricant. (Note: This
“fogging” can be reduced by running warm water over your cylinder
and then drying it before you use the System.)
36
System Care
After each use, carefully clean and store the System as follows:
1. Remove the vacuum pump and the insert, if used, from the cylinder.
Separate the Easy-Action® ring applicator into its two parts, being sure
the cap button remains depressed.
2. Wipe the pump with a damp cloth. Never wash or immerse the pump
in water. Immersing the pump handle will void your warranty.
3. Wash cylinder, insert, tension ring(s) and ring applicator with warm,
soapy water. Never place any ErecAid® component in dishwasher
or microwave. We recommend that you use liquid soap when cleaning
your System. Rinse thoroughly.
4. Let all the parts air-dry thoroughly in a ventilated place before storing.
Be sure to store the System unassembled.
Glossary of Terms
ERECTILE DYSFUNCTION (ED) the inability to get and keep a penile
erection suitable for sexual intercourse.
ERECTION the bodily process in males which fills and stores blood in
the penis, making it rigid.
IMPOTENCE a common name for Erectile Dysfunction.
PETECHIAE tiny, round purplish-red spots caused by broken or swollen
blood vessels just beneath the surface of the skin.
PEYRONIE’S DISEASE a condition in which the penis curves or bends
abnormally due to a build-up of scar tissue inside the penis.
PRIAPISM an erection that lasts more than four hours; an abnormally
prolonged erection.
SCROTUM the soft pouch or sac at the base of the penis which contains
the testes.
URETHRAL STRICTURE scar tissue inside the penile urination channel
which may cause the channel to narrow, blocking the flow of urine
and/or semen.
37
90-Day Return Policy
SPECIAL NOTE
This refund policy is affected at the original point of purchase.
The following return policy is designed to protect and serve your recent
purchase of Timm Medical Technologies, Inc. ErecAid® Esteem® System.
PURCHASED DIRECTLY FROM Timm Medical Technologies, Inc.
Timm Medical Technologies, Inc. provides a 90-day return policy on
systems purchased directly from Timm Medical Technologies, Inc. If
the system fails to produce the desired results within 90 days, you may
qualify for a refund. To qualify for a refund, you must complete the
following steps;
1) have completed and mailed the ErecAid® Esteem® Warranty
Registration Card from your System Kit;
2) call and receive instruction from a Timm Medical Technologies,
Inc.’s Support Service advisor at least twice;
3) meet and work with a Timm Medical Technologies, Inc.’s Clinical
Technician at the prescribing physician’s office, when geographically
feasible;
4) obtain a Return Authorization Number (RMA) from Technical
Support Services, and return all System components, booklets and
video within four weeks of receiving your Return Authorization
Number (RMA). Any system sent to Timm Medical Technologies,
Inc. without a RMA number will be returned to sender without a
refund being processed.
The 90-day return policy is only available for Systems purchased
directly from Timm Medical Technologies, Inc. and is only available
to the System’s original owner. The return policy does not apply to
any subsequent System purchase or components. This policy is in
place of any other policies expressed or implied.
PURCHASED FROM another vendor and NOT Timm Medical
Technologies, Inc.
Please contact the vendor (e.g. store, pharmacy, doctor’s office) with
regards to their particular refund and return policies.
NOTE: The above Return Policy is subject to change without notice.
38
Notes and Cautions
This symbol means: Attention, consult accompanying documents.
This symbol indicates Type BF equipment.
This symbol indicates that the ErecAid Automatic System should be
disposed of properly according to your local laws on regulation.
CAUTIONS:
This device is not intended for use in the presence of flammable mixtures.
This device requires special precautions regarding EMC and needs
to be installed and put into service according to the EMC information
provided in the accompanying documents.
This device may be affected by portable and mobile RF communications
equipment.
This device should not be used adjacent to or stacked with other
equipment and that if adjacent or stacked use is necessary, the Esteem
Automatic should be observed to verify normal operation.
NOTE ON CLASSIFICATION:
This device is classified as internally powered.
This device is classified as ordinary equipment without protection
against ingress of water.
This device is classified as suitable for continuous operation.
NOTE ON DISPOSAL:
This device contains electronic components and should be disposed
of according to local, state and national regulations. Please contact your
local authorities for proper disposal of small electronics devices.
Remove batteries and recycle them according to regulations as well.
Many retail outlets that sell batteries provide for free recycling.
NOTE ON TRANSPORT AND STORAGE:
Ambient temperature range: -40°C to +70°C
Relative humidity range: 10% to 100%, including condensation
Atmospheric pressure range: 500hPa to 1060 hPa.
39
Guidance and manufacturer’s
declaration – electromagnetic emissions
The Esteem Automatic is intended for use in the electromagnetic
environment specified below. The customer or the user of the Esteem Automatic
should assure that it is used in such an environment.
Emissions test
Compliance
Electromagnetic
environment – guidance
RF emissions
CISPR 11
Group 1
The Esteem Automatic uses RF
energy only for its internal function.
Therefore, its RF emissions are very
low and are not likely to cause any
interference in nearby electronic
equipment.
RF emissions
CISPR 11
Class A
The Esteem Automatic is suitable for
use in all establishments, including
domestic establishments and those
directly connected to the public lowvoltage power supply network that
supplies buildings used for domestic
purposes.
Harmonic emissions
IEC 61000-3-2
Not applicable
Voltage fluctuations/
flicker emissions
IEC 61000-3-3
Not applicable
40
Guidance and manufacturer’s
declaration – electromagnetic immunity
The Esteem Automatic is intended for use in the electromagnetic
environment specified below. The customer or the user of the Esteem
Automatic should assure that it is used in such an environment.
IMMUNITY test
IEC 60601
test level
Compliance
level
Electromagnetic
environment –
guidance
Electrostatic
discharge (ESD)
IEC 61000-4-2
± 6 kV contact
± 8 kV air
± 6 kV contact
± 8 kV air
Floors should be wood,
concrete, or ceramic tile.
If floors are covered with
synthetic material, the
relative humidity should
be at least 30%.
Electrical fast
transient/burst
IEC 61000-4-4
± 2 kV for power
supply lines
± 1 kV for input/
output lines
Not applicable
Mains power quality
should be that of a typical
commercial or hospital
environment.
Surge
IEC 61000-4-5
± 1 kV line(s) to line(s)
± 2 kV line(s) to earth
Not applicable
Mains power quality
should be that of a typical
commercial or hospital
environment.
Voltage dips, short
interruptions and
voltage variations
on power supply
input lines
IEC 61000-4-11
<5 % UT
(>95 % dip in UT)
for 0,5 cycle
40 % UT
(60 % dip in UT)
for 5 cycles
70 % UT
(30 % dip in UT)
for 25 cycles
<5 % UT
(>95 % dip in UT)
for 5 s
Not applicable
Mains power quality
should be that of a typical
commercial or hospital
environment. If the user
of the Esteem Automatic
requires continued
operation during power
mains interruptions, it
is recommended that
the Esteem Automatic
be powered from an
uninterruptible power
supply or a battery.
Power frequency
(50/60 Hz)
magnetic field
IEC 61000-4-8
3 A/m
3 A/m
Power frequency
magnetic fields should
be at levels characteristic
of a typical location in
a typical commercial or
hospital environment.
NOTE UT is the a.c. mains voltage prior to application of the test level.
41
Guidance and manufacturer’s
declaration – electromagnetic immunity
The Esteem Automatic is intended for use in the electromagnetic
environment specified below. The customer or the user of the Esteem
Automatic should assure that it is used in such an environment.
IMMUNITY test
IEC 60601
test level
Compliance
level
Electromagnetic
environment – guidance
Portable and mobile RF
communications equipment should
be used no closer to any part of the
Esteem Automatic, including cables,
than the recommended separation
distance calculated from the equation
applicable to the frequency of the
transmitter.
Recommended separation distance
Conducted RF
IEC 61000-4-6
3 Vrms
150 kHz to 80 MHz
3V
d = 1.2 P
d = 1.2 P 80 MHz to 800 MHz
Radiated RF
IEC 61000-4-3
3 V/m
80 MHz to 2.5 GHz
3 V/m
d = 2.3 P 800 MHz to 2.3 GHz
where P is the maximum output
power rating of the transmitter
in watts (W) according to the
transmitter manufacturer and
d is the recommended separation
distance in meters (m). Field
strengths from fixed RF
transmitters, as determined by
an electromagnetic site survey,a
should be less than the compliance
level in each frequency range.b
Interference may occur in the
vicinity of equipment marked with
the following symbol:
NOTE 1 At 80 MHz and 800 MHz, the higher frequency range applies.
NOTE 2 These guidelines may not apply in all situations. Electromagnetic propagation is affected by absorption and
reflection from structures, objects, and people.
a Field strengths from fixed transmitters, such as base stations for radio (cellular/cordless) telephones and land mobile
radios, amateur radio, AM and FM radio broadcast and TV broadcast cannot be predicted theoretically with accuracy. To
assess the electromagnetic environment due to fixed RF transmitters, an electromagnetic site survey should be considered.
If the measured field strength in the location in which the Esteem Automatic is used exceeds the applicable RF compliance
level above, the Esteem Automatic should be observed to verify normal operation. If abnormal performance is observed,
additional measures may be necessary, such as re-orienting or relocating the Esteem Automatic.
b Over the frequency range 150 kHz to 80 MHz, field strengths should be less than 3 V/m.
42
Recommended separation distances between
portable and mobile RF communications
equipment and the Esteem Automatic
The Esteem Automatic is intended for use in an electromagnetic environment in which
radiated RF disturbances are controlled. The customer or the user of the Esteem Automatic
can help prevent electromagnetic interference by maintaining a minimum distance between
portable and mobile RF communications equipment (transmitters) and the Esteem Automatic as
recommended below, according to the maximum output power of the communications equipment.
Rated maximum
output power of
150 kHz to 80 MHz
Separation distance according to frequency of transmitter
150 kHz to 80 MHz
80 MHz to 800 MHz
800 MHz to 2.5 GHz
W
d = 1.2 P
d = 1.2 P
d = 2.3 P
0.01
.12m
.12m
.23m
0.1
.38m
.38m
.76m
1
1.2m
1.2m
2.3m
10
3.8m
3.8m
7.6m
100
12m
012m
23m
m
For transmitters rated at a maximum output power not listed above, the recommended separation distance
d in meters (m) can be estimated using the equation applicable to the frequency of the transmitter, where
P is the maximum output power rating of the transmitter in watts (W) according to the transmitter manufacturer.
NOTE 1 At 80 MHz and 800 MHz, the separation distance for the higher frequency range applies.
NOTE 2 These guidelines may not apply in all situations. Electromagnetic propagation is affected by
absorption and reflection from structures, objects, and people.
43
ErecAid Esteem Warranty Registration Card
®
®
To register please complete, fold, seal, and mail this form within 90 days of purchase,
or go to www.timmmedical.com to register on-line.
Indicate Model:
❑ Manual ❑ Automatic (Battery)
Print or Type Name __________________________________________________________
Address ____________________________________________________________________________
City ________________________________________ State __________ Zip ____________________
Province/Country ________________________________ Postal Code ______________________
(If other than U.S.)
Telephone No. ( ________ ) ____________________________ Date of Birth ________________________
Place Purchased ______________________________ Date Purchased ____________________
Email Address ______________________________________________________________________
Do you wish to receive future information from Timm Medical Technologies? Yes ❑ No ❑
Signature ______________________________________________ Date ________________________
Prescribing Physician’s Name ______________________________________________________
Medical Specialty:
❑
Urology
❑
Family Medicine
❑
Internal Medicine
❑
Other
Physician’s Address ________________________________________________________________
City ________________________________________ State __________ Zip ____________________
Province/Country ________________________________ Postal Code ______________________
(If other than U.S.)
Telephone No. ( ________ ) ____________________________________________________________
By returning this Warranty Registration Card I acknowledge receipt of the ErecAid System
and User Guide. The User Guide includes the Notice of Privacy Practices disclosure.
REGISTER WITHIN 90 DAYS OF PURCHASE TO RECEIVE THE FOLLOWING BENEFITS:
•
•
•
Limited Lifetime Warranty
Refund Options
Toll-free Technical Assistance
REGISTRATION NUMBER:
Timm Medical Technologies, Inc.
9600 West 76th Street, Suite T
Eden Prairie, MN 55344 USA
Toll Free: 800-438-8592
Phone: 952-947-9410
Fax: 952-947-9411
www.timmmedical.com
44
NO POSTAGE
NECESSARY
IF MAILED
IN THE
UNITED STATES
BUSINESS REPLY MAIL
FIRST-CLASS
PERMIT NO. 2586
HOPKINS MN
POSTAGE WILL BE PAID BY ADDRESSEE
TIMM MEDICAL TECHNOLOGIES, INC
9600 W 76TH STREET STE T
EDEN PRAIRIE MN 55344-9951
45
For Further Assistance
If you still have questions on the application of your new ErecAid® Esteem®
System after reading this Guide and viewing your video, call Timm Medical
Technologies, Inc.’s Technical Support, available 24 hours a day, seven
days a week. Call toll-free 800-438-8592 and ask for Technical
Support Services. International owners should contact the local
ErecAid System distributor.
When you call Technical Support Services, you will have a private conversation with a trained professional who has earned accredited certification
in vacuum therapy training with ErecAid Esteem System. If you have a
problem that requires medical attention, they will direct you to speak
with a physician.
5 Year Limited Lifetime Warranty
Timm Medical Technologies, Inc. protects the major components of your
ErecAid Esteem System with a limited lifetime replacement warranty.
This means that we will repair or replace the cylinder and pump free of
charge if they ever fail due to defective workmanship or materials for the
lifetime of the product (as determined by Timm Medical Technologies, Inc.).
The limited lifetime warranty is granted only to the original registered
owner of the System and requires return of the damaged or defective
component. The limited lifetime warranty does not cover accessory items
such as tension rings, the inserts, ring applicator, lubricant or carrying
case. Your System must be registered within 90 days of purchase in
order to activate the limited lifetime warranty. This limited lifetime
warranty is in place of any other warranties expressed or implied.
46
All rights reserved. This material is protected under the International and
Pan American Copyright Conventions.
It may not be reproduced in whole or in part without written permission
from the publisher. Adaptation or any other form of copyright infringement
by any individual, firm, organization or other entity will not be tolerated by
the publisher of this work.
Copyright ©2011 by Timm Medical Technologies, Inc.
Printed in the United States of America
Illustrations by W. Glass
Timm Medical Technologies, Inc.
9600 West 76th Street, Suite T
Eden Prairie, MN 55344 USA
MediMark® Europe Sarl. 11, rue Emile Zola BP 2332
F-38033 Grenoble Cedex 2. France
Caution: US federal law restricts this device to sale by or on the order of a physician.
PL08-0021 Rev. D 05/11
Toll Free: 800-438-8592
Phone: 952-947-9410
Fax: 952-947-9411
www.timmmedical.com