1
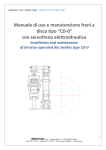
NO MESS SEALANT APPLICATOR
Sealant Applicator User Guide
PLEASE READ INSTRUCTIONS
CAREFULLY BEFORE USE!
www.easybead.co.uk
English
Issue: 1212
GETTING TO KNOW EASYBEAD®
Please note, mastic gun and craft knife are not included.
A mastic gun is required to perform the actions listed in this guide.
Parts not shown to scale.
4
3
3
6
5
1
2
A
B
C
D
LIST OF ITEMS:
PRODUCT FEATURES:
A. Easybead® Applicator
1. Applicator wipers
5. Grip points
B. Easybead® Nozzle
2. Applicator scoop recess
6. Bead guides
C. Sealant Cartridge
3. Aligning grooves
D. Mastic Gun
4. Smoothing tip
IMPORTANT NOTES
For best results and good sealant adhesion, clean and dry surfaces before applying sealant.
(For baths: fill bath fully with water to ensure optimum position to allow for potential joint
movement). Sealant cures more quickly in a warm room temperature. Any delay in smoothing
the bead may result in an uneven finish.
The Easybead® Applicator is recommended for use on clean, flat, and smooth surfaces.
Suitable for application on joints 1-10mm width. Not suitable for abrasive surfaces such as
brickwork or concrete. Easybead® Applicator is not recommended for use with any Nozzle other
than an Easybead® Nozzle.
CLEANING EASYBEAD®
Remove fresh sealant using paper towel, cloth towel and multi-purpose wet-wipes.
Do not use abrasive or aggressive chemical products for cleaning, as it may affect the product finish
and performance. To re-use the Easybead® Applicator and Nozzle, clean immediately after use
to prevent dried sealant causing a blockage.
Keep all items out of reach of children. Use gloves.
Take extra care when using a knife.
2
QUICK GUIDE TO USING EASYBEAD®
Follow these simple steps to get a professional bead!
1
Open or cut off the cartridge tip ABOVE the
screw thread.
3
2
Screw the Nozzle onto the cartridge. Insert into
mastic gun.
4
The Applicator is pre-set to produce a 7mm bead. Push the Applicator securely onto the Nozzle
This can be increased to suit the joint by
using aligning grooves (3).
trimming the tip as shown. Carefully check the
size of bead you require before trimming the
Applicator. It is IMPORTANT that you use a sharp
knife to trim the Applicator to avoid leaving any
rough edges as this will affect the bead finish.
5
Squeeze the gun trigger to produce a steady
flow of sealant, then draw the Applicator gently
along the joint. Apply light pressure to ensure
that the flexible wiping Applicator edges (1) fit
tightly against the surface to prevent sealant
from escaping.
Any imperfections are easily rectified by
re-drawing the Applicator over the same area.
3
USING EASYBEAD® AS A HAND-HELD TOOL
The following instructions only apply when using Easybead® as a hand-held finishing tool.
1
Detach the Applicator from the Nozzle.
3
2
Apply sealant to the joint.
Draw the Applicator over the fresh sealant
bead as shown. As the bead is being formed,
any access sealant is scooped into the Applicator
recess area.
Any imperfections are easily rectified by
re-drawing the Applicator over the same area.
PRODUCT GUARANTEE
This product has been manufactured to meet high operational demands. For guarantee and general
customer service information, please contact your local retailer. Guarantee is limited to replacement
of the product only.
DISCLAIMER
This product should be used in accordance with manufacturer’s instructions. Easybead® Applicator
and Easybead® Nozzle may not be suitable for use with materials other than those
recommended by the manufacturer.
CONTACT INFORMATION
For technical support and advice on how to use any of our products please email our Technical
Department at [email protected] . For more information please visit: www.easybead.co.uk
27 Old Gloucester Street, London, England, WC1N 3AX
Discover more at www.easybead.co.uk
Easybead® is a registered trade mark of Duckbill Products Limited.
4