1
00.AJ-YAX800G表1 05.4.5 9:36 AM ページ1
AJ-
G
Bitte lesen Sie diese Bedienungsanleitung vor der Inbetriebnahme dieses Produkts
aufmerksam durch, und bewahren Sie sie für späteres Nachschlagen auf.
Avant d’utiliser l’appareil, lire attentivement ce mode d’emploi, et le conserver à des
fins de référence ultérieure.
Prima di far funzionare questo prodotto, leggere attentamente le istruzioni e
conservare questo manuale per riferimenti futuri.
Antes de utilizar este producto, lea cuidadosamente las instrucciones y guarde este
manual por si tiene que utilizarlo en el futuro.
お買い上げいただき、まことにありがとうございました。
この取扱説明書をよくお読みのうえ、正しくお使いください。
特に「安全上のご注意」は、ご使用前に必ずお読みいただき、安全にお使いください。
お読みになったあとは、保証書と一緒に大切に保管し、必要なときにお読みください。
F0405W1045 -F @
Printed in Japan
VQT0R61-1
中
文
日
本
語
GPL/LGPL
Before operating this product, please read the instructions carefully and save this
manual for future use.
ESPAÑOL
ITALIANO
FRANÇAIS
Model No.
DEUTSCH
Video Encoder Card
ENGLISH
Operating Instructions
01.AJ-YAX800G(E)14 05.4.5 9:36 AM ページ1
FCC NOTICE (USA)
This device complies with Part 15 of FCC Rules.
Operation is subject to the following two conditions:
(1) This device may not cause harmful interference, and (2) this device must
accept any interference received, including interference that may cause
undesired operation.
To assure continued compliance, follow the attached installation instructions and
do not make any unauthorized modifications.
CAUTION:
This equipment has been tested and found to comply with the limits for a Class B
digital device, pursuant to Part 15 of the FCC Rules. These limits are designed to
provide reasonable protection against harmful interference in a residential
installation. This equipment generates, uses and can radiate radio frequency
energy and, if not installed and used in accordance with the instructions, may
cause harmful interference to radio communications. However, there is no
guarantee that interference will not occur in a particular installation. If this
equipment does cause harmful interference to radio or television reception, which
can be determined by turning the equipment off and on, the user is encouraged
to try to correct the interference by one of the following measures:
• Reorient or relocate the receiving antenna.
• Increase the separation between the equipment and receiver.
• Connect the equipment into an outlet on a circuit different from that to which the
receiver is connected.
• Consult the dealer or an experienced radio/TV technician for help.
The user may find the booklet “Something About Interference” available from
FCC local regional offices helpful.
FCC Warning:
Any unauthorized changes or modifications to this equipment could void the
user’s authority to operate this device.
NOTIFICATION (Canada)
This class B digital apparatus complies with Canadian ICES-003.
Cet appareil numéique de la classe B est conforme à la norme NMB-003 du
Canada.
• To avoid fire, electric shock, damage or malfunction to your equipment, do not
disassemble or remodel.
• Immediately stop using the card if you notice smoke, strange smells or sounds,
or if liquid gets into the card.
1 (E)
• Use of DCF Technologies under license from Multi-Format, Inc.
• This product is licensed under the MPEG-4 Visual patent portfolio license for the personal
and non-commercial use of a consumer for (i) encoding video in compliance with the
MPEG-4 Visual Standard (“MPEG-4 Video”) and/or (ii) decoding MPEG-4 Video that was
encoded by a consumer engaged in a personal and non-commercial activity and/or was
obtained from a video provider licensed by MPEG LA to provide MPEG-4 Video. No
license is granted or shall be implied for any other use. Additional information including
that relating to promotional, internal and commercial uses and licensing may be obtained
from MPEG LA, LLC.
See http://www.mpegla.com/
Software information for this product
Customer advisory: This product includes software licensed under the GNU
General Public License (GPL) and GNU Lesser General Public License (LGPL);
customers have the right to download, modify, and redistribute source code for this
software.
Details on GPL and LGPL can be found in the GPL and LGPL sections of this
manual. The description is the original (written in English).
To download the relevant source code, visit http://panasonic.biz/sav/.
Please note that we cannot answer any questions you may have about the content,
etc. of any source code you may obtain from the above Web site.
Table of contents
Handling and storage precautions . . . 2
PROXY menu . . . . . . . . . . . . . . . . . . 7
Features . . . . . . . . . . . . . . . . . . . . . . . 3
Recording on SD memory cards . . . 10
Product composition . . . . . . . . . . . . . 3
Checking proxy data . . . . . . . . . . . . 11
How to remove the card from its
case . . . . . . . . . . . . . . . . . . . . . . . . . . 3
Errors in proxy recording . . . . . . . . . 12
Specifications . . . . . . . . . . . . . . . . . . 14
Installing a P2 PROXY card . . . . . . . . 4
Checking operations . . . . . . . . . . . . . 5
Handling and storage precautions
OTo avoid fire, electric shock, damage to or malfunction of your equipment, do not
subject to impact, bend, drop, or expose to moisture.
OAfter removing the card from equipment, immediately attach the cap to it to
protect its terminals from dust and grime.
When storing the card or carrying it around, keep it in its protective case.
ODo not leave the card where it may be exposed to corrosive gases.
ODo not remove this card from a Memory Card Camera-Recorder during proxy
data recording. Do not turn off the power of the Memory Card Camera-Recorder
or remove batteries during proxy data recording.
Such actions will delete the proxy data that are being recorded.
OFor assistance with installation of this card in Memory Card Camera-Recorders
that support proxy recording, contact your distributor or designated service
provider.
2 (E)
ENGLISH
01.AJ-YAX800G(E)14 05.4.5 9:36 AM ページ2
01.AJ-YAX800G(E)14 05.4.5 9:36 AM ページ3
Features
The AJ-YAX800G (“P2 PROXY card”) is a PC card type video encoder card (same
shape as a P2 card).
It can create a compressed data file from material recorded with a Memory Card
Camera-Recorder (“P2 cam”), and store that file separately from the original
material.
Files created with this function include an audiovisual file that is compressed using
the MPEG4 format, and a real-time metadata file (time code, user’s bit and UMID
information). These can be stored on P2 cards or SD memory cards.
Material recorded with a P2 cam can be stored as data files, which are of smaller
capacity than the original material.
Product composition
OP2 PROXY card . . . . . . . . . . . . . .k1
OCap . . . . . . . . . . . . . . . . . . . . . . .k1
OCase . . . . . . . . . . . . . . . . . . . . . . .k1
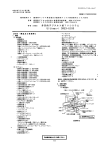
How to remove the card from its case
1 Release the lock in area (a).
2 Open the case.
OWhile removing the card, hold the
case in the direction shown in the
figure so that the card will not fall
onto the floor or ground.
OTo avoid damaging the case, do
not attempt to open it by holding
area (a).
3 Remove the card.
OTo remove only the card, slide it in
direction (b).
OTo remove the card with the cap,
lift it in direction (c) while at the
same time pushing it in the cap
direction.
1
(a)
2
3
(c)
cap
3 (E)
(b)
01.AJ-YAX800G(E)14 05.4.5 9:36 AM ページ4
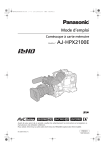
Installing a P2 PROXY card
Insert a P2 PROXY card into the OPTION slot of the P2 cam.
Note that the card should be inserted in P2 card slot No. 5 if another card is
already inserted in the OPTION slot.
1 Turn off the P2 cam.
A P2 PROXY card will not be
recognized if it is inserted in the
camera while the power is on.
2 Remove the two screws, and lift off
the cover of the OPTION slot.
4 Replace
the cover of the OPTION
slot, and refasten with the two
screws.
Removing the P2 PROXY card from
the OPTION slot
1Press the eject button, and confirm
that the button has popped-up.
2Press the eject button again.
This operation releases the P2
PROXY card. Remove it from the
slot.
3 Confirm
that the eject button is
depressed, and then insert a P2
PROXY card into the slot.
EJECT button
Inserting a P2 PROXY card into the
P2 card slot
Please be sure to insert the P2 PROXY
card in the No. 5 slot. Proxy data
recording will not be performed if the P2
PROXY card is inserted in a different
slot.
For more information about inserting
cards, see the P2 cam’s instruction
manual.
5
4 (E)
ENGLISH
Inserting a card into the OPTION slot
01.AJ-YAX800G(E)14 05.4.5 9:36 AM ページ5
Checking operations
Turn on the P2 cam to confirm that the
P2 PROXY card is operating.
OWhen a P2 PROXY card is inserted
in the OPTION slot and it is
recognized property, the display
window of the P2 cam displays
“OP-SLOT”.
DF
0
VTCG
10
h
minM
s
frm
20
F
30
F
40
OO
OP-SLOT
13
-dB
24
OWhen a P2 PROXY card is inserted
in P2 card slot No. 5 and it is
recognized property, the access LED
flashes in orange.
Access LED
5 (E)
Initializing a P2 PROXY card
1Insert a P2 PROXY card into the P2
cam, and turn on the power.
2Press the THUMBNAIL button to
display the thumbnail screen.
3Press the MENU BAR button to move
the pointer to the menu bar.
4Select OPERATION 5 DEVICE
SETUP 5 PROXY 5 INITIALIZE 5
YES using the cursor buttons and the
SET button.
This completes initialization.
W
MEDIA E
BATT E
For first-time use of a P2 PROXY
card with a P2 cam, the card needs
to be initialized from the PROXY
menu.
01.AJ-YAX800G(E)14 05.4.5 9:36 AM ページ6
Checking operations (continued)
“SOFT: NO VERSION” message is
displayed. This does not indicate an
error, but results from the fact that with
proxy data recording the version is
reflected.
ENGLISH
Checking on the thumbnail screen
1Press the THUMBNAIL button to
display the thumbnail screen.
2Press the MENU BAR button to move
the pointer to the menu bar.
3Press the cursor button to move the
pointer to “PROPERTY”, and press
the SET button.
4Press the cursor button to move the
pointer to “DEVICES”, and press the
SET button.
5Press the cursor button to move the
pointer to “PROXY”, and press the
SET button.
When the power is ON
MENU BAR button
After recording of proxy data
(OPTION slot)
THUMBNAIL
button
Cursor buttons
SET button
(P2 card slot No. 5)
6 (E)
01.AJ-YAX800G(E)14 05.4.5 9:36 AM ページ7
PROXY menu
Setting the menu
1Insert a P2 PROXY card into the P2
cam, and turn on the power.
2Press the THUMBNAIL button to
display the thumbnail screen.
3Press the MENU BAR button to move
the pointer to the menu bar.
4Select OPERATION 5 DEVICE
SETUP 5 PROXY using the cursor
buttons and the SET button.
5Select menu items and specify
values using the cursor buttons and
the SET button.
PROXY Menu
Items
REC MEDIA
Adjustable Range
OFF
P2
P2&SD
Select media for proxy data recording.
OFF:
No proxy data are recorded.
P2:
Proxy data are recorded on the P2 card.
P2&SD:
Proxy data are recorded on both the P2 card
and the SD memory card.
O Voice memo is recorded on both the P2
card and the SD memory card, if you record
a voice memo during proxy data recording.
O If you record a voice memo after proxy data
recording finishes, voice memo is recorded
on the P2 card only.
TC SUPER
OFF
UPPER
LOWER
Specify an option for superimposing the time
code display on the video recorded as proxy data.
OFF:
Time code display is not superimposed on the
recorded video.
UPPER:
Time code display is superimposed on the
upper area of the recorded video.
LOWER:
Time code display is superimposed on the
lower area of the recorded video.
REC RATE
192kbps
768kbps
1500 kbps
Specify the recording rate for proxy data
recording.
INITIALIZE
———
Initializes the PROXY menu and the setting data
in the P2 cam.
O Be sure to perform this initialization the first
time you insert a P2 PROXY card in a P2 cam
that supports proxy recording.
The
in the Adjustable Range column
indicates the initial value.
7 (E)
01.AJ-YAX800G(E)14 05.4.5 9:36 AM ページ8
PROXY menu (continued)
$ To display information captured by
proxy data recording on the
viewfinder of the P2 cam, select “ON”
as the “PROXY REC” menu item
from the <VF INDICATOR2> screen
of the menu VF page of the P2 cam.
Either “PROXY REC P2” or “PROXY
REC P2&SD” will be displayed at the
beginning of the recording.
Recording rate and recording signals
(Video and audio)
Recording
rate
192 kbps
768 kbps
1500 kbps
Video (QVGA)
NTSC (525i)
15 frames/sec
PAL (625i)
12.5 frames/sec
NTSC (525i)
30 frames/sec
PAL (625i)
25 frames/sec
NTSC (525i)
30 frames/sec
PAL (625i)
25 frames/sec
Audio
Monaural
(Mixture of
CH1 and CH2),
32 kbps/ch
Stereo
(CH1•CH2),
64 kbps/ch
Stereo
(CH1•CH2),
64 kbps/ch
Recording rate indicates the recording rate for
video signals.
$ If the proxy data are recorded on the
P2 card during shooting of material,
the recording time may be shorter
than the time indicated in the P2
card’s instruction manual.
$ During PROXY menu setting, the P2
cam cannot perform any of the
recording operations.
8 (E)
ENGLISH
$ Proxy data are not recorded during
operation in the following modes:
OIEEE1394 digital recording
OINTERVAL REC
OLOOP REC
01.AJ-YAX800G(E)14 05.4.5 9:36 AM ページ9
PROXY menu (continued)
Proxy recording in 24P/24PA mode [Applicable only to NTSC (525i)]
When the operating mode of the P2 cam is set to 24P (2:3) or 24PA (2:3:3:2) for
proxy recording, the 5-frame sequence will be as follows, depending on the
recording rate:
Recording rate: 768 kbps, 1500 kbps
24P (2:3)
Sequence No.
0
1
2
3
4
Images of original material 0 0 1 1 1 2 2 3 3 3
Images of proxy recording
0
1
1
2
3
3
4
O Underline indicates images of the
second field.
24PA (2:3:3:2)
Sequence No.
0
1
2
Images of original material 0 0 1 1 1 2 2 2 3 3
Images of proxy recording
0
1
1
2
3
Recording rate: 192 kbps
If the recording rate is 192 kbps, the 5-frame sequence will not be performed
correctly.
24P (2:3)
Sequence No.
0
1
2
3
4
0
1
2
3
4
Images of original material 0 0 1 1 1 2 2 3 3 3 4 4 5 5 5 6 6 7 7 7
Images of proxy recording
0
1
3
5
6
24PA (2:3:3:2)
Sequence No.
0
1
2
3
4
0
1
2
3
4
Images of original material 0 0 1 1 1 2 2 2 3 3 4 4 5 5 5 6 6 6 7 7
Images of proxy recording
9 (E)
0
1
3
5
6
01.AJ-YAX800G(E)14 05.4.5 9:36 AM ページ10
For proxy data recording, 256 MB, 512
MB or 1 GB SD memory cards with
“High Speed” indication should be used.
For more information, please visit:
http://panasonic.biz/sav/p2
For proxy data recording, format the SD
memory card, using a P2 cam.
OSD memory cards formatted under
the SD standard on a PC can also be
used.
OFor more information about handling
of SD memory cards, see the P2
cam’s instruction manual.
Checking an SD Memory Card
1Insert an SD memory card into the
P2 cam.
2Press the THUMBNAIL button to
display the thumbnail screen.
3Press the MENU BAR button to move
the pointer to the menu bar.
4Select PROPERTY 5 DEVICES 5
SD CARD, using the cursor buttons
and the SET button.
OFormat status is displayed under “SD
STANDARD” item.
If “NOT SUPPORTED” is displayed,
format the card using the P2 cam.
OCheck the remaining free space for
proxy data recording under the
current recording rate setting, by
selecting the “PROXY REM” item.
OCheck the number of clips recorded
on the SD memory card by selecting
the “NUMBER OF CLIPS” item.
If the recorded number of clips
exceeds 1,000, proxy data recording
will not be performed, even if the SD
memory card still has free space.
OIf the material is recorded across
multiple P2 cards, the number of clips
displayed on the thumbnail screen
will differ from the number of clips of
proxy data recorded on the SD
memory card.
OShot mark cannot be added to the
clips on the SD memory card by
pressing the SHOT MARK button on
the P2 cam.
OProxy data recorded on the SD
memory card will not be deleted by
deletion of the clips recorded on the
P2 card from the thumbnail screen of
the P2 cam.
10 (E)
ENGLISH
Recording on SD memory cards
01.AJ-YAX800G(E)14 05.4.5 9:36 AM ページ11
Recording on SD memory cards (continued)
Formatting an SD memory card
1Insert an SD memory card into the
P2 cam.
2Press the THUMBNAIL button to
display the thumbnail screen.
3Press the MENU BAR button to move
the pointer to the menu bar.
4Select OPERATION 5 FORMAT 5
SD CARD 5 YES, using the cursor
buttons and the SET button.
Approximate recording time for proxy
data recording
This completes formatting of the SD
memory card.
Part No. and
Recording rate and
capacity of
recording time
SD memory
192
kbps
768 kbps 1500 kbps
cards
RP-SDH256N1A Approximately Approximately Approximately
(256 MB)
137 minutes 35 minutes
19 minutes
RP-SDH512N1A
(512 MB)
Approximately Approximately Approximately
278 minutes 71 minutes
39 minutes
RP-SDH512J1A
(512 MB)
Approximately Approximately Approximately
237 minutes 69 minutes
38 minutes
RP-SDH0G1J1A
(1 GB)
Approximately Approximately Approximately
536 minutes 139 minutes 77 minutes
RP-SDK0G1J1A
(1 GB)
Approximately Approximately Approximately
536 minutes 139 minutes 77 minutes
Actual recording time depends on the recording
conditions (number of scenes, voice memos, and
clips.)
<Note>
If the “REC MEDIA” menu item on the PROXY menu is set to “P2&SD”, but proxy
data recording is not performed on the SD memory card, “SD CARD WRITE ERR”
message is displayed at the beginning of the recording. If this happens, check the
SD memory card. For more information, see “Errors in proxy recording” (page 12).
Checking proxy data
$ P indicator is displayed for clips of
material that incorporates proxy data.
$ Proxy data are recorded on a P2 card
and/or to an SD memory card as an
audiovisual file and a real-time
metadata file.
Audiovisual file:
xxxxxxxx.MP4
The
data
conform
to
the
ISO/IEC14496 standard.
Real-time metadata file:
xxxxxxxx.BIN
Time code, user’s bit and UMID
information are recorded for each
frame.
11 (E)
Check the proxy data using the P2
viewer.
For further information on the P2
viewer, please visit:
http://panasonic.biz/sav/p2
01.AJ-YAX800G(E)14 05.4.5 9:36 AM ページ12
Errors in proxy recording
If an error occurs during proxy data recording, refer to the following for the
appropriate action:
Viewfinder:
TURN POWER OFF
Display window:
E-30
Viewfinder:
REC WARNING
Display window:
00:00:00:11
Viewfinder:
EOM (SD)
Operation and causes
Action
Proxy data recording stops.
Turn off the P2 cam and then turn
O Either the P2 card or the P2 PROXY card it on again, to perform recording
is removed during recording.
and playback operations for
checking purposes.
Restore the clips on the removed
Proxy data recording stops.
P2 card (see page 13).
O An error occurs during recording on the
O Proxy data recorded on the P2
P2 card.
card are deleted.
O Proxy data recorded on the SD
memory
card
cannot
be
restored.
Proxy data recording on the SD memory Insert a new SD memory card
card stops, but recording on the P2 card after recording finishes.
O Proxy data being recorded on
continues.
the SD memory card are
O No -spare capacity-on the SD memory
deleted.
card.
To restore deleted proxy data,
select clips on the P2 card and
copy them to the SD memory card
(see page 13).
Viewfinder:
SD CARD WRITE
ERR
Proxy data recording on the SD memory Check the status of the SD
card stops, but recording on the P2 card memory card, and insert another
recordable card (see page 10).
continues.
This message is displayed when the “REC
MEDIA” menu item in the PROXY menu is
set to “P2&SD”, but proxy data recording
cannot be performed on the SD memory
card.
$ Message is displayed at the start of
recording
O No SD memory card inserted.
O SD memory card formatted in an
unsupported format.
O SD memory card is write-protected.
O SD memory card contains more than
1,000 recorded clips.
$ Message is displayed during recording
O SD memory card removed during
recording.
O Error occurs during recording on the
SD memory card.
Viewfinder:
PROXY CARD
ERROR
Proxy data recording stops, but Proxy data cannot be recorded
correctly.
recording on the P2 card continues.
Turn off the P2 cam and then turn
O Error occurs on the P2 PROXY card.
O Error in the input signals to the P2 it on again to perform recording
and playback operations for
PROXY card.
checking purposes.
12 (E)
ENGLISH
Error display
01.AJ-YAX800G(E)14 05.4.5 9:36 AM ページ13
Errors in proxy recording (continued)
Restoring clips
1Press the THUMBNAIL button to
display the thumbnail screen.
2Position the pointer over the clips to be
restored using the cursor buttons, and
press the SET button.
3Press the MENU BAR button to move
the pointer to the menu bar.
4Select OPERATION 5 REPAIR CLIP
5 YES, using the cursor buttons and
the SET button.
<Note>
When clips are restored;
OProxy data recorded on the P2 card are deleted.
OProxy data recorded on the SD memory card cannot be restored.
Copying clips to an SD memory card
1Press the THUMBNAIL button to
display the thumbnail screen.
2Position the pointer over the clips to be
copied using the cursor buttons, and
press the SET button.
3Press the MENU BAR button to move
the pointer to the menu bar.
4Select OPERATION 5 COPY 5 SD
CARD 5 YES, using the cursor buttons
and the SET button.
13 (E)
01.AJ-YAX800G(E)14 05.4.5 9:36 AM ページ14
Input voltage:
DC 3.3 V ±0.3 V
Power consumption:
Maximum 1.5 W
Operating temperature:
0 °C to +40 °C (32 °F to +104 °F)
Operating humidity:
10 % to 85 % (no condensation)
Storage temperature:
–20 °C to +60 °C (–4 °F to +140 °F)
Storage humidity:
10 % to 85 % (no condensation)
Mass:
approx. 43 g (1.5 oz)
Dimensions (WkHkD):
approx. 54 mm k 5 mm k 85.6 mm (2 3/16 inches k 1/4 inch k 3 3/8 inches)
Interface:
PC card standard
File format:
MP4 (ISO/IEC14496 standard)
Video compression format:
MPEG4 simple profile (4:2:0)
Audio compression format:
AAC (Advanced Audio Coding)
Setting mode:
192 kbps
Video : QVGA, 15 frames/sec (525i), 12.5 frames/sec (625i)
Audio : Monaural (mixture of CH1 and CH2), 32 kbps/ch
768 kbps
Video : QVGA, 30 frames/sec (525i), 25 frames/sec (625i)
Audio : Stereo (CH1•CH2), 64 kbps/ch
1500 kbps
Video : QVGA, 30 frames/sec (525i), 25 frames/sec (625i)
Audio : Stereo (CH1•CH2), 64 kbps/ch
Specifications are subject to change without notice.
Mass and dimensions shown are approximate.
14 (E)
ENGLISH
Specifications
02.AJ-YAX800G(G)13 05.4.5 9:38 AM ページ1
• Öffnen und zerlegen Sie Ihre Ausrüstung nicht, um Feuer, Stromschläge,
Beschädigungen und Funktionsstörungen zu vermeiden.
• Brechen Sie die Benutzung der Karte sofort ab, falls Sie Rauch, seltsame Gerüche
oder Geräusche feststellen oder falls Flüssigkeiten in die Karte eindringen.
Softwareinformationen für dieses Produkt
Kundeninformation: Dieses Produkt enthält Software, die gemäß GPL (GNU Public
License) und LPGL (GNU Lesser General Public License) lizenziert wurde; Kunden
haben das Recht, den Quellcode für diese Software herunterzuladen, zu ändern und
wiederzuverkaufen.
Detaillierte Angaben zu GPL und LGPL finden Sie in den Abschnitten GPL und LGPL
des vorliegenden Handbuches. Die Beschreibung ist im englischen Original beigelegt.
Den entsprechenden Quellcode können Sie auf folgender Webseite herunterladen:
http://panasonic.biz/sav/.
Bitte nehmen Sie zur Kenntnis, dass wir keine Fragen zum Inhalt etc. irgendeines
Sourcecodes, den Sie von der oben genannten Webseite beziehen, beantworten
können.
Inhaltsverzeichnis
Vorsichtsmaßnahmen zur Handhabung
und Lagerung . . . . . . . . . . . . . . . . . . . 1
Überprüfungen . . . . . . . . . . . . . . . . . . 4
Leistungsmerkmale . . . . . . . . . . . . . . 2
Aufnahme auf SD-Speicherkarten . . . 9
Zusammensetzung des Produkts . . . 2
Überprüfung der Proxy-Daten . . . . . 10
Entfernen der Karte aus ihrem
Gehäuse . . . . . . . . . . . . . . . . . . . . . . 2
Fehler bei der Proxy-Aufnahme . . . . 11
Einsetzen einer P2-PROXY-Karte . . . 3
PROXY-Menü . . . . . . . . . . . . . . . . . . 6
Spezifikationen . . . . . . . . . . . . . . . . . 13
Vorsichtsmaßnahmen zur Handhabung und Lagerung
O Schützen Sie Ihre Ausrüstung vor Stößen, Verbiegungen, Stürzen und Feuchtigkeit,
um Feuer, Stromschläge, Beschädigungen und Funktionsstörungen zu vermeiden.
O Bringen Sie nach der Entfernung der Karte aus der Ausrüstung sofort die Kappe an,
um die Kontakte vor Staub und Schmutz zu schützen.
Bewahren Sie die Karte bei der Lagerung oder dem Transport in ihrem
Schutzgehäuse auf.
O Schützen Sie die Karte vor ätzenden Gasen.
O Entfernen Sie diese Karte nicht während der Proxy-Datenaufnahme aus einem
Speicherkarten-Camcorder. Schalten Sie während der Proxy-Datenaufnahme den
Speicherkarten-Camcorder nicht aus und entfernen Sie nicht die Batterien.
In diesen Fällen werden die aufgezeichneten Proxy-Daten gelöscht.
O Wenden Sie sich für Beratung zur Installation dieser Karte in SpeicherkartenCamcorder, die die Proxy-Aufnahme unterstützen, an Ihren Händler oder an Ihren
Dienstanbieter.
1 (G)
02.AJ-YAX800G(G)13 05.4.5 9:38 AM ページ2
Leistungsmerkmale
DEUTSCH
Die AJ-YAX800G (“P2-PROXY-Karte”) ist eine PC-Video-Encoder-Karte (gleiche
Größe wie eine P2-Karte), die ist in der Lage, aus mit einem SpeicherkartenCamcorder (“P2-Cam”) aufgenommenem Material eine komprimierte Datendatei zu
erzeugen und diese Datei separat vom Originalmaterial zu speichern.
Die mit dieser Funktion erzeugten Dateien umfassen eine Audiovideodatei, die mit
dem Format MPEG4 komprimiert ist, sowie eine Echtzeit-Metadatendatei (Zeitcode,
Benutzer-Bit und UMID-Information). Sie können auf P2-Karten oder SDSpeicherkarten gespeichert werden.
Mit einer P2-Cam aufgenommenes Material kann als Datendateien gespeichert
werden, die weniger Speicherplatz als das Originalmaterial benötigen.
Zusammensetzung des Produkts
OP2-PROXY-Karte . . . . . . . . . . . . .k1
OKappe . . . . . . . . . . . . . . . . . . . . . .k1
OGehäuse . . . . . . . . . . . . . . . . . . .k1
Entfernen der Karte aus ihrem Gehäuse
1 Lösen Sie die Sperre in Bereich
(a).
2 Öffnen Sie das Gehäuse.
OHalten Sie das Gehäuse beim
Entfernen der Karte in der auf der
Abbildung gezeigten Richtung,
sodass die Karte nicht auf den
Boden fallen kann.
OVersuchen Sie nicht, das Gehäuse
beim Öffnen im Bereich (a) zu
halten, um Beschädigungen zu
vermeiden.
3 Entfernen Sie die Karte.
OSchieben Sie die Karte zum
Entfernen in Richtung (b).
OZum Entfernen der Karte mit der
Kappe heben Sie sie in Richtung
(c), während Sie sie gleichzeitig in
Richtung der Kappe drücken.
1
(a)
2
3
(c)
Kappe
(b)
2 (G)
02.AJ-YAX800G(G)13 05.4.5 9:38 AM ページ3
Einsetzen einer P2-PROXY-Karte
Setzen Sie eine P2-PROXY-Karte in den Steckplatz OPTION der P2-Cam ein.
Beachten Sie bitte, dass die karte in den P2-Kartensteckplatz Nr. 5 eingesteckt
werden muss, falls bereits eine Karte in den Steckplatz OPTION eingesteckt ist.
Einsetzen der Karte in den Steckplatz
OPTION
1 Schalten Sie die P2-Cam aus.
Eine P2-PROXY-Karte wird nicht
erkannt, falls sie eingesetzt wird,
während die Kamera eingeschaltet
ist.
2 Entfernen Sie die beiden Schrauben
und heben Sie die Abdeckung des
Steckplatzes OPTION an.
4 Bringen
Sie die Abdeckung des
Steckplatzes OPTION wieder und
befestigen Sie sie mit den beiden
Schrauben.
Entfernung der P2-PROXY-Karte aus
dem Steckplatz OPTION
1Drücken Sie die Auswurftaste und
stellen Sie sicher, dass die Taste
hochgekommen ist.
2Drücken Sie die Auswurftaste erneut.
Dadurch wird die P2-PROXY-Karte
freigegeben. Entfernen Sie sie aus
dem Steckplatz.
3 Stellen
Sie sicher, dass die
Auswurftaste gedrückt ist, und
setzen Sie die P2-PROXY-Karte in
den Steckplatz ein.
Taste AUSWURF
Einsetzen der P2-PROXY-Karte in
den P2-Kartensteckplatz
Bitte stellen Sie sicher, dass die P2PROXY-Karte in den Steckplatz Nr. 5
eingesetzt
wird.
Die
ProxyDatenaufnahme wird nicht ausgeführt,
wenn die P2-PROXY-Karte in einen
anderen Steckplatz eingesetzt wird.
Für
weitere
Informationen
zum
Einsetzen von Karten siehe die
Bedienungsanleitung der P2-Cam.
5
3 (G)
02.AJ-YAX800G(G)13 05.4.5 9:38 AM ページ4
Überprüfungen
DF
W
10
h
minM
s
frm
Initialisieren einer P2-PROXY-Karte
1Setzen Sie eine P2-PROXY-Karte in
die P2-Cam ein und schalten Sie sie
ein.
2Drücken Sie die Taste THUMBNAIL,
um die Miniaturansicht anzuzeigen.
3Drücken Sie die Taste MENU BAR,
um den Zeiger auf die Menüleiste zu
setzen.
4Wählen Sie OPERATION 5 DEVICE
SETUP 5 PROXY 5 INITIALIZE 5
YES mit den Cusortasten und der
Taste SET.
Dadurch
wird
durchgeführt.
0
VTCG
MEDIA E
BATT E
Bei der ersten Benutzung einer P2PROXY-Karte mit einer P2-Cam
muss die Karte mit dem PROXYMenü initialisiert werden.
die
Initialisierung
20
F
30
F
40
OO
OP-SLOT
13
-dB
24
OWenn eine P2-PROXY-Karte in den
P2-Karten-Steckplatz
Nr.
5
eingesteckt und ordnungsgemäß
erkannt wird, blinkt die LED orange
auf.
LED Zugriff
4 (G)
DEUTSCH
Schalten Sie die P2-Cam ein und
überprüfen Sie, ob die P2-PROXYKarte in Betrieb ist.
OWenn eine P2-PROXY-Karten in den
Steckplatz OPTION eingesteckt und
ordnungsgemäß erkannt wird, zeigt
das Displayfenster der P2-Cam “OPSLOT” an.
02.AJ-YAX800G(G)13 05.4.5 9:38 AM ページ5
Überprüfungen (Fortsetzung)
Überprüfung auf der Miniaturansicht
1Drücken Sie die Taste THUMBNAIL,
um die Miniaturansicht anzuzeigen.
2Drücken Sie die Taste MENU BAR,
um den Zeiger auf die Menüleiste zu
setzen.
3Drücken Sie die Cursortaste, um den
Zeiger
auf
“PROPERTY”
zu
bewegen, und drücken Sie die Taste
SET.
4Drücken Sie die Cursortaste, um den
Zeiger auf “DEVICES” zu bewegen,
und drücken Sie die Taste SET.
5Drücken Sie die Cursortaste, um den
Zeiger auf “PROXY” zu bewegen,
und drücken Sie die Taste SET.
Die Meldung “SOFT: NO VERSION”
wird angezeigt.
Dies ist keine
Fehlermeldung, sondern beruht darauf,
dass bei der Proxy-Datenaufnahme die
Version angezeigt wird.
Wenn das Gerät eingeschaltet ist
Taste MENU BAR
Nach dem Aufnehmen von Proxy-Daten
(Steckplatz OPTION)
Taste
THUMBNAIL
Cursortasten
Taste SET
5 (G)
(P2-Kartensteckplatz Nr. 5)
02.AJ-YAX800G(G)13 05.4.5 9:38 AM ページ6
PROXY-Menü
PROXY-Menü
Positionen
REC MEDIA
Einstellbereich
OFF
P2
P2&SD
Wählen Sie das Medium für die ProxyDatenaufnahme.
OFF:
Keine Proxy-Daten aufgenommen.
P2:
Die Proxy-Daten werden auf der P2-Karte
aufgenommen.
P2&SD:
Die Proxy-Daten werden auf der P2-Karte und der
SD-Speicherkarte aufgenommen.
O Das Voice-Memo wird auf der P2-Karte und der
SD-Speicherkarte aufgenommen, wenn Sie
während der Proxy-Datenaufnahme ein VoiceMemo aufnehmen.
O Wenn Sie ein Voice-Memo nach Beendigung
der Proxy-Datenaufnahme aufnehmen, wird
das Voice-Memo nur auf der P2-Karte
aufgenommen.
TC SUPER
OFF
UPPER
LOWER
Geben Sie die Option für die Einblendung des
Zeitcodes für das als Proxy-Daten aufgenommene
Video an.
OFF:
Der Zeitcode wird nicht in das aufgenommene
Video eingeblendet.
UPPER:
Der Zeitcode wird im oberen Bereich in das
aufgenommene Video eingeblendet.
LOWER:
Der Zeitcode wird im unteren Bereich in das
aufgenommene Video eingeblendet.
REC RATE
192kbps
768kbps
1500 kbps
Wählen Sie die Aufnahmerate für die ProxyDatenaufnahme.
INITIALIZE
———
Initialisiert
das
PROXY-Menü
und
die
Datumseinstellung der P2-Cam.
O Stellen Sie sicher, dass diese Initialisierung beim
ersten Einsetzen einer P2-PROXY-Karte in eine
P2-Cam vorgenommen wird, die die ProxyAufnahme unterstützt.
in der Spalte Einstellbereich gibt den
Ausgangswert an.
6 (G)
DEUTSCH
Einstellung des Menüs
1Setzen Sie eine P2-PROXY-Karte in
die P2-Cam ein und schalten Sie sie
ein.
2Drücken Sie die Taste THUMBNAIL,
um die Miniaturansicht anzuzeigen.
3Drücken Sie die Taste MENU BAR,
um den Zeiger auf die Menüleiste zu
setzen.
4Wählen Sie OPERATION 5 DEVICE
SETUP 5 PROXY mit den
Cusortasten und der Taste SET.
5Wählen Sie die Menüpositionen und
geben Sie die Werte mit den
Cursortasten und der Taste SET ein.
02.AJ-YAX800G(G)13 05.4.5 9:38 AM ページ7
PROXY-Menü (Fortsetzung)
$ Die Proxy-Daten werden während
der folgenden Betriebsweisen nicht
aufgenommen:
OIEEE1394 digitale Aufnahme
OINTERVAL REC
OLOOP REC
$ Wählen Sie zum Anzeigen der von
der
Proxy-Datenaufnahme
aufgezeichneten Informationen im
Viewfinder der P2-Cam “ON” für die
Menüposition “PROXY REC” der
Anzeige <VF INDICATOR2> der
Menüseite VF der P2-Cam.
Bei Beginn der Aufnahme wird
PROXY REC P2” oder “PROXY REC
P2&SD” angezeigt.
$ Wenn die Proxy-Daten während der
Aufnahme des Materials auf der P2Karte aufgenommen werden, kann
die Aufnahmezeit kürzer als in der
Bedienungsanleitung der P2-Karte
angegeben sein.
$ Während
der
Einstellung
des
PROXY-Menüs kann die P2-Cam
keine Aufnahmen vornehmen.
7 (G)
Aufnahmerate und Aufnahmesignale
(Video und Audio)
Aufnahmerate
192 kbps
768 kbps
1500 kbps
Video (QVGA)
NTSC (525i)
15 Frames/Sek.
PAL (625i)
12,5 Frames/Sek.
NTSC (525i)
30 Frames/Sek.
PAL (625i)
25 Frames/Sek.
NTSC (525i)
30 Frames/Sek.
PAL (625i)
25 Frames/Sek.
Audio
Mono
(Mischung von
CH1 und CH2),
32 kbps/ch
Stereo
(CH1•CH2),
64 kbps/ch
Stereo
(CH1•CH2),
64 kbps/ch
Die Aufnahmnerate gibt die Aufnahmerate für
Videosignale an.
02.AJ-YAX800G(G)13 05.4.5 9:38 AM ページ8
PROXY-Menü (Fortsetzung)
Proxy-Aufnahme im Modus 24P/24PA [Nur anwendbar auf NTSC (525i)]
Wenn die Betriebsweise der P2-Cam für die Proxy-Aufnahme auf 24P (2:3) oder
24PA (2:3:3:2) eingestellt ist, ergibt sich in Abhängigkeit von der Aufnahmerate die
folgende 5-Frame-Sequenz:
Aufnahmerate: 768 kbps, 1500 kbps
24P (2:3)
0
1
2
3
4
Bilder der Proxy-Aufnahme
0
1
1
2
3
3
4
O Unterstrichen gibt die Bilder des
zweiten Felds an.
24PA (2:3:3:2)
Sequenz Nr.
0
1
2
Bilder des Originalmaterials 0 0 1 1 1 2 2 2 3 3
Bilder der Proxy-Aufnahme
0
1
1
2
3
Aufnahmerate: 192 kbps
Wenn die Aufnahmerate 192 kbps ist, wird die 5-Frame-Sequenz nicht korrekt
ausgeführt.
24P (2:3)
Sequenz Nr.
0
1
2
3
4
0
1
2
3
4
Bilder des Originalmaterials 0 0 1 1 1 2 2 3 3 3 4 4 5 5 5 6 6 7 7 7
Bilder der Proxy-Aufnahme
0
1
3
5
6
24PA (2:3:3:2)
Sequenz Nr.
0
1
2
3
4
0
1
2
3
4
Bilder des Originalmaterials 0 0 1 1 1 2 2 2 3 3 4 4 5 5 5 6 6 6 7 7
Bilder der Proxy-Aufnahme
0
1
3
5
6
8 (G)
DEUTSCH
Sequenz Nr.
Bilder des Originalmaterials 0 0 1 1 1 2 2 3 3 3
02.AJ-YAX800G(G)13 05.4.5 9:38 AM ページ9
Aufnahme auf SD-Speicherkarten
Für die Proxy-Datenaufnahme sollten
SD-Speicherkarten zu 256 MB, 512 MB
oder 1 GB mit der Angabe “High Speed”
verwendet werden.
Für weitere Informationen siehe bitte:
http://panasonic.biz/sav/p2
Formatieren Sie die SD-Speicherkarte
für die Proxy-Datenaufnahme mit einer
P2-Cam.
OSD-Speicherkarten, die mit dem SDStandard auf einem PC formatiert
werden, können ebenfalls verwendet
werden.
OFür weitere Informationen zum
Umgang
mit
SD-Speicherkarten
siehe die Bedienungsanleitung der
P2-Cam.
Überprüfung einer SD-Speicherkarte
1Setzen Sie eine SD-Speicherkarte in
die P2-Cam ein.
2Drücken Sie die Taste THUMBNAIL,
um die Miniaturansicht anzuzeigen.
3Drücken Sie die Taste MENU BAR,
um den Zeiger auf die Menüleiste zu
setzen.
4Wählen
Sie
PROPERTY
5
DEVICES 5 SD CARD mit den
Cusortasten und der Taste SET.
9 (G)
ODer Formatierungsstatus wird unter
der Position “SD STANDARD”
angezeigt.
Formatieren Sie die Karte mit der P2Cam, falls “NOT SUPPORTED”
angezeigt wird.
OÜberprüfen Sie den verbleibenden
freien Speicherplatz für die ProxyDatenaufnahme mit der aktuellen
Aufnahmerate durch Wahl der
Position “PROXY REM”.
OÜberprüfen Sie die Anzahl der auf
der
SD-Speicherkarte
aufgenommenen Clips durch Wahl
der Position “NUMBER OF CLIPS”.
Falls die Anzahl der aufgenommenen
Clips 1.000 überschreitet, wird die
Proxy-Datenaufnahme
nicht
ausgeführt, auch wenn die SDSpeicherkarte
noch
freien
Speicherplatz aufweist.
OFalls das Material auf mehreren P2Karten aufgezeichnet wird, ist die in
der Miniaturansicht angezeigt Anzahl
der Clips von der Anzahl der auf der
SD-Speicherkarte aufgezeichneten
Clips von Proxy-Daten verschieden.
OEs ist nicht möglich, den Clips auf der
SD-Speicherkarte durch Drücken der
Taste SHOT MARK auf der P2-Cam
Aufnahmemarkierungen hinzuzufügen.
ODie auf der SD-Speicherkarte
aufgezeichneten
Proxy-Daten
werden beim Löschen der auf der
P2-Karte aufgezeichneten Clips in
der Miniaturansicht der P2-Cam nicht
gelöscht.
02.AJ-YAX800G(G)13 05.4.5 9:38 AM ページ10
Aufnahme auf SD-Speicherkarten (Fortsetzung)
Dadurch wird die SD-Speicherkarte
formatiert.
Annährende Aufnahmezeit für die
Proxy-Datenaufnahme
Teilenr. Und
Aufnahmerate und
Kapazität von
Aufnahmezeit
SD192
kbps
768 kbps 1500 kbps
Speicherkarten
RP-SDH256N1A Annährend Annährend Annährend
(256 MB)
137 Minuten 35 Minuten 19 Minuten
RP-SDH512N1A
(512 MB)
Annährend Annährend Annährend
278 Minuten 71 Minuten 39 Minuten
RP-SDH512J1A
(512 MB)
Annährend Annährend Annährend
237 Minuten 69 Minuten 38 Minuten
RP-SDH0G1J1A
(1 GB)
Annährend Annährend Annährend
536 Minuten 139 Minuten 77 Minuten
RP-SDK0G1J1A
(1 GB)
Annährend Annährend Annährend
536 Minuten 139 Minuten 77 Minuten
Die tatsächliche Aufnahmezeit ist von den
Aufnahmebedingungen abhängig (Anzahl der
Szenen, Voice-Memos und Clips.)
<Hinweis>
Wenn die Menüposition “REC MEDIUM” des PROXY-Menüs auf “P2&SD”
eingestellt ist, die Proxy-Datenaufnahme jedoch nicht auf die SD-Speicherkarte
vorgenommen wird, wird die Meldung “SD CARD WRITE ERR” bei beginn der
Aufnahme angezeigt. Überprüfen Sie die SD-Speicherkarte, falls dies vorkommt.
Für weitere Informationen siehe “Fehler bei der Proxy-Aufnahme“ (Seite 11).
Überprüfung der Proxy-Daten
$ Der Indikator P wird für Clips mit
Material angezeigt, das Proxy-Daten
aufweist.
$ Die Proxy-Daten werden auf einer
P2-Karte
und/oder
einer
SDSpeicherkarte als Audiovideodatei
und als Echtzeit-Metadaten-Datei
aufgezeichnet.
Audiovideodatei:
xxxxxxxx.MP4
Die Daten entsprechen dem
Standard ISO/IEC14496.
Echtzeit-Metadaten-Datei:
xxxxxxxx.BIN
Für jeden Frame werden Zeitcode,
Benutzer-Bit und UMID-Information
aufgezeichnet.
Überprüfen Sie die Proxy-Daten mit
dem P2-Viewer.
Für weitere Informationen zum P2Viewer siehe bitte:
http://panasonic.biz/sav/p2
10 (G)
DEUTSCH
Formatierung einer SD-Speicherkarte
1Setzen Sie eine SD-Speicherkarte in
die P2-Cam ein.
2Drücken Sie die Taste THUMBNAIL,
um die Miniaturansicht anzuzeigen.
3Drücken Sie die Taste MENU BAR,
um den Zeiger auf die Menüleiste zu
setzen.
4Wählen
Sie
OPERATION
5
FORMAT 5 SD CARD 5 YES mit
den Cusortasten und der Taste SET.
02.AJ-YAX800G(G)13 05.4.5 9:38 AM ページ11
Fehler bei der Proxy-Aufnahme
Siehe die folgenden Angaben zur Vorgehensweise, falls Fehler während der ProxyDatenaufnahme auftreten:
Fehleranzeige
Viewfinder:
TURN POWER OFF
Anzeigefenster:
E-30
Viewfinder:
REC WARNING
Anzeigefenster:
00:00:00:11
Viewfinder:
EOM (SD)
Betrieb und Ursachen
Vorgehensweise
Schalten Sie die P2-Cam aus und
Proxy-Datenaufnahme hält an.
O Die P2-Karte oder die P2-PROXY-Karte wieder ein, um die Aufnahme und
Wiedergabe zu Kontrollzwecken
wurden während der Aufnahme entfernt.
vorzunehmen.
Stellen Sie die Clips auf der
entfernten P2-Karte wieder her
Proxy-Datenaufnahme hält an.
O Während der Aufnahme auf die P2-Karte ist (siehe Seite 12).
O Die
auf
der
P2-Karte
ein Fehler aufgetreten.
aufgenommenen
Proxy-Daten
werden gelöscht.
O Die auf der SD-Speicherkarte
aufgenommenen
Proxy-Daten
können nicht wieder hergestellt
werden.
Die Proxy-Datenaufnahme auf der SD- Setzen Sie nach dem Ende der
Speicherkarte hält an, aber die Aufnahme Aufnahme
eine
neue
SDauf die P2-Karte fortgesetzt.
Speicherkarte ein.
O Keine Speicherkapazität auf der SD- O Die auf der SD-Speicherkarte
Speicherkarte.
aufgenommenen
Proxy-Daten
werden gelöscht.
Wählen Sie zum wieder Herstellen
gelöschter Proxy-Daten Clips auf der
P2-Karte und kopieren Sie sie auf die
SD-Speicherkarte (siehe Seite 12).
Viewfinder:
SD CARD WRITE
ERR
Die Proxy-Datenaufnahme auf der SDSpeicherkarte hält an, aber die Aufnahme
auf die P2-Karte fortgesetzt.
Diese Meldung wird angezeigt, wenn die
Menüposition “REC MEDIA” des PROXYMenüs auf “P2&SD” eingestellt ist, die ProxyDatenaufnahme jedoch nicht auf die SDSpeicherkarte vorgenommen wird.
$ Die Meldung wird bei Beginn der Aufnahme
angezeigt
O Keine SD-Speicherkarte eingesetzt.
O Die SD-Speicherkarte wurde in einem
nicht unterstützten Format formatiert.
O Die
SD-Speicherkarte
ist
schreibgeschützt.
O Die SD-Speicherkarte enthält mehr als
1.000 aufgenommene Clips.
$ Die Meldung wird während der Aufnahme
angezeigt
O Die SD-Speicherkarte wurde während der
Aufnahme entfernt.
O Während der Aufnahme auf die SDSpeicherkarte ist ein Fehler aufgetreten.
Überprüfen Sie den Status der SDSpeicherkarte und setzen Sie eine
andere aufnehmbare Karte ein (siehe
Seite 9).
Viewfinder:
PROXY CARD
ERROR
Die Proxy-Datenaufnahme hält an, aber die
Aufnahme auf der P2-Karte wird fortgesetzt.
O Auf der P2-PROXY-Karte ist ein Fehler
aufgetreten.
O Fehler in den Eingangssignalen an die P2PROXY-Karte.
Die Proxy-Daten können nicht
ordnungsgemäß
aufgenommen
werden.
Schalten Sie die P2-Cam aus und
wieder ein, um die Aufnahme und
Wiedergabe zu Kontrollzwecken
vorzunehmen.
11 (G)
02.AJ-YAX800G(G)13 05.4.5 9:38 AM ページ12
Fehler bei der Proxy-Aufnahme (Fortsetzung)
DEUTSCH
Wiederherstellung von Clips
1Drücken Sie die Taste THUMBNAIL,
um die Miniaturansicht anzuzeigen.
2Positionieren Sie den Zeiger mit den
Cursortasten
auf
den
wieder
herzustellenden Clips und drücken Sie
die Taste SET.
3Drücken Sie die Taste MENU BAR, um
den Zeiger auf die Menüleiste zu
setzen.
4Wählen Sie OPERATION 5 REPAIR
CLIP 5 YES mit den Cusortasten und
der Taste SET.
<Hinweis>
Wenn Clips wiederhergestellt werden;
ODie auf der P2-Karte aufgenommenen Proxy-Daten werden gelöscht.
ODie auf der SD-Speicherkarte aufgenommenen Proxy-Daten können nicht
wieder hergestellt werden.
Kopieren von Clips auf eine SDSpeicherkarte
1Drücken Sie die Taste THUMBNAIL,
um die Miniaturansicht anzuzeigen.
2Positionieren Sie den Zeiger mit den
Cursortasten auf den kopierenden Clips
und drücken Sie die Taste SET.
3Drücken Sie die Taste MENU BAR, um
den Zeiger auf die Menüleiste zu
setzen.
4Wählen Sie OPERATION 5 COPY 5
SD CARD 5 YES mit den Cusortasten
und der Taste SET.
12 (G)
02.AJ-YAX800G(G)13 05.4.5 9:38 AM ページ13
Spezifikationen
Eingangsspannung:
3,3 V dc ±0,3 V
Stromverbrauch:
Max. 1,5 W
Betriebstemperatur:
0 °C bis +40 °C
Betriebsfeuchtigkeit:
10 % bis 85 % (nicht kondensierend)
Lagerungstemperatur:
–20 °C bis +60 °C
Lagerungsfeuchtigkeit:
10 % bis 85 % (nicht kondensierend)
Masse:
ca. 43 g
Abmessungen (BkHkT):
ca. 54 mm k 5 mm k 85,6 mm
Schnittstelle:
PC-Standardkarte
Dateiformat:
MP4 (Standard ISO/IEC14496)
Videokompressionsformat:
MPEG4 simple profile (4:2:0)
Audiokompressionsformat:
AAC (Advanced Audio Coding)
Einstellmodus:
192 kbps
Video : QVGA, 15 Frames/Sek. (525i), 12,5 Frames/Sek. (625i)
Audio : Mono (Mischung von CH1 und CH2), 32 kbps/ch
768 kbps
Video : QVGA, 30 Frames/Sek. (525i), 25 Frames/Sek. (625i)
Audio : Stereo (CH1•CH2), 64 kbps/ch
1500 kbps
Video : QVGA, 30 Frames/Sek. (525i), 25 Frames/Sek. (625i)
Audio : Stereo (CH1•CH2), 64 kbps/ch
Die Spezifikationen können ohne Vorankündigung Änderungen unterliegen.
Die Angaben für Masse und Gewicht sind Näherungswerte.
13 (G)
03.AJ-YAX800G(F)13 05.4.5 9:39 AM ページ1
• Pour éviter les dangers d’incendie, de choc électrique, les dommages ou les
dysfonctionnements de votre appareil, ne le démontez pas et ne le remodelez pas.
• Cessez immédiatement d’utiliser la carte si vous remarquez de la fumée, des odeurs
ou des bruits bizarres ou si du liquide pénètre dans la carte.
Table des matières
Manipulation et rangement . . . . . . . . 1
Menu PROXY . . . . . . . . . . . . . . . . . . 6
Caractéristiques . . . . . . . . . . . . . . . . . 2
Composition de produit . . . . . . . . . . . 2
Enregistrement sur des cartes
mémoires SD . . . . . . . . . . . . . . . . . . . 9
Comment retirer la carte de sa boîte . . 2
Vérification des données proxy . . . . 10
Installation d’une carte P2 PROXY . . 3
Erreurs d’enregistrement proxy . . . . 11
Opérations de vérification . . . . . . . . . 4
Spécifications . . . . . . . . . . . . . . . . . . 13
Manipulation et rangement
O Pour éviter les dangers d’incendie, de choc électrique, les dommages ou les
dysfonctionnements de votre appareil, évitez de le heurter, de le plier, de le laisser
tomber ou de l’exposer à l’humidité.
O Après avoir retiré la carte de l’appareil, fixez immédiatement le couvercle pour
protéger les bornes contre la poussière et la saleté.
Lorsque vous rangez ou portez la carte avec vous, mettez-la dans sa boîte de
protection.
O Ne laissez pas la carte à un endroit exposé à des gaz corrosifs.
O Ne retirez pas la carte d’un caméscope à carte mémoire pendant l’enregistrement des
données proxy. Ne coupez pas l’alimentation du caméscope à carte mémoire et
n’enlevez pas les batteries pendant l’enregistrement des données proxy.
Cela supprimerait les données proxy en cours d’enregistrement.
O Si vous avez besoin d’assistance pour installer la carte dans un caméscope à carte
mémoire prenant en charge l’enregistrement proxy, veuillez contacter votre revendeur
ou votre prestataire de service désigné.
1 (F)
FRANÇAIS
Informations logicielles pour ce produit
Informations destinées au client : Ce produit contient un logiciel associé à la licence
publique générale (GPL) et à la licence publique générale limitée (LGPL) GNU ; les
clients ont donc le droit de télécharger, modifier et redistribuer le code source de ce
logiciel.
Des informations sur les licences publiques GPL et LGPL sont disponibles dans les
sections GPL et LGPL de ce manuel. La description est l’original de la licence (rédigée
en anglais).
Pour télécharger le code source concerné, accédez aux sites Web
http://panasonic.biz/sav/.
À noter que nous ne pouvons pas répondre à toutes les questions que vous pouvez
vous poser sur le contenu, etc. d’un code source quelconque que vous auriez obtenu sur
le site Web mentionné ci-dessus.
03.AJ-YAX800G(F)13 05.4.5 9:39 AM ページ2
Caractéristiques
L’AJ-YAX800G (“Carte P2 PROXY”) est une carte pour encodeur vidéo du type
carte de PC (elle a la même forme que la carte P2).
Elle permet de créer un fichier de données compressées à partir du matériel
enregistré avec un caméscope à carte mémoire (“caméscope P2”) et de mémoriser
ce fichier en le séparant du matériel original.
Les fichiers créés avec cette fonction comprennent un fichier audiovisuel qui est
compressé au format MPEG4 et un fichier de métadonnées en temps réel (code
temporel, bit d’utilisateur et information UMID). Ils peuvent être mémorisés sur des
cartes P2 ou sur des cartes mémoires SD.
Le matériel enregistré avec un caméscope P2 peut être mémorisé comme un fichier
de données, sa capacité étant inférieure au matériel original.
Composition de produit
OCarte P2 PROXY . . . . . . . . . . . . .k1
OCouvercle . . . . . . . . . . . . . . . . . . .k1
OBoîte . . . . . . . . . . . . . . . . . . . . . . .k1
Comment retirer la carte de sa boîte
1 Ouvrez le verrou en (a).
2 Ouvrez la boîte.
OLorsque vous retirez la carte, tenir
la boîte comme indiqué sur la
figure pour que la carte ne tombe
pas sur le sol.
OPour ne pas endommager la boîte,
n’essayez pas de l’ouvrir en la
tenant en (a).
3 Retirez la carte.
OPour retirer uniquement la carte,
glissez-la en direction (b).
OPour retirer la carte avec le
couvercle, soulevez-la en direction
(c) tout en la poussant en direction
du couvercle.
1
(a)
2
3
(c)
Couvercle
2 (F)
(b)
03.AJ-YAX800G(F)13 05.4.5 9:39 AM ページ3
Installation d’une carte P2 PROXY
Insérez une carte P2 PROXY dans la fente OPTION du caméscope P2.
Notez que la carte devrait être introduite dans la fente de carte P2 No 5 s’il y a
déjà une autre carte dans la fente OPTION.
Introduction d’une carte dans la
fente OPTION
1 Éteignez le caméscope P2.
Le caméscope ne reconnaît pas la
carte P2 PROXY si celle-ci est
introduite alors qu’il est allumé.
2 Déposez les deux vis et soulevez le
fente OPTION et revissez les deux
vis.
Retrait de la carte P2 PROXY de la
fente OPTION
1Appuyez sur le bouton EJECT et
vérifiez que le bouton est remonté.
FRANÇAIS
couvercle de la fente OPTION.
4 Remettez en place le couvercle de la
2Appuyez de nouveau sur le bouton
EJECT.
Cela permet de libérer la carte P2
PROXY. Retirez-la de la fente.
3 Vérifiez que le bouton d’éjection est
enfoncé, puis introduisez une carte
P2 PROXY dans la fente.
Bouton EJECT
Introduction d’une carte P2 PROXY
dans la fente réservée à la carte P2
Veillez à introduire la carte P2 PROXY
dans la fente No 5. L’enregistrement
des données proxy n’a pas lieu si la
carte P2 PROXY est introduite dans
une autre fente.
Pour de plus amples informations sur
l’introduction des cartes, voir le manuel
d’instructions du caméscope P2.
5
3 (F)
03.AJ-YAX800G(F)13 05.4.5 9:39 AM ページ4
Opérations de vérification
Allumez le caméscope P2 pour vérifier
si la carte P2 PROXY fonctionne.
OLorsqu’une carte P2 PROXY est
introduite dans la fente OPTION et
qu’elle est correctement reconnue, la
fenêtre d’affichage du caméscope P2
affiche “OP-SLOT”.
DF
W
0
VTCG
Lors de la première utilisation
d’une carte P2 PROXY sur le
caméscope P2, il faut initialiser la
carte à partir du menu PROXY.
Initialisation d’une carte P2 PROXY
1Introduisez une carte P2 PROXY
dans le caméscope P2 et mettez
sous tension.
2Appuyez sur le bouton THUMBNAIL
pour
afficher
l’écran
d’image
miniature.
3Appuyez sur le bouton MENU BAR
pour déplacer le pointeur dans la
barre de menu.
4Sélectionnez
OPERATION
5
DEVICE SETUP 5 PROXY 5
INITIALIZE 5 YES à l’aide des
touches curseur et du bouton SET.
10
h
minM
MEDIA E
BATT E
s
frm
L’initialisation est terminée.
20
F
30
F
40
OO
OP-SLOT
13
-dB
24
OLorsqu’une carte P2 PROXY est
introduite dans la fente de carte P2
No. 5 et qu’elle est correctement
reconnue, la LED d’accès clignote en
orange.
LED d’accès
4 (F)
03.AJ-YAX800G(F)13 05.4.5 9:39 AM ページ5
Opérations de vérification (suite)
Bouton MENU BAR
Bouton
THUMBNAIL
Le message “SOFT: NO VERSION”
s’affiche. Cela n’indique par une erreur,
mais résulte du fait que la version est
reflétée avec l’enregistrement des
données proxy.
Lorsque le caméscope est sous tension
Après enregistrement des données proxy
(Fente OPTION)
(Fente de carte P2 No 5)
Touches curseur
Bouton SET
5 (F)
FRANÇAIS
Vérification sur l’écran d’image
miniature
1Appuyez sur le bouton THUMBNAIL
pour
afficher
l’écran
d’image
miniature.
2Appuyez sur le bouton MENU BAR
pour déplacer le pointeur dans la
barre de menu.
3Appuyez sur la touche curseur pour
déplacer
le
pointeur
sur
“PROPERTY” et appuyez sur le
bouton SET.
4Appuyez sur la touche curseur pour
déplacer le pointeur sur “DEVICES”
et appuyez sur le bouton SET.
5Appuyez sur la touche curseur pour
déplacer le pointeur sur “PROXY” et
appuyez sur le bouton SET.
03.AJ-YAX800G(F)13 05.4.5 9:39 AM ページ6
Menu PROXY
Paramétrage du menu
1Introduisez une carte P2 PROXY
dans le caméscope P2 et mettez-le
sous tension.
2Appuyez sur le bouton THUMBNAIL
pour
afficher
l’écran
d’image
miniature.
3Appuyez sur le bouton MENU BAR
pour déplacer le pointeur dans la
barre de menu.
4Sélectionnez
OPERATION
5
DEVICE SETUP 5 PROXY à l’aide
des touches curseur et du bouton
SET.
5Sélectionnez les options de menu et
indiquez les valeurs avec les touches
curseur et le bouton SET.
Menu PROXY
Options
REC MEDIA
Plage de réglage
OFF
P2
P2&SD
Sélectionnez un support pour l’enregistrement des
données proxy.
OFF:
Aucune donnée proxy n’est enregistrée.
P2:
Des données proxy sont enregistrées sur la carte
P2.
P2&SD:
Des données proxy sont enregistrées sur la carte
P2 et sur la carte mémoire SD.
O Si vous enregistrez un message vocal pendant
l’enregistrement de données proxy, celui-ci
sera enregistré sur la carte P2 et sur la carte
mémoire SD.
O Si vous enregistrez un message vocal une fois
que l’enregistrement de données proxy est
terminé, celui-ci sera enregistré sur la carte P2
uniquement.
TC SUPER
OFF
UPPER
LOWER
Indiquez une option pour afficher le code temporel en
surimpression sur la vidéo enregistrée comme
donnée proxy.
OFF:
L’affichage de code temporel n’est pas en
surimpression sur la vidéo enregistrée.
UPPER:
L’affichage de code temporel est en surimpression
dans la partie supérieure de la vidéo enregistrée.
LOWER:
L’affichage de code temporel est en surimpression
dans la partie inférieure de la vidéo enregistrée.
REC RATE
192kbps
768kbps
1500 kbps
Indiquez la vitesse
données proxy.
INITIALIZE
d’enregistrement
pour
les
———
Initialise le menu PROXY et les données de
paramétrage du caméscope P2.
O Veillez à effectuer cette initialisation lors de la
première introduction d’une carte P2 PROXY dans
un caméscope P2 prenant en charge
l’enregistrement proxy.
Le
de la colonne de plage de réglage
indique la valeur initiale.
6 (F)
03.AJ-YAX800G(F)13 05.4.5 9:39 AM ページ7
Menu PROXY (suite)
$ Pour
afficher
les
informations
capturées par enregistrement de
données proxy sur le viseur du
caméscope P2, sélectionnez “ON”
comme option de menu “PROXY
REC”
dans
l’écran
<VF
INDICATOR2> du menu page VF du
caméscope P2.
“PROXY REC P2” ou “PROXY REC
P2&SD” s’affiche au début de
l’enregistrement.
Vitesse d’enregistrement et signaux
d’enregistrement (Vidéo et audio)
Vitesse
d’enregistrement
192 kbps
768 kbps
1500 kbps
Vidéo (QVGA)
Audio
NTSC (525i)
15 photogrammes/sec
PAL (625i)
12,5 photogrammes/sec
NTSC (525i)
30 photogrammes/sec
PAL (625i)
25 photogrammes/sec
NTSC (525i)
30 photogrammes/sec
PAL (625i)
25 photogrammes/sec
Monaural
(mélange de
CH1 et CH2),
32 kbps/ch
Stéréo
(CH1•CH2),
64 kbps/ch
Stéréo
(CH1•CH2),
64 kbps/ch
La vitesse d’enregistrement indique la vitesse
d’enregistrement pour les signaux vidéo.
$ Si
les
données
proxy
sont
enregistrées sur la carte P2 pendant
les prises de vue, le temps
d’enregistrement pourrait être plus
court que le temps indiqué sur le
manuel d’instructions de la carte P2.
$ Pendant le paramétrage de menu
PROXY, le caméscope P2 ne peut
effectuer
aucune
opérations
d’enregistrement.
7 (F)
FRANÇAIS
$ Les données proxy ne sont pas
enregistrées pendant les opérations
dans les modes suivants :
OEnregistrement numérique
IEEE1394
OINTERVAL REC
OLOOP REC
03.AJ-YAX800G(F)13 05.4.5 9:39 AM ページ8
Menu PROXY (suite)
Enregistrement proxy en mode 24P/24PA [Applicable uniquement à NTSC (525i)]
Lorsque le mode de fonctionnement du caméscope P2 est réglé sur 24P (2:3) ou
24PA (2:3:3:2) pour l’enregistrement proxy, la séquence à cinq photogrammes sera
la suivante en fonction de la vitesse d’enregistrement:
Vitesse d’enregistrement: 768 kbps, 1500 kbps
24P (2:3)
Séquence No
0
1
2
3
4
Images de matériel original 0 0 1 1 1 2 2 3 3 3
Images d’enregistrement proxy
0
1
1
2
3
3
4
O Les valeurs soulignées indiquent
les images du second champ.
24PA (2:3:3:2)
Séquence No
0
1
2
Images de matériel original 0 0 1 1 1 2 2 2 3 3
Images d’enregistrement proxy
0
1
1
2
3
Vitesse d’enregistrement: 192 kbps
Si la vitesse d’enregistrement est de 192 kbps, la séquence à cinq photogrammes
ne sera par correcte.
24P (2:3)
Séquence No
0
1
2
3
4
0
1
2
3
4
Images de matériel original 0 0 1 1 1 2 2 3 3 3 4 4 5 5 5 6 6 7 7 7
Images d’enregistrement proxy
0
1
3
5
6
24PA (2:3:3:2)
Séquence No
0
1
2
3
4
0
1
2
3
4
Images de matériel original 0 0 1 1 1 2 2 2 3 3 4 4 5 5 5 6 6 6 7 7
Images d’enregistrement proxy
8 (F)
0
1
3
5
6
03.AJ-YAX800G(F)13 05.4.5 9:39 AM ページ9
Pour l’enregistrement de données
proxy, utilisez des cartes mémoires SD
de 256 Mo, 512 Mo ou 1 Go avec
l’indication “High Speed”.
Pour plus d’informations, veuillez aller
au site:
http://panasonic.biz/sav/p2
Pour l’enregistrement de données
proxy, formatez la carte mémoire SD à
l’aide du caméscope P2.
OVous pouvez aussi utiliser les cartes
mémoires SD formatées suivant le
standard SD sur un PC.
OPour plus d’informations sur la
manipulation des cartes mémoires
SD, voir le manuel d’instructions du
caméscope P2.
Vérification d’une carte mémoire SD
1Introduisez une carte mémoire SD
dans le caméscope P2.
2Appuyez sur le bouton THUMBNAIL
pour
afficher
l’écran
d’image
miniature.
3Appuyez sur le bouton MENU BAR
pour déplacer le pointeur dans la
barre de menu.
4Sélectionnez
PROPERTY
5
DEVICES 5 SD CARD à l’aide des
touches curseur et du bouton SET.
OL’état de formatage s’affiche sous
l’option “SD STANDARD.
Si “NOT SUPPORTED” s’affiche,
formatez la carte en utilisant le
caméscope P2.
OVérifiez l’espace libre disponible pour
l’enregistrement de données proxy
en fonction du réglage de vitesse
d’enregistrement
effectif
en
sélectionnant l’option “PROXY REM”.
OVérifiez
le
nombre
de
clips
enregistrés sur la carte mémoire SD
en sélectionnant l’option “NUMBER
OF CLIPS”.
Si le nombre de clips enregistrés
dépasse 1000, l’enregistrement de
données proxy n’a pas lieu même s’il
y a encore de la place sur la carte
mémoire.
OSi le matériel est enregistré sur des
cartes P2 multiples, le nombre de
clips affichés sur l’écran d’image
miniature sera différent du nombre de
clips de données proxy enregistrées
sur le carte mémoire SD.
OUne marque de plan ne peut pas être
ajoutée aux clips présents sur la
carte mémoire en appuyant sur la
touche SHOT MARK du caméscope
P2.
OLes données proxy enregistrées sur
la carte mémoire SD ne seront pas
effacées par effacement des clips
enregistrés sur la carte P2 sur l’écran
d’image miniature du caméscope P2.
9 (F)
FRANÇAIS
Enregistrement sur des cartes mémoires SD
03.AJ-YAX800G(F)13 05.4.5 9:39 AM ページ10
Enregistrement sur des cartes mémoires SD (suite)
Formatage d’une carte mémoire SD
1Introduisez une carte mémoire SD
dans le caméscope P2.
2Appuyez sur le bouton THUMBNAIL
pour
afficher
l’écran
d’image
miniature.
3Appuyez sur le bouton MENU BAR
pour déplacer le pointeur dans la
barre de menu.
4Sélectionnez
OPERATION
5
FORMAT 5 SD CARD 5 YES à
l’aide des touches curseur et du
bouton SET.
Le formatage de la carte mémoire SD
est terminé.
Temps d’enregistrement de données
proxy approximatif
No de pièce
Vitesse d’enregistrement et
et capacité
temps d’enregistrement
des cartes
192
kbps 768 kbps 1500 kbps
mémoires SD
RP-SDH256N1A Environ 137 Environ 35 Environ 19
(256 MB)
minutes
minutes
minutes
RP-SDH512N1A
(512 MB)
Environ 278 Environ 71 Environ 39
minutes
minutes
minutes
RP-SDH512J1A
(512 MB)
Environ 237 Environ 69 Environ 38
minutes
minutes
minutes
RP-SDH0G1J1A
(1 GB)
Environ 536 Environ 139 Environ 77
minutes
minutes
minutes
RP-SDK0G1J1A
(1 GB)
Environ 536 Environ 139 Environ 77
minutes
minutes
minutes
Le temps d’enregistrement effectif dépend des
conditions d’enregistrement (nombre de scènes, de
messages vocaux et de clips.)
<Remarque>
Si l’option “REC MEDIA” du menu PROXY est réglée sur “P2&SD”, mais que
l’enregistrement de données proxy ne s’effectue pas sur la carte mémoire SD, le
message “SD CARD WRITE ERR” s’affiche au début de l’enregistrement. Si cela
se produit, vérifiez la carte mémoire SD. Pour plus d’informations, voir “Erreurs
d’enregistrement proxy” (page 11).
Vérification des données proxy
$ L’indicateur P s’affiche pour des
clips dont le matériel contient des
données proxy.
$ Les données proxy sont enregistrées
sur une carte P2 et/ou sur une carte
mémoire
SD
comme
fichier
audiovisuel
et
fichier
de
métadonnées en temps réel.
Fichier audiovisuel:
xxxxxxxx.MP4
Les données sont conformes au
standard ISO/IEC14496.
10 (F)
Fichier de métadonnées en temps
réel:
xxxxxxxx.BIN
Les code temporel, bit d’utilisateur
et
informations
UMID
sont
enregistrés
pour
chaque
photogramme.
Vérifiez les données proxy avec le
visualiseur P2.
Pour plus d’informations sur le
visualiseur P2, voir :
http://panasonic.biz/sav/p2
03.AJ-YAX800G(F)13 05.4.5 9:39 AM ページ11
Erreurs d’enregistrement proxy
S’il y a une erreur pendant l’enregistrement de données proxy, veuillez intervenir
comme suit:
Viseur:
TURN POWER OFF
Fenêtre d’affichage:
E-30
Viseur:
REC WARNING
Fenêtre d’affichage:
00:00:00:11
Viseur:
EOM (SD)
Opération et causes
Intervention
Éteignez le caméscope P2 et
rallumez-le
pour
vérifier
le
fonctionnement des opérations
d’enregistrement et de lecture.
Restaurez les clips sur la carte P2
L’enregistrement de données proxy qui a été retirée (voir p.12).
O Les
données
proxy
s’interrompt.
enregistrées sur la carte P2
O Erreur pendant l’enregistrement sur la
sont supprimées.
carte P2.
O Les
données
proxy
enregistrées sur la carte
mémoire SD ne peuvent être
restaurées.
L’enregistrement de données proxy
s’interrompt.
O La carte P2 ou celle P2 PROXY est
retirée pendant l’enregistrement.
L’enregistrement de données proxy sur
la carte mémoire SD s’interrompt, mais
l’enregistrement sur la carte P2 continue.
O Il n’y a plus d’espace disponible sur la
carte mémoire SD.
Introduisez une nouvelle carte
mémoire
SD
une
fois
l’enregistrement terminé.
O Les données proxy en cours
d’enregistrement sur la carte
mémoire SD sont supprimées.
Pour restaurer les données proxy
supprimées, sélectionnez des
clips sur la carte P2 et copiez-les
sur la carte mémoire SD (voir
p.12).
Viseur:
SD CARD WRITE
ERR
L’enregistrement de données proxy sur Vérifiez l’état de la carte mémoire
la carte mémoire SD s’interrompt, mais SD et introduisez une autre carte
l’enregistrement sur la carte P2 continue. enregistrable (voir p.9).
Ce message s’affiche lorsque l’option de
menu “REC MEDIA” du menu PROXY est
réglée sur “P2&SD”, mais l’enregistrement
de données proxy ne peut être effectué sur
la carte mémoire SD.
$ Le message s’affiche au début de
l’enregistrement
O Aucune carte mémoire SD.
O Format de la carte mémoire SD non
pris en charge.
O Carte mémoire SD avec protection en
écriture.
O Carte mémoire SD contenant plus de
1000 clips enregistrés.
$ Le
message
s’affiche
pendant
l’enregistrement
O Carte mémoire SD retirée pendant
l’enregistrement.
O Erreur pendant l’enregistrement sur la
carte mémoire SD.
Viseur:
PROXY CARD
ERROR
L’enregistrement de donnée proxy
s’interrompt, mais l’enregistrement sur la
carte P2 continue.
O Erreur sur la carte P2 PROXY.
O Erreur au niveau des signaux d’entrée sur
la carte P2 PROXY.
Les données proxy ne peuvent
être enregistrées correctement.
Éteignez le caméscope P2 et
rallumez-le
pour
vérifier
le
fonctionnement des opérations
d’enregistrement et de lecture.
11 (F)
FRANÇAIS
Affichage d’erreur
03.AJ-YAX800G(F)13 05.4.5 9:39 AM ページ12
Erreurs d’enregistrement proxy (suite)
Restauration de clips
1Appuyez sur le bouton THUMBNAIL
pour afficher l’écran d’image miniature.
2Positionnez le pointeur sur les clips à
restaurer à l’aide des touches curseur
et appuyez sur le bouton SET.
3Appuyez sur le bouton MENU BAR
pour déplacer le pointeur dans la barre
de menu.
4Sélectionnez OPERATION 5 REPAIR
CLIP 5 YES à l’aide des touches
curseur et du bouton SET.
<Remarque>
Lorsque les clips sont restaurés;
OLes données proxy enregistrées sur la carte P2 sont supprimées.
OLes données proxy enregistrées sur la carte mémoire SD ne peuvent être
restaurées.
Copie de clips sur une carte mémoire
SD
1Appuyez sur le bouton THUMBNAIL
pour afficher l’écran d’image miniature.
2Positionnez le pointeur sur les clips à
copier avec les touches curseur et
appuyez sur le bouton SET.
3Appuyez sur le bouton MENU BAR
pour déplacer le pointeur dans la barre
de menu.
4Sélectionnez OPERATION 5 COPY 5
SD CARD 5 YES à l’aide des touches
curseur et du bouton SET.
12 (F)
03.AJ-YAX800G(F)13 05.4.5 9:39 AM ページ13
Tension d’entrée :
DC 3,3 V ±0,3 V
Consommation électrique :
Maximum 1,5 W
Température de fonctionnement :
De 0 °C à +40 °C
Humidité de fonctionnement :
De 10 % à 85 % (sans condensation)
Température de stockage :
De –20 °C à +60 °C
Humidité de stockage :
De 10 % à 85 % (sans condensation)
Masse :
Environ 43 g
Dimensions (LkHkP):
Environ 54 mm k 5 mm k 85,6 mm
Interface :
Carte PC standard
Format de fichier :
MP4 (ISO/IEC14496 standard)
Format de compression vidéo :
Profil simple MPEG4 (4:2:0)
Format de compression audio :
AAC (Advanced Audio Coding)
Mode de paramétrage :
192 kbps
Vidéo : QVGA, 15 photogrammes/sec (525i), 12,5 photogrammes/sec (625i)
Audio : Monaural (mélange de CH1 et CH2), 32 kbps/ch
768 kbps
Vidéo : QVGA, 30 photogrammes/sec (525i), 25 photogrammes/sec (625i)
Audio : Stéréo (CH1•CH2), 64 kbps/ch
1500 kbps
Vidéo : QVGA, 30 photogrammes/sec (525i), 25 photogrammes/sec (625i)
Audio : Stéréo (CH1•CH2), 64 kbps/ch
Les spécifications peuvent changer sans préavis.
La masse et les dimensions indiqués sont approximatifs.
13 (F)
FRANÇAIS
Spécifications
04.AJ-YAX800G(I)13 05.4.5 9:40 AM ページ1
• Per ridurre il pericolo d’incendio, scosse, danni o funzionamento non corretto, evitare di
smontare o modificare il prodotto.
• In caso di emissione di fumo, odori o suoni anomali, oppure se la scheda dovesse entrare
in contatto con un liquido, interrompere immediatamente l’utilizzo della scheda.
Informazioni sul software di questo prodotto
Informazioni per i consumatori: questo prodotto include software soggetto a licenza
secondo il GPL (General Public License) GNU e il LGPL (Lesser General Public
License) GNU; i clienti hanno il diritto di scaricare, modificare e ridistribuire il codice
sorgente di questo software.
Ulteriori dettagli su GPL e LGPL sono disponibili nelle sezioni GPL e LGPL del
presente manuale. La descrizione è originale e in lingua inglese.
Per scaricare il codice sorgente relativo, visitare il sito http://panasonic.biz/sav/.
Non viene fornita alcuna risposta a qualsiasi domanda relativa al contenuto di
qualsiasi codice sorgente scaricabile dal sito suindicato.
Indice
Precauzioni per l’uso e la custodia del
prodotto . . . . . . . . . . . . . . . . . . . . . . . 1
Operazioni di verifica . . . . . . . . . . . . . 4
Caratteristiche . . . . . . . . . . . . . . . . . . 2
Registrazione su scheda di memoria
SD . . . . . . . . . . . . . . . . . . . . . . . . . . . 9
Composizione del prodotto . . . . . . . . 2
Menu PROXY . . . . . . . . . . . . . . . . . . 6
Come rimuovere la scheda dalla
custodia . . . . . . . . . . . . . . . . . . . . . . . 2
Controllo dei dati proxy . . . . . . . . . . 10
Installazione della scheda P2 PROXY . . . 3
Dati tecnici . . . . . . . . . . . . . . . . . . . . 13
Errori nella registrazione proxy . . . . 11
Precauzioni per l’uso e la custodia del prodotto
OPer ridurre il pericolo d’incendio, scosse, danni o funzionamento non corretto il
prodotto, non deve subire impatti né essere piegato, lasciato cadere o esposto
all’umidità.
OUna volta rimossa la scheda dal dispositivo, apporre immediatamente il
cappuccio per proteggere i terminali da polvere e impurità.
Per riporre la scheda o portarla con sé, utilizzare sempre la sua custodia
protettiva.
ONon lasciare la scheda in luoghi in cui potrebbe restare esposta a gas corrosivi.
ONon rimuovere la scheda dal Camcorder a schede di memoria durante la
registrazione di dati proxy. Non interrompere l’alimentazione al Camcorder a
schede di memoria né rimuovere le batterie durante la registrazione di dati proxy.
Tali azioni avrebbero come conseguenza l’eliminazione dei dati proxy in fase di
registrazione.
OPer richiedere assistenza nell’installazione di questa scheda su Camcorder a
schede di memoria che supportano la registrazione proxy, contattare il
distributore o il rivenditore designato.
1 (I)
04.AJ-YAX800G(I)13 05.4.5 9:40 AM ページ2
Caratteristiche
L’unità AJ-YAX800G (“scheda P2 PROXY”) è una scheda di codifica video di tipo
simile a una scheda PC (la forma è identica a quella di una scheda P2).
Essa è in grado di creare un file di dati compressi dal materiale registrato con un
Camcorder a schede di memoria (“cam P2”), e memorizzare quel file in una
posizione separata rispetto al materiale originale.
I file creati con questa funzione sono composti da un file audiovisivo compresso in
formato MPEG4, e da un file di metadati in tempo reale (con le informazioni del time
code, bit utente e UMID). Questi file si possono salvare sulle schede P2 o sulle
schede di memoria SD.
I materiali registrati con una cam P2 si possono salvare come file di dati,
mantenendo dimensioni inferiori rispetto al materiale originale.
Composizione del prodotto
OScheda P2 PROXY . . . . . . . . . . .k1
OCappuccio . . . . . . . . . . . . . . . . . .k1
ITALIANO
OCustodia . . . . . . . . . . . . . . . . . . . .k1
Come rimuovere la scheda dalla custodia
1 Rilasciare il fermo nell’area (a).
2 Aprire la custodia.
ODurante la rimozione della scheda,
tenere la custodia nella direzione
indicata dalla figura in modo che la
scheda non cada per terra.
OPer evitare di danneggiare la
custodia, non tentare di aprirla
tenendo con forza l’area (a).
3 Rimuovere la scheda.
OPer rimuovere solo la scheda, far
scorrere verso la direzione (b).
OPer rimuovere la scheda con il
cappuccio, sollevare verso la
direzione
(c)
continuando
simultaneamente a premere verso
la direzione del cappuccio.
1
(a)
2
3
(c)
Cappuccio
(b)
2 (I)
04.AJ-YAX800G(I)13 05.4.5 9:40 AM ページ3
Installazione della scheda P2 PROXY
Inserire una scheda P2 PROXY nello slot OPTION della cam P2.
Inserire la scheda nello slot per scheda P2 N. 5 se vi fosse un’altra scheda già
inserita nello slot OPTION.
Inserimento di una scheda nello slot
OPTION
1 Spegnere la cam P2.
Se viene inserita quando la camera è
accesa, la scheda P2 PROXY non
viene riconosciuta.
2 Rimuovere le due viti e sollevare il
coperchio dello slot OPTION.
4 Rimettere
il coperchio dello slot
OPTION e fissarlo nuovamente con
le due viti.
Rimozione della scheda P2 PROXY
dallo slot OPTION
1Premere il pulsante di espulsione e
verificare che il pulsante si sia
sollevato.
2Premere nuovamente il pulsante di
espulsione.
Con questa operazione la scheda P2
PROXY viene sbloccata. Rimuoverla
quindi dallo slot.
3 Verificare
che il pulsante di
espulsione non sia premuto e
inserire la scheda P2 PROXY nello
slot.
Pulsante EJECT
Inserimento di una scheda P2
PROXY nello slot della scheda P2.
Accertarsi che la scheda P2 PROXY
venga inserita nello slot N. 5. Se la
scheda P2 PROXY viene inserita in un
altro slot la registrazione dei dati proxy
non verrà eseguita.
Per
maggiori
informazioni
sull’inserimento delle schede, vedere il
manuale delle istruzioni della cam P2.
5
3 (I)
04.AJ-YAX800G(I)13 05.4.5 9:40 AM ページ4
Operazioni di verifica
Accendere la cam P2 per verificare che
la scheda P2 PROXY sia operativa.
OQuando una scheda P2 PROXY
viene inserita nello slot OPTION e
viene correttamente riconosciuta, sul
display della cam P2 viene
visualizzata l’indicazione “OP-SLOT”.
DF
W
0
VTCG
La prima volta che una scheda P2
PROXY viene utilizzata su una cam
P2, è necessario inizializzare la
scheda utilizzando il menu PROXY.
Inizializzazione della scheda P2
PROXY
1Inserire una scheda P2 PROXY nella
cam P2 e accendere la camera.
2Premere il pulsante THUMBNAIL per
visualizzare la schermata delle
miniature.
3Premere il pulsante MENU BAR per
spostare il puntatore verso la barra
dei menu.
4Selezionare
OPERATION
5
DEVICE SETUP 5 PROXY 5
INITIALIZE 5 YES con i pulsanti del
cursore e il pulsante SET.
h
minM
s
frm
MEDIA E
BATT E
L’inizializzazione viene completata.
20
F
30
F
40
OO
OP-SLOT
13
-dB
24
OQuando una scheda P2 PROXY
viene inserita nello slot per scheda
P2 N. 5 e viene correttamente
riconosciuta, il LED di accesso
lampeggia emettendo luce arancione.
LED di accesso
4 (I)
ITALIANO
10
04.AJ-YAX800G(I)13 05.4.5 9:40 AM ページ5
Operazioni di verifica (continua)
Verifiche sulla schermata delle icone
miniaturizzate
1Premere il pulsante THUMBNAIL per
visualizzare la schermata delle icone
miniaturizzate.
2Premere il pulsante MENU BAR per
spostare il puntatore verso la barra
dei menu.
3Premere il pulsante del cursore per
spostare
il
puntatore
su
“PROPERTY” e premere il pulsante
SET.
4Premere il pulsante del cursore per
spostare il puntatore su “DEVICES” e
premere il pulsante SET.
5Premere il pulsante del cursore per
spostare il puntatore su “PROXY” e
premere il pulsante SET.
Pulsante MENU BAR
Pulsante
THUMBNAIL
Quando il dispositivo è acceso
Dopo la registrazione di dati proxy
(slot OPTION)
(slot della scheda P2 N. 5)
Pulsanti del cursore
Pulsante SET
5 (I)
Visualizzazione del messaggio “SOFT:
NO VERSION”. Non indica alcun errore,
è solo la conseguenza del fatto che la
registrazione dei dati proxy comporta
l’omissione della versione.
04.AJ-YAX800G(I)13 05.4.5 9:40 AM ページ6
Menu PROXY
Menu PROXY
Voci
REC MEDIA
Intervallo di Regolazione
OFF
P2
P2&SD
Selezionare il supporto per la registrazione dei
dati proxy.
OFF:
Non vengono registrati dati proxy.
P2:
I dati proxy vengono registrati su scheda P2.
P2&SD:
I dati proxy vengono registrati sia sulla scheda
P2 che sulla scheda di memoria SD.
O Se si registra un promemoria vocale
durante la registrazione di dati proxy, il
promemoria vocale viene registrato sia sulla
scheda P2 che sulla scheda di memoria SD.
O Se si registra un promemoria vocale dopo
che la registrazione dei dati proxy è
terminata, il promemoria vocale viene
registrato solo sulla scheda P2.
TC SUPER
OFF
UPPER
LOWER
Specificare un’opzione per sovrimporre il time
code sul video registrato sotto forma di dati proxy.
OFF:
Il time code non viene sovrimpresso sul video
registrato.
UPPER:
Il time code viene sovrimpresso nell’area in
alto del video registrato.
LOWER:
Il time code viene sovrimpresso nell’area in
basso del video registrato.
REC RATE
192kbps
768kbps
1500 kbps
Specificare la velocità di registrazione per la
registrazione dei dati proxy.
INITIALIZE
———
Inizializza il menu PROXY e i dati di impostazione
della cam P2.
O Accertarsi
di
aver
eseguito
questa
inizializzazione la prima volta che si inserisce
una scheda P2 PROXY in una cam P2 che
supporta la registrazione proxy.
L’indicazione
nella colonna Intervallo di
Regolazione indica il valore iniziale.
6 (I)
ITALIANO
Impostazione del menu
1Inserire una scheda P2 PROXY nella
cam P2 e accendere il dispositivo.
2Premere il pulsante THUMBNAIL per
visualizzare la schermata delle icone
miniaturizzate.
3Premere il pulsante MENU BAR per
spostare il puntatore verso la barra
dei menu.
4Selezionare
OPERATION
5
DEVICE
SETUP
5
PROXY
utilizzando i pulsanti del cursore e il
pulsante SET.
5Selezionare le voci di menu e
specificare
i
valori
desiderati
utilizzando i pulsanti del cursore e il
pulsante SET.
04.AJ-YAX800G(I)13 05.4.5 9:40 AM ページ7
Menu PROXY (continua)
$ I dati proxy non vengono registrati
nelle seguenti modalità:
ORegistrazione digitale IEEE1394
OINTERVAL REC
OLOOP REC
$ Per visualizzare sul mirino della cam
P2 le informazioni catturate con la
registrazione
dei
dati
proxy,
selezionare “ON” come voce del
menu “PROXY REC” dalla schermata
<VF INDICATOR2> del menu alla
pagina VF sulla cam P2.
All’inizio della registrazione apparirà
l’indicazione “PROXY REC P2” o
quella “PROXY REC P2&SD”.
$ Se i dati proxy vengono registrati
sulla scheda P2 nel corso delle
riprese, il tempo di registrazione
potrebbe essere inferiore rispetto a
quello indicato dal manuale delle
istruzioni della scheda P2.
$ Durante l’impostazione del menu
PROXY, la cam P2 non può eseguire
alcuna operazione di registrazione.
7 (I)
Velocità di registrazione e segnali di
registrazione (Video e audio)
Velocità di
registrazione
192 kbps
768 kbps
1500 kbps
Video (QVGA)
Audio
NTSC (525i)
15 fotogrammi/sec
PAL (625i)
12,5 fotogrammi/sec
NTSC (525i)
30 fotogrammi/sec
PAL (625i)
25 fotogrammi/sec
NTSC (525i)
30 fotogrammi/sec
PAL (625i)
25 fotogrammi/sec
Mono
(Mix di CH1 e
CH2),
32 kbps/ch
Stereo
(CH1•CH2),
64 kbps/ch
Stereo
(CH1•CH2),
64 kbps/ch
La velocità di registrazione è riferita alla velocità dei
segnali video.
04.AJ-YAX800G(I)13 05.4.5 9:40 AM ページ8
Menu PROXY (continua)
Registrazione proxy in modalità 24P/24PA [disponibile solo per NTSC (525i)]
Se la modalità operativa della cam P2 è impostata su 24P (2:3) o 24PA (2:3:3:2)
per la registrazione proxy, la sequenza in 5 quadri apparirà nei seguenti modi a
seconda delle velocità di registrazione:
Velocità di registrazione: 768 kbps, 1500 kbps
24P (2:3)
Sequenza N.
0
1
2
3
4
Immagini del materiale originale 0 0 1 1 1 2 2 3 3 3
Immagini della registrazione proxy
0
1
1
2
3
3
4
O La sottolineatura indica le
immagini del secondo campo.
24PA (2:3:3:2)
Sequenza N.
0
1
2
Immagini del materiale originale 0 0 1 1 1 2 2 2 3 3
0
1
1
2
3
Velocità di registrazione: 192 kbps
Se la velocità di registrazione è di 192 kbps, la sequenza in 5 quadri non verrà
eseguita correttamente.
24P (2:3)
Sequenza N.
0
1
2
3
4
0
1
2
3
4
Immagini del materiale originale 0 0 1 1 1 2 2 3 3 3 4 4 5 5 5 6 6 7 7 7
Immagini della registrazione proxy
0
1
3
5
6
24PA (2:3:3:2)
Sequenza N.
0
1
2
3
4
0
1
2
3
4
Immagini del materiale originale 0 0 1 1 1 2 2 2 3 3 4 4 5 5 5 6 6 6 7 7
Immagini della registrazione proxy
0
1
3
5
6
8 (I)
ITALIANO
Immagini della registrazione proxy
04.AJ-YAX800G(I)13 05.4.5 9:40 AM ページ9
Registrazione su scheda di memoria SD
Per la registrazione dei dati proxy si
dovrebbero utilizzare schede SD da 256
MB, 512 MB o 1 GB con indicazione
“High Speed”.
Per maggiori informazioni andare alla
pagina:
http://panasonic.biz/sav/p2
Per la registrazione dei dati proxy,
formattare la scheda di memoria SD
utilizzando una cam P2.
OÈ possibile utilizzare anche schede di
memoria SD formattate con il PC
secondo lo standard SD.
OPer maggiori informazioni sull’utilizzo
delle schede di memoria SD, vedere
il manuale delle istruzioni della cam
P2.
Verifica di una scheda memoria SD
1Inserire la scheda di memoria SD
nella cam P2.
2Premere il pulsante THUMBNAIL per
visualizzare la schermata delle icone
miniaturizzate.
3Premere il pulsante MENU BAR per
spostare il puntatore verso la barra
dei menu.
4Selezionare
PROPERTY
5
DEVICES 5 SD CARD utilizzando i
pulsanti del cursore e il pulsante
SET.
9 (I)
OLo stato del formato viene indicato
tramite la voce “SD STANDARD”.
Se appare l’indicazione “NOT
SUPPORTED”, formattare la scheda
utilizzando la cam P2.
OControllare
lo
spazio
libero
disponibile per la registrazione dei
dati proxy con l’attuale impostazione
della velocità di registrazione,
selezionando la voce “PROXY REM”.
OControllare il numero dei clip
registrati nella scheda di memoria SD
selezionando la voce “NUMBER OF
CLIPS”.
Se il numero dei clip registrati è
superiore a 1.000, la registrazione
dei dati proxy non verrà eseguita
anche se sulla scheda di memoria
SD vi è sufficiente spazio disponibile.
OSe il materiale è stato registrato su
più schede P2, il numero dei clip
visualizzati nella schermata delle
icone miniaturizzate sarà diverso
rispetto al numero dei clip dei dati
proxy registrati sulla scheda di
memoria SD.
ONon è possibile aggiungere un segno
di ripresa ai clip sulla scheda di
memoria SD premendo il pulsante
SHOT MARK sulla cam P2.
OI dati proxy registrati sulla scheda di
memoria SD non verranno eliminati
se si eliminano i clip registrati sulla
scheda P2 tramite la schermata delle
icone miniaturizzate della cam P2.
04.AJ-YAX800G(I)13 05.4.5 9:40 AM ページ10
Registrazione su scheda di memoria SD (continua)
Formattazione di una scheda di
memoria SD
1Inserire una scheda di memoria SD
nella cam P2.
2Premere il pulsante THUMBNAIL per
visualizzare la schermata delle icone
miniaturizzate.
3Premere il pulsante MENU BAR per
spostare il puntatore verso la barra
dei menu.
4Selezionare
OPERATION
5
FORMAT 5 SD CARD 5 YES
utilizzando i pulsanti del cursore e il
pulsante SET.
Tempo di registrazione approssimativo
per la registrazione dei dati proxy
La formattazione della scheda
memoria SD viene completata.
Il tempo di registrazione effettivo dipende dalle
condizioni di registrazione (numero delle scene,
promemoria vocali e clip.)
RP-SDH512N1A
(512 MB)
Circa
278 minuti
Circa
71 minuti
Circa
39 minuti
RP-SDH512J1A
(512 MB)
Circa
237 minuti
Circa
69 minuti
Circa
38 minuti
RP-SDH0G1J1A
(1 GB)
Circa
536 minuti
Circa
139 minuti
Circa
77 minuti
RP-SDK0G1J1A
(1 GB)
Circa
536 minuti
Circa
139 minuti
Circa
77 minuti
<Nota>
Se la voce di menu “REC MEDIA” del menu PROXY viene impostata su “P2&SD”,
ma la registrazione dei dati proxy non viene eseguita sulla scheda di memoria SD,
appare il messaggio “SD CARD WRITE ERR” all’inizio della registrazione. Se ciò
dovesse avvenire controllare la scheda di memoria SD. Per maggiori informazioni,
vedere “Errori nella registrazione proxy” (pagina 11).
Controllo dei dati proxy
$ L’indicatore P viene visualizzato per
i clip dei materiali che incorporano
dati proxy.
$ I dati proxy vengono registrati sulla
scheda P2 e/o sulla scheda di
memoria SD come file audiovisivo e
file di metadati in tempo reale.
File audiovisivo:
xxxxxxxx.MP4
I dati sono conformi allo standard
ISO/IEC14496.
File di metadati in tempo reale:
xxxxxxxx.BIN
Per ogni fotogramma vengono
registrati il time code, i bit utente e
le informazioni UMID.
Controllare i dati proxy utilizzando il
visualizzatore P2.
Per
maggiori
informazioni
sul
visualizzatore P2, andare alla pagina:
http://panasonic.biz/sav/p2
10 ( I )
ITALIANO
di
Codice prodotto
Velocità di registrazione e
e capacità delle
tempo di registrazione
schede di
192
kbps
768 kbps 1500 kbps
memoria SD
RP-SDH256N1A Circa
Circa
Circa
(256 MB)
137 minuti 35 minuti
19 minuti
04.AJ-YAX800G(I)13 05.4.5 9:40 AM ページ11
Errori nella registrazione proxy
Se dovesse verificarsi un errore nel corso della registrazione di dati proxy,
consultare la tabella in basso per intraprendere l’azione appropriata:
Indicazione di errore
Mirino:
TURN POWER OFF
Finestra display:
E-30
Mirino:
REC WARNING
Finestra display:
00:00:00:11
Mirino:
EOM (SD)
Operazione e cause
Azione
La registrazione di dati proxy si interrompe. Spegnere e riaccendere la cam P2,
O La scheda P2 o la scheda P2 PROXY sono in modo da eseguire operazioni di
state rimosse nel corso della registrazione.
registrazione e riproduzione a scopo
di verifica.
Ripristinare i clip sulla scheda P2
La registrazione di dati proxy si interrompe. rimossa (vedere pagina 12).
O Durante la registrazione sulla scheda P2 si è O I dati proxy registrati sulla scheda
verificato un errore.
P2 vengono eliminati.
O I dati proxy registrati sulla scheda
di memoria SD non possono
essere ripristinati.
La registrazione dei dati proxy sulla scheda
di memoria SD si interrompe, ma la
registrazione sulla scheda P2 prosegue.
O Sulla scheda di memoria SD non è più
disponibile ulteriore spazio libero.
Inserire una nuova scheda di
memoria SD quando la registrazione
finisce.
O I dati proxy in fase di registrazione
sulla scheda di memoria SD
vengono eliminati.
Per ripristinare i dati proxy eliminati,
selezionare i clip sulla scheda P2 e
copiarli nella scheda di memoria SD
(vedere pagina 12).
Mirino:
SD CARD WRITE
ERR
La registrazione dei dati proxy sulla scheda
di memoria SD si interrompe, ma la
registrazione sulla scheda P2 prosegue.
Questo messaggio viene visualizzato quando la
voce di menu “REC MEDIA” del menu PROXY
è impostata su “P2&SD”, ma la registrazione dei
dati proxy non può essere eseguita sulla
scheda di memoria SD.
$ Il messaggio viene visualizzato all’inizio della
registrazione
O Non è stata inserita la scheda di memoria
SD.
O La scheda di memoria SD è stata
formattata in un formato non supportato.
O La scheda di memoria SD è protetta dalla
scrittura.
O La scheda di memoria SD contiene oltre
1.000 clip registrati.
Controllare lo stato della scheda di
memoria SD e inserire un’altra
scheda registrabile (vedere pagina
9).
$ Il messaggio viene visualizzato durante la
registrazione
O La scheda di memoria SD è stata rimossa
durante la registrazione.
O Durante la registrazione sulla scheda di
memoria SD si è verificato un errore.
Mirino:
PROXY CARD
ERROR
11 ( I )
La registrazione dei dati proxy si interrompe,
ma la registrazione sulla scheda P2
prosegue.
O Si è verificato un errore sulla scheda P2
PROXY.
O Si è verificato un errore nei segnali in
ingresso nella scheda P2 PROXY.
Non è possibile registrare i dati proxy
in modo corretto.
Spegnere e riaccendere la cam P2,
in modo da eseguire operazioni di
registrazione e riproduzione a scopo
di verifica.
04.AJ-YAX800G(I)13 05.4.5 9:40 AM ページ12
Errori nella registrazione proxy (continua)
Ripristino dei clip
1Premere il pulsante THUMBNAIL per
visualizzare la schermata delle icone
miniaturizzate.
2Posizionare il puntatore sopra i clip da
ripristinare utilizzando i pulsanti del
cursore e premere il pulsante SET.
3Premere il pulsante MENU BAR per
spostare il puntatore verso la barra dei
menu.
4Selezionare OPERATION 5 REPAIR
CLIP 5 YES utilizzando i pulsanti del
cursore e il pulsante SET.
ITALIANO
<Nota>
Quando i clip vengono ripristinati:
OI dati proxy registrati sulla scheda P2 vengono eliminati.
OI dati proxy registrati sulla scheda di memoria SD non possono essere
ripristinati.
Copia dei clip su una scheda di
memoria SD
1Premere il pulsante THUMBNAIL per
visualizzare la schermata delle icone
miniaturizzate.
2Posizionare il puntatore sopra i clip da
copiare utilizzando i pulsanti del
cursore e premere il pulsante SET.
3Premere il pulsante MENU BAR per
spostare il puntatore verso la barra dei
menu.
4Selezionare OPERATION 5 COPY 5
SD CARD 5 YES utilizzando i pulsanti
del cursore e il pulsante SET.
12 ( I )
04.AJ-YAX800G(I)13 05.4.5 9:40 AM ページ13
Dati tecnici
Voltaggio di ingresso:
CC 3,3 V ± 0,3 V
Assorbimento di corrente:
Massimo 1,5 W
Temperatura operativa:
da 0 C° a +40 C°
Umidità tollerata:
da 10 % a 85 % (senza condensa)
Temperatura nella custodia:
da –20 C° a +60 C°
Umidità nella custodia:
da 10 % a 85 % (senza condensa)
Massa:
circa 43 g
Dimensioni (LkAkP):
circa 54 mm k 5 mm k 85,6 mm
Interfaccia:
scheda PC standard
Formato file:
MP4 (standard ISO/IEC14496)
Formato di compressione video:
MPEG4 profilo semplice (4:2:0)
Formato di compressione audio:
AAC (Advanced Audio Coding)
Modalità di impostazione:
192 kbps
Video : QVGA, 15 fotogrammi/sec (525i), 12,5 fotogrammi/sec (625i)
Audio : Mono (mix di CH1 e CH2), 32 kbps/ch
768 kbps
Video : QVGA, 30 fotogrammi/sec (525i), 25 fotogrammi/sec (625i)
Audio : Stereo (CH1•CH2), 64 kbps/ch
1500 kbps
Video : QVGA, 30 fotogrammi/sec (525i), 25 fotogrammi/sec (625i)
Audio : Stereo (CH1•CH2), 64 kbps/ch
Dati tecnici soggetti a modifiche senza preavviso.
La massa e le dimensioni sono valori approssimativi.
13 ( I )
05.AJ-YAX800G(S)13 05.4.5 9:41 AM ページ1
• Para reducir el riesgo de incendios, sacudidas eléctricas, daños o mal
funcionamiento de su equipo, no lo desmonte ni lo modifique.
• Deje inmediatamente de utilizar la tarjeta si nota humo, olores o sonidos
extraños, o si en la tarjeta se vierte algún líquido.
Información de software para este producto
Aviso al cliente: Este producto incluye software bajo licencia de GNU General
Public License (GPL) y GNU Lesser General Public License (LGPL); los clientes
tienen derecho a descargar, modificar y redistribuir el código fuente de este
software.
Los detalles acerca de GPL y LGPL se encuentran en las secciones GPL y LGPL
de este manual. La descripción se encuentra en el original, escrito en inglés.
Para descargar el código fuente relevante, visite http://panasonic.biz/sav/.
Tenga en cuenta que no responderemos a ninguna cuestión que le pueda surgir
acerca del contenido relativo al código fuente que haya obtenido del sitio Web
anterior.
Índice
Precauciones en el manejo y en el
almacenamiento . . . . . . . . . . . . . . . . . 1
Verificación de las operaciones . . . . . 4
Características . . . . . . . . . . . . . . . . . . 2
Grabación en tarjetas de memoria SD . . 9
Composición del producto . . . . . . . . . 2
Verificación de los datos proxy . . . . 10
Cómo sacar la tarjeta de su caja . . . . 2
Fallos en la grabación proxy . . . . . . 11
Instalación de la tarjeta P2 PROXY . . 3
Especificaciones . . . . . . . . . . . . . . . 13
Precauciones en el manejo y en el almacenamiento
OPara reducir el riesgo de incendios, sacudidas eléctricas, daños o mal
funcionamiento de su equipo, no lo someta a choques, no lo incline, no lo haga
caer ni lo exponga a la humedad.
ODespués de quitar la tarjeta del equipo, póngale inmediatamente la tapa para
proteger sus terminales del polvo y de la suciedad.
Cuando se guarda la tarjeta o se transporta en cualquier lugar, póngala en su
caja de protección.
ONo deje la tarjeta donde pueda quedar expuesta a gases corrosivos.
ONo quite esta tarjeta desde un camascopio basado en tarjeta de memoria
durante la grabación proxy. No apague el camascopio basado en tarjeta de
memoria ni quite las baterías durante la grabación proxy.
Dichas acciones borrarán los datos proxy que se están grabando.
OPara conseguir asistencia en la instalación de esta tarjeta en camascopios
basados en tarjeta de memoria compatibles con la grabación proxy, consulte su
distribuidor o el proveedor de servicios designado a tal efecto.
1 (S)
ESPAÑOL
Menú PROXY . . . . . . . . . . . . . . . . . . 6
05.AJ-YAX800G(S)13 05.4.5 9:42 AM ページ2
Características
El AJ-YAX800G (“Tarjeta P2 PROXY”) es una tarjeta codificadora de video de tipo
tarjeta de PC (misma forma que una tarjeta P2).
Puede crear un archivo de datos comprimido a partir del material grabado con un
camascopio basado en tarjeta de memoria (“Cámara P2”), y guardar ese archivo
por separado respecto al material original.
Los archivos creados con esta función incluyen un archivo audiovisual que está
comprimido utilizando el formato MPEG4, y un archivo metadata de tiempo real
(código de tiempo, bits del usuario e información UMID). Éstos se pueden guardar
en tarjetas P2 o en tarjetas de memoria SD.
El material grabado con una cámara P2 se puede guardar como archivos de datos,
que tienen una capacidad inferior respecto al material original.
Composición del producto
OTarjeta P2 PROXY . . . . . . . . . . . .k1
OTapa . . . . . . . . . . . . . . . . . . . . . . .k1
OCaja . . . . . . . . . . . . . . . . . . . . . . .k1
Cómo sacar la tarjeta de su caja
1 Suelte el bloqueo en el área (a).
2 Abra la caja.
OMientras saca la tarjeta, mantenga
la caja en el sentido mostrado en
la figura para que la tarjeta no se
caiga en el suelo.
OPara evitar que la caja quede
dañada, no intente abrirla desde el
área de agarre (a).
3 Saque la tarjeta.
OPara sacar tan sólo la tarjeta,
deslícela en el sentido (b).
OPara sacar la tarjeta con la tapa,
mueva en el sentido (c) mientras al
mismo tiempo la pulsa en el
sentido de la tapa.
1
(a)
2
3
(c)
Tapa
2 (S)
(b)
05.AJ-YAX800G(S)13 05.4.5 9:42 AM ページ3
Instalación de la tarjeta P2 PROXY
Inserte una tarjeta P2 PROXY en la ranura OPTION de la cámara P2.
Note que la tarjeta tiene que insertarse en la ranura de tarjeta P2 No. 5 si en la
ranura OPTION ya hay instalada otra tarjeta.
Cómo insertar una tarjeta en la
ranura OPTION
1 Apague la cámara P2.
La cámara no reconocerá la tarjeta
P2 PROXY si ésta se inserta en la
cámara cuando está encendida.
2 Quite
los dos tornillos y levante la
tapa de la ranura OPTION.
4 Vuelva a colocar la tapa de la ranura
OPTION y apriete de nuevo los dos
tornillos.
Cómo quitar la tarjeta P2 PROXY de
la ranura OPTION
1Pulse el botón de expulsión
controle si el botón está apretado.
y
3 Controle
si el botón de expulsión
está apretado y luego inserte una
tarjeta P2 PROXY en la ranura.
Botón EJECT
Cómo insertar una tarjeta P2 PROXY
en la ranura de tarjeta P2
Asegúrese haber insertado la tarjeta P2
PROXY en la ranura No. 5 La
grabación de datos proxy no se llevará
a cabo si la tarjeta P2 PROXY está
insertada en una ranura distinta.
Para más información acerca de cómo
insertar las tarjetas, consulte el manual
de instrucciones de la cámara P2.
5
3 (S)
ESPAÑOL
2Pulse de nuevo el botón de
expulsión.
Esta operación suelta la tarjeta P2
PROXY. Quítela de la ranura.
05.AJ-YAX800G(S)13 05.4.5 9:42 AM ページ4
Verificación de las operaciones
Encienda la cámara P2 para comprobar
si la tarjeta P2 PROXY está
funcionando.
OCuando en la ranura OPTION se
inserta una tarjeta P2 PROXY y se
reconoce correctamente, la ventana
de visualización de la cámara P2
muestra “OP-SLOT”.
DF
W
La inicialización ha terminado.
10
h
minM
s
frm
20
F
30
F
40
OO
OP-SLOT
13
-dB
24
OCuando en la ranura para tarjetas P2
No. 5 se inserta una tarjeta P2
PROXY
y
se
reconoce
correctamente, el LED de acceso se
ilumina de color naranja.
LED de acceso
4 (S)
Inicialización de una tarjeta P2
PROXY
1Inserte una tarjeta P2 PROXY en la
cámara P2 y enciéndala.
2Pulse el botón THUMBNAIL para
visualizar la pantalla de las
miniaturas.
3Pulse el botón MENU BAR para
mover el puntero en la barra de
menús.
4Seleccione OPERATION 5 DEVICE
SETUP 5 PROXY 5 INITIALIZE 5
YES utilizando los botones CURSOR
y el botón SET.
0
VTCG
MEDIA E
BATT E
Cuando se utiliza una tarjeta P2
PROXY con una cámara P2 por
primera vez, hay que inicializar la
tarjeta desde el menú PROXY.
05.AJ-YAX800G(S)13 05.4.5 9:42 AM ページ5
Verificación de las operaciones (continuación)
Verificación en la pantalla de las
miniaturas
1Pulse el botón THUMBNAIL para
visualizar la pantalla de las
miniaturas.
2Pulse el botón MENU BAR para
mover el puntero en la barra de
menús.
3Pulse el botón CURSOR para mover
el puntero en “PROPERTY”, y pulse
el botón SET.
4Pulse el botón CURSOR para mover
el puntero en “DEVICES”, y pulse el
botón SET.
5Pulse el botón CURSOR para mover
el puntero en “PROXY”, y pulse el
botón SET.
Cuando la cámara está encendida
Después de la grabación de datos proxy
(ranura OPTION)
ESPAÑOL
Botón MENU BAR
Se visualiza el mensaje “SOFT: NO
VERSION”. Esto no indica un fallo, sino
que resulta del hecho de que con la
grabación de datos proxy se refleja la
versión.
Botón
THUMBNAIL
(Ranura de tarjeta P2 No. 5)
Botones CURSOR
Botón SET
5 (S)
05.AJ-YAX800G(S)13 05.4.5 9:42 AM ページ6
Menú PROXY
Ajuste del menú
1Inserte una tarjeta P2 PROXY en la
cámara P2 y luego enciéndala.
2Pulse el botón THUMBNAIL para
visualizar la pantalla de las
miniaturas.
3Pulse el botón MENU BAR para
mover el puntero en la barra de
menús.
4Seleccione OPERATION 5 DEVICE
SETUP 5 PROXY utilizando los
botones CURSOR y el botón SET.
5Seleccione los elementos del menú y
especifique los valores utilizando los
botones CURSOR y el botón SET.
Menú PROXY
Elementos
REC MEDIA
Rango ajustable
OFF
P2
P2&SD
Seleccione el medio para la grabación de datos
proxy.
OFF:
No hay grabados datos proxy.
P2:
Los datos proxy están grabados en la tarjeta P2.
P2&SD:
Los datos proxy están grabados tanto en la tarjeta
P2 como en la tarjeta de memoria SD.
O El memo de voz se graba tanto en la tarjeta P2
como en la tarjeta de memoria SD, si graba un
memo de voz durante la grabación de datos
proxy.
O Si graba un memo de voz después de que la
grabación de datos proxy ha acabado, el memo
de voz se graba tan sólo en la tarjeta P2.
TC SUPER
OFF
UPPER
LOWER
Especifique una opción para sobreponer la
visualización del código de tiempo en el video
grabado como datos proxy.
OFF:
La visualización del código de tiempo no está
sobrepuesta en el video grabado.
UPPER:
La visualización del código de tiempo está
sobrepuesta en la parte superior del video
grabado.
LOWER:
La visualización del código de tiempo está
sobrepuesta en la parte inferior del video grabado.
REC RATE
192kbps
768kbps
1500 kbps
Especifique la velocidad de grabación para la
grabación de datos proxy.
INITIALIZE
———
Inicializa el menú PROXY y los datos de ajuste en la
cámara P2.
O Asegúrese haber llevado a cabo esta inicialización
la primera vez que inserta una tarjeta P2 PROXY
en una cámara P2 compatible con la grabación
proxy.
en la columna del rango ajustable indica el
valor inicial.
6 (S)
05.AJ-YAX800G(S)13 05.4.5 9:42 AM ページ7
Menú PROXY (continuación)
$ Los datos proxy no se graban
durante la operación en los
siguientes modos:
OGrabación digital de IEEE1394
OINTERVAL REC
OLOOP REC
$ Para visualizar la información
capturada por medio de la grabación
de datos proxy en el visor de la
cámara P2, seleccione “ON” como
elemento de menú de “PROXY REC”
desde la pantalla <VF INDICATOR2>
de la página VF del menú de la
cámara P2.
Al principio de la grabación se
visualizará “PROXY REC P2” o
“PROXY REC P2&SD”.
Velocidad de grabación y señales de
grabación (Video y audio)
Velocidad de
grabación
192 kbps
768 kbps
1500 kbps
Video (QVGA)
Audio
NTSC (525i)
15 fotogramas/seg.
PAL (625i)
12,5 fotogramas/seg.
NTSC (525i)
30 fotogramas/seg.
PAL (625i)
25 fotogramas/seg.
NTSC (525i)
30 fotogramas/seg.
PAL (625i)
25 fotogramas/seg.
Monaural
(Mezcla
de
CH1 y CH2),
32 kbps/canal
Estereofónico
(CH1•CH2),
64 kbps/canal
Estereofónico
(CH1•CH2),
64 kbps/canal
La velocidad de grabación se refiere a la velocidad
de grabación de las señales de video.
ESPAÑOL
$ Si los datos proxy se graban en la
tarjeta P2 durante la filmación del
material, el tiempo de grabación
podría ser más corto que el tiempo
indicado
en
el
manual
de
instrucciones de la tarjeta P2.
$ Durante el ajuste del menú PROXY,
la cámara P2 no puede llevar a cabo
ninguna operación de grabación.
7 (S)
05.AJ-YAX800G(S)13 05.4.5 9:42 AM ページ8
Menú PROXY (continuación)
Grabación proxy en el modo 24P/24PA [Aplicable tan sólo al NTSC (525i)]
Cuando el modo de funcionamiento de la cámara P2 está fijado en 24P (2:3) o
24PA (2:3:3:2) para la grabación proxy, la secuencia de 5 fotogramas será como
sigue, dependiendo de la velocidad de grabación:
Velocidad de grabación: 768 kbps, 1500 kbps
24P (2:3)
Secuencia No.
0
1
2
3
4
Imágenes de material original 0 0 1 1 1 2 2 3 3 3
Imágenes de grabación proxy
0
1
1
2
3
3
4
O El subrayado indica las imágenes
del segundo campo.
24PA (2:3:3:2)
Secuencia No.
0
1
2
Imágenes de material original 0 0 1 1 1 2 2 2 3 3
Imágenes de grabación proxy
0
1
1
2
3
Velocidad de grabación: 192 kbps
Si la velocidad de grabación es 192 kbps, la frecuencia de 5 fotogramas no se
llevará a cabo correctamente.
24P (2:3)
Secuencia No.
0
1
2
3
4
0
1
2
3
4
Imágenes de material original 0 0 1 1 1 2 2 3 3 3 4 4 5 5 5 6 6 7 7 7
Imágenes de grabación proxy
0
1
3
5
6
24PA (2:3:3:2)
Secuencia No.
0
1
2
3
4
0
1
2
3
4
Imágenes de material original 0 0 1 1 1 2 2 2 3 3 4 4 5 5 5 6 6 6 7 7
Imágenes de grabación proxy
8 (S)
0
1
3
5
6
05.AJ-YAX800G(S)13 05.4.5 9:42 AM ページ9
Para la grabación de datos proxy, hay
que utilizar tarjetas de memoria SD de
256 MB, de 512 MB o de 1 GB con la
indicación “High Speed”.
Para más información, visite el sitio:
http://panasonic.biz/sav/p2
Para la grabación de datos proxy,
formatee la tarjeta de memoria SD
utilizando una cámara P2.
OTambién pueden utilizarse tarjetas de
memoria SD formateadas en un PC
bajo el estándar SD.
OPara más información acerca de
cómo manejar las tarjetas de
memoria SD, consulte el manual de
instrucciones de la cámara P2.
Verificación de una tarjeta de
memoria SD
1Inserte una tarjeta de memoria SD en
la cámara P2.
2Pulse el botón THUMBNAIL para
visualizar la pantalla de las
miniaturas.
3Pulse el botón MENU BAR para
mover el puntero en la barra de
menús.
4Seleccione PROPERTY 5 DEVICES
5 SD CARD, utilizando los botones
CURSOR y el botón SET.
OEl estado del formato se visualiza
bajo el elemento “SD STANDARD”.
Si se visualiza “NOT SUPPORTED”,
formatee la tarjeta utilizando la
cámara P2.
OCompruebe el espacio libre restante
para la grabación de datos proxy
bajo el actual ajuste de la velocidad
de grabación, seleccionando el
elemento “PROXY REM”.
OCompruebe el número de clips
grabados en la tarjeta de memoria
SD seleccionando el elemento
“NUMBER OF CLIPS”.
Si el número de clips grabados es
superior a 1000, la grabación de
datos proxy no se llevará a cabo,
incluso si la tarjeta de memoria SD
aún tiene espacio libre.
OSi el material se ha grabado a través
de tarjetas P2 múltiples, el número
de clips visualizados en la pantalla
de las miniaturas será distinto del
número de clips de datos proxy
grabados en la tarjeta de memoria
SD.
OLa marca de toma no se puede
añadir en los clips contenidos en la
tarjeta de memoria SD pulsando el
botón SHOT MARK en la cámara P2.
OLos datos proxy grabados en la
tarjeta de memoria SD no se
borrarán con el borrado de los clips
grabados en la tarjeta P2 desde la
pantalla de las miniaturas de la
cámara P2.
9 (S)
ESPAÑOL
Grabación en tarjetas de memoria SD
05.AJ-YAX800G(S)13 05.4.5 9:42 AM ページ10
Grabación en tarjetas de memoria SD (continuación)
Formateo de una tarjeta de memoria
SD
1Inserte una tarjeta de memoria SD en
la cámara P2.
2Pulse el botón THUMBNAIL para
visualizar la pantalla de las
miniaturas.
3Pulse el botón MENU BAR para
mover el puntero en la barra de
menús.
4Seleccione
OPERATION
5
FORMAT 5 SD CARD 5 YES,
utilizando los botones CURSOR y el
botón SET.
Tiempo de grabación aproximado
para la grabación de datos proxy
Esto completa el formateo de la tarjeta
de memoria SD.
El tiempo de grabación real depende de las
condiciones de grabación (número de escenas,
memos de voz y clips.)
Pieza No. y
Velocidad de grabación y
capacidad de
tiempo de grabación
las tarjetas de
192
kbps
768 kbps 1500 kbps
memoria SD
RP-SDH256N1A Aproximadamente Aproximadamente Aproximadamente
(256 MB)
137 minutos 35 minutos 19 minutos
RP-SDH512N1A
(512 MB)
Aproximadamente Aproximadamente Aproximadamente
278 minutos 71 minutos 39 minutos
RP-SDH512J1A
(512 MB)
Aproximadamente Aproximadamente Aproximadamente
237 minutos 69 minutos 38 minutos
RP-SDH0G1J1A
(1 GB)
Aproximadamente Aproximadamente Aproximadamente
536 minutos 139 minutos 77 minutos
RP-SDK0G1J1A
(1 GB)
Aproximadamente Aproximadamente Aproximadamente
536 minutos 139 minutos 77 minutos
<Nota>
Si el elemento de menú “REC MEDIA” en el menú PROXY está puesto en
“P2&SD”, pero en la tarjeta de memoria SD no se lleva a cabo la grabación de
datos proxy, al principio de la grabación se visualiza el mensaje “SD CARD WRITE
ERR”. En este caso, compruebe la tarjeta de memoria SD. Para más información,
consulte “Fallos en la grabación proxy” (página 11).
Verificación de los datos proxy
$ El indicador P se visualiza para los
clips de material que incluyen datos
proxy.
$ Los datos proxy se graban en una
tarjeta P2 y/o en una tarjeta de
memoria
SD
como
archivo
audiovisual y archivo metadata en
tiempo real.
Archivo audiovisual:
xxxxxxxx.MP4
Los datos están conformes con el
estándar ISO/IEC14496.
10 (S)
Archivo metadata en tiempo real:
xxxxxxxx.BIN
Para cada fotograma se graban el
código de tiempo, los bits del
usuario y la información UMID.
Compruebe
los
datos
proxy
utilizando P2 Viewer.
Para más información acerca de P2
Viewer, visite el sitio:
http://panasonic.biz/sav/p2
05.AJ-YAX800G(S)13 05.4.5 9:42 AM ページ11
Fallos en la grabación proxy
Si se produce un fallo durante la grabación de datos proxy, consulte lo siguiente
para llevar a cabo la acción más apropiada:
Visualización fallo
Operación y causas
Acción
La grabación de datos proxy se detiene.
Apague la cámara P2 y luego
Visor:
O La tarjeta P2 o la tarjeta P2 PROXY se ha vuélvala a encender para llevar a
TURN POWER OFF
removido durante la grabación.
cabo las operaciones de grabación y
Ventana de visualización:
de reproducción con el objetivo de
E-30
comprobar el resultado.
La grabación de datos proxy se detiene.
Restaure los clips en la tarjeta P2
Visor:
O Se ha producido un fallo durante la removida (véase página 12).
REC WARNING
grabación en la tarjeta P2.
O Los datos proxy grabados en la
Ventana de visualización:
tarjeta P2 se borran.
00:00:00:11
O Los datos proxy grabados en la
tarjeta de memoria SD no pueden
restaurarse.
Visor:
EOM (SD)
La grabación de datos proxy en la tarjeta de
memoria SD se detiene, pero la grabación en
la tarjeta P2 continua.
O No queda más espacio libre en la tarjeta de
memoria SD.
Inserte una nueva tarjeta de
memoria SD después de que la
grabación ha acabado.
O Los datos proxy que se están
grabando en la tarjeta de
memoria SD se borran.
Visor:
SD CARD WRITE
ERR
La grabación de datos proxy en la tarjeta de Compruebe el estado de la tarjeta de
memoria SD se detiene, pero la grabación en memoria SD e inserte otra tarjeta
la tarjeta P2 continua.
grabable (véase página 9).
Este mensaje se visualiza cuando el elemento
de menú “REC MEDIA” en el menú PROXY
está fijado en “P2&SD”, pero la grabación de
datos proxy no se puede llevar a cabo en la
tarjeta de memoria SD.
$ El mensaje se visualiza al principio de la
grabación
O No hay insertada ninguna tarjeta de
memoria SD.
O La tarjeta de memoria SD ha sido
formateada en un formato no compatible.
O La tarjeta de memoria SD está protegida
contra la escritura.
O La tarjeta de memoria SD contiene más
de 1000 clips grabados.
$ El mensaje se visualiza durante la grabación
O La tarjeta de memoria SD se ha removido
durante la grabación.
O Se ha producido un error durante la
grabación en la tarjeta de memoria SD.
Visor:
PROXY CARD
ERROR
La grabación de datos proxy se detiene,
pero la grabación en la tarjeta P2 continua.
O Se ha producido un fallo en la tarjeta P2
PROXY.
O Error en las señales de entrada en la tarjeta
P2 PROXY.
Los datos proxy no pueden grabarse
correctamente.
Apague la cámara P2 y luego
vuélvala a encender para llevar a
cabo las operaciones de grabación y
de reproducción con el objetivo de
comprobar el resultado.
11 (S)
ESPAÑOL
Para restaurar los datos proxy
borrados, seleccione los clips en la
tarjeta P2 y cópielos en la tarjeta de
memoria SD (véase página 12).
05.AJ-YAX800G(S)13 05.4.5 9:42 AM ページ12
Fallos en la grabación proxy (continuación)
Cómo restaurar los clips
1Pulse el botón THUMBNAIL para
visualizar la pantalla de las miniaturas.
2Coloque el puntero encima de los clips
por restaurar utilizando los botones
CURSOR y pulse el botón SET.
3Pulse el botón MENU BAR para mover
el puntero en la barra de menús.
4Seleccione OPERATION 5 REPAIR
CLIP 5 YES, utilizando los botones
CURSOR y el botón SET.
<Nota>
Cuando los clips se han restaurado;
OLos datos proxy grabados en la tarjeta P2 se borran.
OLos datos proxy grabados en la tarjeta de memoria SD no pueden
restaurarse.
Copiado de clips en una tarjeta de
memoria SD
1Pulse el botón THUMBNAIL para
visualizar la pantalla de las miniaturas.
2Coloque el puntero encima de los clips
por copiar utilizando los botones
CURSOR y pulse el botón SET.
3Pulse el botón MENU BAR para mover
el puntero en la barra de menús.
4Seleccione OPERATION 5 COPY 5
SD CARD 5 YES, utilizando los
botones CURSOR y el botón SET.
12 (S)
05.AJ-YAX800G(S)13 05.4.5 9:42 AM ページ13
Especificaciones
Voltaje de entrada:
DC 3,3 V ±0,3 V
Consumo de energía:
Máximo 1,5 W
Temperatura de funcionamiento:
De 0 °C a +40 °C
Humedad de funcionamiento:
Entre el 10 % y el 85 % (sin condensación)
Temperatura de almacenamiento:
De –20 °C a +60 °C
Humedad ambiental de almacenamiento:
Entre el 10 % y el 85 % (sin condensación)
Masa:
aprox. 43 g
Dimensiones (AnkAlkProf):
aprox. 54 mm k 5 mm k 85,6 mm
ESPAÑOL
Interfaz:
Tarjeta para PC estándar
Formato de archivo:
MP4 (estándar ISO/IEC14496)
Formato de compresión de video:
Perfil sencillo de MPEG4 (4:2:0)
Formato de compresión de audio:
AAC (Advanced Audio Coding)
Modo de ajuste:
192 kbps
Video : QVGA, 15 fotogramas/seg. (525i), 12,5 fotogramas/seg. (625i)
Audio : Monaural (mezcla de CH1 y CH2), 32 kbps/canal
768 kbps
Video : QVGA, 30 fotogramas/seg. (525i), 25 fotogramas/seg. (625i)
Audio : Estereofónico (CH1•CH2), 64 kbps/canal
1500 kbps
Video : QVGA, 30 fotogramas/seg. (525i), 25 fotogramas/seg. (625i)
Audio : Estereofónico (CH1•CH2), 64 kbps/canal
Las especificaciones están sujetas a cambios sin previo aviso.
La masa y las dimensiones indicados son aproximados.
13 (S)
O 为避免火灾、电击以及设备的损害或故障,不要分解和改装本机。
O 如果发现冒烟、闻到强烈的气味或听到声音时,或者如果液体进入卡内时,请立
即停止使用该卡。
本产品相关软件信息
顾客公告:本产品中包括基于 GNU General Public License (GPL) 和 GNU Lesser
General Public License (LGPL) 授权的软件,顾客有权获得、变更和再次发布这些软
件的源代码。
可以在本说明书的 GPL/LGPL 部中找到关于 GPL/LGPL 的详细资料。其内容以原文
(英文)记载。
另外,请浏览下述网站以获得源代码。
http://panasonic.biz/sav/
恕不答复有关顾客从上述网站所获得的源代码内容的咨询。
目录表
操作和保存时的注意事项 . . . . . . . . . . 1
代理服务器菜单 . . . . . . . . . . . . . . . . . 6
特点 . . . . . . . . . . . . . . . . . . . . . . . . . . 2
在 SD 存储卡上记录 . . . . . . . . . . . . . . 9
产品的构成 . . . . . . . . . . . . . . . . . . . . . 2
确认代理服务器数据 . . . . . . . . . . . . . 10
如何从盒中取出卡 . . . . . . . . . . . . . . . 2
代理服务器记录时的错误 . . . . . . . . . 11
安装 P2 代理服务器卡 . . . . . . . . . . . . . 3
规格 . . . . . . . . . . . . . . . . . . . . . . . . . 13
确认操作 . . . . . . . . . . . . . . . . . . . . . . . 4
操作和保存时的注意事项
O为避免火灾、电击以及设备的损害或故障,不要碰撞、弯曲、跌落或将其暴露在湿
气中。
O从设备中取出卡后,请立即盖上盖子以防止其端子进灰和弄脏。
存储或携带卡时,请将其保存在保护盒内。
O不要将卡放置在可能会接触到腐蚀性气体的地方。
O在代理服务器数据记录过程中,不要从广播级数字摄录一体机中取出卡。在代理服
务器数据记录过程中,不要关闭广播级数字摄录一体机的电源或者取出电池。
这样的动作将会删除正在记录的代理服务器数据。
O在将本卡安装到支持代理服务器记录的广播级数字摄录一体机中时,若需要帮助,
请咨询销售商店或指定的服务部门。
1 (C)
特点
AJ-YAX800G ("P2 代理服务器卡") 是一种 PC 卡型视频编码卡 (形状与 P2 卡相同)。
它可以将广播级数字摄录一体机 (“P2 摄录一体机”) 记录的素材生成一个压缩数据
文件,并可以将该文件与原始素材分别保存。
用本功能制作的文件包括一个用 MPEG4 格式压缩的视听文件和一个实时元数据文件
(时间码、用户比特和 UMID 信息)。这些文件可以存储在 P2 卡或 SD 存储卡上。
用 P2 摄录一体机记录的素材可以存储为数据文件,它会比原始资料的容量要小一些。
产品的构成
OP2 代理服务器卡 . . . . . . . . . . . . . .k1
O盒盖 . . . . . . . . . . . . . . . . . . . . . . .k1
O盒子 . . . . . . . . . . . . . . . . . . . . . . .k1
如何从盒中取出卡
1 松开区域 (a) 的卡锁。
2 打开盒子。
O取卡时,要按图中所示方向握住盒
子,这样卡就不会掉到地板或地面
上。
O若要避免盒子损坏,就不要试图握
着区域 (a) 来打开盒子。
3 取出卡。
O若只是取出卡,请朝 (b) 方向滑动
卡。
O若要用盒盖取出卡,请在朝盒盖方
向推动盖子的同时朝 (c) 方向向上
提起盖子。
1
(a)
2
中
3
文
(c)
盒盖
(b)
2 (C)
安装 P2 代理服务器卡
将 P2 代理服务器卡插入 P2 摄录一体机的选件插槽。
如果其他卡已经插入该选件插槽,则 P2 代理服务器卡应插在 5 号 P2 卡插槽中。
将卡插入选件插槽
1 关闭 P2 摄录一体机。
如果在电源打开时将 P2 代理服务器卡
插入摄像机,则该卡将不能被识别。
2 取下两个螺丝,取下选件插槽的盖子。
4 装上选件插槽盖,再次固定两个螺丝。
从选件插槽中取出 P2 代理服务器卡
1按下弹出按钮,确认按钮已经弹起。
2再次按下弹出按钮。
本操作将弹出 P2 代理服务器卡。从插
槽中将其取出。
3 确认按下弹出按钮,然后将 P2 代理服
务器卡插入槽中。
弹出按钮
将 P2 代理服务器卡插入 P2 卡插槽中
请务必将 P2 代理服务器卡插入 5 号插
槽。如果 P2 代理服务器卡插在别的插槽
中,则不能执行代理服务器数据记录。
有关插入卡的更多信息,请参阅 P2 摄录
一体机的操作手册。
5
3 (C)
确认操作
打开 P2 摄录一体机确认 P2 代理服务器卡
正在工作。
O当 P2 代理服务器卡插入到选件插槽并
被识别时,P2 摄录一体机的显示窗显
示出“OP-SLOT”
。
在 P2 摄录一体机上第一次使用 P2 代理
服务器卡时,需要从代理服务器菜单将
卡初始化。
初始化 P2 代理服务器卡
1将 P2 代理服务器卡插入 P2 摄录一体
机后打开电源。
2按下缩略图按钮显示缩略图画面。
3按下菜单栏按钮将指针移动到菜单栏。
4用光标按钮和 SET 按钮,选择“操作”
5“设备设置”5“低码率素材”5
“初始化”5“是”
。
这样初始化完成。
DF
W
0
VTCG
10
h
minM
MEDIA E
BATT E
s
frm
20
F
30
F
40
OO
OP-SLOT
13
-dB
24
O当 P2 代理服务器卡插入到 P2 卡的 5
号插槽并被识别时,访问 LED 呈橙色
闪烁。
访问 LED
中
文
4 (C)
确认操作 (继续)
在缩略图画面上确认
1按下缩略图按钮显示缩略图画面。
2按下菜单栏按钮将指针移动到菜单栏。
3按下光标按钮将指针移动到“属性”,
然后按下 SET 按钮。
4按下光标按钮将指针移动到“设备”,
然后按下 SET 按钮。
5按下光标按钮将指针移动到“低码率
素材”
,然后按下 SET 按钮。
显示出“软件版本:不能取得”的信息。
这并不表示出现了错误,而是代理服务
器数据记录版本所反映事实的结果。
电源打开时
菜单栏按钮
代理服务器数据记录后
(选件插槽)
缩略图按钮
光标按钮
SET 按钮
(5 号 P2 卡插槽)
5 (C)
代理服务器菜单
设置菜单
1将 P2 代理服务器卡插入 P2 摄录一体
机后打开电源。
2按下缩略图按钮显示缩略图画面。
3按下菜单栏按钮将指针移动到菜单栏。
4用光标按钮和 SET 按钮,选择“操作”
5“设备设置”5“低码率素材”
。
5用光标按钮和 SET 按钮,选择菜单项
目和指定值。
代理服务器菜单
项目
记录元数据
可调整的范围
OFF
P2
P2&SD
为代理服务器数据记录选择媒体。
OFF:
不记录代理服务器数据。
P2:
在 P2 卡上记录代理服务器数据
P2&SD:
同时在 P2 卡和 SD 存储卡上记录代理服务器数
据。
O 如果在代理服务器数据记录的时候记录语音
提示,语音提示会同时记录在 P2 卡和 SD 存
储卡上。
O 如果在代理服务器数据记录后记录语音提示,
语音提示仅记录在 P2 卡上。
TC 字符
OFF
上段
下段
指定一项,将时间码添加到记录的视频上,作为代
理服务器数据显示。
OFF:
在记录的视频上不添加时间码显示。
上段:
在记录视频的上部添加时间码显示。
下段:
在记录视频的下部添加时间码显示。
记录码率
192kbps
768kbps
1500 kbps
中
为代理服务器数据记录指定记录速率。
初始化
文
———
初始化代理服务器菜单并在 P2 摄录一体机中设置
数据。
O 请务必在首次将 P2 代理服务器卡插入支持代理
服务器记录的 P2 摄录一体机中时进行初始化。
可变范围的
为初始值。
6 (C)
代理服务器菜单 (继续)
$ 在下列模式下操作时,不能记录代理
服务器数据:
OIEEE1394 数字记录
OINTERVAL REC
OLOOP REC
记录速率和记录信号
(视频和音频)
记录速率
192 kbps
$ 若想在 P2 摄录一体机的寻像器上显示
用代理服务器数据记录拍摄的信息,
请从 P2 摄录一体机的 VF 菜单页的
<VF INDICATOR2> 画 面 中 将
“PROXY REC”菜单项选择为“ON”
。
在记录的开始“PROXY REC P2”和
“PROXY REC P2&SD”都不会显示。
$ 在素材拍摄的过程中,如果代理服务
器数据记录在 P2 卡上,则记录的时间
可能比 P2 卡操作手册上说明的时间
短。
$ 在代理服务器菜单设置过程中,P2 摄
录一体机不能进行任何记录操作。
7 (C)
768 kbps
1500 kbps
视频 (QVGA)
NTSC(525i)
15 帧/秒
PAL(625i)
12.5 帧/秒
NTSC(525i)
30 帧/秒
PAL(625i)
25 帧/秒
NTSC(525i)
30 帧/秒
PAL(625i)
25 帧/秒
音频
非立体声
(CH1 和 CH2 混
合),
每声道 32 kbps
立体声
(CH1•CH2),
每声道 64 kbps
立体声
(CH1•CH2),
每声道 64 kbps
记录速率表示对视频信号的记录速率。
代理服务器菜单 (继续)
24P/24PA 模式 [仅适用于 NTSC (525i)] 下的代理服务器记录
当 P2 摄录一体机的操作模式被设置为 24P (2:3) 或 24PA (2:3:3:2) 进行代理服务器记
录时,根据记录的速率连续的 5 帧将如下显示:
记录速率: 768 kbps,1500 kbps
24P (2:3)
序号
0
1
2
3
4
原始素材的图像 0 0 1 1 1 2 2 3 3 3
代理服务器记录的图像
0
1
1
2
3
3
4
O 下划线表示第二区的图像。
24PA (2:3:3:2)
序号
0
1
2
原始素材的图像 0 0 1 1 1 2 2 2 3 3
代理服务器记录的图像
0
1
1
2
3
记录速率: 192 kbps
如果记录速率是 192 kbps,则不能正确记录连续的 5 帧。
24P (2:3)
序号
0
1
2
3
4
0
1
2
3
4
原始素材的图像 0 0 1 1 1 2 2 3 3 3 4 4 5 5 5 6 6 7 7 7
代理服务器记录的图像
0
1
3
5
6
24PA (2:3:3:2)
序号
0
1
2
3
4
0
1
2
3
4
原始素材的图像 0 0 1 1 1 2 2 2 3 3 4 4 5 5 5 6 6 6 7 7
代理服务器记录的图像
0
1
3
5
6
8 (C)
中
文
在 SD 存储卡上记录
对于代理服务器数据记录,可以使用带
有“高速”指示的 256 MB、512 MB 或 1
GB 的 SD 存储卡。
有关更多的信息,请浏览:
http://panasonic.biz/sav/p2
对于代理服务器数据记录,请用 P2 摄录
一体机格式化 SD 存储卡。
O也可以使用在 PC 上遵照 SD 标准格式
化的 SD 存储卡。
O有关操作 SD 存储卡的更多信息,请参
阅 P2 摄录一体机的操作手册。
确认 SD 存储卡
1将 SD 存储卡插入 P2 摄录一体机中。
2按下缩略图按钮显示缩略图画面。
3按下菜单栏按钮将指针移动到菜单栏。
4用光标按钮和 SET 按钮,选择“属性”
5“设备”5“SD 存储卡”
。
9 (C)
O在“SD 卡标准”项目下显示出格式化
状态。
如果显示“不支持”,请用 P2 摄录一
体机格式化该卡。
O通过选择“低码率记录时间”项,确
认在当前记录速率设置下用于代理服
务器数据记录的剩余容量。
O通过选择“低码率片段数量”项,确
认在 SD 存储卡上记录的场景片段数
量。
如果记录的场景片段数量超过 1000,
即使 SD 存储卡仍有剩余容量,代理服
务器数据记录也不能被记录。
O记录时,素材分布在多张 P2 卡的情况
下,缩略图画面上显示的场景片段数
量与 SD 存储卡上记录的代理服务器数
据的场景片段数量不同。
O不能通过按 P2 摄录一体机上的拍摄标
记按钮将拍摄标记添加到 SD 存储卡上
的场景片段中。
O记录在 SD 存储卡上的代理服务器数据
将不能按照记录在 P2 卡上的场景片段
的删除部分从 P2 摄录一体机的缩略图
画面上删除。
在 SD 存储卡上记录 (继续)
格式化 SD 存储卡
1将 SD 存储卡插入 P2 摄录一体机中。
2按下缩略图按钮显示缩略图画面。
3按下菜单栏按钮将指针移动到菜单栏。
4用光标按钮和 SET 按钮,选择“操作”
5 “格式化”5 “SD 存储卡”5
“是”
。
这样 SD 存储卡的格式化完成。
代理服务器数据记录的近似记录时间
商品号和 SD
存储卡的容量
记录速率和记录时间
192 kbps 768 kbps 1500 kbps
RP-SDH256N1A
(256 MB)
约 137 分钟 约 35 分钟
约 19 分钟
RP-SDH512N1A
(512 MB)
约 278 分钟 约 71 分钟
约 39 分钟
RP-SDH512J1A
(512 MB)
约 237 分钟 约 69 分钟
约 38 分钟
RP-SDH0G1J1A
(1 GB)
约 536 分钟 约 139 分钟 约 77 分钟
RP-SDK0G1J1A
(1 GB)
约 536 分钟 约 139 分钟 约 77 分钟
实际记录时间将视记录条件而定 (场景数量、语音提
示和片段。)
< 注意 >
如果代理服务器菜单的“记录元数据”菜单项被设置为“P2&SD”,而代理服务器数
据记录没有记录在 SD 存储卡上时,将在记录开始时显示“SD CARD WRITE ERR”
信息。如果出现该信息,请检查 SD 存储卡。有关更多的信息,请参阅“代理服务器
记录时的错误”(第 11 页)。
确认代理服务器数据
$ 与代理服务器数据相关联的素材片段
显示 P 指示。
用 P2 播放软件确认代理服务器数据。
有关 P2 播放软件的内容,请浏览:
http://panasonic.biz/sav/p2
$ 代理服务器数据记录在 P2 卡和/或 SD
存储卡上,作为视听文件和实时元数
据文件。
视听文件:
xxxxxxxx.MP4
数据符合 ISO/IEC14496 标准。
中
文
实时元数据文件:
xxxxxxxx.BIN
每一帧都记录有时间码、用户比特
和 UMID 信息。
10 (C)
代理服务器记录时的错误
如果在代理服务器数据记录过程中发生错误,请参阅下表进行适当处理:
显示的错误
寻像器:
TURN POWER OFF
显示窗:
E-30
寻像器:
REC WARNING
显示窗:
00:00:00:11
寻像器:
EOM (SD)
操作和原因
动作
停止代理服务器数据记录。
关闭 P2 摄录一体机,然后再次打开,
O 记录过程中取出 P2 卡或 P2 代理服务器卡。 为检查请进行记录和重放的操作。
修复取出的 P2 卡上的场景片段 (请
参阅第 12 页)。
O 记录在 P2 卡上的代理服务器数
停止代理服务器数据记录。
据被删除。
O 在 P2 卡上记录时出现错误。
O 记录在 SD 存储卡上的代理服务
器数据不能被修复。
停止 SD 存储卡上的代理服务器数据记录,但 记录结束后插入一张新的 SD 存储
P2 卡上的记录继续。
卡。
O SD 存储卡上没有剩余容量。
O 记录在 SD 存储卡上的代理服务
器数据被删除。
若想修复被删除的代理服务器数据,
在 P2 卡上选择场景片段,然后复制
到 SD 存储卡上 (请参阅第 12 页)。
寻像器:
SD CARD WRITE
ERR
停止 SD 存储卡上的代理服务器数据记录,但 确认 SD 存储卡的状态,然后插入
其他可记录的卡 (请参阅第 9 页)。
P2 卡上的记录继续。
当代理服务器菜单中的“记录元数据”菜单设
置为“P2&SD”时出现该信息,但是代理服
务器数据记录不能记录到 SD 存储卡上。
$ 在记录开始时出现信息
O 没有插入 SD 存储卡。
O SD 存储卡被格式化成不支持的格式。
O SD 存储卡被写保护。
O SD 存储卡上已记录的场景片段超过
1000 个。
$ 在记录过程中出现信息
O 记录时 SD 存储卡被取出。
O 在 SD 存储卡上记录时出现错误。
寻像器:
PROXY CARD
ERROR
停止代理服务器数据记录,但 P2 卡上的记录 不能正确记录代理服务器数据。
关闭 P2 摄录一体机,然后再次打开,
继续。
为检查请进行记录和重放的操作。
O 在 P2 代理服务器卡上出现错误。
O 在 P2 代理服务器卡的输入信号中出现错
误。
11 (C)
代理服务器记录时的错误 (继续)
修复场景片段
1按下缩略图按钮显示缩略图画面。
2用光标按钮确定要修复的场景片段上指
针的位置,然后按下 SET 按钮。
3按下菜单栏按钮将指针移动到菜单栏。
4用光标按钮和 SET 按钮,选择“操作”
5“修复场景片段”5“是”
。
< 注意 >
修复场景片段时
O记录在 P2 卡上的代理服务器数据被删除。
O记录在 SD 存储卡上的代理服务器数据不能被修复。
将片段复制到 SD 存储卡上
1按下缩略图按钮显示缩略图画面。
2用光标按钮确定要复制的场景片段上指
针的位置,然后按下 SET 按钮。
3按下菜单栏按钮将指针移动到菜单栏。
4用光标按钮和 SET 按钮,选择“操作”
5“复制”5“SD 存储卡”5“是”
。
中
文
12 (C)
规格
输入电压:
DC 3.3 V ± 0.3 V
消耗功率:
最大 1.5 W
工作温度:
0°C~+40°C
工作湿度:
10%~85% (无结露)
保管温度:
–20°C~+60°C
保管湿度:
10%~85% (无结露)
质量:
约 43 g
外观尺寸 (宽×高×深)
约 54 mm × 5 mm × 85.6 mm
接口:
标准 PC 卡
文件格式:
MP4 (ISO/IEC14496 标准)
视频压缩格式:
MPEG4 简单版 (4:2:0)
音频压缩格式:
AAC (Advanced Audio Coding)
设置模式:
192kbps
视频 : QVGA,15 帧/秒 (525i),12.5 帧/秒 (625i)
音频 : 非立体声 (CH1 和 CH2 混合),每声道 32 kbps
768kbps
视频 : QVGA,30 帧/秒 (525i),25 帧/秒 (625i)
音频 : 立体声 (CH1•CH2),每声道 64 kbps
1500kbps
视频 : QVGA,30 帧/秒(525i),25 帧/秒(625i)
音频 : 立体声 (CH1•CH2),每声道 64 kbps
规格如有修改,恕不另行通知。
所示的质量和尺寸为近似值。
13 (C)
07.AJ-YAX800G(J/GPL/表4)24 05.4.5 9:13 AM ページ1
保証書別添付
製造番号は、品質管理上重要なものです。
製品本体と保証書の製造番号をお確かめください。
本製品に関するソフトウェア情報
本製品には、GNU General Public License(GPL)ならびに、GNU Lesser
General Public License(LGPL)に基づきライセンスされるソフトウェアが含
まれており、お客様は、これらのソフトウェアのソースコードの入手・改変・再配
布の権利があることをお知らせいたします。
GPL と LGPL に関する詳細は、本書の GPL/LGPL 部でご覧いただけます。なお、
原文(英文)で記載しております。
また、ソースコードの入手については、下記のホームページをご覧ください。
http://panasonic.biz/sav/
なお、お客様が入手されたソースコードの内容等についてのお問い合わせは、ご遠
慮ください。
目 次
ご注意 . . . . . . . . . . . . . . . . . . . . . . 1
PROXY メニュー
安全上のご注意
...............2
SD メモリーカードへの記録 . . . . 10
特 長 . . . . . . . . . . . . . . . . . . . . . . 3
プロキシデータの確認 . . . . . . . . . 11
商品構成 . . . . . . . . . . . . . . . . . . . . .3
プロキシ記録のエラー . . . . . . . . . 12
専用ケースからの取り出しかた
...3
保証とアフターサービス . . . . . . . 14
P2 PROXY カードの取り付け
...4
定 格 . . . . . . . . . . . . . . . . . . . . . 15
動作の確認
.............7
..................5
ご注意
O 本製品を曲げたり、強い衝撃や振動を与えたり、水に濡らしたりしないでくださ
い。故障、誤動作の原因となります。
O 使用機器から取り出したときは、必ず専用キャップを取り付けて砂やほこりがコ
ネクタ部に付着しないようにしてください。
また、保管時や携帯時は、専用ケースに入れてください。
日
O 腐食性のガスなどが発生するところには置かないでください。
O プロキシデータの記録中は、本製品をメモリーカードカメラレコーダーから抜か 本
語
ないでください。また、プロキシデータの記録中は、メモリーカードカメラレコ
ーダーの電源を切ったり、バッテリーを外したりしないでください。
記録中のプロキシデータが消去されます。
O 本製品をプロキシ対応のメモリーカードカメラレコーダーに取り付ける場合は、
販売店または、販売店指定のサービス店にお問い合わせください。
1 (J)
07.AJ-YAX800G(J/GPL/表4)24 05.4.5 9:13 AM ページ2
安全上のご注意
必ずお守りください
お使いになる人や他の人への危害、財産への損害を未然に防止するため、
必ずお守りいただくことを、次のように説明しています。
■表示内容を無視して誤った使い方をしたときに生じる危害や損害の程度
を、次の表示で区分し、説明しています。
警告
この表示の欄は、「死亡または重傷などを負う可能性が想
定される」内容です。
■お守りいただく内容の種類を、次の絵表示で区分し、説明しています。
(下記は、絵表示の一例です。)
このような絵表示は、してはいけない「禁止」内容です。
このような絵表示は、必ず実行していただく「強制」内容
です。
警告
分解や改造をしない
分解禁止
火災、感電の恐れや使用機器を損傷することがあります。
点検や修理などは、サービスセンターへご依頼ください。
異常が発生したときは使用を中止する
(煙や異臭、異音が出たり、液体、異物などが内部に入った
ときや、破損したとき)
そのまま使用すると火災の原因になります。
使用機器の電源を切り、サービスセンターにご相談くださ
い。
2 (J)
07.AJ-YAX800G(J/GPL/表4)24 05.4.5 9:13 AM ページ3
特 長
AJ-YAX800G は、PC カード型(P2 カードと同じ形状)のビデオエンコーダー
カード(以下“P2 PROXY カード”と記載)です。
メモリーカードカメラレコーダー(以下“P2 カム”と記載)で撮影した素材を圧
縮データファイルにして、素材とは別の領域に記録する機能を持っています。
このファイルは、MPEG4 型式で圧縮した映像音声ファイルとリアルタイムメタデ
ータファイル(タイムコード・ユーザーズビット・ UMID 情報)で、P2 カードや
SD メモリーカードに記録します。
撮影した素材を、素材よりも容量の少ないデータファイルとして記録することがで
きます。
商品構成
O P2 PROXY カード . . . . . . . . . .k1
O キャップ . . . . . . . . . . . . . . . . . .k1
O ケース . . . . . . . . . . . . . . . . . . . .k1
専用ケースからの取り出しかた
1 (a)部のロックを外す
2 ケースを開ける
O カードの落下防止のため、作業中
のケースの保持方向は図のように
してください。
O ケースの損傷防止のため(a)部を持
って開けないでください。
3 カードを取り出す
O カードのみを取り出すときは、
(b)
方向にスライドさせます。
O キャップ付きで取り出すときは、
キャップ方向に押しながら(c)方向
に取り出します。
1
(a)
2
3
日
本
語
(c)
キャップ
(b)
3 (J)
07.AJ-YAX800G(J/GPL/表4)24 05.4.5 9:13 AM ページ4
P2 PROXY カードの取り付け
P2 PROXY カードは、P2 カムの OPTION スロットに挿入してください。
OPTION スロットに他のカードが挿入されているときは、P2 カードスロット 5
に挿入してください。
OPTION スロットに挿入する
1 P2 カムの電源を OFF にします。
電源が ON の状態で P2 PROXY カ
ードを挿入しても、認識されません。
2 ネジ 2 本を外し、OPTION スロット
のカバーを外します。
4 ネジ 2 本で OPTION スロットのカ
バーを取り付けます。
OPTION スロットから取り外す場合
1 イジェクトボタンを押して、イジェ
クトボタンが飛び出した状態にしま
す。
2 再度イジェクトボタンを押します。
P2 PROXY カードが出てきますの
で、取り外してください。
3 イジェクトボタンが押し込まれた状
態で P2 PROXY カードを挿入しま
す。
イジェクトボタン
P2 カードスロットに挿入する場合
P2 カードスロットに挿入するときは、
必ず 5 のスロットに挿入してくださ
い。他のスロットに挿入しても、プロ
キシデータの記録ができません。
挿入方法については、P2 カムの取扱説
明書を参照してください。
5
4 (J)
07.AJ-YAX800G(J/GPL/表4)24 05.4.5 9:13 AM ページ5
動作の確認
P2 カムの電源を ON にして、P2
PROXY カードの動作を確認します。
O P2 PROXY カードを OPTION スロ
ットに挿入した場合、P2 PROXY
カードを正常に認識すると、P2 カ
ムの表示窓に“OP-SLOT”が表示
されます。
DF
W
P2 PROXY カードを初めて P2 カ
ムで使用するときは、PROXY メニ
ューで初期化を行う必要があります。
初期化を行う
1 P2 PROXY カードを P2 カムに挿
入して、P2 カムの電源を ON にし
ます。
2 THUMBNAIL ボタンを押して、サム
ネール画面を表示します。
3 MENU BAR ボタンを押して、ポイ
ンターをメニューバーに移動します。
4カーソルボタンと SET ボタンで、
OPERATION 5 DEVICE SETUP
5 PROXY 5 INITIALIZE 5 YES
を選択します。
以上で初期化が完了します。
0
VTCG
10
h
minM
MEDIA E
BATT E
s
frm
20
F
30
F
40
OO
OP-SLOT
13
-dB
24
O P2 PROXY カードを P2 カードス
ロット 5 に挿入した場合、P2
PROXY カードを正常に認識すると、
アクセス LED がオレンジ色に点滅し
ます。
アクセス LED
日
本
語
5 (J)
07.AJ-YAX800G(J/GPL/表4)24 05.4.5 9:13 AM ページ6
動作の確認(つづき)
サムネール画面での確認
「SOFT: NO VERSION」が表示されま
1 THUMBNAIL ボタンを押して、サム
すが、異常ではありません。
ネール画面を表示します。
プロキシデータの記録が行われること
2 MENU BAR ボタンを押して、ポイ
で、バージョンが反映されて表示しま
ンターをメニューバーに移動します。 す。
3 カーソルボタンを押して、ポインタ
電源 ON 時
ーを PROPERTY に合わせ、SET ボ
タンを押します。
4 カーソルボタンを押して、ポインタ
ーを DEVICES に合わせ、SET ボタ
ンを押します。
5 カーソルボタンを押して、ポインタ
ーを PROXY に合わせ、SET ボタン
を押します。
MENU BAR ボタン
プロキシデータの記録後
(OPTION スロット)
THUMBNAIL
ボタン
カーソルボタン
SET ボタン
6 (J)
(P2 カードスロット 5)
07.AJ-YAX800G(J/GPL/表4)24 05.4.5 9:13 AM ページ7
PROXY メニュー
メニューの設定
1 P2 PROXY カードを P2 カムに挿
入して、P2 カムの電源を ON にし
ます。
2 THUMBNAIL ボタンを押して、サム
ネール画面を表示します。
3 MENU BAR ボタンを押して、ポイ
ンターをメニューバーに移動します。
4カーソルボタンと SET ボタンで、
OPERATION 5 DEVICE SETUP
5 PROXY を選択します。
5 カーソルボタンと SET ボタンで、メ
ニュー項目を選択して設定を行いま
す。
PROXY メニュー
項 目
REC MEDIA
可変範囲
OFF
P2
P2&SD
プロキシデータの記録を行うメディアを選
択します。
OFF:
プロキシデータの記録を行いません。
P2:
P2 カードにプロキシデータの記録を行
います。
P2&SD:
P2 カードと SD メモリーカードの両方
にプロキシデータの記録を行います。
O 記録中にボイスメモの記録を行うと、
P2 カードと SD メモリーカードの両
方にボイスメモが記録されます。
O 記録終了後にボイスメモの記録を行っ
た場合は、P2 カードだけにボイスメ
モが記録されます。
TC SUPER
OFF
UPPER
LOWER
プロキシデータの記録映像にタイムコード
の表示をスーパーインポーズする設定を行
います。
OFF:
タイムコードの表示を記録映像にスーパ
ーインポーズしません。
UPPER:
記録映像の上部にタイムコードの表示を
スーパーインポーズします。
LOWER:
記録映像の下部にタイムコードの表示を
スーパーインポーズします。
日
本
語
可変範囲の は初期値です。
7 (J)
07.AJ-YAX800G(J/GPL/表4)24 05.4.5 9:13 AM ページ8
PROXY メニュー(つづき)
記録レートと記録信号
(ビデオ・オーディオ)
項 目
REC RATE
可変範囲
192kbps
768kbps
1500 kbps
プロキシデータの記録レートを設定しま
す。
INITIALIZE
———
PROXY メニューの初期化、および P2 カ
ム内部の設定データを初期化します。
O プロキシ対応の P2 カムに、初めて P2
PROXY カードを挿入したときには、必
ず、この項目を実行してください。
可変範囲の は初期値です。
$ 下記のモードのときは、プロキシデ
ータの記録が行えません。
O IEEE1394 デジタル記録
O INTERVAL REC
O LOOP REC
$ P2 カムのビューファインダーにプ
ロキシデータの記録情報を表示する
場合は、P2 カムのメニュー VF ペー
ジの <VF INDICATOR2> 画面から
PROXY REC 項目を選択して ON に
します。
記録開始時に“PROXY REC P2”
または、“PROXY REC P2&SD”
が表示されます。
$ P2 カードにプロキシデータを記録
して素材を撮影する場合、P2 カー
ドの取扱説明書に記載されている記
録時間よりも短くなる場合がありま
す。
$ PROXY メニューの設定中は、全て
の記録操作を受け付けません。
8 (J)
記録レート
ビデオ(QVGA)
オーディオ
NTSC(525i)
モノラル(CH1
15 フレーム/秒
と CH2 のミッ
PAL(625i)
クス)、
12.5 フレーム/秒 32 kbps/ch
NTSC(525i)
ステレオ
30 フレーム/秒 (CH1• CH2)、
768 kbps
PAL(625i)
64 kbps/ch
25 フレーム/秒
NTSC(525i)
ステレオ
30 フレーム/秒 (CH1• CH2)、
1500 kbps
PAL(625i)
64 kbps/ch
25 フレーム/秒
192 kbps
記録レートは、ビデオ信号の記録レートを示して
います。
07.AJ-YAX800G(J/GPL/表4)24 05.4.5 9:13 AM ページ9
PROXY メニュー(つづき)
24P/24PA モードでのプロキシ記録 [NTSC (525i) のみ]
P2 カムの動作モードを 24P(2 : 3)や 24PA(2 : 3 : 3 : 2)に設定して
プロキシデータを記録した場合、記録レートにより 5 フレームのシーケンスは下記
のようになります。
記録レート: 768 kbps、1500 kbps
24P (2:3)
シーケンス No.
0
1
2
3
4
素材の映像 0 0 1 1 1 2 2 3 3 3
プロキシ記録の映像
0
1
1
2
3
3
4
O アンダーラインは、第 2 フィー
ルドの映像を示します。
24PA (2:3:3:2)
シーケンス No.
0
1
2
素材の映像 0 0 1 1 1 2 2 2 3 3
プロキシ記録の映像
0
1
1
2
3
記録レート: 192 kbps
記録レートが 192 kbps のときは、5 フレームのシーケンスが正しく形成されません。
24P (2:3)
シーケンス No.
0
1
2
3
4
0
1
2
3
4
素材の映像 0 0 1 1 1 2 2 3 3 3 4 4 5 5 5 6 6 7 7 7
プロキシ記録の映像
0
1
3
5
6
24PA (2:3:3:2)
シーケンス No.
0
1
2
3
4
0
1
2
3
4
素材の映像 0 0 1 1 1 2 2 2 3 3 4 4 5 5 5 6 6 6 7 7
プロキシ記録の映像
0
1
3
5
6
日
本
語
9 (J)
07.AJ-YAX800G(J/GPL/表4)24 05.4.5 9:13 AM ページ10
SD メモリーカードへの記録
プロキシデータの記録を行う SD メモ
リーカードには、「High Speed」など
と表示された 256 MB、512 MB、1 GB
の SD メモリーカードを使用してくだ
さい。
詳しくは、下記のホームページをご覧
ください。
http://panasonic.biz/sav/p2
プロキシデータの記録を SD メモリー
カードに行う場合、P2 カムでフォーマ
ットしてください。
O SD 規格に準拠したフォーマットを
パーソナルコンピューターなどで行
った SD メモリーカードも使用でき
ます。
O SD メモリーカードの取り扱いにつ
いては、P2 カムの取扱説明書を参
照してください。
SD メモリーカードを確認する
1 SD メモリーカードを P2 カムに挿入
します。
2 THUMBNAIL ボタンを押して、サム
ネール画面を表示します。
3 MENU BAR ボタンを押して、ポイ
ンターをメニューバーに移動します。
4カーソルボタンと SET ボタンで、
PROPERTY 5 DEVICES 5 SD
CARD を選択します。
10 (J)
O SD STANDARD の項目にフォーマ
ットの状態が表示されます。
NOT SUPPORTED が表示された場
合は、P2 カムでフォーマットして
ください。
O PROXY REM 項目で、現在設定し
ている記録レートにおけるプロキシ
データの記録残量時間を確認します。
O NUMBER OF CLIPS 項目で、SD
メモリーカードに記録されているク
リップ数を確認します。
クリップ数が 1000 以上になると、
容量が残っていても SD メモリーカ
ードにプロキシデータを記録するこ
とができません。
O 複数の P2 カードにまたがって素材
を記録した場合は、サムネール画面
に表示されるクリップ数と SD メモ
リーカードに記録されるプロキシデ
ータのクリップ数が異なります。
O SD メモリーカード内のクリップに
は、P2 カムのショットマークボタ
ンを押しても、ショットマークを付
けることができません。
O P2 カムのサムネール画面で、P2 カ
ードに記録されたクリップを削除し
ても、SD メモリーカードに記録さ
れたプロキシデータは削除されませ
ん。
07.AJ-YAX800G(J/GPL/表4)24 05.4.5 9:13 AM ページ11
SD メモリーカードへの記録(つづき)
フォーマットを行う
1 SD メモリーカードを P2 カムに挿入
します。
2 THUMBNAIL ボタンを押して、サム
ネール画面を表示します。
3 MENU BAR ボタンを押して、ポイ
ンターをメニューバーに移動します。
4カーソルボタンと SET ボタンで、
OPERATION 5 FORMAT 5 SD
CARD 5 YES を選択します。
以上で SD メモリーカードのフォーマ
ットが完了します。
プロキシデータ記録時間の目安
SD メモリー
記録レートと記録時間
カードの
品番と容量 192 kbps 768 kbps 1500 kbps
RP-SDH256N1A
約 137 分 約 35 分
(256 MB)
約 19 分
RP-SDH512N1A
約 278 分 約 71 分
(512 MB)
約 39 分
RP-SDH512J1A
約 237 分 約 69 分
(512 MB)
約 38 分
RP-SDH0G1J1A
約 536 分 約 139 分 約 77 分
(1 GB)
RP-SDK0G1J1A
約 536 分 約 139 分 約 77 分
(1 GB)
記録条件(シーン・ボイスメモ・クリップ数など)
により、記録時間が異なります。
< ノート >
PROXY メニューの REC MEDIA 項目が P2&SD に設定されているのに、SD メ
モリーカードにプロキシデータを記録できない場合は、記録開始時に“SD CARD
WRITE ERR”と表示されます。このときは、SD メモリーカードを確認してくだ
さい。詳しくは、「プロキシ記録のエラー」(12 ページ)を参照してください。
プロキシデータの確認
$ プロキシデータの記録を行った素材
のクリップには、 P のインジケータ
が表示されます。
$ プロキシデータは、映像音声ファイ
ルとリアルタイムメタデータファイ
ルとして、P2 カードや SD メモリー
カードに記録されます。
映像音声ファイル:
xxxxxxxx.MP4
ISO/IEC14496 規格に準拠した
データです。
リアルタイムメタデータファイル:
xxxxxxxx.BIN
フレーム単位にタイムコード、ユ
ーザーズビット、UMID 情報を記
録します。
プロキシデータは、P2 ビューアー
で確認してください。
P2 ビューアーに関する情報は、下
記のホームページをご覧ください。
http://panasonic.biz/sav/p2
11 (J)
日
本
語
07.AJ-YAX800G(J/GPL/表4)24 05.4.5 9:13 AM ページ12
プロキシ記録のエラー
プロキシデータの記録を行っているときにエラーが発生したときは、下記の内容を
確認して処理を行ってください。
エラー表示
動作と原因
ビューファインダー:
TURN POWER OFF
表示窓:
E-30
プロキシデータの記録を停止しま
す。
O記 録 中 に P 2 カ ー ド や P 2
PROXY カードが取り出された
ビューファインダー:
REC WARNING
表示窓:
00:00:00:11
処理
P2 カムの電源を OFF にし、再度電源
を ON にして記録再生を確認してくだ
さい。
取り出した P2 カードのクリップの修
復を行ってください。
(13 ページ参照)
プロキシデータの記録を停止しま O P2 カードに記録されたプロキシデ
ータは、削除されます。
す。
O P2 カードへの記録に異常が発生 O SD メモリーカードに記録されたプ
ロキシデータは、修復されません。
した
ビューファインダー:
EOM (SD)
SD メモリーカードへのプロキシデ 記録終了後に、新しい SD メモリーカ
ータ記録を停止しますが、P2 カー ードを挿入してください。
O SD メモリーカードに記録中のプロ
ドへの記録は継続します。
O SD メモリーカードの記録容量が
キシデータは、削除されます。
無い
削除されたプロキシデータを復元する
場合は、P2 カードのクリップを選択し
て SD メモリーカードにコピーしてく
ださい。(13 ページ参照)
ビューファインダー:
SD CARD WRITE
ERR
SD メモリーカードへのプロキシデ SD メモリーカードの状態を確認して、
ータ記録を停止しますが、P2 カー 記録可能なカードを挿入してください。
(10 ページ参照)
ドへの記録は継続します。
PROXY メニューの REC MEDIA
項目が P2&SD に設定されている
のに、SD メモリーカードにプロキ
シデータの記録ができないときに表
示します。
$ 記録開始時に表示する場合
O SD メモリーカードが挿入され
ていない
O SD メモリーカードのフォーマ
ットが違う
O SD メモリーカードがライトプ
ロテクトされている
O SD メモリーカードに 1000
以上のクリップが記録されて
いる
$ 記録中に表示する場合
O 記録中に SD メモリーカード
が取り出された
O SD メモリーカードへの記録に
異常が発生した
ビューファインダー:
PROXY CARD
ERROR
プロキシデータの記録を停止します
が、P2 カードへの素材の記録は継
続します。
O P2 PROXY カードに異常が発生
O P2 PROXY カードへの入力信号
の異常
12 (J)
プロキシデータが正しく記録されませ
ん。
P2 カムの電源を OFF にし、再度電源
を ON にして記録再生を確認してくだ
さい。
07.AJ-YAX800G(J/GPL/表4)24 05.4.5 9:13 AM ページ13
プロキシ記録のエラー(つづき)
クリップを修復する
1 THUMBNAIL ボタンを押して、サム
ネール画面を表示します。
2 カーソルボタンで、修復するクリップ
にポインターを移動して SET ボタンを
押します。
3 MENU BAR ボタンを押して、ポイン
ターをメニューバーに移動します。
4カ ー ソ ル ボ タ ン と S E T ボ タ ン で 、
OPERATION 5 REPAIR CLIP 5
YES を選択します。
< ノート >
クリップを修復すると、
O P2 カードに記録されたプロキシデータは、削除されます。
O SD メモリーカードに記録されたプロキシデータは、修復されません。
クリップを SD メモリーカードにコピー
する
1 THUMBNAIL ボタンを押して、サム
ネール画面を表示します。
2 カーソルボタンで、コピーするクリッ
プにポインターを移動して SET ボタン
を押します。
3 MENU BAR ボタンを押して、ポイン
ターをメニューバーに移動します。
4カ ー ソ ル ボ タ ン と S E T ボ タ ン で 、
OPERATION 5 COPY 5 SD
CARD 5 YES を選択します。
日
本
語
13 (J)
07.AJ-YAX800G(J/GPL/表4)24 05.4.5 9:13 AM ページ14
保証とアフターサービス
故障・修理・お取扱い
などのご相談は、まず、
お買い上げの販売店
へ、お申し付けください。
お買い上げの販売店がご不明の場合は、当社(裏表紙)までご連絡ください。
※内容により、お近くの窓口をご紹介させていただく場合がございますので、ご了
承ください。
■ 保証書(別添付)
お買い上げ日・販売店名などの記入
を必ずお確かめの上、お買い上げの
販売店からお受け取りください。
内容をよくお読みいただいた上、大
切に保存してください。
万一、保証期間内に故障が生じた場
合には、保証書記載内容に基づき、
「無料修理」させていただきます。
■ 補修用性能部品
当社では、オプションカードの補修
用性能部品を、製造打ち切り後、8
年間保有しています。
※補修用性能部品とは、その製品の
機能を維持するために必要な部品
です。
保証期間:
お買い上げ日から本体 1 年間
修理を依頼されるとき
この取扱説明書を再度ご確認の上、お
買い上げの販売店までご連絡ください。
◆保証期間中の修理は...
保証書の記載内容に従って、修理さ
せていただきます。詳しくは、保証
書をご覧ください。
◆保証期間経過後の修理は.
..
修理により、機能、性能の回復が可
能な場合は、ご希望により有料で修
理させていただきます。
14 (J)
ご連絡いただきたい内容
品 名
ビデオエンコーダーカード
品 番
AJ-YAX800G
製造番号
お買い上げ日
故障の状況
07.AJ-YAX800G(J/GPL/表4)24 05.4.5 9:13 AM ページ15
定 格
入力電圧:
DC 3.3 V ± 0.3 V
消費電力:
最大 1.5 W
動作温度:
0 ℃∼+ 40 ℃
動作湿度:
10 %∼ 85 %(結露がないこと)
保存温度:
− 20 ℃∼+ 60 ℃
保存湿度:
10 %∼ 85 %(結露がないこと)
質量:
約 43 g
外形寸法(幅×高さ×奥行):
約 54 mm × 5 mm × 85.6 mm
インターフェース:
PC カード規格
ファイルフォーマット:
MP4 (ISO/IEC14496 規格)
ビデオ圧縮フォーマット:
MPEG4 シンプルプロファイル(4 : 2 : 0)
オーディオ圧縮フォーマット:
AAC (Advanced Audio Coding)
設定モード:
192 kbps
ビデオ
:QVGA、15 フレーム/秒(525i)、12.5 フレーム/秒(625i)
オーディオ :モノラル(CH1 と CH2 のミックス)32 kbps/ch
768 kbps
ビデオ
:QVGA、30 フレーム/秒(525i)、25 フレーム/秒(625i)
オーディオ :ステレオ(CH1• CH2)64 kbps/ch
1500 kbps
ビデオ
:QVGA、30 フレーム/秒(525i)、25 フレーム/秒(625i)
日
オーディオ :ステレオ(CH1• CH2)64 kbps/ch
本
語
この仕様は、性能向上のため変更することがあります。
15 (J)
07.AJ-YAX800G(J/GPL/表4)24 05.4.5 9:13 AM ページi
GPL
$ GNU GENERAL PUBLIC LICENSE
Version 2, June 1991
Copyright (C) 1989, 1991 Free Software Foundation, Inc.
59 Temple Place - Suite 330, Boston, MA 02111-1307,
USA
Everyone is permitted to copy and distribute verbatim
copies of this license document, but changing it is not
allowed.
Preamble
The licenses for most software are designed to take away
your freedom to share and change it. By contrast, the GNU
General Public License is intended to guarantee your
freedom to share and change free software—to make sure
the software is free for all its users. This General Public
License applies to most of the Free Software Foundation’s
software and to any other program whose authors commit to
using it. (Some other Free Software Foundation software is
covered by the GNU Library General Public License
instead.) You can apply it to your programs, too.
When we speak of free software, we are referring to
freedom, not price. Our General Public Licenses are
designed to make sure that you have the freedom to
distribute copies of free software (and charge for this
service if you wish), that you receive source code or can get
it if you want it, that you can change the software or use
pieces of it in new free programs; and that you know you
can do these things.
To protect your rights, we need to make restrictions that
forbid anyone to deny you these rights or to ask you to
surrender the rights. These restrictions translate to certain
responsibilities for you if you distribute copies of the
software, or if you modify it.
TERMS AND CONDITIONS FOR COPYING,
DISTRIBUTION AND MODIFICATION
0. This License applies to any program or other work which
contains a notice placed by the copyright holder saying
it may be distributed under the terms of this General
Public License. The “Program”, below, refers to any
such program or work, and a “work based on the
Program” means either the Program or any derivative
work under copyright law: that is to say, a work
containing the Program or a portion of it, either verbatim
or with modifications and/or translated into another
language. (Hereinafter, translation is included without
limitation in the term “modification”.) Each licensee is
addressed as “you”.
Activities other than copying, distribution and
modification are not covered by this License; they are
outside its scope. The act of running the Program is not
restricted, and the output from the Program is covered
only if its contents constitute a work based on the
Program (independent of having been made by running
the Program). Whether that is true depends on what the
Program does.
1. You may copy and distribute verbatim copies of the
Program’s source code as you receive it, in any
medium, provided that you conspicuously and
appropriately publish on each copy an appropriate
copyright notice and disclaimer of warranty; keep intact
all the notices that refer to this License and to the
absence of any warranty; and give any other recipients
of the Program a copy of this License along with the
Program.
You may charge a fee for the physical act of transferring
a copy, and you may at your option offer warranty
protection in exchange for a fee.
For example, if you distribute copies of such a program,
whether gratis or for a fee, you must give the recipients all
the rights that you have. You must make sure that they, too,
receive or can get the source code. And you must show
them these terms so they know their rights.
2. You may modify your copy or copies of the Program or
any portion of it, thus forming a work based on the
Program, and copy and distribute such modifications or
work under the terms of Section 1 above, provided that
you also meet all of these conditions:
We protect your rights with two steps: (1) copyright the
software, and (2) offer you this license which gives you legal
permission to copy, distribute and/or modify the software.
a) You must cause the modified files to carry prominent
notices stating that you changed the files and the
date of any change.
Also, for each author’s protection and ours, we want to
make certain that everyone understands that there is no
warranty for this free software. If the software is modified by
someone else and passed on, we want its recipients to
know that what they have is not the original, so that any
problems introduced by others will not reflect on the original
authors’ reputations.
b) You must cause any work that you distribute or
publish, that in whole or in part contains or is derived
from the Program or any part thereof, to be licensed
as a whole at no charge to all third parties under the
terms of this License.
Finally, any free program is threatened constantly by
software patents. We wish to avoid the danger that
redistributors of a free program will individually obtain patent
licenses, in effect making the program proprietary. To
prevent this, we have made it clear that any patent must be
licensed for everyone’s free use or not licensed at all.
The precise terms and conditions for copying, distribution
and modification follow.
i
c) If the modified program normally reads commands
interactively when run, you must cause it, when
started running for such interactive use in the most
ordinary way, to print or display an announcement
including an appropriate copyright notice and a
notice that there is no warranty (or else, saying that
you provide a warranty) and that users may
redistribute the program under these conditions, and
telling the user how to view a copy of this License.
(Exception: if the Program itself is interactive but
does not normally print such an announcement, your
work based on the Program is not required to print an
announcement.)
07.AJ-YAX800G(J/GPL/表4)24 05.4.5 9:13 AM ページii
GPL (continued)
Thus, it is not the intent of this section to claim rights or
contest your rights to work written entirely by you;
rather, the intent is to exercise the right to control the
distribution of derivative or collective works based on the
Program.
In addition, mere aggregation of another work not based
on the Program with the Program (or with a work based
on the Program) on a volume of a storage or distribution
medium does not bring the other work under the scope
of this License.
3. You may copy and distribute the Program (or a work
based on it, under Section 2) in object code or
executable form under the terms of Sections 1 and 2
above provided that you also do one of the following:
a) Accompany it with the complete corresponding
machine-readable source code, which must be
distributed under the terms of Sections 1 and 2
above on a medium customarily used for software
interchange; or,
b) Accompany it with a written offer, valid for at least
three years, to give any third party, for a charge no
more than your cost of physically performing source
distribution, a complete machine-readable copy of
the corresponding source code, to be distributed
under the terms of Sections 1 and 2 above on a
medium customarily used for software interchange;
or,
4. You may not copy, modify, sublicense, or distribute the
Program except as expressly provided under this
License. Any attempt otherwise to copy, modify,
sublicense or distribute the Program is void, and will
automatically terminate your rights under this License.
However, parties who have received copies, or rights,
from you under this License will not have their licenses
terminated so long as such parties remain in full
compliance.
5. You are not required to accept this License, since you
have not signed it. However, nothing else grants you
permission to modify or distribute the Program or its
derivative works. These actions are prohibited by law if
you do not accept this License. Therefore, by modifying
or distributing the Program (or any work based on the
Program), you indicate your acceptance of this License
to do so, and all its terms and conditions for copying,
distributing or modifying the Program or works based on
it.
6. Each time you redistribute the Program (or any work
based on the Program), the recipient automatically
receives a license from the original licensor to copy,
distribute or modify the Program subject to these terms
and conditions. You may not impose any further
restrictions on the recipients’ exercise of the rights
granted herein. You are not responsible for enforcing
compliance by third parties to this License.
7. If, as a consequence of a court judgment or allegation of
patent infringement or for any other reason (not limited
to patent issues), conditions are imposed on you
(whether by court order, agreement or otherwise) that
contradict the conditions of this License, they do not
excuse you from the conditions of this License. If you
cannot distribute so as to satisfy simultaneously your
obligations under this License and any other pertinent
obligations, then as a consequence you may not
distribute the Program at all. For example, if a patent
license would not permit royalty-free redistribution of the
Program by all those who receive copies directly or
indirectly through you, then the only way you could
satisfy both it and this License would be to refrain
entirely from distribution of the Program.
c) Accompany it with the information you received as to
the offer to distribute corresponding source code.
(This alternative is allowed only for noncommercial
distribution and only if you received the program in
object code or executable form with such an offer, in
accord with Subsection b above.)
If any portion of this section is held invalid or
unenforceable under any particular circumstance, the
balance of the section is intended to apply and the
section as a whole is intended to apply in other
circumstances.
The source code for a work means the preferred form of
the work for making modifications to it. For an
executable work, complete source code means all the
source code for all modules it contains, plus any
associated interface definition files, plus the scripts used
to control compilation and installation of the executable.
However, as a special exception, the source code
distributed need not include anything that is normally
distributed (in either source or binary form) with the
major components (compiler, kernel, and so on) of the
operating system on which the executable runs, unless
that component itself accompanies the executable.
It is not the purpose of this section to induce you to
infringe any patents or other property right claims or to
contest validity of any such claims; this section has the
sole purpose of protecting the integrity of the free
software distribution system, which is implemented by
public license practices. Many people have made
generous contributions to the wide range of software
distributed through that system in reliance on consistent
application of that system; it is up to the author/donor to
decide if he or she is willing to distribute software
through any other system and a licensee cannot impose
that choice.
If distribution of executable or object code is made by
offering access to copy from a designated place, then
offering equivalent access to copy the source code from
the same place counts as distribution of the source
code, even though third parties are not compelled to
copy the source along with the object code.
This section is intended to make thoroughly clear what
is believed to be a consequence of the rest of this
License.
ii
GPL/LGPL
These requirements apply to the modified work as a
whole. If identifiable sections of that work are not
derived from the Program, and can be reasonably
considered independent and separate works in
themselves, then this License, and its terms, do not
apply to those sections when you distribute them as
separate works. But when you distribute the same
sections as part of a whole which is a work based on the
Program, the distribution of the whole must be on the
terms of this License, whose permissions for other
licensees extend to the entire whole, and thus to each
and every part regardless of who wrote it.
07.AJ-YAX800G(J/GPL/表4)24 05.4.5 9:13 AM ページiii
GPL (continued)
8. If the distribution and/or use of the Program is restricted
in certain countries either by patents or by copyrighted
interfaces, the original copyright holder who places the
Program under this License may add an explicit
geographical distribution limitation excluding those
countries, so that distribution is permitted only in or
among countries not thus excluded. In such case, this
License incorporates the limitation as if written in the
body of this License.
9. The Free Software Foundation may publish revised
and/or new versions of the General Public License from
time to time. Such new versions will be similar in spirit to
the present version, but may differ in detail to address
new problems or concerns.
Each version is given a distinguishing version number. If
the Program specifies a version number of this License
which applies to it and “any later version”, you have the
option of following the terms and conditions either of that
version or of any later version published by the Free
Software Foundation. If the Program does not specify a
version number of this License, you may choose any
version ever published by the Free Software
Foundation.
10. If you wish to incorporate parts of the Program into other
free programs whose distribution conditions are
different, write to the author to ask for permission. For
software which is copyrighted by the Free Software
Foundation, write to the Free Software Foundation; we
sometimes make exceptions for this. Our decision will
be guided by the two goals of preserving the free status
of all derivatives of our free software and of promoting
the sharing and reuse of software generally.
NO WARRANTY
11. BECAUSE THE PROGRAM IS LICENSED FREE OF
CHARGE, THERE IS NO WARRANTY FOR THE
PROGRAM, TO THE EXTENT PERMITTED BY
APPLICABLE LAW. EXCEPT WHEN OTHERWISE
STATED IN WRITING THE COPYRIGHT HOLDERS
AND/OR OTHER PARTIES PROVIDE THE PROGRAM
“AS IS” WITHOUT WARRANTY OF ANY KIND,
EITHER EXPRESSED OR IMPLIED, INCLUDING, BUT
NOT LIMITED TO, THE IMPLIED WARRANTIES OF
MERCHANTABILITY AND FITNESS FOR A
PARTICULAR PURPOSE. THE ENTIRE RISK AS TO
THE QUALITY AND PERFORMANCE OF THE
PROGRAM IS WITH YOU. SHOULD THE PROGRAM
PROVE DEFECTIVE, YOU ASSUME THE COST OF
ALL NECESSARY SERVICING, REPAIR OR
CORRECTION.
12. IN NO EVENT UNLESS REQUIRED BY APPLICABLE
LAW OR AGREED TO IN WRITING WILL ANY
COPYRIGHT HOLDER, OR ANY OTHER PARTY WHO
MAY MODIFY AND/OR REDISTRIBUTE THE
PROGRAM AS PERMITTED ABOVE, BE LIABLE TO
YOU FOR DAMAGES, INCLUDING ANY GENERAL,
SPECIAL, INCIDENTAL OR CONSEQUENTIAL
DAMAGES ARISING OUT OF THE USE OR INABILITY
TO USE THE PROGRAM (INCLUDING BUT NOT
LIMITED TO LOSS OF DATA OR DATA BEING
RENDERED INACCURATE OR LOSSES SUSTAINED
BY YOU OR THIRD PARTIES OR A FAILURE OF THE
PROGRAM TO OPERATE WITH ANY OTHER
PROGRAMS), EVEN IF SUCH HOLDER OR OTHER
PARTY HAS BEEN ADVISED OF THE POSSIBILITY
OF SUCH DAMAGES.
END OF TERMS AND CONDITIONS
iii
07.AJ-YAX800G(J/GPL/表4)24 05.4.5 9:13 AM ページiv
LGPL
Version 2.1, February 1999
Copyright (C) 1991, 1999 Free Software Foundation, Inc.
59 Temple Place, Suite 330, Boston, MA 02111-1307 USA
Everyone is permitted to copy and distribute verbatim
copies of this license document, but changing it is not
allowed.
[This is the first released version of the Lesser GPL. It also
counts as the successor of the GNU Library Public License,
version 2, hence the version number 2.1.]
Preamble
The licenses for most software are designed to take away
your freedom to share and change it. By contrast, the GNU
General Public Licenses are intended to guarantee your
freedom to share and change free software—to make sure
the software is free for all its users.
This license, the Lesser General Public License, applies to
some specially designated software packages—typically
libraries—of the Free Software Foundation and other
authors who decide to use it. You can use it too, but we
suggest you first think carefully about whether this license or
the ordinary General Public License is the better strategy to
use in any particular case, based on the explanations
below.
When we speak of free software, we are referring to
freedom of use, not price. Our General Public Licenses are
designed to make sure that you have the freedom to
distribute copies of free software (and charge for this
service if you wish); that you receive source code or can get
it if you want it; that you can change the software and use
pieces of it in new free programs; and that you are informed
that you can do these things.
To protect your rights, we need to make restrictions that
forbid distributors to deny you these rights or to ask you to
surrender these rights. These restrictions translate to certain
responsibilities for you if you distribute copies of the library
or if you modify it.
For example, if you distribute copies of the library, whether
gratis or for a fee, you must give the recipients all the rights
that we gave you. You must make sure that they, too,
receive or can get the source code. If you link other code
with the library, you must provide complete object files to
the recipients, so that they can relink them with the library
after making changes to the library and recompiling it. And
you must show them these terms so they know their rights.
We protect your rights with a two-step method: (1) we
copyright the library, and (2) we offer you this license, which
gives you legal permission to copy, distribute and/or modify
the library.
To protect each distributor, we want to make it very clear
that there is no warranty for the free library. Also, if the
library is modified by someone else and passed on, the
recipients should know that what they have is not the
original version, so that the original author’s reputation will
not be affected by problems that might be introduced by
others.
Finally, software patents pose a constant threat to the
existence of any free program. We wish to make sure that a
company cannot effectively restrict the users of a free
program by obtaining a restrictive license from a patent
holder. Therefore, we insist that any patent license obtained
for a version of the library must be consistent with the full
freedom of use specified in this license.
Most GNU software, including some libraries, is covered by
the ordinary GNU General Public License. This license, the
GNU Lesser General Public License, applies to certain
designated libraries, and is quite different from the ordinary
General Public License. We use this license for certain
libraries in order to permit linking those libraries into nonfree programs.
When a program is linked with a library, whether statically or
using a shared library, the combination of the two is legally
speaking a combined work, a derivative of the original
library. The ordinary General Public License therefore
permits such linking only if the entire combination fits its
criteria of freedom. The Lesser General Public License
permits more lax criteria for linking other code with the
library.
We call this license the “Lesser” General Public License
because it does Less to protect the user’s freedom than the
ordinary General Public License. It also provides other free
software developers Less of an advantage over competing
non-free programs. These disadvantages are the reason we
use the ordinary General Public License for many libraries.
However, the Lesser license provides advantages in certain
special circumstances.
For example, on rare occasions, there may be a special
need to encourage the widest possible use of a certain
library, so that it becomes a de-facto standard. To achieve
this, non-free programs must be allowed to use the library.
A more frequent case is that a free library does the same
job as widely used non-free libraries. In this case, there is
little to gain by limiting the free library to free software only,
so we use the Lesser General Public License.
In other cases, permission to use a particular library in nonfree programs enables a greater number of people to use a
large body of free software. For example, permission to use
the GNU C Library in non-free programs enables many
more people to use the whole GNU operating system, as
well as its variant, the GNU/Linux operating system.
Although the Lesser General Public License is Less
protective of the users’ freedom, it does ensure that the user
of a program that is linked with the Library has the freedom
and the wherewithal to run that program using a modified
version of the Library.
The precise terms and conditions for copying, distribution
and modification follow. Pay close attention to the difference
between a “work based on the library” and a “work that uses
the library”. The former contains code derived from the
library, whereas the latter must be combined with the library
in order to run.
GPL/LGPL
$ GNU LESSER GENERAL PUBLIC LICENSE
iv
07.AJ-YAX800G(J/GPL/表4)24 05.4.5 9:13 AM ページv
LGPL (continued)
TERMS AND CONDITIONS FOR COPYING,
DISTRIBUTION AND MODIFICATION
0. This License Agreement applies to any software library
or other program which contains a notice placed by the
copyright holder or other authorized party saying it may
be distributed under the terms of this Lesser General
Public License (also called “this License”). Each
licensee is addressed as “you”.
A “library” means a collection of software functions
and/or data prepared so as to be conveniently linked
with application programs (which use some of those
functions and data) to form executables.
The “Library”, below, refers to any such software library
or work which has been distributed under these terms. A
“work based on the Library” means either the Library or
any derivative work under copyright law: that is to say, a
work containing the Library or a portion of it, either
verbatim or with modifications and/or translated
straightforwardly into another language. (Hereinafter,
translation is included without limitation in the term
“modification”.)
“Source code” for a work means the preferred form of
the work for making modifications to it. For a library,
complete source code means all the source code for all
modules it contains, plus any associated interface
definition files, plus the scripts used to control
compilation and installation of the library.
Activities other than copying, distribution and
modification are not covered by this License; they are
outside its scope. The act of running a program using
the Library is not restricted, and output from such a
program is covered only if its contents constitute a work
based on the Library (independent of the use of the
Library in a tool for writing it). Whether that is true
depends on what the Library does and what the
program that uses the Library does.
1. You may copy and distribute verbatim copies of the
Library’s complete source code as you receive it, in any
medium, provided that you conspicuously and
appropriately publish on each copy an appropriate
copyright notice and disclaimer of warranty; keep intact
all the notices that refer to this License and to the
absence of any warranty; and distribute a copy of this
License along with the Library.
You may charge a fee for the physical act of transferring
a copy, and you may at your option offer warranty
protection in exchange for a fee.
2. You may modify your copy or copies of the Library or
any portion of it, thus forming a work based on the
Library, and copy and distribute such modifications or
work under the terms of Section 1 above, provided that
you also meet all of these conditions:
a) The modified work must itself be a software library.
b) You must cause the files modified to carry prominent
notices stating that you changed the files and the
date of any change.
c) You must cause the whole of the work to be licensed
at no charge to all third parties under the terms of
this License.
v
d) If a facility in the modified Library refers to a function
or a table of data to be supplied by an application
program that uses the facility, other than as an
argument passed when the facility is invoked, then
you must make a good faith effort to ensure that, in
the event an application does not supply such
function or table, the facility still operates, and
performs whatever part of its purpose remains
meaningful.
(For example, a function in a library to compute
square roots has a purpose that is entirely welldefined independent of the application. Therefore,
Subsection 2d requires that any application-supplied
function or table used by this function must be
optional: if the application does not supply it, the
square root function must still compute square roots.)
These requirements apply to the modified work as a
whole. If identifiable sections of that work are not
derived from the Library, and can be reasonably
considered independent and separate works in
themselves, then this License, and its terms, do not
apply to those sections when you distribute them as
separate works. But when you distribute the same
sections as part of a whole which is a work based on
the Library, the distribution of the whole must be on
the terms of this License, whose permissions for
other licensees extend to the entire whole, and thus
to each and every part regardless of who wrote it.
Thus, it is not the intent of this section to claim rights
or contest your rights to work written entirely by you;
rather, the intent is to exercise the right to control the
distribution of derivative or collective works based on
the Library.
In addition, mere aggregation of another work not
based on the Library with the Library (or with a work
based on the Library) on a volume of a storage or
distribution medium does not bring the other work
under the scope of this License.
3. You may opt to apply the terms of the ordinary GNU
General Public License instead of this License to a
given copy of the Library. To do this, you must alter all
the notices that refer to this License, so that they refer to
the ordinary GNU General Public License, version 2,
instead of to this License. (If a newer version than
version 2 of the ordinary GNU General Public License
has appeared, then you can specify that version instead
if you wish.) Do not make any other change in these
notices.
Once this change is made in a given copy, it is
irreversible for that copy, so the ordinary GNU General
Public License applies to all subsequent copies and
derivative works made from that copy.
This option is useful when you wish to copy part of the
code of the Library into a program that is not a library.
4. You may copy and distribute the Library (or a portion or
derivative of it, under Section 2) in object code or
executable form under the terms of Sections 1 and 2
above provided that you accompany it with the complete
corresponding machine-readable source code, which
must be distributed under the terms of Sections 1 and 2
above on a medium customarily used for software
interchange.
07.AJ-YAX800G(J/GPL/表4)24 05.4.5 9:13 AM ページvi
LGPL (continued)
5. A program that contains no derivative of any portion of
the Library, but is designed to work with the Library by
being compiled or linked with it, is called a “work that
uses the Library”. Such a work, in isolation, is not a
derivative work of the Library, and therefore falls outside
the scope of this License.
However, linking a “work that uses the Library” with the
Library creates an executable that is a derivative of the
Library (because it contains portions of the Library),
rather than a “work that uses the library”. The
executable is therefore covered by this License. Section
6 states terms for distribution of such executables.
When a “work that uses the Library” uses material from
a header file that is part of the Library, the object code
for the work may be a derivative work of the Library
even though the source code is not. Whether this is true
is especially significant if the work can be linked without
the Library, or if the work is itself a library. The threshold
for this to be true is not precisely defined by law.
in the Library will not necessarily be able to
recompile the application to use the modified
definitions.)
b) Use a suitable shared library mechanism for linking
with the Library. A suitable mechanism is one that (1)
uses at run time a copy of the library already present
on the user’s computer system, rather than copying
library functions into the executable, and (2) will
operate properly with a modified version of the
library, if the user installs one, as long as the
modified version is interface-compatible with the
version that the work was made with.
c) Accompany the work with a written offer, valid for at
least three years, to give the same user the materials
specified in Subsection 6a, above, for a charge no
more than the cost of performing this distribution.
d) If distribution of the work is made by offering access
to copy from a designated place, offer equivalent
access to copy the above specified materials from
the same place.
e) Verify that the user has already received a copy of
these materials or that you have already sent this
user a copy.
If such an object file uses only numerical parameters,
data structure layouts and accessors, and small macros
and small inline functions (ten lines or less in length),
then the use of the object file is unrestricted, regardless
of whether it is legally a derivative work. (Executables
containing this object code plus portions of the Library
will still fall under Section 6.)
For an executable, the required form of the “work that
uses the Library” must include any data and utility
programs needed for reproducing the executable from it.
However, as a special exception, the materials to be
distributed need not include anything that is normally
distributed (in either source or binary form) with the
major components (compiler, kernel, and so on) of the
operating system on which the executable runs, unless
that component itself accompanies the executable.
Otherwise, if the work is a derivative of the Library, you
may distribute the object code for the work under the
terms of Section 6. Any executables containing that
work also fall under Section 6, whether or not they are
linked directly with the Library itself.
It may happen that this requirement contradicts the
license restrictions of other proprietary libraries that do
not normally accompany the operating system. Such a
contradiction means you cannot use both them and the
Library together in an executable that you distribute.
6. As an exception to the Sections above, you may also
combine or link a “work that uses the Library” with the
Library to produce a work containing portions of the
Library, and distribute that work under terms of your
choice, provided that the terms permit modification of
the work for the customer’s own use and reverse
engineering for debugging such modifications.
7. You may place library facilities that are a work based on
the Library side-by-side in a single library together with
other library facilities not covered by this License, and
distribute such a combined library, provided that the
separate distribution of the work based on the Library
and of the other library facilities is otherwise permitted,
and provided that you do these two things:
You must give prominent notice with each copy of the
work that the Library is used in it and that the Library
and its use are covered by this License. You must
supply a copy of this License. If the work during
execution displays copyright notices, you must include
the copyright notice for the Library among them, as well
as a reference directing the user to the copy of this
License. Also, you must do one of these things:
a) Accompany the combined library with a copy of the
same work based on the Library, uncombined with
any other library facilities. This must be distributed
under the terms of the Sections above.
a) Accompany the work with the complete
corresponding machine-readable source code for the
Library including whatever changes were used in the
work (which must be distributed under Sections 1
and 2 above); and, if the work is an executable linked
with the Library, with the complete machine-readable
“work that uses the Library”, as object code and/or
source code, so that the user can modify the Library
and then relink to produce a modified executable
containing the modified Library. (It is understood that
the user who changes the contents of definitions files
b) Give prominent notice with the combined library of
the fact that part of it is a work based on the Library,
and explaining where to find the accompanying
uncombined form of the same work.
8. You may not copy, modify, sublicense, link with, or
distribute the Library except as expressly provided
under this License. Any attempt otherwise to copy,
modify, sublicense, link with, or distribute the Library is
void, and will automatically terminate your rights under
this License. However, parties who have received
copies, or rights, from you under this License will not
have their licenses terminated so long as such parties
remain in full compliance.
vi
GPL/LGPL
If distribution of object code is made by offering access
to copy from a designated place, then offering
equivalent access to copy the source code from the
same place satisfies the requirement to distribute the
source code, even though third parties are not
compelled to copy the source along with the object
code.
07.AJ-YAX800G(J/GPL/表4)24 05.4.5 9:13 AM ページvii
LGPL (continued)
9. You are not required to accept this License, since you
have not signed it. However, nothing else grants you
permission to modify or distribute the Library or its
derivative works. These actions are prohibited by law if
you do not accept this License. Therefore, by modifying
or distributing the Library (or any work based on the
Library), you indicate your acceptance of this License to
do so, and all its terms and conditions for copying,
distributing or modifying the Library or works based on
it.
10. Each time you redistribute the Library (or any work
based on the Library), the recipient automatically
receives a license from the original licensor to copy,
distribute, link with or modify the Library subject to these
terms and conditions. You may not impose any further
restrictions on the recipients’ exercise of the rights
granted herein. You are not responsible for enforcing
compliance by third parties with this License.
11. If, as a consequence of a court judgment or allegation of
patent infringement or for any other reason (not limited
to patent issues), conditions are imposed on you
(whether by court order, agreement or otherwise) that
contradict the conditions of this License, they do not
excuse you from the conditions of this License. If you
cannot distribute so as to satisfy simultaneously your
obligations under this License and any other pertinent
obligations, then as a consequence you may not
distribute the Library at all. For example, if a patent
license would not permit royalty-free redistribution of the
Library by all those who receive copies directly or
indirectly through you, then the only way you could
satisfy both it and this License would be to refrain
entirely from distribution of the Library.
If any portion of this section is held invalid or
unenforceable under any particular circumstance, the
balance of the section is intended to apply, and the
section as a whole is intended to apply in other
circumstances.
It is not the purpose of this section to induce you to
infringe any patents or other property right claims or to
contest validity of any such claims; this section has the
sole purpose of protecting the integrity of the free
software distribution system which is implemented by
public license practices. Many people have made
generous contributions to the wide range of software
distributed through that system in reliance on consistent
application of that system; it is up to the author/donor to
decide if he or she is willing to distribute software
through any other system and a licensee cannot impose
that choice.
This section is intended to make thoroughly clear what
is believed to be a consequence of the rest of this
License.
12. If the distribution and/or use of the Library is restricted in
certain countries either by patents or by copyrighted
interfaces, the original copyright holder who places the
Library under this License may add an explicit
geographical distribution limitation excluding those
countries, so that distribution is permitted only in or
among countries not thus excluded. In such case, this
License incorporates the limitation as if written in the
body of this License.
vii
13. The Free Software Foundation may publish revised
and/or new versions of the Lesser General Public
License from time to time. Such new versions will be
similar in spirit to the present version, but may differ in
detail to address new problems or concerns.
Each version is given a distinguishing version number. If
the Library specifies a version number of this License
which applies to it and “any later version”, you have the
option of following the terms and conditions either of that
version or of any later version published by the Free
Software Foundation. If the Library does not specify a
license version number, you may choose any version
ever published by the Free Software Foundation.
14. If you wish to incorporate parts of the Library into other
free programs whose distribution conditions are
incompatible with these, write to the author to ask for
permission. For software which is copyrighted by the
Free Software Foundation, write to the Free Software
Foundation; we sometimes make exceptions for this.
Our decision will be guided by the two goals of
preserving the free status of all derivatives of our free
software and of promoting the sharing and reuse of
software generally.
NO WARRANTY
15. BECAUSE THE LIBRARY IS LICENSED FREE OF
CHARGE, THERE IS NO WARRANTY FOR THE
LIBRARY, TO THE EXTENT PERMITTED BY
APPLICABLE LAW. EXCEPT WHEN OTHERWISE
STATED IN WRITING THE COPYRIGHT HOLDERS
AND/OR OTHER PARTIES PROVIDE THE LIBRARY
“AS IS” WITHOUT WARRANTY OF ANY KIND,
EITHER EXPRESSED OR IMPLIED, INCLUDING, BUT
NOT LIMITED TO, THE IMPLIED WARRANTIES OF
MERCHANTABILITY AND FITNESS FOR A
PARTICULAR PURPOSE. THE ENTIRE RISK AS TO
THE QUALITY AND PERFORMANCE OF THE
LIBRARY IS WITH YOU. SHOULD THE LIBRARY
PROVE DEFECTIVE, YOU ASSUME THE COST OF
ALL NECESSARY SERVICING, REPAIR OR
CORRECTION.
16. IN NO EVENT UNLESS REQUIRED BY APPLICABLE
LAW OR AGREED TO IN WRITING WILL ANY
COPYRIGHT HOLDER, OR ANY OTHER PARTY WHO
MAY MODIFY AND/OR REDISTRIBUTE THE LIBRARY
AS PERMITTED ABOVE, BE LIABLE TO YOU FOR
DAMAGES, INCLUDING ANY GENERAL, SPECIAL,
INCIDENTAL OR CONSEQUENTIAL DAMAGES
ARISING OUT OF THE USE OR INABILITY TO USE
THE LIBRARY (INCLUDING BUT NOT LIMITED TO
LOSS OF DATA OR DATA BEING RENDERED
INACCURATE OR LOSSES SUSTAINED BY YOU OR
THIRD PARTIES OR A FAILURE OF THE LIBRARY TO
OPERATE WITH ANY OTHER SOFTWARE), EVEN IF
SUCH HOLDER OR OTHER PARTY HAS BEEN
ADVISED OF THE POSSIBILITY OF SUCH
DAMAGES.
END OF TERMS AND CONDITIONS
07.AJ-YAX800G(J/GPL/表4)24 05.4.5 9:13 AM ページviii
Memo
07.AJ-YAX800G(J/GPL/表4)24 05.4.5 9:13 AM ページix
PANASONIC BROADCAST & TELEVISION SYSTEMS COMPANY
UNIT COMPANY OF PANASONIC CORPORATION OF NORTH AMERICA
Executive Office:
One Panasonic Way 4E-7, Secaucus, NJ 07094 (201) 348-7000
EASTERN ZONE:
One Panasonic Way 4E-7, Secaucus, NJ 07094 (201) 348-7621
Southeast Region:
1225 Northbrook Parkway, Ste 1-160, Suwanee, GA 30024 (770) 338-6835
Central Region:
1707 N Randall Road E1-C-1, Elgin, IL 60123 (847) 468-5200
WESTERN ZONE:
3330 Cahuenga Blvd W., Los Angeles, CA 90068 (323) 436-3500
Government Marketing Department:
52 West Gude Drive, Rockville, MD 20850 (301) 738-3840
Broadcast PARTS INFORMATION & ORDERING:
9:00 a.m. – 5:00 p.m. (EST) (800) 334-4881/24 Hr. Fax (800) 334-4880
Emergency after hour parts orders (800) 334-4881
TECHNICAL SUPPORT:
Emergency 24 Hour Service (800) 222-0741
Panasonic Canada Inc.
5770 Ambler Drive, Mississauga, Ontario L4W 2T3 (905) 624-5010
Panasonic de Mexico S.A. de C.V.
Av angel Urraza Num. 1209 Col. de Valle 03100 Mexico, D.F. (52) 1 951 2127
Panasonic Puerto Rico Inc.
San Gabriel Industrial Park, 65th Infantry Ave., Km. 9.5, Carolina, Puerto Rico 00630 (787) 750-4300
Panasonic Broadcast Europe
Panasonic Marketing Europe GmbH
Hagenauer Str. 43, 65203 Wiesbaden-Biebrich Deutschland
Tel: 49-611-235-481
Web Site: h t t p : / / w w w . p a n a s o n i c . c o . j p / g l o b a l /
松下電器産業株式会社 システム事業グループ
j 571-8503
大阪府門真市松葉町 2 番 15 号 i (06) 6901 − 1161
© 2005 Matsushita Electric Industrial Co., Ltd. All Rights Reserved.
G