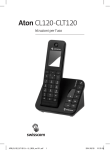
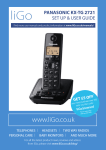
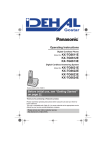
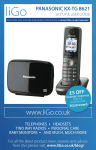
1
Operating Instructions
Easy Use Mobile Phone
Model No.
KX-TU311 E
Thank you for purchasing a Panasonic product.
Please read these operating instructions before using the unit and save them for
future reference.
TU311EBE(en-en)_1021_ver101.pdf
1
2011/10/21
18:25:56
Table of Contents
Introduction
Useful Information
Accessory information ..................................3
General information ......................................4
Error messages ..........................................37
Troubleshooting .........................................37
Conditions of guarantee .............................41
Important Information
For your safety .............................................5
Important safety instructions ........................7
For best performance ...................................7
Other information .........................................7
SAR ..............................................................8
Specifications ...............................................8
Index
Index...........................................................42
Getting Started
Setting up ...................................................10
Note when setting up .................................11
Controls ......................................................12
Display .......................................................13
Turning the power on/off ............................14
Initial settings .............................................14
Making/Answering Calls
Making calls ...............................................16
Answering calls ..........................................16
Call log .......................................................17
Useful features during a call .......................17
Network service features during a
call ..............................................................18
Messages
Character entry ..........................................20
Text message (SMS) .................................20
Voicemail service .......................................22
Phonebook
Phonebook .................................................23
Speed dial ..................................................25
Customising your phone
Settings and Tools .....................................26
Call settings ................................................30
Priority call ..................................................31
Security settings .........................................32
Calendar/Schedule .....................................33
Clock settings .............................................34
Bluetooth
Using a Bluetooth wireless
connection ..................................................36
2
TU311EBE(en-en)_1021_ver101.pdf
2
2011/10/21
18:25:56
Introduction
Accessory information
Supplied accessories
No.
Accessory item/Part number
Quantity
A
AC adaptor/PNLV226EZ
1
B
Rechargeable battery/CGA-LB102
1
C
Charger/PNLC1028ZB: Black, PNLC1028ZW: White
1
Additional/replacement accessories
Please contact your place of purchase or Panasonic sales office for sales information.
Accessory item
Model number
Rechargeable battery
CGA-LB102
R Lithium Ion (Li-Ion) type battery only.
Headset
KX-TCA94EX
Sales and support information
Customer Communications Centre
R For customers within the U.K.: 0844 844 3899
R For customers within Ireland: 01289 8333
R For further support on your product, please visit our website: www.panasonic.co.uk
Direct Sales at Panasonic U.K.
R Order accessory and consumable items for your product with ease and confidence by phoning
our Customer Communications Centre Monday - Thursday 9:00am - 5:30pm, Friday 9:30am 5:30pm (Excluding public holidays).
R Or go on line through our Internet Accessory ordering application at www.pas-europe.com
R Most major credit and debit cards accepted.
R All enquiries transactions and distribution facilities are provided directly by Panasonic U.K.
R It couldn’t be simpler!
R Also available through our Internet is direct shopping for a wide range of finished products.
Take a browse on our website for further details.
Helpline Tel. No.: U.K. 0844 844 3899 Ireland 01289 8333
TU311EBE(en-en)_1021_ver101.pdf
3
2011/10/21
3
18:25:56
Introduction
General information
R This phone is designed to operate on GSM network - Dual band GSM 900/1800 MHz. If you
are inside a tunnel, basement, or buildings where does not provide satisfactory reception,
move to another location for better reception.
R This equipment is designed for use in U.K. and Ireland.
R In the event of problems, you should contact your equipment supplier in the first instance.
Declaration of Conformity:
R Panasonic System Networks Co., Ltd. declares that this equipment is in compliance with the
essential requirements and other relevant provisions of Radio & Telecommunications Terminal
Equipment (R&TTE) Directive 1999/5/EC.
Declarations of Conformity for the relevant Panasonic products described in this manual are
available for download by visiting:
http://www.doc.panasonic.de
Contact to Authorised Representative:
Panasonic Testing Centre
Panasonic Marketing Europe GmbH
Winsbergring 15, 22525 Hamburg, Germany
4
Helpline Tel. No.: U.K. 0844 844 3899 Ireland 01289 8333
TU311EBE(en-en)_1021_ver101.pdf
4
2011/10/21
18:25:56
Important Information
For your safety
Read this section carefully before using the
product to ensure proper and safe operation.
Failure to read them carefully may cause
severe injury, loss of life/property, or be illegal.
WARNING
R This product emits radio waves and may
cause interference to other electronic
devices.
R Do not allow the AC adaptor to be
excessively pulled, bent or placed under
heavy objects.
R To prevent serious damage to this product,
avoid strong impacts and rough handling.
Battery
Power connection
R Use only the power source marked on the
product.
R Do not overload power outlets and
extension cords. This can result in the risk
of fire or electric shock.
R Completely insert the AC adaptor into the
power outlet. Failure to do so may cause
electric shock and/or excessive heat
resulting in a fire.
R Regularly remove any dust, etc. from the
AC adaptor by pulling it from the power
outlet, then wiping with a dry cloth.
Accumulated dust may cause an insulation
defect from moisture, etc. resulting in a fire.
R Unplug the product from power outlets and
remove the battery from the phone if it
emits smoke, an abnormal smell, or makes
an unusual noise. These conditions can
cause fire or electric shock. Confirm that
smoke has stopped emitting and contact an
authorised service centre.
R Unplug from power outlets and never touch
the inside of the product if its casing has
been broken open.
R Never touch the plug with wet hands.
Danger of electric shock exists.
R The AC adaptor should only be used
indoors.
Installation
R This product is not water-resistant. To
prevent the risk of fire or electrical shock,
do not expose the product to rain or any
type of moisture.
R Keep all accessories and the SIM card out
of the reach of children to prevent
swallowing.
R Use only the battery specified.
R Risk of explosion if battery is replaced with
an incorrect type. Dispose of used batteries
according to the instructions.
R Do not open, puncture, crush, or drop the
battery. A damaged battery must not be
used. This can result in the risk of fire,
explosion, overheating, and leaking of the
electrolyte.
R Stop using the battery immediately and
keep away from fire if it emits an abnormal
smell or leaks electrolyte. Released
electrolyte may cause fire or burns.
R Do not touch released electrolyte if the
battery leaks. It may cause burns or injury
to the eyes or skin. The electrolyte is toxic
and may be harmful if swallowed. If you
touch it, immediately wash the affected
areas with water and seek medical help.
R Exercise care when handling the battery.
Do not allow conductive materials such as
rings, bracelets, or keys to touch the
battery, otherwise a short circuit may cause
the battery and/or the conductive material
to overheat and cause burns.
R Do not use or charge a wet battery. This
can result in the risk of fire, explosion,
overheating, and leaking of the electrolyte.
R Charge the battery provided with or
identified for use with this product only, in
accordance with the instructions and
limitations specified in this manual.
R Only use a compatible charger to charge
the battery. Do not tamper with the charger.
Failure to follow these instructions may
cause the battery to swell or explode.
Operating safeguards
R Unplug the product from power outlets
before cleaning. Do not use liquid or
aerosol cleaners.
Helpline Tel. No.: U.K. 0844 844 3899 Ireland 01289 8333
TU311EBE(en-en)_1021_ver101.pdf
5
2011/10/21
5
18:25:56
Important Information
R Do not disassemble the product.
R Do not allow liquids such as water, or
foreign materials such as metal pieces or
flammable materials to get into the SIM
card holder. This can result in the risk of
fire, electric shock, or malfunction.
R Do not leave this product near heat sources
(such as radiators, cookers, etc.), in direct
sunlight, or in a car under blazing sun. It
should not be placed in rooms where the
temperature is less than 0 °C or greater
than 40 °C.
R You are advised not to use the phone in an
aircraft. Turn the phone off before boarding
an aircraft. Set the alarm function off so that
the phone cannot be automatically turned
on. Using this phone in an aircraft may be
hazardous to the aircraft’s operation and
disrupt wireless communication. It may also
be illegal.
R You are advised not to use this product at
refuelling points. Users are reminded to
observe restrictions on the use of radio
equipment in fuel depots, chemical plants
or where blasting operations are in
progress.
R It is imperative that drivers exercise proper
control of vehicles at all times. Do not use a
phone while you are driving; find a safe
place to stop first. Do not speak into a
hands free microphone if it will take your
mind off the road. Always acquaint yourself
thoroughly with restrictions concerning the
use of phones within the area where you
are driving and observe them at all times.
R RF signals may affect electronic systems in
motor vehicles (for example, fuel injection,
air bag systems) that have been improperly
installed or are inadequately shielded. For
more information, consult the manufacturer
of your vehicle or its equipment.
R The use of excessive sound volume
through earphones, headphones, or
headsets may cause hearing loss.
R Do not shine the light close to anybody’s
eyes or turn the light in the direction of car
drivers. This can result in the risk of injuries
or accident.
6
Medical
R Consult the manufacturer of any personal
medical devices, such as pacemakers or
implanted cardioverter defibrillators to
determine if they are adequately shielded
from external RF (radio frequency) energy.
R Wireless Technology Research (WTR)
recommends a minimum separation of
15.3 cm between a wireless device and an
implanted medical device such as
pacemaker or implanted cardioverter
defibrillator to avoid potential interference
with the medical device. If you have any
reason to suspect that your phone is
interfering with a pacemaker or other
medical devices, turn off the phone
immediately and contact the manufacture of
pacemaker or other medical devices.
R Turn off the phone in hospitals or health
care facilities when any regulations posted
in the area instruct you to do so. Hospitals
or health care facilities may be using
equipment that could be sensitive to
external RF energy.
Hearing aids
R This phone is hearing aid compatible and is
rated equivalent to the M3/T3 rating of the
ANSI C63.19 test method. Most hearing
aids on the market should be compatible
with this product but compatibility is not
guaranteed. Please consult with your
Doctor or hearing aid manufacturer before
using a hearing aid with this product.
CAUTION
Installation
R The AC adaptor is used as the main
disconnect device. Ensure that the AC
outlet is installed near the product and is
easily accessible.
R It is recommended that you keep a written
record of any important data which you
store in your phone or SIM card in order to
avoid accidental loss.
Helpline Tel. No.: U.K. 0844 844 3899 Ireland 01289 8333
TU311EBE(en-en)_1021_ver101.pdf
6
2011/10/21
18:25:57
Important Information
SIM card
Routine care
R Do not place magnetic cards or similar
objects near the phone. Magnetic data on
cash cards, credit cards, telephone cards
and floppy disks, etc. may be deleted.
R Do not put magnetic substances close to
the phone. Strong magnetism might affect
operation.
R Do not damage, carelessly handle, or
short-circuit the gold-coloured contacts.
Data might be lost or malfunction may
result.
R Wipe the outer surface of the product
with a soft and dry cloth.
R Do not use benzine, thinner, or any
abrasive powder.
Important safety
instructions
When using your product, basic safety
precautions should always be followed to
reduce the risk of fire, electric shock, and
injury to persons, including the following:
1. Do not use this product near water. For
example, avoid areas near a bathtub,
washbowl, kitchen sink, laundry tub, or
swimming pool.
2. Avoid using the phone if charging during
an electrical storm. There may be a
remote risk of electric shock from lightning.
3. Do not use the phone to report a gas leak
in the vicinity of the leak.
4. Use only the power cord and battery
indicated in this manual. Do not dispose of
the battery in a fire. It may explode. Check
with local codes for possible special
disposal instructions.
5. Do not paint or attach a thick sticker to the
phone. This may prevent proper operation.
SAVE THESE INSTRUCTIONS
For best performance
Environment
R The product should be kept free from
excessive smoke, dust, moisture, high
temperature and vibration.
R To avoid damage, charge the battery only
in temperatures ranging from 5 °C to 40 °C.
Other information
Notice for product disposal, transfer,
or return
R This product and SIM card can store your
private/confidential information. To protect
your privacy/confidentiality, we recommend
that you erase information such as contacts
stored in the contacts list, call logs, and text
messages (SMS) from the memory before
you dispose of, transfer, or return the
product.
Information for Users on Collection
and Disposal of Old Equipment and
used Batteries
1
2
3
These symbols (A, B, C) on the products,
packaging, and/or accompanying documents
mean that used electrical and electronic
products and batteries should not be mixed
with general household waste.
For proper treatment, recovery and recycling
of old products and used batteries, please
take them to applicable collection points, in
accordance with your national legislation and
the Directives 2002/96/EC and 2006/66/EC.
By disposing of these products and batteries
correctly, you will help to save valuable
resources and prevent any potential negative
effects on human health and the environment
which could otherwise arise from inappropriate
waste handling.
Helpline Tel. No.: U.K. 0844 844 3899 Ireland 01289 8333
TU311EBE(en-en)_1021_ver101.pdf
7
2011/10/21
7
18:25:57
Important Information
For more information about collection and
recycling of old products and batteries, please
contact your local municipality, your waste
disposal service or the point of sale where you
purchased the items.
Penalties may be applicable for incorrect
disposal of this waste, in accordance with
national legislation.
For business users in the European
Union
If you wish to discard electrical and electronic
equipment, please contact your dealer or
supplier for further information.
Information on Disposal in other
Countries outside the European Union
These symbols (A, B, C) are only valid in
the European Union. If you wish to discard
these items, please contact your local
authorities or dealer and ask for the correct
method of disposal.
Note for the battery symbol
This symbol (B) might be used in
combination with a chemical symbol (C). In
this case it complies with the requirement set
by the Directive for the chemical involved.
Trademarks
The Bluetooth® word mark and logos are
owned by the Bluetooth SIG, Inc. and any use
of such marks by Panasonic Corporation is
under licence. All other trademarks identified
herein are the property of their respective
owners.
SAR
THIS MODEL MEETS INTERNATIONAL
GUIDELINES FOR EXPOSURE TO RADIO
WAVES and the requirements of the EU
Directive 1999/5/EC.
Your wireless device is a radio transmitter and
receiver. It is designed not to exceed radio
wave exposure limits recommended by
international guidelines. These guidelines
8
were developed by the independent scientific
organisation ICNIRP and include safety
margins designed to assure the protection of
all persons, regardless of age and health.
These guidelines also form the basis of
international regulations and standards on RF
Exposure.
The guidelines use a unit of measurement
known as the Specific Absorption Rate, or
SAR. The SAR limit for wireless devices is
2 W/kg. The highest SAR value for this device
tested at the ear was 0.569 W/kg. The highest
SAR value for this device tested on the body
was 0.244 W/kg.*1
As SAR is measured utilizing the devices
highest transmitting power the actual SAR of
this unit while operating is typically below that
indicated above. This is due to automatic
changes to the power level of the device to
ensure it only uses the minimum level required
to communicate with the network.
The World Health Organization has stated that
present scientific information does not indicate
the need for any special precautions for the
use of wireless devices. They note that if you
want to reduce your exposure then you can do
so by limiting the length of calls.
Additional Information can be found on the
websites:
World Health Organization
(http://www.who.int/emf)
ICNIRP (http://www.icnirp.org)
*1 For body-worn operation, this device
must be separated from the body by a
minimum of 1.5 cm.
Specifications
R Standard:
Dual band GSM 900/1800 MHz
Bluetooth version 2.0
R Power source:
220–240 V AC, 50/60 Hz
R Power consumption (When charging):
Standby: Approx. 0.2 W
Maximum: Approx. 4.0 W
R Operating/Charging conditions:
Operating: 0 °C – 40 °C, 20 % – 80 %
relative air humidity (dry)
Charging: 5 °C – 40 °C
Helpline Tel. No.: U.K. 0844 844 3899 Ireland 01289 8333
TU311EBE(en-en)_1021_ver101.pdf
8
2011/10/21
18:25:57
Important Information
R Battery:
Li-Ion 3.7 V/940 mAh
R Antenna:
Internal
R SIM card type:
1.8 V/3 V
R Shock resistant:
This product has cleared the drop test
stipulated by “MIL-STD-810E,516”.
Note:
R The illustrations in these instructions may
vary slightly from the actual product.
Helpline Tel. No.: U.K. 0844 844 3899 Ireland 01289 8333
TU311EBE(en-en)_1021_ver101.pdf
9
2011/10/21
9
18:25:57
Getting Started
R When the language selection is
displayed, see page 14.
Setting up
Installing the SIM card and the
battery
Important:
R Make sure the phone is turned off and the
AC adaptor is disconnected before
removing the battery.
R Use only the battery specified.
1
2
Open the battery cover.
Position the SIM card as shown below
with the gold-coloured contacts facing
down and the notched corner turned to
the left. Carefully slide the SIM card into
the holder until the tab is positioned on
the SIM card edge.
Removing the SIM card
To remove the SIM card, press the tab and
place a finger on the opposite side of the SIM
card edge, then gently slide it out.
Battery charging
Charge for about 3 hours. Charging time and
battery life might differ when the phone is
out of GSM network range.
R Use only the supplied AC adaptor.
n Charging with charger
Hook
(220-240 V AC,
50/60 Hz)
Charge indicator
Confirm “Charging” is
displayed.
3
Insert the battery, and then close the
battery cover.
n Charging without charger
B
A
10
Helpline Tel. No.: U.K. 0844 844 3899 Ireland 01289 8333
TU311EBE(en-en)_1021_ver101.pdf
10
2011/10/21
18:25:57
Getting Started
Note:
R When the battery is fully charged, the
charge indicator goes off and “Fully
charged” is displayed.
Battery level
Colour
Icon
Green
Battery level
High
Medium
Low
Note when setting up
Note for installing the SIM card and
the battery
R When inserting or removing the SIM card,
take care not to accidentally touch or
scratch the gold-coloured contacts.
R Wipe the battery end ( ,
) with a dry
cloth.
R Avoid touching the battery end ( ,
) or
the unit contacts.
Note for battery charging
R Charge the battery in a place with an
appropriate ambient temperature ranging
from 5 °C to 40 °C.
R The AC adaptor should only be used
indoors.
R Do not put any conductive materials such
as coins or hairpins onto the charge
contacts. This can result in the risk of
overheating.
R It is normal for the phone and the AC
adaptor to feel warm during charging.
R The AC adaptor should be connected to a
vertically oriented or floor-mounted AC
outlet. Do not connect the AC adaptor to a
ceiling-mounted AC outlet, as the weight of
the adaptor may cause it to become
disconnected.
R Clean the charge contacts of the phone
and charger with a soft and dry cloth once a
month. Clean more often if the unit is
exposed to grease, dust, or high humidity.
Red
Needs charging.
Panasonic Lithium Ion (Li-Ion) battery
performance (supplied battery)
Operation
Operating time*1
In continuous use
3.8-9.0 hours
Not in use (standby)
280 hours max.
*1
Operating time is dependent upon usage
environment, battery age and condition.
Note:
R The battery might swell when its life is close
to an end. This is dependent on the usage
conditions and is not a problem.
R The battery level may not be displayed
correctly after you replace the battery. In
this case, charge the battery again.
Helpline Tel. No.: U.K. 0844 844 3899 Ireland 01289 8333
TU311EBE(en-en)_1021_ver101.pdf
11
2011/10/21
11
18:25:57
Getting Started
M
Controls
N: International call “+”/
Space insert “ ”
A
L
B
M
N: Call voicemail
M
N: Profile key
Connector cover
Microphone
C
M
D
N (Light)
Press and hold to keep the light on.
M N (Key lock)
O
E
F
P
G
Q
M N
N (Message shortcut key)
Display
R
H
M
M
N (Off/Power)
M
N (Clear/Mute)
I
Headset jack
J
M
Charge contacts
N (Priority call)
Speaker
K
S
Key functions
T
U
Light
Receiver
Charge indicator
Ringer indicator
MjN/MkN
(
: Volume up/down)
(Change display font size)
Navigator key
M
N (Talk)
Centre of navigator key/
Confirmation key
M N (Speakerphone)
Dial keypad
12
Function key
– M
N: Make or answer calls/function key to
select the feature shown above.
N: End calls/function key to select
– M
the feature shown above.
Navigation Key
– Centre of navigator key: Select the feature
shown above.
– MDN, MCN, MFN, or MEN: Scroll through various
lists/items or move the cursor to edit a
number/name.
– MEN or MFN: Adjust the receiver, speaker, or
ringer volume.
– MDN: Open the main menu (page 14).
– MCN: View the contacts list (page 23).
Helpline Tel. No.: U.K. 0844 844 3899 Ireland 01289 8333
TU311EBE(en-en)_1021_ver101.pdf
12
2011/10/21
18:25:57
Getting Started
Symbol
Display
Text message (SMS) which has
been sent.
Display symbols
Symbol
Meaning
Text message (SMS) which has
already been read.
Meaning
New voicemail message
received.*1 (page 22)
R Signal strength: the more
bars visible, the stronger the
signal.
R R: The phone is currently
seeking or using another
network outside your home
network.
R Schedule alarm is set.
(page 33)
R Alarm is on. (page 34)
Night mode is on. (page 34)
The Bluetooth feature is on.
(page 36)
Battery level
Key lock is on. (page 15)
Silent mode is on. (page 15)
Another Bluetooth device is
connected. (page 36)
Vibration mode is on.
(page 26)
Headset/Bluetooth headset
(option) is connected.
The line is on a call.
*1
Speakerphone is on.
(page 16)
Function items
Ringer volume is off.
(page 26)
Incoming call
Voicemail subscribers only
Icon
Action
Displays the menu.
Accepts the current selection.
Outgoing call
Missed call
Returns to the previous screen.
Mute is on. (page 17)
Opens the recent call log.
Equalizer is set. (page 17)
Makes/answers a call.
The call is on hold. (page 18)
Ends the call.
Text messages (SMS) or
contacts saved to the phone.
(page 20, 23)
Opens the option menu.
Text messages (SMS) or
contacts saved to the SIM card.
(page 20, 23)
Resets the call duration.
R New text message (SMS)
received. (page 21)
R Text message (SMS) which
has not been sent or read.
R When flashing:
Text message (SMS)
memory is full.
Answers a 2nd call.
(page 18)
Opens the contacts list.
(page 23)
Stores phone numbers.
Selects multiple items.
(page 34)
Stops alarm. (page 33, 34)
Helpline Tel. No.: U.K. 0844 844 3899 Ireland 01289 8333
TU311EBE(en-en)_1021_ver101.pdf
13
2011/10/21
13
18:25:57
Getting Started
Icon
Action
Activates the snooze function.
(page 33, 34)
Turns the power off.
(page 34)
Important:
R The phone may prompt you to set display
language and date and time each time a
new SIM card is installed.
A MbN: Select your desired language. ®
Menu items
B Continue from step 3 in “Date and
time”, page 14.
The following items are shown when you
press
(centre of the navigator key).
Item
Display language
Feature
1
2
3
4
Messages
Phonebook
Call Log
Settings
®
®
MbN: “Display” ®
MbN: “Language” ®
MbN: Select your desired language. ®
Tools
Clock Settings
Turning the power on/off
Power on
Press M
N for about 1 second.
Note:
R PIN1 code request is displayed if the
inserted SIM card is initially PIN locked or
PIN1 code request is set to on (page 32).
Enter PIN1 code and press
or M
N.
Note:
R If you select a language you cannot read:
®
®
® MCN 2 times ®
® MDN ®
® MbN: Select your desired
language. ®
Date and time
1
2
3
Power off
Press M
N for about 2 seconds.
4
Initial settings
Symbol meaning:
Example: MbN: “Off”
Press MCN or MDN to select the words in
quotations.
14
®
®
MbN: “Date & Time” ®
Enter the current date, month, and year.
®
Example: 15 July, 2011
M1N M5N M0N M7N M2N M0N M1N M1N
R To change the date format:
® MbN: Select the desired format.
®
Enter the current hour and minute.
Example: 9:30
M0N M9N M3N M0N
R To change the time format:
® MbN: Select “AM”, “PM”, or “24
hours”. ®
5
Helpline Tel. No.: U.K. 0844 844 3899 Ireland 01289 8333
TU311EBE(en-en)_1021_ver101.pdf
14
2011/10/21
18:25:57
Getting Started
Note:
R The date and time may be incorrect when
the battery is dead or replaced. In this case,
set the date and time again.
R To adjust the hour for summer time, see
page 29.
Key lock
Clock display
Audible dialling
You can select how the date and time is
displayed in standby mode from the following
3 options;
– “Large”: Displays only the time in large
font.
– “Normal”: Displays the date and time.
– “Off”: Does not display the date or time.
The default setting is “Large”.
When you turn this feature on, numbers are
announced when pressing dial keys. The
default setting is “Normal”.
1
2
3
4
®
®
MbN: “Display” ®
MbN: “Clock Display” ®
MbN: Select the desired setting. ®
Display font size
You can adjust the size of characters/numbers
shown on the display. The default setting is
“Middle”.
1
2
3
4
®
®
MbN: “Display” ®
MbN: “Font Size” ®
MbN: Select the desired font size.
Note:
R You can adjust the display font size by
simply pressing M N or M N unless you are
on a call or the phone is ringing for an
incoming call.
The keypad can be locked to prevent any keys
from being accidentally pressed.
Slide M N (right side of the phone) to lock or
unlock.
1
2
3
4
®
®
MbN: “Sound” ®
MbN: “Audible Dialling” ®
MbN: Select “Loud”, “Normal”, or “Off”.
®
Note:
R The language used for the dial
announcement is the same as the display
language (page 14).
Telecoil (T-coil) mode
When you activate the Telecoil mode of your
hearing aid, turn this feature “On”. The default
setting is “Off”.
1
2
3
®
®
MbN: “Telecoil Mode” ®
MbN: Select the desired setting. ®
Note:
R When this feature is on, you cannot use the
voice equalizer feature (page 17).
Profile
You can set the silent mode by pressing
M
N for about 2 seconds in standby mode.
Note:
R You can also change the profile setting
from the menu tree (page 26).
Helpline Tel. No.: U.K. 0844 844 3899 Ireland 01289 8333
TU311EBE(en-en)_1021_ver101.pdf
15
2011/10/21
15
18:25:57
Making/Answering Calls
Emergency call
Making calls
1
Enter the phone number (40 digits max.).
R To correct a digit, press M
N.
2
3
Press M
Press M
N to dial.
N to end the call.
Note:
R To insert a pause, press and hold M N until
“p” is displayed. A 3 second pause is
inserted each time “p” is displayed.
R To set the auto redial feature, see
page 27.
To make an emergency call, the phone must
be within the range of a GSM network.
Enter the emergency number. ® M
N
Note:
R When “Limited Service” is displayed
(page 37), you may not be able to make
an emergency call. Call the international
emergency number “112”, if your country
supports this number.
R If you find that a number does not work on
your phone, or for details of emergency
numbers, please contact your network
operator/service provider.
Using the speakerphone
1
Enter the phone number and press M N.
R Speak alternately with the other party.
2
Press M
N to end the call.
Note:
R For best performance, use the
speakerphone in a quiet environment.
R To switch back to the receiver, press M N
N.
or M
Adjusting the receiver or speaker
volume
There are 6 volume levels (1 to 6) available.
Press M N or M N repeatedly while talking.
R When you try to set the receiver volume to
level 5 or 6, “Access volume booster
mode?” is displayed. Press
to
continue adjusting the volume.
Note:
R Even if you set the receiver volume to level
5 or 6, the volume decreases to level 4
when the phone is turned off.
International call
When a call is being received, the ringer
indicator flashes.
1
Press M
N or M N to answer a call.
R You can also answer a call by pressing
any dial key from M0N to M9N, M N, or
N. (Any key answer feature:
M
page 27)
N.
R To reject the call, press M
2
Press M
N to end the call.
Adjusting the ringer volume
Press M N or M N repeatedly to select the
desired volume while the phone is ringing for
an incoming call.
Note:
R You can also customise the ringer volume
beforehand (page 26).
R You cannot adjust the ringer volume while
the phone is ringing in silent mode
(page 15).
Temporary ringer off
1
N until the
Press and hold M
international prefix “+” is displayed.
2
Enter the country/region code, area code,
and phone number. ® M
N
16
Answering calls
While the phone is ringing for a call, you can
turn the ringer off temporarily by pressing
M
N.
Helpline Tel. No.: U.K. 0844 844 3899 Ireland 01289 8333
TU311EBE(en-en)_1021_ver101.pdf
16
2011/10/21
18:25:57
Making/Answering Calls
caller’s phone number following every ring.
The default setting is “Off”.
Call log
This phone has 4 call log lists. The last 10
incoming, outgoing, and missed calls are
stored in each call log (each 40 digits max.).
The recent call log list displays the last 30
calls (incoming, outgoing, and missed), beside
3 other types of call log.
Note:
R When a caller’s phone number matches a
phone number stored in the contacts list,
the stored name is displayed and logged.
– “Unknown Number” is displayed when
a call cannot be received displaying a
phone number.
– “Withheld” is displayed when the
caller requests not to send a phone
number.
Making a call using the call log
1
N to display the recent call log
Press M
list in standby mode.
R Press MEN or MFN to select the desired
call log list.
2
MbN: Select the desired phone number. ®
M
N
Note:
R You can check and reset the duration of
incoming, outgoing, and the last call.
To check the call duration:
Press
®
®
® MbN: “Call
Duration” ®
1
2
3
4
®
®
MbN: “Sound” ®
MbN: “Caller ID Readout” ®
MbN: Select the desired setting. ®
Note:
R The language used for the announcement
is the same as the display language
(page 14).
R The volume level used for the
announcement is the same level as the
ringer volume (page 26).
Call log options
In the call log list, the following options are
available by pressing
:
R “Use Number”: edit and call using the
phone number.
R “Detail”: view the caller’s information.
R “Create Message”: write and send text
messages (SMS).
R “Add Phonebook”: edit and store the
phone number to the contacts list.
R “Delete”: delete a caller’s log.
R “Delete All”: delete all caller logs from
the selected call log list.
Useful features during a
call
Missed calls
Mute
If a call is not answered, the phone treats it as
a missed call. “Missed Call(s)” and the
number of missed calls are shown on the
display. You can view the missed call log by
pressing
when it is displayed.
While mute is on, you can hear the other
party, but the other party cannot hear you.
1
2
Press M
N during conversation.
To return to the conversation, press
M
N again.
Caller ID readout
This feature allows you to know who is calling
without looking at the display. To use this
feature, you must turn this feature on. When a
call is received, the phone announces the
Voice equalizer
This feature clarifies the voice of the person
you are talking to, producing a more
natural-sounding voice that is easier to hear
Helpline Tel. No.: U.K. 0844 844 3899 Ireland 01289 8333
TU311EBE(en-en)_1021_ver101.pdf
17
2011/10/21
17
18:25:57
Making/Answering Calls
and understand. The default setting is
“Normal”.
1
2
3
Press
during conversation.
MbN: “Equalizer” ®
MbN: Select “Normal”, “Treble
Boost”, or “Bass Boost”. ®
Note:
R Depending on the condition and quality of
network, this feature may amplify existing
line noise. If it becomes difficult to hear,
turn this feature off.
Network service features
during a call
You must first subscribe to the services of
your network operator/service provider.
Please contact your network operator/service
provider for details and availability of the
services in your area.
2
® MbN: “Menu” ®
®
®
® MbN: “Contacts” ®
® MbN: Select the desired contact. ®
M
N
R The 1st call is put on hold and
displays the line on hold.
To switch between calls:
® MbN: “Swap” ®
To end a call:
MbN: Select the call you want to end. ®
N
M
To end all calls:
® MbN: “Release All” ®
For conference call service users
This feature allows you to have a conversation
with up to 5 parties at the same time.
n When receiving another call:
1 Press
to answer the 2nd call.
2
3
Hold
This feature allows you to put a call on hold.
1
2
3
Press
during conversation.
This feature allows you to receive and make
calls to other parties while on the phone. If you
receive a call while on the phone, you will hear
a very brief call waiting tone.
To receive a 2nd call displaying the 2nd
caller’s information, activate the call waiting
feature (page 30).
18
2
3
4
. ® MbN:
For call waiting service users
1
n When making another call:
1 Enter the phone number. ® M
MbN: “Hold” ®
To release hold, press
“Retrieve” ®
To answer the 2nd call:
Press
.
R The 1st call is put on hold and
displays the line on hold.
To make another call:
Enter the phone number. ® M
N
R Using the contacts list:
® MbN: “Merge” ®
While on the conference call, press
N to end.
M
18
.
MbN: “Merge” ®
While on the conference call, press
N to end.
M
Useful features during a conference
call
1
2
3
4
During a conference call, press
.
MbN: “Browse conf.” ®
R All members in the conference call are
displayed, either by name or number.
MbN: Select the desired party.
® MbN: “Split” ®
R To end the selected caller’s
participation, select “Disconnect”.
®
R The remaining callers can continue
with the conference call.
Helpline Tel. No.: U.K. 0844 844 3899 Ireland 01289 8333
TU311EBE(en-en)_1021_ver101.pdf
N
After the call is connected, press
2011/10/21
18:25:57
Making/Answering Calls
5
To re-build the conference, press
® MbN: “Merge” ®
.
For transferring call service users
This feature allows you to transfer and
connect 2 outside calls.
1
When receiving another call:
Press
to answer the 2nd call.
When making another call:
Enter the phone number. ® M
N
2
Press M4N and M
N.
R Calls are automatically ended after the
other parties connect successfully.
Helpline Tel. No.: U.K. 0844 844 3899 Ireland 01289 8333
TU311EBE(en-en)_1021_ver101.pdf
19
2011/10/21
19
18:25:57
Messages
Character entry
Text message (SMS)
The dial keys are used to enter characters and
numbers. Each dial key has multiple
characters assigned to it. The characters that
can be entered depend on the input mode.
– Press MFN or MEN to move the cursor.
– Press dial keys to enter characters and
numbers.
– Press M
N to select the desired symbol.
– Press M
N to erase the character or
number to the left of the cursor. Press and
hold M
N to erase all characters or
numbers to the left of the cursor.
– Press M N (A®a) to change the input letter
case. For example, small letter (abc), auto
case (Abc), and capital letter (ABC).
– To enter another character located on the
same dial key, press MEN to move the
cursor to the next space, then press the dial
key again.
– If you do not press any dial key for about 1
second after entering a character, the
character is fixed.
SMS (Short Message Service) allows you to
send and receive text messages using
network services. To use SMS features, you
must confirm that the correct service centre
number is stored. Contact your network
operator/service provider for details and
availability of this service.
Note:
R The service centre number may be
preprogrammed to the SIM card
(page 22).
R You can save SMS messages in the phone
or SIM card by changing storage media
(page 22). SMS messages are
automatically saved to other media when
the memory of the current media is full.
R SMS messages saved in the phone are
indicated by and those saved in the SIM
Selecting input modes and the
symbols
The available input modes are Alphabet (abc),
Numeric (123), Greek (
), Extended 1
), and Extended 2 (
). You can select
(
which mode is entered by pressing a dial key
repeatedly in all modes except Numeric.
When the phone displays the character
entry screen,
n To select the input mode:
® MbN: “Input mode” ®
®
MbN: Select the desired input mode. ®
n To select the symbols:
N ® Press MDN, MCN, MFN, or MEN to
M
select the desired symbol. ®
R
is used only for text message (SMS)
entry.
card are indicated by
.
R A total of 100 SMS messages at 160
characters (70 characters depending on
type) per message can be saved in the
phone. The maximum number of SMS
message that can be stored to the SIM card
is dependent on your SIM card.
R The phone can send or receive SMS
messages beyond the character limit for a
single message. Longer messages are sent
as a series of 2 or more messages. The
message length indicator at the top of the
screen displays the number of characters
remaining and the number of SMS
messages required to send.
R Characters that cannot be displayed are
shown as “?” instead.
Writing and sending a new
message
1
2
3
20
M
N (right side of the phone)
MbN: “Create Message” ®
R The display shows any unfinished or
unsaved text for you to continue.
Enter a message. ®
R To change the input letter, press M
(page 20).
Helpline Tel. No.: U.K. 0844 844 3899 Ireland 01289 8333
TU311EBE(en-en)_1021_ver101.pdf
20
2011/10/21
18:25:57
N
Messages
R To change the input mode:
® MbN: “Input mode” ®
® MbN: Select the desired input mode
(page 20). ®
R To save the message:
® MbN: “Save” ®
4
5
6
Enter destination phone number (20 digits
max.).
R Using the contacts list:
® MbN: Select the desired
contact. ®
To send the message, select “Yes”. ®
R The sent message is automatically
saved to outbox.
R If you select “No”, the display returns
to step 4.
Note:
R This phone supports long messages (3
connected SMS messages max.) of up to
459 or 201 characters depending on
character type. However, the maximum
number of characters you can send or
receive may be limited by your network
operator/service provider. Contact your
network operator/service provider for
details.
R If your SMS message contains over 160
characters (70 characters depending on
character type), it is a long message. The
message length indicator in the upper-right
of the screen displays the number of
characters remaining and the number of
SMS messages required to send. Your
network operator/service provider may treat
long messages differently from other SMS
messages. Contact your network operator/
service provider for details.
R You cannot send or receive SMS
messages containing pictures, sound, or
contacts list.
Reading a received message
When an SMS message is received:
– an SMS ring tone is heard (if the ringer
volume is on).
– the phone vibrates (if the silent mode is on,
page 15).
– “New Message(s)” is displayed with the
total number of new (unread) SMS
messages.
is displayed.
–
Note:
R SMS messages are automatically saved to
other media when the memory of the
current media is full (page 22).
R When the SMS message memory is full,
you cannot receive any new SMS
messages. Erase unnecessary SMS
messages (page 21) to receive new SMS
messages.
1
2
3
M
N ® MbN: “Inbox” ®
MbN: Select a message.
R To scroll through the SMS messages,
press and hold MCN or MDN.
Press
to read the message content.
Note:
R Display the inbox by simply pressing
when “New Message(s)” is displayed.
Replying to a received message
1
While reading a received message, press
.
2
3
MbN: “Reply Message” ®
4
Edit the destination phone number if
necessary. ®
5
To send the message, select “Yes”. ®
Enter a message (page 20). ®
R To save the message:
® MbN: “Save” ®
SMS options
In the inbox, outbox, and draftbox, the
following options are available by pressing
:
R “Use Number”: edit and call using the
recipient’s or sender’s phone number.
Helpline Tel. No.: U.K. 0844 844 3899 Ireland 01289 8333
TU311EBE(en-en)_1021_ver101.pdf
21
2011/10/21
21
18:25:58
Messages
R “Reply Message”: reply to the SMS
message.
R “Forward Message”: edit and send an
SMS messages from inbox.
R “Edit Message”: edit and send an SMS
messages from outbox or draftbox.
R “Add Phonebook”: edit and store the
recipient’s or sender’s phone number or the
numbers in the SMS message to the
contacts list.
R “Delete”: erase an SMS message.
R “Delete All”: erase all SMS messages
from the selected box.
Storing the voicemail access
number
In order to listen to your voicemail messages,
you must dial your network operator/service
provider’s voicemail access number.
1
2
3
M
N ® MbN: “Voicemail” ®
MbN: “Voicemail num.” ®
Enter the voicemail access number (20
digits max.). ®
Listening to voicemail messages
SMS settings
In the SMS menu, you can change the
following settings. To change the settings:
Press M
N ® MbN: “Settings” ®
R “Service Centre”: change and store the
service centre number.
R “Validity Period”: set the time period
during which the service centre will try to
resend the SMS message if it has not been
delivered.
R “Status Report”: receive status reports
to find out whether your sent SMS
messages have been successfully
delivered or not.
R “Reply Path”: SMS messages may be
sent using another service centre number
when this feature is turned on.
R “Storage Media”: select the memory
location of SMS messages from SIM or
phone.
R “Memory Status”: check the amount of
current SMS messages.
When you have new voicemail messages,
is displayed or you receive a text message
(SMS), depending on your network operator/
service provider.
1
Press and hold M
mode.
2
Press M
N when in standby
N to end the call.
Voicemail service
Voicemail is an automatic answering service
offered by your network operator/service
provider. Contact your network operator/
service provider for details and availability of
this service.
22
Helpline Tel. No.: U.K. 0844 844 3899 Ireland 01289 8333
TU311EBE(en-en)_1021_ver101.pdf
22
2011/10/21
18:25:58
Phonebook
Finding and calling from contacts
Phonebook
Scrolling through all contacts
Adding contacts
This phone can store up to 200 contacts with
2 phone numbers for each contact. You can
also store the contacts in a SIM card with 1
phone number for each contact. The
maximum number of contacts that can be
stored in a SIM card is dependent on your SIM
card. Make sure of the memory location
(phone or SIM card) before adding contacts
(page 24).
1
2
3
4
5
6
7
8
9
®
All contacts stored in the phone and SIM card
are displayed.
Important:
R A maximum of 254 SIM card contacts can
be displayed regardless of how many
contacts are stored in your SIM card.
1
indicates the contacts stored in the
phone.
R To change the input mode for
searching the contacts list:
N ® MbN: Select the desired input
M
mode (page 20). ®
R To change the input letter case for
searching the contacts list, press M N
(page 20).
®
MbN: “Create” ®
MbN: “(No name)” ®
Enter the party’s name (16 characters
max.; page 20). ®
R To change the input letter case, press
M N (page 20).
R To change the input mode:
® MbN: “Input mode” ®
® MbN: Select the desired input mode
(page 20). ®
2
MbN: Select the desired contact.
R Press a dial key (M0N to M9N) repeatedly
to display each first contact
corresponding to each character
located on the selected dial key
(page 20). If there is no contact
corresponding to the character you
selected, the next contact is displayed.
3
M
N
R If 2 phone numbers are stored for the
contact, both phone numbers are
displayed.
MbN: Select the desired phone number.
®M
N
MbN: “1) No number” ®
Enter the party’s phone number (40 digits
max.). ®
R If you want to store another phone
number, select “2) No number”
when it is displayed.
R When the selected memory location is
SIM card, go to step 9.
MbN: “(Ungrouped)” ®
MbN: Select the desired group. ®
R To add other contacts, repeat from
step 2.
Note:
R The number of characters and digits that
can be input into each SIM card contact is
limited by your SIM card.
.
Press MCN or
R
indicates SIM card contacts and
Searching by category
1
2
Press MCN or
3
MbN: Select the desired category. ®
R To end the category search, select
“All Users”.
4
MbN: Scroll through the contacts list if
necessary. ® M
N
.
® MbN: “Change Category” ®
Helpline Tel. No.: U.K. 0844 844 3899 Ireland 01289 8333
TU311EBE(en-en)_1021_ver101.pdf
23
2011/10/21
23
18:25:58
Phonebook
4
Contacts list options
In the contacts list, the following options are
available by pressing
:
R “Edit”: edit and store a contact.
R “Create Message”: write and send a text
message (SMS).
R “Use Number”: edit and call using a
contact.
R “Create”: add a contact to the contacts
list.
R “Change Category”: select the category
or group to search for in the contacts list.
R “more...”: show more available options.
– “Add Speed Dial”: assign a contact
to a speed dial key.
– “Add to group”: assign a contact to
the group.
– “Copy”: copy a contact from the phone
to SIM card or vice versa.
– “Delete”: delete a contact.
– “Input mode”: change the character
input mode when entering the character.
Groups (contacts stored in the
phone only)
When adding a contact to the phone, you can
assign it to one of 4 groups. You can change
the names of groups to your desired name
and search for contacts by group. You can
also assign a ringer tone for each group.
Assigning a contact stored in the
phone
1
2
3
4
Find the desired contact (page 23).
® MbN: “more...” ®
MbN: “Add to group” ®
MbN: Select the desired group. ®
Changing the group settings
1
2
3
24
®
®
To change the group name:
MbN: “Rename” ®
® Press M
N
to delete the current name. ® Edit the
name (16 characters max.; page 20). ®
To change the group ringer tones:
MbN: “Ringtone” ®
® MbN: Select
the desired ringer tone. ®
To reset a group:
MbN: “Reset user group” ®
®
MbN: “Yes” ®
Copying contacts between the
phone and SIM card
Important:
R Contacts copied from the phone to SIM
card or vice versa are copied without
overwriting any previously copied contacts,
even in the case of duplicates.
R When copying a contact with 2 phone
numbers from the phone to SIM card, only
1 phone number is copied.
Copying a contact
1
2
3
Find the desired contact (page 23).
® MbN: “more...” ®
MbN: “Copy” ®
Copying all contacts
1
2
3
4
5
®
®
MbN: “more...” ®
MbN: “Memory manager” ®
MbN: “Copy All” ®
MbN: Select “Copy to SIM” or “Copy
to Phone”. ®
Phonebook settings
In the phonebook menu, you can change the
following settings. To change the settings:
Press
®
®
® MbN:
“more...” ®
MbN: “Group” ®
MbN: Select a group. ®
Helpline Tel. No.: U.K. 0844 844 3899 Ireland 01289 8333
TU311EBE(en-en)_1021_ver101.pdf
24
2011/10/21
18:25:58
Phonebook
R “My Number”: view the phone number
assigned to the SIM card and enter/edit it if
necessary.
R “Memory manager”: show more available
settings menus.
– “Memory Status”: check for free and
used memory capacity in the contacts
list.
– “Copy All”: copy all contacts from the
phone to SIM card or vice versa.
– “Delete All”: erase all contacts from
the phone or SIM card.
– “Save New Entry”: select the
memory location for contacts.
R “Enable FDN”/“Disable FDN” (SIM
card dependent): activate or deactivate
FDN (Fixed Dialling Number). This feature
allows you to restrict your outgoing calls to
selected phone numbers if supported by
your SIM card. Only the phone numbers
stored in FDN can be shown, dialled, or
messaged when this feature is enabled.
You need to enter PIN2 each time you
access FDN.
R “Service Dial” (SIM card dependent):
access the special services of your network
operator/service provider (such as
customer support, emergency services,
etc.) if SDN (Service Dialling Number) is
included on your SIM card.
Making a call using a speed dial key
Press the desired speed dial key (M2N to M9N).
N/M N
®M
Cancelling a speed dial assignment
1
2
3
4
5
®
®
MbN: “Speed Dial” ®
MbN: Select the desired dial key number.
®
MbN: “Remove” ®
MbN: “Yes” ®
Speed dial
Assigning a contact to a speed dial
key
1
2
3
4
5
®
®
MbN: “Speed Dial” ®
MbN: Select the desired dial key number.
®
MbN: “Add List” ®
MbN: Select the desired contact. ®
Note:
R If you edit a contact which is assigned to a
speed dial key, the link between the contact
and speed dial key is cut. In this case,
assign the contact to a speed dial key again.
Helpline Tel. No.: U.K. 0844 844 3899 Ireland 01289 8333
TU311EBE(en-en)_1021_ver101.pdf
25
2011/10/21
25
18:25:58
Customising your phone
Settings and Tools
Find useful features for customising your phone by scrolling through the various menus in the
following table. You can customise the basic phone settings (sound settings, display settings etc.)
and other various useful features.
First, press
to display the top-menu. To scroll through the menus, press MDN, MCN, MFN, or
MEN. Press
to select your desired menu and/or setting.
Profile
Press
®
®
Menu
Sub-menu
Profile
–
Default setting
Normal
page
15
Sound
Press
®
®
® MbN: “Sound” ®
Menu
Sub-menu
Default setting
page
Ringer Volume*1
–
Maximum
16
Ringtone*2
–
Ringtone 1
–
SMS Ringtone*2
–
Ringtone 2
–
Vibration
–
Off
–
Audible Dialling
–
Normal
15
Caller ID Readout
–
Off
17
Keytone*3
–
On
–
*1
*2
*3
Ringer volume cannot be set to off for the alarm (page 33, 34).
The preset melodies in this product are used with permission of © 2011 Copyrights Vision
Inc.
Turn this feature off if you prefer not to hear key tones while you are dialling or pressing any
keys.
Display
Press
®
®
® MbN: “Display” ®
Menu
Sub-menu
Default setting
page
Brightness
–
Level 4
–
Wallpaper
–
Off
–
Background
–
Black
–
Clock Display
–
Large
15
Network Name*1
–
On
–
26
Helpline Tel. No.: U.K. 0844 844 3899 Ireland 01289 8333
TU311EBE(en-en)_1021_ver101.pdf
26
2011/10/21
18:25:58
Customising your phone
Menu
Sub-menu
Default setting
page
Font Size
–
Middle
15
Language
–
Auto*2
14
*1
*2
This feature allows you to display the current network in standby mode. If 2 network names
are displayed, the upper line shows network name and the lower line shows network
operator/service provider’s name. The lower line displays depending on your SIM card.
“Auto” means the phone automatically changes the inserted SIM card language, dictated
by the language setting of the SIM card.
Call
Press
®
®
® MbN: “Call” ®
Menu
Priority Call
Default setting
page
Call Number
Sub-menu
–
31
Message
–
32
Buzzer
On
32
Call Waiting
–
–
30
Call Divert
–
–
30
Call Barring
Outgoing Barring
–
Incoming Barring
–
Restrict Incoming*1
–
–
Barring Password
–
30
30
Show My ID*2
–
Network Set
Auto Redial*3
–
Off
–
Any Key Answer
–
Off
16
Auto Talk*4
–
Off
–
*1
*2
*3
*4
–
You can set the phone to reject calls when an anonymous call is received.
– “Except Contacts”: reject calls from phone numbers not registered in the contacts list.
The default setting is “Off”.
– “Withheld”: reject calls when caller information is deliberately withheld. The default
setting is “Off”.
When an anonymous call is received, it is disconnected and logged by the phone.
When you set to “Off”, you may not be able to make calls depending on the network.
This feature allows the phone to automatically redial multiple times under certain conditions,
such as no answer or when the other party’s line is engaged. To stop auto redial while
N.
redialling, press M
When you turn this feature on, you can answer calls by simply lifting the phone off the
charger while charging.
Helpline Tel. No.: U.K. 0844 844 3899 Ireland 01289 8333
TU311EBE(en-en)_1021_ver101.pdf
27
2011/10/21
27
18:25:58
Customising your phone
Other settings
®
Press
®
® MbN: “more...” ®
Menu
Sub-menu
Security
Default setting
page
PIN1 Request
–
32
Change PIN1*1
–
–
Change PIN2
–
Phone Code Request
Change Phone Code
–
Network*2
Reset Settings*3
*1
*2
*3
–
Off
32
0000
–
Auto
Enter the current 4-digit phone
code. ®
–
–
–
When you change PIN1 code, make sure that the PIN1 code request is set to “On”.
This feature allows you to set the phone to automatically roam for a network or to just search
manually.
“Auto”: The phone automatically searches for the currently available network.
“Manual”: Depending on network situations the phone displays a list of networks that exist
in the current location, allowing you to manually select the desired network. A network name
with “ ” is an available network that you can select. If the selection fails, re-select the
network from the list.
All settings other than the following items can be reset to factory default:
– Date and time (page 14), Summer time
– Call logs (page 17)
– All text messages (SMS), service centre number, and validity period (page 22)
– Call waiting (page 30), Call divert (page 30), and Call barring (page 30)
– Priority call settings (page 31)
– PIN1 code request (page 32), Phone code
– All schedule items stored in the calendar/schedule (page 33)
– Contacts, group, fixed dial, and my number in the phonebook settings (page 24)
Tools
®
Press
®
Menu
Sub-menu
Default setting
page
–
–
33
Calendar
On/Off
Bluetooth
Off
–
Headset
–
Deregister
–
Set PIN
–
Telecoil Mode
–
–
Off
28
2011/10/21
–
15
Helpline Tel. No.: U.K. 0844 844 3899 Ireland 01289 8333
TU311EBE(en-en)_1021_ver101.pdf
36
–
SIM Tool Kit*1
28
36
Import Contacts
18:25:58
Customising your phone
*1
If your SIM card includes SAT (SIM Application Toolkit), display shows network operator/
service provider’s additional menu in this area. The SIM Toolkit allows the applications
existing on the SIM card to interact and operate with your phone. Please contact your
network operator/service provider for further information.
Clock settings
Press
®
®
Sub-menu
Default setting
page
Date & Time
Menu
–
–
14
Alarm
–
–
34
Night Mode
–
Off
34
Summer Time
–
Off
–
Helpline Tel. No.: U.K. 0844 844 3899 Ireland 01289 8333
TU311EBE(en-en)_1021_ver101.pdf
29
2011/10/21
29
18:25:58
Customising your phone
Call settings
Call waiting (network service)
5
MbN: Select “Activate” or
“Deactivate”. ®
R To check the status, select “Status”.
6
Enter/edit the phone number if necessary
(20 digits max.). ®
R When you select “If Unavailable”
or “No Answer” in step 4, select a
delay time (5-30 seconds). ®
Activating/deactivating call waiting
1
2
3
4
®
®
MbN: “Call” ®
MbN: “Call Waiting” ®
MbN: Select “Activate” or
“Deactivate”. ®
R To check the status, select “Status”.
Note:
R For details of call waiting service, see
page 18.
Call divert (network service)
This feature allows the phone to divert
incoming calls to another phone number.
Contact your network operator/service
provider for details and availability of this
service.
Note:
R Call divert may not work if call barring is
activated (page 30).
Activating/deactivating call divert
1
2
3
4
30
®
®
Call barring (network service)
Call barring restricts certain types of incoming
and/or outgoing calls, using a password
supplied by your network operator/service
provider. Contact your network operator/
service provider for details and availability of
this service.
Note:
R Call barring may not work if call divert is
activated (page 30).
Activating/deactivating call barring
1
2
3
4
5
6
MbN: “Call” ®
MbN: “Call Divert” ®
MbN: Select the desired situation. ®
– “All Calls”: All calls are diverted.
– “If Unavailable”: Calls are
diverted when if busy, no answer, and
unreachable.
– “If Busy”: Calls are diverted if you
are already on a call.
– “No Answer”: Calls are diverted if
you do not answer a call after a delay.
– “If Unreachable”: Calls are
diverted if the phone is out of GSM
network range.
7
®
®
MbN: “Call” ®
MbN: “Call Barring” ®
MbN: Select “Outgoing Barring” or
“Incoming Barring”. ®
MbN: Select the desired option. ®
MbN: Select “Activate” or
“Deactivate”. ®
R To check the status, select “Status”.
Enter the 4-digit barring password. ®
Note:
R If you enter the incorrect barring password
3 times, it then becomes invalid. Contact
your network operator/service provider.
Changing the call barring password
1
2
3
®
®
MbN: “Call” ®
MbN: “Call Barring” ®
Helpline Tel. No.: U.K. 0844 844 3899 Ireland 01289 8333
TU311EBE(en-en)_1021_ver101.pdf
30
2011/10/21
18:25:58
Customising your phone
4
5
MbN: “Barring Password” ®
6
7
Enter the new 4-digit password. ®
Enter the current 4-digit password. ®
Re-enter the new 4-digit password for
verifying. ®
seconds, the phone automatically dials
the next number. The phone repeats the
sequence of sending SMS message and
dialling the numbers in the call number
list, a maximum of 2 times. If nobody
answers the priority call, the phone
disconnects the call.
Note:
R If you want to stop the priority call
procedure, press M
N during dialling.
Priority call
Priority call is a function that allows you to ask
a registered person for assistance by sending
a text message (SMS) and making a call,
using M N (back of the phone).
The phone will beep and send an SMS
message, and then call the number you stored
in the call number list. Before using this
feature, you need to store the phone number
(5 numbers max.) to the call number list in the
desired order of priority.
Note:
R M N can be activated while the key lock is
on (page 15).
Priority call procedure
1
2
Press and hold M N (back of the phone)
for about 3 seconds, or press it 3 times
within 3 seconds when in standby mode.
The phone sends an SMS message.
R If the buzzer function is on, the phone
beeps until the SMS message is sent
(page 32).
R If the SMS message is not stored
(page 32), the phone skips this step.
3
The phone dials the 1st phone number in
the call number list. Speakerphone is on.
R To switch to the receiver, press M
N.
4
n If the call is answered, the priority call
procedure is stopped and you can start
the conversation.
R The priority call procedure is stopped
even if the call accesses the voicemail
centre.
OR
n If the other party is busy, rejects the
call, or does not answer within 60
Adding a priority call number
You can store the phone number to the priority
call number list (5 numbers max.).
n By entering phone numbers:
1
®
®
2
3
4
5
MbN: “Call” ®
MbN: “Priority Call” ®
MbN: “Call Number” ®
MbN: Select the desired position in the
call number list. ®
6
7
MbN: “(No name)” ®
8
9
MbN: “(Number Empty)” ®
Enter the party’s name (16 characters
max.; page 20). ®
Enter the party’s phone number (40
digits max.). ®
®
n From the contacts list:
1
®
®
2
3
4
5
6
7
MbN: “Call” ®
MbN: “Priority Call” ®
MbN: “Call Number” ®
MbN: Select the desired position in the
call number list. ®
MbN: “Add List” ®
MbN: Select the desired contact. ®
Note:
R Storing public institutions such as the
police, rescue services, or fire brigade is
not recommended.
Helpline Tel. No.: U.K. 0844 844 3899 Ireland 01289 8333
TU311EBE(en-en)_1021_ver101.pdf
31
2011/10/21
31
18:25:58
Customising your phone
Storing an SMS message
When you store an SMS message, the phone
sends the SMS message before dialling the
priority call number.
Note:
R Make sure the SMS service centre number
is stored (page 22).
1
2
3
4
5
®
®
Setting the PIN1 code request
MbN: “Call” ®
MbN: “Priority Call” ®
MbN: “Message” ®
Enter a message (70 characters max.;
page 20). ®
Turning the buzzer on/off
The default setting is “On”.
1
2
3
4
5
®
R If you enter the incorrect PUK1 code 10
times, the SIM card is permanently locked.
The SIM card will need to be replaced as all
information stored will be lost. If you enter
the incorrect PUK2 code 10 times, services
controlled by PIN2 code cannot be used.
Contact your network operator/service
provider for further information.
®
MbN: “Call” ®
MbN: “Priority Call” ®
MbN: “Buzzer” ®
When you turn this feature on, you must enter
PIN1 code each time the phone is turned on.
The default setting is followed by the SIM card
setting.
Important:
R The PIN1 code request cannot be set to
“Off” with some SIM card types.
1
2
3
4
5
6
MbN: Select the desired setting. ®
®
®
MbN: “more...” ®
MbN: “Security” ®
MbN: “PIN1 Request” ®
MbN: Select the desired setting. ®
Enter the current PIN1 code (4 to 8
digits). ®
Phone code
Security settings
The phone code protects the phone against
unauthorised use.
PIN code
PIN1/PIN2 protects your SIM card against
unauthorised use. PIN1 is used for security to
limit access to the phone. PIN2 is used to
control security of certain provided services
such as fixed dial (page 24). Both PIN
numbers are issued by your network operator/
service provider.
Important:
R If you enter the incorrect PIN1/PIN2 code 3
times, the SIM card is locked. Enter the
8-digit PUK1 code for PIN1 or the 8-digit
PUK2 code for PIN2 to unlock. Both PUK
numbers are issued by your network
operator/service provider.
32
Setting the phone code request
When you turn this feature on, you must enter
the phone code each time the phone is turned
on or a new SIM card is inserted. The default
setting is “Off” and default phone code is
“0000”.
1
2
3
4
5
®
®
MbN: “more...” ®
MbN: “Security” ®
MbN: “Phone Code Request” ®
MbN: Select “Power On”, “New SIM
Set”, or “Off”. ®
Helpline Tel. No.: U.K. 0844 844 3899 Ireland 01289 8333
TU311EBE(en-en)_1021_ver101.pdf
32
2011/10/21
18:25:58
Customising your phone
6
Enter the current 4-digit phone code. ®
Calendar/Schedule
This feature allows you to see the calendar
and store schedule items for a specific date.
You can store up to 30 schedule items
(maximum 10 items per day). If you set a
schedule alarm, an alarm sounds for 30
seconds and a text memo is displayed at the
set time.
Creating a new schedule item
1
2
3
®
®
MbN: “Calendar” ®
Press MDN, MCN, MFN, or MEN to select the
desired date.
R To go to a specific date:
® MbN: “Go to date” ®
® Enter the desired date, month, and
year. ®
Note:
R Press
to stop the alarm completely.
R Press
to stop the sound but keep the
snooze function activated.
R The phone will automatically turn on and
sound the alarm at the set time even if the
phone is off.
R The volume level used for the alarm is the
same level as the ringer volume (page 26).
However, when the ringer volume is set to
off, the alarm still sounds at a low level.
Viewing/editing schedule items
1
2
3
4
®
®
MbN: “Calendar” ®
Press MDN, MCN, MFN, or MEN to select the
desired date. ®
R The schedule items are displayed as a
list.
To see the details of each schedule
item:
MbN: Select the desired schedule item. ®
To edit a schedule item:
MbN: Select the desired schedule item. ®
® MbN: “Edit” ®
® Continue
from step 6 in “Creating a new schedule
item”, page 33.
4
5
6
7
8
Press
9
MbN: “On” ®
R If you prefer not to set a schedule
alarm, select “Off”, and then go to
step 11.
Schedule items are not erased automatically
even after the set time has passed.
10
MbN: Select the desired ringer (alarm)
tone. ®
R We recommend selecting a different
ringer tone to the one used for calls.
You can delete a schedule item from a
selected date.
to create the schedule item.
MbN: “Create” ®
Edit the date if necessary. ®
Set the desired time. ®
Enter a text memo (30 characters max.;
page 20). ®
11
R The background colour is changed for
the date the schedule item is added to.
R To add other schedule items, repeat
from step 3.
Erasing schedule items
Erasing a schedule item
1
2
3
4
5
®
®
MbN: “Calendar” ®
Press MDN, MCN, MFN, or MEN to select the
desired date. ®
MbN: Select the desired schedule item.
® MbN: “Delete” ®
Helpline Tel. No.: U.K. 0844 844 3899 Ireland 01289 8333
TU311EBE(en-en)_1021_ver101.pdf
33
2011/10/21
33
18:25:58
Customising your phone
6
8
MbN: “Yes” ®
Erasing all schedule items
You can erase all schedule items stored in the
calendar.
1
2
3
4
5
®
®
MbN: “Calendar” ®
Press MDN, MCN, MFN, or MEN to select the
desired date. ®
® MbN: “Delete All” ®
MbN: “Yes” ®
Clock settings
Alarm
An alarm sounds at the set time (once or
weekly) for 30 seconds and is repeated 3
times at 5 minute intervals (snooze function).
While the alarm is sounding, the text memo is
displayed. A total of 3 separate alarm times
can be programmed. The phone vibrates at
the set time when the silent mode is on
(page 15).
1
2
3
4
®
®
MbN: “Alarm” ®
MbN: Select an alarm (1 to 3). ®
MbN: Select the desired alarm option. ®
– “Once”: Alarm sounds once at the set
time. Go to step 6.
– “Weekly”: Alarm sounds weekly at
the set time(s).
– “Off”: Turns alarm off.
5
MbN: Select the desired day of the week
and press
.®
6
7
Set the desired time. ®
34
Enter/edit a text memo if necessary (30
characters max.; page 20). ®
MbN: Select the desired ringer (alarm)
tone. ®
R We recommend selecting a different
ringer tone to the one used for calls.
Note:
R Press
to stop the alarm completely.
R Press
to stop the sound but keep the
snooze function activated.
R The phone will automatically turn on and
sound the alarm at the set time even if the
phone is off.
When the alarm sounds:
– Press
and
to keep the power
on after the alarm completely stops.
– Press
and
to stop the alarm
completely and keep the power off.
R The volume level used for the alarm is the
same level as the ringer volume (page 26).
However, when the ringer volume is set to
off, the alarm still sounds at a low level.
Night mode
Night mode is a function that stops the phone
from ringing when you do not want to be
disturbed. If you set the ring delay, the phone
starts ringing after a selected amount of time
has passed.
Note:
R If you have set the alarm, the alarm sounds
even if the night mode is on.
R Even when the night mode is on, the phone
vibrates while the phone is ringing in silent
mode (page 15).
Turning night mode on/off
1
2
3
®
®
MbN: “Night Mode” ®
MbN: “On” ®
R To turn this feature off, select “Off”.
4
Enter the desired hour and minute you
wish to start this feature. ®
5
Enter the desired hour and minute you
wish to end this feature. ®
Helpline Tel. No.: U.K. 0844 844 3899 Ireland 01289 8333
TU311EBE(en-en)_1021_ver101.pdf
34
2011/10/21
18:25:58
Customising your phone
6
MbN: Select the desired ring delay. ®
R If you select “No Ringing”, the
phone never rings during night mode.
Helpline Tel. No.: U.K. 0844 844 3899 Ireland 01289 8333
TU311EBE(en-en)_1021_ver101.pdf
35
2011/10/21
35
18:25:59
Bluetooth
Using a Bluetooth wireless
connection
This phone supports Bluetooth wireless
technology and allows the phone to connect to
compatible Bluetooth devices (such as
headsets, hands-free car kits, etc.) within an
approximate range of 10 m. Consult the
manufacturers of other devices to determine
their compatibility with this phone.
Note:
R Bluetooth wireless technology uses radio
waves and there may be restrictions in
some locations. Check with your local
authorities or network operator/service
provider.
R Using Bluetooth technology increases the
battery power consumption and reduces
the battery life. Turn this feature off to save
the battery life when you do not use it.
Turning Bluetooth on/off
To use Bluetooth wireless technology, turn
this feature on. The default setting is “Off”.
1
2
3
4
®
registered successfully, the registered
Bluetooth device name will be displayed.
– “Connect”/“Disconnect”: connect or
disconnect a registered Bluetooth device.
– “Register”: register another Bluetooth
device to your phone.
– “Ringer”: select which device (the
phone or Bluetooth headset) rings when
a call is received.
R “Deregister”: deregister a registered
Bluetooth device.
R “Set PIN”: change the PIN used to import
the phonebook data from other Bluetooth
devices. The default PIN is “0000”.
Note:
R When you import a contact with multiple
phone numbers from another Bluetooth
device, each phone number is stored
separately with the same name.
R You can only import the name and phone
number in each contact and cannot import
any included pictures.
R You cannot turn the incoming ringer volume
off when the ringer is set to ring at the
Bluetooth headset.
®
MbN: “Bluetooth” ®
MbN: “On/Off” ®
MbN: Select the desired setting. ®
Bluetooth features
In the Bluetooth menus, the following features
are available;
Press
®
®
® MbN:
“Bluetooth” ®
R “On/Off”: turn Bluetooth on/off.
R “Import Contacts”: import the
phonebook data from other Bluetooth
devices and store it to your phone or SIM
card.
R “Headset”: show the available menus for
registering and using a Bluetooth devices.
– “Add New Device”: register a
Bluetooth device to your phone. When
the Bluetooth device has been
36
Helpline Tel. No.: U.K. 0844 844 3899 Ireland 01289 8333
TU311EBE(en-en)_1021_ver101.pdf
36
2011/10/21
18:25:59
Useful Information
Error messages
Display message
Cause/solution
SIM Error
Contact your network operator/service provider for further
information.
Limited Service
There is no network service in your current location. Move to
another location where your network can be received
properly.
No Service
There is no network service in your current location. Check
the current status and move to a new location with better
reception (page 13).
PUK1 Blocked!
or
PUK2 Blocked!
You entered incorrect PUK1/PUK2 code 10 times, therefore
PUK1/PUK2 code is blocked. Contact your network operator/
service provider.
Charging stopped,
charge within specified
temperature range.
Charge the battery in a place with an appropriate ambient
temperature ranging from 5 °C to 40 °C.
Troubleshooting
If you still have difficulties after following the instructions in this section, turn off the phone,
remove the battery, then turn it on again after about 1 minute.
General use
Problem
Cause/solution
The phone does not turn on
even after installing charged
battery.
R Press M
The phone does not work.
R Make sure the SIM card and the battery are installed
correctly (page 10).
R Fully charge the battery (page 10).
The display is blank.
R The phone is in power save mode. Activate the display
again by pressing the centre of the navigator key.
N for about 1
R The phone is not turned on. Press M
second to turn the power on.
The contacts in the contacts list
are not displayed correctly.
R Only characters supported by this phone can be
displayed (page 20).
The display is in a language I
cannot read.
R Change the display language (page 14).
N for about 1 second to turn the power on.
Helpline Tel. No.: U.K. 0844 844 3899 Ireland 01289 8333
TU311EBE(en-en)_1021_ver101.pdf
37
2011/10/21
37
18:25:59
Useful Information
Problem
Cause/solution
The receiver volume has
changed to level 4, even
though I set it to a higher
volume.
R The receiver volume decreases to level 4 when the phone
is turned off. Adjust the volume again (page 16).
Battery recharge
Problem
Cause/solution
The phone beeps and/or
flashes.
R Battery charge is low. Fully charge the battery (page 10).
I fully charged the battery, but
–
still flashes or
– the operating time seems to
be shorter.
R Clean the battery end ( ,
) and the charge contacts
with a dry cloth and charge again.
R It is time to replace the battery (page 10).
R The battery power consumption is increased and the
battery life is reduced when the Bluetooth feature is
turned on. Turn the Bluetooth setting off (page 36) if you
want to save the battery life.
Making/answering calls
Problem
Cause/solution
Noise is heard, sound cuts in
and out.
R You are using the phone in an area with high electrical
interference. Move to a location away from sources of
interference.
R The GSM network signal is weak. Check the current
status and move to a new location until more bars are
visible (page 13).
The phone does not ring.
R The ringer volume is turned off. Adjust ringer volume
(page 26).
R Night mode is on. Turn it off (page 34).
R The ringer is set to ring at the Bluetooth headset. Change
the setting (page 36).
I cannot make a call.
R The phone is not in a GSM network service coverage
area. Check the current status and move to a new
location until more bars are visible (page 13).
R Outgoing calls are barred. Deactivate the outgoing call
bar settings (page 30).
R Your call is withheld. Change the show my ID setting to a
setting other than “Off” (page 27).
R The key lock is on. Unlock it (page 15).
R Fixed dialling feature is enabled (page 24). Disable it.
38
Helpline Tel. No.: U.K. 0844 844 3899 Ireland 01289 8333
TU311EBE(en-en)_1021_ver101.pdf
38
2011/10/21
18:25:59
Useful Information
Problem
Cause/solution
I cannot receive a call.
R The phone is not in a GSM network service coverage
area. Check the current status and move to a new
location until more bars are visible (page 13).
R Incoming calls are barred. Deactivate the incoming call
bar settings (page 30).
R A call matching the criteria for incoming restriction is
being received (page 27). Turn the incoming restriction
feature off.
Messages
Problem
Cause/solution
I cannot send text messages
(SMS).
R The phone could not connect to the service centre.
Confirm that the correct service centre number is stored
(page 22).
R Connection to service centre is temporarily down. Wait
and try again later.
R The destination phone number is incorrect. Enter the
correct destination phone number (page 21) and try again.
R Fixed dialling feature is enabled (page 24). Disable it.
R Recipient is currently out of network or has turned their
power off. Wait and try again later.
I cannot receive text messages
(SMS).
R Text message (SMS) transmission was interrupted. Wait
until the text message (SMS) has been sent before using
phone functions.
I cannot receive voicemail
message notifications.
R When the text message (SMS) memory is full, you may
not be able to receive any new voicemail message
notifications. Erase unnecessary text messages (SMS) to
receive new voicemail message notifications (page 21).
I cannot receive text messages
(SMS) even though the phone
has enough memory to receive
messages.
R Some kind of text messages (SMS) can be received to
the SIM card only. Check the memory status in the SIM
card (page 22) and erase unnecessary text messages
(SMS) (page 21).
I cannot receive E-mail
messages.
R This phone only supports text message (SMS) services.
Contact your network operator/service provider for details
of this service.
Bluetooth
Problem
Cause/solution
I cannot import the phonebook
data from another device.
R Confirm that the other device supports Bluetooth wireless
technology.
R Turn the other Bluetooth device off, then turn it on and try
again.
R Fixed dialling feature is enabled (page 24). Disable it.
Helpline Tel. No.: U.K. 0844 844 3899 Ireland 01289 8333
TU311EBE(en-en)_1021_ver101.pdf
39
2011/10/21
39
18:25:59
Useful Information
Problem
Cause/solution
I cannot have a conversation
using the Bluetooth headset.
R The Bluetooth headset is not registered. Register it
(page 36).
R The Bluetooth headset is not connected. Connect it
(page 36).
R Turn the Bluetooth headset off, then turn it on and try
again.
There is noise interference
during calls on the Bluetooth
headset.
R A Bluetooth headset can communicate with a phone
within a range of approximately 10 m. The connection
may be subject to interference from obstructions such as
walls or electronic devices. Move to a new location.
I cannot connect the Bluetooth
device to my phone.
R Confirm that the Bluetooth device is turned on.
R If the Bluetooth device is already connected to another
Bluetooth device, disconnect it. Then connect it to the
phone (page 36).
R The Bluetooth device is not registered. Register it
(page 36).
R Confirm that the Bluetooth setting of the phone is turned
on (page 36).
Liquid damage
Problem
Cause/solution
Liquid or other form of moisture
has entered the phone/charger.
R Disconnect the AC adaptor from the phone/charger.
Remove the SIM card and battery from the phone and
leave to dry for at least 3 days. After the phone/charger
are completely dry, insert the SIM card and battery into
the phone. Then reconnect the AC adaptor to charge fully
before use. If the phone does not work properly, contact
your place of purchase or nearest Panasonic service
centre.
Caution:
R To avoid permanent damage, do not use a microwave oven to speed up the drying process.
40
Helpline Tel. No.: U.K. 0844 844 3899 Ireland 01289 8333
TU311EBE(en-en)_1021_ver101.pdf
40
2011/10/21
18:25:59
Useful Information
Conditions of guarantee
This guarantee is in addition to and does not in any way affect any statutory or other rights of
consumer purchasers. If within the applicable guarantee period, the product proves to be
defective by reason of faulty design, workmanship or materials, we undertake subject to the
following conditions to have the defective product (or any part or parts there of) repaired or
replaced free of charge.
1. The product shall have been purchased and used solely within either the U.K. or Ireland
and in accordance with standard operating instructions and the technical and/or Safety
Standards required in the U.K.
2. On being found defective, please consult with the retailer from where it was purchased for
assistance.
3. This guarantee shall not apply to damage caused through fire, accident, lightning, misuse,
wear and tear, neglect, incorrect adjustment or repair, to damage caused through
installation, adaption, modification or use in an improper manner or inconsistent with the
technical and/or safety standards required in the country where this product is used, or to
damage occurred during transit to or from the purchaser.
4. If at any time during the guarantee period any part or parts of the product are replaced
with a part or parts not supplied or approved by us or of an objective quality safe and
suitable for the product, or the product has been dismantled or repaired by any person not
authorised by us, we shall have the right to terminate this guarantee in whole or in part
immediately without further notice.
5. The purchaser’s sole and exclusive remedy under this guarantee against us is for the
repair or replacement of the product or any defective part or parts and no other remedy,
including, but not limited to, incidental or consequential damage or loss of whatsoever
nature shall be available to the purchaser.
6. This guarantee shall not apply to batteries and any other items of limited natural life.
7. Our decision on all matters relating to complaints shall be final. Any product or defective
part which has been replaced shall become our property.
8. The guarantee period applicable to this product shall be 12 months.
Please keep these operating instructions with your receipt.
Panasonic U.K. a branch of Panasonic Marketing Europe GmbH
Receipt No.
Date of purchase
Model No.
Serial No.
Helpline Tel. No.: U.K. 0844 844 3899 Ireland 01289 8333
TU311EBE(en-en)_1021_ver101.pdf
41
2011/10/21
41
18:25:59
Index
Index
A
B
C
D
E
G
H
I
K
L
M
N
P
Alarm: 34
Answering calls: 16
Any key answer: 16, 27
Audible dialling: 15, 26
Auto redial: 27
Auto talk: 27
Battery: 10
Bluetooth: 28, 36
Calendar: 33
Call barring: 30
Call divert: 30
Call duration: 17
Call log: 17
Call waiting: 18, 30
Caller ID readout: 17
Character entry: 20
Conference call: 18
Date and time: 14
Display
Background: 26
Brightness: 26
Clock: 15
Font size: 15
Language: 14
Network name: 26
Wallpaper: 26
Emergency call: 16
Equalizer: 17
Error messages: 37
Group: 24
Hold: 18
International call: 16
Key lock: 15
Keytone: 26
Light: 12
Making calls: 16
Missed calls: 17
Mute: 17
Network: 28
Night mode: 34
Pause: 16
Phonebook: 23
Contacts list: 23
Contacts list options: 24
Phonebook settings
Fixed dialling number: 24
R
S
T
V
Memory status: 24
Memory storage location: 24
My number: 24
Service dialling number: 24
Power on/off: 14
Priority call: 31
Profile: 15, 26
Reset settings: 28
Restrict incoming call: 27
Ringer tone: 26
SAT: 28
Schedule: 33
Security: 28, 32
Phone code: 32
PIN: 32
PUK: 32, 37
Show my ID: 27
Silent mode: 15, 26
SIM: 10
Speakerphone: 16
Speed dial: 25
Summer time: 29
Telecoil (T-coil) mode: 15
Text message (SMS): 20
Text message (SMS) settings
Memory status: 22
Reply path: 22
Service centre: 22
Status report: 22
Storage media: 22
Validity period: 22
Transferring call: 19
Troubleshooting: 37
Vibration: 26
Voicemail: 22
Volume
Receiver: 16
Ringer: 16, 26
Speaker: 16
42
TU311EBE(en-en)_1021_ver101.pdf
42
2011/10/21
18:25:59
Notes
43
TU311EBE(en-en)_1021_ver101.pdf
43
2011/10/21
18:25:59
For your future reference
We recommend keeping a record of the following information to assist with any repair under
warranty.
Serial No.
Date of purchase
(found on the carton box or to the left of the battery compartment)
Name and address of dealer
Attach your purchase receipt here.
Helpline Tel. No. for customers within the U.K.: 0844 844 3899
Helpline Tel. No. for customers within Ireland: 01289 8333
Sales Department:
Panasonic House, Willoughby Road, Bracknell, Berkshire, RG12 8FP
Web site: www.panasonic.co.uk
1-62, 4-chome, Minoshima, Hakata-ku, Fukuoka 812-8531, Japan
© Panasonic System Networks Co., Ltd. 2011
*TU311EBE*
*TU311EBE*
PNQX5077YA
TU311EBE(en-en)_1021_ver101.pdf
44
2011/10/21
TT0911YK1111
18:25:59