Transcript
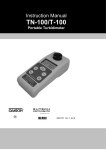
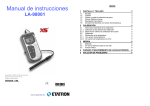
Operating Instructions EcoTestr pH 1 Waterproof Pocket Tester
Before First Use: Precipitation of the sensor electrolyte may cause white crystals to
form around the cap. This is normal and does not affect the tester’s performance.
Battery
cover
Note: If no button is pressed for 15 seconds, tester will automatically confirm calibration.
pH Testing: Remove cap and press on/off button to turn on the tester • Dip the
sensor in at least 20 mm of test solution • Stir once and let the reading stabilize.
Note the pH value • Press hold/ent button to hold (HO) the reading. Annunciator
will flash to indicate reading is in hold mode. Press hold/ent again to cancel (HC)
the hold mode • Press the on/off button to shut tester off.
Note: Tester automatically shuts off after 8.5 minutes of non-use to conserve batteries.
Maintenance: Rinse the sensor in tap water after use. In harsh samples, take
readings quickly, then rinse sensor immediately afterwards with de-ionized water
to remove residues and prevent electrode contamination.
Useful Notes: • To avoid cross-contamination, rinse sensor between samples and
buffer with de-ionized water • To maintain tester accuracy, use tester regularly or
calibrate at regular intervals as required • For long-term storage, fill the cap with
20 mm of storage solution (NOT de-ionized water), and replace cap*. This will keep
the sensor conditioned and ready for next use.
* The tester cap is not leak-proof. Please keep tester upright during soaking.
LIFT
Step 2
LIFT
Conditioning: Condition the tester before first use. Remove the transparent cap
and fill with tap water to a height of 20 mm. Recap the tester and soak* sensor for
one hour. This will activate the sensor and dissolve any crystals present. Rinse the
cap after use.
Calibration: Select pH 7.0 buffer for general testing. Select pH 4.0 for acid and
pH 10.0 for basic samples • Press on/off button to power on. Immerse sensor in
20 mm of buffer and stir gently. Wait for displayed value to stabilize at or near
pH 7.0 • Press cal button to enter calibration sequence. CAL will flash momentarily
and then show a flashing default reading • To complete calibration, press hold/ent
button to confirm (Ent) • To abort calibration, press cal button to escape (ESC). You
have successfully calibrated the instrument.
LIFT
Lift and push up
Step 1
Lift and hold
Figure 1:
Removing battery cover
to change batteries
Changing Batteries: To remove batteries, lift up front battery cover and hold in
position before lifting two sides of the pocket clip (Figure 1). Remove old batteries
and replace with fresh ones. Note polarity as shown in battery compartment. No
re-calibration is required after battery change since tester’s non-volatile memory
function retains calibration.
Error Messages: bAt – Batteries are weak and need replacement. Err – Wrong or
bad buffer value (out of range) and/or the sensor is failing. Use fresh buffer. Or/Ur –
Over or Under range signal or sensor is contaminated/damaged/not fully immersed.
Reset Option: Reset option allows you to restore the calibration back to factory
default settings • Press on/off to turn off tester • Press and hold hold/ent button and
then switch on using the on/off button. The display shows a flashing rSt (reset)
• Press hold/ent button to confirm (Ent) reset or press the cal button to escape
(ESC) reset option.
Warranty: This tester is supplied with a warranty against manufacturing defects for
a period of ONE year from date of purchase.
Accessories:
Eutech
Order Code
ECBU4BT
ECBU7BT
ECBU10BT
ECRE005
ECDPCBT
Oakton
Order Code
00654-00
00654-04
00654-08
00653-04
00653-06
Description
pH 4.01 buffer solution, 480 ml bottle
pH 7.00 buffer solution, 480 ml bottle
pH 10.01 buffer solution, 480 ml bottle
Storage solution for pH sensor, 480 ml bottle
Protein remover solution, 480 ml bottle