1
TGB21xE(en).book Page 1 Wednesday, April 9, 2014 11:53 AM
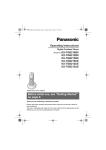
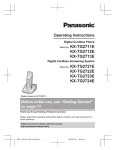
Operating Instructions
Digital Cordless Phone
Model No. KX-TGB210E
KX-TGB212E
KX-TGB213E
KX-TGB214E
Model shown is KX-TGB210.
Before initial use, see “Getting Started”
on page 10.
Thank you for purchasing a Panasonic product.
Please read these operating instructions before using the unit and save them for
future reference.
This unit is compatible with Caller ID. You must subscribe to the appropriate service
offered by your service provider/telephone company.
Please access our online customer survey:
http://panasonic.net/pcc/tel/q
TGB21xE(en).book Page 2 Wednesday, April 9, 2014 11:53 AM
Table of Contents
Introduction
Model composition. . . . . . . . . . . . . . . . . . . . 3
Accessory information . . . . . . . . . . . . . . . . . 3
General information . . . . . . . . . . . . . . . . . . . 4
Important Information
For your safety. . . . . . . . . . . . . . . . . . . . . . .
Important safety instructions . . . . . . . . . . . .
For best performance . . . . . . . . . . . . . . . . .
Other information . . . . . . . . . . . . . . . . . . . . .
Specifications. . . . . . . . . . . . . . . . . . . . . . . .
6
7
7
8
9
Getting Started
Setting up. . . . . . . . . . . . . . . . . . . . . . . . . .
Note when setting up . . . . . . . . . . . . . . . . .
Controls . . . . . . . . . . . . . . . . . . . . . . . . . . .
Display . . . . . . . . . . . . . . . . . . . . . . . . . . . .
Turning the power on/off . . . . . . . . . . . . . .
Initial settings . . . . . . . . . . . . . . . . . . . . . . .
10
11
12
12
13
13
Making/Answering Calls
Making calls . . . . . . . . . . . . . . . . . . . . . . . . 14
Answering calls . . . . . . . . . . . . . . . . . . . . . 14
Useful features during a call . . . . . . . . . . . 15
Phonebook
Handset phonebook. . . . . . . . . . . . . . . . . . 16
Programming
Programmable settings . . . . . . . . . . . . . . . 17
Special programming . . . . . . . . . . . . . . . . . 19
Caller ID Service
Using Caller ID service . . . . . . . . . . . . . . . 20
Caller list . . . . . . . . . . . . . . . . . . . . . . . . . . 20
Voice Mail Service
Voice mail service . . . . . . . . . . . . . . . . . . . 22
Intercom/Locator
Intercom. . . . . . . . . . . . . . . . . . . . . . . . . . . 23
Handset locator . . . . . . . . . . . . . . . . . . . . . 23
Transferring calls, conference calls . . . . . . 23
Useful Information
Character entry . . . . . . . . . . . . . . . . . . . . .
Error messages . . . . . . . . . . . . . . . . . . . . .
Troubleshooting . . . . . . . . . . . . . . . . . . . . .
Conditions of guarantee. . . . . . . . . . . . . . .
24
26
26
30
Index
Index . . . . . . . . . . . . . . . . . . . . . . . . . . . . . 31
2
TGB21xE(en).book Page 3 Wednesday, April 9, 2014 11:53 AM
Introduction
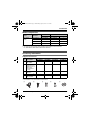
Model composition
Base unit
Handset
Part No.
Part No.
KX-TGB210
KX-TGB210
KX-TGBA20
1
KX-TGB212
KX-TGB210
KX-TGBA20
2
KX-TGB213
KX-TGB210
KX-TGBA20
3
KX-TGB214
KX-TGB210
KX-TGBA20
4
Series
Model No.
KX-TGB210
series
Quantity
L The Intercom feature is only available for KX-TGB212, KX-TGB213, and KX-TGB214.
L The suffix (E) in the following model numbers will be omitted in these instructions:
KX-TGB210E/KX-TGB212E/KX-TGB213E/KX-TGB214E
Accessory information
Supplied accessories
No.
Accessory item/
Part number
Quantity
KX-TGB210
KX-TGB212
KX-TGB213
KX-TGB214
1
AC adaptor/
PNLV226EZ
1
2
3
4
2
Telephone line
cord/PNJA1113Y
(Black/for U.K.) or
PNJA1037Z
(Transparence/
for U.K.)
1
1
1
1
3
Rechargeable
batteries*1
2
4
6
8
4
Handset cover*2
1
2
3
4
5
Charger/
PNLC1059ZB
—
1
2
3
*1 See page 4 for replacement battery information.
*2 The handset cover comes attached to the handset.
1
2
3
4
Helpline Tel. No.: U.K. 0844 844 3899 Ireland 01289 8333
5
3
TGB21xE(en).book Page 4 Wednesday, April 9, 2014 11:53 AM
Introduction
Additional/replacement accessories
Please contact your nearest Panasonic dealer for sales information.
Accessory item
Model number
Rechargeable
batteries
HHR-4MVE*1
Battery type:
– Nickel metal hydride (Ni-MH)
– 2 x AAA (R03) size for each handset
*1 Replacement batteries may have a different capacity from that of the supplied batteries.
Sales and support information
Customer Communications Centre
L For customers within the U.K.: 0844 844 3899
L For customers within Ireland: 01289 8333
L For further support on your product, please visit our website: www.panasonic.co.uk
Direct Sales at Panasonic U.K.
L Order accessory and consumable items for your product with ease and confidence by phoning
our Customer Communication Centre Monday - Friday 9:00am - 5:00pm (Excluding public
holidays).
L Go on line through our Internet Accessory ordering application at www.pas-europe.com
L Most major credit and debit cards accepted.
L All enquiries transactions and distribution facilities are provided directly by Panasonic U.K.
L Also available through our Internet is direct shopping for a wide range of finished products.
Take a browse on our website for further details.
http://shop.panasonic.co.uk/
General information
L This equipment is designed for use on the U.K. and Ireland analogue telephone network.
L In the event of problems, you should contact your equipment supplier in the first instance.
Declaration of Conformity:
L Panasonic System Networks Co., Ltd. declares that this equipment is in compliance with the
essential requirements and other relevant provisions of Radio & Telecommunications Terminal
Equipment (R&TTE) Directive 1999/5/EC.
Declarations of Conformity for the relevant Panasonic products described in this manual are
available for download by visiting:
http://www.ptc.panasonic.eu
Contact to Authorised Representative:
Panasonic Testing Centre
Panasonic Marketing Europe GmbH
Winsbergring 15, 22525 Hamburg, Germany
4
Helpline Tel. No.: U.K. 0844 844 3899 Ireland 01289 8333
TGB21xE(en).book Page 5 Wednesday, April 9, 2014 11:53 AM
Introduction
For your future reference
We recommend keeping a record of the following information to assist with any repair under
warranty.
Serial No.
Date of purchase
(found on the bottom of the base unit)
Name and address of dealer
Attach your purchase receipt here.
Helpline Tel. No.: U.K. 0844 844 3899 Ireland 01289 8333
5
TGB21xE(en).book Page 6 Wednesday, April 9, 2014 11:53 AM
Important Information
For your safety
To prevent severe injury and loss of life/
property, read this section carefully before
using the product to ensure proper and safe
operation of your product.
k WARNING
Power connection
L Use only the power source marked on the
product.
L Do not overload power outlets and
extension cords. This can result in the risk
of fire or electric shock.
L Completely insert the AC adaptor/power
plug into the power outlet. Failure to do so
may cause electric shock and/or excessive
heat resulting in a fire.
L Regularly remove any dust, etc. from the
AC adaptor/power plug by pulling it from the
power outlet, then wiping with a dry cloth.
Accumulated dust may cause an insulation
defect from moisture, etc. resulting in a fire.
L Unplug the product from power outlets if it
emits smoke, an abnormal smell, or makes
an unusual noise. These conditions can
cause fire or electric shock. Confirm that
smoke has stopped emitting and contact an
authorised service centre.
L Unplug from power outlets and never touch
the inside of the product if its casing has
been broken open.
L Never touch the plug with wet hands.
Danger of electric shock exists.
Installation
L To prevent the risk of fire or electrical shock,
do not expose the product to rain or any
type of moisture.
L Do not place or use this product near
automatically controlled devices such as
automatic doors and fire alarms. Radio
waves emitted from this product may cause
such devices to malfunction resulting in an
accident.
6
L Do not allow the AC adaptor or telephone
line cord to be excessively pulled, bent or
placed under heavy objects.
Operating safeguards
L Unplug the product from power outlets
before cleaning. Do not use liquid or
aerosol cleaners.
L Do not disassemble the product.
L Do not spill liquids (detergents, cleansers,
etc.) onto the telephone line cord plug, or
allow it to become wet at all. This may
cause a fire. If the telephone line cord plug
becomes wet, immediately pull it from the
telephone wall jack, and do not use.
Medical
L Consult the manufacturer of any personal
medical devices, such as pacemakers or
hearing aids, to determine if they are
adequately shielded from external RF
(radio frequency) energy. (The product
operates in the frequency range of 1.88
GHz to 1.90 GHz, and the RF transmission
power is 250 mW (max.).)
L Do not use the product in health care
facilities if any regulations posted in the
area instruct you not to do so. Hospitals or
health care facilities may be using
equipment that could be sensitive to
external RF energy.
k CAUTION
Installation and location
L Never install telephone wiring during an
electrical storm.
L Never install telephone line jacks in wet
locations unless the jack is specifically
designed for wet locations.
L Never touch uninsulated telephone wires or
terminals unless the telephone line has
been disconnected at the network interface.
L Use caution when installing or modifying
telephone lines.
L The AC adaptor is used as the main
disconnect device. Ensure that the AC
outlet is installed near the product and is
easily accessible.
Helpline Tel. No.: U.K. 0844 844 3899 Ireland 01289 8333
TGB21xE(en).book Page 7 Wednesday, April 9, 2014 11:53 AM
Important Information
L This product is unable to make calls when:
– the handset batteries need recharging or
have failed.
– there is a power failure.
4. Use only the power cord and batteries
indicated in this manual. Do not dispose of
batteries in a fire. They may explode.
Check with local codes for possible special
disposal instructions.
Battery
SAVE THESE INSTRUCTIONS
L We recommend using the batteries noted
on page 4. USE ONLY rechargeable NiMH batteries AAA (R03) size.
L Do not mix old and new batteries.
L Do not open or mutilate the batteries.
Released electrolyte from the batteries is
corrosive and may cause burns or injury to
the eyes or skin. The electrolyte is toxic and
may be harmful if swallowed.
L Exercise care when handling the batteries.
Do not allow conductive materials such as
rings, bracelets, or keys to touch the
batteries, otherwise a short circuit may
cause the batteries and/or the conductive
material to overheat and cause burns.
L Charge the batteries provided with or
identified for use with this product only, in
accordance with the instructions and
limitations specified in this manual.
L Only use a compatible base unit (or
charger) to charge the batteries. Do not
tamper with the base unit (or charger).
Failure to follow these instructions may
cause the batteries to swell or explode.
Important safety
instructions
When using your product, basic safety
precautions should always be followed to
reduce the risk of fire, electric shock, and
injury to persons, including the following:
1. Do not use this product near water for
example, near a bathtub, washbowl,
kitchen sink, or laundry tub, in a wet
basement or near a swimming pool.
2. Avoid using a telephone (other than a
cordless type) during an electrical storm.
There may be a remote risk of electric
shock from lightning.
3. Do not use the telephone to report a gas
leak in the vicinity of the leak.
For best performance
Base unit location/avoiding noise
The base unit and other compatible Panasonic
units use radio waves to communicate with
each other.
L For maximum coverage and noise-free
communications, place your base unit:
– at a convenient, high, and central
location with no obstructions between
the handset and base unit in an indoor
environment.
– away from electronic appliances such as
TVs, radios, personal computers,
wireless devices, or other phones.
– facing away from radio frequency
transmitters, such as external antennas
of mobile phone cell stations. (Avoid
putting the base unit on a bay window or
near a window.)
L Coverage and voice quality depends on the
local environmental conditions.
L If the reception for a base unit location is not
satisfactory, move the base unit to another
location for better reception.
Environment
L Keep the product away from electrical noise
generating devices, such as fluorescent
lamps and motors.
L The product should be kept free from
excessive smoke, dust, high temperature,
and vibration.
L The product should not be exposed to direct
sunlight.
L Do not place heavy objects on top of the
product.
L When you leave the product unused for a
long period of time, unplug the product from
the power outlet.
Helpline Tel. No.: U.K. 0844 844 3899 Ireland 01289 8333
7
TGB21xE(en).book Page 8 Wednesday, April 9, 2014 11:53 AM
Important Information
L The product should be kept away from heat
sources such as radiators, cookers, etc. It
should not be placed in rooms where the
temperature is less than 0 °C or greater
than 40 °C. Damp basements should also
be avoided.
L The maximum calling distance may be
shortened when the product is used in the
following places: Near obstacles such as
hills, tunnels, underground, near metal
objects such as wire fences, etc.
L Operating the product near electrical
appliances may cause interference. Move
away from the electrical appliances.
Routine care
L Wipe the outer surface of the product
with a soft moist cloth.
L Do not use benzine, thinner, or any
abrasive powder.
Other information
CAUTION: Risk of explosion if battery is
replaced by an incorrect type. Dispose of used
batteries according to the instructions.
Notice for product disposal, transfer,
or return
L This product can store your private/
confidential information. To protect your
privacy/confidentiality, we recommend that
you erase information such as phonebook
or caller list entries from the memory before
you dispose of, transfer, or return the
product.
Information for Users on Collection
and Disposal of Old Equipment and
used Batteries
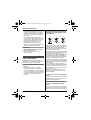
1
2
3
These symbols (1, 2, 3) on the products,
packaging, and/or accompanying documents
mean that used electrical and electronic
products and batteries should not be mixed
with general household waste.
For proper treatment, recovery and recycling
of old products and used batteries, please take
them to applicable collection points, in
accordance with your national legislation and
the Directives 2002/96/EC and 2006/66/EC.
By disposing of these products and batteries
correctly, you will help to save valuable
resources and prevent any potential negative
effects on human health and the environment
which could otherwise arise from inappropriate
waste handling.
For more information about collection and
recycling of old products and batteries, please
contact your local municipality, your waste
disposal service or the point of sale where you
purchased the items.
Penalties may be applicable for incorrect
disposal of this waste, in accordance with
national legislation.
For business users in the European
Union
If you wish to discard electrical and electronic
equipment, please contact your dealer or
supplier for further information.
Information on Disposal in other
Countries outside the European
Union
These symbols (1, 2, 3) are only valid in the
European Union. If you wish to discard these
items, please contact your local authorities or
8
Helpline Tel. No.: U.K. 0844 844 3899 Ireland 01289 8333
TGB21xE(en).book Page 9 Wednesday, April 9, 2014 11:53 AM
Important Information
dealer and ask for the correct method of
disposal.
Note for the battery symbol
This symbol (2) might be used in combination
with a chemical symbol (3). In this case it
complies with the requirement set by the
Directive for the chemical involved.
Note for the battery removal
procedure
Refer to “Battery installation”, page 10.
Specifications
■ Standard:
DECT (Digital Enhanced Cordless
Telecommunications)
■ Frequency range:
1.88 GHz to 1.90 GHz
■ RF transmission power:
Approx. 10 mW (average power per
channel)
■ Power source:
220–240 V AC, 50/60 Hz
■ Power consumption:
Base unit:
Standby: Approx. 0.6 W
Maximum: Approx. 3.3 W
Charger:
Standby: Approx. 0.1 W
Maximum: Approx. 2.2 W
■ Operating conditions:
0 °C – 40 °C, 20 % – 80 % relative air
humidity (dry)
Note:
L Design and specifications are subject to
change without notice.
L The illustrations in these instructions may
vary slightly from the actual product.
Helpline Tel. No.: U.K. 0844 844 3899 Ireland 01289 8333
9
TGB21xE(en).book Page 10 Wednesday, April 9, 2014 11:53 AM
Getting Started
Battery installation
Setting up
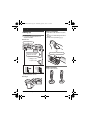
Connections
L Use only the supplied Panasonic AC
adaptor PNLV226E.
L USE ONLY Ni-MH batteries AAA (R03)
size.
L Do NOT use Alkaline/Manganese/Ni-Cd
batteries.
L Confirm correct polarities (S, T).
■ Base unit
Press plug firmly.
“Click”
Hook
Use only the supplied
telephone line cord.
Rechargeable Ni-MH ONLY
(DSL/ADSL filter*)
To telephone line
To power outlet
Correct
Incorrect
Battery charging
Charge for about 7 hours.
*DSL/ADSL filter (not supplied) is required if
you have DSL/ADSL service.
■ Charger
Hook
To power outlet
10
Helpline Tel. No.: U.K. 0844 844 3899 Ireland 01289 8333
TGB21xE(en).book Page 11 Wednesday, April 9, 2014 11:53 AM
Getting Started
Note when setting up
Note for connections
L The AC adaptor must remain connected at
all times. (It is normal for the adaptor to feel
warm during use.)
L The AC adaptor should be connected to a
vertically oriented or floor-mounted AC
outlet. Do not connect the AC adaptor to a
ceiling-mounted AC outlet, as the weight of
the adaptor may cause it to become
disconnected.
During a power failure
The unit will not work during a power failure.
We recommend connecting a corded-type
telephone (without AC adaptor) to the same
telephone line or to the same telephone line
jack using a T-adaptor. Your Panasonic sales
shop can offer you more information about
connection possibilities.
Note for battery installation
L Use the supplied rechargeable batteries.
For replacement, we recommend using the
Panasonic rechargeable batteries noted on
page 4, 7.
L Wipe the battery ends (S, T) with a dry
cloth.
L Avoid touching the battery ends
(S, T) or the unit contacts.
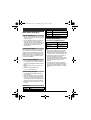
Icon
Battery level
6
Medium
7
Low
8
Needs charging.
Panasonic Ni-MH battery
performance (supplied batteries)
Operation
Operating time
In continuous use
16 hours max.
Not in use
(standby)
280 hours max.
Note:
L It is normal for batteries not to reach full
capacity at the initial charge. Maximum
battery performance is reached after a few
complete cycles of charge/discharge (use).
L Actual battery performance depends on
usage and ambient environment.
L Even after the batteries are fully charged,
the handset can be left on the base unit or
charger without any ill effect on the
batteries.
L The battery level may not be displayed
correctly after you replace the batteries. In
this case, place the handset on the base
unit or charger and let it charge for at least 7
hours.
Note for battery charging
L It is normal for the handset to feel warm
during charging.
L Clean the charge contacts of the handset,
base unit, and charger with a soft and dry
cloth once a month. Before cleaning the
unit, disconnect from power outlets and any
telephone line cords. Clean more often if
the unit is exposed to grease, dust, or high
humidity.
Battery level
Icon
5
Battery level
High
Helpline Tel. No.: U.K. 0844 844 3899 Ireland 01289 8333
11
TGB21xE(en).book Page 12 Wednesday, April 9, 2014 11:53 AM
Getting Started
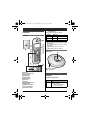
■ Control type
A Navigator key
Controls
Navigator keys functions as follows.
Symbol
Handset
G
C
D
{3}
Left
{R}
{4}
Right
J
K
Base unit
I
B
Up
{^}
{y}
– {^}, {V}, {3}, or {4}: Scroll through various
lists and items.
– {^} or {V} (v): Adjust the receiver volume
while talking.
– {y} (Caller list): View the caller list.
– {R} (Redial): View the redial list.
H
A
Meaning
{v}
L
A
E
F
M
B
A Charge contacts
B {x} (Locator)
A
A
B
C
D
E
F
G
H
I
J
K
L
M
12
Ringer
{k} (Phonebook)
{C} (Clear)
{C} (Talk)
Dial keypad
Microphone
Receiver
Display
{j/OK} (Menu/OK)
{P} (Pause)
{R} (Recall/Flash)
{m} (Off/Power)
Charge contacts
Display
Handset display items
Item
w
Meaning
Within range of a base unit
L When flashing:
Handset is searching for
base unit. (page 27)
Helpline Tel. No.: U.K. 0844 844 3899 Ireland 01289 8333
TGB21xE(en).book Page 13 Wednesday, April 9, 2014 11:53 AM
Getting Started
Item
Meaning
C
Handset is on an outside call.
L When flashing:
An incoming call is now
being received or the call is
put on hold.
y
Missed call*1 (page 20)
T
L Mute is on. (page 15)
L Ringer volume is off. (page
17)
5
Battery level
k
Phonebook is opened.
0
New voice mail message
received.*2 (page 22)
Note:
L If you select a language you cannot read:
{m} s {j/OK} s {V} 4 times s
{j/OK} 2 times s {r}: Select your
desired language. s {j/OK} s {m}
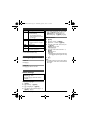
Date and time
1 {j/OK}
2 {r}: “Set Time” s {j/OK}
3 {r}: “Date & Time” s {j/OK}
4 Enter the current date, month, and year.
s {j/OK}
Example: 15 July, 2014
15 z7 14
5
*1 Caller ID subscribers only
*2 Voice mail subscribers only
Turning the power on/off
6
Enter the current hour and minute. s
{j/OK}
Example: 15:30
15 3z
L If you enter the wrong date and/or time,
press {C} and perform again from step
3.
{m}
Note:
L The date and time may be incorrect after a
power failure. In this case, set the date and
time again.
Power on
Press {m}.
Power off
Press {m} for about 2 seconds.
Initial settings
Symbol meaning:
Example: {r}: “Off”
Press {V} or {^} to select the words in
quotations.
Display language
1 {j/OK}
2 {r}: “Setup” s {j/OK}
3 {r}: “Language” s {j/OK}
4 {r}: Select your desired language. s
{j/OK} s {m}
Helpline Tel. No.: U.K. 0844 844 3899 Ireland 01289 8333
13
TGB21xE(en).book Page 14 Wednesday, April 9, 2014 11:53 AM
Making/Answering Calls
Making calls
1
2
3
Lift the handset and dial the phone
number.
L To correct a digit, press {C}.
{C}
When you finish talking, press {m} or
place the handset on the base unit or
charger.
Adjusting the receiver volume
Press {^} or {V} repeatedly while talking.
Making a call using the redial list
The last 10 phone numbers dialled are stored
in the redial list (each 24 digits max.).
1 {R}
2 {r}: Select the desired phone number.
L When the number matches a phone
number stored in the phonebook, the
stored name in the phonebook is
displayed.
3
{C}
Note:
L When editing:
– To erase a number, place the cursor to
the right of where you want to erase the
number, then press {C}.
– To insert a number, place the cursor to
the right of where you want to insert the
number, then press the appropriate dial
key.
Pause (for PBX/long distance service
users)
A pause is sometimes required when making
calls using a PBX or long distance service.
When storing a calling card access number
and/or PIN in the phonebook, a pause is also
needed (page 16).
Example: If you need to dial the line access
number “0” when making outside calls with a
PBX:
1
2
z s {P}
Dial the phone number. s {C}
Note:
L A 3 second pause is inserted each time {P}
is pressed. Repeat as needed to create
longer pauses.
Editing/erasing/storing numbers in
the redial list
1
2
3
14
{R}
{r}: Select the desired phone number.
s {j/OK}
Proceed with the desired operation.
■ Editing a number before calling:
{r}: “Edit & Call” s {j/OK} s
Press {3} or {4} to move the cursor.
s Edit the number. s {C}
■ Erasing a number:
{r}: Select “Erase” or “Erase All”.
s {j/OK} 2 times s {m}
■ Storing a number to the
phonebook:
{r}: “Save TEL No.” s {j/OK}
s To store the name, continue from
step 3, “Adding entries”, page 16.
Answering calls
1
Lift the handset and press {C} when the
unit rings.
L You can also answer the call by
pressing any dial key from z to 9, *,
or y. (Any key answer feature)
2
When you finish talking, press {m} or
place the handset on the base unit or
charger.
Auto talk
You can answer calls simply by lifting the
handset off the base unit or charger. You do
not need to press {C}. To turn this feature on,
see page 18.
Helpline Tel. No.: U.K. 0844 844 3899 Ireland 01289 8333
TGB21xE(en).book Page 15 Wednesday, April 9, 2014 11:53 AM
Making/Answering Calls
Adjusting the handset ringer volume
■ While the handset is ringing for an
incoming call:
Press {^} or {V} repeatedly to select the
desired volume.
■ Programming the volume beforehand:
1 {j/OK}
2 {r}: “Ringer Setup” s {j/OK}
3 {r}: “Volume” s {j/OK}
4 {r}: Select the desired volume.
5 {j/OK} s {m}
If you subscribe to both Caller ID and Call
Waiting with Caller ID services, the 2nd
caller’s information is displayed after you hear
the call waiting tone on the handset.
1
2
Press {R} to answer the 2nd call.
To switch between calls, press {R}.
Note:
L Please contact your service provider/
telephone company for details and
availability of this service in your area.
Call share
Available for:
KX-TGB212/KX-TGB213/KX-TGB214
Useful features during a
call
Mute
While mute is turned on, you can hear the
other party, but the other party cannot hear
you.
1
Press {j/OK} during conversation. s
{r}: “Mute” s {j/OK}
L T is displayed.
2
To return to the conversation, press
{j/OK}. s {r}: “Mute” s {j/OK}
You can join an existing outside call.
To join the conversation, press {C} when the
other handset is on an outside call.
Note:
L To prevent other users from joining your
conversations with outside callers, turn the
privacy mode on (page 18).
Recall/flash
{R} allows you to use the special features of
your host PBX such as transferring an
extension call, or accessing optional
telephone services.
Note:
L To change the recall/flash time, see page
18.
For call waiting or Call Waiting
Caller ID service users
To use call waiting or Call Waiting Caller ID,
you must first subscribe with your service
provider/telephone company.
This feature allows you to receive calls while
you are already talking on the phone. If you
receive a call while on the phone, you will hear
a call waiting tone.
Helpline Tel. No.: U.K. 0844 844 3899 Ireland 01289 8333
15
TGB21xE(en).book Page 16 Wednesday, April 9, 2014 11:53 AM
Phonebook
Handset phonebook
The phonebook allows you to make calls
without having to dial manually. You can add
50 names and phone numbers, and confirm
the number of entries (page 16).
Adding entries
1 {k}
2 {r}: “New Entry” s {j/OK}
3 Enter the party’s name (12 characters
max.). s {j/OK}
L You can change the character entry
mode by pressing {k} (page 24).
4
5
Enter the party’s phone number (24 digits
max.). s {j/OK} 2 times
L To add other entries, press {j/OK}
and repeat from step 3.
{m}
Confirming the number of entries
1
2
3
{k}
{r}: “Memory” s {j/OK}
{m}
Finding and calling from a
phonebook entry
Scrolling through all entries
1
2
3
4
{k}
{r}: “Show List” s {j/OK}
{r}: Select the desired entry.
L To view the phone number, press
{j/OK}. s {r}: “Phone No.” s
{j/OK}
To return, press {C}.
{C}
Editing entries
1 Find the desired entry (page 16). s
{j/OK}
2
16
3
Edit the name if necessary (12 characters
max.; page 24). s {j/OK}
4
Edit the phone number if necessary (24
digits max.; page 14). s {j/OK}
2 times
5
{m}
Editing an entry and making a call
1
Find the desired entry (page 16). s
{j/OK}
2
{r}: “Edit & Call” s {j/OK} s
Press {3} or {4} to move the cursor. s
Edit the number (page 14). s {C}
Erasing entries
Erasing an entry
1
Find the desired entry (page 16). s
{j/OK}
2
3
{r}: “Erase” s {j/OK} 2 times
{m}
Erasing all entries
1
2
3
{k}
{r}: “Erase All” s {j/OK} 2 times
{m}
Chain dial
This feature allows you to dial phone numbers
in the phonebook while you are on a call. This
feature can be used, for example, to dial a
calling card access number or bank account
PIN that you have stored in the phonebook,
without having to dial manually.
1
2
3
During an outside call, press {k}.
{r}: Select the desired entry.
Press {C} to dial the number.
Note:
L When storing a calling card access number
and your PIN in the phonebook as one
phonebook entry, press {P} to add pauses
after the number and PIN as necessary
(page 14).
{r}: “Edit” s {j/OK}
Helpline Tel. No.: U.K. 0844 844 3899 Ireland 01289 8333
TGB21xE(en).book Page 17 Wednesday, April 9, 2014 11:53 AM
Programming
Programmable settings
You can customise the unit by programming the following features using the handset.
Programming by scrolling through the display menus
1 {j/OK}
2 Press {V} or {^} to select the desired main menu. s {j/OK}
3 Press {V} or {^} to select the desired item in sub-menu 1. s {j/OK}
L In some cases, you may need to select from sub-menu 2. s {j/OK}
4
Press {V} or {^} to select the desired setting. s {j/OK}
L This step may vary depending on the feature being programmed.
L To exit the operation, press {m}.
Note:
L In the following table, < > indicates the default settings.
Main menu
Sub-menu 1
Ringer Setup
Volume*1
<Volume 5>
–
15
Ringtone*2
<Ringtone 1>
–
–
–
13
Set Time
Date & Time*3
Alarm
Sub-menu 2
Page
Alarm Mode
<Off>
Repeat Times
<Off>
Repeat Cycle
<3 Minutes>
19
Ringtone
<Ringtone 1>
Volume
<Volume 5>
Phonebook
Caller List
Time Adjust*3, *4
<Caller ID>
–
–
Show List
–
16
New Entry
–
16
Erase All
–
16
Memory
–
16
–
20
–
Helpline Tel. No.: U.K. 0844 844 3899 Ireland 01289 8333
17
TGB21xE(en).book Page 18 Wednesday, April 9, 2014 11:53 AM
Programming
Main menu
Sub-menu 1
Setup
Language
<English>
–
13
Contrast
(Display contrast)
<Contrast 04>
–
–
Clock Disp.*5
(Disp.: display)
<On>
–
–
Auto Talk*6
<Off>
–
14
Register HS
(HS: handset)
–
29
Keytones*7
<On>
–
–
Recall/Flash*3, *8
<100 msec.>
–
15
Privacy Mode*3, *9, *10
<Off>
–
–
Change PIN*3
Intercom*9
–
Sub-menu 2
Page
–
29
–
23
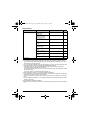
*1 Ringer volume cannot be turned off for paging.
*2 If you select one of the melody ringer tones, the ringer tone continues to play for several
seconds even if the caller has already hung up. You may either hear a dial tone or no one on
the line when you answer the call.
*3 If you program these settings using one of the handsets, you do not need to program the same
item using another handset. (KX-TGB212/KX-TGB213/KX-TGB214)
*4 This feature allows the unit to automatically adjust the date and time each time caller
information including date and time is received.
To turn this feature on, select “Caller ID”. To turn this feature off, select “Manual”. (Caller
ID subscribers only)
To use this feature, set the date and time first (page 13).
*5 When this feature is set to off, the handset number is displayed.
*6 If you subscribe to a Caller ID service and want to view the caller’s information after lifting up
the handset to answer a call, turn off this feature.
*7 Turn this feature off if you prefer not to hear key tones while you are dialling or pressing any
keys.
*8 The recall/flash time depends on your telephone exchange or host PBX. Contact your PBX
supplier if necessary.
*9 KX-TGB212/KX-TGB213/KX-TGB214
*10To prevent other users from joining your conversations with outside callers, turn this feature
on.
18
Helpline Tel. No.: U.K. 0844 844 3899 Ireland 01289 8333
TGB21xE(en).book Page 19 Wednesday, April 9, 2014 11:53 AM
Programming
L We recommend selecting a different
ringer tone from the one used for
outside calls.
Special programming
Alarm
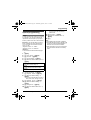
An alarm sounds at the set time (once or daily)
for 2 minutes. You can also customise the
repeat times and the repeat cycle (snooze
function). Alarm can be set for each handset.
Example: If you want the alarm to sound 3
times, repeating at 5 minute intervals from
7:00, you need to set the alarm as follows;
Time: “07:00”
“Repeat Times”: “3 Times”
“Repeat Cycle”: “5 Minutes”
13
14
15
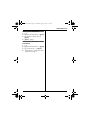
{r}: “Volume” s {j/OK}
{r}: Select the desired volume. s
{j/OK}
{m}
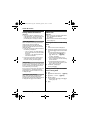
Note:
L Press {m} to stop the alarm completely.
L Press any dial key from z to 9, *, or y
to stop the sound but keep the set time
and/or the snooze function activated.
L When the handset is in use, the alarm will
not sound until the handset is in standby
mode.
Important:
L Set the date and time beforehand (page
13).
1
2
3
4
5
{j/OK}
{r}: “Set Time” s {j/OK}
{r}: “Alarm” s {j/OK}
{r}: “Alarm Mode” s {j/OK}
{r}: Select the desired alarm option. s
{j/OK}
“Off”
Turns alarm off. Go to step 15.
“Once”
An alarm sounds once at the set time.
“Daily”
An alarm sounds daily at the set time.
6
7
8
Set the desired time. s {j/OK}
9
10
{r}: “Repeat Cycle” s {j/OK}
11
12
{r}: “Ringtone” s {j/OK}
{r}: “Repeat Times” s {j/OK}
{r}: Select the desired setting. s
{j/OK}
L If you only want the alarm to sound 1
time, select “Off” and go to step 11.
{r}: Select the desired setting. s
{j/OK}
{r}: Select the desired alarm tone. s
{j/OK}
Helpline Tel. No.: U.K. 0844 844 3899 Ireland 01289 8333
19
TGB21xE(en).book Page 20 Wednesday, April 9, 2014 11:53 AM
Caller ID Service
Using Caller ID service
Caller list
Important:
L This unit is Caller ID compatible. To use
Caller ID features, you must subscribe to a
Caller ID service. Contact your service
provider/telephone company for details.
Important:
L Only 1 person can access the caller list at a
time. (KX-TGB212/KX-TGB213/
KX-TGB214)
L Make sure the unit’s date and time setting is
correct (page 13).
Caller ID features
When an outside call is being received, the
caller’s phone number is displayed.
Caller information for the last 50 callers is
logged in the caller list from the most recent
call to the oldest.
L If the unit cannot receive caller information,
the following is displayed:
– “Out of Area”: The caller dials from
an area which does not provide a Caller
ID service.
– “Private”: The caller requests not to
send caller information.
L If the unit is connected to a PBX system,
caller information may not be properly
received. Contact your PBX supplier.
Viewing the caller list and calling
back
1 {y}
L The most recent call is displayed.
2
Press {V} to search from the next recent
call, or press {^} to search from the oldest
call.
L To switch the display from name to
phone number, press {j/OK}. s
{r}: “Phone No.” s {j/OK}
To return, press {C}.
L If the whole phone number is not
shown, press {4} to see the remaining
phone numbers.
L To switch the display from name or
phone number to date and time, press
{4}. To return, press {3}.
3
To call back, press {C}.
To exit, press {m}.
Missed calls
If a call is not answered, the unit treats it as a
missed call and y is displayed. This lets you
know if you should view the caller list to see
who called while you were away.
Even if only one missed call in the caller list is
viewed (page 20), y disappears from the
display. When you receive another new call, y
is displayed again.
Phonebook name display
When caller information is received and it
matches a phone number stored in the
phonebook, the stored name in the phonebook
is displayed and logged in the caller list.
Editing a caller’s phone number
before calling back
1 {y}
2 {r}: Select the desired entry. s {j/OK}
3 {r}: “Edit & Call” s {j/OK}
4 Edit the number.
L Press dial key (z to 9) to add, {C} to
delete (page 14).
5
20
{C}
Helpline Tel. No.: U.K. 0844 844 3899 Ireland 01289 8333
TGB21xE(en).book Page 21 Wednesday, April 9, 2014 11:53 AM
Caller ID Service
Erasing caller information
1 {y}
2 {r}: Select the desired entry. s {j/OK}
3 {r}: “Erase” or “Erase All” s
{j/OK}
4
{j/OK} s {m}
Storing caller information to the
phonebook
1 {y}
2 {r}: Select the desired entry. s {j/OK}
3 {r}: “Save TEL No.” s {j/OK}
4 To store the name, continue from step 3,
“Adding entries”, page 16.
Helpline Tel. No.: U.K. 0844 844 3899 Ireland 01289 8333
21
TGB21xE(en).book Page 22 Wednesday, April 9, 2014 11:53 AM
Voice Mail Service
Voice mail service
Voice mail is an automatic answering service
offered by your service provider/telephone
company. After you subscribe to this service,
your service provider/telephone company’s
voice mail system answers calls for you when
you are unavailable to answer the phone or
when your line is busy. Messages are
recorded by your service provider/telephone
company, not your telephone. When you have
new messages, 0 is displayed on the
handset if message indication service is
available. Please contact your service
provider/telephone company for details of this
service.
Important:
L If 0 still remains on the display even after
you have listened to new messages, turn it
off by pressing and holding {C} for 2
seconds.
22
Helpline Tel. No.: U.K. 0844 844 3899 Ireland 01289 8333
TGB21xE(en).book Page 23 Wednesday, April 9, 2014 11:53 AM
Intercom/Locator
Intercom
Available for:
KX-TGB212/KX-TGB213/KX-TGB214
Intercom calls can be made between
handsets.
Note:
L If you receive an outside call while talking
on the intercom, you hear interrupt tones.
To answer the call, press {m}, then press
{C}.
L When paging the handset, the paged
handset beeps for 1 minute.
Making an intercom call
1 {j/OK}
2 {r}: “Intercom” s {j/OK}
3 To page a specific handset, enter the
handset number.
L To page all handsets, press *, or
{j/OK} again.
(KX-TGB213/KX-TGB214)
L To stop paging, press {m}.
4
Transferring calls,
conference calls
Available for:
KX-TGB212/KX-TGB213/KX-TGB214
Outside calls can be transferred or a
conference call with an outside party can be
made between 2 handsets.
1
2
During an outside call, press {j/OK}.
3
Enter the desired handset number you
want to transfer to.
4
Wait for the paged party to answer.
L If the paged party does not answer,
press {C} to return to the outside call.
5
To complete the transfer:
Press {m}.
L The outside call is being routed to the
destination unit.
To establish a conference call:
Press {C}.
L To leave the conference, press {m}.
The other 2 parties can continue the
conversation.
When you finish talking, press {m}.
Answering an intercom call
1 Press {C} to answer the page.
2 When you finish talking, press {m}.
Transferring a call without speaking
to the other handset user
1
Handset locator
You can locate a misplaced handset by paging
it.
{r}: “Intercom” s {j/OK}
L C flashes to indicate the outside call
is on hold.
2
Perform step 1 to 3, “Transferring calls,
conference calls”, page 23.
{m}
L The outside call rings at the other
handset.
1
Base unit: Press {x}.
L All registered handsets beep for 1
minute.
2
Note:
L If the other handset user does not answer
the call within 30 seconds, the call rings at
your handset again.
To stop paging:
Base unit: Press {x}.
Handset: Press {m}.
Answering a transferred call
Press {C} to answer the page.
Helpline Tel. No.: U.K. 0844 844 3899 Ireland 01289 8333
23
TGB21xE(en).book Page 24 Wednesday, April 9, 2014 11:53 AM
Useful Information
Character entry
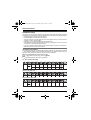
The dial keys are used to enter characters and numbers. Each dial key has multiple characters
assigned to it. The characters that can be entered depend on the character entry mode (page 24).
– Press {3} or {4} to move the cursor left or right.
– Press dial keys to enter characters and numbers.
– To erase a character or number, place the cursor to the right of where you want to erase the
character or number, then press {C}.
– Press * (A→a) to switch between uppercase and lowercase.
– To enter another character located on the same dial key, press {4} to move the cursor to the
next space, then press the appropriate dial key.
– If you do not press any dial key within 5 seconds after entering a character, the character is
fixed and the cursor moves to the next space.
Character entry modes
The available character entry modes are Alphabet (ABC), Numeric (0-9), Greek (F), Extended
1 (o), Extended 2 (H), and Cyrillic (I). When in these entry modes except Numeric, you
can select which character is entered by pressing a dial key repeatedly.
When the unit displays the character entry screen:
{k} s {r}: Select a character entry mode. s {j/OK}
Note:
L in the following tables represents a single space.
Alphabet character table (ABC)
Numeric entry table (0-9)
Greek character table (M)
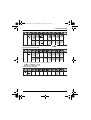
24
Helpline Tel. No.: U.K. 0844 844 3899 Ireland 01289 8333
TGB21xE(en).book Page 25 Wednesday, April 9, 2014 11:53 AM
Useful Information
Extended 1 character table (p)
L The following are used for both uppercase and lowercase:
Extended 2 character table (O)
L The following are used for both uppercase and lowercase:
Cyrillic character table (P)
Helpline Tel. No.: U.K. 0844 844 3899 Ireland 01289 8333
25
TGB21xE(en).book Page 26 Wednesday, April 9, 2014 11:53 AM
Useful Information
Error messages
Display message
Cause/solution
Memory Full
L The phonebook memory is full. Erase unwanted entries (page 16).
Troubleshooting
If you still have difficulties after following the instructions in this section, disconnect the base unit’s
AC adaptor and turn off the handset, then reconnect the base unit’s AC adaptor and turn on the
handset.
General use
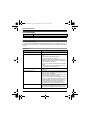
Problem
Cause/solution
The handset does not turn on even
after installing charged batteries.
L Place the handset on the base unit or charger to turn
on the handset.
The unit does not work.
L Make sure the batteries are installed correctly (page
10).
L Fully charge the batteries (page 10).
L Check the connections (page 10).
L Unplug the base unit’s AC adaptor to reset the unit
and turn off the handset. Reconnect the adaptor, turn
on the handset and try again.
L Remove the batteries from the handset and install
again.
L The handset has not been registered to the base
unit. Register the handset (page 29).
The handset display is blank.
L The handset is not turned on. Turn the power on
(page 13).
I cannot hear a dial tone.
L Make sure that you are using the supplied telephone
line cord. Your old telephone line cord may have a
different wiring configuration.
L The base unit’s AC adaptor or telephone line cord is
not connected. Check the connections.
L Disconnect the base unit from the telephone line and
connect the line to a known working telephone. If the
working telephone operates properly, contact our
service personnel to have the unit repaired. If the
working telephone does not operate properly,
contact your service provider/telephone company.
I cannot use the intercom feature.
L This feature is available between the handsets.
Although the handset displays “Intercom”, this
feature is not available for single handset models.
26
Helpline Tel. No.: U.K. 0844 844 3899 Ireland 01289 8333
TGB21xE(en).book Page 27 Wednesday, April 9, 2014 11:53 AM
Useful Information
Programmable settings
Problem
Cause/solution
The display is in a language I
cannot read.
L Change the display language (page 13).
Battery recharge
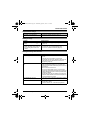
Problem
Cause/solution
The handset beeps and/or 8
displays.
L Battery needs charging. Fully charge the batteries
(page 10).
I fully charged the batteries, but
– battery level does not increase or
– the operating time seems to be
shorter.
L Clean the battery ends (S, T) and the charge
contacts with a dry cloth and charge again.
L It is time to replace the batteries (page 10).
Making/answering calls, intercom
Problem
Cause/solution
w is flashing.
L The handset is too far from the base unit. Move
closer.
L The base unit’s AC adaptor is not properly
connected. Reconnect AC adaptor to the base unit.
L The handset is not registered to the base unit.
Register it (page 29).
Noise is heard, sound cuts in and
out.
L You are using the handset or base unit in an area
with high electrical interference. Re-position the
base unit and use the handset away from sources of
interference.
L Move closer to the base unit.
L If you use a DSL/ADSL service, we recommend
connecting a DSL/ADSL filter between the base unit
and the telephone line jack. Contact your DSL/ADSL
provider for details.
L Unplug the base unit’s AC adaptor to reset the unit
and turn off the handset. Reconnect the adaptor, turn
on the handset and try again.
The handset does not ring.
L The ringer volume is turned off. Adjust ringer volume
(page 15).
I cannot make a call.
L The handset is too far from the base unit. Move
closer and try again.
L Another unit is in use.*1 Wait and try again later.
*1 KX-TGB212/KX-TGB213/KX-TGB214
Helpline Tel. No.: U.K. 0844 844 3899 Ireland 01289 8333
27
TGB21xE(en).book Page 28 Wednesday, April 9, 2014 11:53 AM
Useful Information
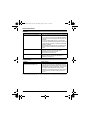
Caller ID
Problem
Cause/solution
Caller information is not displayed.
L You must subscribe to a Caller ID service. Contact
your service provider/telephone company for details.
L If your unit is connected to any additional telephone
equipment, remove and plug the unit directly into the
wall jack.
L If you use a DSL/ADSL service, we recommend
connecting a DSL/ADSL filter between the base unit
and the telephone line jack. Contact your DSL/ADSL
provider for details.
L Other telephone equipment may be interfering with
this unit. Disconnect the other equipment and try
again.
Caller information is slow to display.
L Depending on your service provider/telephone
company, the unit may display the caller’s
information at the 2nd ring or later.
L Move closer to the base unit.
Time on the unit has shifted.
L Incorrect time information from incoming Caller ID
changes the time. Set the time adjustment to
“Manual” (off) (page 17).
Liquid damage
Problem
Cause/solution
Liquid or other form of moisture has
entered the handset/base unit.
L Disconnect the AC adaptor and telephone line cord
from the base unit. Remove the batteries from the
handset and leave to dry for at least 3 days. After the
handset/base unit are completely dry, reconnect the
AC adaptor and telephone line cord. Insert the
batteries and charge fully before use. If the unit does
not work properly, contact an authorised service
centre.
Caution:
L To avoid permanent damage, do not use a microwave oven to speed up the drying process.
28
Helpline Tel. No.: U.K. 0844 844 3899 Ireland 01289 8333
TGB21xE(en).book Page 29 Wednesday, April 9, 2014 11:53 AM
Useful Information
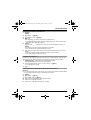
Registering a handset to the base unit
1
Handset:
{j/OK}
2
3
4
{r}: “Setup” s {j/OK}
{r}: “Register HS” s {j/OK}
Base unit:
Press and hold {x} for about 5 seconds. (No registration tone)
L If all registered handsets start ringing, press {x} again to stop, then repeat this step.
(KX-TGB212/KX-TGB213/KX-TGB214)
5
Handset:
Wait until “PIN:____” is displayed. s Enter the base unit PIN (default: “0000”). s
{j/OK}
L If you forget your PIN, contact an authorised service centre.
L The next step must be completed within 90 seconds.
6
Wait until a long beep is heard and then enter the desired handset number you want to
register.
L When the handset has been registered successfully, w stops flashing.
L If w is still flashing, start again from step 1.
Deregistering a handset
A handset can cancel its own registration to the base unit, or other handsets registered to the
same base unit. This allows the handset to end its wireless connection with the system.
1 {j/OK}y131 s Enter the base unit PIN (default: “0000”).
L All handsets registered to the base unit are displayed.
2
3
Enter the desired handset number you want to cancel. s {j/OK}
L A confirmation tone sounds.
{m}
Changing the base unit PIN (Personal Identification Number)
Important:
L If you change the PIN, please make note of your new PIN. The unit will not reveal the PIN to
you. If you forget your PIN, contact an authorised service centre.
1
2
3
4
5
6
{j/OK}
{r}: “Setup” s {j/OK}
{r}: “Change PIN” s {j/OK}
Enter the current 4-digit base unit PIN (default: “0000”).
Enter the new 4-digit base unit PIN.
Enter the new 4-digit base unit PIN again. s {m}
Helpline Tel. No.: U.K. 0844 844 3899 Ireland 01289 8333
29
TGB21xE(en).book Page 30 Wednesday, April 9, 2014 11:53 AM
Useful Information
Conditions of guarantee
This guarantee is in addition to and does not in any way affect any statutory or other rights of
consumer purchasers. If within the applicable guarantee period, the product proves to be
defective by reason of faulty design, workmanship or materials, we undertake subject to the
following conditions to have the defective product (or any part or parts there of) repaired or
replaced free of charge.
1. The product shall have been purchased and used solely within either the U.K. or Ireland
and in accordance with standard operating instructions and the technical and/or Safety
Standards required in the U.K.
2. On being found defective, please consult with the retailer from where it was purchased for
assistance.
3. This guarantee shall not apply to damage caused through fire, accident, lightning, misuse,
wear and tear, neglect, incorrect adjustment or repair, to damage caused through
installation, adaption, modification or use in an improper manner or inconsistent with the
technical and/or safety standards required in the country where this product is used, or to
damage occurred during transit to or from the purchaser.
4. If at any time during the guarantee period any part or parts of the product are replaced with
a part or parts not supplied or approved by us or of an objective quality safe and suitable
for the product, or the product has been dismantled or repaired by any person not
authorised by us, we shall have the right to terminate this guarantee in whole or in part
immediately without further notice.
5. The purchaser’s sole and exclusive remedy under this guarantee against us is for the
repair or replacement of the product or any defective part or parts and no other remedy,
including, but not limited to, incidental or consequential damage or loss of whatsoever
nature shall be available to the purchaser.
6. This guarantee shall not apply to batteries and any other items of limited natural life.
7. Our decision on all matters relating to complaints shall be final. Any product or defective
part which has been replaced shall become our property.
8. The guarantee period applicable to this product shall be 12 months.
Please keep these operating instructions with your receipt.
Panasonic U.K. a branch of Panasonic Marketing Europe GmbH
Receipt No.
Date of purchase
Model No.
Serial No.
30
Helpline Tel. No.: U.K. 0844 844 3899 Ireland 01289 8333
TGB21xE(en).book Page 31 Wednesday, April 9, 2014 11:53 AM
Index
Index
A
B
C
D
E
H
I
K
M
P
R
T
V
Alarm: 19
Answering calls: 14
Auto talk: 14
Battery: 10, 11
Caller ID service: 20
Caller list: 20
Caller list edit: 20
Call share: 15
Call waiting: 15
Call Waiting Caller ID: 15
Chain dial: 16
Character entry: 24
Conference calls: 23
Control type: 12
Date and time: 13
Display
Contrast: 18
Language: 13
Error messages: 26
Handset
Deregistration: 29
Locator: 23
Registration: 29
Intercom: 23
Keytones: 18
Making calls: 14
Missed calls: 20
Mute: 15
Pause: 14
Phonebook: 16
PIN: 29
Power failure: 11
Power on/off: 13
Privacy mode: 18
Recall/flash: 15
Redialling: 14
Ringer tone: 17
Time adjustment: 17
Transferring calls: 23
Troubleshooting: 26
Voice mail: 22
Volume
Receiver: 14
Ringer (Handset): 15
31
TGB21xE(en).book Page 32 Wednesday, April 9, 2014 11:53 AM
IMPORTANT!
If your product is not working properly. . .
1 Reconnect AC adaptor to the base unit.
2 Check if telephone line cord is connected.
3 Use rechargeable Ni-MH batteries.
(Alkaline/Manganese/Ni-Cd batteries CANNOT be used.)
4 Read troubleshooting page in the Operating Instructions.
If you still have any problems, please call the Panasonic
DECT Helpline
0844 844 3899 (U.K.)
01289 8333 (Ireland)
or contact us through our website:
www.panasonic.co.uk
Buy online via our eShop: http://shop.panasonic.eu
Sales Department:
Panasonic House, Willoughby Road, Bracknell, Berkshire, RG12 8FP
1-62, 4-chome, Minoshima, Hakata-ku, Fukuoka 812-8531, Japan
© Panasonic System Networks Co., Ltd. 2014
PNQX6518YA
TC0214MU1044