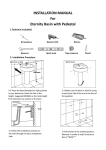
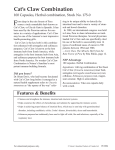
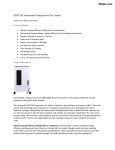
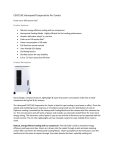
1
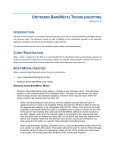
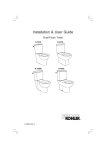
INSTALLATION MANUAL For Eternity CLOSE COUPLED toilet set 1. Tools (not included) Screwdriver Spanner Electric Drill Spirit level Silicon Tape measure Pencil 2. Installation Instruction 2‐1 Install the Seat cover according to seat cover installation manual that provided whereas. 2‐2 Fitting has been installed when supplied. 2‐3 Install the top push button according to fitting installation manual. 2‐4 Install the Toilet set. Small rubber gasket screw Rubber water seal washer Nut 2‐4‐1 Place the cistern on the top of the pan. 2‐4‐2 Put the rubber water seal onto the Cistern flushing outlet. Screw the bolt to link the cistern onto the WC pan. Install the plastic washer and the then tighten the nut, until the cistern is securely installed onto the pan. 55mm 2‐4‐3 Establish position for the pan. Mark hole position on the floor, ensure the alignment by use of a spirit level. 2‐4‐4 Drill holes with 10mm diameter; ensure the holes at 50mm away from the marked position. FIT the L‐shape bracket to floor. Do not over tighten.**NOTE** not included 2‐4‐5 Attach the extensible pipe (not included) to the drain hole and apply the waterproof PVC sealant around the hole. 2‐4‐6 Locate the pan and connect the other end of pipe to the pan. . 2‐4‐7 Fix the pan by tightening the screw 2‐4‐8 Use the silica gel to seal the joint of the WC by screwdriver and insert the plastic pan and the floor surface. washer and cap as above picture, do not over tighten. Connect the water source to the inlet valve by assembly the hose(not supplied). Turn on the water valve and flush several times and check for leaks. 5. Guarantee This product has a 2 year guarantee after its initial purchase for manufacturing faults. 6. Care Instruction Do not use abrasive, cleanses to cleaning up the pan and toilet seat as they may scratch and dull the pan and seat surface. Do not use cleaners containing chlorine as it can seriously damage of fitting. Use warm spongy water or liquid detergent to clean the surface and dry with soft cloth. 7. Problem and solution A: The fill valve not turn off. Open the cap of the fill valve and clear the valve seal, or replace the seal if it is defective or cracked. The position of the floater may too high, adjust the valve floater by adjust the thread nod. Replace the flapper if it is worn. Check the tightening of the mechanism. B: Water leaks out under the cistern: Fitting screws must be tightened. The gasket between the pan and the cistern is badly positioned or it is worn, replace the gasket. C. Poor flush performance Adjust the water level inside the cistern. Check if the water supply valve is fully open. Clear obstructions from the trap way and pan rim holes. D. No flush Check if water supply valve is closed. Check if the water supply hose is blocked. E. Long time require to fill the cistern. Check if the water supply valve is fully open. Check the hose of inlet valve if any leaks. **NOTE** Please ensure when drilling that the area to be drilled is clear from hidden wires, pipes or anything else that may cause a problem if drilled into. INSTALLATION MANUAL For Eternity Basin with Pedestal 1.Tools(not included) Screwdriver Electric Drill Spanner Spirit level Silicon Tape measure Pencil 2. Installation Procedure Spirit level Basin top surface 850mm 3‐1 Place the Basin/Pedestal to right position 3‐2 Make sure the basin is level by using in your bathroom. Mark the line of the height. Suggested 850MM as the total height from the basin top surface to the floor . Ceramic basin Wall 3‐3 Mark the installation position on the wall through the basin installation hole. a spirit level. Mark the line at the foot of the pedestal. 3‐4 Drill holes at the marked position. (Remark: A‐outlet to wall; B‐outlet to floor)**NOTE** Plastic plug Screw Faucet sets (not included) 3‐5 Install the plastic plug and tighten the screws. (Not included)(please select correct fitting for your type of wall) 3‐6 Install the faucet sets and flushing fittings as per the separate installation manual. (Not included) Faucet (not included) 3‐7 Put the basin up on the plug and fixed by installation sets. Choose the right flushing fitting sets based on your bathroom outlet way: A‐to the wall; B‐to the floor. (Not included) 3‐8 Install the inlet and outlet fittings(Not included). Seal the edge of basin backwards/wall and Pedestal/Floor Using the silicon 4. Cleaning Your Basin For best result, keep the following in mind when caring for your products 4‐1 Use a mild detergent such as liquid dishwashing soap and warm water for cleaning. Do not use abrasive cleaners that may scratch or dull the surface. 4‐2 carefully read the cleaner product label to ensure the cleaner is safe for use on the material. 4‐3 Wipe surface and rinse completely after cleaner application .Rinse and dry any overspray that lands on nearby surfaces. 4‐4 Use a soft, dampened sponge or cloth, never use an abrasive material such as a brush or scouring pad to clean. **NOTE** Please ensure when drilling that the area to be drilled is clear from hidden wires, pipes or anything else that may cause a problem if drilled into. INSTALLATION MANUAL For Eternity Basin with Pedestal 1.Tools(not included) Screwdriver Electric Drill Spanner Spirit level Silicon Tape measure Pencil 2. Installation Procedure Spirit level Basin top surface 850mm 3‐1 Place the Basin/Pedestal to right position in your bathroom. Mark the line of the height. Suggested 850MM as the total height from the basin top surface to the floor . Ceramic basin 3‐2 Make sure the basin is level by using a spirit level. Mark the line at the foot of the pedestal. Wall 3‐4 Drill holes at the marked position. 3‐3 Mark the installation position on the wall through the basin installation hole. (Remark: A‐outlet to wall; B‐outlet to floor)**NOTE** Plastic plug Screw Faucet sets (not included) 3‐5 Install the plastic plug and tighten the screws. (Not included)(please select correct fitting for your type of wall) 3‐6 Install the faucet sets and flushing fittings as per the separate installation manual. (Not included) Faucet (not included) 3‐7 Put the basin up on the plug and fixed by installation sets. Choose the right flushing fitting sets based on your bathroom outlet way: A‐to the wall; B‐to the floor. (Not included) 3‐8 Install the inlet and outlet fittings(Not included). Seal the edge of basin backwards/wall and Pedestal/Floor Using the silicon 4. Cleaning Your Basin For best result, keep the following in mind when caring for your products 4‐1 Use a mild detergent such as liquid dishwashing soap and warm water for cleaning. Do not use abrasive cleaners that may scratch or dull the surface. 4‐2 carefully read the cleaner product label to ensure the cleaner is safe for use on the material. 4‐3 Wipe surface and rinse completely after cleaner application .Rinse and dry any overspray that lands on nearby surfaces. 4‐4 Use a soft, dampened sponge or cloth, never use an abrasive material such as a brush or scouring pad to clean. **NOTE** Please ensure when drilling that the area to be drilled is clear from hidden wires, pipes or anything else that may cause a problem if drilled into. INSTALLATION MANUAL For Eternity CLOSE COUPLED toilet set 1. Tools (not included) Screwdriver Spanner Electric Drill Spirit level Silicon Tape measure Pencil 2. Installation Instruction 2‐1 Install the Seat cover according to seat cover installation manual that provided whereas. 2‐2 Fitting has been installed when supplied. 2‐3 Install the top push button according to fitting installation manual. 2‐4 Install the Toilet set. Small rubber gasket screw Rubber water seal washer Nut 2‐4‐1 Place the cistern on the top of the pan. 2‐4‐2 Put the rubber water seal onto the Cistern flushing outlet. Screw the bolt to link the cistern onto the WC pan. Install the plastic washer and the then tighten the nut, until the cistern is securely installed onto the pan. 55mm 2‐4‐3 Establish position for the pan. Mark hole position on the floor, ensure the alignment by use of a spirit level. 2‐4‐4 Drill holes with 10mm diameter; ensure the holes at 50mm away from the marked position. FIT the L‐shape bracket to floor. Do not over tighten.**NOTE** not included 2‐4‐5 Attach the extensible pipe (not included) to the drain hole and apply the waterproof PVC sealant around the hole. 2‐4‐6 Locate the pan and connect the other end of pipe to the pan. . 2‐4‐7 Fix the pan by tightening the screw 2‐4‐8 Use the silica gel to seal the joint of the WC by screwdriver and insert the plastic pan and the floor surface. washer and cap as above picture, do not over tighten. Connect the water source to the inlet valve by assembly the hose(not supplied). Turn on the water valve and flush several times and check for leaks. 5. Guarantee This product has a 2 year guarantee after its initial purchase for manufacturing faults. 6. Care Instruction Do not use abrasive, cleanses to cleaning up the pan and toilet seat as they may scratch and dull the pan and seat surface. Do not use cleaners containing chlorine as it can seriously damage of fitting. Use warm spongy water or liquid detergent to clean the surface and dry with soft cloth. 7. Problem and solution A: The fill valve not turn off. Open the cap of the fill valve and clear the valve seal, or replace the seal if it is defective or cracked. The position of the floater may too high, adjust the valve floater by adjust the thread nod. Replace the flapper if it is worn. Check the tightening of the mechanism. B: Water leaks out under the cistern: Fitting screws must be tightened. The gasket between the pan and the cistern is badly positioned or it is worn, replace the gasket. C. Poor flush performance Adjust the water level inside the cistern. Check if the water supply valve is fully open. Clear obstructions from the trap way and pan rim holes. D. No flush Check if water supply valve is closed. Check if the water supply hose is blocked. E. Long time require to fill the cistern. Check if the water supply valve is fully open. Check the hose of inlet valve if any leaks. **NOTE** Please ensure when drilling that the area to be drilled is clear from hidden wires, pipes or anything else that may cause a problem if drilled into. INSTALLATION MANUAL For Eternity CLOSE COUPLED toilet set 1. Tools (not included) Screwdriver Spanner Electric Drill Spirit level Silicon Tape measure Pencil 2. Installation Instruction 2‐1 Install the Seat cover according to seat cover installation manual that provided whereas. 2‐2 Fitting has been installed when supplied. 2‐3 Install the top push button according to fitting installation manual. 2‐4 Install the Toilet set. Small rubber gasket screw Rubber water seal washer Nut 2‐4‐1 Place the cistern on the top of the pan. 2‐4‐2 Put the rubber water seal onto the Cistern flushing outlet. Screw the bolt to link the cistern onto the WC pan. Install the plastic washer and the then tighten the nut, until the cistern is securely installed onto the pan. 55mm 2‐4‐3 Establish position for the pan. Mark hole position on the floor, ensure the alignment by use of a spirit level. 2‐4‐4 Drill holes with 10mm diameter; ensure the holes at 50mm away from the marked position. FIT the L‐shape bracket to floor. Do not over tighten.**NOTE** not included 2‐4‐5 Attach the extensible pipe (not included) to the drain hole and apply the waterproof PVC sealant around the hole. 2‐4‐6 Locate the pan and connect the other end of pipe to the pan. . 2‐4‐7 Fix the pan by tightening the screw 2‐4‐8 Use the silica gel to seal the joint of the WC by screwdriver and insert the plastic pan and the floor surface. washer and cap as above picture, do not over tighten. Connect the water source to the inlet valve by assembly the hose(not supplied). Turn on the water valve and flush several times and check for leaks. 5. Guarantee This product has a 2 year guarantee after its initial purchase for manufacturing faults. 6. Care Instruction Do not use abrasive, cleanses to cleaning up the pan and toilet seat as they may scratch and dull the pan and seat surface. Do not use cleaners containing chlorine as it can seriously damage of fitting. Use warm spongy water or liquid detergent to clean the surface and dry with soft cloth. 7. Problem and solution A: The fill valve not turn off. Open the cap of the fill valve and clear the valve seal, or replace the seal if it is defective or cracked. The position of the floater may too high, adjust the valve floater by adjust the thread nod. Replace the flapper if it is worn. Check the tightening of the mechanism. B: Water leaks out under the cistern: Fitting screws must be tightened. The gasket between the pan and the cistern is badly positioned or it is worn, replace the gasket. C. Poor flush performance Adjust the water level inside the cistern. Check if the water supply valve is fully open. Clear obstructions from the trap way and pan rim holes. D. No flush Check if water supply valve is closed. Check if the water supply hose is blocked. E. Long time require to fill the cistern. Check if the water supply valve is fully open. Check the hose of inlet valve if any leaks. **NOTE** Please ensure when drilling that the area to be drilled is clear from hidden wires, pipes or anything else that may cause a problem if drilled into. INSTALLATION MANUAL For Eternity CLOSE COUPLED toilet set 1. Tools (not included) Screwdriver Spanner Electric Drill Spirit level Silicon Tape measure Pencil 2. Installation Instruction 2‐1 Install the Seat cover according to seat cover installation manual that provided whereas. 2‐2 Fitting has been installed when supplied. 2‐3 Install the top push button according to fitting installation manual. 2‐4 Install the Toilet set. Small rubber gasket screw Rubber water seal washer Nut 2‐4‐1 Place the cistern on the top of the pan. 2‐4‐2 Put the rubber water seal onto the Cistern flushing outlet. Screw the bolt to link the cistern onto the WC pan. Install the plastic washer and the then tighten the nut, until the cistern is securely installed onto the pan. 55mm 2‐4‐3 Establish position for the pan. Mark hole position on the floor, ensure the alignment by use of a spirit level. 2‐4‐4 Drill holes with 10mm diameter; ensure the holes at 50mm away from the marked position. FIT the L‐shape bracket to floor. Do not over tighten.**NOTE** not included 2‐4‐5 Attach the extensible pipe (not included) to the drain hole and apply the waterproof PVC sealant around the hole. 2‐4‐6 Locate the pan and connect the other end of pipe to the pan. . 2‐4‐7 Fix the pan by tightening the screw 2‐4‐8 Use the silica gel to seal the joint of the WC by screwdriver and insert the plastic pan and the floor surface. washer and cap as above picture, do not over tighten. Connect the water source to the inlet valve by assembly the hose(not supplied). Turn on the water valve and flush several times and check for leaks. 5. Guarantee This product has a 2 year guarantee after its initial purchase for manufacturing faults. 6. Care Instruction Do not use abrasive, cleanses to cleaning up the pan and toilet seat as they may scratch and dull the pan and seat surface. Do not use cleaners containing chlorine as it can seriously damage of fitting. Use warm spongy water or liquid detergent to clean the surface and dry with soft cloth. 7. Problem and solution A: The fill valve not turn off. Open the cap of the fill valve and clear the valve seal, or replace the seal if it is defective or cracked. The position of the floater may too high, adjust the valve floater by adjust the thread nod. Replace the flapper if it is worn. Check the tightening of the mechanism. B: Water leaks out under the cistern: Fitting screws must be tightened. The gasket between the pan and the cistern is badly positioned or it is worn, replace the gasket. C. Poor flush performance Adjust the water level inside the cistern. Check if the water supply valve is fully open. Clear obstructions from the trap way and pan rim holes. D. No flush Check if water supply valve is closed. Check if the water supply hose is blocked. E. Long time require to fill the cistern. Check if the water supply valve is fully open. Check the hose of inlet valve if any leaks. **NOTE** Please ensure when drilling that the area to be drilled is clear from hidden wires, pipes or anything else that may cause a problem if drilled into.