1
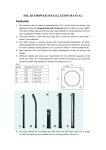
SOLAR SHOWER INSTALLATION MANUAL
Features:
1. The shower tube is made of environmental PVC, which does not contain any
poisonous chemical components and of course will do no harm to your health.
The color, black assures that the tube will absorb the most possible sunshine,
thus to gather the heat to warm up the water inside the tube.
2. The solar shower has a long life. It could be used for more than 4 years if used
totally outdoors.
3. The solar shower is energy saving and environmental protection. No other
heating equipment is required. The heat is produced by the sunshine. As long as
we have sunshine during daytime, we could have water in warm temperature.
4. Easy tp operate. You can adjust the water temperature simply by turning the
handle.
Pic.1
Model
Capacity
Size L1×L2
A
18L
144×214
A
5. The solar shower does not heat by itself, when the hot water has been used, it
needs to be refilled with water and heated by sun which takes about 4-6 hours.
INSTALLATION
1. Drill holes in the concrete floor or other solid ground, fix the solar shower to the
ground by the bolts in the parts bag, and make sure the solar shower will not
collapse due to the strong wind and other external forces.
2. It is much better to install the solar shower in the places where the sunshine will
last much longer than others. It will help to have the right temperature of water
while in use.
3. Quick connect adaptor is used for the water inlet. We suggest using the flexible
hose (i.e. garden hose). Make sure this flexible hose would bear the pressure of
6kgs/cm2.
4. Please ask professionals to install the solar shower to avoid any injury.
5. When install MODEL A (two section solar shower as following picture 4), you are
required to insert the stainless stain rail and the gasket before screwing the cap,
thus to avoid any leaking problem.
6. Having tested the shower after all the components have been installed so as to
check whether there are any leaking problems. Transportation and any improper
operation during installation will make the parts loose thus cause leaking. Tightly
screw the leaking part may help to solve any leaking problem.
NOTES
1. When the sunshine is strong, especially in summer, the water inside the tube will
reach a very high temperature, so please do not stand under the solar head
when you use it. Otherwise you will be scalded by the hot water, please turn on
the cold water first then adjust the water temperature by the handle gradually.
2. Do not remove or add any parts, otherwise leaking would be easily caused.
3. Clean the shower head periodically to make sure the water sprays without
resistance.
4. Children are not allowed to use the solar shower alone.
5. Fill up the tube after the shower is installed. You should turn the adjusting handle
to the position of hot water, when the shower head has water, the tube is fully
filled
6. When in winter, empty the water in the tube by drainage to avoid freezing inside
the tube. (Warranty is void if this happens, so please winterize properly).
DRAIN SCREW
1. For MODEL A TYPE (two section solar shower), the handle on the top is for hot
water and the handle in the bottom is for the cold water. See picture ⑥
Turn on the cold water first then adjust the water temperature by the handle
gradually.
Flowing pictures show you the hot and cold water handle position, Turn to blue side, it is
cold water, and turn to red side, and it is hot water.
70544
⑥
Hot water position
Cold water position