1
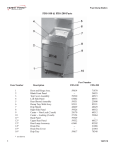
Viking VKFS 330
15R Followspot
__________________
User Manual
Content
1. Contents ............................................................................................ 02
2. Caution ............................................................................................. 03
3. Dimensions ........................................................................................ 04
4. Product info ...................................................................................... 05
5. Parts info ........................................................................................... 06
6. Lamp replacement .......................................................................... 07
7. Operation & Control Panel ............................................................. 08
8. Inside structure .............................................................................. 10
9. PCB ................................................................................................... 10
2 Caution
2.1 Before installation, please check the unit for any damage in transport, and in
particular that no foreign objects have become lodged in the end of the lens tube.
2.2 The unit should be mounted on the stand supplied using the spigot (or similar)
and stood on even ground. The light should be raised up to shoulder height for
operation.
2.3 The unit should be switched on in advance of it being required and left on for the
duration of the performance. It is not suitable for frequent switching on and off which
will damage the starter circuit and shorten the lamp life considerably.
2.4 You must wait for ten minutes after the lamp has been turned off to let it
completely cool before the unit can be re-struck and used again as the lamp is of the
‘Cold Restrike’ variety.
2.5 In order to ensure the service life of the product, please keep it dry and ventilated.
2.6 There are no user serviceable parts inside the unit with the exception of lamp
replacement. The product should only be serviced by professionals.
2.7 The Powercon mains lead must be plugged into the rear of the Followspot and
into a permanent mains feed (13a socket outlet). This unit MUST NOT be plugged
into a dimmer.
2.8 Do not stare at the lamp light source directly so as not to damage the eyes or
down the lens tube, the lamp is extremely bright.
2.9 The Followspot is cooled by a quiet running fan in the rear of the unit. If this fan
should fail the unit must NOT ber used, but refer to a service agent for repair.
2.10 Make sure the power is disconnected prior and during the installation of a new
lamp or service.
3. Dimensions: (mm)
Colour Wheel:
01—White
03—Yellow
05—Green
02—Red
04—Blue
06—Magenta
Colour Temperature Wheel:
01—6500K
03—4300K
05—3200K
02—5600K
04—3800K
06—Frost
4. Product information
1. Technical Specifications
Lamp : YODN 15R 330W or SIRIUS HRI330W
Lamp life span:1500hours
Output:33486 Lumen at 5m - see chart below
Dimmer:Linear Electronic Dimmer
Colour wheel: Electronically Adjustable - 5 colours plus White
Iris: Electronically Adjustable from Small to Large Spot
Colour temperature:Electronically Adjustable: 3200-6500K plus Frost
Focus:Electronically Adjustable
Zoom Lens: Electronically Adjustable: 5-10 degrees
Rating: IP20 : For Indoor Use only
Power:100-240V 50-60Hz Auto switching
Total power:420w
External Fuse: 20ma 6.35a Ceramic Fuse
Light size:918 x 348 x 314mm
Product weight:26kg
Stand weight:6kg
Flight case size:1022×580×490mm
2. Output
5. Parts information
01
02
03
04
05
01
02
03
04
05
—control panel
—handle
—stand handle
—light
—lens
5.1 Control panel
01
04
02
03
05
06
01
02
03
04
05
06
—display screen
—Channels rod
—Colours key
—Power switch
—Fuse
—Power input
6. Lamp replacement
1. Remove the rear handle
2. Remove the control panel box
3. Remove the lamp rear panel
4. Remove the screws for the lamp
5. Use the screwdriver to hold the metal.
7. Replace the lamp and rebuild in reverse order
6. Remove the lamp power cable
7.0
7.1
Control panel
Operation
There is a hidden On/Off switch to prevent unauthorised use of the light. When the
lamp is off, press the red key for 3 seconds, the display will show (on) and will strike.
The lamp will take a few minutes to reach maximum brightness.
To turn the lamp off, press the white key for 3 seconds, the display will show (OFF) and
will extinguish but the cooling fan will continue working.
Once the lamp is turned off, please wait about 10 minutes if needed on again. (This
protects the unit and lamp from damage)
Fader
Colour
Button
Dimmer
Iris
Zoom
Focus
Colour
Temperature
Display Value
1
2
3
4
5
6
0-50
51-130
0-255
0-255
0-255
0-42
43-84
85-126
127-168
169-210
211-255
Function
White
Red
Yellow
Blue
Green
Pink
Dimmer
Close
Open - dim to full
Iris - small to big
Zoom - big to small
Focus
6500K
5600K
4300K
3800K
3200K
Frost
2. Menu Operation - This option is for service use only.
Access to the menu is by pressing both the green and pink buttons simultaneously.
Blue Key:
White Key:
Red Key:
Yellow key:
SELECT (Save the updated value and return back to the main menu)
DOWN (or +),can plus continually if pressed for more than 1 second
UP (or -), can minus continually if pressed for more than 1 second
EXIT (Back to the menu & do not save the data)
Function
< t4PE >
< d15U >
< dr1U >
Lights kind
Fan 1 status(r19H:normal Erro:
Error)
Fan 2 status(r19H:Normal Erro:
Error)
Version(xxx)
Motor version(xxx)
< rEtn >
Enter
< FAn1 >
Info set
< 1nfo >
< FAn2 >
Display delay
close
< LoFF >
Display set
<d15P >
Menu display
enter
< NEN8 >
oN
L001
L002
L003
oFF
N001
N001
N001
< rEtn >
Readress
< rEdr >
Feature
SET
< 5PEC >
< LANP >
< ALLr>
rEtn
Run mode
< rUod >
default
< dEFA >
<rEtn>
default
< LAPd >
Lamp control
< NAnL >
< rEtn >
< CoLo >color motor
< CoLt >color motor
< 2oon >focus motor
< FocU >focus motor
< rEtn >
r001
r002
oFF
oN
oFF
oN
oFF
oN
oFF
oN
Lamp on
Close after 1 min
Close after 2 min
Close after 3 min
No enter
Enter after 1 min
Enter after 2 min
Enter after 3 min
Enter
Motor reset(0-255)
Enter
manual
auto
no
Default set
enter
Lamp off after reset
Lamp on after reset
Lamp off by manual
lamp on by manual
Enter
No Reset
Reset
Menu exit
8. Internal structure
05
03
06
04
02
01
07
01
02
03
04
05
06
07
9. PCB
—Lamp socket
—Fan
—Driving board
—Focus module
—Slide bar
—zoom module
—belt