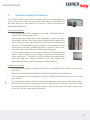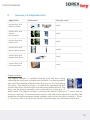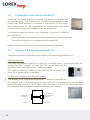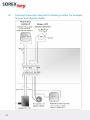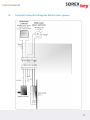
1
User manual SOREX wirelessKey Your mobile phone is the key! User manual wirelessKey BASIC www.wireless-key.com www.wireless-key.com 1. Security data for your wirelessKey Basic MAC–Address: The MAC-Address is the worldwide uniquely assigned identification number for your Bluetooth device. Pairing-PIN: The Pairing-PIN is utilized to authorize new mobile phones as keys by pressing the multifunction button. On delivery the Pairing-PIN is the same for all mobile phones that are being assigned, but can be adjusted with the proper software. Delete-PIN: Authorized mobile phones can be deleted from the wirelessKey Basic module with the Delete-PIN by using the multifunction button. Config-PIN for PC: A computer can be connected to the wirelessKey module for software set-up by using the Config-PIN. Login-PW: Upon first connection with the wirelessKey Basic module, the login password has to be entered into the configuration software. Further details can be found in your configuration software manual. The login password is requested for software versions 1.2 and up. User manual 2. Table of contents Seite 1. Security data for your wirelessKey Basic2 . Table of contents 3 . Introduction 4 4. Safety instructions 4 5. General assembly instructions 5 6. Description of operating modes 7 7. Description of user configuration 7 7.1 Addition of mobile phones 7 7.2 Removal of mobile phone 10 7.3 Deletion of all users (Reset)) 11 7.4 PC software set-up 12 8. Opening procedure with authorized mobile phones 12 9. Summary of adaptable locks 13 10. Combination with wall pushbuttons 16 10.1 Summary of adaptable pushbuttons 16 10.2 Application overview 17 11. Care and maintenance 17 12. Electric connection specifications 18 13. Terminal connection diagram: Simons Voss digital cylinder 20 14. Terminal connection diagram: Electric door opener 21 15. Tested mobile phones 22 16. Error sources 24 17. Technical specifications26 17.1 SOREX wirelessKey26 17.2 Certificates26 17.3 Bluetooth27 18. Warranty and liability27 19. Overview pushbutton operation28 20. Support28 www.wireless-key.com 3. Introduction Congratulations and thank you for purchasing the SOREX wirelessKey. The wirelessKey Basic is part of the stand alone access-system product series of the SOREX Company and is based on Bluetooth technology. The system enables every Bluetooth capable mobile phone to be used as key and open front doors, sliding doors, garage doors and many more. 4. Safety instructions Please note that installation of the SOREX wirelessKey Basic module may require direct contact with live circuits. These operations should only be conducted by qualified personnel. SOREX shall not be liable for any incidental or consequential damages that occur during the installation of the wirelessKey Basic system. Please contact a partner / authorized company near you for the installation of the system. Please note that the wirelessKey Basic module may not be directly connected to 230V as the equipment will be damaged. The voltage supply is 6-24V direct current. Operation over 230V current is only possible with the enclosed adaptor. When assembling the wirelessKey Basic module near 230V circuits, please consider the standards and guidelines in effect for the spacing of cables. The module may not be assembled in a flush mounted socket together with 230V cables. Please consider the country specific rules and regulations as well as the EIBguidelines, if applicable. Please note that the device at hand is electrical and has to be shielded from external influence such as extreme temperatures, contact with water and so forth. For further information regarding the assembly, please contact a SOREX partner near you. Additional details regarding partners are listed in the support chapter of this manual. User manual 5. General assembly instructions The SOREX wirelessKey Basic module can be attached directly to the door area with the enclosed wall fixtures. Mounting is possible either on the interior or exterior. Please consider the following guidelines: Interior mounting: • The wirelessKey Basic module has to be mounted directly within the interior door area. • The recognition range has to be selected in such a way that the mobile phones can be already recognized in front of the door, however not surpassing into areas that are frequented by users. Depending on the conditions, the module can be mounted in an area shielded by walls or similar. If this is not possible, please consider the following paragraph. • It is recommended to combine the wirelessKey Basic module with a wall pushbutton in order to prevent unrequested “door openings”. The door is only unlocked in combination with pressing the wall pushbutton. See also chapter 8, opening procedure with authorized mobile phones. ! Exterior mounting: • The wirelessKey Basic module has to be mounted directly within the exterior door area. • Please note that the module has to be protected from the elements. • The temperatures for operation listed in the technical data sheet have to be considered. • It is important to mount the module appropriately to protect from obstruction. Please note that the switching circuits of the electro mechanic locking-system are connected directly with the module. By-passing the switching circuits can short-out the lock and open the door! www.wireless-key.com Assembly instructions: Step 1: Inspection Unpack your wirelessKey Basic module and check for possible visual damage. A damaged module may not be mounted. If the module is damaged, please contact one of the partners listed in the support chapter of this manual. Step 2: Wiring the electro mechanic locking-system The switching circuits necessary for controlling the electro mechanic locking-system have to be connected to the proper terminals according to the circuit diagram. The proper terminal layout can be found in chapter 12, electronic connection specifications. It is not necessary to further connect the wirelessKey Basic module. The switching circuits can be connected directly to the gate input of the electro mechanic lockingsystem. Detailed instructions are provided in the user manual of your electro mechanic locking-system. ! Please contact the manufacturer of your locking-system if you cannot locate the appropriate connections. If the cable is either too short or too long, a certified specialist can shorten or lengthen it at any time. Step 3: Module feed If the SOREX wirelessKey basic system is properly attached to the locking-system, the feed with the originally enclosed adapter can be conducted. The module is now ready for use and can be set-up. Connection details are provided in chapter 12. User manual 6. Description of operating modes The wirelessKey Basic module can be operated in two different modes to be selected with the configuration software Basic (not included in delivery). Standard-Mode: The module is in standard-mode by default. In standard-mode, the opening procedure is initiated approx. 2 seconds quicker than in secure-mode. This mode has been especially developed for standard applications. Secure-Mode: The secure-mode differs from standard-mode by its speed and enhanced security. Several 128 Bit encoded ciphers are being submitted within this mode, additionally containing a random code. 7. Description of user configuration Set-up: The configuration of the wirelessKey Basic module is performed with a button on the side of the device. This button is concealed for security reasons, in order to prevent from accidental activation. You will require a longish, thin object for pressing the button (see illustration). For instance, a toothpick, a paper clip or a screw driver with a diameter of 2.3 mm (0.09 inch) are suitable objects. 7.1 Addition of mobile phone Note: The addition of users can be also performed with the software (not included in delivery)! Step 1: Activation of mobile phone Activate the Bluetooth function of your mobile phone and switch the Bluetooth mode to “visible”. With most mobile phones the activation of the Bluetooth function can be found as menu item “connections”. Here you can select to make the Bluetooth mode visible. www.wireless-key.com ! The Bluetooth connection of your mobile phone has to remain in visible mode for future access. Step 2: Activation of wirelessKey Basic module Press the button on the inside of the hole (see illustration) as far as it will go until a signal can be heard. This takes 3 seconds. Let go of the button and another signal will be sounded, indicating that the device is visible and ready for configuration. ! Please note that for security reasons the device will only remain visible and in configuration mode for 3 minutes after pressing the button. When time is up, another signal will be sounded during processing. If the set-up (addition of new mobile phone as key) is not completed within this timeframe, you will have to restart the process. Therefore, the initial preparation of the mobile phone is recommended (see Step 1, activation of Bluetooth). Step 3: Recognition range set-up The wirelessKey Basic system allows you to choose the recognition range freely, i.e. the range that has to be reached in order to activate the opening process. The distance that is being kept at the moment when you add your mobile phone as a key to the system will be saved as future recognition range (see Step 5, input of mobile phone confirmation code). As the wirelessKey Basic module can be also mounted inside the house, it is recommended that during the addition of the mobile phone you exit and close the door to ensure the proper selection of the range. ! The range configuration can take up to one minute during initial set-up. While the configuration is processed, the wirelessKey module will emit consecutive signal tones. It is important to keep the desired opening range until the recognition range is saved. Please do not move your mobile phone during this process. User manual i Information: Most mobile phones request a confirmation for the first access after the code is entered. Therefore, please keep an eye on your mobile phone! Step 4: Calibration of wirelessKey Basic module The SOREX wirelessKey Basic module has been developed to adapt itself to the location at hand, offering improved functionality. This adaptation is being processed during the initial addition of a new mobile phone. The calibration is completed during the set-up of the recognition range (see Step 3). Therefore, the addition of the first mobile phone as key is advisable only after the wirelessKey Basic module has been mounted. If a mobile phone has been added prior, the wirelessKey Basic module can be “reset” (see chapter 19, overview pushbutton operation) to its original set-up and the calibration can be restarted. ! Step 5: Addition of new user (mobile phone) Please note that for security reasons there are only 3 minutes after pressing the wirelessKey pairing button (Step 2) for the addition of new users! Take your Bluetooth activated and visible mobile phone (see Step 1). Open the menu option “Bluetooth” on your device and begin the search for Bluetooth-able devices in reach. Most mobile phones include this option under “search Bluetooth devices” As the name of this menu option can vary by type mobile phone, it is recommended to consult your mobile phone’s user manual. Your mobile phone will display the search results in form of a list after the search for Bluetooth devices is completed. Select “add.SOREX-w.Key” from the list. Your mobile phone will inquire if you would like to establish a connection with this device. Please confirm with “Yes”. You will now be prompted to enter the connection code. This is a 10-digit code (Pairing-PIN) which is listed on the first page of your user manual. ! Keep the code secure as it will be requested for each addition of new devices. www.wireless-key.com ! After you have entered the code, please confirm and your mobile phone will add “add.SOREX-w.Key” to the list of connected devices on your phone.. Please note that the “add.SOREX-w.Key” may not be deleted from the list if you use your wirelessKey Basic module in secure-mode. If you use the system in standardmode, the “add.SOREX-w.Key” can be deleted from the mobile phone. Step 6: Completion Please note that the recognition range is also saved during the completion process (see Step 3). Therefore, the desired opening range has to be kept until the short signals of the wirelessKey module are replaced by a long, high-pitched sound. The mobile phone is now authorized to unlock your door. ! Some mobile phones inquire if the connection should be established automatically. Please respond with “Yes”. Additionally, it is possible that – in combination with this question - your mobile phone will provide the option “do not ask again”. This can be selected if wished. The door will automatically unlock upon approach, no additional key has to be pressed on your mobile phone. Each additional user can be added following the same Steps 1 through 6. Please note that the wirelessKey Basic option can only manage up to 10 users. ! Removal and re-addition of users can be performed any number of times. Please note that a maximum of 10 users can be saved with your wirelessKey Basic. If this storage is full, a user has to be removed to be able to add a new one. 7.2 Removal of mobile phone Note: The removal of users is also possible with the software (not included in delivery)! If you are in possession of the mobile phone to be deleted, please follow the following steps (otherwise continue with 7.3): Step 1: Activation of mobile phone Activate the Bluetooth function of your mobile phone. Detailed instructions are listed in chapter 7.1, addition of mobile phone (Step 1). 10 User manual Step 2: Activation of module Press the button on the inside of the hole (see illustration) as far as it will go until the second signal can be heard. This takes 6 seconds. Let go of the button and a two-tiered sound (two tone melody) will follow, indicating that the device is visible and ready for configuration. Step 3: Search for devices Now you will look again for devices, following instructions from chapter 7.1, addition of mobile phone (Step 5). Once the search for Bluetooth devices is completed, your mobile phone will display the results in form of a list. Step 4: Removal process Please select “del.SOREX-w.Key” from the list. Your mobile phone will inquire if you would like to establish a connection with this device. Please confirm with “Yes”. You will now be prompted to enter the connection code. This code is the same for all wirelessKey Basic modules and is “1234”. It is listed on the first page of your user manual. After you have entered the code, please confirm and your mobile phone will add “del.SOREX-w.Key” to your list. As soon as the process is complete, the wirelessKey basic module will sound four times. Step 5: Completion Please delete “add.SOREX-w.Key” and “del.SOREX-w.Key” from the list on the mobile phone. You are no longer connected with the module. 7.3 Deletion of all users (Reset) If you would like to delete the mobile phones of all users, press the button until the signal is sounded 4 times. This will take about 15 seconds. After the fourth signal sound, a long four-tiered melody will be given for confirmation. www.wireless-key.com 11 The device deletes all users and resets your wirelessKey Basic module to factory settings. The wirelessKey Basic module will now restart. Wait for a short three-tiered melody. This can take a couple of seconds. New users can be now added to the device with the 10-digit code. 7.4 PC software set-up Besides the manual configuration using directly the module’s multifunction button, there is the option to set-up the wirelessKey Basic with the help of computer software. This software can be purchased from an authorized SOREX dealer. The manual “Configuration Software Basic” contains detailed information regarding the use of wirelessKey with this software. 8. Opening procedure with authorized mobile phones No code has to be entered! An additional code does not have to be entered for the opening process after a mobile phone is authorized (chapter 7.1, addition of mobile phone). The opening process - unlocking of the door - is automatically initiated once you are within range and Bluetooth has been activated on your mobile phone. ! If a code is requested, you have not confirmed the option “auto-connect” on your mobile phone. This can be completed at any time (see mobile phone user manual). There will only be one opening process within range! Once you enter the recognition range with the authorized mobile phone, a one-time opening process is initiated. No further opening process will follow until the mobile phone has left the range for about 10 seconds. i NOTE: The same effect is achieved by deactivating Bluetooth on your mobile phone for at least 10 seconds. This setting can be deactivated with the software. 12 User manual 9. Summary of adaptable locks Application Illustration Security Level wirelessKey with digital cylinder hoch wirelessKey with electric push control hoch wirelessKey with power lock hoch wirelessKey with electric door opener mittel wirelessKey with garage door drive hoch wirelessKey with automatic door hoch Digital cylinder: The digital cylinder is installed directly into the door wing replacing the mechanic cylinder lock (keyhole). It is deactivated in idle state (the rotation of both knobs does not result in unlocking the door). The digital cylinder is coupled by approaching the wirelessKey Basic module with an authorized mobile phone. The door can be locked manually and unlocked by turning one of both knobs. The digital cylinder is powered by battery (lifetime 5-7 years) and no wiring is necessary. It communicates wireless with the wirelessKey Basic module. The maximum distance between digital cylinder and wirelessKey Basic module is 30 cm (11.8 inches), 60 cm (23.6 inches) for the special design (not included in delivery). www.wireless-key.com 13 Motor lock: The power lock is installed directly into the door wing. The mechanic cylinder lock has to be dismantled and replaced by the power lock. The power lock needs permanent power supply, wiring is necessary. A closed door is always in a locked mode with this system. By approaching the wirelessKey Basic module with an authorized mobile phone, the bolt is retracted by an electric motor and a spring is tightened. The door is also unlocked automatically on approach. The door does not have to be modified, except for providing proper wiring. The power lock fits exactly into the existing mechanic lock cut on the door wing. Electric push control: The push control is installed directly into the door wing. The mechanic cylinder lock has to be dismantled and replaced by the push control. The push control needs permanent power supply, wiring is necessary. A closed door is always locked. By approaching the wirelessKey Basic module with an authorized mobile phone, the push control is activated. The bolt is retracted by employing the door handle and a spring is tightened. The door is also unlocked conveniently by pushing the door handle. Electric door opener (mainly used with intercom systems): The electric door opener is installed into the doorframe, not into the door wing as required by other systems. It needs permanent power supply. The door wing itself does not have to be modified. A door knob has to be installed on the outside of the door instead of a door handle, a handle remains on the inside. By approaching the wirelessKey Basic module with an authorized mobile phone, the electric door opener is activated and the door can be opened. Entrance without an authorized mobile phone is not possible, exit from the inside is granted at any time. The door is not effectively locked, but rather cannot be opened from the outside as there is no door handle. 14 User manual Garage door drive: SOREX wirelessKey can be utilized with virtually any garage door drive. The only condition is a floating contact. Also, the following has to be taken into consideration when employing the wirelessKey system with a garage door drive: Over large distances, the opening of the garage door should only be initiated with the SOREX Bluetooth handheld transmitter (not included in delivery). The handheld’s button has to be pressed in order to initiate the opening process. This opening process can be activated from distances up to 100m (328 feet). The handheld control can be only connected with the wirelessKey by using special software. In addition, the opening with an authorized mobile phone is also possible. The maximum range is 14m (46 feet). As the garage door would automatically be opened upon approach within range, the combination of the wirelessKey system with a wall pushbutton or motion sensor is recommended. The opening process can be initiated as follows: • Handheld transmitter (by pressing a button) • Mobile phone (by entering within range with the mobile phone and recognition by the motion sensor or use of a wall pushbutton) Automatic door: The opening system of automatic doors is not modified. The wirelessKey module has to be connected with the door system by a floating contact to activate the automatic door. The automatic door opens independently when an authorized mobile phone approaches. The door is locked after several seconds and does not need to be locked again if the door control is set on “locked”. www.wireless-key.com 15 10. Combination with wall pushbuttons If desired, the wirelessKey Basic module can be also combined with wall pushbuttons. This combination is mainly recommended if the wirelessKey Basic module is mounted in the interior of the house. The configuration of the wirelessKey in combination with wall pushbuttons requires the configuration software Basic. To initiate an opening process two conditions are to be ful¬filled at the same time: • An authorized mobile phone has to be within the recognition range. • The wall pushbutton has to be pressed for approval. If both conditions are present, the opening process is initiated. 10.1 Summary of adaptable pushbuttons The wirelessKey Basic module can be utilized with following pushbuttons: Radio pushbutton The radio pushbutton needs no wiring on assembly and is connected with the wirelessKey Basic module via radio link. This pushbutton can be attached to the wall with screws or adhesive tape. The radio pushbutton should only be fixed on the outside of the door, if it is protected from weather! ! Display with integrated pushbutton (wired) The display with integrated pushbutton is directly mounted on the exterior with a flush fitting box on the wall. It is connected to the wirelessKey module through the wall. The Display shows the status of the wirelessKey and with the integrated push button an explicit opening can be done. wirlessKeymodule Interior 16 Pushbutton with flush fitting box Exterior User manual 10.2 Application overview A pushbutton on the exterior or on the exterior/interior is being recommended depending on the use of an electro-mechanic locking system. Application Illustration Pushbutton interior Pushbutton exterior wirelessKey with digital cylinder yes yes (recommended) (recommended) wirelessKey with electric push control yes (recommended) wirelessKey with power lock yes yes (recommended) (recommended) wirelessKey with electric door yes (recommended) wirelessKey with garage door drive wirelessKey with automatic door 11. yes yes (recommended) (recommended) yes (recommended) Care and maintenance The wirelessKey Basic system does not require particular maintenance. Please note that it is an electric device. Exposure to the elements - such as extreme temperatures, contact with water, and so forth - should be avoided. www.wireless-key.com 17 12. Electric connection specifications 1. Voltage supply: The enclosed adapter is connected to terminals V+ and GND. 2. Locking system outlet (see chapter 13, terminal connection diagram): a. Floating contact (only one relay is switched) The switched contact has to be connected to terminals A1 and A2, terminals V+ and GND have to remain open. The initiation time is 5 seconds and can be adjusted freely with the proper software (not included in delivery). b. Utilization with internal module supply voltage (supply voltage is emitted through relay) The switched contact has to be connected to terminals [A2, GND], terminals V+ and A1 have to be connected (bridged). 3. Floating / full-voltage input (e.g. for wall pushbutton): The input has to be activated with the proper software (not included in delivery)! a. When connecting an external voltage (6-24V DC) to the input terminals (E+, E-), the jumpers are to be placed as illustrated below. Klemme b. When operating with a floating contact (pushbutton) at the input, the jumpers are to be placed as illustrated below: Klemme 4. 18 If needed, LEDs (LEDgr, LEDor, LEDro, GND) can be placed at the outputs without additional series resistor (optional). User manual Terminal connections: E+ E- LEDro LEDgr GND LEDor Jumper V+ GND V+ A1 V+ LEDgr LEDor LEDro GND A1 A2 E+ E- A2 GND supply (adapter, 6-24V DC, cable with white lininge) Led, green Led, orange Led, red Ground see chapter 12, electric connection specifications see chapter 12, electric connection specifications input for pushbutton / radio control and external voltage (+) output for pushbutton / radio control and external voltage (-) www.wireless-key.com 19 13. 20 Terminal connection diagram for floating contact, for example Simons Voss digital cylinder: User manual 14. Terminal connection diagram: Electric door opener www.wireless-key.com 21 15. Tested mobile phones Securemode: Model: Nokia 5500 7650 6230i 6131 Sony-Ericsson 22 Standardmode: Manufacturer: 6280 E50 8910 3600 6600 6500c 6021 6120c 6151 5310 5300 E61-1 6233 6125 T68 W710i K750i Z550i Z10 P910iR M600i W950i Notes: No signal tone upon first addition, but invisibletone mode Bluetooth is only visible for 3 minutes and has to be switched visible for each opening procedure. Connection to internet has to be allowed when setting the Bluetooth connection Input on display keypad (Attention: limited time for PIN input!) User manual Standardmode: Securemode: Manufacturer: Model: Sony-Ericsson K700i K510i W880 K320i K530i A1000 L6 Bluetooth is only visible for 60 seconds and has to be switched visible for each opening procedure. V550 Bluetooth is only visible for 60 seconds and has to be switched visible for each opening procedure. KRZR K1 Bluetooth is only visible for 60 seconds and has to be switched visible for each opening procedure. V3 Bluetooth is only visible for 60 seconds and has to be switched visible for each opening procedure. Motorola (Siemens)-BenQ S65 Samsung LG Notes: Bluetooth is only visible for 10 minutes. AP75 S81 x x x x Bluetooth cannot be switched visible. No connection possible S68 SK65 M75 EF81 x EGH700 U600 D900i x KG800 www.wireless-key.com Request of roster can be terminated. 23 Standardmode: Securemode: Manufacturer: Model: Blackberry 8700 8100 8800 7100 7290 8310 8300 (MDA) Touch Dell Axim X30 HP 6816 x x Voice Messenger x x 514 x x 6515 6915 SDA II XDA II Select “finish” after the device is no longer busy or the door has been unlocked for the first time. Visible shown only in Bluetooth menu. Asus VPA Compact III iPhone P525 VK VK2020 x x Only 5-digit codes are supported. HTC T-Mobile Vodafone Apple 16. Notes: Select “always allow to connect” after pairing Error sources The mobile phone does not find the device: 1. Ensure that the wirelessKey Basic module is in “addition” mode. If you are not certain, wait and try to re-activate the wirelessKey Basic module for the search by pressing the button until the signal is sounded. . 24 Ensure that you are not outside the selected range or behind a solid wall. User manual . Please keep in mind that the wirelessKey module is only active in the “addition” mode for 3 minutes. The module could have deactivated during the search for the device. 4. Ensure that your mobile phone is switched to “visible for others”. Enter the Bluetooth menu and select “visible” for your mobile phone. 5. Check if the wirelessKey appears on your list. The device does not sound when the button is pressed: 1. Ensure that the device is connected to a power supply. . Ensure that the button on the inside of the hole is being pushed. The device has unintentionally sounded more than one time: If you press the multifunction button for too long, the signal is sounded a second time. Press the multifunction button briefly in order to exit the current program mode. Now you can restart with the set-up. No melody follows the one-time signal sound: You are either still in the addition or deletion mode or have pressed the button again. Simply wait until the wirelessKey Basic module is deactivated. You will hear a dual tone sequence. You can also exit the current mode by briefly pressing the multifunction button. Now you can try again. Depending on how many signal tones you are waiting for, a melody will be audible. Please note that the melody will only sound after the button is released following the signal tone. The connection is not established after code input: Check if you have entered the code correctly. Please keep in mind that the wirelessKey is only active in the “addition” mode for 3 minutes. The device could have deactivated during the code input. Please repeat the process. You can repeat the code input any number of times without being locked. Also, please check if other devices are being included in the list of “connected devices” on your mobile phone. It could be possible that your mobile phone does not permit additional connections. In this case, at least one of the existing connections has to be deleted from the list on your mobile phone. www.wireless-key.com 25 The connection times-out before I can activate my mobile phonen: Adjust your mobile phone in a way that you only have to select “new devices” and activate the module at this point. Usually, “add.SOREX-w.Key” will be found instantly. Most mobile phones can disconnect the search and continue with “add.SOREXw.Key” at this stage. Keep your code available and press “OK” only if you would like to maintain the range of the device for the future. I cannot locate my code: Please contact one of our service technicians. The device has to be returned and furnished with a new code. Our service technicians – listed in chapter 20, support - are at your disposal for any possible error sources. 17. Technical specifications 17.1 SOREX wirelessKey Voltage supply: Voltage at input: Output for supplying a door opener: One floating relay-output: Switching capacity: Measurements L x W x H: Recommended working temperature: Equipment: • 1 floating optocoupler input • Adjustable range 17.2 Certificates BluetoothTM FCC - Rule Parts 15C CE - EC/2006/20013 ROHS 26 6…..24V DC, 2 W 6.......24V DC 6…..24V DC, max 10 W max. 1.2A, 50V DC max. 10 W 147 x 90 x 25 mm (5.79 x 3.54 x 0.98 in) -20°C … +60°C (-4°F to 140°F) User manual 17.3 Bluetooth Initially, Bluetooth was developed by Ericsson beginning in 1994 to enable a wireless connection between mobile phones and additional devices. With the intention of establishing a de facto standard, the Bluetooth SIG was founded in cooperation with industry partners in 1998. It was the goal to create the specifications for a constructive unit with the double-function of transmitter and receiver with low production costs, flexible application possibilities, low energy needs, resilience towards flaws and the ability to transmit data for multimedia applications. Today, Bluetooth is considered industry standard (IEEE 802.15.1) for the wireless radio connection of devices. This network is called also a Wireless Personal Area Network (WPAN). • • • • • • Compatibility with all Bluetooth enabled devices (about 2 billion units worldwide) High wireless transmission stability based on the frequency jumping process (1,600 jumps per second) Highly secure transmission: 128 Bit encryption Wide range: up to 100 meters (328 feet) Routing via own modules Small, compact design of the wireless modules 18. Warranty and liability SOREX Wireless Solutions grants a warranty of six months for this product. An invoice is to be provided as proof of purchase. SOREX shall not be liable for any incidental or consequential damages or injuries resulting of the misuse or use of the product in against instructions of this manual. All claims out of tort or otherwise – regardless of the theory of claim – as a result of a possible defective delivery or the incorrect execution of a service provided by SOREX, are explicitly excluded. Further details can be found in the AGBs of the SOREX Wireless Solutions GmbH Company. www.wireless-key.com 27 19. Overview pushbutton operation 0,5 sec 3 sec 6 sec 9 sec 15 sec 18 sec and up 20. Support -> 1 signal tone (low): back to standard-mode -> 1 time signal tone: add mobile phone (add.)) -> 2-tier signal tone: delete mobile phone (del.) -> 3-tier signal tone: connect with PC (adm.) -> 4-tier signal tone: reset (to factory settings) -> 1 signal tone (low): back to standard-mode Manufacturer: SOREX – Wireless Solutions GmbH Herzog Leopold Straße 5 2700 Wr. Neustadt Tel.: Fax: +43676/9739012 +432622/32013-15 E-Mail: [email protected] Web: www.sorex-austria.com Your Distributor: Please note the GTC of SOREX Wireless Solutions GmbH 28