1
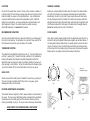
LOW ENERGY LED LIGHTING SYSTEM
Our new low energy LED lighting system is designed to be maintenance free.
In the rare event of a failure, the LED units and transformer can be replaced
(we recommend this is done by a competent person). DISCONNECT CABINET
FROM MAINS SUPPLY FIRST. Open the door and remove the row of screws
situated on the front of the top panel. Remove the panel and the perspex
light cover. Undo the retaining screws from the mounting strip and disconnect
wiring joint. To replace, reverse the process, ensuring that the wiring polarity
is correct and that the back of the perspex cover fits within the housing. The
transformer is situated inside an access panel at the rear of the unit.
BASIC FAULT FINDING
Loss of cooling- Check power supply
- Check thermostat is correctly set
- Check product is not forcing grill on to circulation fan
stopping rotation and air circulation
- Check gasket is sealing properly
- Check condenser is clear
- Check air vents are unobstructed
Loss of light - Check LED unit
- Check transformer output is 12V DC
The guarantee shall not cover any fault or defect caused by:
Parts not assembled in accordance with the instructions of the manufacturer
Careless operating, handling and misuse and/or lack of maintenance
External sources such as weather or transit damage (except where reported at time
of delivery)
Repairs or alterations carried out by unauthorised parties or agents
Normal wear and tear including door gaskets and any damage caused by harsh
cleaning materials
Damage caused by the use of parts and accessories other than those produced or
recommended by the manufacturer
OSBORNE REFRIGERATORS LTD
Rose Green Road
Bognor Regis
PO21 3EG
[email protected]
Tel +44(0)1243 267711
www.osborne-ref.co.uk
Fax +44(0)1243 265853
2009 Osborne Refrigerators Ltd
INSTALLATION AND USER MANUAL
”BB” Range 2010 (LED version)
INTRODUCTION
This environmentally friendly refrigerated cabinet is designed to store
wine, beer and food conveniently and efficiently. It has been fitted with
LED lighting and low energy fan motors to use as little energy as possible
while maintaining cooling performance. With a little care, as described in
this manual, it should give a long and trouble free life.
UNPACKING
Check the cabinet for obvious signs of damage while unwrapping, and
contact your supplier if you are concerned about its condition. If the
cabinet has been stored horizontally in transit, allow it to stand upright for
an hour before plugging power cord into supply.
ELECTRICAL CONNECTION
The cabinet is complete with a factory-fitted fused plug suitable for a
13amp socket outlet. This appliance must be earthed.
LOCATION
This chiller cabinet has a top-mounted
refrigeration unit which must be allowed
sufficient ventilation to work properly. We
recommend an airgap of at least 50mm.
LOCATION
GENERAL CLEANING
Do not site the cabinet near a source of heat, such as a boiler or radiator, or
in direct sunlight. This will conserve energy and reduce running costs. Do not
place the cabinet on uneven or thick carpeted floors - only a solid surface
ensures unrestricted air flow around the refrigeration system. Install the
cabinet on a level surface - an uneven surface can increase vibration and
affect alignment of doors. The cabinet should be vertical or leaning
fractionally backwards - it must not lean forward.
Before use, and periodically thereafter, clean the inside of the cabinet with a
soft cloth and a solution of one teaspoon of Bicarbonate of Soda (Sodium
Bicarbonate), to one litre (1¾ pints) of warm water. Rinse with clean water
and dry thoroughly. Clean the outside of the cabinet as necessary with mild
detergent and warm water. Rinse with clean water and dry thoroughly. Ensure
that the door seal and the front edge of the cabinet are thoroughly cleaned.
Do not use abrasives of any kind on the cabinet.
RECOMMENDED OPERATION
DOOR GASKETS
Once the unit is stocked and in use, leave the cabinet to run continuously. If
the unit is to be taken out of commission for a period of time, switch off at
the mains and prop the door open to allow air to circulate.
Wine, beer and other sugary liquids spilt on the gasket will cause the door to
stick which will tear the gasket. Please clean regularly as instructed above. If
the door gasket requires replacement, it is usually easier to remove the door
(see fig 3) and lay it down to avoid the glass unit falling out. Simply remove
all the screws from the retaining strips, remove strips and remove the gasket.
Replace with a new gasket and reverse the above instructions.
THERMOSTAT SETTING
The cabinet is thermostatically controlled (see fig 1). The control dial can be
set from 1 (warmest) to 7 (coldest). Normally, a setting of 3-4 (indicated by
marker) will maintain the cabinet at a suitable temperature but further
adjustment may be necessary to allow for ambient conditions, frequency of
door openings or other factors. Turning the control fully anti-clockwise (past
1) turns the cabinet off. The dial is found inside on the top rear panel.
4
3
5
Top view of
refrigeration system
6
2
SHELF CLIPS
1
0
7
Please ensure that the shelf clips are installed the correct way up (see fig 2).
They will not support a loaded shelf if they are the wrong way up and
damage will be done to the cabinet.
Warmer
Cooler
fig 1
ROUTINE MAINTENANCE & CLEANING
This cabinet has been designed so that it requires almost no maintenance by
the owner. The low-energy LED lighting system is designed to be practically
maintenance free (see back page) and the condenser should only need
cleaning periodically (see fig 4). The top air vent must be kept unobstructed.
ALWAYS KEEP THE CONDENSER WELL VENTILATED
fig 4
fig 2
fig 3