1
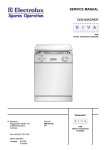
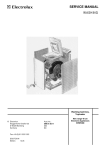
SERVICE MANUAL
VACUUM CLEANERS
Vacuum cleaners
© AEG Hausgeräte GmbH
Muggenhofer Straße 135
D-90429 Nürnberg
Germany
Fax +49 (0)911 323 1420
TSE - N
Edition:
05.00
Publ.-Nr.:
599 50 77 62
685
EN
Vampyr 6000
Vampyr 7000
Vampyr 8000
Repair notes
TSE-N 05.00 A. B.
-2-
599 50 77 62
EN
Disassembly and Assembly of Separate Components
Lid
16
Lock Key
Locking Piece
13
15
Accessory Tray
Accessory Lid
17
1
Accessory Lid Lock
14
Paper Filter Safety
Device
Switch Key,
Stop Key
22
Printed Panel
2
Potentiometer Panel,
Slider Panel and Blind
Panel
3 – Keys
3
20
TSE-N 05.00 A. B.
18
4
Guided on both sides with hinge and lid necks. When removing,
raise the lid and press the flaps with the lid necks outward.
When closing the lid, the paper filter must be put in, raise the lid in
upright position and insert the hinge and lid necks in both sides.
Press key to the front using a screwdriver between lid 16 and key.
Take out the spring wire, press the 2 clips of the lid 16 upward one
after the other using a small screwdriver while moving that piece
forward.
Guided with 2 necks (axes) on both sides.
Press the lid in the middle of its front side down with your fingers,
the lid leaps up, press the 2 guiding necks inward and pull the lid
up.
During assembly first put the spring onto the axis, then put the lid
in open position to the necks, press downward and let it lock in; if
necessary, place the spring into the guide groove.
Put a small screwdriver into the support, unlock it and press it
down.
During assembly put the guide bolt into the support and press it
from below to top into the device.
Apply the screwdriver inside and press outward.
The keys are snapped twice each.
It is better to raise and/or remove the lid completely when
performing these activities.
During disassembly press the key and put the screwdriver between
the key and potentiometer panel, slider panel respectively control
panel or key 4 (250 W, 110 W), apply to the snap-in catches and
press outward (possibly by turning), put the screwdriver between
the key and printed panel 2 (inclined ribs and press outward
(possibly by turning).
During assembly unlock the printed panel 2 respectively remove it
completely. Guide both outside snap-in catches of the key into the
pockets inside the rim of the support part 8 and press the key at
the inside down (possibly with a slight beat of your ball of the
thumb), so that the snap-in catch will be locked inside the
potentiometer panel 3, slider panel 20 respectively control panel or
key 4. Locking in respectively putting on the printed panel 2 leads
to the second lock of the key.
Unlock the snap-in catches, which are each snapped in twice on
the left and right side, one after the other, using a screwdriver.
Only mounted on, can be taken off.
Can be taken off and mounted on again; by mounting on the
printed panel 2 the keys are locked
-3-
599 50 77 62
EN
Control Panel ?,
Rocker Switch
5
6
Rotary Electronic
Sliding Electronic
27
21
Slider
19
Brake Lever
Lower Housing
Microfilter Key
Wheel
23
24
12
26
Front Wheel
25
Plug Box
9
Plug Funnel
10
Fan
Electronic
11
7
TSE-N 05.00 A. B.
Unlock the control panel, take off the rocker switch, put in the
rocker switch again with mounted-on adjusting spring and lock in
the control panel with the compression spring.
Put in the rotary potentiometer into the device in support part 8.
Insert the gear wheel symmetrically into the sliding part with the
slide potentiometer and apply it in the centre of rack and guide bar
move the complete unit to the right to the end of the rack and put
on the slider panel 20 with slider 19 the end stop at the right side;
in doing so, check the function whether the slide potentiometer is
guided by slider 19.
Lever the slider using a screwdriver between slider and panel.
During assembly put in the angle spring into the neck of the slider
and lock in the slider using a screwdriver.
Expand the support (2 legs) using circlip pliers.
Unscrew the 7 screws (1 of them below the microfilter box 12).
Press from outside to inside and unlock.
Has to be unlocked with a screwdriver or pliers, if necessary lever
with a screwdriver between lower housing 24 and wheel.
Lever with a screwdriver between lower housing 24 and wheel,
additionally unlock the neck in the middle with pliers or another
screwdriver.
Press up the snap-in catch in the cable roller box and move a bit
outward, now press the plug box together from the outside and
unhinge the hang-in catches above and below.
Push out of the guide (cable roller side) upward. During assembly
the plug funnel must be pushed in first outside the support part 8
slightly inclined, so that both flaps reach the guide left and right at
the cable roller side; in doing so, the stopper must be adjacent
below outside the support part 8. Then push in the plug box 9 from
the outside passing the rims left and right of the plug funnel.
Remove both rubber buffers with pliers.
Unlock the 3 catches and pull them through downward; in doing so,
take out the indications in the printed panel 2 because of the wire
lengths.
-4-
599 50 77 62
EN