1
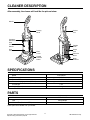
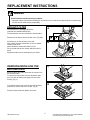
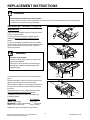
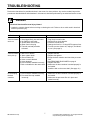
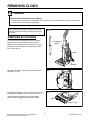
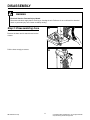
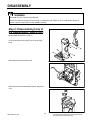
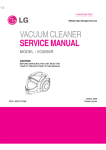
Internal Use Only
Website http://biz.lgservice.com
VACUUM CLEANER
SERVICE MANUAL
CAUTION
BEFORE SERVICING THE UNIT,
READ THE SAFETY PRECAUTIONS IN THIS MANUAL.
MODEL: VUP153NJP
CONTENTS
IMPORTANT SAFEGUARDS...............................................................................3
CLEANER DESCRIPTION...................................................................................4
SPECIFICATIONS ................................................................................................4
PARTS ..................................................................................................................4
REPLACEMENT INSTRUCTIONS ......................................................................5
TROUBLESHOOTING .........................................................................................7
REMOVING CLOGS ............................................................................................8
DISASSEMBLY ..................................................................................................10
SCHEMATIC DIAGRAM ....................................................................................14
EXPLODED VIEW..............................................................................................15
REPLACEMENT PARTS LIST...........................................................................17
Copyright © 2007 LG Electronics. Inc. All right reserved.
Only for training and service purposes
2
LGE Internal Use Only
IMPORTANT SAFEGUARDS
WARNING
Your safety is important to us. To reduce the risk of fire, electrical shock, injury
to persons, or damage when using your vacuum cleaner, please follow these basic safety precautions.
1. Disconnect power supply before cleaning the unit.
2. Do not leave appliance plugged in. Unplug from the socket when not in use.
3. Do not use outdoors or on wet surfaces. Do not pick up water or wet materials.
4. Do not handle plug or appliance with wet hands.
5. Do not allow it to be used as a toy. Close attention is necessary when used by or
near children.
6. Use only as described in this manual. Use only attachments recommended by
the manufacturer.
7. Do not use with a damaged cord or plug. If the supply cord is damaged, it must
be replaced by the manufacturer or an Authorised Service Centre or a similarly
qualified person in order to avoid a hazard.
8. Do not pull or carry by the power cord as a handle, close door on cord, or pull the
cord around sharp edges or corners. Do not run appliance over the cord. Keep the
cord away from heated surfaces.
9. Do not unplug by pulling the cord. To unplug, grasp the plug, not the cord.
10.Do not put any object into openings. Do not use with any opening blocked. Keep
free from dust, lint, hair, and anything that might reduce air flow.
11.Keep hair, loose clothing, fingers, and all parts of the body away from the openings
and moving parts.
12.Do not use vacuum cleaner to pick up sharp, hard objects, small toys, pins, etc.
13.Do not use to pick up anythng that is burning or smoking, such as cigarettes,
matches, or hot ashes.
14.Do not pick up flammable or combustible liquid or vapour such as gasoline or use
in areas where they may exist.
15.Do not use vacuum cleaner without dust container and/or filters in place.
16.Always turn off all controls before unplugging.
17.Do not keep vacuum cleaner on chairs, tables, etc. Extra care must be taken when
cleaning stairs.
18.Always unplug the unit or turn off the switch when the unit stops unexpectedly.
If you don’t, the cleaner could re-start unintentionally.
Thermal protector: This vacuum cleaner has a special thermostat that protects the cleaner in case of motor
overheating. If the cleaner suddenly shuts off, turn off the switch and unplug the cleaner. Check the cleaner for a
possible source of overheating such as a full dust container, a blocked hose or clogged filter. If these conditions
are found, fix them and wait at least 30 minutes before attempting to use the cleaner. After the 30 minutes period,
plug the cleaner back in and turn on the switch. If the cleaner still does not run, contact a qualified electrician.
SAVE THESE INSTRUCTIONS
THIS PRODUCT IS FOR HOUSEHOLD USE ONLY
LGE Internal Use Only
3
Copyright © 2007 LG Electronics. Inc. All right reserved.
Only for training and service purposes
CLEANER DESCRIPTION
After assembly, the cleaner will look like the picture below.
Handle
Dusting
Brush
Crevice
Tool
Container
Release Knob
Dust
Container
Handle
Dust
Container
Flexible
Hose
Power
Cord
Filter
Cover
Extension
Wand
Handle
Release
Pedal
Motor
Protector
SPECIFICATIONS
Model
Power supply
Power
Dimension/upright position (WxDxH)
Cord length
Weight (approx.)
VUP153NJP
230V/50Hz
IEC-1300W, MAX-1500W
approx 334 x 1096 x 347mm
7.7m
6.3kg
PARTS
Model
Belt
Exhaust Filter(Washable HEPA)
VUP153NJP
4400FI3348A
3210FI2434D
These parts are available from your dealer.
Copyright © 2007 LG Electronics. Inc. All right reserved.
Only for training and service purposes
4
LGE Internal Use Only
REPLACEMENT INSTRUCTIONS
WARNING
Electrical Shock and Personal Injury Hazard
• Unplug the vacuum cleaner before cleaning the unit. Failure to do so could result in electrical shock or personal injury
from the vacuum cleaner starting unexpectedly.
EXHAUST FILTER
A
The exhaust filter is washable HEPA filter.
(Optional: Non washable HEPA filter)
The exhaust filter must be rinsed when it becomes dirty.
Rotate to the left side to remove the filter cover. (Fig.A,B)
Open
We advise you to rinse at least once a year.
After rinsing, allow the exhaust filter to dry in a shaded
location for 24 hours.
Never renstall the exhaust filter while it is wet.
Do not operate the vacuum cleaner without the filter in
place.
Replacement filter can be obtained from your dealer.
Close
B
Exhaust
Filter
Filter Cover
REMOVING/INSTALLING THE
BOTTOM PLATE
C
Before replacing any parts, disconnect the vacuum from
the electrical outlet.
To remove the bottom plate, unscrew the bottom plate
first. Then pull the bottom plate away from the nozzle
housing. (Fig. C)
Removing
Installing
D
To install the bottom plate, hook the front end of bottom
plate into the slots on the front of nozzle. (Fig. D)
Press the bottom plate then tighten the screws.
LGE Internal Use Only
5
Copyright © 2007 LG Electronics. Inc. All right reserved.
Only for training and service purposes
REPLACEMENT INSTRUCTIONS
WARNING
Electrical Shock and Personal Injury Hazard
• Unplug the vacuum cleaner before cleaning the unit. Failure to do so could result in electrical shock or personal injury
from the vacuum cleaner starting unexpectedly.
REPLACING THE BELT AND/OR
AGITATOR
Agitator
Check the belt and agitator regularity. If they are broken
of worn out, replace them.
Turn the unit over and remove the bottom plate as
described in Removing/Installing the Bottom Plate
section.
To remove the agitator, grasp both ends of the agitator
and lift it slowly. Remove the belt from the agitator pulley
and the motor shaft. If the belt is broken, be sure all
pieces are removed.
Belt
WARNING
Motor
Shaft
Personal Injury Hazard
The belt is under high tension; be careful when
removing the agitator.
Failure to do so could result in personal injury
caused by the agitator releasing quickly and
snapping away.
Belt Pulley
New Belt
Head
Cover
Loop the new belt around the motor shaft and agitator
pulley.
Reinsert the agitator, making sure that both ends of the
agitator fit into the grooves in the nozzle head.
After installing the agitator, turn it by hand to make sure
that the belt is not twisted or pinched and that all parts
turn freely.
Reinstall the body cover by reversing the steps in the
Removing/Installing the Bottom Plate section.
End Cap
Base Slot
Agitator
Belt
The agitator must also be cleaned according to the
following schedule:
Vacuum Use
Clean Agitator
HEAVY - (used daily)
every week
MODERATE - (used 2-3 times/week)
every week
LIGHT - (used 1time/week)
every 2 months
Agitator
Replacement part are avaiable from your dealer.
Copyright © 2007 LG Electronics. Inc. All right reserved.
Only for training and service purposes
6
LGE Internal Use Only
TROUBLESHOOTING
Review the chart below for possible solutions in the event of a minor problem. Any service needed, beyond the
procedures described below and elsewhere in this manual, should be performed by an authorised service centre.
WARNING
Electrical Shock and Personal Injury Hazard
• Unplug the vacuum cleaner before servicing or cleaning the unit. Failure to do so could result in electrical
shock or personal injury.
Problem
Possible Cause
Possible Solution
Vacuum cleaner
won’t run
1. Not plugged firmly into wall outlet
2. No voltage in wall outlet
3. On/Off switch not turned on
4. Blown fuse in the plug
5. Thermal overload protection
activated
1. Plug firmly into wall outlet.
2. Check fuse or circuit breaker.
3. Press the On/Off switch.
4. Change the fuse for a 13 Amp ASTA approve fuse.
5. Turn the vacuum cleaner off, unplug it, and allow it
to cool. (See page 3)
Vacuum cleaner
won’t pick up
1. Belt worn or broken
2. Worn agitator brush
3. Dust container full
4. Hose or nozzle blocked
5. Hose damaged
6. Dust container installed incorrectly
7. Belt not installed on the motor shaft
1. Replace the belt.
2. Replace the agitator.
3. Empty the dust container and check the pre-motor
filter.
4. See REMOVING BLOCKAGES on page 8.
5. Replace the hose.
6. Make sure the dust container is seated properly in
the handle.
7. Install the belt on the motor shaft. (See page 16.)
Dust escaping
the dust
container
1. Dust container installed incorrectly
2. Pre-motor filter cap installed
incorrectly
1. Make sure the dust container is seated properly in
the handle.
2. Make sure the pre-motor filter is in place and
seated correctly.
LGE Internal Use Only
7
Copyright © 2007 LG Electronics. Inc. All right reserved.
Only for training and service purposes
REMOVING CLOGS
WARNING
Electrical Shock and Personal Injury Hazard
• Unplug the vacuum cleaner before cleaning the unit. Failure to do so could result in electrical shock or personal injury
from the vacuum cleaner starting unexpectedly.
If your vacuum cleaner makes a strange noise or suction
decreases, check for blockages or whether the pre-motor
filter is dirty.
A
REMOVING BLOCKAGES
First check the hose and extension wand. Visually
inspect the hose and the opening of the vacuum
cleaner body into which the hose is inserted. (Fig. A)
Remove the dust container and check the pre-motor
filter. (See page 15)
Extension
Wand
Hose
Opening
Check the dust inlet on the vacuum cleaner body for
blockages. (Fig. B)
B
If the blockage remains, turn the vacuum cleaner over
and check the agitator area and suction inlet. (Fig. C)
Stand the vacuum cleaner back up in an upright
position before plugging into the electrical outlet.
C
Agitator
Suction Inlet
Copyright © 2007 LG Electronics. Inc. All right reserved.
Only for training and service purposes
8
LGE Internal Use Only
REMOVING CLOGS
WARNING
Electrical Shock and Personal Injury Hazard
• Unplug the vacuum cleaner before cleaning the unit. Failure to do so could result in electrical shock or personal injury
from the vacuum cleaner starting unexpectedly.shock or personal injury from cleaner suddenly starting.
PRE-MOTOR FILTER
Check and clean the pre-motor filter
regularly.
If the motor pre-filter is covered with too
much dust, vacuum cleaner will stop moving
as the thermal protect work.
You should also check the pre-motor filter
whenever the vacuum cleaner makes a
strange noise or suction decreases.
A
First, turn off the vacuum cleaner and
unplug the power cord from the electrical
outlet.
Remove the dust container by pushing the
release button and pulling out on the dust
container handle. (Fig. A)
Remove the cover and empty the container.
(Fig. B)
Clean the pre-motor filter (on the dust
container cover) by tapping it gently. (Fig. C)
B
C
E
D
2
If the pre-motor filter is excessively dirty,
rinse the filter with water.
Easy to rinsing, separate pre-motor filter
from the filter cap. (Fig. D,E)
1
After rinsing, allow the pre-motor filter to dry
in a shaded location for 24 hours. Never
reinstall the pre-motor filter while it is
wet.
Before reinstalling the dust container, make
sure that the cover is positioned properly.
To reinstall the dust container, hook the
bottom of the container onto the lower part
of the handle and push the top of the dust
container into the handle until it latches in
place. (Fig. F)
LGE Internal Use Only
9
Copyright © 2007 LG Electronics. Inc. All right reserved.
Only for training and service purposes
DISASSEMBLY
WARNING
Electrical Shock or Personal Injury Hazard
Disconnect electrical supply before servicing or cleaning the unit. Failure to do so could result in electrical
shock or personal injury from cleaner suddenly starting.
Step 1: Disassembling handle
and cord hanger.
Remove screw and pull out the handle.
Cord
Hanger
Remove screw and disassemble cord hanger, spring
and washer.
Washer
Screw
Spring
Step 2: Disassembling Dust tank
Copyright © 2007 LG Electronics. Inc. All right reserved.
Only for training and service purposes
10
LGE Internal Use Only
DISASSEMBLY
WARNING
Electrical Shock or Personal Injury Hazard
Disconnect electrical supply before servicing or cleaning the unit. Failure to do so could result in electrical
shock or personal injury from cleaner suddenly starting.
Step 3: Disassembling hose
A
Remove the lower end of stretch hose from the
cleaner.
Pull the hose strongly to remove.
LGE Internal Use Only
B
11
Copyright © 2007 LG Electronics. Inc. All right reserved.
Only for training and service purposes
DISASSEMBLY
WARNING
Electrical Shock or Personal Injury Hazard
Disconnect electrical supply before servicing or cleaning the unit. Failure to do so could result in electrical
shock or personal injury from cleaner suddenly starting.
Step 4: Disassembling head of
the cleaner(agitator, belt, pedal
assembly, etc.)
A
Turn the cleaner over to exposure the underside.
To remove the bottom plate, unscrew(optional) and
slide latch off as shown in the figure.
B
Pushing the locking tabs toward the center of the
vacuum, pull the bottom plate away from the nozzle
housing.
Remove the belt from motor shaft, then grasp the ends
of agitator and lift it slowly.
Agitator
C
Unscrew and remove the pedal assembly.
Belt
Pull the left side of the head cover off the body, then
remove right side of the head cover.
D
Push the right edge of connector pipe to turn and set
the position to remove.
Side connector pipe of the head cover.
Copyright © 2007 LG Electronics. Inc. All right reserved.
Only for training and service purposes
12
LGE Internal Use Only
DISASSEMBLY
WARNING
Electrical Shock or Personal Injury Hazard
Disconnect electrical supply before servicing or cleaning the unit. Failure to do so could result in electrical
shock or personal injury from cleaner suddenly starting.
Step 5: Disassembling body of
the cleaner(motor, switch, etc.)
Disassemble head (Refer to Step 4).
Unscrew and remove the body cover from the body
base.
Disconnect wires and remove motor.
Disconnect wires and disassemble switch, and power
cord.
LGE Internal Use Only
13
Copyright © 2007 LG Electronics. Inc. All right reserved.
Only for training and service purposes
SCHEMATIC DIAGRAM
Live
Neutral
Switch
Capacitor
T/P
M
Motor
Copyright © 2007 LG Electronics. Inc. All right reserved.
Only for training and service purposes
14
LGE Internal Use Only
EXPLODED VIEW
1 BLOCK
MEGBD1
MBGBC1
MHYBC1
MEGBH1
MEBHC1
EBFBA1
MECBC1
MEGBD1
MEGBH2
MECBC2
ACVBA1
MAMBB1
MDQBF1
MKBBA1
MCKBF1
MEBHC2
MBFBC1
MDSBA1
EADBA1
MCQBA1
MEGBH1
MHJBA1
EADBC1
3 BLOCK
MCQBM1
EAUBA1
MCQBA2
MCKTD1
2 BLOCK
MDSTA1
ADQTC1
MFGCA1
MGJTC2
MHYCC1
MGJTC1
MJHTB1
MJMTD1
MCKCB1
LGE Internal Use Only
15
Copyright © 2007 LG Electronics. Inc. All right reserved.
Only for training and service purposes
EXPLODED VIEW
5BLOCK
MEGHF1
MCKHH1
AHRBA1
MGEHP1
MDFAA1
MJDHA1
MFCLA1
MAKAA1
MGJBB1
MCDAB1
MKBBA2
MHJAA1
MDSBA3
MDFAA2
MCDAB2
MASBA1
FADAC1
4BLOCK
6 BLOCK
AGRPT1
ABCBF1
AEMAF1
MFVBC1
ABCAD1
Copyright © 2007 LG Electronics. Inc. All right reserved.
Only for training and service purposes
16
LGE Internal Use Only
P/NO : 3828FI5874D