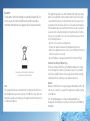
1
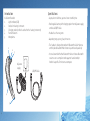
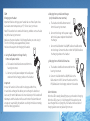
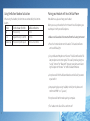
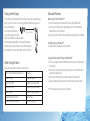
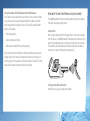
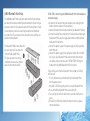
User Guide ReSound Headset for ReSound Hearing Instrument AZ60-DI and AZ60-VI Thank you for purchase a ReSound headset. Using the telephone, while using your hearing instruments with the headset, may require some practice. This user manual will help you make the most of your headset. We hope you enjoy it! Your ReSound headset lets you do all this: • Answer calls • End calls • Reject calls* • Voice dial* • Redial last number* • Call waiting* • Call hold* * If your cellular phone supports this feature Contents Page Introduction . . . . . . . . . . . . . . . . . . . . . . . . . . . . . . . . . . . . . . . . . . . . . . . . . . . . . . . . 4 What’s in the Box . . . . . . . . . . . . . . . . . . . . . . . . . . . . . . . . . . . . . . . . . . . . . . . . . . . 4 Specifications . . . . . . . . . . . . . . . . . . . . . . . . . . . . . . . . . . . . . . . . . . . . . . . . . . . . . . . 5 Use . . . . . . . . . . . . . . . . . . . . . . . . . . . . . . . . . . . . . . . . . . . . . . . . . . . . . . . . . . . . . . . . . . 6 Charging your Headset . . . . . . . . . . . . . . . . . . . . . . . . . . . . . . . . . . . . . . . . . . . . . 6 Using the Button: Modes of activation . . . . . . . . . . . . . . . . . . . . . . . . . . . . . 8 Pairing your Headset with Your Cellular Phone . . . . . . . . . . . . . . . . . . . . 9 Turning the Headset On and Off . . . . . . . . . . . . . . . . . . . . . . . . . . . . . . . . . . 11 Low Battery Waring . . . . . . . . . . . . . . . . . . . . . . . . . . . . . . . . . . . . . . . . . . . . . . . 12 Adjusting the Volume . . . . . . . . . . . . . . . . . . . . . . . . . . . . . . . . . . . . . . . . . . . . . 12 Connecting the headset to the cellular phone . . . . . . . . . . . . . . . . . . 13 Making and Ending a Cellular Phone Call . . . . . . . . . . . . . . . . . . . . . . . . 14 Answering and Ending an Incoming Cellular Phone Call . . . . . . . . 14 Switching between Headset and Cellular Phone . . . . . . . . . . . . . . . . 15 Rejecting an Incoming Call . . . . . . . . . . . . . . . . . . . . . . . . . . . . . . . . . . . . . . . 15 Staying within Range . . . . . . . . . . . . . . . . . . . . . . . . . . . . . . . . . . . . . . . . . . . . . 16 What the Lights Mean . . . . . . . . . . . . . . . . . . . . . . . . . . . . . . . . . . . . . . . . . . . . 16 Advanced Features . . . . . . . . . . . . . . . . . . . . . . . . . . . . . . . . . . . . . . . . . . . . . . . 17 Making a Call with Voice Dial . . . . . . . . . . . . . . . . . . . . . . . . . . . . . . . . . . . . . 17 Re-dialling the Last Number . . . . . . . . . . . . . . . . . . . . . . . . . . . . . . . . . . . . . 17 Using Call Waiting and Placing a Call On Hold . . . . . . . . . . . . . . . . . . . 17 Bluetooth Hub for Desk Phone Use . . . . . . . . . . . . . . . . . . . . . . . . . . . . . . 19 Using the Hub . . . . . . . . . . . . . . . . . . . . . . . . . . . . . . . . . . . . . . . . . . . . . . . . . . . . . 19 JABRA Bluetooth Hub Setup . . . . . . . . . . . . . . . . . . . . . . . . . . . . . . . . . . . . . . 20 Daily use of the headset and the JABRA Bluetooth Hub . . . . . . . . . 24 Maintenance . . . . . . . . . . . . . . . . . . . . . . . . . . . . . . . . . . . . . . . . . . . . . . . . . . . . . . 27 Precautions and Warnings . . . . . . . . . . . . . . . . . . . . . . . . . . . . . . . . . . . . . . . 28 Taking Care of Your Headset . . . . . . . . . . . . . . . . . . . . . . . . . . . . . . . . . . . . . 28 Batteries and Product Disposal . . . . . . . . . . . . . . . . . . . . . . . . . . . . . . . . . . 28 Glossary . . . . . . . . . . . . . . . . . . . . . . . . . . . . . . . . . . . . . . . . . . . . . . . . . . . . . . . . . . . 29 Troubleshooting . . . . . . . . . . . . . . . . . . . . . . . . . . . . . . . . . . . . . . . . . . . . . . . 30-31 Need more Help? . . . . . . . . . . . . . . . . . . . . . . . . . . . . . . . . . . . . . . . . . . . . . . . . . . 31 Key Word Index . . . . . . . . . . . . . . . . . . . . . . . . . . . . . . . . . . . . . . . . . . . . . . . . 32-33 Introduction A. ReSound headset 1. Light indicator (LED) 2. Socket for hearing instrument 3. Charging socket (inside the socket for the hearing instrument) 4. Function button 5. Microphone 1 2 Specifications • Up to 4 hours talk time, up to 120 hours stand by time • Rechargeable battery with charging option from AC power supply and via a USB/PC cable • Headset less than 12 grams • Operating range up to 33 feet/10 meters • The headset is designed to work with Bluetooth cellular® phones and the Jabra Bluetooth Hub that can be purchased separately 3 AC power supply • It can also work with other Bluetooth® devices that are Bluetooth version 1.1 or 1.2 compliant and support a headset and/or hands-free profile. For instance a computer. USB/PC cable 4 5 Use Charging your Headset Important: Before setting up your headset be sure that all parts have been above room temperature 32 ºF/0ºC for at least 30 minutes Note! The headset has its own built-in battery, and does not use the battery of the hearing instrument. Make sure thatyour headset is fully charged before you start using it. The first full charge takes approximately 2 hours. You have three options for charging the headset. 1.Using the AC adaptor to charge directly from a wall power socket a. The headset should be disconnected from the hearing instrument. b. Connect your AC power adaptor to the wall power socket and to the charging socket on the headset Important: In case the headset is left unused for a longer period of time, it needs to be recharged. We advice you to recharge the headset at least every 6 months! Otherwise the internal battery of the headset will decompose and the headset will cease to function. ReSound does not accept any responsibility for problems resulting from failure to comply with the recharge guidelines 2.Charging from your ReSound charger (only included in some countries) a. The headset should be disconnected from the hearing instrument. b. Connect the charger to the power supply with the AC power adaptor included with the charger c. Connect the USB end of the USB/PC cable to the USB socket on the charger. Connect the other end of the PC/USB cable to the charging socket on the headset 3.Charging from a PC with USB interface a. The headset should be disconnected from the hearing instrument. b. Connect the USB end of the USB/PC cable to the USB socket on the PC. Connect the other end of the PC/USB cable to the charging socket on the headset Color Indicators: When the LED is steady yellow/light green, your headset is charging. When the LED is green, it is fully charged. If the headset has not been charged for a very long time, the headset will need a bit of charging before constant yellow light turns on. Using the Button: Modes of activation Pairing your Headset with Your Cellular Phone When using the headset, the functions are activated by the function button. Action Touch Answer / End for… Audible indications Tap Press briefly 1 click Press Approximately 1 second 2 clicks Double tap Press briefly and repeat 1 click + 2 fast clicks Note: Before use, please charge your headset. Before you use your headset the first time with a cellular phone, you need to pair it with your cellular phone: 1.Make sure the headset is disconnected from the hearing instrument 2.Press the function button on the headset. The headset will now emit a solid blue light 3.Set your Bluetooth® phone to “discover” the ReSound headset. Follow your phone instruction guide. This usually involves going to a “setup”, “connect” or “Bluetooth” menu on your phone and selecting the option to “discover” or “add” a Bluetooth® device 4.Your phone will find the ReSound headset and will ask if you want to pair with it 5.Accept pairing by pressing Yes/OK (or similar) on the phone and confirm with PIN “0000” (4 zeros) 6.Your phone will confirm when pairing is complete. 7. The headset emits blue flashes and turns off If you have problems: Turning the Headset On and Off • The headset is in pairing mode for two minutes. If it turns off after one minute, and if you did not finish the pairing process, you need to go back to step 2. 1.Connect the hearing instrument to the headset. Initially, it will be most easy to connect the two devices before the hearing instrument is placed on the ear. With some training it is possible to connect the headset while wearing the hearing instrument • If pairing is unsuccessful for some other reason, repeat the steps above. Note: If you accidentally put the headset into pairing mode, tap the pairing button to exit pairing mode. Also note that the headset will automatically turn itself off 10 seconds after being paired with either a phone and/or the hearing instrument. Once the headset is disconnected from the hearing instruments or if the hearing instruments are turned off the headset is no longer active/ON. Important: The same headset can be paired with multiple phones. 2.The headset emits 4 quick blue flashes and is now turned on. The headset will continuously emit slow blue flashes indicating it is active 3.To turn off the headset, remove it from the hearing instrument. The headset emits 4 fast blue flashes and turns off For optimal performance, the ReSound headset and your cellular phone should be worn on the same side of your body. In general, you will get better performance when there are no obstructions between your headset and your cellular phone. 10 11 Low Battery Warning Connecting the headset to the cellular phone When the headset is running low on battery the headset beeps and the LED blinks yellow (while in a call, every second, otherwise every third second). 1.If the headset has not been paired to the cellular phone, follow the pairing instructions (page 6). Note that the battery will have less capacity after two years use, which means that standby and talk time is reduced. When the battery runs out of power, the headset will automatically turn off. Adjusting the Volume The automatic volume control of the headset elevates sound level and quality to match your environment. If necessary, use the volume buttons on your cellular phone. 12 2.Turn the headset on by attaching it to the hearing instrument. 3.When the cellular phone is within range (max 10 meters) and has Bluetooth enabled, the headset and the cellular phone will connect. This is shown on most cellular phones as a quick status message and a permanent headset symbol on the cellular phone display. Note: If you detach the headset from the hearing instrument, the connection will be lost. When you attach the headset to the hearing instrument again, the connection is automatically re-established. 13 Making and Ending a Cellular Phone Call Switching between Headset and Cellular Phone* 1. Make sure the headset is attached to your hearing instrument and is connected to your cellular phone. 2. Make the call from your cellular phone 3. On most phones the call will transfer to your headset automatically (see your cellular phone User Manual to find out how to activate this feature if it is not active by default). If your phone does not allow the automatic transfer, see your cellular phone User Manual on how to answer a call with a headset. 4. To end a call, tap the headset function button, OR press End/No (or similar) on your cellular phone. You can switch the call from your headset to your cellular phone, or from your cellular phone to the headset during an active call. Use the menu on your cellular phone to switch between headset and cellular phone during an active call (see your cellular phone User Manual) Answering and Ending an Incoming Cellular Phone Call 1. When the phone rings, the headset emits fast blue flashes 2. To answer, tap the headset function button on your headset. 3. To end a call, tap the headset function button, OR press End/No (or similar) on your cellular phone. Rejecting an Incoming Call* 1.Press the headset function button when the phone rings to reject an incoming call 2.Depending on your phone settings, the person who called will either be forwarded to your voice mail or hear a busy signal * Cellular phone dependant. Check your cellular phone User Manual for further information. Important: If you answer a call on your cellular phone handset, certain cellular phone models will not automatically transfer the call to your headset. Note: When you are in an active call on one phone, the headset can not answer a call from another paired phone. 14 15 Staying within Range Advanced Features The sound in your headset will deteriorate if you move beyond range (up to 33 feet / 10 meters in line of sight). Move back into range to restore sound quality. If you move too far from 33 feet / 10 meters your cellular phone, the call might be ended or re-routed to your cellular phone, depending on what cellular phone model you are using. Please see your cellular phone User Manual for more information on this function. Making a Call with Voice Dial** 1.Press the headset function button to enter Voice Dial mode 2.Consult your cellular phone User Manual for more information about how to use this feature 3.For best results, record the voice dialling tag through your headset. What the Lights Mean Only one colour will be visible at any one time. 16 When your headset LED does this… Green steady Blue slow flash Blue quick flash Blue steady Yellow/light green flash Yellow/light green steady It means… Charge complete Headset on (sleep mode) Headset on (active mode) Headset in pairing mode Low battery Charge in progress Re-dialling the Last Number** 1.Double tap the headset function button. Using Call Waiting and Placing a Call On Hold* 1.This lets you put a call on hold during a conversation and answer a waiting call. 2.Press the function button once to put the active call on hold and answer the waiting call. 3.Press the function button to switch between the two calls. 4.Tap the headset function button to end the active conversation **If the cellular phone supports this feature 17 Using the Headset with Multiple Bluetooth-Enabled Devices Your headset can be paired with up to 8 devices at the same time. However, only two can be connected (paired with the headset, turned on and in range) with the headset at a time. This could be any Bluetooth® devices, for example: • Two cellular phones • A cellular phone and a Hub • A Blueetooth-enabled PC and a cellular phone If you want to connect a third device and have two devices connected already, then turn off one of the two connected devices or take it outside the range of the headset so that the connection is broken. The third device will now make a connection with the headset. Bluetooth® Hub for Desk Phone Use (not included) The JABRA Bluetooth® Hub is an optional product that you can acquire from your hearing care professional. Using the Hub When using the Bluetooth® Hub the phone call is at all times managed from the phone. The JABRA Bluetooth® Hub allows you to choose if you want the sound output to be on the phone handset or on the headset. The sound can be switched between headset and phone handset as many times as you wish during the telephone call. Pairing your Headset with the Hub Note: Before use, please charge your headset. 18 19 JABRA Bluetooth Hub Setup The JABRA Bluetooth® Hub needs to be connected to the desk phone, paired with the headset and configured to work with the correct type of phone in order for the headset to work with the desk phone. Finally, the sound quality can be fine tuned to give optimal sound without any echo effect. These steps only have to be done once, and they are explained in detail below. The Bluetooth® HUB is covered by a lid. Use your finger nails to remove the lid from the Bluetooth® Hub. This gives you access to settings and allows you to see the symbols above the connection sockets. SETUP STEP 1: Connecting your JABRA Bluetooth® Hub with desk phone and power supply 1.Disconnect the handset from your desk phone (by unplugging the handset from the socket on the desk phone). 2. Connect the handset to the handset socket of your Bluetooth® Hub (14) 3. Connect the desk phone socket port to the desk phone socket (15) on the Bluetooth® Hub. Use the supplied connection cord (desk phoneto-Bluetooth® Hub) for this. 4. Connect the power supply to the power supply of socket your Bluetooth® Hub (18) 5. Connect the power supply to the wall power socket. When the LED (10) is green, your Bluetooth® Hub is now correctly connected to your phone, and you can move on to “SETUP STEP 2: Pairing your headset with the JABRA Bluetooth Hub” instructions. In the unlikely event that the Bluetooth® Hub is not OK, its LED (10) will flash red. • First, try disconnecting and reconnecting the Bluetooth® Hub from the power source. • If the LED is still flashing red, you must reset your Bluetooth® Hub. 1. Press and hold the Bluetooth® Hub reset button (16). 2. The reset light (10) will turn solid red for 3 seconds, and then turn green. 3. If the LED is still flashing red, after disconnect and reset, please contact your dealer. 20 21 SETUP STEP 2: Pairing your headset with the JABRA Bluetooth® Hub In this step, you make the Bluetooth® Hub and the headset aware of each other. SETUP STEP 3: Adjusting settings with a test call from your desk phone Note: Before use, please charge your headset. 1. Turn the headset on by attaching it to the hearing instrument. It will now flash blue every third second. 1. Make sure the headset is disconnected from the hearing instrument 2. Place the headset on your ear and tap the headset button. 2. Press the function button on the headset until it shows a steady blue light (it takes around 2 seconds) 3. Lift your desk phone handset and listen for a dial tone in your headset. 3. Press and hold the JABRA Bluetooth® Hub until the light on the JABRA Bluetooth® Hub turns steady blue (this takes up to 10 seconds). The two devices will now search for each other. 4. If dial tone is missing or unclear, slowly slide the Dial Tone Switch (9) from A through G until you hear a clear dial tone. The Dial Tone Switch is preset to setting A, since that setting is most commonly used. 4. Pairing takes between 5 and 20 seconds. When your headset and JABRA Bluetooth® Hub have paired successfully, the JABRA Bluetooth® Hub LED will turn green, and the headset LED will flash blue slowly for around 15 seconds and then turn off. 5. Dial a friend so you can test the volume of your microphone (how your voice sounds to others). 5. If pairing is unsuccessful, wait 20 seconds and then repeat the steps above. 6. Adjust the headset microphone volume (12) in the Bluetooth® Hub until your friend confirms that your voice can be heard at an appropriate level. Your headset is now paired with the Bluetooth® Hub, and is able to receive sound from your phone. 7. To end the call, place the desk phone handset, and tap the headset button. Note: If you accidentally put the headset or the Bluetooth® Hub into pairing mode, you can tap the button at any time to exit pairing mode. Alternatively, it will also switch off automatically after a few minutes. 22 23 Daily use of the headset and the JABRA Bluetooth® Hub Making and ending a call from your desk phone • Attach the headset to the hearing aid • Place the headset on your ear and tap the headset button or the button on the Bluetooth® Hub. • Pick up the phone handset and keep it off the hook (for instance, put it on the table). Wait for the dial tone. • Dial the desired number. • To end the call, place the handset on your desk phone AND tap the headset button or the button on the Bluetooth® Hub. Answering and ending a call to your desk phone • Place your headset on your ear and tap the headset button or the button on the Bluetooth® Hub. Switching from headset to handset You can switch from your headset to your desk phone handset during an active call. You may want to do this if, for example, your headset battery is running low. • Tap the headset button or the button on the Bluetooth® Hub. The call will be transferred to your desk phone handset. Switching from handset to headset You can switch from your desk phone handset to your headset during an active call. You may want to do this if, for example, the call was answered on the desk phone handset, and you would prefer to use your headset. • Keep the desk phone handset off the hook. • Tap the headset button or the button on the Bluetooth® Hub. The call will be transferred to the headset. • Pick up the phone handset and keep it off the hook (for instance, put it on the table) to answer the call, and begin talking. • To end the call, place the handset on your desk phone, AND tap the headset button or the button on the Bluetooth® Hub. 24 25 Staying within range The sound in your headset will deteriorate if you move beyond range (up to 33 feet/10 meters in line of sight) on the Bluetooth® Hub. Move back into range to restore sound quality. If you move too far from the Bluetooth® Hub, the call will be routed to your desk phone handset. Return into range within 60 seconds and the call will be re-routed back to the headset. Maintenance Your headset can be cleaned on the outside by wiping it with a moist cloth. If necessary, use a small amount of mild detergent on the cloth. It is not possible to change the rechargeable battery in the headset. Remember! In general, you will get better performance when there are no obstructions between your headset and your Bluetooth® Hub. Notes Note: While in a call, you can switch the sound back and forth between the phone handset and the headset as often as you like by pressing the button on the JABRA Bluetooth® HUB or the button on the headset. Important: After ending the call, make sure that the sound is switched back to the phone handset so that the phone is working normally. Important: The JABRA Bluetooth® Hub is “unaware” of whether there is a phone call in progress or not. Even if you put the phone handset back on the hook, the Bluetooth® Hub will still have an ongoing connection to the headset unless you remember to press the button to close the connection, and bring the phone back to normal handset function. 26 27 Precautions and Warnings Glossary Taking Care of Your Headset • Always store the headset disconnected from the hearing instrument and safely protected • Avoid storage at extreme temperatures (above 113 ºF / 45 ºC – including direct sunlight – or below 14 ºF/-10 ºC). This can shorten battery life and may affect operation. High temperatures may also degrade performance. • Do not expose the headset to rain or other liquids • Do not wear the headset in mines or other explosive areas, unless those areas are certified for use with battery powered equipments Bluetooth® is a radio technology that connects devices, such as cellular phones and headsets, without wires or cords over a short distance. For more information go to www.bluetooth.com Driving • Using a cellular phone while driving can distract you and increase the likelihood of an accident. If driving conditions demand it (such as bad weather, high traffic density, presence of children in the car, difficult road conditions), pull off the road and park before making or answering calls. Also, try to keep conversations short and do not make notes or read documents. Handset is your cellular phone or desk phone Pairing creates a unique and encrypted link between two Bluetooth® devices and lets them communicate with each other. Bluetooth® devices will not work if the devices have not been paired. PIN is a code that you enter on your cellular phone to pair it with your headset. This makes your phone and the headset recognize each other and work together automatically. Voice dialling tag is a name or phrase you record onto your cellular phone. This enables you to dial a specific person by repeating the voice dialling tag. Batteries and Product Disposal • Do not expose the headset batteries to heat • Dispose of the product and/or batteries according to local standards and regulations 28 29 Troubleshooting Guide SYMPTOM CAUSE POSSIBLE REMEDY LED not on when charging headset • Cables not connected correctly • Headset not used for a long time • Connect cables correctly and plug in power supply • Charge headset. After approx. half an hour the LED will turn on No sound in headset • • • • • Headset not paired with phone Headset connected to two other phones Headset not charged Headset not connected properly with hearing instrument Headset not within range of the cellular phone / JABRA Bluetooth Hub Headset not responding • Headset must be reset /No LED • • • • Pair headset with phone Disconnect one of the phones Charge headset Connect headset correctly to hearing instrument • Decrease the distance to the phone / Hub • Charge the headset for at least 2 seconds to reset the headset Need more Help? Please contact your hearing care professional. 30 31 Key Word Index Bluetooth, using with . . . . . . . . . . . . . . . . . . . . . . . . . . . . . . . . . . . . . . . . . . . . . . . 9 Bluetooth hub for desk phone use . . . . . . . . . . . . . . . . . . . . . . . . . . . . . . . 19 Call, incoming . . . . . . . . . . . . . . . . . . . . . . . . . . . . . . . . . . . . . . . . . . . . . . . . . . . . . 15 Call, making a call . . . . . . . . . . . . . . . . . . . . . . . . . . . . . . . . . . . . . . . . . . . . . . . . . 15 Cellular phone use . . . . . . . . . . . . . . . . . . . . . . . . . . . . . . . . . . . . . . . . . . . . . . . . 14 Charging . . . . . . . . . . . . . . . . . . . . . . . . . . . . . . . . . . . . . . . . . . . . . . . . . . . . . . . . . . . . 6 Connecting headset to cellular phone . . . . . . . . . . . . . . . . . . . . . . . . . . . 13 Disposal . . . . . . . . . . . . . . . . . . . . . . . . . . . . . . . . . . . . . . . . . . . . . . . . . . . . . . . . . . . 34 Double tap . . . . . . . . . . . . . . . . . . . . . . . . . . . . . . . . . . . . . . . . . . . . . . . . . . . . . . . . . . 8 Glossary . . . . . . . . . . . . . . . . . . . . . . . . . . . . . . . . . . . . . . . . . . . . . . . . . . . . . . . . . . . 29 Hearing instrument, connecting with . . . . . . . . . . . . . . . . . . . . . . . . . . . . 11 JABRA Blueetooth Hub . . . . . . . . . . . . . . . . . . . . . . . . . . . . . . . . . . . . . . . . . . . . 20 LED lights . . . . . . . . . . . . . . . . . . . . . . . . . . . . . . . . . . . . . . . . . . . . . . . . . . . . . . . . . 16 Low battery warning . . . . . . . . . . . . . . . . . . . . . . . . . . . . . . . . . . . . . . . . . . . . . 12 Maintenance . . . . . . . . . . . . . . . . . . . . . . . . . . . . . . . . . . . . . . . . . . . . . . . . . . . . . . 27 On hold call . . . . . . . . . . . . . . . . . . . . . . . . . . . . . . . . . . . . . . . . . . . . . . . . . . . . . . . 17 On/off (headset) . . . . . . . . . . . . . . . . . . . . . . . . . . . . . . . . . . . . . . . . . . . . . . . . . . . 11 32 Pairing, with cellular phone . . . . . . . . . . . . . . . . . . . . . . . . . . . . . . . . . . . . . . . . 9 Pairing, with Bluetooth hub . . . . . . . . . . . . . . . . . . . . . . . . . . . . . . . . . . . . . . 20 Precautions . . . . . . . . . . . . . . . . . . . . . . . . . . . . . . . . . . . . . . . . . . . . . . . . . . . . . . . 28 Press . . . . . . . . . . . . . . . . . . . . . . . . . . . . . . . . . . . . . . . . . . . . . . . . . . . . . . . . . . . . . . . . 8 Range, staying within . . . . . . . . . . . . . . . . . . . . . . . . . . . . . . . . . . . . . . . . . . . . 16 Redialing . . . . . . . . . . . . . . . . . . . . . . . . . . . . . . . . . . . . . . . . . . . . . . . . . . . . . . . . . . 17 Rejecting a call . . . . . . . . . . . . . . . . . . . . . . . . . . . . . . . . . . . . . . . . . . . . . . . . . . . . 15 Tap . . . . . . . . . . . . . . . . . . . . . . . . . . . . . . . . . . . . . . . . . . . . . . . . . . . . . . . . . . . . . . . . . . 8 Troubleshooting . . . . . . . . . . . . . . . . . . . . . . . . . . . . . . . . . . . . . . . . . . . . . . . . . . 30 Volume adjustment . . . . . . . . . . . . . . . . . . . . . . . . . . . . . . . . . . . . . . . . . . . . . . . 12 Voice dial . . . . . . . . . . . . . . . . . . . . . . . . . . . . . . . . . . . . . . . . . . . . . . . . . . . . . . . . . . 17 Warnings . . . . . . . . . . . . . . . . . . . . . . . . . . . . . . . . . . . . . . . . . . . . . . . . . . . . . . . . . . 28 33 Bluetooth® The Bluetooth® word mark and logos are owned by Bluetooth SIG, Inc. and any use of such marks by GN ReSound is under license. Other trademarks and trade names are property of their respective owners. Please ask your local hearing care professional concerning disposal of your headset. Note: This equipment has been tested and found to comply with the limits for a Class B digital device, pursuant to part 15 of the FCC rules. These limits are designed to provide reasonable protection against harmful interference in a residential installation. 34 This equipment generates uses and can radiate radio frequency energy and, if not installed and used in accordance with the instructions, may cause harmful interference to radio Communications. However, there is no guarantee that interference will not occur in a particular installation. If this equipment does cause harmful interference to radio or television reception, which can be determined by turning the headset off and on, the user is encouraged to try to correct the interference by one or more of the following measures: - Reorient or relocate the receiving antenna - Increase the separation between the equipment and receiver - Connect the equipment into an outlet on a circuit different from that to which the receiver is connected - Consult the dealer or an experienced radio/TV technician for help Statement according to FCC part 15.19 This device complies with Part 15 of the FCC Rules. Operation is subject to the following two conditions: (1) this device may not cause harmful interference, and (2) this device must accept any interference received, including interference that may cause undesired operation. Caution: Changes or modifications not expressly approved by GN ReSound could void the user’s authority to operate this equipment according to part 15 of the FCC rules This class B digital apparatus complies with Canadian ICES-003. Cet appareil numérique de la classe B est conforme à la norme NMB-003 du Canada. 35 United Kingdom GN ReSound Ltd. 1 Landscape Close Weston Business Park Weston-on-the-Green Oxon OX25 3SX Tel.: 0 1869 343 500 Fax: 0 1869 343 466 www.gnresound.co.uk Any issues relating to the EU Medical Device Directive 93/42/EEC should be directed to ReSound A/S. Australia GN ReSound Pty. Ltd. Unit R1 Regent Park Estate 391 Park Road Regent Park NXW 2143 Tel.: 02 9743 9707 Fax: 02 9743 7472 www.gnresound.com.au New Zealand GN ReSound (NZ) Ltd. 12 Parkway Drive Mairangi Bay Auckland Tel.: (free) 0800 900 126 Fax: (free) 0800 007 695 www.gnresound.co.nz 15958300-GB-07.02 Rev.A Worldwide Headquarters GN ReSound A/S Lautrupbjerg 9 DK-2750 Ballerup, Denmark Tel.: +45 45 75 11 11 Fax: +45 45 75 11 19 www.gnresound-group.com