1
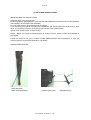
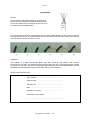
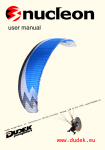
1 of 10
OWNERS MANUAL
FOR THE THESIS
INDEX
(1) GENERAL DATA
- Introduction
- Technical Information
- Trimming and Adjustments
- Safety System
(2) FLYING PRECAUTIONS AND CONTROLS
- Pre-Flight Checklist
- Launch
- Flight
- Flight with Speed-System
- Making Turns
- Landings
- Tow Launching/Motorized Flight
(3) CRITICAL FLYING SITUATIONS
(4) MEANS TO DESCEND AND RATES OF DESCENT
(5) MAINTENANCE AND REPAIRS
(6) DRAWING/TECHNICAL DATA
(7) THE THESIS SPEED-SYSTEM
(8) APPENDIX
- Notes
- Usability
- Test Flight Certificate
- Line plans
(according to DHV 26th January 2005)
PRO-DESIGN VERSION 1.1 3.05
2 of 10
(1) GENERAL DATA
INTRODUCTION
Congratulations, you are now a proud owner of a state-of-the-art glider. We are pleased to welcome
you among the number of discerning PRO-DESIGN pilots. Extensive development work using the
most modern methods and thorough tests make the THESIS a user-friendly and safe paraglider
without neglecting performance and fun of flying. To facilitate more speed the THESIS is equipped
with a special Speed-System. For flying more comfortably we recommend the use of a harness out of
the current PRO-DESIGN range. Of course, you can fly the THESIS with other kinds of certified
paragliding harnesses as well. But in such cases take notice of the suitability (see chapter Technical
Information).
Please read this manual carefully before flying your THESIS. Besides the choice of optimum
equipment, paragliding demands caution, sense of judgment and theoretical knowledge, which you
can only acquire and develop in recognized paragliding training programs. Paragliding can be a
dangerous sport and lead to injury, disability or death. Do not fly in strong turbulence and winds as
these could cause uncontrolled and critical flying situations and lead to crashes. If you have any
doubts about weather, wind or terrain, do not launch!
During production and before delivery we check each paraglider precisely and your dealer test flies it
too. A note on the technical data label on the glider as well as the filled test flight certificate in this
manual confirm this. Make sure your canopy was test flown before your first launch, otherwise please
contact your dealer!
If you still have any questions when reading this manual, call us, we'll be pleased to help you.
We wish you many pleasant flights on your THESIS!
PRO-DESIGN
TECHNICAL INFORMATION
The THESIS has been developed for self-launching, but not for tandem flying. The THESIS has been
tested by the DHV (German Hanggliding Association) and has successfully passed all load- and flight
tests. The test results confirm that in a broad field of normal and abnormal flying conditions the
THESIS proves to be stable and airworthy. Please do always consider the fact that in turbulent
conditions any paraglider can tuck partly or completely. So never fly in these conditions!
CAUTION! - The Speed-System provides more speed by reduction of the angle of attack. Therefore
the canopy tucks more easily. Do not fly accelerated near the ground but ensure that you have a good
safety margin of altitude when using the system!
The use of harnesses: Only use certified harnesses with DHV category GH! In case of uncertainty
please contact PRO-DESIGN.
TRIMMING AND ADJUSTMENTS
Factory standard line adjustment allows a trim speed of approximately 37 km/h (depending on the
pilot's weight and mainly on your speedometer). The adjustment of the brake lines is correct if the
lines come tight when the brake handles are pulled down approx. 10 cm from the block. In this state of
tuning the THESIS has been tested by the DHV. In extreme situations other tunings could cause
different reactions of the paraglider. Always keep the brake handles in your hands so you can react at
any moment to changing conditions (possibly you may take even both handles in one hand). If you fly
the THESIS with a PRO-DESIGN harness you should keep the adjustment of the brake lines
unchanged. In case you fly with another harness refit the brake handles if necessary by adjusting the
line length accordingly.
CAUTION! - If you have any doubts concerning the brake lines it is best to adjust them rather too long
since you can always shorten them by winding the line around your wrist.
PRO-DESIGN VERSION 1.1 3.05
3 of 10
SAFETY SYSTEM
It is a matter of course, that an optimum equipment is essential for every paraglider pilot. You should
always wear high ankle support boots, helmet and gloves. Pay attention to warm clothing (even in
summer it can get very cold at high altitudes). In case of extreme atmosphere conditions, mid-air
collision or any material damage, a reserve system can safe your life. We strongly recommend to fly
with a reserve system under all circumstances!
ATTENTION! - In case of uncertainty whether you should fly or not, never take any risk simply
because you fly with a safety system (i.e. do not take off!). No safety system can guarantee 100%
protection under all conditions. At worst, releasing the safety system can cause entanglement of the
lines or other complications, possibly both systems could fail by inappropriate interaction.
(2) FLYING PRECAUTIONS AND CONTROLS
PRE-FLIGHT CHECKLIST
1. Check the canopy for tears or damage, especially the seams, where the ribs join the upper and
lower wing surface. Check the line- and brake line connections as well.
2. Check the lines for damage, especially the condition of the stitching. It is important to check the
lines and brake lines to clear entanglements. The line lengths should be rechecked after every 25
hours of airtime or if anything unusual should occur in the reactions of your THESIS.
3. Check the risers and rapid links for perfect condition.
4. Check the knots which connect the brake handles with the brake lines. They brake lines must not
get caught anywhere.
5. Check your harness for wear or other damages. In case of a hard landing, check your harness
outside as well as inside carefully, especially the seams and webbing’s.
6. Check if the reserve system is correctly attached or integrated to the harness. Check the proper
operation of the releasing mechanism.
7. Check the carabiners. They must be hooked in correctly and locked before take off!
LAUNCH
Use only suitable launch sites which allow a safe abort if necessary. After the thorough pre-flight
check of the canopy according to the check list above, position your THESIS in an arch layout and
make sure, that all the cells are open. In case of a stronger wind we recommend not to unfold too
much, so you are not overpowered during inflation.
- forward launch
To be carried out under all wind conditions except strong winds. Inflate the canopy by pulling on the
A-risers, keeping B-, C- and D-risers in the arm bow, pull up the canopy dynamically.
CAUTION! - On the A-risers there are additional lines mounted which are connected to the outermost
A-lines. When grabbing the A-risers, take these lines into your hands too in order to avoid possible
entanglements (further comments please see chapter Big Earing).
The stronger the wind the less of a run you will need to launch. As soon as the canopy is above you,
let go off the A-risers. Now a quick visual inspection of the canopy is very important to check if it has
inflated properly, otherwise do not launch (abort and try again!).Then run for a perfect take off. In case
of light wind you will take off more easily if you slightly pull the brake lines. After take off let go brake
lines again to reach full flying speed.
- reverse launch
This is the method for stronger winds. Please note, that in strong wind conditions you may need an
experienced person to assist and that you can easily lose control in a gust. If you feel, that the wind is
too strong, pull one or both brake lines to decrease the pressure on the canopy; or pull on the back
risers to avoid drag back.
PRO-DESIGN VERSION 1.1 3.05
4 of 10
FLIGHT
Basic advice: Always fly at safe altitude! The THESIS has its best glide ratio with brakes up. Minimum
sink rate is achieved with brakes slightly pulled. In turbulence you can prevent tucks by braking
slightly. Forward pendulum movements of the canopy can be countered by braking, backward
pendulum by letting the brakes go.
FLIGHT WITH SPEED-SYSTEM
The THESIS Speed-System consists of:
a) adjustable 4-riser-system
b) pulleys (do not come with the glider; they are part of the PRO-DESIGN harness)
c) foot stirrup
Adjust the Speed-System that you reach full acceleration with straight legs. Never use the SpeedSystem in turbulent air or near the ground, because reduction of the angle of attack decreases the
stability of the canopy despite its higher speed.
ATTENTION! - At any disturbances of the canopy (any kind of tucks) the Speed-System has to be
released immediately (releasing the stirrup) so that the canopy can recover properly.
The THESIS Speed-System accelerates for approx. 8-10 km/h at full range. The system shortens the
A-risers relative to the B-risers which adds speed at the cost of stability. Due to the mechanic of the
Speed-System the A-riser reduction is concentrated near full range, allowing the pilot to carefully
adjust the speed versus stability in this area a lot.
MAKING TURNS
Pull down brake on the side towards which you want to turn. To reduce sinkrate, also pull outside
brake slightly.
You can also make turns by weight shifting in your harness. The looser the chest strap (cross-braces)
of your harness the more effective is of your weight shifting.
BEWARE! - In extreme situations (e.g. strong and large asymmetric tucks) a too loose setting of the
chest strap could delay reinflation of the canopy. You have best setting if the distance between
carabiners is not more than 35cm.
An optimum technique for making turns is the combination of pulling the brake lines and weightshifting. An emergency method for making turns (e.g. damaged brake lines) is by either pulling one Ariser slightly (beware of tucks) or pulling on a back riser (beware of stall). We recommend not to use
these methods under normal conditions.
LANDINGS
Whenever possible walk your landing field first to assess hazards and wind! Plan for landing with
sufficient height! That way you avoid stress situations and have time to check wind direction and
watch other gliders approaching. The final approach should always be against the wind and with open
brakes to keep the paraglider steerable. In case of turbulence you should fly with slightly pulled brakes
to avoid tucks. To land feet first, move to an upright position in your harness in time (latest 5 m above
ground) for the final approach, otherwise you could land on your back and get hurt. Approx. 2 m
before touching the ground, pull both brakes totally to reduce speed for a soft landing. In case of head
wind you need not pull the brakes very much for a soft landing (top landing especially). If there is no
wind or wind from the back you have to pull the brakes more strongly.
ATTENTION! - If you pull too much on the brakes at an too high altitude your glider could stall and
cause you to fall backwards (especially with strong head wind)!
In case of strong winds on the ground, take wind and pressure out of the canopy by pulling in the
brake lines totally or pulling on both back risers. Never use the Speed-System when landing!
PRO-DESIGN VERSION 1.1 3.05
5 of 10
TOW LAUNCHING/ MOTORIZED FLIGHT
The THESIS is suitable for tow launching and flight with rucksack motor. Please make sure about the
particular law situations in your country!
ATTENTION! - The THESIS is not suitable for skydiving!
(3) CRITICAL FLYING SITUATIONS
In this section we describe flying situations which you may cause either intentionally (for training) or
which are caused by piloting error or turbulence. Every pilot who flies in turbulence once will be
confronted with these flying situations. So prepare yourself and ask your paragliding school for
instruction. Special safety-courses above water are available. Acquainting yourself with critical flight
situations increases your safety considerably. Enough altitude and a safety system are imperative!
ATTENTION! - All described critical flying situations are dangerous when exercised without adequate
knowledge and sufficient altitude above the ground. The description of the maneuvers is according to
the DHV. You cannot expect any paraglider to always behave according to the DHV rating. Even little
differences in pilot input and different weather conditions can lead to a much worser behavior of the
paraglider and even result in a crash. Do not forget, that all disturbances of the canopy result in
increased sinkrate.
Aerobatics are not allowed!
Critical flying situations are:
- side collaps
- front collaps
- central tuck
- stall with brakes
- B-line stall
- stall with C/D-rises
- full stall
- spin / negative spin
(4) MEANS TO DESCEND AND RATES OF DESCENT
Basic advice: Before you try to descend always fly away from the thermal or area of lift! F.e. it makes
absolutely no sense to ‘fight’ 15 m/s lift with 15 m/s sink rate (which many pilots will not even reach)!
- BIG EARING
Without or with the use of the Speed-System.
Sinking 3-7 m/sec - recommended and best option!
You can fully steer with only weight shifting in your harness (with loose cross braces)! There are
additional lines mounted to the A-risers to easily exercise this maneuver (see chapter Big Earing
before).
CAUTION! - By pulling in the ears too much (without using the Speed-System) there is danger of
Deep Stall! In case you want to use the Speed-System in addition, please pull in the ears first and
then push the Speed bar. Never opposite!
- SPIRAL DIVE
Allows fast descent without stalling or collapsing the wing.
Sinking from 5 to more than 15 m/sec.
Disadvantages: The pilot may suffer high G-loads and become dizzy. The maneuver only allows the
pilot to descend vertically, with no horizontal movement. Altitude is required to enter and exit the
maneuver.
Enter the spiral dive by pulling down one brake line slowly. The glider is capable of entering a tight
turn without the tendency of stalling the inside wing. When doing fast spirals, release the inside brake
because very little is necessary to maintain the turn. It is also recommended to keep the opposite
brake pulled slightly to control speed and allow quicker recovery from the spiral. Recovery is usually
made by slowly releasing the inside brake.
PRO-DESIGN VERSION 1.1 3.05
6 of 10
CAUTION! - The THESIS is a dynamic paraglider and it is very easy to reach high speeds, lose
altitude quickly and put high physical strains on the pilot. Exit the spiral dive with sufficient altitude!
Attempting fast recovery could cause the pilot to a forward pendulum, resulting in a quick climb and
stall, which could lead to a forward surge of the canopy and a big collapse! When descending in a
spiral faster than 14 m/sec a stable rotation may occur. This means that with no brake input the glider
will continue to spiral. This tendency is strongly dependent on the harness settings (tight or loose
chest strap and cross brace settings) and on the weight shifting. If you shift your weight into the turn,
the glider continues to spiral. To stop rotation, pull the opposite brake, but be careful not to exit too
quickly.
BASIC ADVICE! - Never exercise the Spiral Dive in low altitudes. High sink rate can easily be
underestimated!
- B-LINE STALL
Sinking 5-10 m/sec.
IMPORTANT! - Stop in time and at appropriate altitude for a total recovery from stall, if necessary with
active pilot input! Not as uncritical as often described! (See chapter B-Riser Stall before).
(5) MAINTENANCE AND REPAIRS
Repairs are best made by PRO-DESIGN or an appropriate agent. Tears have to be stitched with
expertise. Sticky back cloth can only fix small tears.
Keep your paraglider dry and store indoors. Protect your paraglider from humidity and sun. UV-rays
lead to loss of strength and damage the fabric. Dry a humid or wet paraglider on a shady place in
fresh air.
CAUTION! - Above all, the worst you can harm your glider is to store it humid or wet. Humidity
(especially when packed airtight) starts a chemical reaction which weakens the connection between
the Nylon fabric and the coating. In consequence the cloth gets soft and delamination of the coating
occurs, i.e. the fabrics gets to much porous in a very short time! If you take care of this matter, your
glider will have a considerable higher lifespan.
Do not expose your paraglider to a temperature of more than 50 degrees Celsius (car!). Such high
temperatures could soften the lines and as a consequence they could shrink and/or lose their
strength. This can be checked by remeasuring and load test only!
It is important to protect your paraglider at all times, particularly during ground handling when most
damage could occur. Never allow the paraglider, particularly in high winds, to bang down onto the
leading edge.
We recommend that you have your THESIS checked every year, at least after every 100 flights (no
matter how long you have had your wing) and sent to PRO-DESIGN or to an appropriate agent. The
line lengths must be remeasured after every 25 hours of airtime or whenever the reactions of your
paraglider seem strange. For this, please contact your dealer or PRO-DESIGN.
CAUTION! The main bottom lines (cover in polyester, core in HMA-Aramides) need a periodical check
for proper braking strengh and/or need to be replaced. Aramides have a fast aging behaviour and are
sensitive to pressure and bending. A proper check and evaluation work can only be done by an
appropriate dealer, workshop or directly at PRO-DESIGN.
Clean the canopy with warm water only or soft soap water. Do not use solvents or detergents!
PRO-DESIGN
Graf,Hofbauer Ges.m.b.H.
Lärchenweg 33
6161 Natters
Austria
Phone: +43 512 546444
Fax: +43 512 54644520
[email protected]
www.pro-design.at
… the new synthesis!
PRO-DESIGN VERSION 1.1 3.05
7 of 10
(6) DRAWING/TECHNICAL DATA
Lines
Risers
Brake Lines
Air Entrance
Cell
Stabilizer
THESIS
60
80
100
Area projected
Area layout
Span projected
Span layout
Max.chord
Aspect ratio projected
Aspect ratio layout
No. of cells
Weight
Min./max. total load
Min./trim speed
Max. speed with Speed-System
Certification
22,26m²
25,67m²
8,64m
10,75m
2,90m
3,35
4,5
40
5,2kg
60-85kg
22-37km/h
46km/h
DHV 1
24,16m²
27,85m²
9m
11,2m
3,02m
3,35
4,5
40
5,5kg
80-105kg
22-37km/h
46km/h
DHV 1
26,13m²
30,13m²
9,36m
11,65m
3,14m
3,35
4,5
40
5,9kg
100-125kg
22-37km/h
46km/h
DHV 1
PRO-DESIGN VERSION 1.1 3.05
8 of 10
(7) THE THESIS SPEED-SYSTEM
INSTRUCTIONS FOR INSTALLATION
Install the stirrup onto your harness:
a) Mount guidance gears/pulleys to your harness (PRO-DESIGN harnesses have mounted guidance
gears already, left and right of the seat plate).
b) Lines of the stirrup to be guided through the pulleys.
c) For launching first hook in the risers to the carabiners and second attach the small hooks to each
other - the hooks from the lines of the stirrup to the hooks of the Speed-System.
d) Check the Speed-System for free running.
NOTE! - Before you install the Speed-System to another harness, please contact PRO-DESIGN or
your agent.
Follow our comments we give in chapter FLYING PRECAUTIONS AND CONTROLS! In case you
have any doubts, contact PRO-DESIGN or your dealer.
THESIS SPEED-SYSTEM
- block and tackle
- attach with Speed-Hook
- guidance gear pulley
PRO-DESIGN VERSION 1.1 3.05
- adjustable stirrup
9 of 10
(8) APPENDIX
NOTES
Special and precisely fitting plastics in the quick links
prevent them from getting crosswise and self-opening.
In case of entanglement or exchange of lines, they can
be removed and reinstalled easily.
For a permanent connection of the brake line to the brake handle please use the right knot. See the
drawings for instructions. The standard adjustment of the brake lines shows the mark at the grommet.
From the mark to the end of the line = 25cm.
1)
2)
3)
4)
5)
6)
USABILITY
The THESIS is a Basic-Intermediate glider with easy handling, high stability and excellent
performance in its class. The THESIS is also made for pilots who are not flying permanently, perfect
for school-use and entry level pilots. The attractive flight behaviour and the good performance will also
please safety-orientated advanced pilots and pilots who fly more frequently.
TESTFLIGHT CERTIFICATE
Type: THESIS .............................................................
Serial number: ..............................................................
Test flown by: ................................................................
Date: .............................................................................
Signature of the pilot: ...................................................
Confirmation of the dealer:
.....................................................................................
PRO-DESIGN VERSION 1.1 3.05
10 of 10
LINE PLANS
(refers to all sizes)
changes reserved.
PRO-DESIGN VERSION 1.1 3.05


![[en] - User manual, [de] - Betriebshandbuch, [fr]](http://vs1.manualzilla.com/store/data/005845053_1-6d1995608e49c7f1600fcad0c20a630a-150x150.png)