1
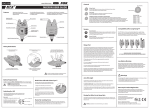
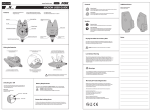
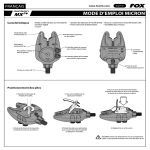
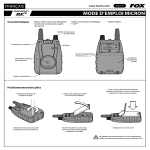
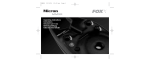
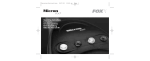
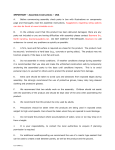
www.foxint.com
ENGLISH
MICRON USER GUIDE
Features
• Weatherproof Sealed Case
• Digital Circuitry
• See-Saw Effect Elimination Feature
• Audible & Visual Backdrop Indication
Micro Light Slots
Multi Colour LED
• Low Battery Drain
• CNC Machined Rollerwheel - Tru-Run™
D-Tec Sensing System™
(DTSS)
On / Off
Volume Control
High Quality Cone Speaker
Battery Cover
Tone Control
Intelligent Sensitivity
System™ Control
Buzzer Bar Locking Screw
Extension Socket
(2.5mm)
Power+ Out Socket
(3.5mm)
Rigid 3/8” Stainless Steel Thread
Fitting the Batteries
1. Turn off unit prior to fitting or
replacing batteries.
3. Pull the lower tab up to remove
the battery cover.
5. For best weatherproofing, ensure
battery cover has a good seal by firmly
pushing the edging of the battery cover.
2. Using the supplied screwdriver
unscrew the two battery cover screws.
4. Take care removing the batteries.
Insert new batteries and ensure
correct polarity.
6. Re-fit cover and screws.
DO NOT over tighten the battery compartment screws,
excessive force will damage the screw threads.
Battery Requirements
Multi Colour LED
The Microns require 2 x LR6 AA 1.5V Alkaline batteries. The use of good quality
batteries is essential for maximum battery life. To reduce the risk of battery leakage:
• DO NOT mix old and new batteries
• DO NOT mix different battery types
• The use of rechargeable batteries is NOT recommended
This allows the choice of five colours (Red, Blue, Green,
Cyan & White) to be selected with the push of a button.
1. Simply remove the battery cover and screws.
2. Using a pen or LED selector tool press the selector
plunger positioned between the batteries to select the
LED colour.
Switching On / Off
• Push down and release the power switch to activate the unit.
• Push up and release the power switch to deactivate the unit.
(LED will briefly flash red)
Your choice will remain stored in the Microns memory
even when the batteries have been removed.
Power Off
Please note:
The unit does not beep when
switched on or off.
Power On
Buzzer Bar Locking Screw
This allows infinite alignment adjustability for the Micron facing position. If the Micron is
not facing the desired position, unscrew the micron until you can reach the locking screw.
Back the locking screw a quarter to half a turn, then screw the Micron back on.
www.foxint.com
ENGLISH
Controls
Min. Sensitivity
MICRON USER GUIDE
Features
• Weatherproof Sealed Case
• Digital Circuitry
• See-Saw Effect Elimination Feature
• Audible & Visual Backdrop Indication
Micro Light Slots
Multi Colour LED
Volume Control
Turn the knob clockwise to increase volume, anti-clockwise to lower volume.
There are eight different volume settings available.
Max. Sensitivity
Tone Control
Turn the knob clockwise to raise pitch, anti-clockwise to lower pitch.
There are eight different tone settings available.
• Low Battery Drain
• CNC Machined Rollerwheel - Tru-Run™
Intelligent Sensitivity Control (With See-Saw Elimination)
Turn the knob clockwise to increase the sensitivity and anti-clockwise to reduce the sesitivity.
There are eight different sensitivity settings available. In all sensitivity settings (except maximum), the line must
travel the specified distance in the same direction in order to trigger the unit. Any movement in the opposite
direction will reset the distance counter to zero. This can substantially reduce, or eliminate false triggering caused
by wind and water movement. The unit automatically defaults to maximum sensitivity, once the sensitivity
“threshold” has been reached - i.e. once the rollerwheel is moving.
D-Tec Sensing System™
(DTSS)
On / Off
Sensitivity Table
Setting 1 = 68mm (Min)
Setting 2 = 60mm
Setting 3 = 51mm
Setting 4 = 43mm
Setting 5 = 34mm
Setting 6 = 26mm
Setting 7 = 17mm
Setting 8 = 8.5mm (Max)
Volume Control
High Quality Cone Speaker
Battery Cover
Tone Control
Sockets
Intelligent Sensitivity
System™ Control
Buzzer Bar Locking Screw
Extension Socket
Extension socket for wired extension boxes or remote system.
Extension Socket
(2.5mm)
Power+ Out Socket
New 3.5mm power out socket designed for use with Fox next generation
Swingers and Hangers with Colour Sync™. To use with Fox Illuminated
Swingers and Hangers, that use a 2.5mm jack plug, the supplied adaptor
will need to be used.
Power+ Out Socket
(3.5mm)
Rigid 3/8” Stainless Steel Thread
3.5mm - 2.5mm Adaptor
For use with Illuminated
Hangers and Swingers
Fitting the Batteries
1. Turn off unit prior to fitting or
replacing batteries.
Drying Out After Use in Heavy Rain
3. Pull the lower tab up to remove
the battery cover.
5. For best weatherproofing, ensure
battery cover has a good seal by firmly
pushing the edging of the battery cover.
These Microns have been designed to be weatherproof. However, after use in
heavy rain, it is important to allow the unit to dry out properly by bringing the
unit indoors and removing the hard case cover.
NEVER place batteries in a hot environment (e.g. on a radiator).
Low Battery Warning
3.5mm
Jack Plug
When the Micron detects that its batteries are failing, the main LED colour
changes to purple. When this occurs, batteries should be replaced at the earliest
opportunity, although the unit may continue to work for some time in this
condition, particularly if the volume setting is reduced. No audible indication of
low battery is given. It is not possible to change the LED colour once it has
changed to purple.
2.5mm
Jack Socket
Warnings
• Do not trigger LED or speaker in close proximity to human or animal eyes and ears.
• Store this equipment out of reach of children and infants.
• Avoid dropping or subjecting the Micron to severe impacts.
• Use only recommended batteries and accessories.
2. Using the supplied screwdriver
unscrew the two battery cover screws.
4. Take care removing the batteries.
Insert new batteries and ensure
correct polarity.
6. Re-fit cover and screws.
DO NOT over tighten the battery compartment screws,
excessive force will damage the screw threads.
Battery Requirements
Multi Colour LED
The Microns require 2 x LR6 AA 1.5V Alkaline batteries. The use of good quality
batteries is essential for maximum battery life. To reduce the risk of battery leakage:
• DO NOT mix old and new batteries
• DO NOT mix different battery types
• The use of rechargeable batteries is NOT recommended
This allows the choice of five colours (Red, Blue, Green,
Cyan & White) to be selected with the push of a button.
1. Simply remove the battery cover and screws.
2. Using a pen or LED selector tool press the selector
plunger positioned between the batteries to select the
LED colour.
Switching On / Off
• Push down and release the power switch to activate the unit.
• Push up and release the power switch to deactivate the unit.
(LED will briefly flash red)
Your choice will remain stored in the Microns memory
even when the batteries have been removed.
Power Off
Please note:
The unit does not beep when
switched on or off.
Power On
Buzzer Bar Locking Screw
This allows infinite alignment adjustability for the Micron facing position. If the Micron is
not facing the desired position, unscrew the micron until you can reach the locking screw.
Back the locking screw a quarter to half a turn, then screw the Micron back on.
Warranty & Product Registration
Register your Fox product online at www.foxint.com. You will be given a
Customer Reference Number and a Warranty Reference Number, please make
a note of these numbers. You can view warranty details online using the
Customer Reference number.
Alternatively fill out the Warranty Card enclosed in the box and post to:
Customer Care Department
Fox International Group Ltd, UK Headquarters,
56-58 Fowler Road, Hainault Business Park,
Hainault, Essex, IG6 3UT
Micron is a Registered Trade Mark
NTX-R, NX, N & NTX Receiver are Registered Trade Marks
We reserve the right to alter or modify the contents of this manual.