1
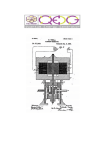
Model PS20D630
20 Watt Amplified Horn
Loudspeaker
Installation and
Operating Instructions
DOCUMENT NUMBER PS20D630/OEM/01
REVISION 1.2
8th December 2008
TABLE OF CONTENTS
SAFETY NOTES
Page 3
SYSTEM OVERVIEW
Page 4
INSTALLATION NOTES
Page 5
RECOMMENDED CABLE TYPE
Page 5
CONNECTION DETAILS
Page 5
TESTING
Page 7
ADJUSTING GAIN & VOLUME CONTROLS
Page 8
TECHNICAL SUPPORT
Page 8
ILLUSTRATIONS & DIAGRAMS
MOUNTING BRACKET : DIMENSIONS & DRILLING DETAILS
Page 5
WIRING DRAWINGS : BALANCED & UNBALANCED
Page 6
TESTING USING A PERSONAL STEREO DEVICE (e.g.MP3 Player)
Page 7
REMOVING THE REAR COVER
Page 7
PCB SWITCHES & VOLUME CONTROL LOCATIONS
Page 8
GAIN TABLE & SWITCH SETTINGS DETAIL
Page 8
DOCUMENT NUMBER PS20D630/OEM/01REVISION 1.2
8th December 2008
Page 2 of 8
SAFETY PRECAUTIONS
WARNING
The warnings listed below may seem to be ridiculously obvious, but please be sure to read and
heed them carefully before installation and use.
Please observe the instructions in this manual, as the conventions of safety symbols and
messages should be regarded as very important.
We recommend that you keep this instruction manual handy for future reference.
CAUTION
• Use only a power supply with the specified output voltage and current, as exceeding the
specified limits could result in fire or other failures.
• To avoid accidental air explosions, do not use the unit around gasoline, thinner or other
combustibles.
• Install the unit only in a location that can structurally support the weight of the unit and the
mounting bracket. Doing otherwise may result in the unit falling down and causing personal injury
and/or property damage.
• Ensure that the additional weight of any build up of snow or ice on the speaker cannot cause the
unit to fall, causing personal injury and/or property damage.
• Be sure to mount the bracket securely, using appropriate fixings. If extreme force is applied to the
unit, it could fall, causing personal injury and/or property damage.
• Tighten each fixing securely. Ensure that the bracket has no loose joints after installation, so as
to prevent accidents that could result in personal injury.
• Attach a safety wire to the unit when mounting in locations high above the ground. Failure to do
so could result in personal injury or property damage if the speaker should later fall for any
reason.
• Avoid mounting the unit in locations exposed to constant vibration. The mounting bracket could
be damaged by excessive vibration, potentially causing the speaker to fall, which could result in
personal injury.
• Avoid installing the unit in excessively dusty locations, or in locations exposed to heaters,
solvents, acid, alkali, smoke, or steam, as excessive exposure to these factors could result in
speaker failure, fire or electric shock.
• Do not operate the unit for an extended period of time with the sound distorting. This is an
indication of an overloaded amplifier, which in turn could cause heat to generate and result in
failure of the unit, or possibly even a fire.
• Do not stand or sit on, nor hang from the unit as this may cause it to fall or drop, resulting in
personal injury and/or property damage.
DOCUMENT NUMBER PS20D630/OEM/01REVISION 1.2
8th December 2008
Page 3 of 8
SYSTEM OVERVIEW
This amplified horn loudspeaker is designed and manufactured for heavy-duty industrial use. It is
finished with a tough, White powder coating, and is supplied complete with a stainless steel,
universal “U” bracket, which allows for both horizontal and vertical angular adjustment.
The input is transformer balanced, which eliminates Ground-loop hum while also providing
isolation of at least 500V DC.
It has a built-in 20 Watt power amplifier, which utilises the latest Class “D” technology. This
technology allows power amplifiers to operate with a much higher efficiency than conventional
classes (typically over 88% in this unit). This means that little power is wasted and therefore little
heat is generated.
The unit’s master gain may be set to 12, 18, 24 or 36db by means of an internal switch. There is
also an internal volume control for on-site adjustment. This is factory pre-set for the purpose of
initial uniformity.
The audio input is factory set to “Balanced”, although unbalanced signals may be used, and an
internal selector jumper is provided to allow for either.
In “Balanced” mode, the audio input of the unit is transformer isolated. This prevents “Ground-loop
hum” and also provides isolation from the cable of up to 500 Volts DC.
The unit has switchable gains of 12,18, 24 and 36db and is suitable for signal levels ranging from
The loudspeaker’s frequency response, dynamic range and dispersion pattern are optimised for
the transmission of human speech.
The unit is weatherproof to IP65 rating. If the unit is disassembled during installation or servicing,
care must be taken to ensure that glands and gaskets are correctly refitted.
The unit is supplied with a 2 metre flying lead. This is a shielded, 2-pair type cable. During
final termination, do ensure that the wiring connections are protected from the ingress of moisture.
If the wire terminations are not adequately protected, premature failure of this unit, or other
associated equipment is almost certain.
The unit is supplied complete with a switched-mode power adapter. This has a universal input
rating of 90 ~ 280Volts AC @ 50 ~ 60Hz and a regulated output of 18Volts DC @ 1100mA.
This unit will operate with a regulated supply Voltage range of 9 Volts DC to 18 Volts DC.
Operating at Voltages lower than 18 Volts will reduce the maximum power output (e.g. at 12 Volts
DC the maximum power output is approximately 8 Watts RMS).
DOCUMENT NUMBER PS20D630/OEM/01REVISION 1.2
8th December 2008
Page 4 of 8
INSTALLATION
The unit should be mounted where required by means of the supplied stainless steel “U” bracket.
Front View
Mounting Bracket Dimensions (mm)
When installing the speaker, be sure the drain hole
is positioned facing the ground. Without the drain
hole positioned correctly, rain could flood the
speaker, causing it to fail
Drain Hole
Centre
Cone
IMPORTANT NOTE : The power adapter is not weatherproof.
It should be mounted in a dry area, no more than 10 metres away from the loudspeaker unit.
Do not apply mains to the power adapter yet!
Terminate the audio signal and DC power connections to the “flying lead” of the loudspeaker unit.
Ensure that the chosen termination method is waterproof!
The cable type we recommend is BELDEN TYPE 8723 or equivalent.
The connections are as follows:BALANCED-LINE INSTALLATION
Wire Colour
RED
BLACK
Connect To
+18VDC
0VDC
WHITE
GREEN
Audio Signal HOT
Audio Signal COLD
SHIELD
Do not connect (Earth at signal SOURCE end)
UNBALANCED INSTALLATION
Wire Colour
RED
BLACK
Connect To
+18VDC
0VDC
WHITE
GREEN
Audio Cable Signal Core
Loop to SHIELD
SHIELD
Audio Cable Screen
See following sample drawings
DOCUMENT NUMBER PS20D630/OEM/01REVISION 1.2
8th December 2008
Page 5 of 8
DOCUMENT NUMBER PS20D630/OEM/01REVISION 1.2
8th December 2008
Page 6 of 8
Testing and Adjusting
Adjust the vertical and horizontal angles of the loudspeaker unit so that it “points” in the required
direction.
Ensure that there is an audio signal source applied to the loudspeaker unit. This may be either the
source audio which is ultimately to be used in the system, or, for test purposes only, you may use
any audio device with a “Line Output” or a “Headphone Output”.
If using the latter, a sample wiring drawing appears below.
Example Wiring For Using Personal Stereo To Test Amplified Loudspeaker
Switch on the AC power to the loudspeaker’s power adapter and audio should be heard from the
loudspeaker.
When the system is fully operational, you should adjust the gain of the amplifier module, and/or the
volume control, to give the ideal output level. The gain and volume controls are on the PCB inside
the back cover of the loudspeaker unit (see drawing on next page)
These should be set during commissioning, using the audio from the system’s source device.
Remove the four screws which hold the rear cover
in place (shown on the right).
Carefully remove the cover. Take not to lose the
screws or gasket and do not pull on the internal
wiring.
Rear View
DOCUMENT NUMBER PS20D630/OEM/01REVISION 1.2
8th December 2008
Page 7 of 8
To Set the Gain and volume level of the amplifier module.
1/
Remove the back cover of the loudspeaker.
On the PCB inside there is a 2-way DIP
switch marked “SW1” (Gain).
Set both of these switches to “ON”. This
sets the module to minimum gain (12db).
2/
Adjust the volume control (anti-clockwise
for volume down or clockwise for volume
up) until the output level is adequate. If the
output level is insufficient, set the gain to
the next highest gain, according to the
following table, and repeat the procedure
with the volume control.
G1 G0
This may be done at all gain
settings, until an adequate output
level is just achieved.
Setting the gain to the minimum
required will minimise any unwanted
noise pickup.
GAIN
G0
G1
12db
ON
ON
18db
ON
OFF
24db
OFF
ON
36db
OFF
OFF
That’s it! You may now replace the rear cover. As this speaker unit is weatherproof to IP65, care
must be taken during the replacement of the back cover, to ensure that glands and gaskets are
correctly refitted and watertight.
DOCUMENT NUMBER PS20D630/OEM/01REVISION 1.2
8 December 2008
th
Page 8 of 8