1
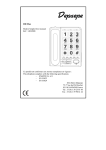
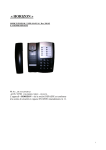
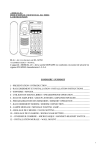
NOTICE D’UTILISATION
HORIZON 50
USER MANUAL
98 AV., DE STALINGRAD
-BP 05- 92702 COLOMBES CEDEX – FRANCE.
L’appareil « HORIZON 50 » de la société DEPAEPE est conforme
à la norme de sécurité en vigueur EN 60950 Amendements1 à 11.
Sommaire/Summary
1 - RACCORDEMENT - ALIMENTATION / CONNECTION – POWER FEED…….. 4
2 – FONCTIONNEMENT DU MENU / HOW TO USE THE “MENU”……………….…4
3 – CHOIX DU LANGAGE MENU / MENU LANGUAGE CHOICE……………….……5
4 – REGLAGE DU CONTRASTE DE L’ECRAN / LCD CONTRAST ADJUSTMENT…5
5– CHOIX DU TYPE DE NUMEROTATION / DIALLING CHOICE………………...…6
6 – CHOIX DU FLASHING / HOOK FLASH DURATION………………………………..6
7 – APPELER / MAKING A CALL…………………………………………………………..7
8 – ECOUTE AMPLIFIEE - MAINS – LIBRES / AMPLIFIED SPEAKER - HANDS
FREE SPEAKERPHONE……………………………………………………...……...…..7/8
9 – AFFICHAGE JOUR – DATE – HEURE / DAY – DATE – TIME DISPLAY.………8/9
10 - ENREGISTREMENT DES MEMOIRES / MEMORIES STORING.…………….9/10
11 – UTILISATION DU REPERTOIRE ET DES MEMOIRES / HOW TO USE THE
PHONEBOOK AND THE 4 ONE TOUCH MEMORY KEYS…………………………….11
12 - MODIFIER OU EFFACER UN ENREGISTREMENT / MODIFY OR ERASE A
RECORD………………………………………………………………………………….11/12
13 - CHOIX ET REGLAGES SONNERIES / RINGER VOLUME AND MELODY
SELECTION…………………………………………………………………………….13/14
14 - UTILISATION CASQUE / HEADSET USE…………………………………….14/15
15 - UTILISATION du mode HDMATIC / HDMATIC mode OPTION.……………15/16
16 – IDENTIFICATION DE L’APPELANT / CALLER’S IDENTIFICATION (CID).17
17 - APPELER - EFFACER UN N° DE LA LISTE DES APPELANTS / TO CALL OR
ERASE A NUMBER OF THE CALLER’S LIST………………………………………17/18
18 - ENREGISTER UN APPEL PRESENT DANS LE JOURNAL DES APPELANTS
DANS LE REPERTOIRE OU DANS UNE MEMOIRE / TO STORE A CALLER’S ID
NUMBER IN THE PHONEBOOK OR IN A ONE TOUCH MEMORY KEY……………18
19 - PARAMETRES DE VERROUILLAGE / SELECT THE LOCKING
PARAMETERS……………………………………………………………………….…18/20
20 - MODIFIER LE CODE D’ACCES / TO CHANGE THE PIN ACCESS CODE.20/21
21 - LAMPE MESSAGE / MESSAGE WAITING LED………………………………….21
22 - INSTALLATION MURALE / WALL MOUNTING…………………………..…….21
2
Liste des appelants
Caller ID List
Affichage LCD
LCD Screen
Fleches de deplacement
Moving Arrows
LED Message
Mesage lamp waiting
Repertoire
Phonebook
Touches du Menu
Menu Keys
Memoires directes
One touch
Secret Microphone
Mute
Bis/Pause
LNR/Pause
Flashing
Volume HP/Combiné
Speaker/Handset Volume
Mains Libres/Ampli/Casque
Speakerphone /Headset
Clavier de Numerotation
Dialling Keypad
MODEM
Data port
!
ATTENTION : - Avant toute ouverture
trappe à piles, il est impératif de se débrancher
ligne téléphonique, pour se prévenir de tout
électrique.
Les piles utilisées doivent être uniquement de type
AA 1.5V.
Ligne TRC
Niveau de
sécurité TRT3
PSTN Line
TRT3 Security
level
de la
de la
choc
LR06
!
CAUTION
The set should be disconnected from the line before
opening for battery Replacement.
USE only LR06 AA batteries 1.5 V type.
Conformément à la norme en vigueur EN60950 amendements 1 à 11. Cet appareil se
raccorde à la ligne de télécommunication (Réseau TRT3 Tension de réseau de
Télécommunication) par le conjoncteur.
TRT3 security level according to EN60950 A1 to A11.
3
1 - RACCORDEMENT - ALIMENTATION / CONNECTION – POWER FEED
Raccorder le cordon d’alimentation à l’arrière du poste dans l’entrée « TEL ». Installer les
piles dans le compartiment situé sous le poste en veillant à respecter les polarités.
NB : les piles sont nécessaires pour le rétro éclairage du clavier, pour l’accès au menu et pour
l’identification de l’appelant. Toutes les autres fonctions du téléphone sont assurées même si
les piles sont absentes ou faibles.
Connect the line cord at the back of the telephone in the « TEL » entry. Insert the 3 batteries
in the compartment located below the telephone making sure that polarities are correct.
Note : batteries are required to power LCD backlight, menu access and caller identification.
All the other telephone features will work even without batteries or with low batteries.
Témoin d’usure des piles / Batteries indicator
Si cette icône clignote, les piles sont absentes
ou faibles et doivent être changées.
If this icon is blinking, it indicates that there
is no battery or that they are low and need to
be changed
2 – FONCTIONNEMENT DU MENU / HOW TO USE THE “MENU”
Pour accéder au menu, il suffit d’appuyer sur la touche “Menu” et de naviguer avec les
touches ↑ ou ↓ . Si les piles sont en place, l’afficheur est éclairé dans le mode « menu ».
La validation des choix se fait à l’aide de la touche « OK », la correction à l’aide de la touche
« Del/Sup ».
L’accès au menu est possible en mode raccroché, en mode décroché au combiné, en mode
mains-libres, en mode écoute amplifiée et en mode de consultation de la liste des appelants.
Pour sortir du mode « menu » :
appuyer sur la touche « Menu » à nouveau
ou, si le combiné est raccroché, en le décrochant ou en appuyant sur la touche « Ecoute
amplifiée/mains-libres
, si le combiné est décroché, en raccrochant, en mode mains-
libres, en appuyant sur la touche « Ecoute amplifiée/mains-libres
en appuyant sur la touche
pour consulter la liste des appelants
pour raccrocher,
To access to the « menu » mode, simply press »Menu » key, scroll through the menu choices
with ↓or ↑ key. If batteries have been inserted, the LCD will be backlighted in the “menu”
mode. Confirm any choice by pressing “OK” key and delete any entry by pressing “Del/Sup”
key.
Access to the “menu” mode is possible in the on-hook mode, in the off-hook mode, in the
speakerphone mode, in the amplified speaker mode and, also when going through the callers
list.
To exit the “menu” mode :
press “Menu” key again
Or, if the handset is on-hook, pick up the handset or press the
key
If the handset is off-hook, return to on-hook ; in the speakerphone mode press
4
if
key is pressed to consult the callers’ list
3 – CHOIX DU LANGAGE MENU / MENU LANGUAGE CHOICE
NB : L’Horizon 50 est paramétré en usine avec le menu en langue française
Note : the Horizon 50 factory settings include the LCD menu in French
Pour choisir la langue d’affichage :
-appuyer sur la touche « Menu »
-à l’aide des touches ↑ ou ↓ , sélectionner « PARAMETRES TEL »
-valider cette sélection en appuyant sur « OK »
-à l’aide de la touche ↑ ou ↓ , sélectionner « LANGUE FRANCE » ou « LANGUE
ANGLAISE »
-valider le choix de langue avec la touche « OK »
-retour automatique à l’écran de veille après une temporisation ( 20 s) ou manuellement en
décrochant puis raccrochant le combiné.
To change the menu language :
-press “MENU” key
-select “PHONE PARAMETERS” with keys ↓ or ↑
-confirm this selection by pressing “OK” key
-select “LANGUE ANGLAISE” (for English) or “LANGUE FRANCE” (for French) with ↓ or
↑ key
-confirm your language choice by pressing “OK” key
-return to standby LCD mode is automatic after 20 seconds or after picking up and hanging
up the handset
4 – REGLAGE DU CONTRASTE DE L’ECRAN / LCD CONTRAST ADJUSTMENT
Pour obtenir la meilleure lisibilité possible des informations affichées sur l’écran, il est
recommandé de procéder au réglage du contraste en fonction de la position de l’utilisateur et
de l’appareil. Procéder comme suit :
-appuyer sur la touche « Menu »
-à l’aide des touches ↑ ou ↓ , sélectionner « PARAMETRES TEL »
-valider cette sélection en appuyant sur « OK »
-à l’aide de la touche ↑ , sélectionner « LCD CONTRAST »
-valider cette sélection en appuyant sur « OK »
-choisir le niveau de contraste souhaité (de 1 à 5)
-valider le niveau choisi en appuyant sur « OK »
-retour automatique à l’écran de veille après une temporisation ( 20 s) ou manuellement en
décrochant puis raccrochant le combiné.
For a better reading comfort, we suggest that you adjust the LCD contrast according before
using the phone. Proceed as follows :
-press “MENU” key
-select “PHONE PARAMETERS” with keys ↓ or ↑
-confirm this selection by pressing “OK” key
-select “LCD CONTRAST” with ↑ key
-choose your LCD contrast level (from 1 to 5)
-confirm your level choice by pressing “OK” key
5
-return to standby LCD mode is automatic after 20 seconds or after picking up and hanging
up the handset
5– CHOIX DU TYPE DE NUMEROTATION / DIALLING CHOICE
L’Horizon 50 est prévu pour pouvoir numéroter dans le mode décimal ou en Fréquences
vocales. Il est paramétré en sortie usine dans le mode « Fréquences vocales »
Consulter votre installateur ou votre opérateur pour connaître le mode de numérotation à
utiliser.
The Horizon 50 allows Pulse or Tone dialing. Factory setting is the Tone dialing mode.
Check your dialing mode with your installer or your operator.
Pour modifier le mode de numérotation :
-appuyer sur la touche « Menu »
-à l’aide des touches ↑ ou ↓ , sélectionner « PARAMETRES TEL »
-valider cette sélection en appuyant sur « OK »
-à l’aide de la touche ↑ ou ↓ , sélectionner « NUMEROTATION FV » ou
« NUMEROTATION DC »
-valider la sélection en appuyant sur « OK »
-retour automatique à l’écran de veille après une temporisation ( 20 s) ou manuellement en
décrochant puis raccrochant le combiné.
To change the dialing mode :
-press “MENU” key
-select “PHONE PARAMETERS” with keys ↓ or ↑
-confirm this selection by pressing “OK” key
-select “DIALLING TONE” or “DIALLING PULSE” with ↓ or ↑ key
-confirm your dialling choice by pressing “OK” key
-return to standby LCD mode is automatic after 20 seconds or after picking up and hanging
up the handset
6 – CHOIX DU FLASHING / HOOK FLASH DURATION
La touche “R/Flash” est utilisée lorsque le poste est installé derrière un PABX et sert à
effectuer les transferts de communication entre postes. L’Horizon 50 offre le choix d’un
flashing calibré à 100, 300 ou 600ms. Le réglage en sortie usine est à 300 ms.
« R/Flash » key allows communications transfer to other extensions when this telephone is
connected behind a PABX. The Horizon 50 offers the choice of 100, 300 or 600 ms hook –
flash duration. Factory setting is 300 ms.
Pour changer le réglage du Flashing :
--appuyer sur la touche « Menu »
-à l’aide des touches ↑ ou ↓ , sélectionner « PARAMETRES TEL »
-valider cette sélection en appuyant sur « OK »
-à l’aide des touches ↑ou ↓, sélectionner « FLASHING : 300MS » ou « FLASHING :
100MS » ou « FLASHING : 600MS »
-valider cette sélection en appuyant sur « OK »
-retour automatique à l’écran de veille après une temporisation ( 20 s) ou manuellement en
décrochant puis raccrochant le combiné.
6
To change the hook-flash duration :
-press “MENU” key
-select “PHONE PARAMETERS” with keys ↓ or ↑
-confirm this selection by pressing “OK” key
-select “FLASH TIME : 100MS” or “FLASH TIME : 300MS” or “FLASH TIME 600MS”
with ↓ or ↑ key
-confirm your hook-flash selection by pressing “OK” key
-return to standby LCD mode is automatic after 20 seconds or after picking up and hanging
up the handset
7 – APPELER / MAKING A CALL
L’Horizon 50 offre la composition d’un numéro combiné décroché ou raccroché.
Le numéro composé s’affiche à l’écran.
Lorsque le combiné est raccroché, on peut entrer le numéro au clavier (pré numérotation) et
déclencher la numérotation soit en appuyant sur la touche
, soit en appuyant sur la touche
« OK », soit en décrochant le combiné.
Le niveau d’écoute dans le combiné peut-être réglé en cours de communication à l’aide de la
touche +/-, le contrôle des 2 niveaux de réglage apparaît à l’écran. Le niveau choisi est
mémorisé pour les conversations suivantes.
La coupure temporaire du micro (pour un aparté temporaire) est assurée par appui sur la
touche
dans tous les modes de conversation y compris en mode « mains-libres » (voir
paragraphe suivant)
NB : le décroché du combiné en cours de composition d’un numéro n’arrête pas la
numérotation. La durée de communication s’affiche 10 secondes après la composition du
numéro, elle disparaît dès le raccroché
Horizon 50 allows off-hook or on-hook dialling ; the dialled number is displayed on the LCD.
When the handset is on-hook, the number to dial can be entered with the keypad (pre dialling)
and the dialling itself will be initiated when pressing
key, or “OK” key, or when picking
up the handset.
The receiver volume can be adjusted during a call with the +/- key. The 2 steps levels are
displayed on the LCD. The selected level is memorized for the next conversation.
Microphone mute is activated by pressing
both during handset and speakerphone mode.
Note : picking up the handset during dialling does not stop the dialling.
Elapsed communication time is displayed 10 seconds after dialling a number, the display is
cleared when hanging up.
8 – ECOUTE AMPLIFIEE - MAINS – LIBRES / AMPLIFIED SPEAKER - HANDS
FREE SPEAKERPHONE
La touche
commande l’activation et la désactivation de l’écoute amplifiée quand le
combiné est décroché. Si le combiné est raccroché, elle commande le mode mains-libres et le
raccroché de ligne. En cours de conversation en mode écoute amplifiée, le raccroché du
7
combiné entraîne automatiquement le passage en mode mains-libres. Lorsque le haut-parleur
est en marche ou, lorsque le mode « Casque » est activé (voir paragraphe 13), le symbole
est affiché à l’écran. Le volume du haut-parleur peut être réglé à l’aide de la touche « +/-« (4
niveaux) avec contrôle à l’écran.
The
key will activate or deactivate the amplified speaker when the handset is off-hook. If
the handset is on-hook, it will activate the speakerphone mode or it will hang up the call.
During a conversation in the amplified speaker mode, hanging up the handset will
automatically switch to the speakerphone mode. When the speaker is activated or in the
“Headset” mode (see section 13), the
is displayed. Speaker volume can be adjusted with
the “+/-“ key (4 levels) with LCD control.
9 – AFFICHAGE JOUR – DATE – HEURE / DAY – DATE – TIME DISPLAY
Pour régler la date et l’heure, procéder comme suit :
-appuyer sur la touche « Menu »
-à l’aide des touches ↑ ou ↓ , sélectionner « PARAMETRES TEL »
-valider cette sélection en appuyant sur « OK »
-à l’aide des touches ↑ ou ↓, sélectionner « HEURE/JOUR/DATE »
-valider cette sélection en appuyant sur « OK »
-les digits de l’année clignotent
-à l’aide des touches ↓ ou ↑, régler l’année à afficher, puis valider en appuyant sur « OK »
-les digits de l’heure clignotent ; régler l’heure avec les 2 touches ↑ ou ↓ puis valider avec
« OK »
-les digits des minutes clignotent
-à l’aide des touches ↓ ou ↑, régler les minutes puis valider le réglage par appui sur « OK »
-les digits de la date clignotent
-régler la date à afficher avec l’aide des touches ↑ ou ↓ puis valider par appui sur « OK »
-les digits du mois clignotent
-régler le mois à afficher de la même manière puis valider par « OK »
-l’écran affiche « ENREGISTRE »
-retour automatique à l’écran de veille après une temporisation ( 20 s) ou manuellement en
décrochant puis raccrochant le combiné
NB : le jour de la semaine est toujours affiché automatiquement en anglais juste au-dessus de
l’heure.
To adjust the day, date and time display :
-press “MENU” key
-select “PHONE PARAMETERS” with keys ↓ or ↑
-confirm this selection by pressing “OK” key
-select “TIME-DATE-DAY-?”
-confirm this selection by pressing “OK” key
-the year digits will start blinking
-select the year to display using ↓ or ↑ keys and confirm by pressing “OK” key
-the hour digits will start blinking
-select the hour to display using ↑ or ↓ key and confirm by pressing “OK” key
8
-the minutes digits will start blinking
-select the minutes to display using ↓ or ↑ key and confirm by pressing “OK” key
-the day digits will start blinking
-select the day to display using ↑ or↓ key and confirm by pressing “OK” key
-the month digits will start blinking
-select the month to display using ↓ or ↑ key and confirm by pressing “OK” key
-the LCD will show “STORED”
-return to standby LCD mode is automatic after 20 seconds or after picking up and hanging
up the handset
Note : the day of the week is always displayed in English right above the time display.
10 - ENREGISTREMENT DES MEMOIRES / MEMORIES STORING
L’Horizon 50 intègre un répertoire alphanumérique dont la capacité permet d’enregistrer
jusqu’à 50 noms et numéros. Viennent s’y ajouter 4 mémoires à accès direct (M1, M2, M3, et
M4), chacune permettant d’enregistrer un nom associé à un numéro.
Chaque nom peut comporter jusqu’à 16 caractères et chaque numéro jusqu’à 22 digits.
Un nom peut être enregistré avec des chiffres (ex : Bernard 1 ou André 2)
Dans le répertoire, le classement des noms se fait par ordre alphabétique, mais si un nom
comporte un chiffre le classement par chiffre est prioritaire sur le classement par lettre (ex : 1
Bureau sera classé avant 2 Bureau ou Bureau).
Les touches Pause, Flashing * et # peuvent être enregistrées dans un numéro.
NB : l’enregistrement de ces données est sauvegardé sur EEPROM, évitant leur effacement en
cas de débranchement ou de piles déchargées.
Up to 50 names and numbers can be stored into the Horizon 50 repertory dialler plus 4 extra
ones into the 4 one touch direct access memory keys (M1, M2, M3, and M4)
Names capacity is limited to 22 digits (a combination of letters and numbers is possible like :
OFFICE 1 or OFFICE 2 , for instance) and numbers capacity is limited to 16 digits. Pause
key, Flash key as well as * or # can be stored in the number storage process.
Ranking is made by alphabetical order but if a name stored includes a number, numbers will
have a ranking priority (for example : 1 BRUCE will be shown before 2 BRUCE or BRUCE).
Note : these records are saved by EEPROM memory backup even if the phone is disconnected
from the line or if batteries are dead.
Pour enregistrer :
-appuyer sur la touche « Menu »
-à l’aide des touches ↑ ou ↓ , sélectionner « MEMOIRES ? »
-valider cette sélection en appuyant sur « OK »
-à l’aide des touches ↓ ou ↑ , sélectionner « AJOUTER ? »
-valider cette sélection en appuyant sur « OK »
-l’écran affiche « NOM ? »
-entrer le nom à mémoriser à l’aide des touches du clavier comme indiqué ci-dessous en
prenant soin d’attendre que le curseur se soit déplacé pour poursuivre la saisie et en effaçant
au besoin une entrée erronée à l’aide de la touche « Del/Sup »
-valider la saisie du nom en appuyant sur « OK »
-l’écran affiche « NUMERO ? »
9
-saisir le numéro au clavier
ATTENTION : si l’on veut mémoriser cette saisie dans le répertoire alphabétique, il suffit de
terminer en appuyant sur « OK », par contre si l’on veut l’affecter à une des touches mémoire
à accès direct, il faut terminer en appuyant directement sur la touche mémoire choisie (M1,
M2, M3 ou M4).
-l’écran affiche « ENREGISTRE » pour confirmer la mémorisation, puis, après une courte
temporisation, il affiche à nouveau « MEMOIRES ? » pour permettre de poursuivre d’autres
saisies comme ci-dessus.
-retour automatique à l’écran de veille après une temporisation ( 20 s) ou manuellement en
décrochant puis raccrochant le combiné
NB : si le nom a déjà été précédemment enregistré, l’afficheur indiquera « DEJA
ENREGISTRE », puis basculera sur »MEMOIRES ? » comme ci-dessus.
To store :
-press “MENU” key
-select « MEMORIES ? with key ↑ or ↓
-confirm this selection by pressing “OK” key
-select “ADD ?” with key ↓ or ↑
--confirm this selection by pressing “OK” key
-the LCD will show “NAME ?”
-enter the name to store with the keypad as shown below, waiting until the cursor moves to
enter further letters and, if necessary, using “Del/Sup” key to erase a wrong entry.
-confirm the name storing by pressing “OK” key
-the LCD will show “NUMBER ?”
-enter the number to store with the keypad
CAUTION : if you want this file to be stored into the alphabetical repertory, confirm by
pressing the “OK” key, but, if you want this file to be stored into one of the 4 one touch direct
access memory keys, directly press the selected memory key where you want this file to be
stored.
-the LCD will show “STORED” to confirm the entry and, after a few seconds, it will display
“MEMORIES ?” again allowing further entries if necessary.
-return to standby LCD mode is automatic after 20 seconds or after picking up and hanging
up the handset
NOTE : if the name has been previously recorded, the LCD will show “ALREADY STORED”
and will switch to “MEMORIES ?” as above
Pour le “A” appuyer une fois /To display A press once
2ABC
Pour le “B” appuyer deux fois /To display A press twice
2ABC
Pour le “C” appuyer trois fois /To display A press 3 times
Pour le “2” appuyer quatre fois /To display A press 4 times
2ABC
2ABC
10
11 – UTILISATION DU REPERTOIRE ET DES MEMOIRES / HOW TO USE THE
PHONEBOOK AND THE 4 ONE TOUCH MEMORY KEYS
Pour consulter une des 4 touches mémoire, il suffit d’appuyer sur la touche choisie et son
contenu s’affichera à l’écran.
Pour appeler le correspondant enregistré dans cette mémoire, au choix, décrocher le combiné,
ou appuyer sur
ou sur « OK » pour un appel en mode mains-libres.
Pour consulter une fiche du répertoire :
-appuyer sur
-l’écran affiche « RECHERCHER »
-à l’aide de la touche ↓ ,ou
, faire défiler les correspondants jusqu’à la fiche souhaitée
ou,si l’on souhaite un accès direct, entrer au clavier la ou les premières lettres du nom
recherché puis sur
Même méthode que ci-dessus pour appeler le correspondant.
To check the name and number stored in one of the 4 one-touch memory keys, simply press
the memory key and it will display its content.
To call, pick up the handset or press
or “OK” for speakerphone mode
To check a name and number stored in the phonebook :
-press
-the LCD will show “INPUT PREFIX”
-scroll through the repertory with ↓ key or
until you find your file or, if you want a direct
access, enter the first letter(s) of the searched name and press
Same as above for calling
12 - MODIFIER OU EFFACER UN ENREGISTREMENT / MODIFY OR ERASE A
RECORD
Il est possible de modifier ou de supprimer un nom et (ou) un numéro présent dans le
répertoire ou dans l’une des mémoires à accès direct :
-appuyer sur la touche « Menu »
-à l’aide de la touche ↑ ou ↓ , sélectionner « MEMOIRES ? »
-valider cette sélection en appuyant sur « OK »
-à l’aide des touches ↓ ou ↑ , sélectionner « MODIFIER ? »
-valider cette sélection en appuyant sur « OK »
-l’écran affiche « RECHERCHER »
-si la fiche à modifier se trouve dans l’une des 4 mémoires à accès direct, appuyer directement
sur la touche mémoire concernée pour faire afficher les noms et numéros à modifier ;
si la fiche se trouve dans le répertoire, rechercher la fiche à modifier à l’aide des touches ↓ ou
↑.
-une fois la fiche trouvée, confirmer le souhait de modification en appuyant sur « OK »
-pour un effacement total de l’entrée, maintenir l’appui sur « Del/Sup » pendant 3
secondes :
l’écran affiche « EFFACER MEM ? »
11
-valider ce choix avec « OK », l’écran affiche « ENREGISTRE »
-pour une correction partielle de la fiche : après avoir validé le choix de fiche à modifier,
le curseur clignotant se positionne sur le dernier digit du numéro invitant à corriger le numéro
(on peut le déplacer vers la gauche avec la touche ↓ et vers la droite avec la touche ↑) et à
l’aide de la touche « Del/Sup » pour effacer un digit et du clavier pour saisir un autre chiffre,
effectuer la correction souhaitée, puis, même si le numéro n’a pas été changé, passer à l’étape
ci-dessous
-valider la correction du chiffre avec « OK »
-le curseur clignotant se positionne maintenant sur la première lettre du nom invitant à
corriger la saisie du nom. Procéder de la même manière que pour les chiffres à l’aide de
« Del/Sup » et du clavier
-valider la correction finale de la fiche avec « OK »
-l’écran affiche « ENREGISTRE » , puis « MEMOIRES ? » donnant la possibilité d’effectuer
d’autres corrections en reprenant comme en haut de ce paragraphe.
-une fois la (les) correction(s) effectuée(s), sortir du menu en appuyant sur « Menu »
Names and numbers stored in the alphabetical repertory or in the one touch memory keys can
be modified or erased.:
-press “Menu” key
--select « MEMORIES ? with key ↑ or ↓
-confirm this selection by pressing “OK” key
-select « MODIFY ? » with key ↑ or ↓
-confirm this selection by pressing “OK” key
-the LCD shows “INPUT PREFIX”
-if the file to modify is stored in one of the 4 one touch direct access keys, depress this key to
display the name and number to modify ;
-if the file is stored in the alphabetical repertory, use ↓ or ↑ key to search and display it
-once the file is displayed, confirm your wish to modify this file by pressing “OK”
-for a complete erasure of the file, keep “Del/Sup” key depressed until the LCD shows
“DELETE MEMORY ?”
-confirm this wish by pressing “OK” key, the LCD will show “STORED”
-for a partial correction of the file, once the file to modify has been selected, the blinking
cursor stands below the last digit of the stored number waiting for your correction (you can
move the cursor to the left with ↓ key and to the right with ↑ key) ; with the help of “Del/Sup”
key to erase a digit and with the keypad to enter a new digit make your correction and then
even if you did not modify the number
-press “OK” to confirm
-the blinking cursor stands now below the first letter of the name waiting for your correction
-make all necessary corrections with the help of “Del/Sup” key to erase and with the keypad
to enter new letters
-confirm your final correction of the file by pressing “OK”
-the LCD shows “STORED”, and the “MEMORIES ?” allowing new corrections as above in
this section
-once all corrections completed, quit the menu by pressing “Menu” key
12
13 CHOIX ET REGLAGES SONNERIES / RINGER VOLUME AND MELODY
SELECTION
POUR LE CHOIX DE LA MELODIE :
-appuyer sur la touche « Menu »
-à l’aide des touches ↑ ou ↓ , sélectionner « PARAMETRES TEL »
-valider cette sélection en appuyant sur « OK »
--à l’aide des touches ↑ ou ↓, sélectionner « MELODIE SONNERIE »
-appuyer sur « OK » , l’écran affiche le type de mélodie enregistrée et son numéro (de 1 à 8)
et le téléphone la fait entendre 1 fois.
-à l’aide des touches ↑ ou ↓ , balayer les choix proposés et confirmer la mélodie choisie en
appuyant sur « OK » .
-l’écran affiche « ENREGISTRE » confirmant la prise en compte du choix
-retour automatique à l’écran de veille après une temporisation ( 20 s) ou manuellement en
décrochant puis raccrochant le combiné
POUR LE CHOIX DU VOLUME :
procéder comme ci-dessus, mais , au lieu de sélectionner « CHOIX MELODIES »,
sélectionner « VOLUME SONNERIE »
-appuyer sur « OK », l’écran affiche le niveau de sonnerie enregistré et son numéro (de 0 à 5,
0 = sonnerie coupée) et le téléphone sonne une fois, permettant d’écouter le niveau
correspondant
-à l’aide des touches ↓ ou ↑ , balayer les niveaux proposés et confirmer son choix en appuyant
sur « OK »
-l’écran affiche « ENREGISTRE » confirmant la prise en compte du choix
-retour automatique à l’écran de veille après une temporisation ( 20 s) ou manuellement en
décrochant puis raccrochant le combiné
TO SELECT A RINGER MELODY :
-press “MENU” key
-select “PHONE PARAMETERS” with keys ↓ or ↑
-confirm this selection by pressing “OK” key
-select “RINGER MELODY” with ↑ or ↓ key
-press “OK” key, the LCD will show the previously stored melody with its rank (1 up to 8)
and the phone will play it once
-scroll from 1 to 8 with ↓ or ↑ key to select your melody and confirm your selection by
pressing “OK” key
-the LCD will show “STORED”
-return to standby LCD mode is automatic after 20 seconds or after picking up and hanging
up the handset
TO SELECT THE RINGER VOLUME :
-start as above but instead of selecting “RINGER MELODY”, select “RINGER LEVEL”
-press “OK” key, the LCD will show the previously stored level (0 up to 5, 0 = ringer off)
and the phone will play it once
13
-scroll from 0 to 5 with ↓ or ↑ key to select your ringer level and confirm your selection by
pressing “OK” key
--the LCD will show “STORED”
-return to standby LCD mode is automatic after 20 seconds or after picking up and hanging
up the handset
14 - UTILISATION CASQUE / HEADSET USE
Il est possible de brancher un microcasque à la place du combiné (simplement en
déconnectant le cordon du combiné et en raccordant à la place le cordon du casque) et de se
servir de la touche
pour décrocher sur un appel, converser avec le casque et raccrocher
ensuite, toujours à l’aide de la touche
sans avoir à soulever et reposer le combiné.
Important :
Avant d’activer le mode casque, il faut préalablement sélectionner ou non la possibilité
d’activer l’écoute amplifiée en même temps que l’utilisation casque (pour une meilleure
audition ou pour faciliter la supervision d’une conversation, par exemple).
Pour un fonctionnement sans ampli : Prendre la ligne à l’aide de la touche
, avec la touche
+/- choisir le niveau 4, une fois le niveau choisi appuyer de nouveau sur
pour raccrocher
la ligne et passer au paragraphe « Pour activer le mode Casque »
Une fois le mode activé, la touche +/- ne permettra que le réglage de réception du casque à 2
niveaux.
Pour un fonctionnement avec ampli : Prendre la ligne à l’aide de la touche
, avec la
touche +/- choisir le niveau 1, 2 ou 3 (1 niveau le plus faible , 3 le plus fort), une fois le
pour raccrocher la ligne et passer au paragraphe
niveau choisi, appuyer de nouveau sur
« Pour activer le mode Casque »
Une fois le mode activé, la touche +/- ne permettra que le réglage de réception du casque à 2
niveaux.
Pour activer le mode casque :
-appuyer sur la touche « Menu »
-à l’aide des touches ↑ ou ↓ , sélectionner « PARAMETRES TEL »
-valider cette sélection en appuyant sur « OK »
-à l’aide des touches ↑ ou ↓ , sélectionner « CASQUE : ON »
-valider en appuyant sur la touche « OK »
-sortir du menu en appuyant sur la touche « Menu »
Pour revenir à l’utilisation sans casque, avec combiné :
Procéder comme ci-dessus et sélectionner « CASQUE : OFF »
-valider en appuyant sur la touche « OK »
-sortir du menu en appuyant sur la touche « Menu »
14
You can connect a headset instead of the handset (connect the headset cord in place of the
handset cord ) and use the
key to answer a call, talk with the headset and hang up with
the
key again without having to move the handset.
Caution :
before activating this headset mode, a selection between 2 different options must be done.
Option N°1 will allow the use of the amplified speaker listening while the headset is in use
(offering a better understanding of the communication or allowing a supervision of the
communication, for instance).
Option N°2 cancels the activation of the amplified speaker while the headset is in use.
To select the amplified speaker activation (Option 1): press
to go off-hook, select with
+- key level N°4, press again
to hook on and proceed with headset mode activation as
detailed below. Once the headset mode is activated, +- key will allow a 2 steps reception
volume adjustment.
To select an activation without amplified speaker (Option N°2), press
to go off-hook,
select with +- key level 1, 2 or 3 (1 for low level, 2 for medium and 3 for high) press again
to hook on. Proceed with headset mode activation as detailed below. Once the headset
mode is activated, +- key will allow a 2 steps reception volume adjustment.
To activate the headset mode:
--press “MENU” key
-select “PHONE PARAMETERS” with keys ↓ or ↑
-confirm this selection by pressing “OK” key
-select “HEADSET : ON” with ↓ or ↑ key
-confirm this selection by pressing “OK” key
-escape from the menu mode by pressing “Menu” key
To deactivate the headset mode :
-Proceed as above and select”HEADSET : OFF”
-confirm this selection by pressing “OK” key
-escape from the menu mode by pressing “Menu” key
15 - MODE HDMATIC (OPTION) / HDMATIC MODE( OPTIONAL)
Le mode HDmatic permet de répondre automatiquement à un appel en « Mains libres » après
1 ou 9 sonneries (Choix défini par l’utilisateur) sans avoir besoin de prendre le combiné ou
d’appuyer sur la touche
. Une fois la ligne prise, la communication s’établit en Mains
libres. La communication terminée, le poste raccroche automatiquement en détectant la
tonalité de raccroché.
Pendant la communication en mode HDMATIC, le décrochage du combiné ou l’appui sur la
touche
, revient temporairement a un mode d’utilisation du poste téléphonique classique.
15
Au raccroché de la ligne, le mode HDMATIC est automatiquement réactivé pour les appels
suivants.
Pour activer le mode HDMATIC :
-appuyer sur la touche « Menu »
-à l’aide des touches ↑ ou ↓ , sélectionner « PARAMETRES TEL »
-valider cette sélection en appuyant sur « OK »
-à l’aide des touches ↑ ou ↓ , sélectionner « HDMATIC : 0 »
-valider en appuyant sur la touche « OK »
- à l’aide des touches ↑ ou ↓ , sélectionner le nombre de sonnerie avant le décrochage (de
1 à 9)
- valider en appuyant sur la touche « OK »
-sortir du menu en appuyant sur la touche « Menu »
Pour revenir à l’utilisation classique sans le décrochage automatique:
Procéder comme ci-dessus et sélectionner « HDMATIC : X » (X étant le nombre de sonneries
préalablement demandées avant le décrochage automatique dans le mode d’activation de la
fonction ci-dessus)
-valider en appuyant sur la touche « OK »
-à l’aide des touches ↓ ou ↑ , sélectionner « HDMATIC 0 »
-valider en appuyant sur la touche OK
-sortir du menu en appuyant sur la touche « Menu »
The HDMATIC mode, once selected, will automatically go off-hook and turn on the
handsfree speakerphone mode on all entering calls after a selected number of rings.
No need to pick up the handset or press
key.
When the call is over, it will automatically detect the busy tone and hang up returning to onhook mode.
During a conversation in the HDMATIC mode, picking up the handset or pressing
key
will temporarily switch to standard telephone mode. However, when hanging up, the unit
returns to the HDMATIC mode.
To activate the HDMATIC mode :
-press “Menu” key
-select “PHONE PARAMETERS” with ↓ or ↑ key
-confirm this selection by pressing “OK” key
-select “HDMATIC : 0 with ↑ or ↓ key
-confirm this selection by pressing “OK” key
-select the number of rings (from 1 up to 9) before the Horizon 50 should go off-hook
-confirm your choice by pressing “OK” key
-escape from the “Menu” mode by pressing “Menu”
To return to regular mode (no more HDMATIC)
-Proceed as above until “HDMATIC: X” is displayed (X being the number of rings previously
selected)
-confirm by pressing “OK” key
-select “HDMATIC : 0” with ↓ or ↑ key
-confirm this selection by pressing “OK” key
-escape from the “Menu” mode by pressing “Menu” again
16
16– IDENTIFICATION DE L’APPELANT / CALLER’S IDENTIFICATION (CID)
Dans la mesure ou le service « identification de l’appelant » est activé par l’opérateur et si,
dans le cas d’une installation derrière PABX, ce PABX est capable de retransmettre le signal,
l’Horizon 50 fait apparaître à l’écran l’heure et la date de l’appel, le numéro du correspondant
et son nom (si l’opérateur le transmet ou s’il correspond à une fiche enregistrée dans le
répertoire de l’appareil).
L’Horizon 50 mémorise les 50 derniers appels non répondus . La présence d’appel(s) en
absence est signalée par le clignotement de l’icône
(entre l’heure et la date). Le nombre
total d’appels non répondus est indiqué en bas à gauche de l’écran et, en bas à droite, le
nombre de ceux qui n’ont pas été consultés.
Pour consulter le journal des appelants, appuyer sur la touche
. L’appel le plus ancien
apparaît à l’écran avec son numéro d’ordre la date et l’heure de l’appel.
En se servant de la touche ↓ , le défilement des appels sera passé en revue du plus ancien au
plus récent. Chaque appel consulté remet à niveau le compteur en bas à droite de l’écran.
Pour sortir du journal des appelants, appuyer à nouveau sur
.
If the caller’s ID service is activated by the operator and, if the PABX is able to forward the
informations, the Horizon 50 will display the date and time as well as the caller’s number and
name (only if the operator provides it or if the name is recorded in the Horizon 50
phonebook).
The Horizon 50 will record the 50 last unanswered calls. Indication of unanswered calls will
appear on the LCD with a blinking
(between time and date).
The total numbers of unanswered calls is displayed at the left bottom of the LCD and the the
number of calls which have not been reviewed is at the right bottom of the LCD.
To review the caller’s ID list, press
key. The oldest call is displayed first with its ranking
order, the date and time of call.
Scroll through the list with ↓ key to review unanswered calls. The counter of unanswered calls
at the bottom right will adjust automatically.
To exit caller’s ID list depress
key again.
17 - APPELER - EFFACER UN N° DE LA LISTE DES APPELANTS / TO CALL OR
ERASE A NUMBER OF THE CALLER’S LIST
Pour appeler :
sélectionner le numéro souhaité comme indiqué au paragraphe 15 ci-dessus puis décrocher le
combiné ou appuyer sur la touche
, le numéro se composera automatiquement.
Pour effacer un numéro :
sélectionner le numéro souhaité et appuyer sur la touche « Del/Sup »
l’écran affiche « APPEL SUPPRIME ».
Pour effacer la totalité des appels non répondus :
appuyer sur la touche
ou sélectionner n’importe quel numéro,
appuyer sur « Del/Sup » pendant 5 secondes
l’écran affiche « TT APPEL SUPPRIME »
17
To call :
select the number to call as indicated here above at section 15, then pick up the handset or
press
key, the number will be dialled out automatically.
To erase a number :
select the number and press “Del/Sup” key
the LCD shows “CALL DELETED”
To erase all the caller’s list :
press
key or select any number
press “Del/Sup” key for 5 seconds
the LCD shows “ALL CALL DELETED”
18 - ENREGISTER UN APPEL PRESENT DANS LE JOURNAL DES APPELANTS
DANS LE REPERTOIRE OU DANS UNE MEMOIRE / TO STORE A CALLER’S ID
NUMBER IN THE PHONEBOOK OR IN A ONE TOUCH MEMORY KEY
Sélectionner le numéro de l’appelant souhaité comme indiqué ci-dessus,
appuyer directement sur la touche
(pour un enregistrement dans le répertoire) ou sur
l’une des 4 touches mémoires directes M1, M2, M3 ou M4.
L’écran affiche « ENREGISTRE »
NB : le journal des appelants ne comporte pas toujours le nom correspondant au numéro
mémorisé. Si l’on souhaite le rajouter pour qu’il soit associé au numéro, il faut, une fois le
numéro enregistré, procéder comme au chapitre 12 « Modifier un enregistrement »
Select a number as indicated above,
press
key (if you wish to store this number in the phonebook) or on one of the 4 one touch
memory keys (M1, M2, M3 or M4)
The LCD displays “STORED”.
Note : the caller’s list does not always displays the name of the calling party
If you wish the name to be stored with the number, refer to section 12 “ Modify a record”
once the number stored.
19 - PARAMETRES DE VERROUILLAGE / SELECT THE LOCKING PARAMETERS
L’ Horizon 50 offre le choix de verrouiller l’accès au clavier de numérotation et au menu et
(ou) au répertoire et aux mémoires.
Attention : avant d’activer le verrouillage, il faut d’abord sélectionner les accès à
condamner ; si aucun paramètre n’est sélectionné, la saisie du code de verrouillage sera
inopérante.
a) Pour sélectionner la condamnation du clavier :
Appuyer sur la touche « Menu »
à l’aide de la touche ↓ ou ↑, sélectionner « PARAMETRES TELE »
appuyer sur « OK »
sélectionner avec ↑ ou ↓ « CLAVIER LIBRE »
appuyer sur « OK », l’écran affiche « VERROU CLAVIER »
18
b) Pour rendre le verrouillage actif :
Appuyer sur « Menu »
l’écran affiche « VERROU ? »
appuyer sur « OK »
l’écran affiche « CODE ACCES » et le curseur clignote, invitant à saisir le code au clavier.
entrer le code de verrouillage à 4 digits au clavier (par défaut « 0000 » est mémorisé en sortie
usine), puis, appuyer sur « OK »
l’écran affiche « POSTE VERROUILLE »
A partir de maintenant, chaque fois que l’on appuiera sur une touche du clavier de
numérotation ou sur « Menu », l’écran affichera « CODE ACCES », invitant à saisir le code
d’accès pour autoriser la numérotation ou l’accès au menu. En revanche, l’accès à la
consultation du répertoire est possible.
c) Pour déverrouiller le blocage clavier :
lorsque l’écran affiche « CODE ACCES » à l’appui de l’une des touches du clavier, entrer le
code à 4 chiffres et appuyer sur « OK », l’écran affiche « POSTE DEVERROU »
L’accès au clavier et au menu est maintenant autorisé,
recommencer comme en a) , et lorsque l’écran affiche « VERROU CLAVIER », appuyer sur
« OK », l’écran affichera « CLAVIER LIBRE ».
Sortir du menu en appuyant sur « Menu ».
d) Pour sélectionner la condamnation du répertoire :
procéder comme en a) et sélectionner « REPERTOIRE LIBRE »
appuyer sur « OK », l’écran affiche « VERROU REPERTOIRE »
e) rendre le verrouillage actif comme en b)
A partir de maintenant, chaque fois que l’on appuiera sur la touche
ou sur « Menu », l’écran affichera « CODE ACCES », invitant à saisir le code d’accès pour
autoriser l’accès au répertoire ou au menu. En revanche l’accès au clavier de numérotation est
possible.
f) Pour déverrouiller le blocage du répertoire :
procéder comme en c)
sélectionner « VERROU REPERTOIRE » puis appuyer sur « OK », l’écran affichera
« REPERTOIRE LIBRE »
Sortir du menu en appuyant sur « Menu ».
The Horizon 50 offers the choice of barring the access to the keypad and to the menu and (or)
to the phonebook and to the one-touch memory keys.
Caution : selection of parameters to lock must be done before activating the locking; if no
parameter has been selected, entering the code access will have no effect.
a) To select the keypad lock :
press “Menu” key
select “PHONE PARAMETERS” with ↓ or ↑ key
press “OK” key
select “KEYPAD UNLOCKED” with ↑ or ↓ key
press “OK” key, the LCD will show “KEYPAD LOCKED”
19
b) to activate the locking :
Press “Menu” key
the LCD shows “LOCK ?”
press “OK” key
the LCD shows “ACCESS CODE” and the blinking cursor waits for the 4 digits PIN code to
be entered (factory stored PIN code is “0000”), and press “OK”
the LCD shows “PHONE LOCKED”
Starting from now, each time a keypad key or the Menu key will be depressed, the LCD will
show “ACCESS CODE”, waiting for the PIN code to be entered. However, access to the
phonebook is possible.
c) To unlock the keypad :
when the LCD shows “ACCESS CODE “after trying to press a keypad or menu key, enter the
4 digits PIN code and press “OK”, the LCD will show “PHONE UNLOCKED”
Access to the keypad and to the menu is no longer denied,
proceed like in a) and when the LCD shows “KEYPAD LOCKED”, press “OK”, the keypad
will show “KEYPAD UNLOCKED”
Exit by pressing “Menu” key
d) To select the Phonebook lock :
proceed as in a) and select “PHONEBOOK : UNLOCKED”
press “OK”, the LCD will show “PHONEBOOK : LOCKED”
e)actvate the locking as in b)
Starting from now, each time the
or Menu key will be pressed, the LCD will show
“ACCESS CODE” waiting for the PIN code to be entered to give access to the Phonebook or
to the menu. However, access to the keypad will be possible.
f) To unlock the Phonebook access :
proceed as in c)
select “PHONEBOOK : LOCKED” and press “OK” key, the LCD will show “PHONEBOOK
: UNLOCKED”.
Exit by pressing “Menu” key
20 - MODIFIER LE CODE D’ACCES / TO CHANGE THE PIN ACCESS CODE
Rappel: le code d’accès enregistré en usine est : 0000
Il est possible de le modifier pour un autre code à 4 digits.
Procéder comme suit :
appuyer sur la touche « Menu »
à l’aide de la touche ↑, sélectionner « PARAMETRES TEE »
confirmer la sélection en appuyant sur « OK »
sélectionner à l’aide de ↑ ou ↓, « CODE ACCES »
appuyer sur « OK », l’écran affiche « ANCIEN CODE » et le curseur clignote, invitant à
entrer au clavier le code d’accès actuel (rappel « 0000 » si rien n’a été changé depuis la
livraison usine)
entrer l’ancien code et appuyer sur « OK », l’écran affiche « NOUVEAU CODE » et le
curseur clignote, invitant à entrer au clavier le nouveau code à 4 digits choisi
20
entrer ce nouveau code et appuyer sur « OK », l’écran demande confirmation en affichant
« CONFIRME CODE »
entrer à nouveau le nouveau code choisi et appuyer sur « OK », l’écran affiche
« ENREGISTRE » confirmant l’enregistrement du nouveau code choisi.
Reminder : the factory access PIN code is 0000
It is possible to modify it for any other 4 digits code.
Proceed as follows :
Press “Menu” key
select “PHONE PARAMETERS” with ↑ key
confirm this selection by pressing “Ok” key
select “ACCESS CODE” with ↑ or ↓ key
press “OK” key, the LCD will show “OLD CODE” and the blinking cursor waits for this
code to be entered with the keypad (factory code is 0000)
enter the old code and press “OK” key, the LCD will show “NEW CODE” and the blinking
cursor waits for your new choice of 4 digits code to be entered with the keypad
enter your new code and press “OK” key, the LCD will show “CONFIRM CODE” waiting
for a second entry to confirm your choice
enter this new code again and press “OK” key, the LCD will show “STORED” confirming
the new code storage.
21 - LAMPE MESSAGE / MESSAGE WAITING LED
La led message située sur le devant de l’appareil signalera par un
clignotement lumineux tout message en attente dans une messagerie
vocale à condition que l’Horizon 50 soit raccordé derrière un PABX
utilisant la technique « par courant d’appel ».
The waiting message led located on the front of the panel will blink indicating all waiting
voice mail provided that the Horizon 50 be connected behind a PABX with ringing current
voice mail system technology.
22 - INSTALLATION MURALE / WALL MOUNTING
Percer deux trous aux emplacements prévus sur le gabarit de perçage ci-joint. Présenter le
fond de l’appareil en alignant les deux orifices du fond de poste face aux vis. Monter le kit
mural. Glisser le poste vers le bas pour bloquer.
Retourner le crochet situé sur le socle (voir illustration) pour assurer le maintien mural du
combiné.
100,00 mm
Drill 2 holes respecting the above diagram. Install 2 screws.
Align slot hole for wall mount on the back of the telephone over the 2 screws. Gently pull
down the telephone until it is held securely by the 2 screws.
Pull the handset hanger out from the base top and turn to 180°.
21
SA HENRI DEPAEPE 98, avenue de Stalingrad BP n°05- 92702 COLOMBES (France)
Nom : DEPAEPE
Siège social :
Téléphone : 0147817122
Adresse :
98, Avenue de Stalingrad
Télécopie : 0147841899
Localité :
COLOMBES
Code postal : 92702
Identification du produit :
-
Nature : Terminal de Télécommunications
Type : Poste téléphonique
Référence commerciale : HORIZON
Autres informations : Poste bi-bloc 10 mémoires avec « PLSD » et amplificateur
Déclare sous son entière responsabilité que le produit décrit ci-dessus est en conformité avec
les exigences essentielles applicables et en particulier celles de la directive 1999/5/CE)
suivantes :
Article 3.1 a : (protection de la santé et de la sécurité de l’utilisateur)
…………………………………EN 60950
Article 3.1 b : (exigences de protection en ce qui concerne la compatibilité
électromagnétique)
…………………………………. EN 55022et EN 55024.
Article 3.3 : (Raccordement au réseau public compatibilité électrique et acoustique)
………………………………… TBR 37 (21) et TBR 38
Procédure suivie (Annexes) : II
Ce symbole signifie que ce produit est conforme à la directive de l’Union Européenne sur les déchets des
équipements électriques et électroniques. (WEEE), 2002/96/EC. IL ne doit pas être jeté en fin de vie comme un
déchet ménager afin de préserver l’environnement et la santé humaine.
Adressez-vous à votre fournisseur ou aux autorités locales pour le déposer dans un point de collecte prévu à cet
effet.
This marking indicates that this product complies with the European Union Waste Electrical and Electronic
Equipment directive (WEEE), 2002/96/EC. It should not be disposed of with other household wastes at the end
of its working life to prevent possible harm to the environment or human health.
Please contact your supplier or your local government office to dispose of it in an approved recycling centre.
Made in China
22