1
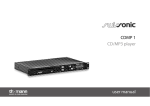
CDMP 1
CD/MP3 player
user manual
Musikhaus Thomann e.K.
Treppendorf 30
96138 Burgebrach
Germany
Telephone: +49 (0) 9546 9223-0
E-mail: [email protected]
Internet: www.thomann.de
06.03.2014, ID: 221521
Table of contents
Table of contents
1
General notes...............................................................................................................................................
1.1 Further information...........................................................................................................................
1.2 Notational conventions....................................................................................................................
1.3 Symbols and signal words...............................................................................................................
2
Safety instructions.................................................................................................................................. 10
3
Features....................................................................................................................................................... 15
4
Installation.................................................................................................................................................. 16
5
Connections and operating elements........................................................................................... 17
6
Operation.................................................................................................................................................... 31
7
Technical specifications....................................................................................................................... 37
8
Plug and connection assignment.................................................................................................... 38
9
Protecting the environment.............................................................................................................. 40
CDMP 1
3
4
5
6
7
General notes
1
General notes
This manual contains important instructions for the safe operation of the unit. Read and follow
the safety instructions and all other instructions. Keep the manual for future reference. Make
sure that it is available to all those using the device. If you sell the unit please make sure that
the buyer also receives this manual.
Our products are subject to a process of continuous development. Thus, they are subject to
change.
CD/MP3 player
4
General notes
1.1 Further information
On our website (www.thomann.de) you will find lots of further information and details on the
following points:
Download
This manual is also available as PDF file for you to download.
Keyword search
Use the search function in the electronic version to find the topics of
interest for you quickly.
Online guides
Our online guides provide detailed information on technical basics
and terms.
Personal consultation For personal consultation please contact our technical hotline.
Service
If you have any problems with the device the
customer service will gladly assist you.
CDMP 1
5
General notes
1.2 Notational conventions
This manual uses the following notational conventions:
Letterings
The letterings for connectors and controls are marked by square brackets and italics.
Examples: [VOLUME] control, [Mono] button.
Displays
Texts and values displayed on the device are marked by quotation marks and italics.
Examples: ‘24ch’ , ‘OFF’ .
CD/MP3 player
6
General notes
Instructions
The individual steps of an instruction are numbered consecutively. The result of a step is
indented and highlighted by an arrow.
Example:
1.
Switch on the device.
2.
Press [Auto].
ð Automatic operation is started.
3.
Switch off the device.
1.3 Symbols and signal words
In this section you will find an overview of the meaning of symbols and signal words that are
used in this manual.
CDMP 1
7
General notes
Signal word
Meaning
DANGER!
This combination of symbol and signal word
indicates an immediate dangerous situation
that will result in death or serious injury if it is
not avoided.
CAUTION!
This combination of symbol and signal word
indicates a possible dangerous situation that
can result in minor injury if it is not avoided.
NOTICE!
This combination of symbol and signal word
indicates a possible dangerous situation that
can result in material and environmental
damage if it is not avoided.
Warning signs
Type of danger
Warning – high-voltage.
CD/MP3 player
8
General notes
Warning signs
Type of danger
Warning – laser radiation.
Warning – danger zone.
CDMP 1
9
Safety instructions
2
Safety instructions
Intended use
This device is intended to be used for playback of audio CDs and MP3 discs. Use the unit only
as described in this manual. Any other use or use under other operating conditions is consid‐
ered to be improper and may result in personal injury or property damage. No liability will be
assumed for damages resulting from improper use.
This device may be used only by persons with sufficient physical, sensorial, and intellectual
abilities and having corresponding knowledge and experience. Other persons may use this
device only if they are supervised or instructed by a person who is responsible for their safety.
Safety
DANGER!
Danger for children
Ensure that plastic bags, packaging, etc. are disposed of properly and are not
within reach of babies and young children. Choking hazard!
Ensure that children do not detach any small parts (e.g. knobs or the like) from
the unit. They could swallow the pieces and choke!
Never let children unattended use electrical devices.
CD/MP3 player
10
Safety instructions
DANGER!
Electric shock caused by high voltages inside
Within the device there are areas where high voltages may be present. Never
remove any covers.
There are no user-serviceable parts inside.
DANGER!
Electric shock caused by short-circuit
Always use proper ready-made insulated mains cabling (power cord) with a pro‐
tective contact plug. Do not modify the mains cable or the plug. Failure to do so
could result in electric shock/death or fire. If in doubt, seek advice from a regis‐
tered electrician.
CDMP 1
11
Safety instructions
DANGER!
Laser radiation inside
The device contains a class-1M laser, classified according to EN 60825-1. The use
of optical instruments increases the potential hazard to your eyes.
NOTICE!
Risk of fire
Do not cover the device nor any ventilation slots. Do not place the device near
any direct heat source. Keep the device away from naked flames.
NOTICE!
Operating conditions
This device has been designed for indoor use only. To prevent damage, never
expose the device to any liquid or moisture. Avoid direct sunlight, heavy dirt, and
strong vibrations.
CD/MP3 player
12
Safety instructions
NOTICE!
Power supply
Before connecting the device, ensure that the input voltage (AC outlet) matches
the voltage rating of the device and that the AC outlet is protected by a residual
current circuit breaker. Failure to do so could result in damage to the device and
possibly injure the user.
Unplug the device before electrical storms occur and when it is unused for long
periods of time to reduce the risk of electric shock or fire.
NOTICE!
Risk of fire due to incorrect polarity
Incorrectly inserted batteries may destroy the device or the batteries.
Ensure that proper polarity is observed when inserting batteries.
CDMP 1
13
Safety instructions
NOTICE!
Possible damage by leaking batteries
Leaking batteries can cause permanent damage to the device.
Take batteries out of the device if it is not going to be used for a longer period.
CAUTION!
Possible hearing damage
With loudspeakers or headphones connected, the device can produce volume
levels that may cause temporary or permanent hearing impairment.
Do not operate the device permanently at a high volume level. Decrease the
volume level immediately if you experience ringing in your ears or hearing
impairment.
CD/MP3 player
14
Features
3
Features
This CD/MP3 player is suitable to be used in clubs, bars, discos and on stages.
Special features of this device:
n
n
n
n
n
n
n
n
n
n
Balanced XLR outputs
40 seconds anti shock buffer memory for uninterrupted playback during vibrations
Speed / pitch adjustable by ± 24 %
Infrared remote control
Loop function
Slot-in drive
Headphones output with separate volume control
19" rack housing (1 RU)
Built-in power supply unit with detachable power cable
Automatic standby
CDMP 1
15
Installation
4
Installation
Unpack and carefully check that there is no transportation damage before using the unit. Keep
the equipment packaging. To fully protect the device against vibration, dust and moisture
during transportation or storage use the original packaging or your own packaging material
suitable for transport or storage, respectively.
Establish all connections as long as the unit is switched off. Use the shortest possible highquality cables for all connections.
Rack mounting
The unit has been designed for rack mounting in a standard 19-inch rack; it occupies one rack
unit.
Inserting batteries into the
remote control
Open the battery compartment cover on the rear side of the remote control and insert
2 × 1.5 V batteries ('AAA' size) according to the drawing in the compartment. Make sure to
respect the correct polarity, otherwise the remote will not work and may be damaged. Close
the compartment. If the remote control begins to work unreliably, replace both batteries with
new ones of the same type.
CD/MP3 player
16
Connections and operating elements
5
Connections and operating elements
Front panel
CDMP 1
17
Connections and operating elements
1 Power indicator
The LED lights up when the unit is turned on.
2 [POWER]
Press this button to turn the device on or off.
3 Disc slot
Carefully insert the disc to be played here about half.
4
Press this button once to restart the currently playing track. Press it repeatedly to select previous tracks.
5
Press this button to skip the playback to the beginning of the next track.
6 [+10]
This button lets you select high MP3 track numbers more quickly, as the device skips 10 titles per press. But this works
only if the current folder on the disc contains more than 10 files.
CD/MP3 player
18
Connections and operating elements
7 [CUE]
If you press this button during playback, the playback will return to the beginning of the current track. The [CUE]
button lights red. If you press the button again and hold it, the playing will be resumed and will continue as long as
you hold the button.
8 [TIME]
Press this button to select the display mode for the playing time: elapsed track time, remaining track time or
remaining total time (not in MP3 mode).
9 [PROG.]
In CD mode, this button lets you programme up to 20 tracks to play in a specific order.
In MP3 mode, use this button to skip to the alphabetically next folder.
10 [SGL]
Press this button to toggle between play modes ‘SINGLE’ and ‘CONTINUOUS’. In SINGLE mode, the unit stops after
playing a track and the [SGL] button lights up. In CONTINUOUS mode, the unit will stop only after all tracks have been
played, the button then remains unlit.
11 [REPEAT]
Press this button to activate the repeat function: repeat one track (display shows ‘1’ ), repeat all songs in an MP3
folder (display shows ‘F’ ) or all tracks on the disc (the display shows ‘A’ ).
CDMP 1
19
Connections and operating elements
12 [REMOTE SENSOR]
This sensor receives the remote control signals. When using the remote control, point it at the device. Keep the area
in front of the sensor free from any obstructive objects and don't glue stickers on the sensor, otherwise the remote
won't work.
13 Display
Display area for playback information and ID3 tags in MP3 mode.
14 [PHONES]
Connect headphones with a 3.5 mm mini phone plug to this output. The level of this output is subject to the volume
control of the [CUE LEVEL] control.
15 [PITCH]
If you press this button the setting of the [PITCH] control is applied to the current playback. When the pitch function
is activated the button lights up.
16 [FWD]
Press and hold this button to activate the search function forwards.
17 [REV]
Press and hold this button to activate the search function backwards.
CD/MP3 player
20
Connections and operating elements
18
Press this button after inserting the disc to start playback. During playback, the button is lit. If you press this button
during playback, the playback is paused and the button is flashing. Press this button again to resume playback.
19 [MASTER LEVEL]
For adjusting the [LINE] output level.
20 [CUE LEVEL]
For adjusting the [PHONES] output level.
21 [PITCH]
With this control you can increase or decrease the speed and thus the audio pitch by ± 24%. This feature is only ena‐
bled when the [PITCH] button is lit.
22 [EJECT]
Press this button to eject the inserted disc.
CDMP 1
21
Connections and operating elements
Rear panel
23 [LINE OUTPUT L/R]
This unbalanced RCA output is subject to the [MASTER LEVEL] volume control. Connect here for example the line
input of a mixer, amplifier or similar device via an RCA cable.
24 [REC OUTPUT L/R]
Unbalanced RCA output with fixed output level. Again, you can for example connect the line input of a mixer, ampli‐
fier or similar device via an RCA cable.
CD/MP3 player
22
Connections and operating elements
25 [XLR BALANCED]
Balanced XLR output, which is not subject to any volume control. Connect here for example the line input of a mixer,
amplifier or similar device via an XLR cable.
26 IEC chassis connector for operating voltage supply. Use the supplied mains cable to connect this mains power con‐
nector to an earthed wall outlet.
CDMP 1
23
Connections and operating elements
Display
1 Bargraph, symbolizing the time course when playing a track from an audio CD. 10 elements correspond to the full
track time.
In MP3 mode, the track name is shown here instead.
2 Repeat function display: ‘1’ = single track repeat, ‘F’ = folder repeat (MP3), ‘A’ = disc repeat.
3 Pitch display for raised or lowered playback speed.
4 Playing time indicator.
CD/MP3 player
24
Connections and operating elements
5 Track number indicator.
6 Indicator for playback ( ) or pause ( ).
CDMP 1
25
Connections and operating elements
Remote control
1
During playback, press this button once to pause the playback. Press twice to stop
playback.
2 Numeric buttons for direct track selection.
3 [PROGRAM]
In CD mode, this button lets you programme up to 20 tracks to be played in a spe‐
cific order.
In MP3 mode, use this button to skip to the alphabetically next folder.
4 [PITCH+]
The PITCH + / – control of the remote control operates independently of the
[PITCH] knob on the front panel of the device and can affect playback only when
the [PITCH] button is not lit, the feature therefore is deactivated. If you press
[PITCH+], the playback speed is set to the value that has been adjusted with the
[PITCH] control plus 1%. Each subsequent press increases the playback speed by
1%.
CD/MP3 player
26
Connections and operating elements
5 [SGL/CTN]
Press this button to toggle between play modes ‘SINGLE’ and ‘CONTINUOUS’. In
SINGLE mode, the unit stops after playing a track and the [SGL] button lights up. In
CONTINUOUS mode, the unit will stop only after all tracks have been played, the
button then remains unlit.
6
Press this button to skip the playback to the beginning of the next track.
7
Keep this button pressed to activate a forward search.
8
Press this button once to restart the currently playing track. Press it repeatedly to
select previous tracks.
9 [RELOOP]
Press this button to skip the playback to the beginning of a previously marked
loop.
CDMP 1
27
Connections and operating elements
10 [LOOP OUT]
With this button you can mark the end of a loop. Then, the selected section will be
repeated. Press this button again to delete the marks and to let the playing con‐
tinue normally.
11 [LOOP IN]
With this button you can set the start marker for a loop.
12
Press this button after inserting the disc to start playback. If you press this button
during playback, playback is paused. Press it again to resume playback.
13
Press and hold this button to activate a reverse search.
14 [TIME]
Press this button to select the display mode for the playing time: elapsed track
time, remaining track time or remaining total time (not in MP3 mode).
CD/MP3 player
28
Connections and operating elements
15 [CUE]
If you press this button during playback, the playback will return to the beginning
of the current track. The [CUE] button on the unit then lights red. Press it again to
resume playback.
16 [PITCH]
If you press this button the setting of the [PITCH] control is activated or deactivated
for the current playback. When the pitch function is activated the [PITCH] button on
the unit lights up.
17 [PITCH–]
If you press [PITCH–], the playback speed is set to the value that has been adjusted
with the [PITCH] control minus 1%. Each subsequent press decreases the playback
speed by 1%.
CDMP 1
29
Connections and operating elements
18 [REPEAT]
Press this button to activate the repeat function: repeat one track (display shows
‘1’ ), repeat all songs in an MP3 folder (display shows ‘F’ ) or all tracks on the disc
(display shows ‘A’ ).
19
Press this button to eject the inserted disc.
CD/MP3 player
30
Operation
6
Operation
Turning the device on and off
Press the [POWER] button to turn the device on. The status LED to the left of the switch and the
display backlight will light up. If you want to turn the device off press the [POWER] button
again.
Automatic standby
The device switches to standby mode, if you don’t press any button on the device or the
remote control within 30 minutes after the playback of the last track.
In standby mode, the backlight of the display and of the buttons is switched off, the blue
power indicator light remains lit. Press any button on the device or the remote control to
return to normal operation.
Inserting a disc
Insert an audio CD or a CD-R with MP3 files carefully about half into the disc slot. The rest of
the transport is handled by the device. Subsequently, the device reads the disc (the EJECT indi‐
cator is flashing) and remains in Pause mode of track 1 of an audio CD or the first track in the
alphabetically first folder with MP3 files. The flashing
button indicates the Pause mode.
CDMP 1
31
Operation
Playback
Press the
button to start playback. The button lights up solid during playback. Press this
button again to pause playback.
Press the button during playback or pause to skip to the next track on the disc. Press the
button once to skip to the beginning of the current track. Press twice to skip to the beginning
of the previous track.
If you keep the [FWD] button pressed during playback, the playback jumps ahead in incre‐
ments of 5 seconds. If you keep the [REV] button pressed during playback, the playback will
jump backwards in increments of 5 seconds.
If you keep the [FWD] button pressed when playback is paused, you can move the playback
position in single frames forward. If you keep the [REV] button pressed when playback is
paused, you can move the playback position in single frames backward.
You can adjust the playback speed and thus the pitch by ± 24 %. Turn the [PITCH] control in
the desired direction (‘+’ for higher speed, ‘—’ for lower speed). This setting has only effect if
the PITCH function is active and so the [PITCH] button lights up.
When the unit is exposed to vibration during operation, the buffer memory of the device
ensures that the playback continues undisturbed for up to 40 seconds. But if the vibrations
last, there will be dropouts.
CD/MP3 player
32
Operation
Volume control
You can adjust the volume on the LINE output and the headphone output separately. In order
to increase the volume on the LINE output, turn the [MASTER LEVEL] control clockwise. To
decrease the volume, turn it counter clockwise. To increase the volume of the headphone
output PHONES, turn the [CUE LEVEL] control clockwise. To decrease the volume, turn it
counter clockwise. The output level on the outputs ‘REC’ and ‘XLR BALANCED’ is not adjust‐
able.
CDMP 1
33
Operation
Play modes
Single or total playback
Press the [SGL] button to toggle between play modes ‘SINGLE’ and ‘CONTINUOUS’. In SINGLE
mode, the unit stops after playing a track and the SGL-button lights. In CONTINUOUS mode,
the unit will stop only after all tracks have been played, the button remains unlit.
Repeat function
Press the [REPEAT] button once, then the currently playing track is repeated after reaching its
end. The display reads ‘1’. Press the [REPEAT] button twice, then all tracks on the disc are
played repeatedly. The display then reads ‘A’. Press the [REPEAT] button again, the indicator
turns off and the repeat function is terminated.
For MP3 playback, also the repeat function for files in a specific folder is available.
Programme function
Before you start playback after inserting an audio CD, you can programme a desired playback
order for up to 20 tracks. To do so, proceed as follows:
1.
Press the [PROG] button.
2.
Subsequently, use the
/
buttons to select the first track.
CD/MP3 player
34
Operation
3.
Press the [PROG] button to confirm.
4.
Proceed that way with further desired songs.
5.
Press the
button to start the programmed playback.
Ejecting the disc will erase the programme.
The programming function is not available in MP3 playback.
Toggling display functions
You can use the [TIME] button to select the playing time indication in the display: elapsed track
time, remaining track time or remaining total time.
In MP3 playback, only the display of ‘elapsed’ and ‘remaining track time’ are avail‐
able.
CDMP 1
35
Operation
Ejecting the disc
Press the [EJECT] button to remove the disc. This is only possible when playback is paused to
avoid an unintended removal of the disc. The [EJECT] button lights up while the unit ejects the
disc.
CD/MP3 player
36
Technical specifications
7
Technical specifications
Outputs
1 pair of XLR mounting sockets, balanced, fixed output
1 pair of RCA sockets, fixed output
1 pair of RCA sockets, volume-controlled
1 × headphones, 3.5 mm mini phone socket with separate volume control
Control range for playback speed
± 24 %
Operating voltage supply
AC 230 V
Dimensions (W × H)
485 mm × 44.5 mm (1 RU)
, 50/60 Hz
Installation depth: 255 mm
Overall depth: 275 mm
Weight
4 kg
CDMP 1
37
Plug and connection assignment
8
Plug and connection assignment
Introduction
This chapter will help you select the right cables and plugs to connect your valuable equip‐
ment in such a way that a perfect sound experience is ensured.
Please note these advices, because especially in ‘Sound & Light’ caution is indicated: Even if a
plug fits into the socket, an incorrect connection may result in a destroyed power amp, a short
circuit or ‘just’ in poor transmission quality!
RCA connection
Drawing and table indicate the pin assignment of an RCA plug.
1
Signal
2
Ground, shielding
CD/MP3 player
38
Plug and connection assignment
XLR plug (balanced)
1
Ground, shielding
2
Signal (in phase, +)
3
Signal (out of phase, –)
CDMP 1
39
Protecting the environment
9
Protecting the environment
Disposal of the packaging mate‐
rial
For the transport and protective packaging, environmentally friendly materials have been
chosen that can be supplied to normal recycling.
Ensure that plastic bags, packaging, etc. are properly disposed of.
Do not just dispose these materials with your normal household waste, but make sure that
they are fed to a recovery. Please follow the notes and markings on the packaging.
Disposal of batteries
Batteries must not be disposed of as domestic waste or thrown into fire. Dispose of the bat‐
teries according to national or local regulations regarding hazardous waste. To protect the
environment, dispose of empty batteries at your retail store or at appropriate collection sites.
CD/MP3 player
40
Protecting the environment
Disposal of your old device
This product is subject to the European Waste Electrical and Electronic Equipment Directive
(WEEE). Do not dispose with your normal household waste.
Dispose this device through an approved waste disposal firm or through your local waste
facility. When discarding the device, comply with the rules and regulations that apply in your
country. If in doubt, consult your local waste disposal facility.
CDMP 1
41
Notes
CD/MP3 player
42
Musikhaus Thomann e.K. · Treppendorf 30 · 96138 Burgebrach · Germany · www.thomann.de