1
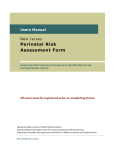
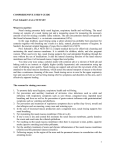
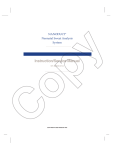
USER MANUAL for UP-02D ultrasonic nebulizer 0197 SANASOL Verz. 01. 1 GENERAL INFORMATION Thank you for choosing SANASOL’s device. The UP-02D ultrasonic medicine vaporizer was developed for vaporizing water solvent medication, medicinal waters and physiological saline solution for infants, until they will be 2 years old. The arising aerosol gets into the respiratory-tracts with the help of the inhalation hood. The vaporization of the fluid is performed by a piezo-ceramics, with the help of interference liquid and a vaporizing membrane. The size of the generated particle makes it possible that the medicine gets even into the bronchus. The vaporization of medication is very economical, the device works efficiently until the last drop. The device is suitable for the treatment of bronchitis, asthma bronchiale, laryngitis, pseudocroup, mucoviscidosis etc., or to prevent pneumoconiosis. While the using the constant watch of an adult is required! Before the use of the device, read carefully this User’s Manual, and keep the ones written in there while using it, in order for that your device can serve the longer. With question, suggestion or complaint, turn to us with trust. Zalaegerszeg, 15rd May, 2008. Gábor Németh, Executive Director 2 I. CONSTRUCTION OF THE DEVICE The UP-02D ultrasonic personal nebulizer consists of three main parts: 1. The vaporizing unit 2. Network adapter 3. Inhalation hood 3 The vaporizing unit consists of the following parts: A vaporizer house B vaporizer cap C ventilator On the vaporizer house you can find: ¾ The operating button, (1) ¾ The vaporizer insertion made from silicone rubbery (2), and on its base you can find ¾ The vaporizer membrane (3) You can find on the removable vaporizing cap the opening of the suction house(4) and the air-inlet bores (5). 4 The hood consists of the following parts: • Transparent hood – The hood consists of a truss made from plastic and a plastic foil, which covers it. • Tube leading the aerosol in– This tube can be set up in every direction, and ensures so that in the vaporizer arisen aerosol gets directly into the infant’s nose and mouth. The hood Legs Transparent plastic cover Openable part Tube leading the aerosol in Adjuster head for the suction house Tube leading the aerosol in Silicone rubbery drop-catcher Suction house 5 II. FIRST INSTALLATION OF THE DEVICE Interference liquid (distilled water) between the piezo ceramic and the vaporizing insertion is required for the working of the vaporizer. The manufacturer fills up the device during the production. This inserted liquid may decrease during the use and the storage. Since there can elapse a notable period between the manufacture and the use, so it can happen that this liquid level drops off already before the first use. Therefore at the first use check the factory filled liquid’s presence. If the level does not reach the vaporizing membrane on the bottom of the vaporizing insertion, you have to do the filing up of the device according to instructions written in Chapter IV (pages 9 and 10). NOTICE! The pushbutton is continuously lighting after it was connected to the network. If the liquid level drops so much, that it would endanger the functioning, the controlling electronics will disable the functioning, which is shown by the continuously flicker of the pushbutton after it was connected to the network. In such cases the device can be only used again after it was filled up with interference liquid. The device has to be disinfected according to section V. (page 12) before the first use! With the applied vaporizer membrane you can vaporize any kind of, water solvent medicine. 6 III. THE USE OF DEVICE 1. Grab the top of the hood and open the legs ① one by one. The opened, and fixed position which is indicated by a click. 2. Place the silicone drop-catcher ⑥ onto the end of the tube leading the aerosol in ⑤ and with your finger push it into the tube, according to the figure. 3. Insert the tube leading the aerosol in ⑤ into the opening on the hood’s top. 4. Take off the cap of the vaporizing unit. 5. Pour the medicine or liquid to be vaporized into the vaporizer insertion (max. 10 ml). 6. Put the cap back on the lower part of the vaporizing unit. 7. Flip the ventilator to the cap and connect the ventilator into the socket. 8. Connect the adapter first to the vaporizing unit, then to the network. 9. Connect the suction house ⑦ to the adjuster head ④according to the figure. 7 11. Insert the adjuster head ④ to the tube leading the aerosol in ⑤. At the inserting pay attention to that the little protruding part on the adjuster head ④ should enter in one of the cuts on the side of the tube leading the aerosol in ⑤. 12. Place the hood on the baby so that the openable part should be into the direction of its body. 13. Posture the tube leading the aerosol in 4 so that its end should be approximately 5 centimetres far from the baby’s nose, mouth. 14. Insert the suction house’s other end into the opening of the vaporizer device. 15. By pressing the pushbutton of the vaporizer device you can start the treatment. Pressing the pushbutton again for a short time the vaporization will stop. The vaporization automatically stops also after 10 minutes are over. If the liquid to be vaporized is not consumed, or you would like to continue the treatment after filling it up again, the vaporization can started again by pressing the pushbutton repeated for a short time. 8 Important information and warnings relating to the use of the device ¾ ¾ ¾ ¾ ¾ Only by the doctor recommended medicine, and only in the prescribed dilution can be vaporized. The device contains small sized components too. At dissembling keep them on such places, where the baby could not reach it. The vaporizing unit and the hood should be cleaned after each use. The cleaning process can be found in the Section V (page 11). (Occasionally you can leave the unused medicine in the device until tthe next use this does not damage the device.) If the level of the interference liquid in the vaporizing unit drops so much that the vaporizing membrane of the vaporizing insertion already doesn’t reach into it, the interference liquid has to be refilled. Refilling has to be made as it is written in Chapter IV (page 9). During the use the vaporizing insertion becomes worn due to the ultrasonic effect (small cracks appear in the material of the vaporizing membrane in the form of white discolouration on the surface of the membrane). This causes the reduction of the vaporizing performance in this case the vaporizing insertion has to be replaced. Replacement must be made as written in the Chapter IV (page 8). Do not operate the device with removed cap, because the device splashes the medication and the ultrasound – if you touch into the fluid – can cause painful injury. D O N O T O P E R A T E T H E D E V I C E W ITH BROKEN OR DAMA G ED COVER! If there would be any problem in connection with using the device, before turning to the service, look as written in the Chapter IX (page 15). 9 IV. REFILLING OF THE INTERFERENCE LIQUID, REPLACEMENT OF THE VAPORIZING INSERTION If the vaporizing insertion becomes worn during use due to the ultrasonic effect (white discolouration can be seen on the rubbery membrane surface of the vaporizer), or the interference liquid’s level in the vaporizing unit so much that the vaporizing insertion made from silicone rubbery doesn’t reach into it, the device has to be disassembled, and the vaporizing insertion has to be replaced, and the interference liquid has to be refilled. The replacement and the refill have to be done in the following way: 1. Insert the blank attached to the device into the slots on the inner side of the fixing ring of the vaporizing insertion. 2. Screw out the ring anticlockwise. 3. If the fixing ring has not lifted out the vaporizing insertion, remove it from its place. 4. Pour out the fluid, which can be found even there. 5. If it is needed clean the inner surface of the tank. Do the cleaning with a wet or alcoholic cloth, do not use any other agent! 10 6. Fill up the tank with 25 ml distilled water. For the refilling it is recommended to use a syringe. Attention! Do not use a needle in the syringe during refilingl to avoid damages to the vaporizing insertion! Be careful not to touch the golden surfaced ceramic with a hard object! 7. Replace the vaporizing insertion. If the old one is worn, replace it with a new one. 8. Screw back the fixing ring, and tighten it with the attached blank. ATTENTION! The lifetime of the vaporizing insertion is significantly reduced, if the device is run empty, without fluid to be vaporized. So if the flui, medicined to be vaporized, i is out, do not use the device further! It is recommended to perform the sterilization process written in the Chapter V (page 12) during the replacement of the vaporizing insertion and the refill ing of the interference liquid. The replacement of the worn vaporizing insertion is provided by the manufacturer. See our availability on the back cover. 11 V. CLEANING AND DISINFECTION THE CLEANING AND DISINFECTION OF THE DEVICE IS EXCLUSIVELY ALLOWED TO BE PERFORMED IN A STAGE IF IT IS DISCONNECTED, ANNEALED FROM THE MAINS POWER! Cleaning (After every use) ¾ ¾ ¾ ¾ ¾ ¾ Flip the ventilator from the cap before you start the cleaning. Pour out the fluid, which remained in the device as you take off the cap. Rinse the vaporizing insertion with clean water. Wash the plastic components with running water. Do the cleaning of the ventilator and the hood only with wet cloth. Placing the cleaned device and its accessories onto clean surface dry them on air. Wash the air filter of the ventilator (if it is needed) occasionally with running water. The filter should be replaced only after it is completely dried. Change the worn or damaged filter. (Is available at the manufacturer.) A blocked filter reduces the air transport! Do not use other agents (petrol, solvent etc) for the cleaning! Take care that no water should get into connectors of vaporizing unit, and into the ventilator! DURING THE CLEANING AND THE DISINFECTION, TAKE CARE NOT TO TOUCH THE RUBBERY MEMBRANE WITH A SHARP OJECT, BECAUSE THAT COULD CAUSE THE DAMAGE OF THE MEMBRANE! 12 Disinfecting (as occasion requires) Before the first use, or after a long storage, and to avoid re-contamination, the device has to be disinfected occasionally. The way of the disinfecting: Make an antiseptic solution from any cold antiseptic (eg. BARRYCIDAL 22) available at a pharmacy –on the way prescribed for the agent-. ¾ Clean up the external surface of the vaporizer unit and the hood and the ventilator with a disinfectant, after it clean it with clear water wetted cloth. ¾ Fill up the vaporizing membrane of the vaporizing unit with the solution, and soak it for the agent’s prescribed contact time. ¾ Finishing the disinfection from the vaporizing insertion flush out extensively the antiseptic liquid with clear water. ¾ Soak also the plastic and rubbery components into the antiseptic solution for the agent’s prescribed contact time. ¾ The disinfected components have to be also flushed extensively with running water. ¾ Do over the network adapter (if is needed) occasionally with an antiseptic, mildly wet tissue. Dry the so disinfected device and its accessories –placing them onto clear surface – on air. ¾ ¾ ¾ During the disinfection, take care not to let any water into the connectors of the vaporizing unit, and the ventilator! If water would get into the adapter during the cleaning or the disinfection (for example if it fell into water by accident), you should not try to dry out the device, but send it promptly to the service. The device could be in that case damaged, or could cause an electric shock. You MUSTN’T attach it again to the network! 13 VI. MAIN TECHNICAL DATAS Voltage: Performance: Adaptor: Vaporizing frequency: UP-02, UP02 B UP-02C Particle size: UP-02, UP-02B UP-02C Filling amount: 24 V DC 14 W input: 100-240V AC 50/60 Hz 0,45A max output: 24V DC 750 mA 2,4 MHz Vaporizing output (measured with distilled water, minimum) UP-02: UP-02B, UP-02C, 1 ml/min Operating time/pause: 30/30 perc Weight vaporizing unit: 151 g adapter: 110 g Brutto: 261 g Size: 110 x 50 x50mm ° Storage temperature: 0 - +35 C 5 µ MMD 10 ml Do not store the device permanently at temperatures under 0 C°, because the distilled water in the vaporizer freezes, and this makes the device temporarily unserviceable! The data, guidelines referring to the device’s electromagnetic immunity, output of the jam, and the recommended protecting distances and the manufacturer’s statements can be found on the website of the SANASOL Ltd. (www.sanasol.hu) among the downloads. Manufacturer: SANASOL Kft. u.13. H-8900 Zalaegerszeg, HUNGARY : +36 92-511-381 Fax: +36 92-511-382 Skype: sanasol2 web: www.sanasol.hu E-mail: [email protected] Wlassics Gyula 14 VII. CONTENT OF THE PACKAGE 1. Vaporizing unit 2. Network adapter * 3. Ventilator 4. Hood 5. Cardboard box 6. User’s Manual * Manufacturer of the adapter: GlobTek Inc. 15 IX. WHAT SHOULD I IF... Failure symptom Cause of the To do failure The pushbutton There is Check the presence of the interference liquid (distilled water) . Refill it if it is is flickering after interference needed (Chapter IV, pages 9 and 10). it was connected liquid below the to the network vaporizing insertion Cracked ceramic If you can find the interference liquid, in that case the device is damaged, and can only repaired in a special service. The vaporizing The vaporizing Check if you can see white discoloration on the vaporizing insertion’s bottom, output of the insertion is worn on the vaporizing membrane. If yes, replace the vaporizing insertion. (Chapter device has IV, pages 9 and 10) decreased The ceramic is If the replacement of the vaporizing insert had not solved the problem, most worn likely the replacement of the ceramic is required. Turn to the service. The device vaporizes, but the ventilator does not rotate The device vaporizes, but the fan does not blow out the aerosol. The ventilator is not connected Water got into the ventilator Other defects Water entered in the air inlet ports of the vaporizing lid Check if the connecting plug of the ventilator is pushed into the vaporizing unit to the stop into the vaporizing unit. Disconnect the fan, remove the fan, and let it dry (1 day). Try again after the fan gets dry. Contact the service. Disconnect the fan, remove the fan, and remove the liquid from the air inlet ports by blowing them out. 16 X. SYMBOLS USED ON THE DEVICE WARNING! Read the Instruction Manual, and comply with those written in it! B-type device II. Class of protection against indirect contact (dual insulation) Manufacturer 17 Declaration of conformity Manufacturer: Address: Product typ: SANASOL SANASOL Meditechnika Kft. Wlassics Gy. 13, H-8900 Zalaegerszeg, HUNGARY Phone: +36 92 511 381 Fax: +36 92 511 382 e-mail: [email protected] web: www.sanasol.hu UP-02D Ultrasonic nebulizer Serial number: Class: II.a (according to the Rule 11 of Annex IX of 93/42/ECC Directive) We herewith declare on our sole responsibility that above product complies with the requirements of EC Directive 93/42/EEC. Applied standards: Notified body: Certificate No: Certificate date: Date of Issue: For applies standards, please refer to Chapter IV. Construction File. TÜV Rheinland Product Safety GmbH Am Grauen Stein, 51105 Köln (Notified Body No. 0197) DD 60022053 0001 28. Aug. 2008. 01. Sept. 2008. Issued by: Managing Director Gabor Nemeth of the Technical 18 GUARANTEE A period of 1 year for the unit after the date of purchase the proper construction, workmanship and materials of this product is guaranteed by SANASOL. During this period of guarantee SANASOL will, without charge for labour or parts, repair or replace the defect product or its defective parts. The guarantee does not cover any of the following: o Transport costs and risk of transport. o Costs for repairs and/or defects resulting from repairs done by unauthorised persons. Should guarantee service be required please apply to the retailer whom the product was purchased from for an authorised SANASOL distributor. For the address refer to the product packaging/attached literature or to your specialised retailer. If you have difficulties in finding SANASOL Kft., contact us for information.* o Periodic check-ups, maintenance and repair. o Failure or wear of accessories or attachments other than the main device itself, unless explicitly guaranteed above. o Costs resulting from non-acceptance of a claim. o Damages of any kind including personal caused accidentally or from misuse. Repair or replacement under the guarantee does not give rise to any extension or renewal of the guarantee period. The guarantee will be granted only if the complete product is returned together with the guarantee card and the original invoice/cash ticket issued to the consumer by the retailer and customer. The guarantee card must be completed in full and SANASOL reserves the right to refuse guarantee service if any unclear information has been given. SANASOL Kft. becomes the owner of all exchanged parts or units. *SANASOL Kft. Wlassics Gy. 13., H-8900 Zalaegerszeg, Hungary Phone: (92) 511-381 Fax: (92) 511-382 E-mail: [email protected] 19 GUARANTEE DOCUMENT Product name: ULTRASONIC MEDICINE NEBULIZER Type: UP-02D Product serial number: Manufacturer: SANASOL Kft. Wlassics Gy u. 13. 8900. Zalaegerszeg, HUNGARY Date of purchase: ……..day ……………….month ……... year ________________________ signature _________________________ stamp of retailer SERVICE: SANASOL Kft.., 8900. Zalaegerszeg, Wlassics Gy u. 13. HUNGARY : +36 92-511-381 Fax: +36 92-511-382 E-mail: [email protected] Skype: sanasol2