1
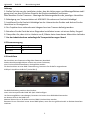
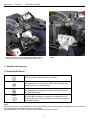
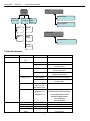
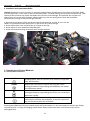
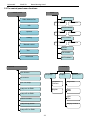
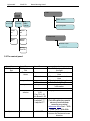
Bedienungsanleitung
Deutsch Seite: 1-15
User Manual
English Page: 16-30
Shaft 5R
Beam Moving Head
Art.: LIG0010525-000 Shaft 5R
Art.: LIG0010000-000 Shaft 5R Touring Pack
Art.: LIG0010510-000 Shaft 5R + Single Case
Sehr geehrter Kunde,
vielen Dank, dass Sie sich für ein Produkt von LightmaXX entschieden haben.
In der folgenden Anleitung erhalten Sie wichtige Informationen über dieses Produkt, sowie deren
Eigenschaften und Funktionen.
Dear Customer,
Thank you for purchasing our product from LightmaXX.
To fully enjoy the benefits of this product,
Please read and understand the important information and instructions
Included in this manual.
LightmaXX
Shaft 5R
Beam Moving Head
______
Inhaltsverzeichnis
1. Produkt-Einleitung
Seite 2
2. Sicherheitshinweise
Seite 3
3. Zubehör
Seite 4
4. Informationen zur Installation
Seite 4-5
4.1 Montage und Befestigung
Seite 4
4.2 Stromversorgung
Seite 5
4.3 Anschlüsse
Seite 5
4.4 Informationen zum Leuchtmittel
Seite 6-7
5. Betrieb und Steuerung
Seite 7
5.1 Bedienfeld & Menü
Seite 7
5.2 Menüstruktur
Seite 8-9
5.3 Menüfunktionen
Seite 9-10
6. DMX Kanal Tabelle
Seite 11
6.1 DMX Kanal Tabelle Fortsetzung 1
Seite 12
6.2 DMX Kanal Tabelle Fortsetzung 2
Seite 13
7. Wartungshinweise
Seite 14
8. Technische Daten
Seite 14
9. Fehlerbehebung
Seite 15
1
LightmaXX
Shaft 5R
Beam Moving Head
______
Sehr geehrter Kunde,
vielen Dank, dass Sie sich für ein Produkt von LightmaXX entschieden haben.
Um den sicheren Umgang des Produkts zu gewährleisten, lesen Sie bitte vor Inbetriebnahme
aufmerksam die Betriebsanleitung.
Wir wünschen Ihnen viel Spaß und viele erfolgreiche Veranstaltungen
mit ihrem neuen Shaft 5R Beam Moving Head.
1. Produkt-Einleitung
Vielen Dank, für die Wahl des Shaft 5R Beam Moving Head.
Dieses Gerät ist die neueste Entwicklung aus dem Hause LightmaXX
und zählt zu den fortschrittlichsten und hellsten Beam Lights in dieser Klasse.
Das formschöne Industrie Design und das äußerst stabile und tourtaugliche Gehäuse
machen ihn zum optimalen Begleiter für alle professionellen Einsatzbereiche,
wie z.B: Fernsehproduktionen, Veranstaltungen und Discotheken.
DMX Kanäle: 17 DMX Kanäle nach internationalem DMX512 Standard
Bewegung: Wide & ultra-high-speed smooth Scan Motoren
mit Horizontal Scan 540 °, Vertikal-Scan 270 °, in voller 16-Bit-Auflösung.
Dadurch wird eine saubere und präzise Positionierung gewährleistet,
die Bewegungsgeschwindigkeit ist über einen separaten DMX Kanal einstellbar.
Farbrad: 14 Farben + offen - weiß, mit Colorflow-Effekt in beide Richtungen
Goborad: 17 Gobos + offen - Spot
Shutter mechanisch, Blitzfrequenz: 1-13Hz/Sek., Random Strobe
Dimmer: mechanisch 0% bis 100% linear
Zoom: 0° - 4° für ultra scharfe Projektion und gewaltige Beams
Prisma: 8-fach Prisma mit Rotation in beide Richtungen + Prisma Zoom
Fokussierung: Elektronischer Fokus, Advanced Micro Devices
für eine reibungslose Anpassung der Brennweite
LCD-Display & Menü mit vielen professionellen Features und einfacher Bedienung
Anschlüsse: XLR 3 pol. DMX IN & OUT, 230V Neutrik PowerCon
Montage: 2x Camlock Bügel nach Industriestandard
Leuchtmittel: Philips MSD Platinum 5R,
elektronischer Ballast, schnelle Zündung des Brenners, flickerfrei
Beleuchtungsstärke: 58700 Lux @ 20m
2
LightmaXX
Shaft 5R
Beam Moving Head
______
2. Sicherheitshinweise
• Installation
Stellen Sie sicher, dass alle Teile für die Befestigung des Geräts
in einem guten Zustand sind.
Stellen Sie sicher, dass die Transportsicherung für PAN und TILT
vor der Inbetriebnahme gelöst ist.
Das Safety Stahlseil muss ordnungsgemäß mit dem Rahmen verbunden werden, sodass
die primäre Fallhöhe des Gerätes so gering wie möglich ist.
• Mindestabstand zu Objekten
Das Gerät muss so positioniert werden, dass die Gegenstände, die durch den Lichtstrahl
getroffen werden, mindestens 12 Meter entfernt vom Objektiv des Moving Head sind.
• Mindestabstand zu entflammbaren Materialien
Der Moving Head muss so positioniert werden, dass entzündbare Materialien
mindestens 0,50m von jedem Punkt von der Oberfläche des Geräts entfernt sind.
• Montageflächen
Es ist zulässig, die Montage auf normal entflammbaren Oberflächen durchzuführen.
T a 40℃
IP20
Tc100℃
• Die maximale Umgebungstemperatur
Betreiben Sie das Gerät nicht bei Umgebungstemperaturen über 40 ° C
• Schutzklasse IP20
Das Gerät ist gegen das Eindringen von festen Fremdkörpern über 12 mm im
Durchmesser (erste Kennziffer 2) geschützt, nicht aber gegen Tropfwasser, Regen,
Spritzwasser oder Wasserstrahlen (zweite Ziffer 0)
• Schutz gegen elektrischen Schlag
Der Anschluss muss an eine Stromversorgung mit einer leistungsfähigen Erdung (Gerät
der Klasse I gemäß der Norm EN 60598-1) erfolgen.
Es wird außerdem empfohlen, die Zuleitungen der Projektoren vor indirekten Kontakten
und Kurzschlüssen mit einer korrekt bemessenen Fehlerstrom-Schutzeinrichtung zu
schützen.
• Anschluss an das Stromnetz
Der Anschluss an das Stromnetz muss von eine Fachmann
wie z.B. einem Elektroinstallateur durchgeführt werden.
Prüfen Sie, ob die Netzfrequenz und Spannung für das Gerät ausgelegt ist. Auf dem
Typenschild finden sie die entsprechenden Angaben dazu.
Dieses Schild gibt auch die Eingangsleistung an, bitte berechnen Sie die maximal
zulässige Belastung um Überlastungen ihres Stromnetzes zu vermeiden.
• Temperatur der Außenfläche
Die maximale Temperatur, die an der äußeren Oberfläche der Armatur erreicht wird, liegt
in einem thermisch stabilen Zustand bei 100 ° C.
• Wartung
Vor Beginn von Wartungs- oder Reinigungsarbeiten am Projektor, trennen Sie Das Gerät
unbedingt vom Stromnetz.
Man sollte den Moving Head nicht direkt nach dem Abschalten öffnen. Warten sie damit
mindestens 35 Minuten. Nach dieser Zeit ist das Gerät abgekühlt und die
Wahrscheinlichkeit, dass die Lampe explodiert ist praktisch null.
Das Gerät wurde so konzipiert, dass Splitter bei einem eventuellen Bersten der Lampe
zurückgehalten werden. Alle Linsen müssen intakt sein! Wenn sichtbare Beschädigungen
vorliegen, ersetzen Sie diese durch Originalersatzteile.
• Lampe
Der Lampensockel / -Halterung trägt eine Entladungs-Lampe, die eine externe
Zündeinheit verlangt. Diese Zündeinheit ist in das Gerät eingebaut.
Lesen Sie die "Betriebsanleitung" des Lampen Herstellers.
Ersetzen Sie das Leuchtmittel, wenn die angegebene Lebensdauer erreicht ist, wenn das
Leuchtmittel beschädigt ist, oder wenn es von der Hitze verformt wurde.
Die genannten Bezeichnungen in diesem Handbuch entsprechen den Richtlinien der EG
Europäischen Gemeinschaft
• Niederspannungsrichtlinie 2006/95/EG
• Elektromagnetische Verträglichkeit 2004 / 108/CE
3
LightmaXX
Shaft 5R
Beam Moving Head
3. Zubehör
1x Bedienungsanleitung
2x Camlock Montagebügel
1x Powercon Netzkabel
1x DMX Kabel
1x Leuchtmittel (bereits vorinstalliert)
4. Informationen zur Installation
4.1 Montage und Befestigung
Verriegeln Sie den Transportschutz für die X-und Y-Achse (PAN & TILT) in einer Stellung,
um die Installation zu erleichtern. (siehe Bild 1 & 2)
Das Gerät kann auf dem Boden, oder an einer anderen geeigneten Stellfläche platziert werden.
Für die Installation an Traversen, Wänden und Decken, benutzen Sie bitte
die beiliegenden Camlock Haltebügel und verwenden Sie als Fallschutz ein
Safety Stahlseil. (siehe Bild 3 & 4)
Bild 1
Bild 3
Bild 2
Bild 4
4
LightmaXX
Shaft 5R
Beam Moving Head
______
Achtung:
1. Stellen Sie bitte vor der Installation sicher, dass die Halterungen und Montageflächen stabil
genug sind, um dem 10-fachen Gewicht des Geräts standhalten zu können.
Bitte beachten Sie bei Traversen - Montage die Belastungstabellen des jeweiligen Herstellers.
2. Befestigung von Traversenhaken mit M10-M12 Schrauben am Camlock-Haltebügel
3. Installieren Sie die Camlock Haltebügel an der Unterseite des Gerätes und drehen Sie den
Verschluss im Uhrzeigersinn.
4. Der Projektor kann stehend sowie hängend an einer Traverse befestigt werden.
5. Betreiben Sie das Gerät bei einer fliegenden Installation immer mit einem Safety Fangseil.
6. Überprüfen Sie, dass sich im Umkreis von 0,5 Meter keine brennbaren Materialien befinden
7. Vor der Inbetriebnahme unbedingt die Transportsicherungen lösen!
4.2 Stromversorgung
Spannung
200-250V
100-120V
Sicherung
5A
7A
4.3 Anschlüsse
Der Anschluss ans Stromnetz erfolgt über Powercon Netzkabel.
Andere Anschlussmöglichkeiten müssen von einem Fachmann,
wie z.B. einem Elektroinstallateur, durchgeführt werden.
Für den Anschluss an eine DMX Lichtsteuerung, benutzen Sie die dafür vorgesehenen
XLR 3pol. Anschlüsse IN & OUT. (siehe Bild 5)
Bild 5
Die DMX Verbindung zwischen den Geräten
muss mit einem passenden DMX XLR 3pol. Kabel erfolgen.
Um Steuerungsfehlern vorzubeugen, benutzen sie immer einen DMX Abschlussstecker
am letzten Gerät in der DMX Linie.
Maximal können bis zu 30 Geräte an einer DMX Linie betrieben werden.
Benutzen Sie zur Sicherheit immer einen DMX Splitter, wenn Sie eine größere Anzahl an Geräten betreiben
möchten.
5
LightmaXX
Shaft 5R
Beam Moving Head
4.4 Informationen zum Leuchtmittel
1. Passende Leuchtmittel
Philips MSD Platinum 5R
OSRAM SIRIUS HRI 190W VSE 60
Achtung!
Die Installation anderer Arten von Leuchtmitteln kann zu potentiellen Sicherheitsrisiken und Materialschäden
führen. Um das Risiko von Schäden am Gerät zu minimieren, wechseln Sie das Leuchtmittel, wenn die
angegebene Lebensdauer erreicht ist.
2. Installation und Leuchtmitteltausch
Achtung! Behandeln Sie das Leuchtmittel beim Wechsel mit Sorgfalt. Berühren Sie keinesfalls die Oberfläche
des Kolbens oder des Reflektors .Das Leuchtmittel muss sauber gehalten werden! Liegt eine Verschmutzung
vor, reinigen Sie es mit dem Leuchtmittel beiliegendem Reinigungstuch. Die Kontakte und das Anschlusskabel
müssen fest sitzen. Ein schlechter Kontakt des Terminals kann dafür sorgen, dass das Leuchtmittel nicht
funktioniert, oder Schäden verursacht. Achten Sie beim Einbau des Leuchtmittels darauf, dass nichts die
beiden Lüfter blockiert.
1. Trennen Sie das Gerät vom Netz und lassen es danach ca. 35min. abkühlen.
2. Zur Vereinfachung des Lampentauschs, benutzen sie die Transportsicherung für PAN & TILT.
2. Lösen Sie die vier Schrauben an der Kopfeinheit. (Bild 6)
3. Lösen Sie die beiden Schrauben an der Lüfterhalterung und heben den Lüfter ab. (Bild 7)
4. Lockern sie ggf. die Brenner-Positionierungsschraube (Bild 8 Inbusschraube mit Drehwelle)
5. Drücken sie das Leuchtmittel nach unten in Richtung der Haltefedern und kippen es nach hinten (Bild 8&9)
6. Jetzt können sie das Leuchtmittel schräg nach oben aus der Halterung ziehen. (Bild 9)
7. Ziehen Sie die Kabel an den beiden Kontakten der Lampe ab.
8. Achten sie auf festen Sitz der Anschlusskabel bei ihrem neuen Leuchtmittel.
Bild 6
Bild 7
6
LightmaXX
Shaft 5R
Beam Moving Head
______
Bild 8 (links neben dem Leuchtmittel finden sie die
Inbusschraube zur Positionierung des Brenners)
Bild 9
5. Betrieb und Steuerung
5.1 Bedienfeld & Menü
SELECT
DOWN
UP
ENTER
Im Einstellungsmenü: Zurück zum vorherigen Menüebene
ohne Veränderung (Beenden der Funktion).
Reduzieren eines Werts oder Springen zum nächsten Punkt.
Bei Einstellung von Parametern, halten Sie die DOWN Taste
gedrückt für den Schnelldurchlauf
Erhöhen eines Wertes oder Springen zum vorherigen Punkt.
Bei Einstellung von Parametern, Halten Sie die UP Taste für
den Schnelldurchlauf.
Bestätigung um in weitere Menüebenen zu kommen. Um
Einstellungen und Werte zu speichern. Bestätigen Sie Ihre
Einstellungen nicht mit der ENTER Taste, dann werden diese
nicht übernommen.
Info !
Durch Drücken der Taste DOWN und UP Tasten gleichzeitig, während das Display im Ruhezustand ist erreichen
die Anzeige Umkehr-Funktion (Display Invertierung)
Bitte beachten Sie, dass die S und E Funktionstaste dann vertauscht sind.
7
LightmaXX
Shaft 5R
Beam Moving Head
______
5.2 Menüstruktur
2 Info
1 Press E into
Powerontimes
DMX Address Set
Poweron time
Clear time
Info
Lampoontimes
Options
Lamp on time
Clear time
Setting
Lamp strikes
Manual control
Lamp strike
Reset strikes
System
version
Test
Fan monitor
Advanced
InfoFeedback
3 Options
4 Setting
Pan Inverse
Tilt Inverse
Language
Display
Factory set
Pan Tilt Swap
Lamp on via DMX
Lamp off via DMX
Simplified
Chinese
Brightness
English
Light
Mode
Reset via DMX
Light
Time
Lamp on by powon
Display Inverse
Lamp off if no DMX
8
LightmaXX
Shaft 5R
Beam Moving Head
______
5manua
l control
6 Test
DMX values
Lamp
on or off
Reset
Functio
n
Lamp
on
Adj
DMX
values
Run program
Reset
all
7 Advanced
Lamp
off
Reset
Effect
Access code
____
Reset
Pan/Tilt
5.3 Menüfunktionen
Ebene 1
DMX Address Set
Info
Ebene 1
DMX address
Set
Power on times
Lamp on times
Ebene 3
Beschreibung
Einstellen der DMX Adresse
Power on times
Clear times
Betriebsstundenzähler
Betriebsstundenzähler
zurücksetzen
Betriebsstundenzähler
des Leuchtmittels
Betriebsstundenzähler der
Lampe zurücksetzen
Zähler für Lampenzündungen
Zähler für Lampenzündungen
zurücksetzen
Softwareversion Information
Lamp on times
Clear time
Lamp strikes
Lamp strike
Reset strikes
System version
Disp Board 1.50
Pan Tilt 1.50
8ch Board 1.50
Fan Speed (RPM)
Lamp fan 1 ****
Lamp fan 2****
Fan Monitor
Options
Pan Inverse
Tilt Inverse
Pan Tilt Swap
Lamp on via
DMX
ON/OFF
ON/OFF
ON/OFF
ON /OFF
9
Lüftergeschwindigkeiten 1&2
(Gerät abschalten wenn die Anzeige
von den Referenzwerten stark
abweichen) Referenzwerte:
Fan1: 4500-5500r
Fan2: 3200-4000r
PAN Bewegung invertieren
TILT Bewegung invertieren
Tauschen den P/T Kanäle
Lamp ON Befehl per DMX
ermöglichen
LightmaXX
Options
Shaft 5R
Beam Moving Head
Lamp off via
DMX
Reset via DMX
ON /OFF
Lamp on by
Power on
Lamp off if no
DMX
Setting
ON/OFF
______
ON /OFF
ON/OFF
Language
Display
Factory reset
Manual control
Lamp on or off
Reset function
Test
Advanced
Adj DMX value
Display DMX
value
Run Program
Access Code
____
10
LAMP OFF Befehl per DMX
ermöglichen
Resetfunktion per DMX
ermöglichen
LAMP ON Befehl wenn das
Gerät eingeschatet wird
LAMP OFF Befehl bei fehlenden
DMX Signal
Menüsprache wählen
Displayhelligkeit
5-100%
Displaybeleuchtung
AN / AUS
Displaybeleuchtungsdauer
5-60 sek.
Display invertieren
Zurücksetzten auf
Werkseinstellung
Manuelle Lampensteuerung
AN / AUS
Zurücksetzen alle Funktionen
Reset für Gobo- & Farbrad,
Shutter, Prisma, Frost
Reset für PAN /TILT
Positionierung
Keine Funktion
Anzeige der aktuell
anliegenden DMX Werte
Keine Funktion
Motorkalibrierung
Dieser Bereich ist nur für
Fachpersonal gedacht.
LightmaXX
Shaft 5R
Beam Moving Head
______
6. DMX Kanal Tabelle
CH1
color wheel
CH2 strobe
CH3 Dimmer
DMX value
Effects
Attribute
128——255
Clockwise rotate color wheel Slow ->Fast
Linearity
124
Blue +White
Single step
120
Blue
Single step
116
CTB8000+Blue
Single step
111
CTB8000
Single step
107
CTO190+CTB8000
Single step
103
CTO190
Single step
99
CTO260+ CTO190
Single step
94
CTO260
Single step
90
Blue-green + CTO260
Single step
86
Blue-green
Single step
82
Purple +Blue-green
Single step
77
Purple
Single step
73
Yellow +Purple
Single step
69
Yellow
Single step
64
Pink +Yellow
Single step
60
Pink
Single step
56
Lavender +Pink
Single step
52
Lavender
Single step
47
Bright green +Lavender
Single step
43
Bright green
Single step
39
Green +Bright green
Single step
35
Green
Single step
30
Blue-green +Green
Single step
26
Blue-green
Single step
22
Orange +Blue–green
Single step
18
Orange
Single step
13
Red +Orange
Single step
9
Red
Single step
5
White +Red
Single step
0
White
Single step
DMX VALUE
Effect
attribute
250-255
Turn on
Single step
240-249
Random strobe , fast – slow
Single step
230-239
Random strobe , medium speed
Single step
220-229
Random strobe , slow speed
Single step
210-219
Effect 2
Single step
200-209
Effect 1
Single step
192-199
Turn on
Single step
167-191
Strobe (quick close) fast->slow
Linear
161-166
Turn on
Single step
136-160
Strobe (quick start) fast->slow
Linear
128-135
Turn on
Single step
72-127
Symmetry strobe slow->fast
Linear
64-71
Turn on
Single step
8-63
Strobe slow->fast
Linear
2-7
Turn on
Single step
1-0
Turn off
Single step
DMX value
Effect
Attribute
0—255
↑Rays bright ->dim
Linearity
11
LightmaXX
Shaft 5R
Beam Moving Head
______
CH4 Fixed Gobo
DMX Value
250—255
249—244
237—243
231—236
224—230
218—223
212—217
205—211
199—204
192—198
186—191
180—185
173—179
167—172
160—166
118—159
114-117
72—113
68-71
64-67
60-63
56-59
52-55
48-51
44-47
40-43
36-39
32-35
28-31
24-27
20-23
16-19
12-15
8-11
4-7
0-3
Effect
Gobo 16 shake Slow ->Fast
Gobo 15 shake Slow ->Fast
Gobo 14 shake Slow ->Fast
Gobo 13 shake Slow ->Fast
Gobo 12 shake Slow ->Fast
Gobo 11 shake Slow ->Fast
Gobo 10 shake Slow ->Fast
Gobo 9 shake Slow ->Fast
Gobo 8 shake Slow ->Fast
Gobo 7 shake Slow ->Fast
Gobo 6 shake Slow ->Fast
Gobo 5 shake Slow ->Fast
Gobo 4 shake Slow ->Fast
Gobo 3 shake Slow ->Fast
Gobo 2 shake Slow ->Fast
Gobo clockwise rotate Slow ->Fast
Stop
Gobo anticlockwise rotate Slow ->Fast
Gobo17
Gobo16
Gobo15
Gobo14
Gobo13
Gobo13
Gobo11
Gobo10
Gobo9
Gobo8
Gobo7
Gobo6
Gobo5
Gobo4
Gobo3
Gobo2
Gobo 1
White Open
Attribute
Linearity
Linearity
Linearity
Linearity
Linearity
Linearity
Linearity
Linearity
Linearity
Linearity
Linearity
Linearity
Linearity
Linearity
Linearity
Linearity
Single-step
Linearity
Single-step
Single-step
Single-step
Single-step
Single-step
Single-step
Single-step
Single-step
Single-step
Single-step
Single-step
Single-step
Single-step
Single-step
Single-step
Single-step
Single-step
Single-step
CH5 Prism load
DMX Value
128—255
0—127
Effect
ON
OFF
Attribute
Single-step
Single-step
12
LightmaXX
Shaft 5R
CH6 Prism Rotation
CH7 Prism Effect
Movement
CH8 Atomization
Frost Effect
CH9 ZOOM
Beam Moving Head
______
DMX Value
Effect
Attribute
193—255
191—192
128—190
0—127
DMX Value
Clockwise Rotation, Slow ->Fast
Stop
Anticlockwise ,Rotation, Fast->Slow
0°->540°
Effect
Linearity
Single-step
Linearity
Linearity
Attribute
0—255
DMX Value
Near - wide
Effect
Linearity
Attribute
0—255
DMX Value
Atomization white ->full
Effect
Linearity
Attribute
0-255
ZOOM near->far
Linearity
Explanation :CH10 Each unit adjust angle 2.12°
CH10 X axle PAN
movement
DMX value
CH11 X axle PAN fine
adjustment
DMX Value
Effect
Attribute
0—255
X axle Micro rotation 0°—2.12°
Linearity
CH12 Y axle TILT
Movement
DMX Value
0—255
Effect
X axle movement
Attribute
0°—540°
Linearity
Explanation :CH11 Each unit adjust angle 0.008°
Explanation :CH11 Each unit adjust angle 0.98°
0—255
Effect
Y axle rotation
Attribute
0°—540
Linearity
Explanation :CH13 Each unit adjust angle 0.004°
CH13 Y axle fine TILT
adjustment
DMX value
Effect
Attribute
0—255
Y axle fine tuning 0°—0.98°
Linearity
CH 14 macro function
DMX value
Effect
Attribute
0-255
Unused
Attribute
CH15 Reset
DMX value
Effect
Attribute
The complete machine reset
XY axles reset
Effective parts reset (color 、Gobo 、Lens, etc. )
Free
Effect
single step delay 5seconds
single step delay 5seconds
single step delay 5seconds
CH16 Bulb switch
128—255
77—127
26—76
0—25
DMX value
101—255
26—100
0—25
Turn on
Turn off
Free
single step delay 5seconds
single step delay 5seconds
DMX value
Effect
Attribute
251-255
1-250
0
The Fastest
Speed Linear reduction
The Fastest
Linearity
Linearity
Linearity
CH17 The speed of XY
axle
13
Attribute
LightmaXX
Shaft 5R
Beam Moving Head
______
7. Wartung
Es wird empfohlen eine regelmäßige Wartung am Moving Head durchzuführen.
Die Lebensdauer des Geräts hängt zum Großteil von der Arbeitsumgebung und den Betriebsbedingungen ab.
Daher ist es sehr wichtig, dass Gerät regelmäßigen Wartungen zu unterziehen.
Achtung! Trennen sie das Gerät vom Stromnetz, bevor sie es öffnen.
Keine ätzenden oder alkoholhaltigen Reinigungsmittel verwenden.
Die Wartungsarbeiten am Gerät sollten von einem Fachmann durchgeführt werden.
Reinigungsschritte:
1. Schalten Sie die Stromversorgung ab, abkühlen lassen, den Deckel an der Kopfeinheit öffnen.
2. Staub mit Druckluft aus allen Bereichen entfernen, immer von innen nach außen arbeiten.
3. Entfernen Sie die Verschmutzungen mit einem Tuch und destilliertem Wasser.
4. Bei hartnäckiger Verschmutzung kann etwas Glasreiniger oder ein wenig Spülmittel beigemischt werden.
5. Reinigen Sie die Lüfter und Lüftungsschlitze an den Gehäuse schalen der Kopfeinheit.
Ein stark verschmutzter/ blockierter Lüfter kann dafür sorgen, dass die Temperatursicherung
eine automatische Abschaltung der Lampe bewirkt.
6. Entfernen Sie den Staub aus dem Lichtkanal, Objektiv, Reflektor, Konvexlinse etc.
Überprüfen Sie hierbei ob alles noch intakt und korrekt montiert ist.
Überprüfen Sie alle Anschlusskabel / Platinenstecker auf Festigkeit
7. Entfernen Sie alte Schmierstoffrückstände und ersetzten sie diese mit neuen,
sehr hitzebeständigem Schmierfett.
8. Reinigen Sie das Gerät von außen.
Bitte beachten Sie, dass beim Reinigen keine Feuchtigkeit in die Anschlüsse oder sonstigen Öffnungen
eintreten kann.
9. Führen Sie einen kompletten Funktionstest durch.
8. Technische Daten
• Leuchtmittel: Philips MSD Platinum 5R, Osram SIRIUS HRI 190W VSE 60
• Beleuchtungsstärke: 58700 Lux @ 20m
• DMX Kanäle: 17 nach internationalem Standard DMX-512
•PAN horizontaler Scanbereich: 540 ° (16bit) mit Automatik-Korrektur
• Tilt vertikaler Scanbereich: 270 ° (16bit) mit Automatik - Korrektur
• HD LCD Display, vier Taster, invertierbar um 180 °
• Farbrad: 14 Farben + offen / weiß
• Goborad: 17 Gobos + offen / Spot
• Prisma: 8-fach Prisma mit beidseitiger Rotation,
• Prisma Effekt: Near – Wide Prisma Zoom
• Spezialfunktion: Frostfilter
• Dimmer: mechanisch von 0-100%
• Shutter: mechanisch, Blitzfrequenz: 1-13Hz/Sek., Random Strobe
• Zoom: 0-4°
• Stromversorgung: 100-240V, 50/60Hz
• Leistungsaufnahme: 230W
• IP Schutzart: IP20
• Vorschaltgerät: elektrisch EVG
• Nettogewicht: 18 kg inkl. Camlock Haltebügel
14
LightmaXX
Shaft 5R
Beam Moving Head
______
9. Fehlerbehebung
1. Leuchtmittel zündet nicht (kein Licht)
A. Das Leuchtmittel ist nach einem Neustart noch nicht komplett abgekühlt.
Warten Sie bitte 5-10 Minuten nach dem abschalten und starten sie das Gerät neu.
B. Die Innentemperatur übersteigt die üblichen Werte. Prüfen Sie, ob der Lüfter und Lüftungsschlitze
Durch etwas blockiert sind. Überprüfen sie den Lüfter auf Funktion und die Drehzahl.
C. Überprüfen Sie, ob das Leuchtmittel defekt ist, wenn ja, bitte erneuern.
D. Prüfen Sie die Anschlussleitungen am Leuchtmittel auf Wackelkontakte, Korrosion oder sonstige Schäden.
2. Die Intensität ist zu schwach
A. das Leuchtmittel wird demnächst oder hat bereits Ende seiner angegebenen Lebensdauer erreicht
B. Überprüfen Sie, ob alle optischen Teile sauber sind.
C. Führen Sie eine routinemäßige Wartung durch.
3. PAN / TILT Motoren funktioniert nicht
A. Überprüfen Sie, ob das Gerät korrekt am Stromnetz angeschlossen ist.
B. Überprüfen Sie die Sicherung in der Nähe der Powerconbuchse.
C. Überprüfen Sie, ob alle Motoranschlusskabel an Platine und Motor einen festen Sitz haben.
4. Keine oder falsche Reaktion mit DMX
A. Überprüfen sie Ihre Verkabelung,verwenden sie nur DMX XLR 3pol. Kabel,
verwenden sie einen DMX Abschlussstecker 120Ω,
B. Ist die richtige DMX Adresse eingestellt?
C. Die DMX Zuleitung ist zu lang, um das Signal stabil zu halten. Verwenden sie einen DMX Signalverstärker,
Bei mehr als 30 Geräten in einer DMX Linie können Störungen auftreten.
15
LightmaXX
Shaft 5R
Beam Moving Head
______
INSTRUCTION MANUAL
1. Product Introduction
Page 17
2. Safety Information
Page 18
3. Accessories
Page 19
4. Installation Information
Page 19
4.1 Equipment mounting bracket installation
Page 19
4.2 Device power
Page 20
4.3 Connectivity standard
Page 20
4.4 Light bulbs instructions and installation
Page 20-21
5. Operation and Control Methods
Page 21
5.1 Control panel instruction
Page 21
5.2 Control panel menu functions
Page 22-23
5.3 The control panel
Page 23-24
6. Function Table of DMX Control Channel
Page 25-27
7. Routine maintenance
Page 28
8. Technical parameters
Page 29
9. Common Malfunctions
Page 30
16
LightmaXX
Shaft 5R
Beam Moving Head
______
Dear Customer,
thank you for choosing a LightmaXX Product.
To assure a secure Use, please read the following instruction Manual before starting the device.
We wish you a lot of fun and successful Events with your brand new LightmaXX Shaft 5R Beam Moving Head.
1. Introduction
Thanks for choosing the LightmaXX Shaft 5R. This Moving Head is the latest development from LightmaXX and
counts to the most advanced and brightest Beam Lights in its class. The shapely Design of the Beam Light and
the tough, tour-ready Housing let him become a perfect companion for all professional ranges of use like TV
Productions, all kind of Events and Nightclubs.
Channel mode: 17 DMX 512 Channels (International Standard)
Scanning: Wide range and ultra-high-speed smooth scan engines, horizontal scan 540°, vertical scan 270°,
with 16 bit scanning accuracy, for smooth and precise positioning. The scanning speed is adjustable.
Color Wheel: 14 colors + white, rainbow effect, adaptive in two directions
Gobo Wheel: 17 fixed gobos + open, gobo shake and soft reset function
Mechanical Shutter: Strobe rate: 1-13 Hz/ Sec., random Strobe
Prism Wheel: Octuple (eightfold) Prism, adaptive in two directions + Prism Zoom
Dimming: 0% - 100% mechanical linear dimming
Focusing: motorized Zoom, advanced Micro Devices for smooth adjustment of focal distance
Atomization: 0% - 100% linear adjustment of atomization effect (Frost/ diffusion)
Easily operated LCD Display
Connection Points: XLR 3 Pole DMX IN & OUT, 230V Neutrik PowerCon for power supply
Fitting: 2x Camlock Mount, Industrial Standard
Lamp: Philips MSD Platinum 5R, electronic ballast, fast ignition of the Lamp, flickerfree
17
2. Safety Information
• Installation
Make sure all parts for fixing the projector are in a good state of repair.
Make sure the point of anchorage is stable before positioning the projector.
The safety chain must be properly hooked onto the fitting and secured to the framework,
so that, if the primary support system fails, the fitting falls as little as possible.
If the safety chain gets used, it needs to be replaced with a genuine spare.
• MINIMUM DISTANCE OF ILL UMINATED OBJECTS
The projector needs to be positioned so that the objects hit by the beam of light are at
least 12 meters (39’4”) from the lens of the projector.
• Minimum distance from flammable materials
The projector must be positioned so that any flammable materials are at least 0.50
meters (19, 7") from every point on the surface of the fitting.
• Mounting surfaces
It is permissible to mount the fitting on normally flammable surfaces.
T a 40℃
IP20
Tc100℃
• Maximum ambient temperature
Do not operate the fixture if the ambient temperature (Ta) exceeds 40° C (104° F).
• IP20 protection rating
The fitting is protected against penetration by solid bodies of over 12mm (0.47”)
in diameter (first digit 2), but not against dripping water, rain, splashes or jets of water
(second digit 0).
• Protection against electrical shock
Connection must be made to a power supply system fitted with efficient grounding (Class
I appliance according to standard EN 60598-1).
It is, moreover, recommended to protect the supply lines of the projectors from
indirect contact and/or shorting to earth by using appropriately sized residual current
devices.
• Connection to mains supply
Connection to the electricity mains must be carried out by a qualified electrician.
Check that the mains frequency and voltage correspond to those for which the projector
is designed as given on the electrical data label.
This label also gives the input power to which you need to refer to evaluate the
maximum number of fittings to connect to the electricity line, in order to avoid
overloading.
• Temperature of the external surface
The maximum temperature that can be reached on the external surface of the fitting, in
a thermally steady state, is 100°C (212°F).
• Maintenance
Before starting any maintenance or cleaning work, interrupt the power from the mains
supply.
To avoid getting burnt, do not remove any parts of the fitting for at least 35 minutes,
after switching off the device. After this time, the chance of an exploding Lamp is
improbable.
The fitting is designed, to hold in any splinters produced by an exploding Lamp. The
lenses must be in good condition. Visible damages have to be replaced with genuine
spares.
• Lamp
The Fitting mounts a high-pressure lamp, which needs an external igniter. This igniter is
fitted onto the device.
Please read the "operating instructions", which are provided by the lamp manufacturer,
carefully.
Replace the lamp immediately, if it’s damaged or deformed by heat.
All in this Manual mentioned Products are conform to the European Community
Directives to which they are subject:
• Low Voltage 2006/95/CE
• Electromagnetic Compatibility 2004/ 108/CE
18
LightmaXX
Shaft 5R
Beam Moving Head
______
3. Accessories
1x Manual
2x Camlock Mounting bracket
1x Signal line
1x Power Supply
1x Lamp (installed)
4. Installation information
4.1 Equipment mounting bracket installation
Please lock the X and Y axis transport protection, to alleviate the installation.
(Picture 1 & 2)
X-axis of the lock-bit pattern
Y-axis of the lock-bit pattern
Caution:
1. Before mounting the device, make sure the clamps and drawbridges are adequate to bear up 10 times the
weight of the equipment. Please check for Truss Installation the load limits of the respective Manufacturer.
2. Fix the clamps and drawbridge with the M12 screw and nuts.
3. Install the drawbridge to the light base with the fixing device and Screw the fastener clockwise.
4. The Projector can get installed in standing and hanging positions.
5. Always use Safety Ropes while using device in a hanging position.
6. Verify, that there are no flammable items around the device which are closer than 0, 5 meters.
7. Unlock the protection lock after the installation, otherwise it won’t work normally and may cause damage.
19
LightmaXX
Shaft 5R
Beam Moving Head
______
4.2 Device power
Power supply
200-250V
100-120V
Fuse
5A ( main fuse)
7A (main fuse)
The connecting operator must have the relative certificate. Confirm that power voltage accords to the power
marked on the lamp. Make sure, it has overload and leakage protection.
Caution: Connect the equipment to the power supply directly .Do not connect to the silicon box color system,
otherwise it will damage the device. The device has to be equipped with a standard 3-pin plug and socket, the
line yellow / green can be connected to ground .If you still have any questions, consult a qualified electrician.
4.3 Connectivity standard
The Connection to the grid occurs via PowerCon power cable.
Other connection options have to be executed by a qualified electrician.
For connection to any DMX Light Controllers, please use the specified XLR 3 Pole connections IN & OUT. (Pic 5)
The DMX Connection between the devices has to occur with matching DMX XLR 3 Pole cables.
To prevent any controlling fails, please always use DMX terminator plugs at the end of the DMX line.
The maximum numbers of devices you can operate in one DMX line are thirty.
If you operate a high number of devices, please always use DMX splitter for safety reasons.
Caution!Do not overload the connection, serial connection up to 30 devices can be accessed using 17channel mode. Specific details refer to the DMX512 protocol.
4.4 Light bulbs instructions and installation
1. Light bulbs instructions
Philips MSD Platinum 5R
OSRAM SIRIUS HRI 190W VSE 60
Caution!Installing other similar types of bulbs may cause potential safety hazard and equipment damage .In
order to reduce the risk of lamp damage, change the bulb before the light bulb exceed 100% service life span.
20
LightmaXX
Shaft 5R
Beam Moving Head
______
2. Installation and replacement bulbs.
Caution! Replace the Lamp carefully. To avoid oil contamination, do NOT touch the surface of the bulb. Bulbs
must be kept clean, if not, clean it with the attached paper. The bulb leading wire must be inserted firmly . Bad
contact of the terminal may cause that bulbs won’t work or even damage .Ensure bulbs are in place and
cooling fans wire is well after changed. Please make sure, that no routing wires block the fan blades,
otherwise the cooling of the bulb can get affected.
1. Disconnect the power supply and let the device cool down for at least 35 min. Get the
Head in a horizontal position and lock the Y axle for an easy Lamp change.
2. Screw off the four cross screws of the 4*12 type on the top.
3. Screw off the 3 wires speed fan of 80*80 types.
4. Screw off connection plug of the bulb then change the bulb.
5. Operating and Control Methods
5.1 Control panel instruction
SELECT
If setting menu: Back to Previous Level without change (exit
from the function ).
DOWN
Reduce the value show or lead to the next item .when
setting parameters, keep holding the DOWN key can reduce
the parameters rapidly.
Increase the value show or lead to the previous item .when
setting parameters, keep holding the UP key can increase the
parameter rapidly.
Enter into setting menu on standby, enter into next menu or
confirmation and save the parameter .if you don’t press the
key ,all the setting won’t be confirmed .
UP
ENTER
Pressing the DOWN and UP keys simultaneously while the display is in the rest mode can achieve the display
reversal function .It’s easy for hanging upside down! Please notice that the S and E function key will be
exchanged then.
21
LightmaXX
Shaft 5R
Beam Moving Head
5.2 The control panel menu functions:
2 Info
1 Press E into
Powerontimes
DMX Address Set
Poweron time
Clear time
Info
Lampoontimes
Options
Lamp on time
Clear time
Lamp strikes
Setting
Lamp strike
Reset strikes
Manual control
System
version
Test
Fan monitor
Advanced
InfoFeedback
3 Options
4 Setting
Pan Inverse
Language
Display
Factory set
Tilt Inverse
Pan Tilt Swap
Lamp on via DMX
Simplified
Chinese
Brightness
English
Light
Mode
Lamp off via DMX
Reset via DMX
Light
Time
Lamp on by powon
Display Inverse
Lamp off if no DMX
22
LightmaXX
Shaft 5R
Beam Moving Head
6 Test
5
manual
control
DMX values
Lamp
on or off
Reset
Functio
n
Lamp
on
Adj
DMX
values
Run program
Reset
all
7 Advanced
Lamp
off
Reset
Effect
Access code
____
Reset
Pan/Tilt
5.3 The control panel
Level 1 menu
DMX Address
Set
Info
Level 2 menu
DMX address
Set
Power on
times
Level 3 menu
Power on times
Clear times
Lamp on times
Lamp strikes
System
version
Fan Monitor
Options
Pan Inverse
Lamp on times
Clear time
Lamp strike
Reset strikes
Disp Board
1.50
Pan Tilt 1.50
8ch Board 1.50
Fan Speed (RPM)
Lamp fan 1 ****
Lamp fan 2****
ON/OFF
Introductions
Set DMX Address Code for
the light
Enter and see conduction
time
Reset device conduction
time
Display bulb lighting time
Reset bulb lighting time
Display Bulb strike
information
Reset strike number
Display version information
Display the speed of bulb fan
(Turn off the bulb when speed is
abnormal .Avoid bulb break
caused by poor cooling)
.reference value:Fan 1:45005500r Fan 2:3200-4000r
According to the scene
choose the horizontal scan
direction
Setting
Tilt Inverse
ON/OFF
Pan Tilt Swap
ON/OFF
Lamp on via
DMX
Lamp off via
DMX
Reset via DMX
ON /OFF
Lamp on by
Power on
ON/OFF
Lamp off if no
DMX
Language
ON/OFF
Display
ON /OFF
ON /OFF
Simplified
Chinese / English
Brightness
Light Mode
Light time
Manual control
Factory reset
Lamp on or off
Reset function
Inversion
Cancel /Confirm
Lamp on or off
Reset all
Reset Effect
Reset Pan/Tilt
Test
Advanced
Adj DMX value
Display DMX
value
Run Program
Access Code
____
Motor correction
24
According to the scene choose
the vertical scan direction
Choose the lamp horizontal
and vertical control exchange
or not . ( For hanging lamps )
Choose opening the bulb by
control table or not
Choose closing the bulb by
control table or not
Choose resetting the
equipment by control table or
not
Choose lighting bulb
automatically by power on or
not
Choose turning off bulb or not
automatically if no DMX
Switch Chinese or English
Adjust LCD backlight brightness
100 .Changeable values:5-100
Choose the light mode
Screen lighting time 20
.Changeable values 5-60s.
Display inversion ON/OFF
Factory reset or not
Turn on or turn off
Reset the whole light or not
After choosing, effective parts
(color、 gobo、strobe、lens )
reset
After choosing, horizontal and
vertical parts reset
unused
After choosing ,display current
DMX channel value
unused
Correct stepper motor site to
bring out the full potential of
the equipment (the function is
suitable for persons familiar
with stage light equipment)
LightmaXX
Shaft 5R
Beam Moving Head
______
6. Function Table of DMX Control Channel
CH1
color wheel
CH2 strobe
CH3 Dimmer
Effects
Attribute
128——255
Clockwise rotate color wheel Slow ->Fast
Linearity
124
Blue +White
Single step
120
Blue
Single step
116
CTB8000+Blue
Single step
111
CTB8000
Single step
107
CTO190+CTB8000
Single step
103
CTO190
Single step
99
CTO260+ CTO190
Single step
94
CTO260
Single step
90
Blue-green + CTO260
Single step
86
Blue-green
Single step
82
Purple +Blue-green
Single step
77
Purple
Single step
73
Yellow +Purple
Single step
69
Yellow
Single step
64
Pink +Yellow
Single step
60
Pink
Single step
56
Lavender +Pink
Single step
52
Lavender
Single step
47
Bright green +Lavender
Single step
43
Bright green
Single step
39
Green +Bright green
Single step
35
Green
Single step
30
Blue-green +Green
Single step
26
Blue-green
Single step
22
Orange +Blue–green
Single step
18
Orange
Single step
13
Red +Orange
Single step
9
Red
Single step
5
White +Red
Single step
0
White
Single step
DMX VALUE
Effect
attribute
250-255
Turn on
Single step
240-249
Randomstrobe,fast–slow
Single step
230-239
Randomstrobe,mediumspeed
Single step
220-229
Randomstrobe,slowspeed
Single step
210-219
Effect 2
Single step
200-209
Effect 1
Single step
192-199
Turn on
Single step
167-191
Strobe(quickclose)fast->slow
Linear
161-166
Turn on
Single step
136-160
Strobe(quickstart)fast->slow
Linear
128-135
Turn on
Single step
72-127
Symmetrystrobeslow->fast
Linear
64-71
Turn on
Single step
8-63
Strobe slow->fast
Linear
2-7
Turn on
Single step
1-0
Turn off
Single step
DMX value
0—255
Effect
↑Rays bright ->dim
Attribute
Linearity
DMX value
25
LightmaXX
Shaft 5R
Beam Moving Head
______
CH4 Fixed Gobo
DMX Value
250—255
249—244
237—243
231—236
224—230
218—223
212—217
205—211
199—204
192—198
186—191
180—185
173—179
167—172
160—166
118—159
114-117
72—113
68-71
64-67
60-63
56-59
52-55
48-51
44-47
40-43
36-39
32-35
28-31
24-27
20-23
16-19
12-15
8-11
4-7
0-3
Effect
Gobo 16 shake Slow ->Fast
Gobo 15 shake Slow ->Fast
Gobo 14 shake Slow ->Fast
Gobo 13 shake Slow ->Fast
Gobo 12 shake Slow ->Fast
Gobo 11 shake Slow ->Fast
Gobo 10 shake Slow ->Fast
Gobo 9 shake Slow ->Fast
Gobo 8 shake Slow ->Fast
Gobo 7 shake Slow ->Fast
Gobo 6 shake Slow ->Fast
Gobo 5 shake Slow ->Fast
Gobo 4 shake Slow ->Fast
Gobo 3 shake Slow ->Fast
Gobo 2 shake Slow ->Fast
Gobo clockwise rotate Slow ->Fast
Stop
GoboanticlockwiserotateFast->Slow
Gobo17
Gobo16
Gobo15
Gobo14
Gobo13
Gobo13
Gobo11
Gobo10
Gobo9
Gobo8
Gobo7
Gobo6
Gobo5
Gobo4
Gobo3
Gobo2
Gobo 1
White
Attribute
Linearity
Linearity
Linearity
Linearity
Linearity
Linearity
Linearity
Linearity
Linearity
Linearity
Linearity
Linearity
Linearity
Linearity
Linearity
Linearity
Single-step
Linearity
Single-step
Single-step
Single-step
Single-step
Single-step
Single-step
Single-step
Single-step
Single-step
Single-step
Single-step
Single-step
Single-step
Single-step
Single-step
Single-step
Single-step
Single-step
CH5 Prism load
DMX Value
128—255
0—127
Effect
Attribute
Single-step
Single-step
CH6 Prism Rotation
DMX Value
Effect
Attribute
CH7 Effect Movement
193—255
191—192
128—190
0—127
DMX Value
Clockwise Rotation, Slow ->Fast
Stop
Anticlockwise ,Rotation, Fast->Slow
0°->540°
Effect
Linearity
Single-step
Linearity
Linearity
Attribute
CH8 Atomization
0—255
DMX Value
Effect
Linearity
Attribute
CH9 ZOOM
0—255
DMX Value
Atomization white ->full
Effect
Linearity
Attribute
0-255
ZOOM near->far
Linearity
Explanation :CH10 Each unit adjust angle 2.12°
CH10 X axle
movement
DMX value
CH11 X axle fine
adjustment
DMX Value
CH12 Y axle
Movement
DMX Value
CH13 Y axle fine
adjustment
DMX value
Effect
Attribute
0—255
Y axle fine tuning 0°—0.98°
Linearity
0—255
X axle movement
0°—540°
Explanation :CH11 Each unit adjust angle 0.008°
0—255
0—255
Effect
Effect
X axle Micro rotation 0°—2.12°
Explanation :CH11 Each unit adjust angle 0.98°
Effect
Y axle rotation 0°—540
Explanation :CH13 Each unit adjust angle 0.004°
Attribute
Linearity
Attribute
Linearity
Attribute
Linearity
CH 14 macro function
DMX value
Effect
Attribute
0-255
Unused
Attribute
CH15 Reset
DMX value
Effect
Attribute
The complete machine reset
XY axles reset
Effective parts reset (color 、Gobo 、Lens, etc. )
Free
Effect
single step delay 5seconds
single step delay 5seconds
single step delay 5seconds
CH16 Bulb switch
128—255
77—127
26—76
0—25
DMX value
101—255
26—100
0—25
Turn on
Turn off
Free
DMX value
Effect
Attribute
251-255
1-250
0
The Fastest
Speed Linear reduction
The Fastest
Linearity
Linearity
Linearity
CH17 The speed of XY
axle
27
Attribute
single step delay 5seconds
single step delay 5seconds
LightmaXX
Shaft 5R
Beam Moving Head
______
7. Routine maintenance
Routine maintenance to the moving head light is strongly recommended .The equipments life span depends on the
working environment to a great degree .Therefore it’s very important to keep routine maintenance.
Caution! Switch off the power supply before opening any lid.
1. Clean the optical parts
Optical parts should be wiped gently as coating surface is fragile which can be scraped easily .Devastating solvent
mustn’t be applied because they can damage the plastic and coating surface.
Cleaning steps:
1、Turn off the power supply, cool it down thoroughly, open the lid.
2、Blow away the dust and floats with vacuum or blower.
3、Wipe off the graininess with odorless tissue or cotton saturated with rinsing or distilled water. Do not wipe surface,
blow away the floats with vacuum.
4、Wipe off the dust and odd parts with cotton soaked with Propanol, odorless tissue or glass cleaner .Residue dust
must be wiped off with distilled water then scrub it clean with soft cotton from center towards outside.
2. Clean the fan and air hole
Overheating protection caused by the fan air hole block can lead to moving head light stop working?
Wipe off the dust stuck in the fan and air hole with soft brush, cotton, vacuum or blower.
2. Cleaning regularly
Wipe off the dust from the light body, lens, reflector, inside, PCB regularly.
Fasten pendent parts, swing and twirling nuts regularly.
Add lubricant to the rolling parts regularly.
Check the working motor wires and connecting wires of large current .Be cautious of short circuit and ageing.
3. Gobo plate swabbing
In order to keep the gobo plate swirling continually and freely, swabbing should be taken every six months with
lubricant. Don’t overuse the lubricant in case splash out while gobo plate swirling.
4. In order to keep light in the best working effectiveness and function, the key point is
clean the parts where dusts accumulate easily regularly .Wipe off the dust on gobo and
optical filter must with the soft cotton soaked with glass cleanser.
Warning: Don’t use solvent or alcohol.
6. Deliver the light to professionals to carry out the routine maintenance after using the
light for one year. Including the followings:
A. Clean inside thoroughly
B. Replace and replenish the lubricant with excellent heat resisting one in the parts abraded or grinded easily.
C. Check inside components, wires, and mechanical parts etc thoroughly
D. Carry through electronic parts, optical parts and function test.
28
LightmaXX
Shaft 5R
Beam Moving Head
______
8. Technical parameters
• Bulbs:Philips MSD Platinum 5R, Osram SIRIUS HRI 190W VSE 60
• Illuminance: 58700 Lux @ 20m
• Channel:17 international standard DMX signal channels
• Horizontal scan:540° (16bit precise scan) automatically correct
• Tilt scan:270° (16bit precise scan) automatically correct
• HD LCD, four Touch switches ,reversible 180°display and operate
• Color Wheel: one color wheel, consist of 14 color sheets plus white
• Gobo Wheel: 17 Gobo effects
• Effects wheel: One rotatable 8 lens, Effects movement, Frost function
• 0—100%Mechanical dimmer, supports mechanical strobe,support strobe macro function
•Lens unit optical system, Electric focus,Beam angle 0~4°
• Overheating protection measures to turn off the bulb
• Bulb cooling fan damage and irregular rotation speed protection measures to turn off the bulb
• Power :100-240V,50/60Hz
• Rate of work:230W
• IP protection grade: IP20
• Electric ballast AC/DC power supply
• Flight case size: LWH75x46x69cm @ 2ps face up.
• Net weight:18KG with Camlock Mounting brackets
29
LightmaXX
Shaft 5R
Beam Moving Head
______
9. Common Malfunctions
1. Bulb cannot light up
A. Bulb con not cool down completely because of improper operation .First cool the fan inside the light body
do for about 10 minutes, then switch off the power, 5 minutes later, after all inner parts return to normal,
restart the power at last .
B. The inner temperature is overheated and become into overheat protection state .Check if the fan and air
hole stuck by sundries.
C .Check if the bulb has expired, if so, change to new one .
D. Check if it has leakage, detachment, or poor contact between the bulb an d trigger wire.
E. Check whether the fan speed is abnormal or damaged on the panel menu.
2. The beam becomes dim
A. The bulb may have expired, change it to new one.
B. Check if the optical parts are clean.
C. Keep routine maintenance to the bulb and other inner parts as the bulb accumulates dust.
3. Motor doesn’t work
A. Check whether the power is suitable voltage and fuse is burnout.
B. Check whether the motor wire and connecting wire are ageing to broken.
C. Check whether the fastening flange screw is loose and stuck by other things.
D. Check whether the plug-in on the PCB and IC components is loose, poor connection or ageing burnout.
E. Check whether the power output voltage is normal.
4. Communion is out of control
A. Whether communication cable is incorrect linked, dry joint, loose or open circuit .
B. Whether the address code is set correctly.
C. the IC on the PCB has been high-voltage breakdown.
D. The connection line is too long to keep the signal enough. you can cascade the signal amplifier and equip
the”2”,”3” cannon plug of last light with one 1W/120Ω terminal resistance.
E. Interfered by peripheral equipment signal or voltage.
F. Controller has been damaged or signal is in-compatible.
5. The shadow casted has halo
A. Check whether the channel value of focusing is suitable for the projection distance.
6. The light works intermittently
A. Check whether the fan works abnormally or dusty.
30