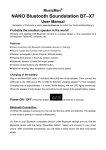
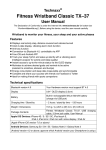
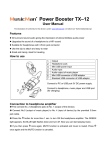
1
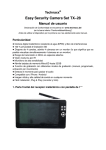
Technaxx Video Watch Compass HD 4GB
User Manual
Please find the Declaration of Conformity for this device under following internet-link:
www.technaxx.de//konformitätserklärung/video_watch_compass_hd_4gb
Charging and low battery status
1. This watch has a built-in rechargeable Li-battery which can be charged by
connecting the watch’s USB interface with adapter or computer USB interface.
After connected it, the red light and the blue light both turn ON, and then the red
light turns OFF while the blue light flashes slowly, indicating its charging. When
the blue light constantly is ON, it indicates that the device is fully charged. Then
disconnect it.
2. While recording video or taking pictures, the blue light flashes quickly when
the battery becomes a low status. The camera turns OFF automatically. Before
the camera turns OFF, it saves the files.
Buttons
1. Power/Video-Photo-Audio button: press and hold the button to turn on/off,
press shortly to record a video
2. USB interface
3. Mode button: press shortly to change function mode
4. Camera lens
5. LED indicator
6. Microphone
7. Time setting
8. Compass
RESET: Press down the Power/Video-Photo-Audio button (1) together with the
Mode button (2) at the same time
Operation Methods
1. Turning camera ON
Press and hold down the Power/Video-Photo-Audio button for two seconds. The
red light and blue light both turn on at the same time. The red light turns off while
the blue light keeps on shining (it indicates power on and standby time mode).
2. Turning camera OFF
In the standby/video mode press and hold down the Power/Video-Photo-Audio
button. The red light flashes for three times and then turns off. When the camera
is not used 3 minutes after powered on, it will power off automatically.
3. Recording a video
In the standby time mode, press shortly the Power/Video-Photo-Audio button.
The blue light flashes for 3 times and then turns off. The video recording begins.
Meanwhile press shortly any button, the blue light flashes for 3 times. It reminds
you that it is recording a video. Press the Power/Video button 2 times shortly and
the video will be saved and you enter in the standby mode.
Note: When the camera is out of memory, the red and blue lights both flash
quickly, about 5 seconds later the camera turns off automatically.
4. Switching camera modes
In Standby mode: press mode button (3) shortly to change:
- Red LED turns ON = photo mode
- Red & blue LED’s turn ON = audio mode
- Blue LED turns ON = video mode
5. Taking a photo
In the standby mode when the red light is ON, press shortly the
Power/Video-Photo-Audio button. When the red light flashes once, a photo is
saved in JPG format.
6. Separate sound recording
In the standby mode press shortly the Mode button. When the red light and blue
light both turn on, press shortly the Power/Video-Photo-Audio button. Then red
light flashes slowly, sound recording begins. Meanwhile, press shortly the Mode
button to change into another mode and a sound clip is saved.
7. RESET
When the system crashes down, do a RESET to restart the system.
Press down the Power/Video-Photo-Audio button (1) together with the Mode
button (2) at the same time.
Installation of the driver
1. For Win98 only installation of an additional driver to the PC is needed (it is on
the CD-ROM enclosed in delivery). It comes to effect after restarted the PC.
There is no need to install the driver for Windows Vista / XP / ME / 2000 / Mac
OS 9.2.2 systems or higher version.
2. Put the CD accessory to the CD-ROM drive to install the PC camera driver
(WDV_020_PC-Camera.exe) to the computer.
Connection with a computer
1. Use the USB cable to connect it to the PC USB port. After that a “removable
disk” occurs on the computer. When the watch camera is connected to the PC,
the watch begins to work as a removable disk. Video/transmit/copy can be
checked, data can be easily attached and deleted (video, audio, etc) and
non-music documents can be saved.
2. PC camera function: In power on mode, connect the watch to the PC with
the USB cable. After that the red light turns on. You will find the “standard
camera” PC camera device on My Computer (after installation of the driver).
Then the PC camera can be used.
3. Update date and time of the video:
Connect the device to your computer and run the tool „WriteTime.exe“ from the
included CD. You can also download the tool from:
http://www.technaxx.de/support/drivers/WriteTime.zip
Choose the correct drive letter:
Click “Update” and then “OK”.
Close the tool and disconnect the device.
4. Quit USB device:
a. Double-click the Windows Interface "Safely Remove Hardware" icon (lower
right corner of the green arrow).
b. Select "Stop" in "Safely Remove Hardware" dialog box.
c. Choose the device to stop, click "OK", device quit safely, "Safely Remove
Hardware" dialog box shows ’USB Mass Storage Device can now be safely
removed from the system’ in the lower right corner of the green arrow.
d. Close "Safely Remove Hardware" dialog box.
e. Disconnect the USB device from the computer.
FAQ’s
Cannot turn on:
Check if the devices power is low: charge the battery
Can not upload / download files normally
1. Check the USB cable between the devices USB and the PC, maybe is
damaged or not/correct connected
2. Check if the driver is installed properly (Windows 98 system)
3. Check if there is enough storage space to save the file
Technical Specifications
Video resolution
1280 * 720; 30fps (frames per second)
Photo resolution
1600 * 1200 (optional)
Video format
AVI
Photo format
JPG
USB
1.1 (Hs)
Flash memory
4GB
Battery
Li-battery, built-in
Supports
Video recording function; Compass function; Audio/Sound
recording function (with an extra waterproofed cap for the
microphone button); Standard PC camera function (need to
install the provided driver)
Feature
Protected against water, dirt, dust, rain, snow
OS
Windows Vista / XP / ME / 2000 / Mac OS 9.2.2 or higher
version, no need to install a driver (Windows98 need a
driver installation)
Security and Disposal Hints for Batteries
• Hold children off batteries. When a child swallowed a battery by mistake go to a doctor’s place or bring the child into a
hospital promptly!
• Look for the right polarity (+) and (▬) of batteries! Always change all batteries, never use old and new batteries or
batteries of different types together.
• Do NOT open, deform or load up batteries! There is a risk of injury by battery leakage fluid!
• NEVER throw batteries into fire! There is a risk of explosion! Never short batteries.
• Take out exhausted batteries from the device and take out batteries from the device when its not used over a longer
period of time.
Hints for Environment Protection
Packages materials are raw materials and can be recycled. Separate the packages by types and put
them to an adequate recycling on behalf of the environment.
Do not disposal old devices into the domestic waste. Disposal old / defective devices professionally!
The environment will be grateful for that.
Do not disposal batteries into the domestic waste. Disposal old / empty / defective batteries
professionally! The environment will be more than grateful for that.
Cleaning: Protect the device from contamination and pollution. Only clean the device with soft cloth or drapery, avoid
using rough or coarse-grained materials. Do NOT use solvents or other aggressive cleaner. Wipe the device after
cleaning accurately. Important Notice: Should battery fluid leak from a battery, wipe the battery-case with a soft cloth dry
and put in a new battery!