1
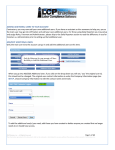
EX9486C-W User Manual
Install of Software
1. Execute files of EEX-TOOL_V1.EXE.
2. Click the start to beginning install.
(Choose the route or using default value.)
3. Press the OK click after install complete by automation.
4. Choose the click of Launch EEX-Tool Now.
5. After install complete the program will run this window.
Install of Hardware
First please prepare a PC, a HUB and EX9486C-W.
1. Use PC Internet to connect with HUB and then use other internet to
connect with EX9486C-W.
2. Insert power cord of EX9486C-W.
(The LAN Light will flash once on the beginning, 3 seconds later the light
will change to bright, 30 seconds later the WLAN light will change to bright
and afterwards about 10 seconds the SYS light will change to red.)
3. Execute of EEX-TOOLS to click the Search Device.
3. Please correction the PC to the same domain and press Refresh, if by the
chance for same internet should press GoTo Web Management directly.
4. Before entrance will figure the safety warning and press YES.
5. Key in User name and password.
(The two characters of Default value should be small capital).
10. After enter the window please get to Network Configuration-IP
Configuration first and correct complete to wireless IP and then press the
APPLY click.
6. Enter the Wireless Configuration again and press SSID.
9-1 Click the Security options from MIS provide massage (Ex: WEP) and press
APPLY.
7. Click the System Tools – Restart Device and press the Reboot button.
7. After Reboot should remove Network connection line to change the
Wireless. (Please attention if step 9 is correct, if correct use EEX-TOOLS to
pass over the IP).
11-1. If can not pass over of above please check step 9 to confirm the
information is mistake and please inquire with MIS superintendent.
Test steps with wired and wireless of Convey or receive.
1. Enter the setting window.
1. Click the Port Serial Setting to setting Serial of communication protocol.
2-1. Choose the interface
2-2. Setting the Baud Rate
2-3. Setting the Data Bits
2-4. Setting the Stop Bits
2-5. Setting the Parity
2-6. Setting the Flow Control
2. Setting the Service Mode
3-1. First please choose the TCP Service Mode.
3-2 Setting the TCP Server Port3 (Ex. open socket of 100 port)
2. Open the Super terminating Machine.
4-1. Key in a name (ex. test) and press enter.
4-2. Choose the TCP/IP
4-3. Key in Converter IP and Socket then press enter.
5. Complete the open window of terminating Machine.
2. Please use the DB9 of 2 and 3PIN short circuit.
(Please following the step 2 of Test steps with wired and wireless of Convey
or receive, this example choose RS232 mode.)
6. Key in any character on Keyboard that will show as reply character.
7. Following the complete steps as above to mean that the self testing are
success.