1
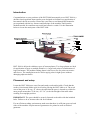
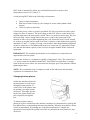
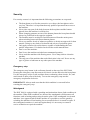
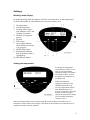
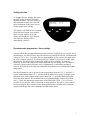
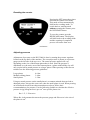
HOT 2000
USER’S MANUAL
version 1.3 Beta
Hot 2000 User’s manual Introduction .................................................................................................................... 3 Placement and setup ....................................................................................................... 3 Changing bottom platens ............................................................................................ 4 Security .......................................................................................................................... 5 Emergency stop .......................................................................................................... 5 Watchguard ................................................................................................................. 5 Settings ........................................................................................................................... 6 Working mode display................................................................................................ 6 Setting the temperature ............................................................................................... 6 Setting the time ........................................................................................................... 7 Recommended temperature / time settings ................................................................. 7 Resetting the counter .................................................................................................. 8 Adjusting pressure ...................................................................................................... 8 Maintenance ................................................................................................................... 9 Operating the HOT 2000 ............................................................................................... 9 Start / Function test ..................................................................................................... 9 Pressing heat transfers with HOT 2000 .................................................................... 10 Specifications HOT 2000 ............................................................................................. 11 Parts included ............................................................................................................... 11 Spare parts .................................................................................................................... 12 Accessories .................................................................................................................. 12 Declaration of conformity ............................................................................................ 14 2
Introduction
Congratulations on your purchase of the HOT 2000 heat transfer press. HOT 2000 is a
advanced and ergonomic heat transfer press designed to facilitate easy application of
heat transfer decals on textiles. Please take your time to read through this manual to
get acquainted with the key features and functions of the machine, and learn the
methods needed for consistent successful and effective results. Use the illustration
below to locate the main parts of the HOT 2000.
HOT 2000 is delivered with three types of bottom platens. Two large platens are ideal
for application of large or multiple transfers i.e. large back prints or combinations of
logos and names. The medium oblong platen is the best to use for prints on trousers
and sleeves. The small platen can be used to apply prints in tight spaces without
damaging adjacent details.
Placement and setup
Locate the HOT 2000 press on a firm and sturdy work surface/table. Check that the
surface is horizontal with a spirit level before placing the HOT 2000 on it. The work
area of the press is 20 cm (~8”) above the table that the press is located on, which for
most people means that 75-90 cm (~30”-36”) is the ideal height of the table when
working in an upright position.
IMPORTANT: The press should be securely fastened to the table with the included
bolts. Failure to do so increases the risk for accidents.
For an efficient working environment, make sure that there is sufficient space on both
sides of the machine for placement of garments to be printed as well as finished
garments.
3
HOT 2000 is intended for indoor use and should be placed in rooms with a
temperature between 10°C and 35°C.
Avoid placing HOT 2000 in the following environments:
•
•
•
Close to radio transmitters.
With lots of static electricity (for example in rooms with synthetic fitted
carpets)
Close to explosive materials.
Connect the power cord to a properly grounded 210-240 volt electrical socket with a
rating of at least 10 Ampere. The power plug on the HOT 2000 is on the back of the
machine adjacent to the main power switch. There is a main fuse and a spare fuse just
below the plug. Allow enough slack in the power cord for the upper part of the
machine to move freely without tightening the cord. Extension cords, if used, should
be as short as possible and be rated for at least 10 Ampere (cable dimensions typically
minimum 1,5 mm2 / 15 gauge). If using a circuit where other high demand equipment,
such as a compressor or an additional heat press is connected, it is important to make
sure that the maximum capacity of the circuit is enough to handle all the connected
equipment.
IMPORTANT: The machine should under no circumstances be connected to an
ungrounded electrical socket.
Connect the air hose to a compressor capable of supplying 5-8 bar. The connection is
a ½” quick connector included with the HOT 2000. Make sure that there is enough
slack in the air hose to allow free movement for the upper part of the machine without
tightening the hose.
NOTE: We recommend using a compressor with in-line lubricator and automatic
separation of condensation water.
Changing bottom platens
Switch the machine off and let
the heat platen cool off before
changing bottom platens. To
remove one of the platens start
by turning it two laps counter
clockwise. Thereafter grip the
back of the platen firmly and
pull it upwards and against
you.
To mount a platen start by
putting it in place and then turn the machine on and press it downwards by placing the
heat platen above it and pushing both start/stop buttons. When the heat platen is down
release it immediately by pushing one of the start/stop buttons. Complete the
operation by moving the heat platen out of the way and turn the new platen two laps
clockwise.
4
Security
For security reasons it is important that the following precautions are respected:
•
•
•
•
•
•
•
•
•
•
The heat platen as well as the protective cover above the heat platen can be
very hot. Therefore it is important that only qualified personnel has access to
the machine.
Never place any part of the body between the heat platen and the bottom
platens when the machine is switched on.
When changing garments on one of the bottom platens the heat platen should
always be positioned in the opposite endpoint.
The machine must be switched of and disconnected from the mains power
when switching between different bottom platens.
Never use transfer decals of unknown qualities or decals not approved for heat
transfer. Doing so may lead to fire hazard and release of poisonous gases.
Only apply transfers on textiles that are capable of withstanding the heat
transfer temperature. If in doubt check with the textile manufacturer.
Don’t cover the machine.
Don’t leave the machine switched on at unmanned premises.
Never wash the machine with flowing water. Use a damp cloth to clean the
machine.
The only part of the machine that needs lubrication is the axel. Never use any
type of grease or lubricant on any other part of the machine.
Emergency stop
The emergency stop button is the red button located on the top of the HOT 2000.
Pressing the emergency stop disconnects all electric circuits and raises the heat platen.
Use the emergency stop to avoid accidents from overheating, short circuits, fire, and
stuck hands or other parts of the body. To reset the emergency stop turn the
emergency stop button clockwise.
IMPORTANT: Always make sure that the fault condition is corrected before
resetting the emergency stop.
Watchguard
The HOT 2000 is equipped with a guarding mechanism that detects fault conditions in
the machine. When fault conditions are detected the watchguard will disconnect all
functions such as heating and pressing down the plate. If the watchguard is activated
and there is no apparent fault with the machine it is possible to reset the guard by
switching the machine off and waiting for ten seconds before it is turned on again. If
the watchguard remains or is activated again shortly it is necessary to contact a
service technician to repair the machine.
5
Settings
Working mode display
In normal working mode the display will show set temperature, actual temperature,
set time and number of completed presses since last counter reset.
1. Set temperature.
2. Actual temperature.
3. Flashing of the degree
sign indicates active and
working electronics.
4. Number of completed
presses.
5. Set time.
6. SET button.
7. Green right indicator
shows that heat pressing
is in progress.
8. INCREASE button.
9. Red indicates that the
heat of the heat platen is
switched on.
10. DECREASE button.
Setting the temperature
To change the temperature
setting first press SET (1) one
time to enter temperature
adjustment mode. If no button
is touched for three seconds
the display will shift back to
working mode.
When in temperature
adjustment mode press the
INCREASE button (2) to
increase temperature and the
DECREASE button (3) to
decrease temperature. Keep the
buttons pressed to rapidly
change the temperature setting.
The maximum temperature
setting is 250° C.
When the display shifts back to working mode the actual temperature and the new set
temperature will be shown in the display. Wait until the heat platen has reached the new set
temperature before using the machine.
6
Setting the time
To change the time setting, first press
the SET button twice to enter time
adjustment mode. The time setting is
then adjusted with the increase and
decrease buttons in the same way as
for the temperature setting.
The display will shift back to working
mode when no button is pressed for
three seconds, and the new time
setting will be shown in the display.
The new time setting will be
immediately effective.
Recommended temperature / time settings
Always follow the recommended temperature and time setting from the transfer decal
manufacturer. For Hot Screen Universal and Process transfer decals the recommended
setting is 150° C for 15 seconds. This recommendation will work well for application
on most common materials. For some materials it might be necessary to make slight
adjustments. For application on materials with low heat resistance it might be
necessary to lower the temperature and compensate by increasing time. To improve
efficiency when pressing on large series of garments it is sometimes possible to
increase heat and decrease time providing that the garments can withstand the higher
temperature.
Hot Screen transfers can be pressed on at temperatures between 135° C and 160° C.
Lower temperatures than 135° C will not melt the adhesive properly leading to poor
adhesion of the print. Higher temperatures than 160° C can lead to damaged prints.
Note that some transfer decal manufacturers recommend higher temperatures than
160° C. Since the maximum temperature of the Hot 2000 is 250° C it is of course
possible to use the Hot 2000 for pressing on such transfers. We advise extra caution
when pressing on these transfers since many garments have details such as buttons,
zippers and linings that can be damaged at high temperatures.
7
Resetting the counter
Pressing the SET button three times
activates the counter reset mode.
This mode will not automatically
shift back to working mode. To
switch back to working mode
without resetting the counter press
the INCREASE button.
To reset the counter press the
DECREASE button. The display
will shift back to the working mode
and the counting of completed
presses will restart from zero.
Adjusting pressure
Adjustment of pressure on the HOT 2000 is done by turning the pressure regulator
located on the top back of the machine. The current pressure is shown on a pressure
gauge on the left side of the top cover. The actual pressure applied will vary
depending on the size of the bottom platen that is used. Since the pressure is
distributed over the entire area of the bottom platen, a platen with half the size will
only require half as much pressure as a larger platen. When pressing on Hot Screen
transfers use the following pressure guidelines.
Large platen:
Medium oblong platen:
Small platen:
4-6 bar
3-4 bar
1-2 bar
Using too much pressure on the small platen is a common mistake that can lead to
damaged prints. Always take extra care when the small platen is used. When pressing
on heat transfer decals from other manufacturers always follow their
recommendations for pressure. Use the following formula to calculate the effective
pressure in kgf (kilogram force) per cm2 on a specific platen size:
Bar * 51,3 / Platensize
Where Bar is the amount shown on the pressure gauge and Platensize is the size of
the platen in cm2.
8
Maintenance
The axel of the machine must be kept lubricated to maximize the durability of the
HOT 2000. For a machine that is used for 8 hours per day it is necessary to lubricate
the axel once every week. Follow these steps to lubricate the axel.
1.
2.
3.
4.
Press both start/stop buttons so the heat platen is in the down position.
Disconnect the air pressure connection and turn the power off.
Apply a thin layer of lubricant on the entire surface of the axel.
Connect the air pressure and turn the machine back on.
IMPORTANT WARNING: When the air pressure is reconnected the heat platen
will be immediately raised to the up position. Be careful when making the air pressure
connection to avoid being squeezed by the returning heat platen.
NOTE: Be careful to follow the manufacturer’s recommendations for maintenance of
the compressor. It’s very important that auto-drain bottles and/or condensation filters
on the compressor are emptied regularly. Failure to do so can lead to damage on the
HOT 2000.
If trying to press transfers on textiles not approved for the temperature, or if doing a
mistake such as placing a transfer upside down, dirt might get stuck on the surface of
the heat platen. In such cases heat the platen to 200° C and wipe the it with a cloth. Be
very careful and use a thick cloth to avoid getting burned. Do not use an abrasive
scrubber, or any kind of metal that will scratch the Teflon coating of the platen.
Operating the HOT 2000
Start / Function test
Start the HOT 2000 by switching the on/off button on the back of the machine to the
on position. Before using the HOT 2000 the following three function tests should be
done.
1. Make sure that the emergency stop works by activating it and checking that
the machine isn’t operational.
2. Check that the machine only operates in the correct heat platen positions. Start
by positioning the heat platen in the outermost right position. Lower the platen
by pressing both start/stop buttons simultaneously. Raise it again by pressing
one of the start/stop buttons. Move the heat platen a couple of mm to the left
and check if it’s still possible to lower the platen. Repeat the same test and
move the heat platen further and further to the left until you find the position
where it no longer is possible to lower it. This position should be no further
from the outermost position than 15 mm. Do the same test in the opposite
direction for the outermost left position.
3. Check that the two-hand security mechanism is operational. Position the heat
platen in one of the outermost side positions. First press and hold one of the
start/stop buttons and after 0,5 seconds press the other start/stop button. The
9
security mechanism is working ok if the heat platen doesn’t come down when
pressing the second start/stop button.
IMPORTANT: If any of these tests fail, do not operate the machine. Contact a
service technician to have it repaired.
Pressing heat transfers with HOT 2000
After switching the HOT 2000 on wait for it to reach the target temperature. When the
actual temperature (top right on the display) equals the set temperature (top left on the
display) the machine is ready to be used. Move the heat platen to one side and place a
garment on the bottom platen on the other side. Place a heat transfer decal on the
garment. Move the heat platen over the garment and press both start/stop buttons to
lower the heat platen. When the set time is reached the heat platen will automatically
be raised. You can prepare another garment to be printed on the other bottom platen
while pressing takes place.
The two-button activation mechanism on the HOT 2000 is a security measure
designed to minimize accidents from unintentional lowering of the heat platen. For
the heat platen to be lowered both the start/stop buttons needs to be pushed
simultaneously. If the time between pushing the two buttons is longer than 0,2
seconds then both buttons must be released before a new attempt can be made. The
heat platen will only be lowered when positioned over one of the bottom platens. If
the start/stop buttons are pressed when the heat platen is placed between the bottom
plates the display will show “turn to stop”.
To stop heat pressing before the set time has passed just push one of the start/stop
buttons. This function can be used for preheating garments. Preheating garments for a
couple of seconds removes wrinkles and possible water content which may improve
the results for some garments. The counter will not increase for pressing cycles that
have been stopped. This means that the counter will show an accurate number of
pressed garments even if preheating is used. The display will show “Cut” if a pressing
cycle is stopped.
When pressing on two sides of a garment, pull the garment over the bottom platen so
that the printed side is underneath the platen. This will avoid reheating previously
transferred prints on the other side of the garment. It will also avoid any bleedthrough of inks on light fabrics.
Try to avoid laying collars, cuffs, zippers and other bulky parts of garments on the
bottom platens. Pressing may be affected if a bulky part prevents the appropriate
pressure from being applied to the transfer area. Some bulky details may also run the
risk of being damaged if pressure is applied to them.
10
Specifications HOT 2000
Weight:
80 kg
Dimensions (WxDxH):
825 x 880 x 570 mm
Power requirements:
210-240 V, 50-60 Hz, 2200 W
Fuse:
10 A slow
Pressure in air connection Min-Max: 5 – 8 bar
Heat pressing time Min-Max:
1 – 60 sec
Temperature Max:
+ 250° C
Heat platen dimensions (WxD):
380 x 410 mm
Bottom platen dimensions (WxD)
Large platen:
Medium oblong platen:
Small platen:
380 x 400 mm
150 x 380 mm
150 x 150 mm
Noice level:
< 70 dbA 1m
Parts included
The delivery of HOT 2000 should include:
1 power cord
2 large bottom platens 380 x 400 mm
1 medium bottom platen 150 x 300 mm
1 small bottom platen 150 x 150 mm
1 manual
1 quick reference
1 quick connect air connection
2 bolts for secure attachment of the machine
11
Spare parts
Spare parts can be ordered from Hot Screen. Use a qualified service technician for
repairs or return the machine to Hot Screen for repairs if necessary. For security
reasons and best performance of your HOT 2000 it is important that only tested and
approved spare parts from Hot Screen are used.
Accessories
Some of the accessories that can be ordered from Hot Screen are:
•
•
•
•
•
•
Extra bottom platens
o Large bottom platen 380 x 400 mm
o Medium bottom platen 150 x 300 mm
o Small bottom platen 150 x 150 mm
Aluminium cooling plate with Teflon coating 15 x 15 mm. Used for quick
cooling of transfer decals after heat pressing.
Textile covers for bottom platens. Reduces wear on the platen rubber surface.
Reduces friction between platen surface and garments.
o Large textile cover
o Medium textile cover
o Small textile cover
Teflon sheet 400 x 380 mm. To be placed over the print after removing the
bearer from the transfer decal when doing second pressing.
Teflon cover for heat platen. Protects the heat platen from wear and reduces
suction power between heat platen and bottom platen. Makes second pressing
easier as no separate Teflon sheet needs to be used.
Silicone rubber sheet. To be used for second pressing after removing the
bearer from the transfer decal when the print should be pressed more tightly
into the garment allowing the structure of the textile to blend in with the print.
NOTE: Second pressing is not necessary for most textiles when using Hot Screen
transfer decals. For some other brands of transfer decals it might be necessary to do
the pressing in two stages, with and without bearer, to get proper adhesion. If in doubt
whether this is necessary always check with the manufacturer of transfer decals for
the proper heat pressing procedure.
12
Limited warranty
Hot Screen AB warrants that the heat press is free from defects in both material and
workmanship One Year from the date of purchase. If any parts or workmanships are
found to be defective in manufacture, Hot Screen AB will repair or replace the
defective parts or workmanship. This warranty covers all parts to repair the defects,
except when damage occurs from accident, alteration, misuse or abuse, or when the
machine has been improperly installed or modified in any way. If the press becomes
defective during the warranty period, Hot Screen AB reserves the right to recall the
defective press to the factory for repairs. A return authorization must be granted by
Hot Screen AB prior to it’s return. Freight and/or travel costs for warranty repairs will
be charged to the customer.
If a press covered by the warranty must be returned to the factory for repairs, Hot
Screen AB will make every effort to repair the press. However, Hot Screen AB
reserves the exclusive right to determine whether to repair or replace a defective
press.
There are no warranties which extend beyond the description on the face hereof. Hot
Screen disclaims any implied warranty of merchantability and/or any implied
warranty of fitness for a particular purpose. In no event will Hot Screen AB be liable
for any damages, including loss of profits, destruction of goods or any other special,
incidental, consequential or indirect damages arising from the use of the press or
accompanying materials. This limitation will apply even if Hot Screen AB has been
advised of the possibility of such damage.
Hot Screen AB
Varlabergsvägen 2
Box 10078
S434 21 KUNGSBACKA
SWEDEN
www.hotscreen.se
Tel: +46 300 568 990
Fax: +46 300 779 95
e-mail: [email protected]
13
Declaration of conformity
14